Guild PPL650G User manual

GUILD
650W Planer
Instruction Manual
Important - Please read these instructions fully before operating or maintaining your Guild planer
These instructions contain important information that will help you get the best from your Guild
planer, ensuring it remains safe to operate.
If you need help or have damaged or missing parts, call the Customer Helpline on 0333 3201989
After Sales Support
PPL650G
UK/Ireland 0333 3201989
Help@guildpowertools.co.uk

Customer Helpline 0333 3201989
2
Contents
Safety Information.....................................................................................................3
In The Box..................................................................................................................7
Accessories................................................................................................................7
Operating Instructions.............................................................................................10
Maintenance.............................................................................................................15
Technical Data..........................................................................................................15
Environmental Protection........................................................................................16
Guarantee................................................................................................................17
Declaration of Conformity........................................................................................17
Plug Replacement (Uk & Ireland Only)....................................................................18

Customer Helpline 0333 3201989
3
Safety Information
Important - Please read these instructions fully before starting assembly
Warning Symbols
The following warning symbols appear throughout this assembly manual and
indicate the appropriate safety measures you should take when assembling and
operating the guild planer.
To reduce the risk of injury, Please read the instruction manual
Warning
Wear ear protection
Wear eye protection
Wear dust mask
Double insulation
Waste electrical products must not be disposed of with household waste. Please recycle
where facilities exist. Check with your local authorities or retailer for recycling advice.

Customer Helpline 0333 3201989
4
WARNING! Read all safety warnings and all instructions. Failure to follow the
warnings and instructions may result in electric shock, fire and/or serious injury.
Save all warnings and instructions for future reference.
The term “power tool” in the warnings refers to your mains-operated (corded) power tool
or battery-operated (cordless) power tool.
1) Work area safety
a) Keep work area clean and well lit. Cluttered or dark areas invite accidents.
b) Do not operate power tools in explosive atmospheres, such as in the presence of
flammable liquids, gases or dust. Power tools create sparks which may ignite the
dust or fumes.
c) Keep children and bystanders away while operating a power tool. Distractions can
cause you to lose control.
2) Electrical safety
a) Power tool plugs must match the outlet. Never modify the plug in any way. Do not
use any adapter plugs with earthed (grounded) power tools. Unmodified plugs and
matching outlets will reduce risk of electric shock.
b) Avoid body contact with earthed or grounded surfaces, such as pipes, radiators,
ranges and refrigerators. There is an increased risk of electric shock if your body is
earthed or grounded.
c) Do not expose power tools to rain or wet conditions. Water entering a power tool will
increase the risk of electric shock.
d) Do not abuse the cord. Never use the cord for carrying, pulling or unplugging the
power tool. Keep cord away from heat, oil, sharp edges or moving parts. Damaged or
entangled cords increase the risk of electric shock.
e) When operating a power tool outdoors, use an extension cord suitable for outdoor
use. Use of a cord suitable for outdoor use reduces the risk of electric shock.
f) If operating a power tool in a damp location is unavoidable, use a residual
current device (RCD) protected supply. Use of an RCD reduces the risk of electric
shock.
3) Personal safety
a) Stay alert, watch what you are doing and use common sense when operating a
power tool. Do not use a power tool while you are tired or under the influence of
drugs, alcohol or medication. A moment of inattention while operating power tools
may result in serious personal injury.
b) Use personal protective equipment. Always wear eye protection. Protective
equipment such as dust mask, non-skid safety shoes, hard hat, or hearing protection
used for appropriate conditions will reduce personal injuries.
c) Prevent unintentional starting. Ensure the switch is in the off-position before
connecting to power source and/or battery pack, picking up or carrying the tool.
Carrying power tools with your finger on the switch or energising power tools that
have the switch on invites accidents.
Safety Information
Important - Please read these instructions fully before starting assembly
General Power Tool Safety Warnings
Original Instructions

Customer Helpline 0333 3201989
5
d) Remove any adjusting key or wrench before turning the power tool on. A wrench or
a key left attached to a rotating part of the power tool may result in personal injury.
e) Do not overreach. Keep proper footing and balance at all times. This enables better
control of the power tool in unexpected situations.
f) Dress properly. Do not wear loose clothing or jewellery. Keep your hair, clothing
and gloves away from moving parts. Loose clothes, jewellery or long hair can be
caught in moving parts.
g) If devices are provided for the connection of dust extraction and collection facilities,
ensure these are connected and properly used. Use of dust collection can reduce
dust-related hazards.
4) Power tool use and care
a) Do not force the power tool. Use the correct power tool for your application.
The correct power tool will do the job better and safer at the rate for which it was
designed.
b) Do not use the power tool if the switch does not turn it on and off. Any power tool
that cannot be controlled with the switch is dangerous and must be repaired.
c) Disconnect the plug from the power source and/or the battery pack from the power
tool before making any adjustments, changing accessories, or storing power
tools. Such preventive safety measures reduce the risk of starting the power tool
accidentally.
d) Store idle power tools out of the reach of children and do not allow persons
unfamiliar with the power tool or these instructions to operate the power tool.
Power tools are dangerous in the hands of untrained users.
e) Maintain power tools. Check for misalignment or binding of moving parts, breakage
of parts and any other condition that may affect the power tool’s operation. If
damaged, have the power tool repaired before use. Many accidents are caused by
poorly maintained power tools.
f) Keep cutting tools sharp and clean. Properly maintained cutting tools with sharp
cutting edges are less likely to bind and are easier to control.
g) Use the power tool, accessories and tool bits etc. in accordance with these
instructions, taking into account the working conditions and the work to be
performed. Use of the power tool for operations different from those intended could
result in a hazardous situation.
5) Service
Have your power tool serviced by a qualified repair person using only identical
replacement parts. This will ensure that the safety of the power tool is maintained.
Safety Information
Important - Please read these instructions fully before starting assembly
General Power Tool Safety Warnings

Customer Helpline 0333 3201989
6
1. Wait for the cutter to stop before setting the tool down. An exposed rotating cutter
may engage the surface leading to possible loss of control and serious injury. Note The
above warning applies only to planers without an automatic closing guard.
2. Hold the power tool by insulated gripping surfaces only, because the cutter may
contact its own cord. Cutting a “live” wire may make exposed metal parts of the power
tool “live” and could give the operator an electric shock.
3. Use clamps or another practical way to secure and support the workpiece to a stable
platform. Holding the work by your hand or against the body leaves it unstable and
may lead to loss of control.
Additional safety rules for planner
1. Always wear a dust mask.
Safety Information
Important - Please read these instructions fully before starting assembly
Planer Safety Warnings

Customer Helpline 0333 3201989
7
In The Box
Parts
1
5
11
2
6
14
13
12
15
16
17
18
19
3
7
8
9
10
4
Rebate guide fastening screw(2pcs)
Cutting depth Scale
Cutting depth adjustment knob
Dust bag (SEE FIG I)
Blade(SEE FIG K)
Blade clamp (SEE FIG K)
Spanner (SEE FIG K)
Large pulley (SEE FIG O)
Pinion (SEE FIG O)
On/off switch
Lock-off switch
Hand grip areas
Dust extraction cover
Belt cover
Fastening screw
Parallel guide
Base plate
V-grooves
Rebate guide
Accessories
Parallel guide 1pc
Rebate guide 1pc
Blades (on tool) 2pc
Spanner 1pc
Dust bag 1pc
10
11
11
89
1312 24 3
1
5
6
7

Customer Helpline 0333 3201989
8
13
NOTE: Before using the tool, read the instruction book carefully.
Intended Use
The tool is intended for planing of firmly supported wooden materials, such as beams and
boards. It is also suitable for beveling edges and rebating.
1. SAFETY ON/OFF SWITCH (SEE FIG A)
The switch is locked off to prevent accidental starting. Depress the lock off button then
the on/off switch and release the lock off button. To switch off, just release the on/off
switch.
WARNING: Danger of kickback! Apply the tool to the work piece only when
switched on.
2. CUTTING DEPTH ADJUSTMENT (SEE FIG B)
The planing depth can be adjusted from 0 to 2mm. Rotate the cutting depth adjustment
knob (12) to set the required cutting depth with the scale (11). Clockwise rotation
increases the planing depth; anticlockwise rotation reduces the planing depth.
It is recommended that test cuts be made in scrap wood after each adjustment to make
sure that desired amount of wood is being removed by your planer.
NOTE: To protect blades during storage, transporting, etc., set blade depth adjustment
knob to 0.
Operating Instructions
A
B

Customer Helpline 0333 3201989
9
45o
9
Operating Instructions
3. STANDARD SURFACE PLANING (SEE FIG C)
Set the desired cutting depth. Position the front part of the base plate flat onto the
work surface. Make sure that the blades are not touching the workpiece. Switch the
tool on and push your planer forward and it will start cutting. Always maintain all of
the base plate flat on the work surface to prevent the cutting blade jumping. Move the
plane evenly over the work surface.
Be careful to avoid hitting nails during operation. It could nick, crack, or damage
blades. We suggest that you always keep an extra set of blades on hand for
replacement.
4. EDGE CHAMFERING (SEE FIG D, E)
CAUTION: Always use both hands on the tool for any operation. It assures to
maintain control and avoid the risk of serious personal injury. The workpiece
must always be properly supported and clamped so that both hands will be free to
control the planer.
Using the V-groove (9) in the base plate you can make a chamfer on the work piece
edge. Guide the planer along the edge and maintain a constant angle and force to
produce a good finish. You can control the angle of the chamfer with your hands. Make
a test chamfer on a scrap piece of wood. Maintain downward pressure to keep your
planer flat at the beginning and the end of the work surface.
C D
E
Customer Helpline 0333 3201989
10
11
Operating Instructions
5. USING THE PARALLEL GUIDE (SEE FIG F)
Insert the screw provided through the hole on the support of parallel guide (7). Turn the
screw into the nut on the housing. Fix the parallel guide on the support of parallel guide
with the screw and nut. Ensure the screws are tightened securely.
NOTE: The parallel guide should be fitted on the left of housing.
To adjust the required width of cut, loosen the nut and slide the parallel guide to the
required position. Retighten the nut fully.
Use the parallel guide while cutting. The guide should be held firmly against the edge of the
workpiece.
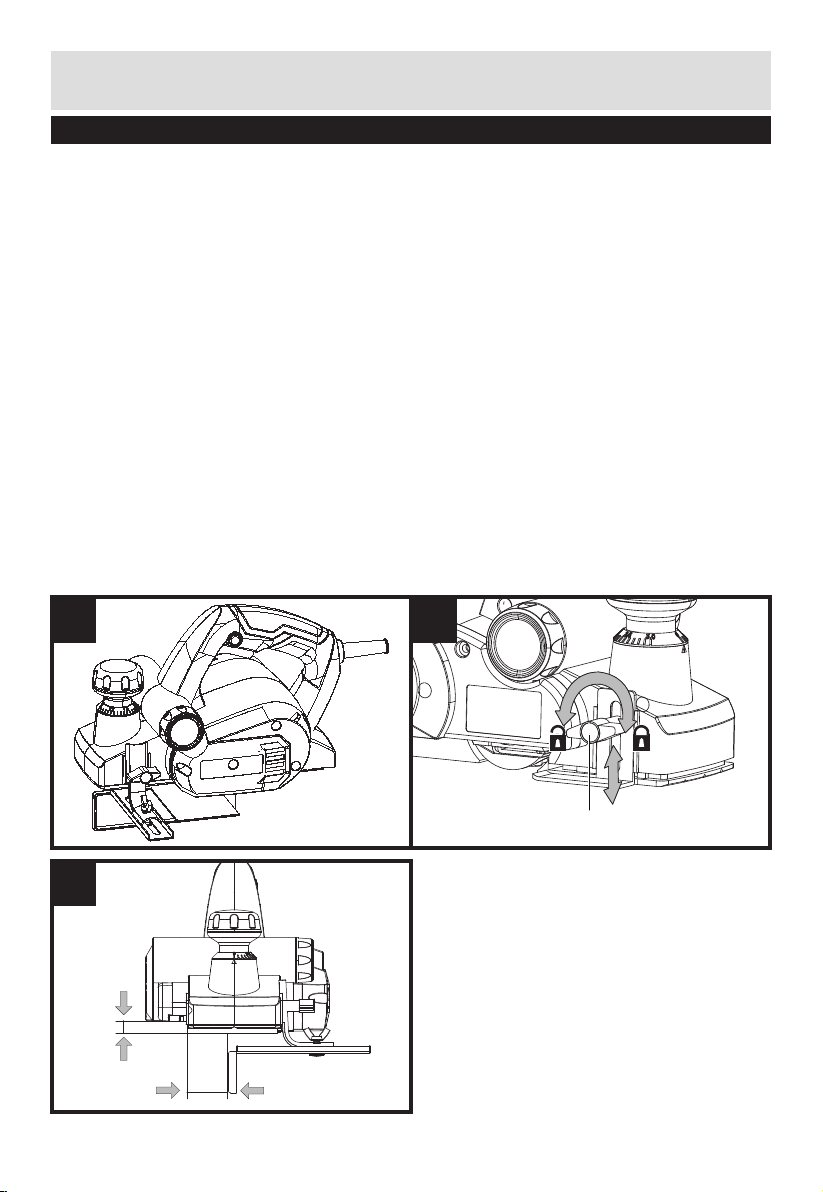
6. USING THE REBATE (SEE FIG G)
Insert the screw (11) provided through the slot on the Rebate. Turn the screw into the nut on the
housing.
The cut depth adjustment can be set from 0 to 10mm.
To adjust the depth of cut, place the planer on a flat board, then loosen the screw and slide the
cut depth adjustment guide up and down for required depth. Tighten the thumb screw fully.
7. REBATING (SEE FIG H)
The width of rebating cut (a) is adjustable by moving the parallel guide. The depth of
rebating cut (b) is determined by moving the Rebate, and the number of passes made along
the workpiece. Make sure that the plane is guided with a lateral supporting pressure.
H
F G
b
a
Table of contents
Popular Planer manuals by other brands

Felisatti
Felisatti PF180/1500 operating instructions

DeWalt
DeWalt DW 1150 Operation, adjustmants, maintenance, spare parts

Triton
Triton TRP UL Operating and safety instructions

Melbourne
Melbourne MTC-49407 owner's manual

VARO
VARO POWERplus POW1520 manual

Powermatic
Powermatic 209 Operating instructions and parts manual


