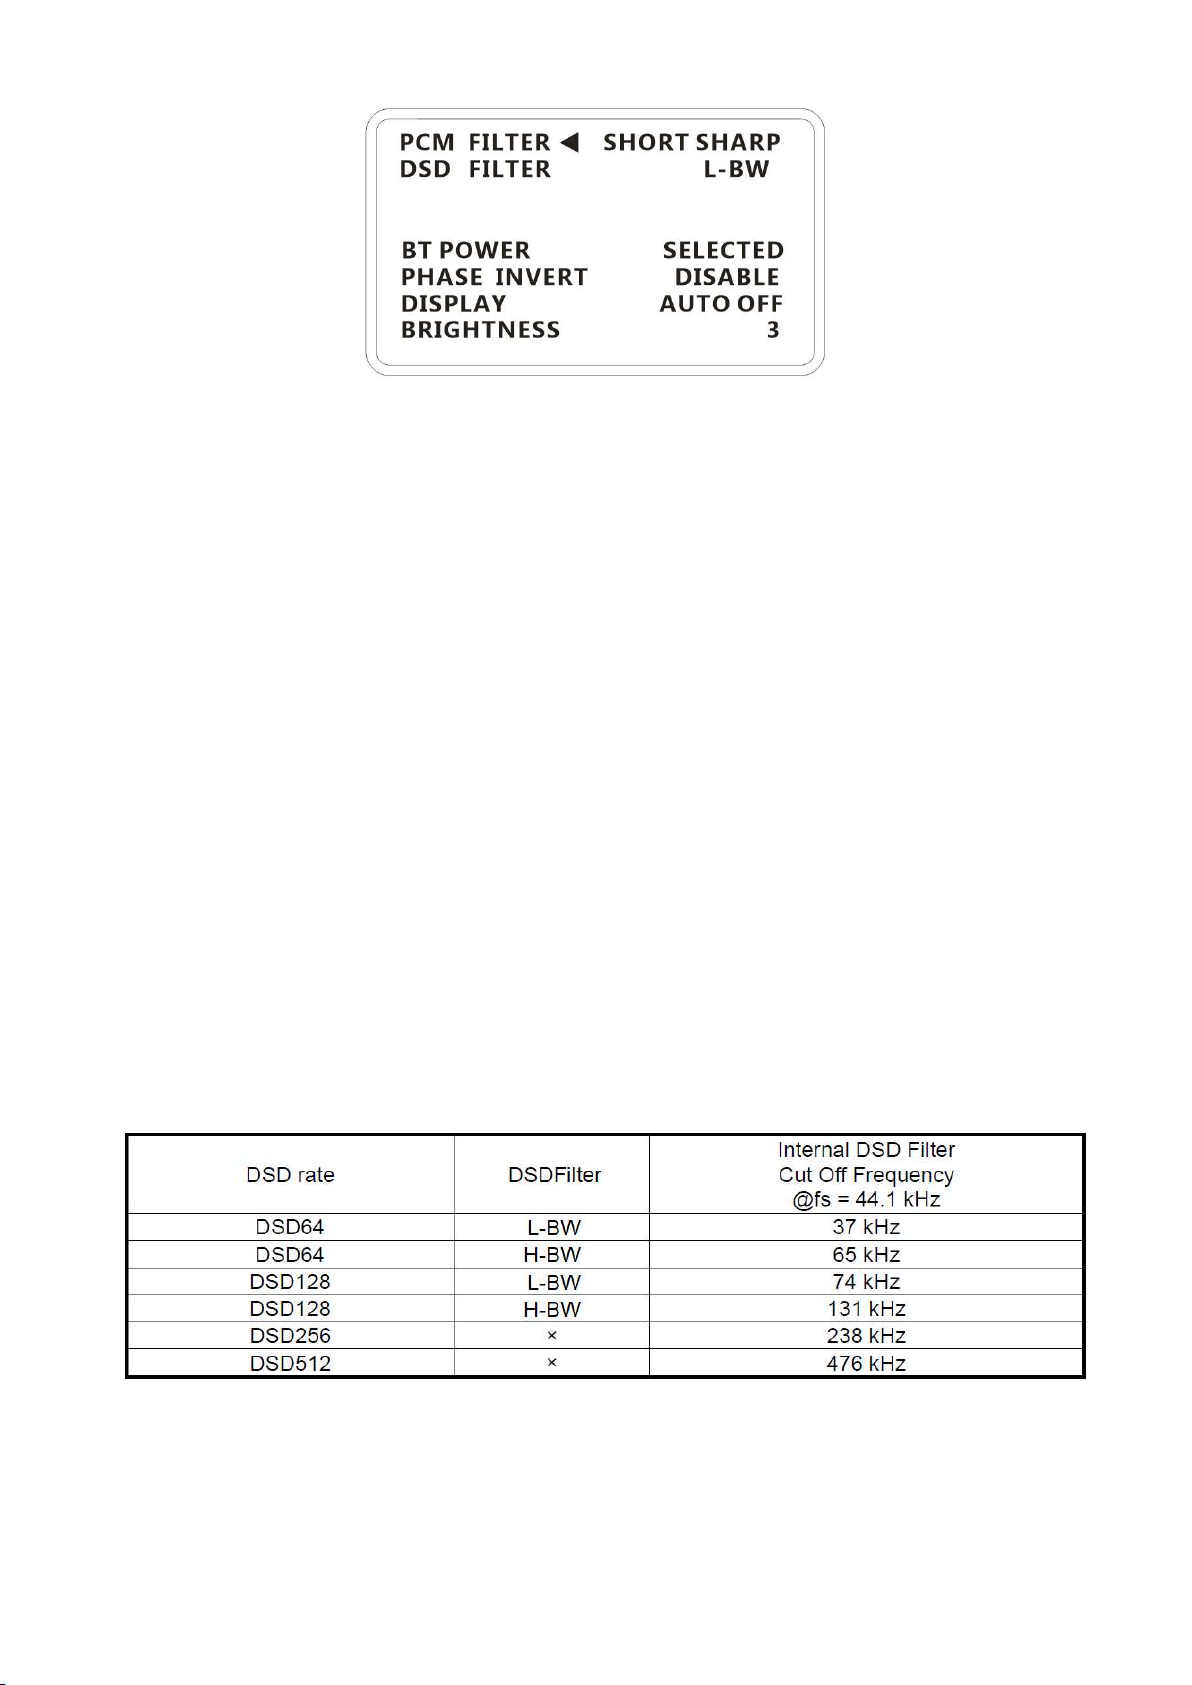
GUSTARD DAC-A18 User manual

Gustard
DAC-A18
High-performance Audio DAC
User’s Manual

-
1
-
Table of Contents
Front panel Introduction········································2
Rear panel Introduction·········································2
Display and menu················································3
IR Remote control···············································6
Windows driver installation·····································7
DSD playback settings using foobar2000··························10
DSD playback troubleshooting····································15
Product specifications··········································19
After-sales policy··············································20

-
2
-
Front panel
1. The screen will display the current input channel, encoding format and sample rate,
volume and other status.
2. Turntable can adjust digital volume attenuation; or adjust each menu option in the
menu state.
3. Function button, short press to cycle through digital input channels, switch items
in the menu; long press to enter or exit the menu.
Rear panel

-
3
-
Display and menu
1. The DAC-A18 uses an OLED screen for real-time status display and functional
operation. The following graphic shows the status of the main page of the screen.
2. Digital input channel selection:
The DAC-A18 has a total of 5 input channels. In the display state of the main page,
short press the function button, you can select the current input channel in the
order of COAX——AES——USB——IIS——BT.
3. VOLUME:
When the screen is the main page, you can directly adjust the digital volume
attenuation function of the DAC-A18 by operating Turntable. Rotate counterclockwise
to attenuate the volume and clockwise to increase the volume. The volume can be
attenuated from 00dB to -90dB for a total of 90 digital volume positions.
4. Settings menu:
In the home screen state, press and hold the function button to enter the setting
menu. In this state, short-press the function button to cycle through the menu
items to be modified. Turntable is used to adjust the currently selected menu
option. When the screen is in the setting menu, long-press the menu key again to
return to the main page. The menu is switched by the movement of the arrow, in
order:
—PCM Filter
—DSD Filter
—Bluetooth power control
—Phase invert
—Display control
—Brightness

-
4
-
5. Menu items’ functions:
The following is a detailed introduction of each menu item:
a. PCM FILTER:
DAC-A18 has a total of 6 PCM digital filter types. Turning Turntable clockwise will
sequentially select in the order of SHARP——SLOW——SUPER SLOW——SHORT SHARP——LOW-d
SHOT——SHORT SLOW. Turn Turntable counterclockwise The cycle is reversed. SHARP is a fast
roll-off digital filter, which is the most common type of digital filtering. It is the most
accurate and neutral in the sense of hearing. SLOW is a slow roll-off. It has smooth out-of-
band attenuation characteristics of the signal, but also because of its in-band attenuation.
The attenuation characteristic will make the sound soften; SHORT SHARP / SHORT SLOW is a
short delay version of SHARP / SLOW.
SUPER SLOW is similar to the effect of NOS. The extension at both ends is reduced, and the
intermediate frequency is naturally suitable for human voice. LOW-d SHOT is a new filter of
AKM Company, which adopts the asymmetrical pattern of front and rear ringing, and then
produces a new sense of hearing.
A18 recommends the use of SHORT SHARP digital filtering.
b. DSD Filter:
The DAC-A18 DSD filter has two different bandwidths that can be adjusted, L-BW is low bandwidth;
H-BW is high bandwidth. The AK4499 does not use a fixed frequency as the cutoff frequency of
the filter, but automatically switches according to the DSD sampling rate. Please see the
table below for the cut-off frequency:
* The bandwidth of DSD256 and DSD512 are fixed and are not affected by the options.

-
5
-
c. BT POWER
Bluetooth power control, A18 high-definition Bluetooth module can only be turned on when the
Bluetooth channel is selected. Option “SELECTED” Bluetooth can only be connected when the
current input channel is Bluetooth.. Option “ALWAYS” will always enable Bluetooth connection.
The Bluetooth name of A18 is GUSTARD BT.
d. PHASE INVERT(Analog output phase inverting switch):
This function has two options: DISABLE (RCA positive phase output - XLR American standard)
and ENABLE (RCA inverted output - XLR Japanese / European standard) optional.
When this function is DISABLEd, the RCA output of the DAC-A18 is positive phase, and the XLR
balanced output is the American standard polarity output, which is 1 ground, 2 hot, and 3
cold.
When this function is ENABLEd, not only the RCA output is the inverting output, but the XLR
balanced output will be the Japanese/European standard polarity output, which is 1 ground,
2 cold, and 3 hot.
e. DISPLAY (display control):
"ALWAYS" means that the screen is always on and displays various states.
"AUTO OFF" automatically turns off the screen. If there is no operation, the screen will
automatically turn off after 10 seconds.
Any operation of the fuselage and remote control will wake up the screen. If there is a new
change in the current playback sampling rate, it will also wake up the screen.
f. BRIGHTNESS(Screen brightness):
This menu item adjusts the brightness of the OLED screen, and a total of 8 screen brightness
levels can be adjusted.

-
6
-
IR Remote control
* DAC-A18 uses the new remote control, please press and hold the DAC key for more
than 3 seconds to enter the DAC operation mode.
① Mute button: In the non-mute state, press this button once, the DAC-A18 will be muted; press this button
again to unmute.
② Menu button: Press this button once to enter the setup menu of the DAC-A18, press this button again to exit
the setting menu.
③ D-pad and OK button:After entering the setting menu of the DAC-A18, use the up/down of the D-pad to switch
the function to be adjusted, and adjust the options by left/right. Press OK to confirm the result and return
to the main page.
④ Back button: Returns to the main page state.
⑤ Volume minus button: When the DAC-A18 is in the main page state, press this button to decrease the volume.
⑥ Volume plus button: When the DAC-A18 is in the main page state, press this button to increase the volume.
Note: ● The operating distance varies depending on the angle. ● If there is something between the remote control
and the IR sensor, it may not operate normally. ● If the remote control will not be used for a long time (one
month or longer), remove the battery. ● If the battery Leaking, please thoroughly clean all the residues in the
battery compartment and install new batteries. ● When using other devices controlled by infrared rays, using
this remote control may operate these devices by mistake.

-
7
-
Windows driver installation
* The unit's accessories contain a CD containing the GUSTARD USB Audio driver.
This driver can also be downloaded from our official website http://www.gustard.cn
* This driver supports Windows 7 (SP1 and newer); Windows 8; Windows 10
1. For users who use a desktop PC to connect to the DAC-A18, it is recommended to
use the native USB2.0 interface.It is also highly recommended to use the USB port
on the back of the chassis. Because the USB port on the rear panel of the chassis
is directly connected to the motherboard. The USB port on the front of the chassis
is connected to the motherboard with an extension cable, which has a certain
negative effect on high-speed signals.
2. Please connect the DAC-A18 to the computer with the USB cable, then turn on the
power of the DAC-A18. The computer will prompt you to find new hardware and try
to set the device. If you don't see this prompt, please try to replace other USB
ports or manually restart DAC-A18.

-
8
-
3. Open the CD and double-click to run the Gustard_USBAudio_v1A_2018-10-15_setup.exe
program.
If the "User Account Control" window appears, click "Yes".
4. Click the next or install button as prompted.

-
9
-
5. When the installer checks the device, if there is a red text prompt: Setup requires
that the device is..., please restart the GUSTARD DAC-A18 or re-plug the USB cable.
6. The figure below shows the screen for successfully installing the driver. Click
Finish to complete the installation.

-
10
-
DSD playback settings using foobar2000
1. Open the folder foobar2000_DSD_0.7.X, double-click to run ASIOProxyInstall-
0.7.2.exe, and then click next or install to complete the installation.
2. Run Foobar2000. Click File -> Preferences.

-
11
-
3. Click on "Components" on the left and click on "Install" on the bottom right.
Use the mouse to select two files at the same time, or press Ctrl to select two
files at the same time. Then click "Open".

-
12
-
Two rows of component information will be added to the component list, followed by
"Apply".
The window shown below will pop up and click "OK". Then Foobar2000 will restart.
4. Click File -> Preferences again.

-
13
-
5. Expand Playback - Output - ASIO, and double-click foo_dsd_asio.
6. In the "foo_dsd_asio v0.7.2" window. Select "Gustard USB Audio" from the drop-down
menu of the first line ASIO Driver.
Select "ASIO Native" from the drop-down menu in the second line of the DSD Playback
Method.
For other settings, please make the same selection according to the red box in the
figure. Then click the X in the upper right corner to exit.

-
14
-
7. Click "Output" on the left, then select "ASIO:foo_dsd_asio" from the drop-down menu
for "Device" on the right.
8. Then click on Tools -> SACD and select "DSD" from the drop-down menu in the Output
Mode on the right. Finally click "OK" below to complete the setup.

-
15
-
DSD playback troubleshooting for Foobar2000
1. Q: Why does my foobar2000 preference window play (Playback) -> Output (Output)
does not show ASIO?
A: Because you don't have the ASIO component installed. Drag the foo_out_asio.fb2k-
component file from the foobar2000_DSD_0.7.X folder to the space in the box to
the right of the component option in the preference window of foobar2000, then
click the "Apply" button in the lower right corner. Click OK in the Restart
foobar2000 dialog that pops up at this time. After restarting foobar2000, you can
find the ASIO option.

-
16
-
2. Q: Why is there no SACD in the tool options in my foobar2000's preference window?
A: Because you don't have the SACD component installed. Drag the
foo_input_sacd.fb2k-component file from the foobar2000_DSD_0.7.X folder to the
space in the box to the right of the component option in the preference window of
foobar2000, then click the "Apply" button in the lower right corner. Click OK in
the Restart foobar2000 dialog that pops up at this time. After restarting
foobar2000, you can find the ASIO option.

-
17
-
3. Q: I have installed the above two Foobar2000 components. Why do I see an error
window like the one below when I play the DSD file?
A: Because the version of your ASIOProxy conflicts with the version of the SACD
decoding component. The correct version is shown below, all of which are 0.7.X.

-
18
-
Some users use the old version of foobar2000, and its SACD decoding component
stays in the 0.6.X version. If the ASIOProxyInstall-0.7.2.exe program is installed,
the version of the foo_dsd_asio window is 0.7.2. This creates a conflict with the
SACD decoding component.
There are two solutions.
One is to update the version of the SACD component, and the installation method
is consistent with the solution to the second problem. However, some versions of
the foobar2000 component are locked and cannot be replaced. Please reinstall the
new version of the official original Foobar2000 to solve the problem.
Second, if you are not willing to reinstall foobar2000, you can install the old
version of ASIOProxy, such as ASIOProxyInstall-0.6.5.exe. Google search
ASIOProxyInstall-0.6.5.exe to find the download link, which can also solve the
problem.

-
19
-
Product specifications
Sample rate supported by digital input channels:
COAX :PCM 16-24bit/44.1-192kHz;DSD DOP64
AES :PCM 16-24bit/44.1-192kHz;DSD DOP64
USB :PCM 16-32bit/44.1-768kHz;DSD DOP64-DOP256;NATIVE DSD:DSD64-DSD512
IIS :PCM 16-32bit/44.1-768kHz;DSD DOP64-DOP256;NATIVE DSD:DSD64-DSD512
BT Bluetooth 5.0 : PCM LDAC, AAC, SBC, APTX, APTX LL, APTX HD and other high frequency
encoding, LDAC can achieve 24B / 96K high code transmission
* USB input supported operating system:WIN7 SP1/WIN8/WIN10 32-64bit;macOS;Linux
Analog output performance:
Amplitude frequency response:20-20kHz /+-0.6dB
DNR: >124dB
Crosstalk:-129dB @ 1kHz
THD+N:<0.00015% 1kHz
IMD:<0.0008%@-3dBFs
RCA Output level:3Vrms (VOLUME 00dB)
Output impedance 100 ohms
XLR Output level:6.0Vrms (VOLUME 00dB)
Output impedance 100 ohms
Other specifications:
AC Power supply:AC 115V/230V 50/60Hz
Power consumption:<15W
Dimensions:Width 220mm * Height 50mm * Depth 170mm(Excluding protrusions)
Weight:2.5Kg (including packaging)
Table of contents
Other GUSTARD Media Converter manuals

GUSTARD
GUSTARD DAC-X26 User manual

GUSTARD
GUSTARD A26 User manual

GUSTARD
GUSTARD DAC-X20 User manual

GUSTARD
GUSTARD R26 User manual

GUSTARD
GUSTARD DAC-X22 User manual

GUSTARD
GUSTARD A26 User manual

GUSTARD
GUSTARD DAC-A22 User manual

GUSTARD
GUSTARD DAC-X20PRO User manual

GUSTARD
GUSTARD DAC-X16 User manual

GUSTARD
GUSTARD DAC-X18 User manual