GUSTARD A26 User manual

G
u
s
t
a
r
d
A26
High performance audio DAC decoder
instruction manual

- 1 -
About MQA
MQA
(Master Quality Authenticated)
MQA
is an award-winning British technology that delivers the sound of
the original master recording. Master
MQA
Files are fully verified and
small enough to be streamed or downloaded.
When the screen displays
"MQA"
or
"MQA
.” when.
’
it indicates that
the product is decoding and playing the
MQA
stream or file , with
attribution to ensure that the sound is the same as the source material.
'
M
Q
A
.
' means it is not only playing
MQA
S
t
u
d
i
o
file that has
been approved by the artist/producer 's studio or verified by the copyright
holder.
"OFS " confirms that the product is being received MQA stream or
file .
This will provide Final expansion of the MQA file and displaying the
original sample rate .
MQA
is
MQA
L
i
m
i
t
e
d
registered trademark of
©
2018

- 2 -
Tabl
e of
cont
ents
Front Panel Introduction ···························································· 3
Rear Panel Introduction ····························································· 3
Display and operation menu ························································· 4
Infrared remote control operation ·············································· 8
WINDOWS Next driver installation ················································· 9
Foobar2000 accomplish DSD Hard solution settings ························· 12
Foobar2000 DSD Hard solution problem exclusion ·························· 17
Product parameters ····································································· 21
After sales service ··································································· 22

- 3 -
front panel
1. Switch between ready state and use state. A26 turns on the power switch at the rear of
the fuselage and enters the ready state.
2. The display shows the status of the current input channel, encoding format, sampling
rate, volume, etc.
3.
"
+
" "
-
"
The button is usually used to attenuate/increase the volume; in the menu
interface, it is used to switch options .
4. The setting button is used for input selection switching in the normal state; long
press to enter or exit the menu; it can also switch items.
rear panel

- 4 -
*When operating the international voltage switching switch, please be sure to set the two switches to the same
voltage at the same time, otherwise the internal transformer will be damaged after power on

- 5 -
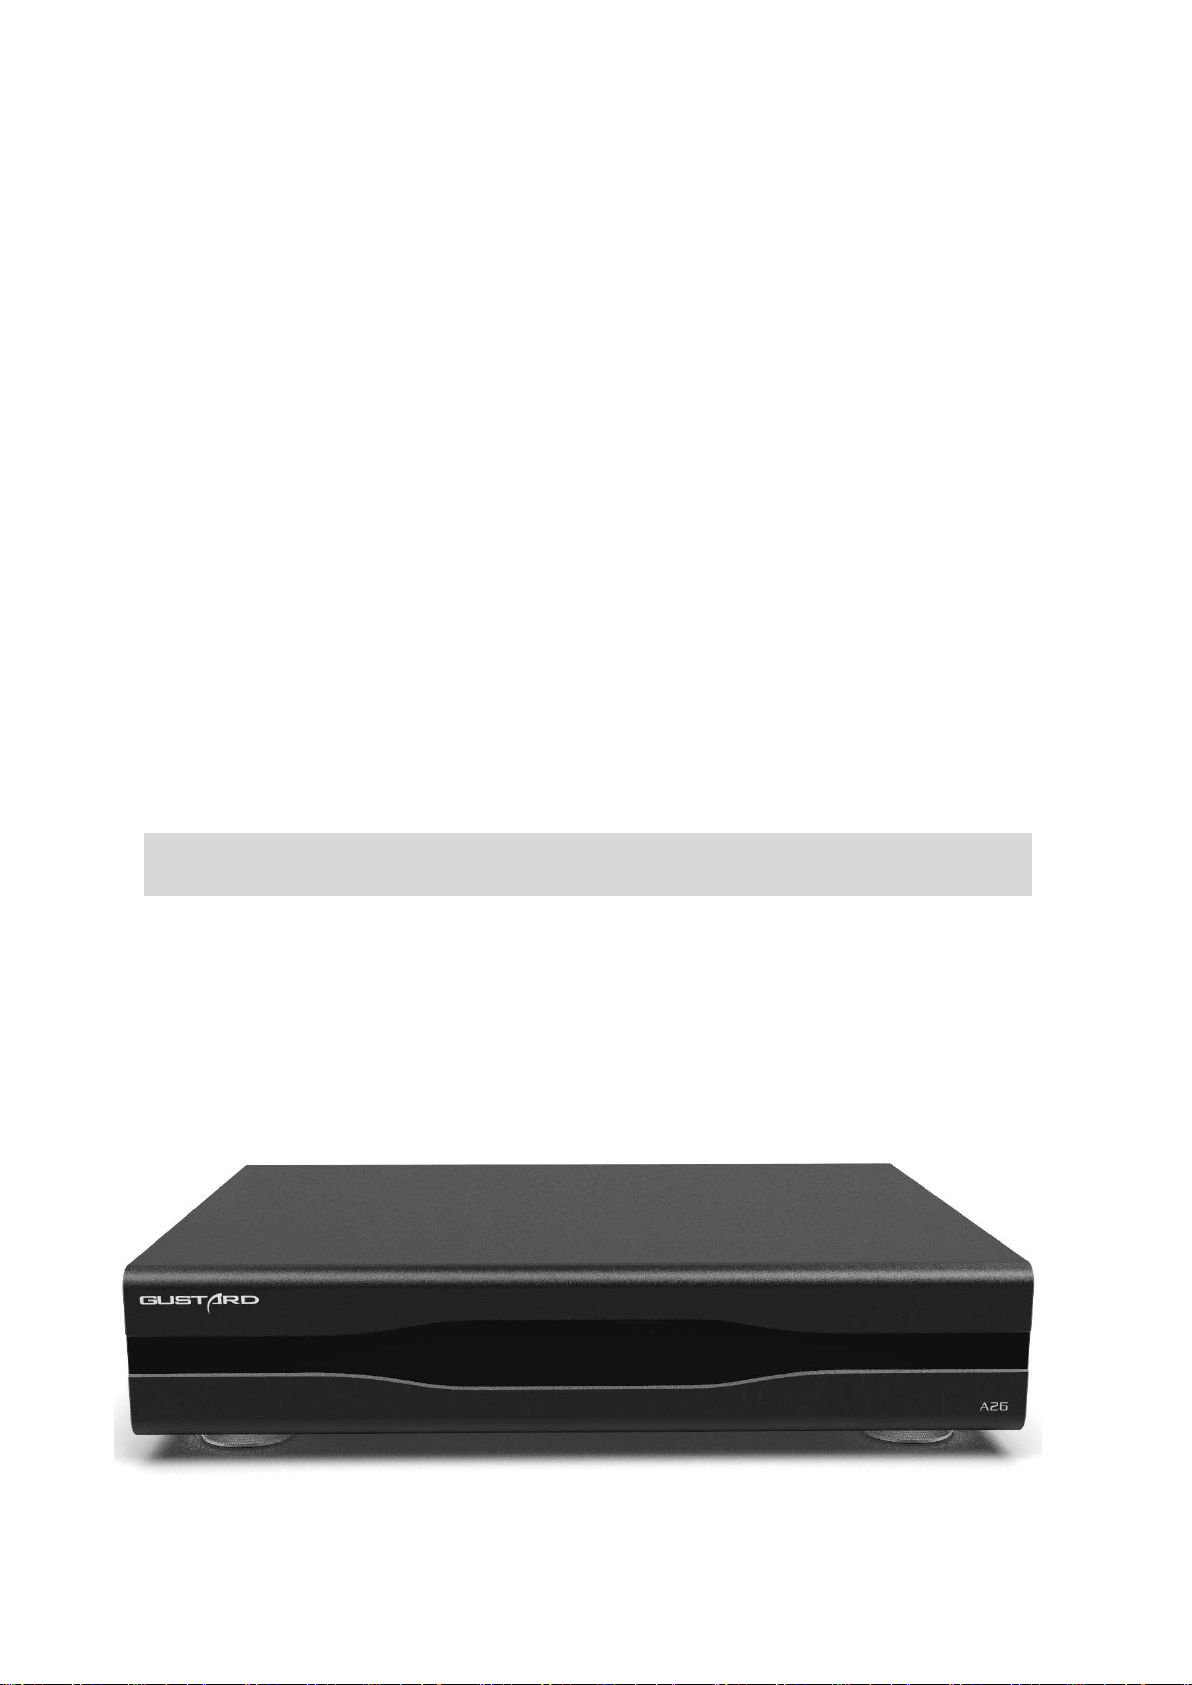
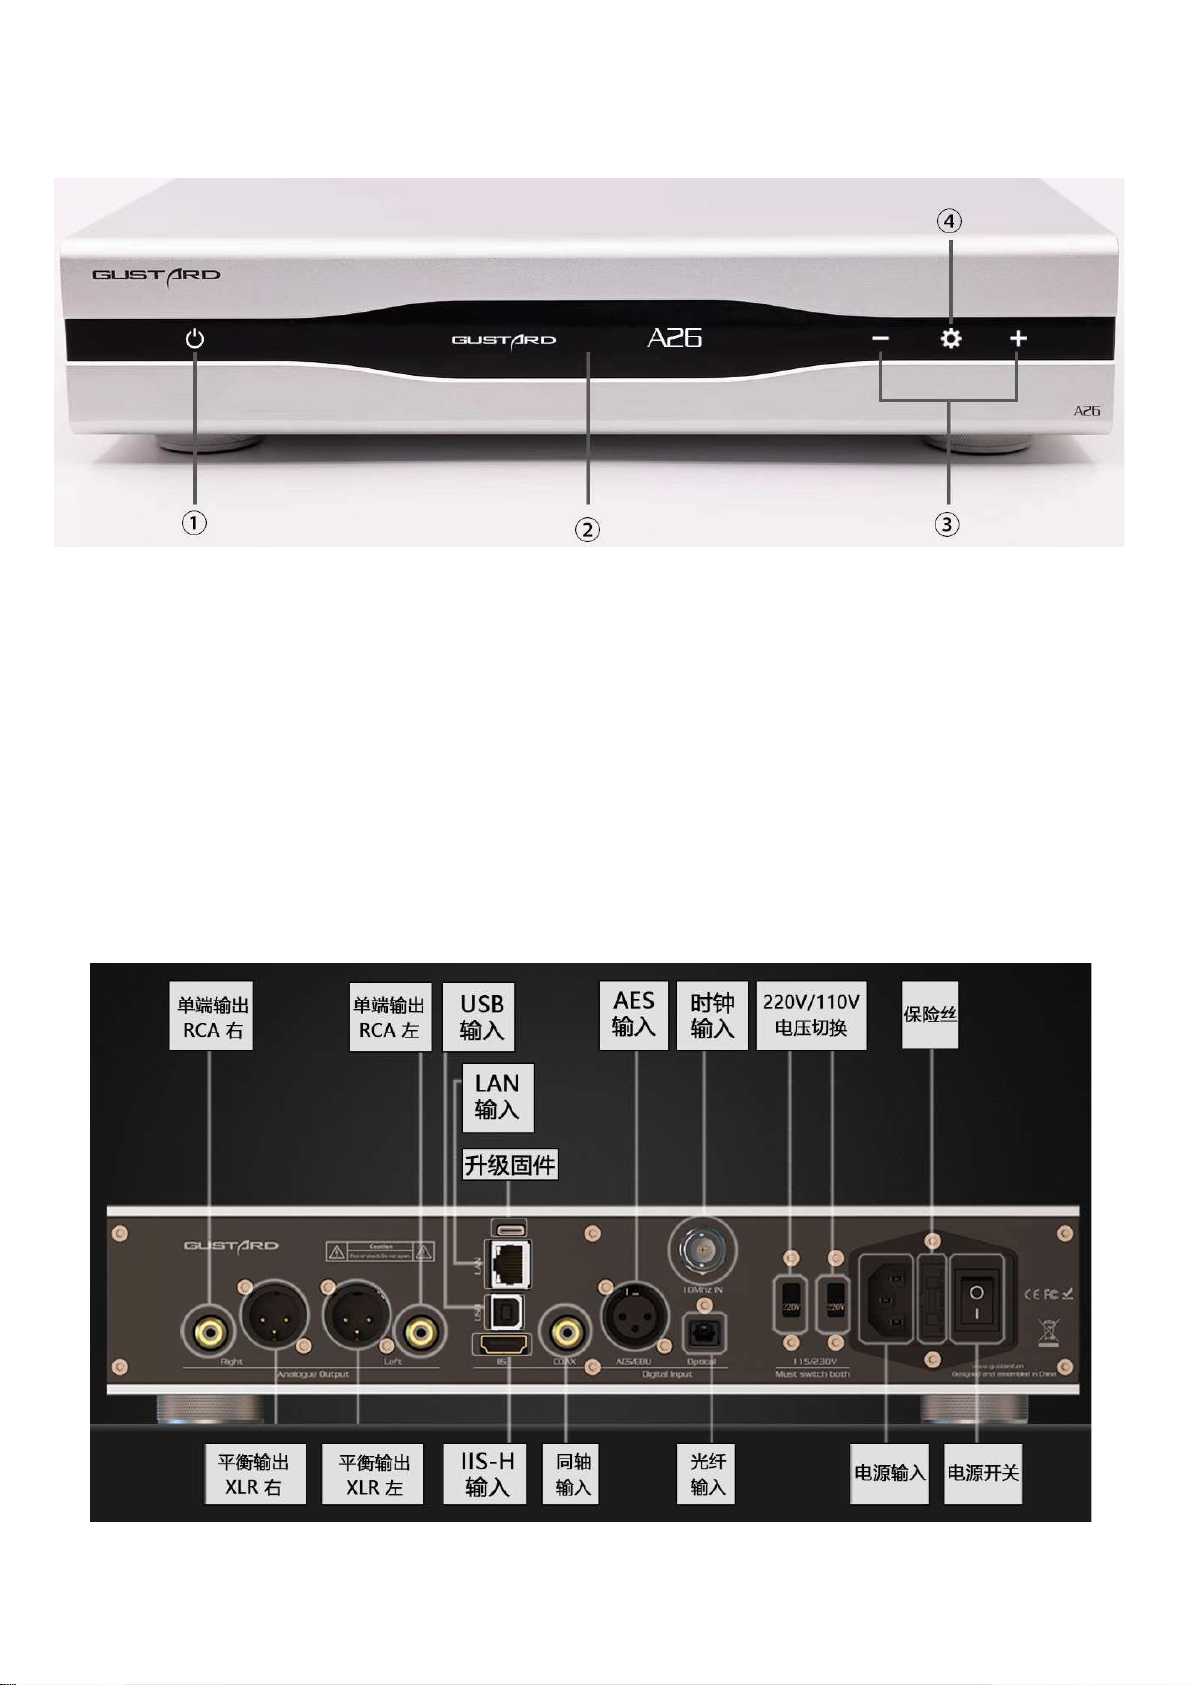
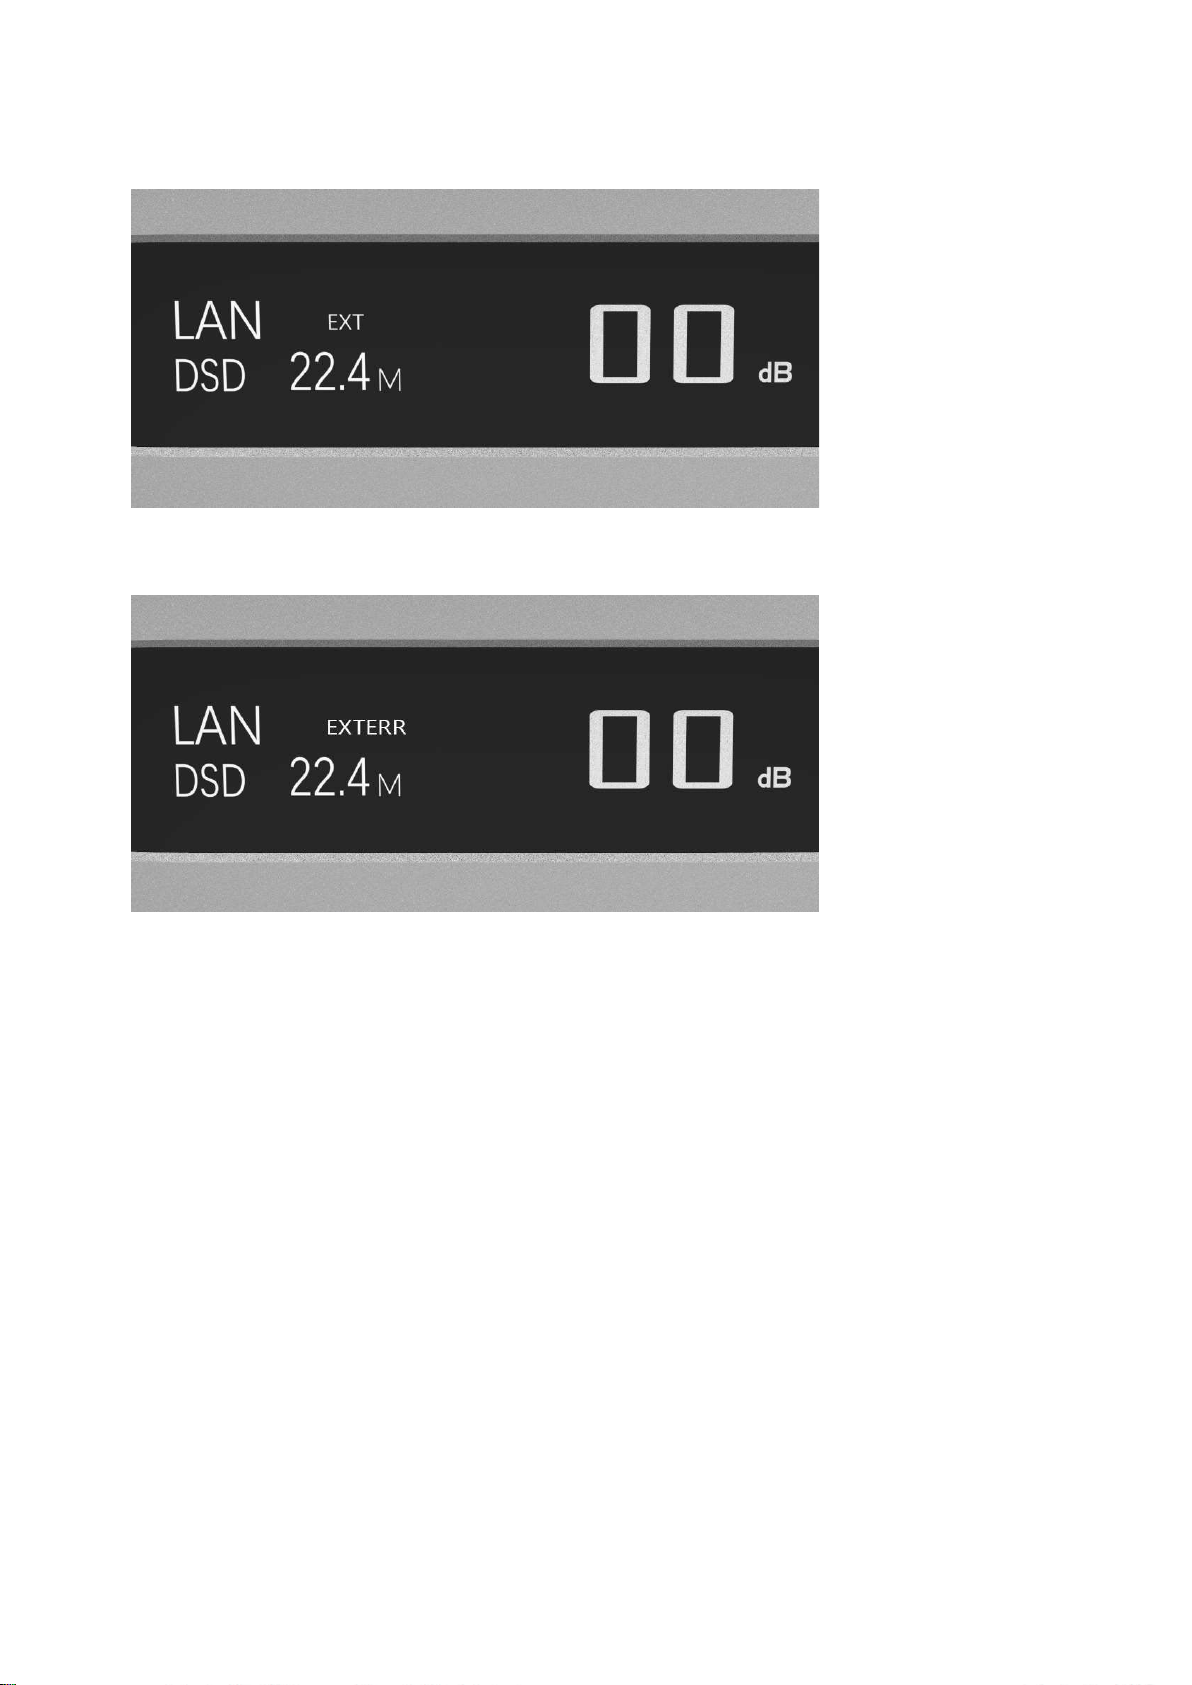
Display and operating menu
1. A26 uses a large-size OLED display, real-time status display and functional operation. The
following figure shows the display status of the main page of the screen.
2. Input channel selection:
The A26 has a total of 6 input channels. When the main page is displayed, press the switch
button, you can press COAX——AES—— IIS—
—USB——OPT——LAN order to cycle through the current input channel.
3. Volume adjustment ( V O L U M E ):
When the screen is the home page display screen,
"
+
" "
-
"
Buttons can be
directly adjusted A26 's digital volume attenuation function.
The volume can be
attenuated from 00dB to -90dB , a total of 90 levels of digital volume.
When the volume position is at 00dB , increase the volume to enter the fixed output
mode (volume bypass ), and the volume position displays FIXED. To decrease the
volume, exit FIXED first, and then adjust the volume.
4. setting menu:
On the home screen, long press the menu button to enter the setting menu. In this
state, the menu key can sequentially switch the menu items to be modified
,
"
+
" "
-
"
It is used to adjust the currently selected menu option. When the screen is
in the setting menu, press and hold the menu button again to return to the main
page.
The menu is switched by the movement of the digital cursor, as follows:
—1). PCM digital filter adjustment
—2).DSD digital filter adjustment
—3).DSD direct mode decoding
—4 ). Clock source selection

- 6 -
—5 ). Sound
—6 ). Attenuator
—7 ).Phase adjustment
—8 ). Screen brightness and screen saver

- 7 -
5. Menu function introduction:
Press the menu key to enter the menu when the main page screen is on, and the menu
options are introduced below.
1) PCM FILTER (PCM digital filter adjustment ):
A26 use AKM Built-in high performance PCM filter, a
total of 6 Class digital filtering . Sharp Roll-off
default option
Slow Roll- off
Short Delay Sharp Roll-off
Short Delay Slow Roll-off
Super Slow Roll-off (NOS-like)
Low Dispersion Short Delay filter
2) DSD FILTER (DSD digital filter
adjustment ): AKM has two built-in
bandwidth options,
Narrowband Narrow Bandwidth default
option Broadband Wild Bandwidth
3) DSD DIRECT (DSD direct mode )
: It can be configured as a
DSD direct DA circuit.
Disable (DISABLE) Default
option Enable (ENABLE)
When this option is turned on ( EN A B L E ), it will pass through DSD , and
only the most original DSD signal at the front end will be sent to the decoding
circuit. At the same time, the volume function will also be bypassed, the
volume position will display FIXED, and the digital volume of the unit will
no longer be adjustable.
——It is recommended to turn down the back-end volume before proceeding.

- 8 -
* When turned on , there will be a slight clicking sound when the playback data format
is switched between PCM and DSD .
4) REF CLOCK (reference clock selection ):
GUSTARD-K2, low noise clock synthesizer. With ultra-low phase noise, the
synthesized clock achieves femtosecond-level ultra-low jitter performance, and can
directly transfer the near-end performance of the reference clock. Thanks to the
high-precision divider, the frequency accuracy of its synthesized audio clock
reaches ppb level.
Thanks to this, the main clock of the built-in digital processing
circuit of the A26 is also provided by the K2 high-precision lock
synthesizer, and the
REF CLOCK can choose INT. Internal reference,
using the internal femtosecond.
Or select EXT . Select an external 10M reference source, it is recommended to connect the
C16 or C18 reference 10M main clock.

- 9 -
When EXT mode is selected and the external 10M is correctly locked . After exiting the
menu, the main screen will display EXT .
When selecting the external clock, if the external clock is lost, or the deviation of the external
clock is greater than +- 1 5 0 p p m , it will display EXT ERR .
5) SOUND (sound )
Two sound modes provided by AKM
Monitoring monitoring default options
ListeningListening _
6) ATTENUATOR (attenuator )
The A26 comes with a set of stereo analog attenuators with a range of -24dB, which
can apply low-level volumes with less dynamic performance loss , such as volume
settings of -40db.
Auto
It can be activated automatically
when the volume reaches the
switching point.
default
option
Off Only digital volume attenuation is
used throughout.
On
Turns the analog attenuator on all
the way.

- 10
7) PHASE (phase setting ):
There are two options for this function: NON-inverted (RCA positive phase output—
XLR American standard ) and Inverted (RCA reverse phase output— XLR Japanese/European
standard ) optional.
NON-inverted , the RCA output of A26 is positive phase, and the XLR
balanced output is American standard polarity output, that is, 1
ground, 2 hot, 3 cold.
Inverted , not only the RCA output is an inverted output , but the XLR
balanced output will be a Japanese/European polarity output, that is,
1 ground, 2 cold, and 3 hot.
8) BRIGHTNESS (screen
brightness ): dark dark
Moderate
Moderately
Bright _
Auto off Automatic
Screen Screen Saver
screen saver
Due to the characteristics of OLED itself, long-term high-
brightness use is likely to cause screen burn-in,
ghosting, etc. It is recommended to avoid long-term
use of bright options.

- 11
Infrared remote control
* When used to operate DAC products, please press and hold the DAC button for more than 3
seconds to enter the DAC operation mode. AMP and STREAM modes are used to control other
types of GOSTE products
① Ready/use button: In the ready state, press this button to light up the screen of
A26 and enter the use state; when the A26 is in use , press this button to enter the ready
state.
② Menu button: Press this button to enter the function setting menu of A26 .
③ Four-dimensional direction button: When entering the menu of A26 , use the up/down of the
four-dimensional direction key to switch the function to be adjusted, and use the left
/ Right to adjust options.
Press the middle to enter or unmute.
④ Back button: Return to the main screen display state.
⑤ Volume down button: When the A26 is displayed on the main screen, press this button to
reduce the output volume.
⑥ Volume plus button: When the A26 is displayed on the main screen, press this button to

- 12
increase the output volume.
Note: ●The operating distance varies depending on the angle ●If there is an object between the remote control and the
sensor, it may not operate normally ●If the remote control will not be used for a long time (one month or more),
please remove the battery ●If the battery leaks liquid, please thoroughly clean all residues in the battery
compartment and install new batteries When using other devices controlled by infrared rays, using this remote
control may misoperate these devices

- 13
Installation of USB driver under Windows system
* The driver is suitable for all WINDOWS systems.
*MAC The OS system has its own driver, which can be used after plugging in, without
additional driver installation.
* A CD is included in the accessories of this machine, which contains GUSTARD USB driver.
* Also available from www.gustard.cn Download related drivers, components and manuals from
the website
*This driver supports Windows 7 Requires SP1 and above ; Windows 8; Windows 10; Windows 11
1. who use a desktop computer to connect to the decoder are recommended to use the
native USB 2.0 interface. It is also strongly recommended to use the interface on the
rear of the chassis . Because the interface on the back is directly connected to the
motherboard, and the interface on the front of the chassis has an extra patch cord, it has
a certain negative effect on high-speed signals.
2.
use
USB
line will be Gosta equipment's
USB
After the interface is connected to the
computer, turn on the power of the device. The computer will prompt to find new
hardware
and try to set up the device. If there is no prompt, please try another
USB interface or turn on the Gosta USB interface again.
3. Open the CD, double-click to run the Gustard_UsbAudio_v4.82.0_2020-04-17_setup.exe
program
(or other latest version )

- 14
If the "User Account Control" window pops up, click "Yes".

- 10 -
4. When prompted, click next or install in turn .
5. Detect equipment, if there is a red text prompt: Setup requires that the device
is... , please restart the Gosta USB interface or re-plug the USB cable.

- 11 -
6. On the successful driver installation screen, click Finish to complete the installation.
If any other English prompt box appears, just select YES .

- 12 -
Foobar2000 software realizes the setting of DSD hard solution
1. Open the folder foobar2000_DSD_0.7.X , double-click to run ASIOProxyInstall-0.7.2.exe
, and click next or install to complete the installation.
2. Run the Foobar2000 program. Click on File —> Preferences .

- 13 -
3. "C o m p on e n t s "onthe left ( Chinese version is "Component" ) , and then click on the lower right
" Ins t a l l "( Chinese version is "Installation" )
Use the mouse to select two files at the same time, or press Ctrl to select two files at the same
time. Then click " O p en ", which means "open" in Chinese.

- 14 -
Two lines of component information will be added in the component list, and then click "
A p p ly "( the Chinese version is "apply ").
A box will pop up and click "OK". The Foobar2000 software will then rerun.
4. Click on the file (File )-> parameter option (Preferences ) again.
Other manuals for A26
1
Table of contents
Other GUSTARD Media Converter manuals

GUSTARD
GUSTARD DAC-X20PRO User manual

GUSTARD
GUSTARD DAC-X26 User manual

GUSTARD
GUSTARD A26 User manual

GUSTARD
GUSTARD DAC-X20 User manual

GUSTARD
GUSTARD DAC-X22 User manual

GUSTARD
GUSTARD DAC-X18 User manual

GUSTARD
GUSTARD DAC-A22 User manual

GUSTARD
GUSTARD DAC-A18 User manual

GUSTARD
GUSTARD R26 User manual

GUSTARD
GUSTARD DAC-X16 User manual