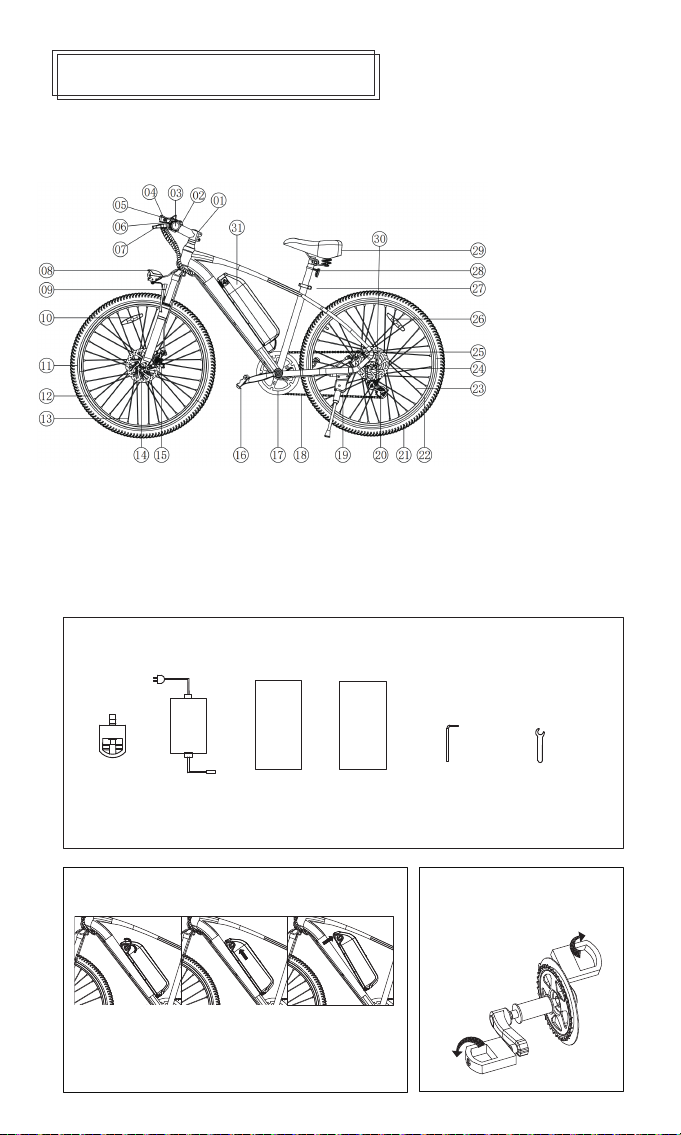
Gyrocopters BRIO User manual

BRIO MOUNTAIN E-BIKE
INSTRUCTION MANUAL
Do not use this product without carefully reading this instruction
manual and understanding the performance of electric bicycles.
Please keep the instruction manual properly.

HELMETS
SAVE
LIVES!
Always wear a properly fitted helmet that complies
with CPSC or CE safety standards when you ride
your Gyrocopters Brio e-bike.
Correct Fitting:
Make sure your
helmet covers your
forehead.
Incorrect Fitting:
Forehead is exposed
and vulnerable to
serious injury.

2× Pedals 1× Charger 1× Feedback
Card
1× Instruction
Manual
1× Hex Key 1× 15mm
(or 0.59 inch) Spanner
Note: As we upgrade our eBikes, the one you own may be slightly different from the one shown above.
In the Package
Battery Removal & Installment Installing the Pedals
Screw in the right pedal clockwise, and the left
counter-clockwise.
PARTS & COMPONENTS
1. Turn the key clockwise
to lock the battery. Turn
the key counterclockwise
to open the battery lock.
2. To remove the
battery, gently lift it
upwards and slide
the battery from the
tube.
3. Pull out the battery and
to install it again, open the
lock, gently slide the battery
into the tube and lock the
battery.
1.The riser
2.Acceleration handle
3.Handle grip
4.Variable speed finger
5.Battery display
6.Front reflector
7.Brake lever
8.Headlight
9.Front fork
10.Front wheel reflector
11.Tyre
12.Wheel
13.Spoke
14.Disc
15.Brake
16.Pedal
17.Chain wheel
18.Chain
19. Parking rack
20.Transmission
21.Tyre
22.Wheel
23.Spoke
24.Brake disc
25.Brake
26.Rear wheel reflector
27.Sitting clamp
28.Rear reflector
29.Seat
30.Transmission lever
31.Battery

GETTING STARTED
1. Assembling: Open the box, remove the
packaging, and remove your Gyrocopters Brio
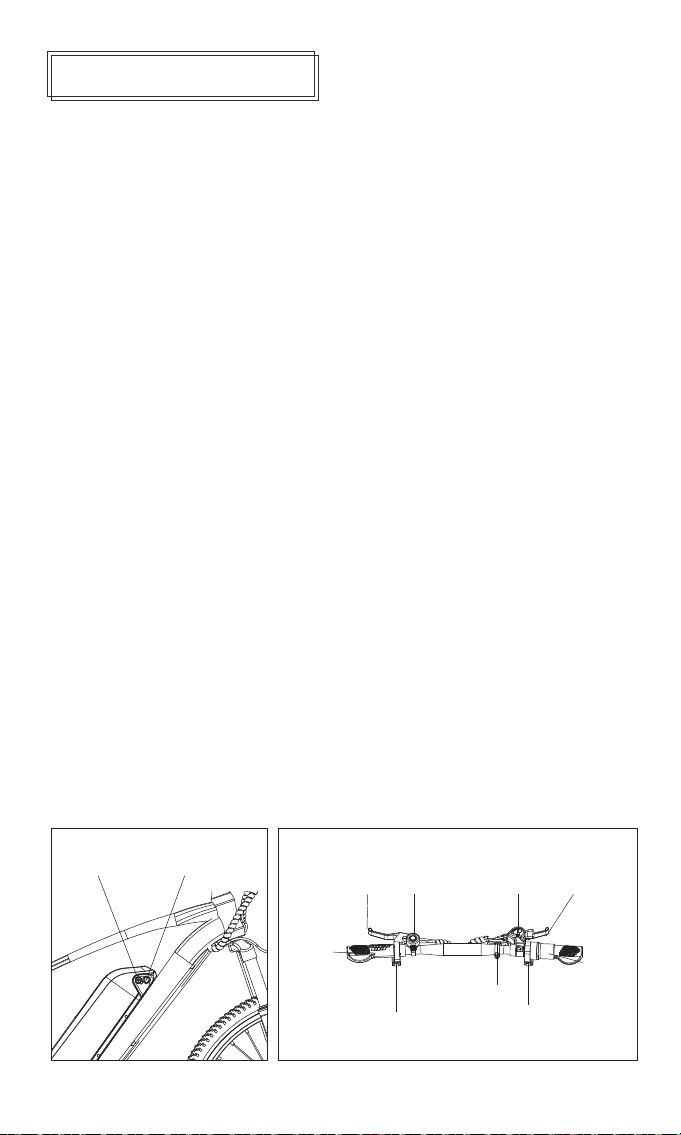
e-Bike. Straighten the riser and fasten the latch.
Adjust the seat to your desired height, and lock the
quick release. To align the handlebar, quickly
release the latch, align it, and lock it into place.
Gently pull the brake levers a couple of times
till the brake cables are well positioned.
Switch the power on and enjoy your ride with a
helmet on.
2. Charging: Connect the DC jack of the original
charger to the charging port of your Gyrocopters
Brio e-bike and the AC plug to the mains. The
charger light turns from red to green when the
charging is complete. (Note: do not charge your
e-bike unattended. Please avoid rain and sunlight
over the charger if charging outside.)
3. Power on and off: Locate the power button on
the left handle. Press the power button to switch on
and power off. Holding the switch will also display
the battery level when turned on.
4. Light on and off. Locate the button below the
display on the right handle, and press and hold for
three seconds to switch the headlight.
5. Cruise control: After driving at a constant speed,
maintaining a certain speed, press the cruise button
to enter cruise mode. Releasethe cruise bar, or
brakeexit cruise mode.
6. Ride assistance :
a. Throttle Assist: In Throttle Assist Mode, when the
power is on, you can accelerate and start the ride
without pedaling by twisting the throttle.
b. Pedal Assist: Pedal Assist Mode, when the power
is on, and you are also pedaling, the mode provides
power for an easier and more energy-efficient ride.
7. Powercut-off brakes: When you pull the brake
levers, the controller cuts off the motor output, and
the mechanical disc brakes are engaged. Pedal
Assist Mode or Throttle Mode remains disabled as
long as the brake levers are not ultimately released.
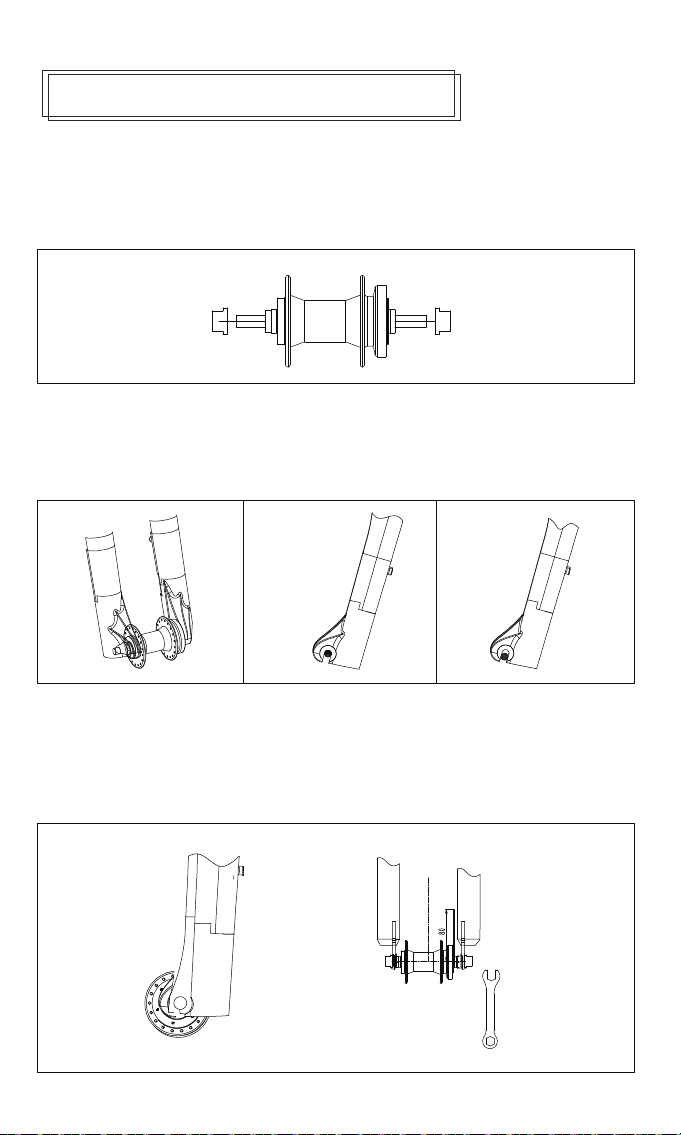
8. Removing and Installing the Battery: Gyrocopters
Brio e-bike offers a removable battery feature. To
remove the battery, open the battery lock and push
the battery upwards along the tube. Disconnect the
battery from the controller and pull it out. To install
the battery, slide it into the tube, connect it to the
controller below, and lock it. (For battery
replacement due to damage, please contact our
official customer service.)"
Charging Port Power Switch
Left brake lever Right brake lever
Power switch
Bell
Reflective
Switch light, cruise button
Accelerator
Shifter
Handlebar

INSTALLING THE FRONT WHEEL
Turn the anchor nuts clockwise to increase clamping, and anti-clockwise to decrease.
II. How to install
1. To insert the front wheel, manually turn the anchor nuts anti-clockwise to loosen them up, and then insert the
front wheel all the way into the dropouts of the front fork.
2.To secure the front wheel, manually turn the anchor nuts clockwise. Ensure that the front wheel is located at
the very center of the front fork and that the disc brake rotor is parallel to the disc brake caliper towards the end
of the front fork with space in between. Keep some space on both sides and tighten with a spanner as
indicated below:
Correct Wrong

GEARS
Gyrocopters Brio Mountain e-bike
comes with Seven gears, which consist of:
• Rear sprocket cluster/freewheel/cassette
• Rear derailleur
• Shifter
• Control cable
• Front sprocket / countershaft sprocket
• Drive chain
The gear mechanism differs in ergonomic design, performance, and price.
A downshift is moving from high to low gear, making pedaling easier for the rider. An upshift is moving to a
higher or faster gear, which makes pedaling harder. While riding Brio e-bike, you can upshift to go faster
and downshift to go uphill. A shift is possible only when you are pedaling forward, i.e. the drive chain is
moving forward and under some tension.
CAUTION
Never shift when pedaling backward. Also, do not pedal backward after a shift. Either action may jam the
chain and cause serious damage to your Gyrocopters Brio e-bike.

Build
Performance
Features
Model
Material
Expanded size
Pedal height from ground
Wheel hub
Body color
Net Weight
Maximum Load
*Max speed
*Range in throttle mode
*Range in pedal assist mode
*Hill climbing capacity
Operating temperature
IP rating/
Battery type
Battery capacity
Battery rated voltage
Charging voltage
Charger input voltage
Charging time
Motor rated power
21.5 kg
120 kg
32km/h
40±3km
55±5KM
15 degrees
-10~45 degrees Celsius
IP54
18650 lithium-ion
10 AH
36 V
DC42V
AC100-240V
4-6H
350 W
Headlight
Speed sensor
Adjustable seat height
Braking
Yes
Yes
Yes
Front and rear disc brakes
BRIO
Aluminum alloy frame
1870*580*1110 mm
130 mm
27.5 inches
Black
SPECIFICATION
Note: *The max speed varies depending on the battery level, load, tire pressure, terrain, lubrication state of
the chain and bearings, etc. *The range of the e-bike may vary, depending on your riding behavior, ambient
temperature, load, tire pressure, terrain, etc. The specs are measured with a load weight of 75kg, leveling &
hardening road surface, and the battery completely exhausted from a full charge, uninterrupted test. Driving
habits, temperature, loading, tire pressure, road environment, and other factors will affect the mileage.

MAINTENANCE
About the charger
Charging process
●
●
●
●
●
●
●
●
●
●
Use only the factory designated charger and avoid charging in residential buildings. Keep it out of reach of
children.
Be careful with the charger plug to avoid damaging it and causing poor input/output. Make sure the
charger is moisture-proof and waterproof.
Do not use the charger in unstable, excessively oily or dusty, humid, or direct sunlight environments. Do
not connect other electrical appliances during lightning and maintain good ventilation.
Keep external objects out of the charger and prevent any liquid or metal from entering it to avoid short
circuits. Be aware of impacts or violent shocks.
Only open the charger if you are a professional. Do not change the plug or wire of the charger by yourself
since there is high voltage inside.
It is recommended to charge the battery after each use, or at least once every two weeks to maintain its
performance and lifespan.
Avoid charging the battery in extremely hot or cold temperatures, as it can damage the battery and reduce
its lifespan.
Do not charge the battery for longer than the recommended time specified in the user manual, as it can
cause overheating and damage to the battery.
Do not leave the battery charging unattended, especially overnight or for extended periods, as it can be a
fire hazard.
Always use the original charger provided by the manufacturer, as using a different charger can damage
the battery and may void the warranty.
About the battery (Non professionals should not dismantle it)
Additionally, it is important to note that non-professionals should not attempt to dismantle the battery.
Mixing different types of batteries and applicable voltages should be avoided. The battery should only be
charged in a well-ventilated environment and never in residential buildings, confined spaces, or in hot
weather. Any odors or excessively high temperatures during charging should be addressed immediately
by stopping the charging process and seeking maintenance.
About the motor
It's important to protect the motor outlet to prevent short circuits caused by motor line wear, which can
lead to burning of the motor. Additionally, the motor should not be immersed in water for extended periods
of time.
About the controller
Attention should be paid to protect the exposed wires of the vehicle, to avoid causing the short-circuit
burn out of the controller. Strictly prohibit contacting the controller with water.

NOTICE
Before riding, it is important to wear a helmet, gloves, kneecap, and elbow protectors for safety.
It is recommended to ride at a medium speed and to avoid pedaling when slowing down.
Riding on motorways, around pedestrians, or on steep slopes is strictly prohibited (the climbing gradient
should be less than 20 degrees). The e-bike should not be ridden by individuals exceeding the maximum
weight limit of 120KG. It should not be used in extremely hot or cold environments, or on bumpy, wet
roads.It is important to note that the e-bike should not be used by children under the age of 16, as illegal
use may result in unexpected dangers. The company does not take any responsibility for any damage to
life, personal injury, or property damage resulting from not following the instructions in this manual.
DECLARATION OF RESPONSIBILITY
The company reserves the right to amend the product type, specifications, or related information
mentioned in the manual and holds the final interpretation right.
The specific functions mentioned in this manual apply to this particular type only. Any changes or
modifications to the product type, specifications, or related information mentioned in this manual will not
be notified to the user.
No copy, modification, retransmission, dissemination, or release of the manual version shall be made in
any form without the company's written permission.
Please read the handbook carefully before using the product and operate it in accordance with the
manual. Otherwise, the company is not responsible for any damage to the product caused by improper
use or error or the loss of personal property.
For product-related information, please inquire on Gyrocopters.ca
WEIGHT AND SPEED LIMITATIONS
Speed and weight limits are set for your own safety. Please do not exceed the limits listed in
the“Specifications” section of this manual.
WARNING
Overweight exertion on the device may increase
possibility of injury or product damage.

OPERATING RANGE
The following are some of the major factors that will affect the operating range of your device.
1) Terrain:Riding distance is highest when riding on a smooth, flat surface. Riding uphill and/or
on rough terrain will reduce distance significantly.
2) Weight: A lighter user will have further range than a heavier user.
3) Ambient temperature: Please ride and store the device under recommended tempera-tures,
which will increase driving distance; battery life, and overall performance of your device.
4) Speed and Riding Style: Maintaining a moderate and consistent speed while riding produces
maximum distance. Traveling at high speeds for extended periods, frequent starts and stops, idling and
frequent acceleration or deceleration will decrease overall distance.
Do not attempt to stop suddenly as this may lead to injury or damage to your brake discs.
Please follow all local, state and federal laws in regards to recycling, handling and disposing of Lead-acid
battery
Proper use of your brake is vital to safe, efficient
stopping. To avoid misuse and potential injury, do
not apply sudden or excessive force to your brake.
Apply the brake gradually and give yourself
enough room to come to a complete stop safely.
WARNING
WARNING
Seek immediate medical assistance if you are
exposed to any substance that is emitted from the
battery.

SAFETY ALERTS
● "Error code" displayed on the screen.
● Flashing LED lights or beeping sounds.
● Power off or sudden stop of the e-bike.
● Abnormal vibration or noise from the e-bike.
● Overheating of the battery, motor or controller.
● Unusual or unexpected behavior of the e-bike.
● Warning message displayed on the screen, such as "brake failure" or "motor overheating".
● Any other abnormality that may occur during use.
If any of these Safety Alerts appear during use, the rider should stop the e-bike immediately, turn off
the power, and check for any issues. If the problem cannot be solved, the user should seek professional
help or contact the manufacturer for assistance. Ignoring these alerts could lead to serious injury or
damage to the e-bike.
Prohibited riding surfaces (uneven, too steep, unsafe, etc.). Battery voltage is too low. The device is
still charging. Overheating, or the motor temperature is too high. When the battery is about to run out of
power, the battery icon will flash. If one or both tires are blocked, the device will stop after 10 seconds.
When the battery level is below the protection mode, the device motor will power off after 15
seconds. While sustaining a high discharge current during use (such as riding up a steep slope for a
long period of time), the device motor will power off after 15 seconds.
WARRANTY
Manufacturer warranty does not cover any physical or accidental damage due to improper usage. The
warranty also does not cover normal wear and tear, damage to wheels, fenders, or any other physical
damage, or water/liquid damage to your parts and units.
For warranty information,
Please visit us at www.gyrocopters.ca or

Website: Gyrocopters.ca
Phone: 647 846 1064
Address: 11-2340 Meadowvale Blvd, Mississauga, Ontario. Canada
Table of contents
Other Gyrocopters Bicycle manuals