GYS GYSTECH 3800 User manual

5 6 7
Cachet du revendeur:
N° de série: .....................................................................
Référence de l'appareil: .................................................
Date de l'achat : : ...........................................................
Nom de l'acheteur : ....................................................
Valable 1 an à compter de la date d'achat
Certificat de arantie FRANCE
P
OUR VOTRE SÉCURITE
Ce manuel d'utilisation comprend des indications sur le
fonctionnement de votre appareil et de nombreuses précautions à
suivre pour votre sécurité. Merci de le lire attentivement avant
première utilisation et de le conserver soigneusement pour toute
relecture future.
D
ESCRIPTION GÉNÉRALE
GYSTEC 3800 a été développé pour recharger la plupart des
batteries au plomb sans entretien, couramment utilisées pour les
motos, voitures et pour de nombreux autres véhicules. Ces batteries
peuvent être de plusieurs types ex: liquides (Electrolyte liquide),
GEL (électrolyte gélifié), AGM (électrolyte gélifié). Il a été conçu
pour la recharge des batteries 12V de 1.2 Ah à 60 Ah ou pour le
maintien en charge des batteries 12V de 60 à 120 Ah. Le chargeur
détecte une batterie dont la tension est supérieure à 7.8 V.
SÉCURITE
▪Ne pas tenter de recharger des piles ou batteries non
rechargeables.
▪Si le câble d'alimentation est endommagé, il doit être remplacé par
le fabricant, son service après vente ou une personne de
qualification similaire afin d'éviter un danger.
▪Respecter le calibre du fusible indiqué sur l'appareil
▪Ne pas couvrir le chargeur pendant utilisation
▪La charge doit être effectuée dans un local abrité, suffisamment
aéré ou spécialement aménagé.
▪Produit faisant l'objet d'une collecte sélective. Ne pas jeter dans
une poubelle domestique.
INDICATIONS
ET
ACCESSOIRES
a) Indications:
N° Voyant Description
1 Voyant veille
s'éteint en passage mode 1 à 3
2
“Mode 1” (14.4V/0.8A)
3
“Mode 2” (14.4V/3.8A )
4
“Mode 3” (14.7V/3.8A )
5 Erreur de polarité
6
En cours de charge
7
Charge terminée
8
Bouton de sélection
b) Description des accessoires
9
Chargeur
10
Trou de fixation
11
Câble secteur avec prise
12
13
Câb
le de connexion fi
xe pour moto
ou autoportée
borne “+” (rouge) avec cosse
borne “-” (noir) avec cosse
14
Pince de charge borne “+”
15
Pince de charge borne "
-
"
T
YPE DE
B
ATTERIES
&
REGLAGES
Les recommandations suivantes sont indicatives. Pour plus de
précisions, veuillez vous référer aux instructions du fabricant de
votre batterie.
Mode 14.4V/0.8A
Ce mode est adapté pour les batteries de <14 Ah
Mode 14.4V/3.8A
Ce mode est adapté pour les batteries liquide ou sans
entretien et pour la plupart des batteries GEL.
Mode 14.7V/3.8A
Ce mode est recommandé pour la plupart des
batteries AGM et de tous les autres types de batteries
lorsque la température ambiante est inférieure à 0°C.
CHARGE
Charge d'une batterie installée sur le véhicule
a- Avant tout branchement/débranchement, le chargeur doit être
déconnecté de la prise secteur.
b- Vérifier la polarité des bornes de la batterie. La borne positive
(“+”) est habituellement plus large que la borne négative.
c- Identifier la borne de la batterie connectée au châssis du
véhicule (masse). abituellement, c'est la borne négative.
d- Charger une batterie avec la masse à la borne négative:
• Vérifier que le câble noir (connecté à la borne “-”) n'ait aucun
contact avec toute canalisation combustible ou avec la batterie.
• Connecter le câble rouge (“+”) à la borne positive de la
batterie (“+”) et le cordon noir (“-“) au châssis du véhicule.
e- Charger une batterie avec la terre à la borne positive:
• Vérifier que le câble rouge (connecté à la borne “+”) n'ait
aucun contact avec toute canalisation combustible ou avec la
batterie.
• Connecter la câble noir à la borne négative et le câble rouge
(“+“) au châssis du véhicule.
Charger une batterie non connectée au véhicule.
a- Avant tout branchement/débranchement, le chargeur doit être
déconnecté de la prise secteur
b- Connecter le câble rouge (“+”) à la borne positive (“+”) de la
batterie et le câble noir (“-“) à la borne négative (“-“).
Branchement à demeure grâce aux câbles cosses (acc. n°12 et 13)
Attention: ne pas connecter les câbles cosses au chargeur lors du
montage.
1- connecter le câble cosse rouge sur la borne positive de la batterie
2- connecter le câble cosse noir sur la borne négative de la batterie.
3- Fixer les câbles sur le châssis du véhicule. Attention : les câbles ne
doivent pas être pincés ou en contact avec des surfaces chauffantes
ou coupantes.
4- C'est seulement après ce montage que vous pourrez raccorder le
câble du chargeur.
Après la charge, débrancher le chargeur de batterie de
l'alimentation réseau , puis retirer la connexion du châssis et enfin
la connexion de la batterie dans cet ordre.
S
ÉLECTION DU MODE DE CHARGE
Connecter le chargeur à la batterie. Après raccordement à la prise
d'alimentation, le voyant secteur s'allume .
Sélectionner votre mode de charge en pressant le bouton Les
différents modes apparaissent dans l'ordre suivant ,
MODE 1 , MODE 2 , MODE 3 .
En fin de charge, si la batterie est toujours connectée, le chargeur
effectuera une charge d'entretien même si l'utilisateur change de
mode. Cette protection évite d'endommager la batterie.
MODE
1
(14.4/0.8A)
Sélectionner grâce au bouton le Mode 1.
Le voyant s'allume. Si aucun mode suivant n'est activé, le
système électronique démarrera automatiquement la charge (0,8A
±10%). La charge est signalée par le voyant "Charge" .
Pendant toute la charge ce voyant restera allumé jusqu'à ce que la
batterie soit rechargée (14.4V±0.25V). La fin de charge est
indiquée par le voyant "OK" .
MODE
2
(14.4/3.8A)
Sélectionner grâce au bouton le Mode 2.
Le voyant suivant s'allume . Si aucun mode suivant n'est
activé, le système électronique démarrera automatiquement la
charge (3.8A ±10%). La charge est signalée par le voyant "Charge"
. Pendant toute la charge ce voyant restera allumé jusqu'à ce
que la batterie soit rechargée (14.4V±0.25V). La fin de charge est
indiquée par le voyant "OK" .
MODE
3
(14.7/3.8A)
Sélectionner grâce au bouton le Mode 3.
Le voyant suivant s'allume . Si aucun mode suivant n'est
activé, le système électronique démarrera automatiquement la
charge (3.8A ±10%).
La charge est signalée par le voyant . Pendant toute la charge
ce voyant restera allumé jusqu'à ce que la batterie soit rechargée
(14.7V±0.25V). La fin de charge est indiquée par le voyant
"OK" .
RECUPERATION DE BATTERIE EN DÉCHARGE PROFONDE
Avant de commencer la charge, GYSTEC 3800 analyse la tension
de la batterie. Si la tension est comprise entre 7,5V à 10,5V, il
réalise une charge pulsée avec un très faible courant pour
"récupérer" la batterie jusqu'à que sa tension atteigne 10,5V±0.5V.
P
ROTECTIONS
En cas de problème, le chargeur se met automatiquement en
protection ( ). Afin d'éviter d'endommager la batterie, le système
restera dans cette position jusqu'à ce que l'utilisateur intervienne.
Problèmes
Causes
Remèdes
Voyant
allumé
Court circuit
Circuit ouvert
Tension batterie
< 7,5V ± 0,5
1
-
Vérifier qu’il n’y a pas de perte
de courant dans le circuit du
véhicule
2- Vérifier que les pinces soient
bien connectées
3- Après ces corrections, si le
voyant reste allumé, la batterie
sulfatée ou détériorée est sans
doute à remplacer
Voyant et
allumés
Inversion de
polarité
Vérifier que les pinces soient bien
connectées
P
ROTECTION THERMIQUE
Le Gystech 3800 est contrôlé par un capteur de température.
Durant toute la charge, si le chargeur devient trop chaud, la
puissance délivrée est automatiquement réduite afin de le préserver
de tout dommage. Le chargeur bascule ainsi en charge d'entretien
(floating). Lorsque que la température ambiante devient acceptable,
Gystech 3800 reprendra sa charge normale.
T
EMPS DE
C
HARGE
Capacité
Batterie
(Ah)
Mode Temps de char e de 20 %
à 80% (heures)
2
Charge 1 30 + charge d'entretien
8 Charge 7 + charge d'entretien
20
Charge 3 30 + charge d'entretien
60 Charge 10 + charge d'entretien
100
Charge d'entretien
120 Charge d'entretien
D
ÉCLARATION DE
C
ONFORMITÉ
La société GYS atteste que le chargeur décrit dans ce manuel est
fabriqué conformément aux exigences des directives européennes
suivantes :
- Directive basse tension: 2006/95/EC - 12/12/2006 (amendée par
93/68/EEC)
- Directive CEM : 2004/108/EC - 15/12/2004 (amendée par
92/31/EEC, 93/68/EEC, 91/263/EEC, 93/97/EEC).
Ils sont pour cela conformes aux normes harmonisées :
EN60335-1 - EN60335-2-29 – EN55014-1 - EN55014-2 – EN61000-
3-2– EN61000-3-3 – EN62233.
S
PÉCIFICITÉS TECHNIQUES
/
T
ECHNICAL
D
ATA
Tension d'entré AC
Input Voltage AC
220-240VAC, 50/60 z
Tension de sortie
Output Voltage
Nominal: 12V
Courant d'entrée
Input Current
0.6A RMS max
Rendement
Efficiency
75%
Tension de charge
Charging Voltage
14.4V±0.25V or 14.7V±0.25V
Courant de charge
Charging Current
3.8A±10% or 0.8A±10%
Consommation
Batteries au repos
Back Current Drain
1 mA
Ondulation
Ripple
Max 150mV
Temperature ambiant
e
Ambient Temperature
-20°C to 50°C
Type de batteries
Type of Batteries
Batterie au plomb 12V (électrolyte liquide,
sans entretien, AGM, gel)
12V Lead-acid batteries (WET, MF,AGM and
GEL)
Capacité batterie
Battery Capacity
1.2-120Ah
Dimensions (lxPx )
Dimensions (LxWx )
172x62x42mm
Indice de protection
ousing Protection
IP65 (Protégé contre la poussière et les
projections d'eau /Dust and Splash proof)
Poids
Weight
0.486kg
Niveau de bruit
Noise Level
<50 dB (relevé à une distance de 50cm)
<50 dB (Tested from a distance of 50cm)
Courbe de charge
Charging process
Selon les sélections, voir texte
Depends on charging mode, cf text
C
ONDITIONS DE GARANTIE
La garantie n’est valable que si le bon a été correctement rempli par
le vendeur.
La garantie couvre tout défaut ou vice de fabrication pendant 1 an,
à compter de la date d’achat (pièces et main d’œuvre).
La garantie ne couvre pas les erreurs de tension, incidents dus à un
mauvais usage, chute, démontage ou toute autre avarie due au
transport.
La garantie ne couvre pas l’usure normale des pièces (Ex. : câbles,
pinces, etc.).
En cas de panne, retournez l’appareil à la société GYS (port dû
refusé), en y joignant :
Le présent certificat de garantie validé par le vendeur
Une note explicative de la panne.
Après la garantie, notre SAV assure les réparations après
acceptation d’un devis.
Contact SAV :
Société Gys-134 Bd des Loges
BP 4159-53941 Saint-Berthevin Cedex
Fax: +33 (0)2 43 01 23 75
Tél: +33 (0)2 43 01 23 68

2 3 4
NOTICE D'UTILISATION
INSTRUCTION MANUAL
C
ONTENTS
S
OMMAIRE
For your safety
...............
2
Pour votre sé urité
.......
5
Produ t
Feature
..........................
2
Des ription
générale ........................
5
Safety Information
.........
2
Sé urité
........................
5
Equipment
Des ription
....................
2
Indi ations
et a essoires ...............
6
Battery Type &
Settings
.........................
3
Type de b
atteries
& réglages.....................
6
Charging
........................
3
Charge
..........................
7
Sele t Charging
Mode
..............................
3
Séle tion du mode
de harge ......................
6
Res uing drained
battery
...........................
4
Ré upération
de batterie ....................
7
Abnormality
Prote tion
.....................
4
Prote tions
...................
7
Overheating
Prote tion
......................
4
Prote tion
thermique .....................
7
Charging time
...............
4
Temps de Charge
..........
7
De laration of
Complian e
....................
4
Dé laration de
Conformité ....................
7
Te hni al Data
...............
8
Spé ifi ités
Te hniques ....................
8
Garantie
........................
8
F
OR
Y
OUR
S
AFETY
This manual contains important safety and operating instructions.
Read this manual carefully before using the charger for the first
time and keep the manual in a safe place for future reference.
P
RODUCT
F
EATURE
GYSTEC 3800 is designed for charging a variety of SLA (sealed
lead acid) batteries, widely used in motorbikes, cars and several
other vehicles. The batteries may be of various types i.e.
WET/Flooded (Liquid Electrolyte), GEL (Gelatin type Electrolyte,
absorbed into the plates), AGM (Absorbed Glass Mat) batteries.
Gystech charges 12V batteries from 1.2 Ah to 60Ah and provides
maintenance charge for 12V batteries from 60 to 120 Ah. The
charger detects a battery with a voltage above 7.8 V.
S
AFETY
I
NFORMATION
▪Do not use it for any other purposes
▪Do not attempt to charge non rechargeable batteries
▪Respect the rating of the fuse, which is indicated on the charger.
▪In case the power cord is damaged, be sure to stop using it at
once. Sent it to nearby appoint repair center that is authorized by
manufacturer in order to avoid any danger.
▪Do not cover the charger while charging.
▪Charging should be carried out in a well-ventilated, weather
protected facility.
▪Separate collection required. Do not throw in a domestic dustbin.
E
QUIPMENT
D
ESCRIPTION
a) Indication:
N° State Description
1 Standby indicator
Lights off after user selects mode 1 to 3
2 “Mode1” (14.4V/0.8A)
3
“Mode2” (14.4V/3.8A )
4
“Mode3” (14.7V/3.8A )
5 “Incorrect polarity/Fault
6
“Charging in progress”
7
“Fully charged”
8
“Mode” selection button
b) Component Description
9 Charger
10 Mounting holes
11 Mains cable with power plug
12
13
Permanent connection cable for motorbike or
riding lawn mowers :
- “+” Pole with ring terminal (red)
- “-” Pole with ring terminal (black)
14 “+” Pole quick clamp (red)
15 “-” Pole quick clamp (black)
B
ATTERY
T
YPE
&
S
ETTINGS
The following recommendations should only be referred to as
guidelines. For precise details, you must refer to battery
manufacturer for instructions.
Mode 14.4V/0.8A
This mode is normally suitable for batteries <14 Ah
batteries
Mode 14.4V/3.8A
This mode is normally used for WET, MF
(maintenance Free) and most GEL batteries
Mode 14.7V/3.8A
This mode is recommended for several AGM batteries.
This mode is also suitable for charging batteries in
sub-zero temperatures.
C
HARGING
Charging of a permanently installed battery in a vehicle
a- Before connecting or disconnecting the battery leads, the power
cord should be removed from the mains.
b- Check polarity of battery post. A positive (“+”) battery post
usually has a larger diameter than a negative (“-”) post.
c- Identify the pole of battery which is connected to the chassis
(earth). Normally the negative terminal is connected to the chassis.
d- Charging of negative earthed battery:
• Make sure the black wire (“-” pole connection) has not contact
with the fuel line or the battery.
• Connect the red wire (“+”) to the positive (“+”) pole of the
battery and the black wire (“-“) to the vehicle chassis.
e- Charging of positive earthed battery:
• Make sure the red wire (“+” pole connection) has no contact
with the fuel line or the battery.
• Connect the black wire (“-”) to the negative (“-”) pole of the
battery and the red wire (“+“) to the vehicle chassis.
Charging of a battery not connected to a vehicle
a- Before connecting or disconnecting the battery leads, the power
cord should be removed from the mains.
b- Connect the red wire (“+”) to the positive (“+”) pole of the
battery and the black wire (“-“) to the negative (“-“) pole.
Permanent connection to the vehicle battery ( cable with eyelet
terminals=accessories n°12-13)
Warning: During the mounting, do not connect the charger to the
cable with eyelet terminals.
a- connect the red cable to the positive battery's pole.
b- connect the black cable to the negative battery's pole.
c- Fix your cable to the vehicle chassis.
Make sure that the cable is not being pinched or in contact with
warm surfaces or sharp edges.
d- After this, the quick contact of the charger can be connected
After charging, disconnected the battery charger from supply
mains. Then remove the chassis connection and the battery
connection, in this order.
S
ELECT
C
HARGING
M
ODE
Connect the charger to the battery. After connection to the power
supply, the power indicator lights on .
By repeatedly pressing the selection button displays the
charging modes in the following order , MODE 1 ,
MODE 2 , MODE 3 and repeats this
cycle.
If you press , charging mode automatically switches to the next
operation mode and begins functioning in that specific mode.
owever after a full charge, if battery is not disconnected from the
charger, it remains in float charge mode, even if user switches it
over to another mode. This protects battery from being damaged.
MODE
1
(14.4/0.8A)
Press the selection button to select Mode 1. LED display will
light up. If no further process is activated, the electronic system will
automatically start the charging process with the LED displaying
and charging starts with a current of 0.8A ±10%. If this
procedure runs smoothly, the LED display will remain on
during the entire charging process, until battery is fully charged up
to 14.4V±0.25V. At this stage LED display will turn off and
LED display will turn on.
MODE
2
(14.4/3.8A)
Press the selection button to select Mode 2. The corresponding
LED display will light up. If no further process is activated, the
electronic system will automatically start the charging process with
the LED displaying and charging starts with a current of 3.8A
±10%. If this procedure runs smoothly, the LED display will
remain on during the entire charging process, until battery is fully
charged up to 14.4V±0.25V. At this stage LED display will
turn off and LED display will turn on.
MODE
3
(14.7/3.8A)
Press the selection button to select Mode 3. The corresponding
LED display will light up immediately. If no further action is
taken, the electronic system will automatically start the charging
process with a set delay. In this mode, the charging current is
identical to that of Mode 2. If this procedure runs smoothly, the LED
display remains on, the electronic system becomes active and
remains in this condition until battery is fully charged upto
14.7V±0.25V. At this stage LED display will turn off and LED
display will turn on.
R
ECOVERY OF DEEP DISCHARGED BATTERY
At the beginning of the charging process, GYSTEC 3800
automatically checks the voltage of the battery. If voltage is
between 7,5V and 10,5V, it begins pulse charging with small current
to recover the battery until 10,5V±0.5V.
P
ROTECTIONS
In case of problem, the charger automatically switches on
protection mode . The system will remain in that position until the
user intervene.
Problem
Causes
Solutions
Indicator
switched on.
-
Short circuit
- Circuit open
- Battery voltage
<7,5V +/- 0,5V.
-
Check that there is no
voltage loss in the vehicle
circuit.
- Check that the clamps are
well connected.
- After corrections, if the
indicator is still on, the
sulfated or damaged
battery may be replaced.
Indicators and
switched on.
Polarity reversal
Check that the clamps are
well connected
O
VERHEATING
P
ROTECTION
Gystech 3800 charger is protected by a thermal sensor. During the
charging process, if the charger becomes too hot or due to extreme
ambient temperature, the power output is automatically reduced to
protect itself from damage. The charger continues to work trickle
charge. Charger increases power automatically when the ambient
temperature drops.
C
HARGING TIME
Battery
size (Ah) Mode
Char in time from 2
0% to
80% Char e(hours)
2
Charge 1 30 + maintenance
8 Charge 7 + maintenance
20
Charge 3 30 + maintenance
60 Charge 10 + maintenance
100 Maintenance
120 Maintenance
D
ECLARATION OF
C
OMPLIANCE
The company GYS certifies that the product described on this manual is
manufactured in compliance with the requirements of the following
European directives :
- Low Voltage Directive : 2006/95/EC - 12/12/2006 (amended by
93/68/EEC)
- EMC Directive : 2004/108/EC, 15/12/2004 (amended by 92/31/EEC,
93/68/EEC, 91/263/EEC, 93/97/EEC),
It therefore complies with the following harmonized standards :
- EN60335-1 - EN60335-2-29 – EN55014-1 - EN55014-2 – EN61000-3-2
– EN61000-3-3 – EN62233.
11
11
13 12
2
15
14
10
1
3
4
6 7 5
8
10
9
010811
Produit faisant l'objet d'une collecte sélec
tive
-
Ne pas jeter dans une poubelle domestique.
Separate collection required -
Do not throw in a domestic dustbin

P
ARA SU SEGURIDAD
Este manual contiene instrucciones de seguridad y de operación
importantes. Por favor lealo muy atentamente antes de utilizar el
cargador por la primera vez y conservelo para poder leerlo de
nuevo si necesito.
D
ESCRIPCIÓN GENERAL
GYSTECH 3 00 fue concebido para cargar la mayoría de las baterías
al plomo sin mantenimiento, comúnmente utilizadas para motos,
coches o varios otros vehículos. Estas baterías pueden ser de varios
tipos : líquido (electrólito líquido), gel (electrólito gelificado), AGM
(electrólito gelificado). Fue concebido para la carga de baterías 12V
de 1.2Ah a 60Ah o por el mantenimiento en carga de las baterías
12V de 60 a 120Ah. El cargador detecta una batería cuya tensión es
superior a 7. V.
▪Nunca tratar de cargar pilas o baterías que no pueden ser
cargadas.
▪Si el cable de alimentación está dañado, debe ser reemplazado por
el fabricante, su servicio postventa o una persona con una
cualificación similar, para evitar todo peligro.
▪Nunca cubrir el aparato durante su utilización.
▪La carga de tener lugar en un lugar abrigado, suficientemente
ventilado o especialmente acondicionado.
▪Este aparato es objeto de una recogida selectiva. No echar en un
contenedor domestico.
I
NDICACIONES Y ACCESORIOS
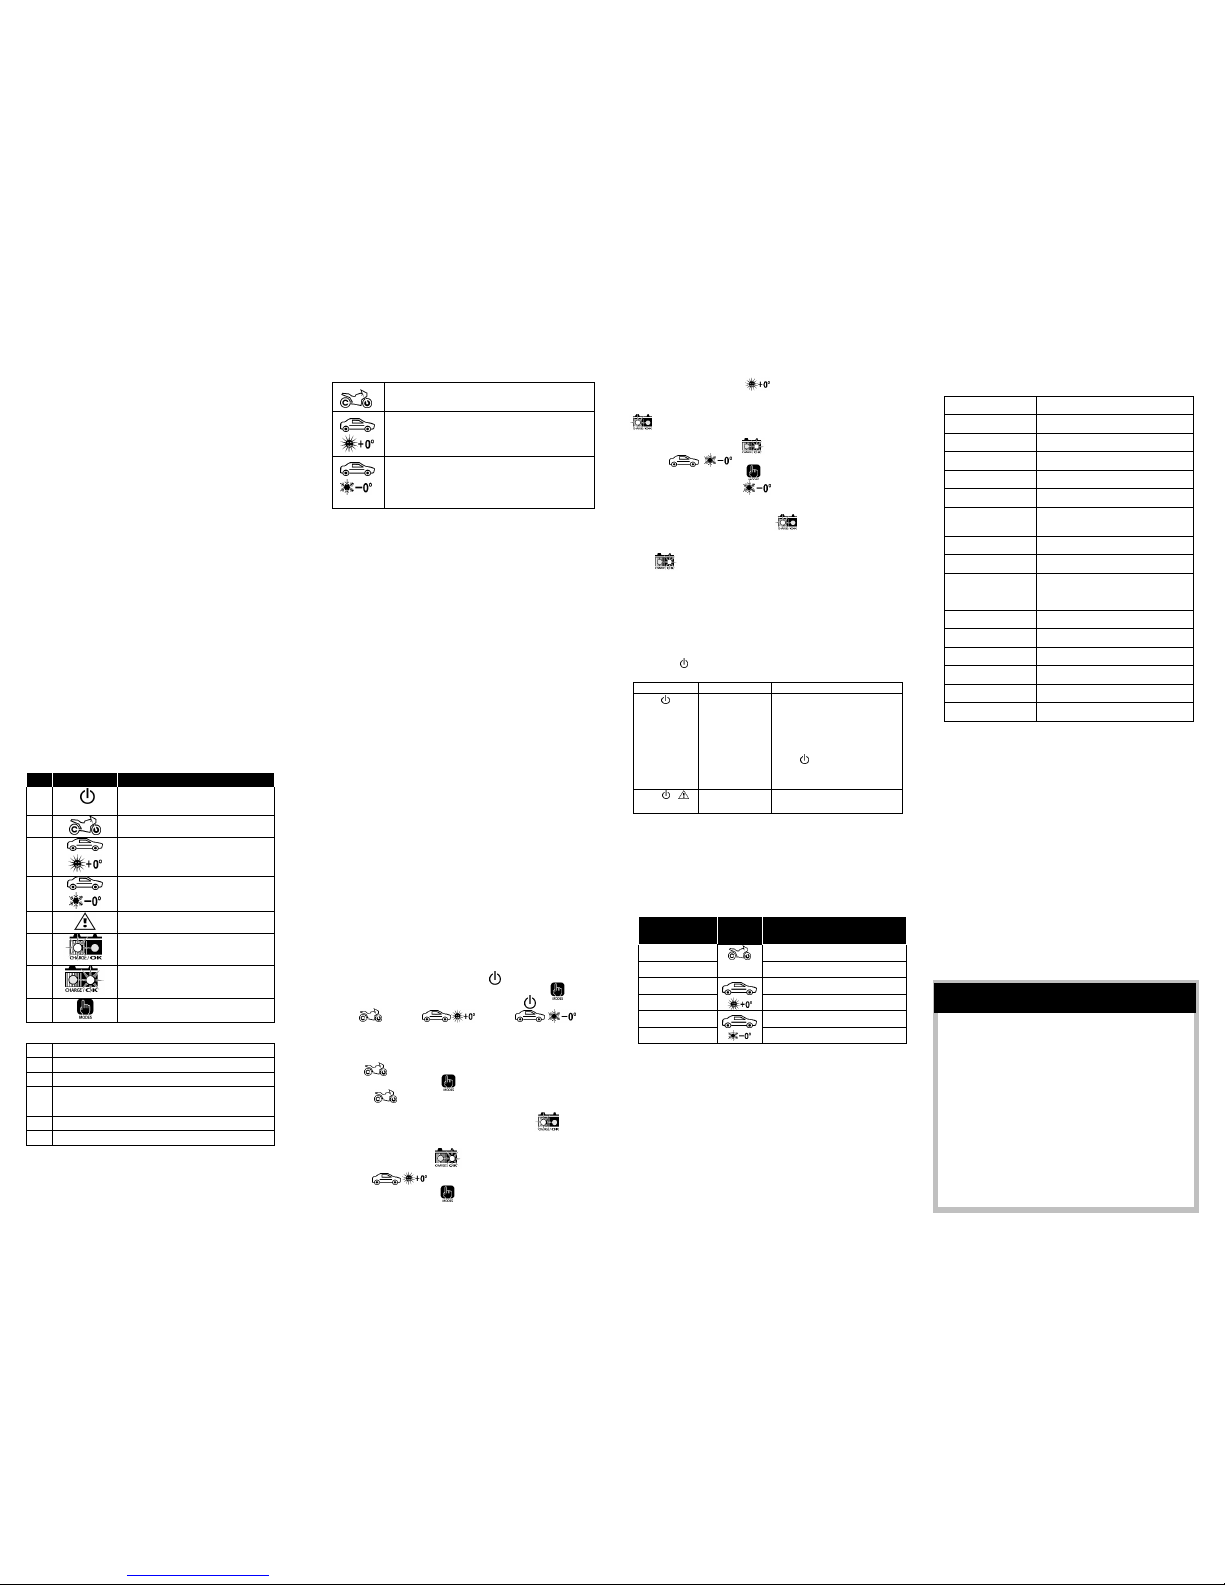
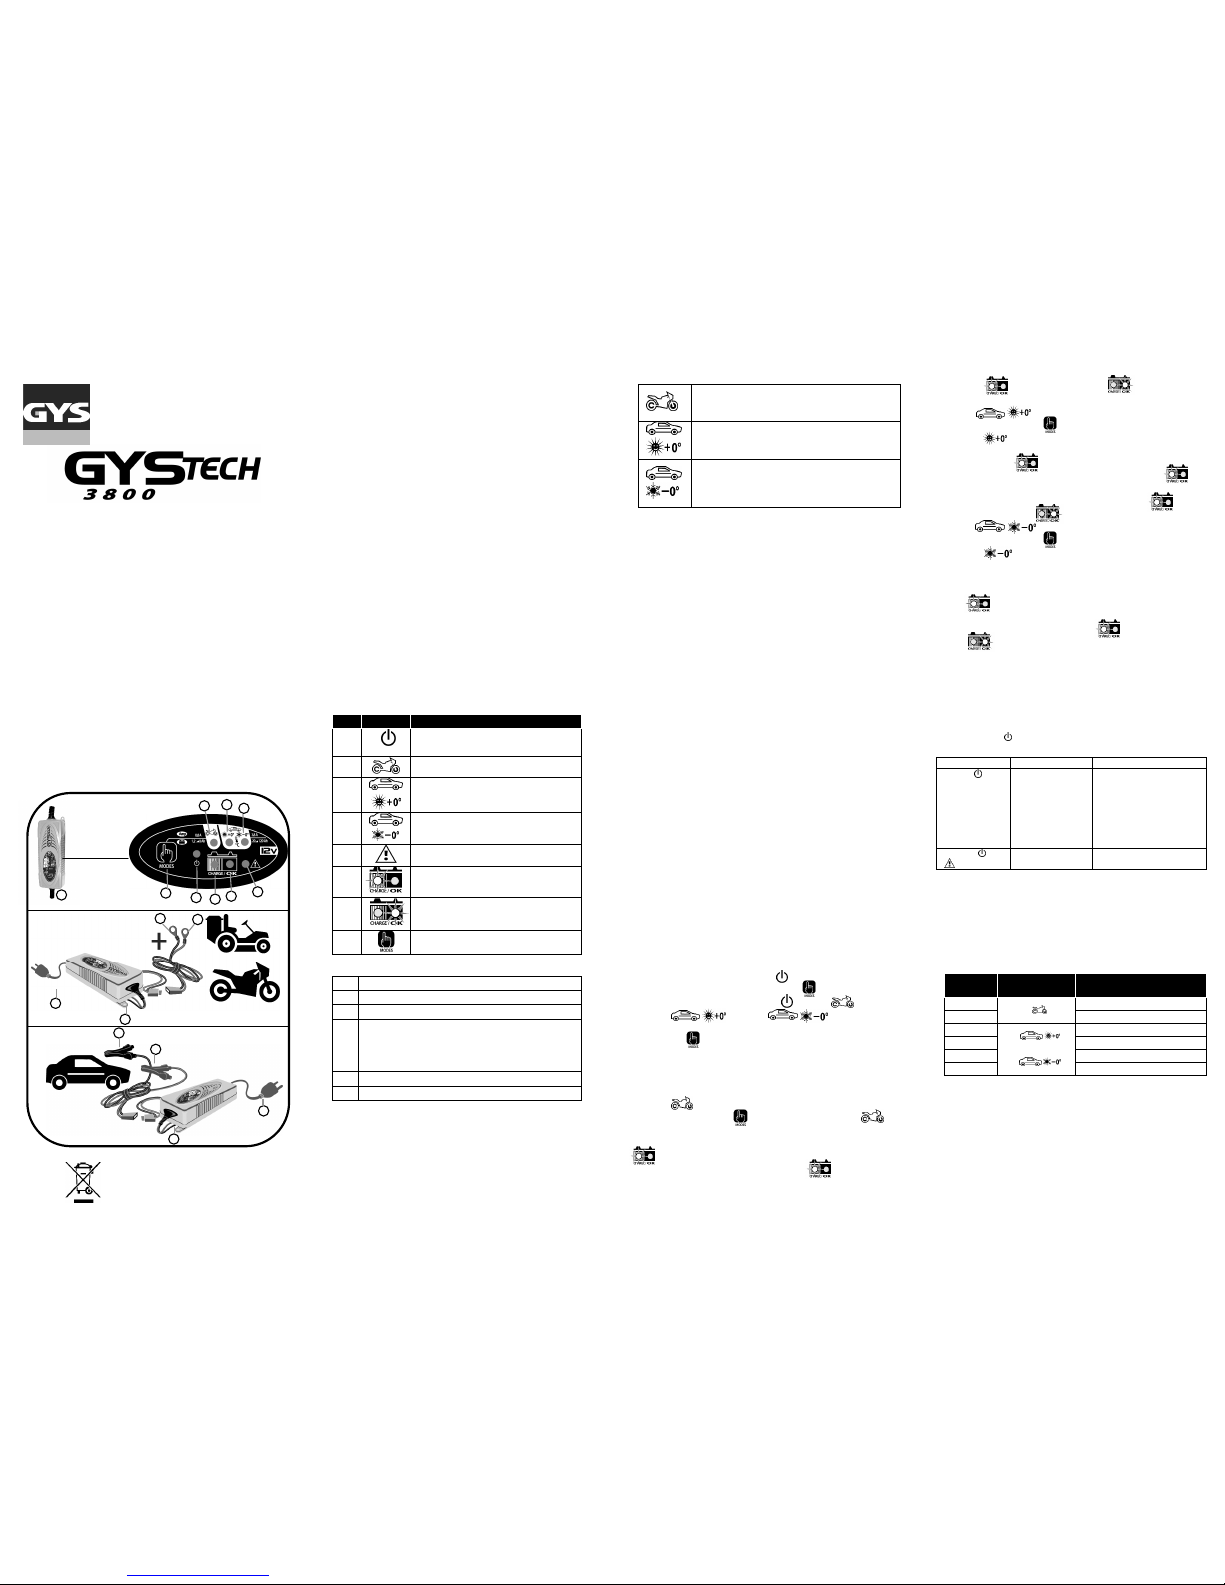
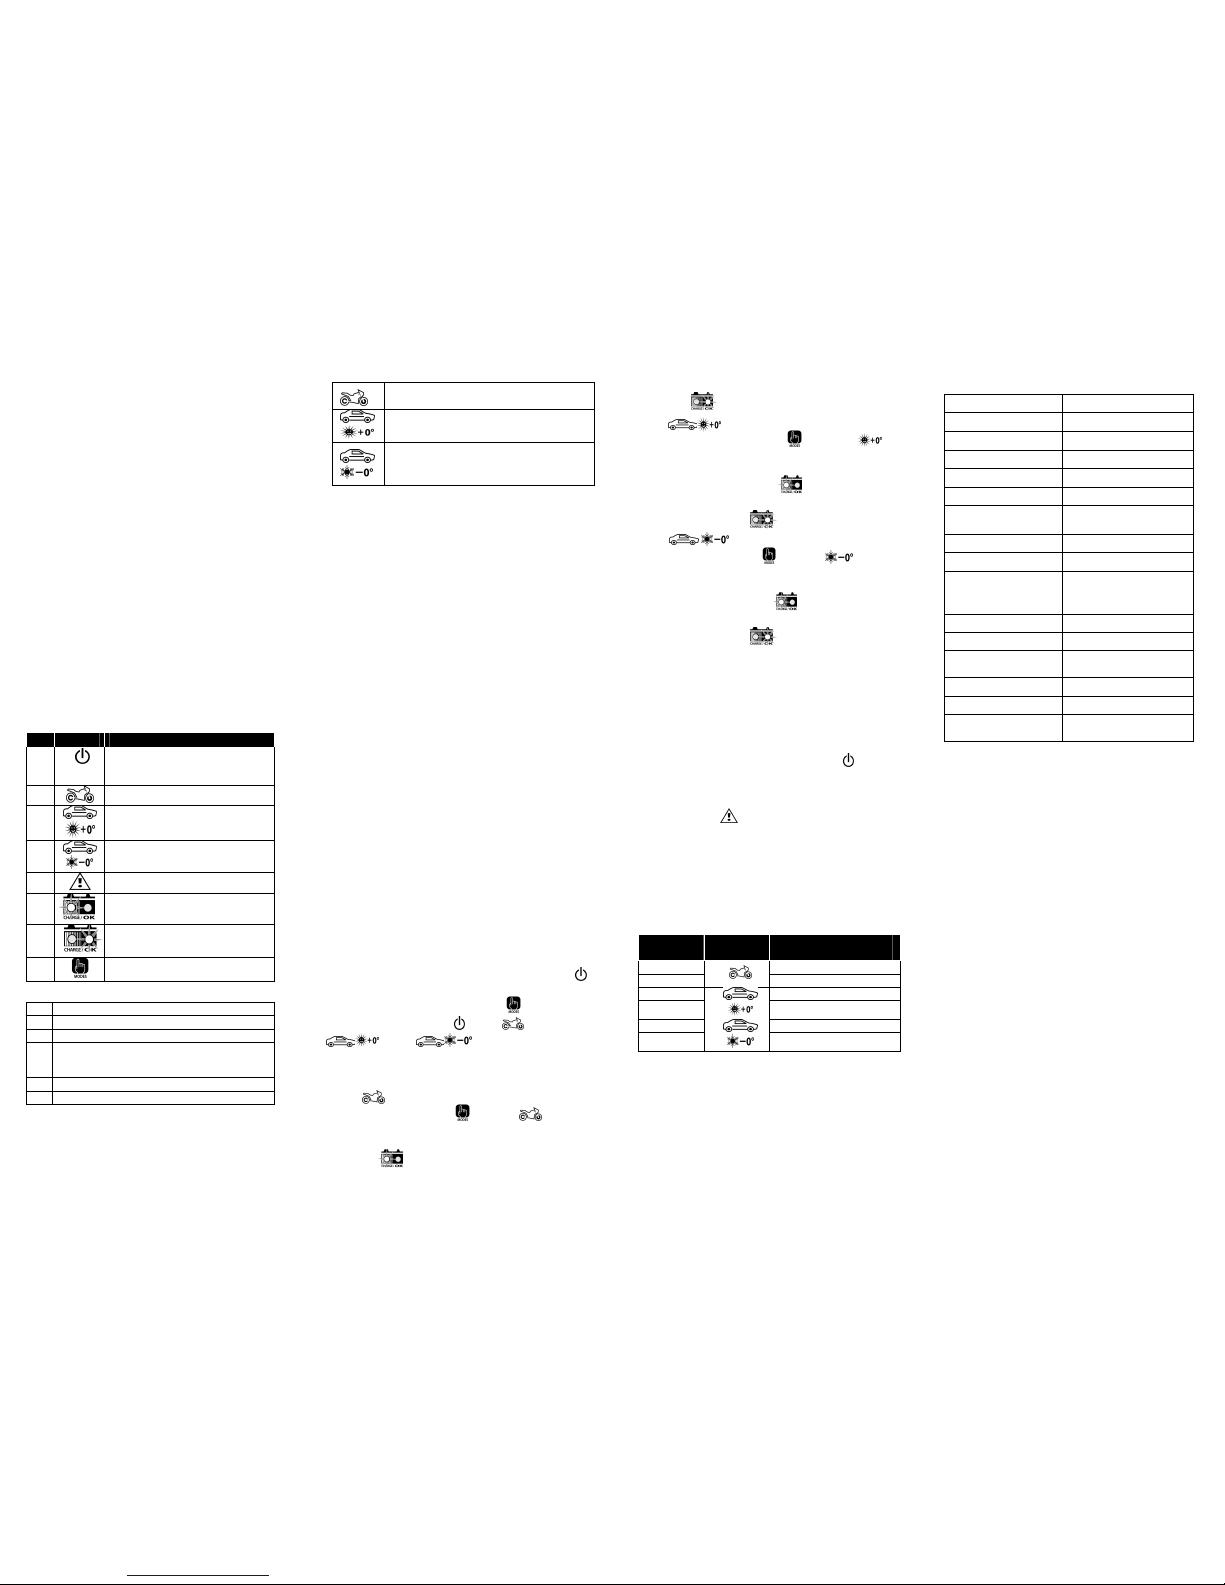
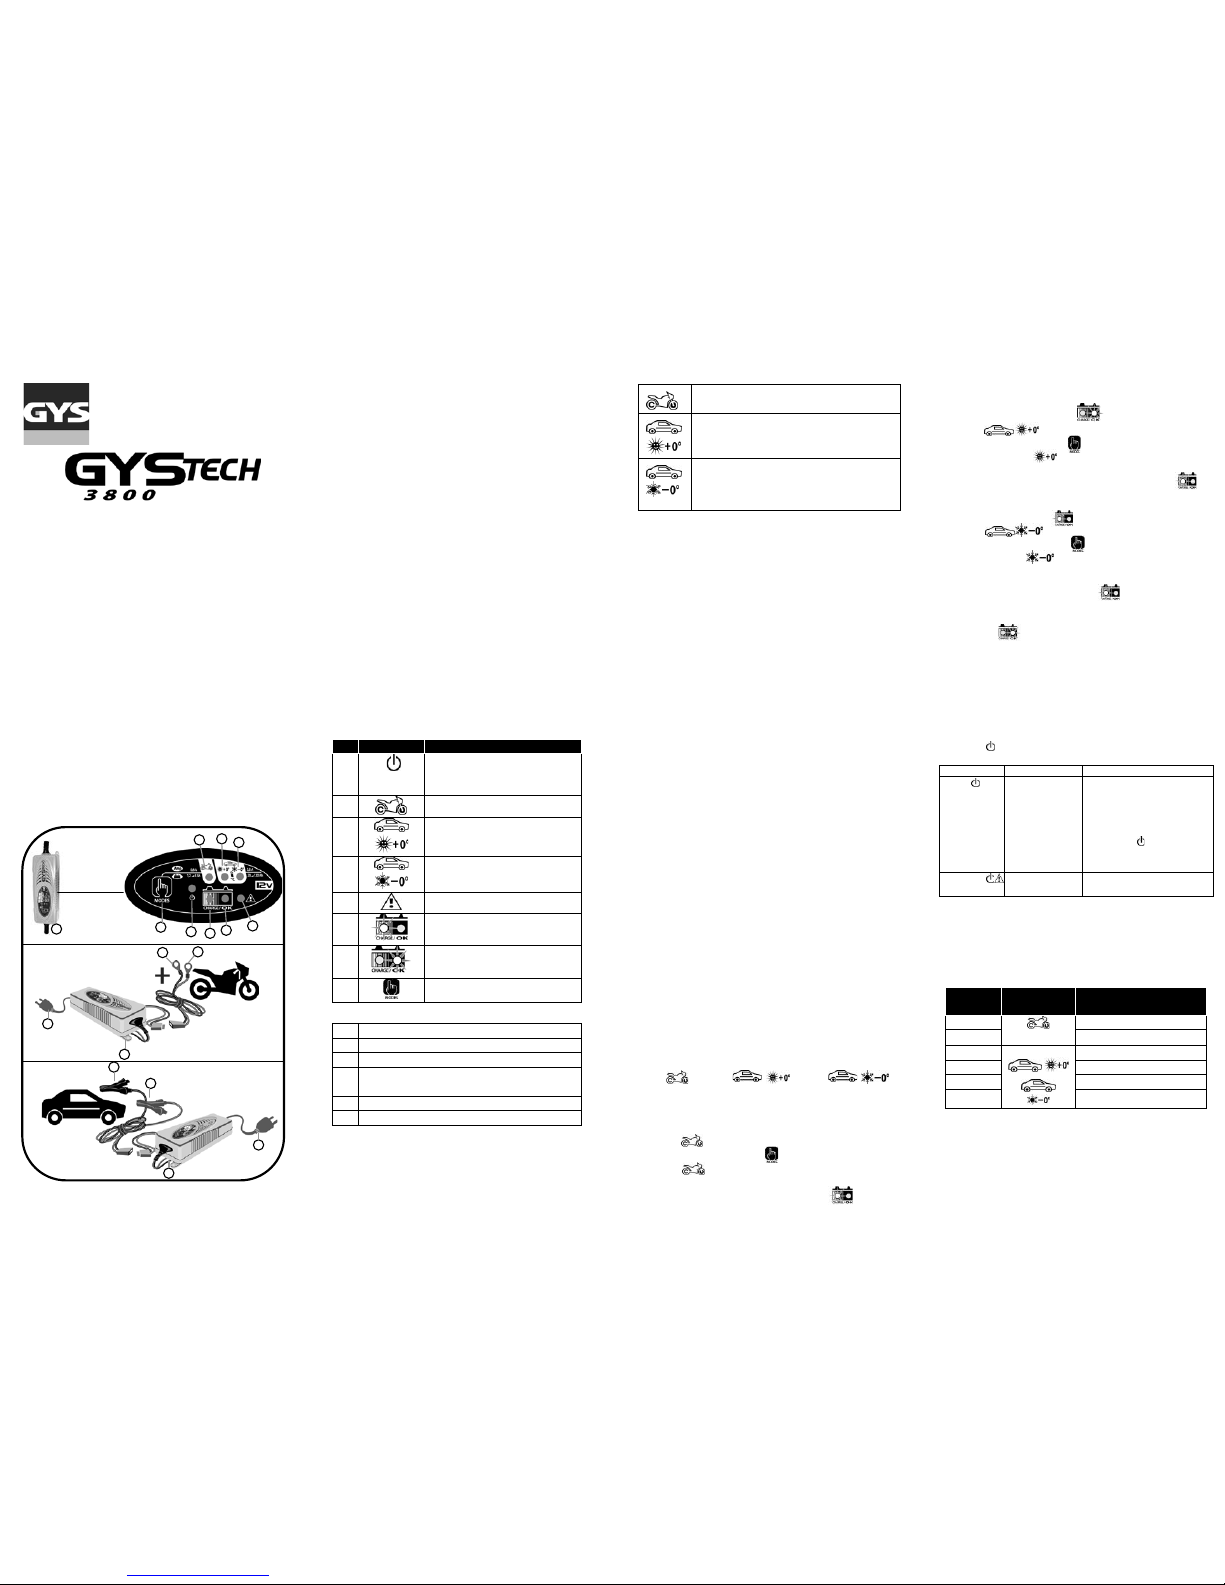
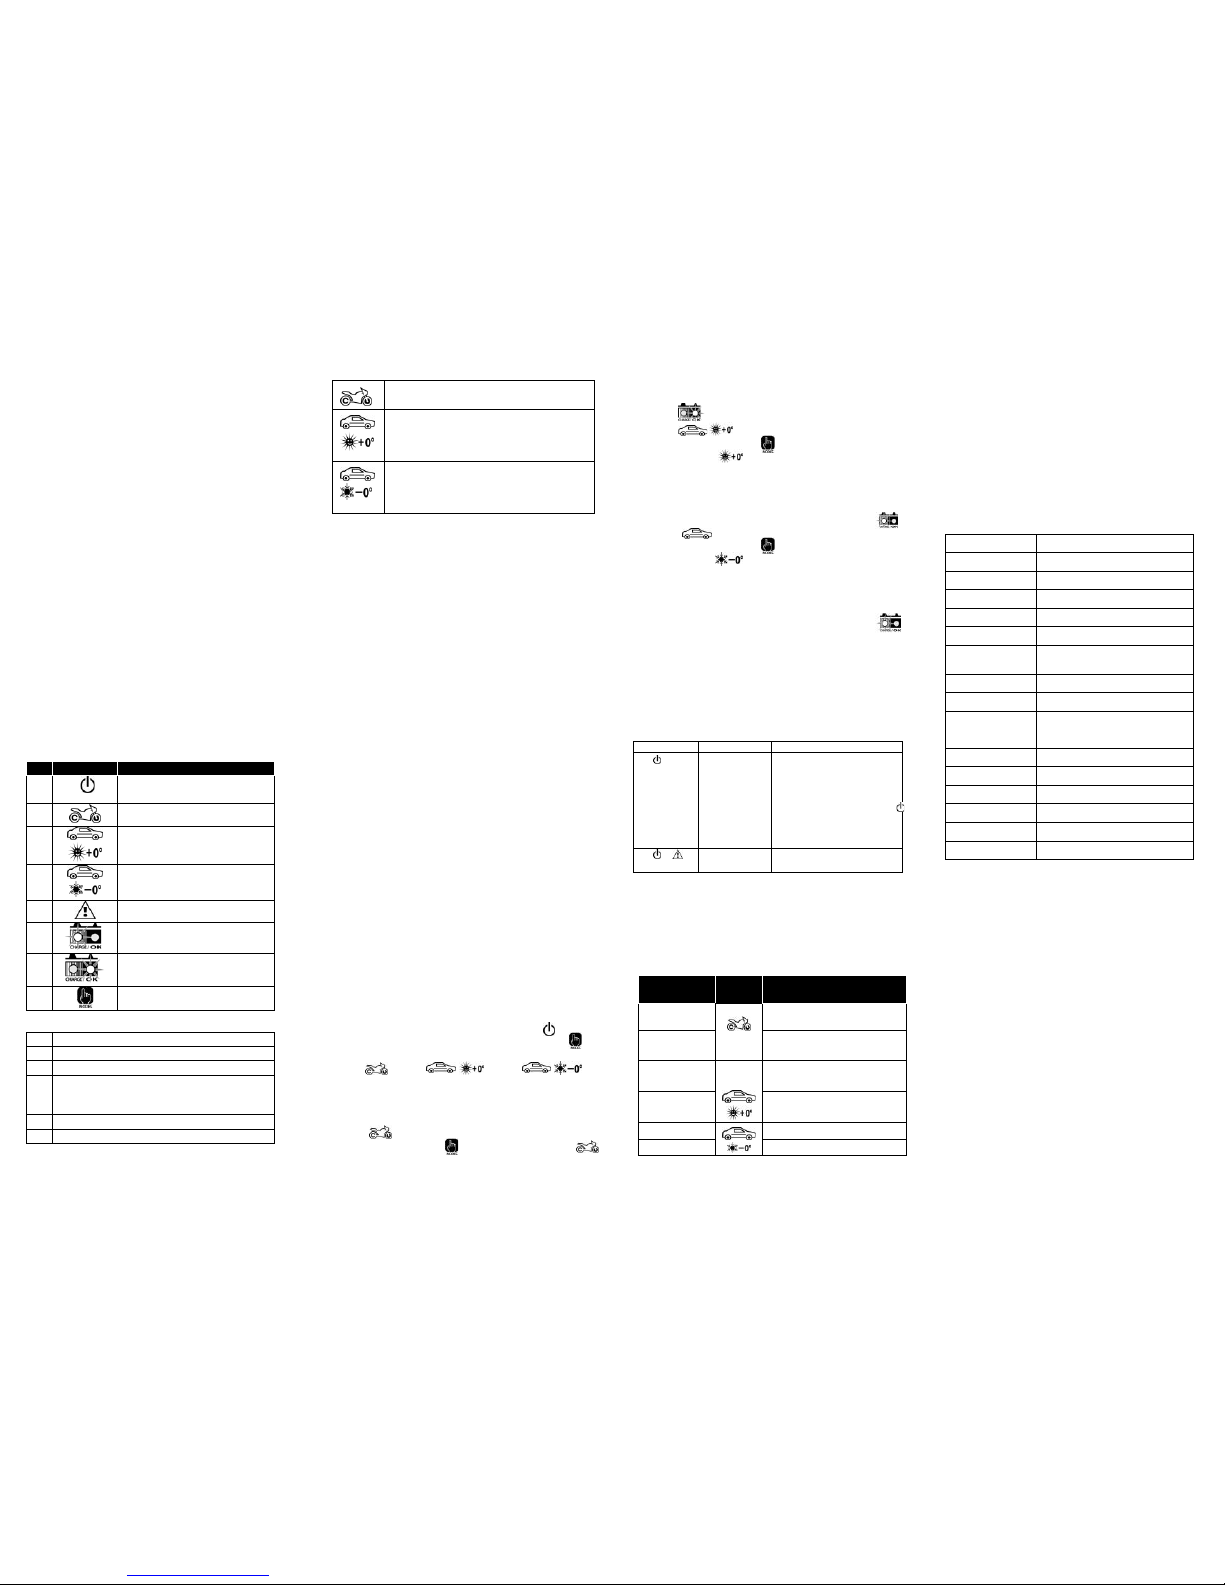
a) Indicación:
N° State Description
1 Indicador de funcionamiento
Se apaga durante el paso del modo 1 al
modo 3
2 “Modo 1” (14.4V/0. A)
3
“Modo 2” (14.4V/3. A )
4
“Modo 3” (14.7V/3. A )
5
"Inversion de polaridad"
6
“Carga en curso”
7
“Carga completa”
Selección del modo
b) Descripción de los componentes
9 Cargador
10 Orificio de fijación
11 Cable de alimentación con enchufe
12
13
Cable de conexión fija para motos:
- Terminal "+" (rojo) con guardacabo
- Terminal "-" (negro) con guardacabo
14 Pinza de carga terminal "+"
15 Pinza de carga terminal "-"
T
IPOS DE BATERÍAS Y REGLAJES
Las indicaciones siguientes son indicativas. Para más precisiones,
lea las instrucciones del fabricante de su batería.
Modo 14.4V/0.8A
Este modo es adaptado a las baterías < 14Ah
Modo 14.4V/3.8A
Este modo es adaptado a las baterías al líquido o sin
mantenimiento y para la mayoría de las baterías GEL.
Modo 14. V/3.8A
Este modo es recomendado por la mayoría de las baterías
AGM y de todos los otros tipos de baterías cuando la
temperatura ambiente está debajo de 0°C.
C
ARGA
Carga de una batería permanentemente colocada en un vehículo
a- Antes de conectar o disconectar, el cargador debe ser
desenchufado de la red.
b- Verificar la polaridad de los terminales de la batería. El terminal
positivo "+" comúnmente tiene un diametro más grande que lo del
terminal negativo "-".
c- Identificar el terminal de la batería conectado al chasis (masa).
Es comúnmente el terminal negativo.
d- Cargar una batería con la masa al terminal negativo:
• Verificar que el cable negro (conectado al terminal "-") no
tiene ningún contacto con una tubería combustible o con la
batería.
• Conectar el cable rojo ("+") al terminal positivo de la batería
("+") y el cable negro ("-") al chasis del vehículo.
e- Cargar una batería con la masa al terminal positivo :
• Verificar que el cable rojo (conectado al terminal "+") no tiene
ningún contacto con una tubería combustible o con la batería.
• Conectar el cable negro ("-") al terminal negativo de la batería
("-") y el cable rojo ("+") al chasis del vehículo.
Carga de una batería no conectada a un vehículo
a- Antes de conectar o disconectar, el cargador debe ser
desenchufado de la red.
b- Conectar el cable rojo ("+") al terminal positivo de la batería
("+") y el cable negro ("-") al terminal negativo de la batería ("-").
Conexión permanente gracias a los cables terminales (accesorios
12 y 13)
Cuidado : Nunca conectar los cables terminales al cargador durante
el montaje.
a- Conectar el cable terminal rojo al terminal positivo de la batería.
b- Conectar el cable terminal negro al terminal negativo de la batería.
c- Fijar los cables al chasis del vehículo. Cuidado : los cables no
deben ser pinzados o en contacto con superficies que calientan o
cortantes.
d- Sólo es despues de este montaje que podrá conectar el cable del
cargador.
Despues la carga, disconectar el cargador de batería de la red y
quitar la conexión del chasis y por fin la conexión de la batería en
este orden.
S
ELECCIÓN DEL MODO DE CARGA
Despues de la conexión a la red, el indicador de funcionamiento
se encende . Conectar el cargador a la batería.
Seleccionar el modo de carga gracias al botón . Los modos
aparecen en el orden siguiente : , modo 1 , modo 2
, modo 3 . En fin de carga, si la batería
todavia está conectada, el cargador hará una carga de
mantenimiento aun si el operador cambia de modo. Esta protección
evita de dañar la batería.
MODE
1
(14.4/0.8A)
Elegir el modo 1 gracias al botón .El indicador se encende.
Si ningún modo siguiente es activado, el sistema electrónico inicia la
cargaa automaticamente (0. A+/- 10%). La carga está indicada por
el indicador . Durante toda la carga, este indicador queda
encendido (14.4V+/-0.25V). El fin de carga es indicada por el
indicador "OK" .
MODE
2
(14.4/3.8A)
Elegir el modo 2 gracias al botón .El indicador se
encende. Si ningún modo siguiente es activado, el sistema
electrónico inicia la cargaa automaticamente (3. A+/- 10%). La
carga está indicada por el indicador . Durante toda la carga,
este indicador queda encendido (14.4V+/-0.25V). El fin de carga es
indicada por el indicador "OK" .
MODE
3
(14. /3.8A)
Elegir el modo 1 gracias al botón .El indicador se
encende. Si ningún modo siguiente es activado, el sistema
electrónico inicia la cargaa automaticamente (3. A+/- 10%). La
carga está indicada por el indicador . Durante toda la carga,
este indicador queda encendido (14.7V+/-0.25V). El fin de carga es
indicada por el indicador "OK" .
R
ECUPERACIÓN DE BATERÍA
Antes de iniciar la carga, GYSTECH 3 00 analisa la tensión de la
batería. Si la tensión está debajo de 7.5V, hace una carga pulsada
con un corriente muy pequeño para "recuperar" la batería hasta
llegar a 10.5V+/-0.5V.
P
ROTECCIONES
En caso de corto circuito, circuito abierto, inversión de polaridad o
baterí con una tensión debajo de 7.5V+/-0.5V, el cargador
automaticamente se pone en protección : el indicador se
encende. Para evitar un daño de la batería, el sistema se queda en
esta posición hasta su intervención. En caso de inversión de
polaridad, además del indicador de funcionamiento, el indicador de
inversión de polaridad también se enciende.
P
ROTECCIÓN TÉRMICA
Gystech 3 00 es protegido por un sensor térmico. Durante toda la
carga, si el cargador deviene demasiado caliente, la potencia es
automaticamente reducida para preservarlo de todo daño. El
cargador bascula así en carga de mantenimiento (floating). Cuando
la temperatura ambiente es acceptable, GYSTECH 3 00 asegura de
nuevo su carga normal.
T
IEMPO DE CARGA
Capacidad de
batería (Ah) Modo Tiempo de carga de 20% a
80% (horas)
2 Carga 1H30 + mantenimiento
Carga 7H+ mantenimiento
20 Carga 3H30 + mantenimiento
60
Carga 10H+ mantenimiento
100 Mantenimiento
120
Mantenimiento
D
ECLARACIÓN DE CONFORMIDAD
La empresa GYS atesta que los cargadores descritos en estas
instrucciones de uso está fabricado en conformidad con las
directivas europeas siguientes :
- Directiva Baja Tensión : 2006/95/EC - 12/12/2006 (amendada
par 93/6 /EEC)
- Directiva CEM : 2004/10 /EC - 15/12/2004 (amendada par
92/31/EEC, 93/6 /EEC,91/263/EEC,93/97/EEC),
Es para eso en conformidad con las normas harmonizadas :
EN60335-1 - EN60335-2-29 – EN55014-1 - EN55014-2 – EN61000-
3-2- EN61000-3-3 – EN62233.
T
ECHNISCHE
D
ATEN
/
T
ECHNICAL
D
ATA
Netzspannung
Tensión de entrada AC
220-240VAC, 50/60Hz
Ausgangsspannung
Tensión de salida
Nominal/De vacio : 12V
Eingangsstrom
Corriente de entrada
0.6A RMS max
Wirkungsgrad
Rendimiento
75%
Ladespannung
Tensión de carga
14.4V±0.25V or 14.7V±0.25V
Ladestrom
Corriente de carga
3. A±10% or 0. A±10%
Erhaltungsladung
Consumo baterías al descanso
1 mA
Welligkeit
Ondulación
Max 150mV
Zugelassene
Betriebstemperatur
Temperatura ambi
ente
-20°C a 50°C
Batteriearten
Tipo de baterías
Bleibatterie 12V (mit Gel
-
Elektrolyt
,
wartungsfrei, AGM, Gel)
Batería al plomo 12V (electrólito
líquido, sin mantenimiento, AGM,
gel
Batterie Kapazität
Capacidad de batería
1.2-120Ah
Abmessungen (lxPxH)
Dimensiones (Lxlxa)
172x62x42mm
Schutzklasse
Indicio de protecció
IP65
(Geschützt vor Staub und
Spritzwasser) /protegido contra el
polvo y agua)
Gewicht
Peso
0.4 6kg
Laustärke
Nivel de ruido
<50 dB (
aus einer Entfernung von
50cm)/ (a los 50cm)
<50 d
B (Tested from a distance of
Ladekennlinie
Curve de carga
Modi Auswahl abhängig, siehe Text
/ Según las selecciones, ver el
texto

1
2
3
4
BETRIEBSANLEITUNG
INSTRUCCIONES DE USO
INHALTSVERZEICHNIS
I
NDICE
Für Ihre Sicherheit
2
Para su seguri a
.......
5
Allgemeine
Beschreibung..............
2
Descripción general
....
5
Sicherheitshinweise
2
Seguri a
...................
5
Ausstattungs
merkmale ...................
2
In icaciones y
accesorios
..................
6
Batterie Typ &
Einstellungen..............
3
Tipos e baterías y
reglajes
......................
6
La ung .......................
3
Carga
.........................
7
La emo us
einstellen....................
3
Selección el mo o
e carga
.....................
6
Batterie
Regenerierung .............
4
Recuperación e
batería
.......................
7
Schutz ........................
4
Protecciones
..............
7
Überhitzungsschutz ....
4
Protección térmica
.....
7
La ezeit .....................
4
Tiempo e carga
........
7
Konformitäts-
erklärung....................
4
Declaración e
conformi a
...............
7
Technische Daten
8
Datos tecnicos
............
8
Wir gratulieren Ihnen zum Kauf dieses GYS Ladegeräts. Bitte lesen
Sie aufmerksam die folgende Betriebsanleitung.
A
LLGEMEINE
B
ESCHREIBUNG
Das GYSTECH 3 00 lädt Starter-Batterien (Blei, Calcium, Silber, Gel,
Optima maXXima). Das GYSTECH 3 00 lädt 12V Batterien von 1.2 Ah
bis 60Ah und ermöglicht Erhaltungsladungen bis 120 Ah. Das
Ladegerät erkennt eine Batterie, deren Spannung größer ist als 7. V.
S
ICHERHEITSHINWEISE
▪Niemals für andere Zwecke einsetzen.
▪Keine Anwendung bei nichtaufladbaren Batterien.
▪Absicherungshinweise auf dem Gerät unbedingt beachten.
▪Keine Anwendung bei Netzkabelschaden. Instandsetzung nur
durch Fachpersonal oder durch den Hersteller.
▪Gerät nicht abdecken
▪Gerät nur in gut gelüfteten Räumen benutzen
▪Entsorgung nur als Sondermüll - Elektroschrott, nicht als
Hausmüll.
AUSSTATTUNG
a) Symbole
N° Symbol Erklärung
1 Netzspannungsanzeige
Die Anzeige erlischt sobald Mode 1 – 3
gewählt wurde
2 “Mode1” (14.4V/0. A)
3
“Mode2” (14.4V/3. A )
4
“Mode3” (14.7V/3. A )
5 “falsche Polarität“
6
“Ladeanzeige”
7
“Vollladung erreicht”
“Mode”- Umschalter
b) Lieferumfang
9 Ladegerät
10 Befestigungslaschen
11 Netzanschlussleitung mit Stecker
12
13
Motorradadapter:
- “+” Pol mit Ringkabelschuh (rot)
- “-” Pol mit Ringkabelschuh (black)
14 “+” Pol mit Ladeklemme (rot)
15 “-” Pol mit Ladeklemme (schwarz)
B
ATTERIE
T
YP
&
E
INSTELLUNGEN
Die folgenden Einstellungen sind lediglich Empfehlungen für den
optimalen Einsatz. Nähere Details bei Bedarf vom Hersteller.
Mode 14.4V/0.8A
In diesem Modus werden Batterien < 14 Ah geladen.
Mode 14.4V/3.8A
Zum Laden von Flüssigbatterien, wartungsfreien
Batterien und den meisten Gel- Batterien.
Mode 14. V/3.8A
Zum Laden von verschiedenen AGM- Batterien und
empfohlen bei Temperaturen unter 0 C.
B
EDIENUNGSHINWEISE
Ladung eingebauter Starterbatterien
a- Bevor sie die Batteriezangen an- oder abklemmen, trennen Sie
das Gerät vom Netz.
b- Prüfen Sie die Polarität der Batterieanschlüsse. Der Pluspol hat
meist größere Abmessungen als der Minuspol.
c- Suchen Sie den Pol, welcher mit der Karosse verbunden ist.
Normalerweise ist das der Minuspol.
d- Ladung von Batterien mit geerdetem Minuspol:
• Stellen Sie sicher, dass das schwarze Kabel keinen Kontakt zur
Batterie oder Benzinleitung hat.
• Verbinden sie das rote Kabel mit dem Pluspol („+“) der
Batterie und das schwarze Kabel („-“) mit einer unlackierten,
blanken Stelle an der Karosserie.
e- Ladung von Batterien, mit geerdetem Pluspol
:
• Stellen Sie sicher, dass das rote Kabel keinen Kontakt zur
Batterie oder der Benzinleitung hat.
• Verbinden Sie das schwarze Kabel mit dem Minuspol („-“) der
Batterie und das rote Kabel („+“) mit einer unlackierten,
blanken Stelle an der Karosserie.
Ladung ausgebauter Batterien
a- Bevor Sie die Batteriezangen an- oder abklemmen, trennen Sie
das Gerät vom Netz.
b- Verbinden sie das rote Kabel („+“) mit dem Pluspol („+“) der
Batterie und das schwarze Kabel („-“) mit dem Minuspol („-“) der
Batterie.
Dauerhafter Anschluss des Adapterkabels mit Ringkabelschuhen
(Zubehör Nr. 12 & 13)
Warnung: Während der Montage soll das Gerät nicht mit dem
Adapterkabel verbunden werden!
a- Verbinden sie das rote Kabel („+“) mit dem Pluspol („+“) der
Batterie
b- Verbinden sie das schwarze Kabel („-“) mit dem Minuspol („-“)
der Batterie
c- Fixieren sie das Kabel an einer gut zugänglichen Stelle der
Karosse und stellen sie sicher, dass es nicht mit heißen Teilen oder
scharfen Kanten in Berührung kommt.
d- Anschließend nutzen die Kabelsteckverbindung.
Nach erfolgter Ladung trennen Sie das Ladegerät vom Netz.
Zuerst die Klemme von der Karosserie und dann die Klemme an der
Batterie entfernen. Bitte beachten Sie unbedingt die Reihenfolge.
LADEMODUS EINSTELLEN
Nach Einstecken des Netzkabels in die Steckdose leuchtet die
Netzspannungsanzeige .
Verbinden Sie das Ladegerät mit der Batterie.
Durch wiederholtes Drücken des Mode Umschalter
werden die verschiedenen Lademodi in folgender Reihenfolge
angezeigt: , MODE 1 , , MODE 2 ,
MODE 3
Wenn Sie auf drücken, wechselt automatisch der Lademodus.
Nach Vollladung, wenn die Batterie nicht vom Gerät getrennt wird,
erfolgt der Wechsel auf Erhaltungsladung automatisch, auch wenn
der Benutzer den Lademodus ändert. Damit wird eine Beschädigung
der Batterie verhindert.
MODE
1
(14.4/0.8A)
Drücken Sie den Knopf um Mode 1 zu wählen. LED leuchtet.
Wenn keine weiteren Eistellungen erfolgen startet die Elektronik
den Ladevorgang automatisch. Die LED- Anzeige zeigt folgendes
und die Ladung startet mit 0. A ±10%. Solange der
Ladevorgang läuft, leuchtet die Ladeanzeige bis zur
Vollladung der Batterie (14.4V±0.25V). Nach Vollendung der
Ladung leuchtet folgende LED . .
MODE
2
(14.4/3.8A)
Drücken Sie den Knopf um Mode 2 zu wählen. LED
leuchtet. Wenn keine weiteren Eistellungen erfolgen startet die
Elektronik den Ladevorgang automatisch. Die LED- Anzeige zeigt
folgendes und die Ladung startet mit 3. A ±10%. Solange
der Ladevorgang läuft, leuchtet die Ladeanzeige bis zur Vollladung
der Batterie (14.4V±0.25V). Nach Vollendung der Ladung leuchtet
folgende LED . .
MODE
3
(14. /3.8A)
Drücken Sie den Knopf um Mode 2 zu wählen. Wenn keine
weiteren Eistellungen erfolgen startet die Elektronik den
Ladevorgang automatisch. Die LED- Anzeige zeigt folgendes
und die Ladung startet mit 3. A ±10%. Solange der
Ladevorgang läuft, leuchtet die Ladeanzeige bis zur
Vollladung der Batterie (14.4V±0.25V). Nach Vollendung der
Ladung leuchtet folgende LED.
BATTERYREGENERIERUNG
Am Beginn der Ladung prüft das GYSTEC 3 00 automatisch die
Spannung der Batterie. Bei Spannungen unter7,5 Volt beginnt eine
Pulsladung mit geringer Stromstärke um die Batterie auf eine
Spannung von 10,5 V ±0.5V zu bringen.
S
CHUTZ
Im Falle eines Kurzschlusses, unterbrochenen Lade- Stromkreises,
Spannungen unter 7.5V±0.5, schaltet das Ladegerät ab und setzt
sich automatisch auf die Starteinstellungen zurück um eine
Beschädigung des Ladegerätes und der Batterie auszuschließen. Die
Netzkontrollleuchte bleibt an bis eine neue Eingabe durch den
Benutzer erfolgt. Zusätzlich leuchtet die Fehleranzeige um
Verpolung oder andere Fehler anzuzeigen.
Ü
BERHITZUNGSSCHUTZ
Gystech 3 00 ist durch einen Überhitzungsschutz geschützt.
Während des Ladeprozesses wird die Ausgangsleistung reduziert,
wenn das Gerät überhitzt, um es vor Beschädigung zu schützen.
Das Ladegerät erhöht die Ausgangsleistung automatisch, wenn die
Umgebungstemperatur sich normalisiert.
LADEZEIT
Batterie-
größe (Ah) Modus Ladezeit von 20% bis 80%
Ladung (Stunden)
2 Ladung 1 H 30 + Erhaltungsladung
Ladung 7 H + Erhaltungsladung
20 Ladung 3 H 30 + Erhaltungsladung
60
Ladung 10H + Erhaltungsladung
100 Erhaltungsladung
120
Erhaltungsladung
KONFORMITÄTSERKLÄRUNG
GYS erklärt, dass das Batterieladegerät Gystech 750 richtlinienkonform mit
folgenden europäischen Bestimmungen hergestellt wurde:
- Niederspannungs- Richtlinie : 2006/95/EC - 12/12/2006 (ersetzt durch:
93/6 /EEC)
- EMV- Richtlinie: 2004/10 /EC - 15/12/2004 (ersetzt durch: 92/31/EEC,
93/6 /EEC, 91/263/EEC, 93/97/EEC).
Dieses Gerät stimmt daher mit den erweiterten Normen überein:
- EN60335-1 - EN60335-2-29 – EN55014-1 - EN55014-2 – EN61000-3-2 -
EN61000-3-3 – EN62233.
11
11
13
12
2
15
14
10
1
3
4
6
7
5
8
10
9
010811
Dieses
Produkt
wird als
Elektrogerät
entsorgt. Bitte
nicht zusammen mit Hausmüll entsorgen
Este aparato es objeto de una recolección selectiva.
No debe ser tirado en en cubo doméstico.

5 6 7
ДЛЯ ВАШЕЙ БЕЗОПАСНОСТИ
Данный документ содержит сведения по эксплуатации вашего
аппарата, атакже многочисленные указания по технике
безопасности. Пожалуйста, перед использованием изучите
внимательно инструкцию и сохраните ее для дальнейших
консультаций.
ОБЩИЕ СВЕДЕНИЯ
GYSTECH 3800 был разработан для зарядки без присмотра
свинцовых аккумуляторов используемых для мотоциклов,
автомобилей идругого автотранспорта. Аккумуляторы могут
быть различного типа, например: на жидком электролите или
GEL иAGM (гелевый электролит). Аппарат рассчитан на зарядку
аккумуляторов на 12Вот 1.2 Aм/чдо 60 Aм/ч, атакже для
подпитки аккумуляторов на 12Вот 60 до 20 Aм/ч. Зарядное
устройство определило аккумулятор с напряжением
превышающим 7.8 B.
МЕРЫ ПРЕДОСТОРОЖНОСТИ
▪Не пытайтесь зарядить батарейки или аккумуляторы не
предназначенные для перезарядки.
▪Если сетевой шнур поврежден, он должен быть заменен
производителем, его ремонтным отделом или
квалифицированным специалистом.
▪Соблюдайте калибр предохранителя указанный на аппарате
▪Не накрывайте аппарат во время использования
▪Зарядка должна осуществляться взащищенном, хорошо
проветриваемом или специально оборудованном помещении.
▪Аппарат является объектом специальной утилизации. Не
выбрасывать вбытовой мусоросборник.
СИМВОЛЫ ИАКСЕССУАРЫ
a) Символы:
N°
Указатель
Описание
1
Аппарат включен в сеть
Выключается при переходе из
режима 1 в режим 3
2
“Режим 1” (14.4В/0.8A)
3
“ Режим 2” (14.4В/3.8A )
4
“ Режим 3” (14.7В/3.8A )
5
Неправильная полярность
6
Идет зарядка
7
Зарядка завершена
8
Кнопка для выбора
b) Описание аксессуаров
9
Зарядное усторойство
10
Отверстие для закрепления
11
Сетевой шнур со штепселем
12
13
Кабель для постоянного подсоединения для мотоцикла
клемма “+” (красный) с контактом
клемма “-” (черный) с контактом
14
Зажим зарядки клеммы “+”
15
Зажим зарядки клеммы "-"
ТИПЫ АККУМУЛЯТОРОВ И НАСТРОЙКИ
Последующие рекомендации ориентировачные. Для более
правильного использования следуйте указаниям производителя
аккумулятора.
Режим 14.4В/0.8A
Данный режим предназначен для аккумуляторов
<14 A/час
Режим 14.4В/3.8A
Данный режим предназначен для жидких аккуму-
ляторов или большинства гелевых.
Режим 14.7В/3.8A
Данный режим рекомендован для большинства
аккумуляторов AGM идля аккумуляторов всех
других типов, когда температура окружающей
среды не превышает 0°C.
ЗАРЯДКА
Зарядка аккумулятора, установленного на автомобиле:
a- Перед каждым подключением/отключеним зарядник должен
быть отключен от электрической сети.
b- проверьте полярность клемм аккумулятора. Положительная
клемма (“+”) чаще всего более широкая чем отрицательная
клемма.
c- Определите клемму аккумулятора подсединенную к кузову
автомобиля (масса). Обычно это отрицательная клемма.
d- Зарядка аккумуляторас массой на отрицательнойклемме:
• Проверьте, что черный кабель (подключенный кклемме
“-”) никак не соприкасается с трубопроводом подачи
топлива или с аккумулятором.
• Подключите красный кабель (“+”) к положительной
клемме аккумулятора (“+”) и черный кабель (“-“) к кузову
автомобиля.
e- Заряжать аккумулятор с заземлением на положительной
клемме:
• Проверьте, что красный кабель (подключенный кклемме
“+”) никак не соприкасается с трубопроводом подачи
топливаили с аккумулятором.
• Подключите черный кабель котрицательнойклемме и
красный кабель (“+“) к кузову автомобиля.
Зарядка аккумулятора, не подсоединенного к автомобилю
a- Перед каждым подключением/отключеним зарядник должен
быть отключен от электрической сети
b- Подключите красный кабель (“+”) к положительнойклемме
аккумулятора (“+”) и черный кабель (“-“) к отрицательной
клемме (“-“).
Подсоединие наглухо с помощью кабельных наконечников
(аксессуары n°12 и13). Внимание: не подключайте кабельные
наконечники к заряднику в процессе подготовки.
1- Подключите наконечник красного кабеля к положительной
клемме аккумулятора
2- Подключите наконечник черного кабеля котрицательной
клемме аккумулятора.
3- Зафиксируйте кабели на кузове автомобиля. Внимание: кабели
не должны быть зажаты или касаться горячих или режущих
поверхностей.
4- Только после этой подготовки вы можете подсоединить кабель
зарядного устройства.
После зарядки отключите зарядное устройство от сети,
затем отсоедините кабели от кузова и, наконец, отсоедините
аккумулятор. Действуйте в этом порядке.
ВЫБОР РЕЖИМА ЗАРЯДКИ
После подключенияксети индикатор загорается.
Подсоедините зарядное устройство к аккумулятору.
Для выбора режима зарядки нажмите на кнопку Различные
режимы появляются в следующем порядке: ,
MODE 1 , MODE 2 , MODE 3 .
Если аккумулятор все еще подключен при завершении зарядки,
зарядное утройство продолжит подпитку даже если
пользователь изменит режим. Данная защита помогает
избежать повреждение аккумулятора.
MODE/РЕЖИМ 1(14.4/0.8A)
Выберите режим спомощью кнопки Режим / Mode 1.
Сигнал загорается. Если вы не выбрали режим, то
электронная система автоматически начнет зарядку (0,8A
±10%). Зарядка обозначена индикатором "Charge" .
В течении всей зарядки этот индикатор будет светиться пока
аккумулятор не зарядится (14.4В±0.25В). Конец зарядки
указывается индикатором "OK" .
MODE /РЕЖИМ 2(14.4/3.8A)
Выберете с помощью той же кнопки Режим/Mode 2.
Загорается индикатор . Если вы не выбрали режим, то
электронная система автоматически начнет зарядку (3.8A
±10%). Зарядка указывается индикатором "Зарядка / Charge"
. Втечение всей зарядки эта лампочка будет гореть пока
аккумулятор не зарядится (14.4В±0.25В). Конец зарядки
указывается индикатором "OK" .
MODE /РЕЖИМ 3(14.7/3.8A)
Выберете с помощью кнопки Режим / Mode 3.
Загорается индикатор . Если вы не выбрали режим, то
электронная система автоматически начнет зарядку (3.8A
±10%).
Зарядка указывается индикатором . Втечение всей зарядки
эта лампочка будет гореть пока аккумулятор не зарядится
(14.7В±0.25В). Конец зарядки указывается индикатором
"OK" .
ВОССТАНОВЛЕНИЕ СИЛЬНО РАЗРЯЖЕННОГО АККУМУЛЯТОРА
Перед тем, как начать зарядку GYSTECH 3800 анализирует
аккумуляторное напряжение. Если оно ниже 7,5В, то зарядное
устройство производит пульсирующую зарядку на слабом токе ,
чтобы восстановить аккумулятор до тех пор, пока его
напряжение не достигнет 10,5В±0.5В.
ЗАЩИТЫ
Вслучае короткого замыкания, холостого хода, инверсии
полярности или напряжения аккумулятора ниже 7,5В±0.5,
защита зарядного устройства автоматически срабатывает :
Зажигается индикатор сети.
Во избежании повреждения аккумулятора система останется в
этом положении до вмешательства пользователя.
Вслучае инверсии полярности, вместе с индикатором сети
включается индикатор ошибочной полярности.
ТЕРМОЗАЩИТА
Gystech 3800 контролируется температурным датчиком. Если
зарядное устройство перегревается во время зарядки, то
выдаваемая мощность автоматически снижается с тем, чтобы
предохранить от повреждения. Зарядное устройство переходит
таким образом в режим подпитки (floating). Когда температура
снова становится приемлемой, то Gystech 3800 вернется в
нормальный режим зарядки.
ВРЕМЯ ЗАРЯДКИ
Емкость
A/час Режим
Время зарядки от 20 %
до 80% (час.)
2 Зарядка 1ч. 30 + подпитка
8 Зарядка 7ч. + подпитка
20
Зарядка 3ч. 30 + подпитка
60 Зарядка 10 ч. + подпитка
100
Подпитка
120 Подпитка
ДЕКЛАРАЦИЯ ОСООТВЕТСТВИИ
Компания GYS удостоверяет что зарядное устройство,
описанное вданной инструкции, производится в соответствии с
требованиями следующих европейских директив :
- Директива по низкому напряжению: 73/23/EEC - 19/02/1973
(поправки внесенные директивой 93/68/EEC)
- Директива CEM : 89/336/EEC - 03/05/1989 (поправки внесены
92/31/EEC, 93/68/EEC, 91/263/EEC),
Зарядные устройства соответствуют согласованным нормам:
- EN60335-2-29
- EN55014
ТЕХНИЧЕСКИЕ ХАРАКТЕРИСТИКИ /TECHNISCHE SPECIFICATIES
Напряжение на входе AC
Ingaande spanning AC
220-240VAC, 50/60Hz
Напряжение на выходе
Uitgaande spanning
Nominal: 12V
Ток на входе
Ingang stroom
0.6A RMS max
КПД
Opbrengst
75%
Зарядное напряжение
Laadspanning
14.4V±0.25V or 14.7V±0.25V
Зарядный ток
Laadstroom
3.8A±10% or 0.8A±10%
Потребление
в нерабочем режиме
Accu verbruik in de ruststand
1 mA
Волны
Golving
Max 150mV
Температура среды
Omgevingstemperatuur
-20°C to 50°C
Тип аккумулятора
Accu soort
Свинцовые аккумуляторы 12В
(жидкие, без ухода, AGM,
гелевые)
12V lood accu (vloeibare elektrolyt,
onderhoudsvrij, AGM, gel)
12V Lead-acid batteries (WET,
MF,AGM and GEL)
Емкость аккумулятора
Accu capaciteit
1.2-120Ah
Размеры (lxPxH)
Afmetingen (BxLxH)
172x62x42mm
Степень защиты
Beschermingsklasse
IP65 (Защищен от пыли и
брызг/Dust and Splash proof)
IP65 (Beschermd tegen regen en
vocht
Вес
Gewicht
0.486kg
Уровень шума
Geluidsniveau
<50 dB (замеренный с рассояния
50см)
<50 dB (getest op een afstand van
50cm)
Кривая зарядки
Laadcurve
IUoU

2 3 4
HANDLEIDING
ИНСТРУКЦИЯ ПОЛЬЗОВАНИЯ
SAMENVATTING СОДЕРЖАНИЕ
Voor uw veiligheid.......
2
Безопастность..........
5
Algemene
omschrijving...............
2
Общие
сведения
..................
5
Veiligheid...................
2
П
РЕДОСТОРОЖНОСТИ
5
Aanwijzingen
en accessoires
............
2
Символы и
аксессуары
..............
6
Accu soort
& instellingen
.............
3
Типы аккумуляторов
И настройки
.............
6
Laden ........................
3
Зарядка ...................
7
Laad modi selectie.......
3
Выбор режима
зарядки
....................
6
Herstel
van de accu
................
4
Восстановление
аккумуляторов
.........
7
Beveiligingen..............
4
Защиты ....................
7
Thermische beveiliging.
4
Термозащита ...........
7
Laadtijd .....................
4
Время зарядки .........
7
Certificaat van
overeenstemming
........
4
Декларация о
соответствии
............
7
Technische
bijzonderheden
...........
8
Технические
Данные
....................
8
VOOR UW VEILIGHEID
In deze gebruiksaanwijzing kunt u de aanwijzingen over het
functioneren van uw toestel en de veiligheid voorzorgsmaatregelen
vinden. Dank u voor het aandachtig lezen van dit document vόόr
het eerst gebruik en voor het bewaren voor de herziening.
ALGEMENE OMSCHRIJVING
GYSTECH 3800 is ontwikkeld voor het laden van de meeste lood-
accu's met of zonder onderhoud, die gebruikt worden voor auto's
en veel andere voertuigen. De accu's kunnen van verschillende
types zijn, bijvoorbeeld vloeistof (vloeibaar elektrolyt), GEL
(gegeleerde elektrolyt), AGM (geïmpregneerd elektrolyt). Het was
ontwikkeld voor het laden van de 12V accu's van 1.2 Ah tot 60 Ah,
of voor het behoud van laadniveau van 12V accu's van 60 tot 120
Ah.
VEILIGHEID
▪Probeer niet om niet-oplaadbare batterijen of accu's op te laden.
▪Als de voedingskabel beschadigd is, dient deze vervangen te
worden door de fabrikant, zijn reparatie dienst of een
gekwalificeerde technicus, om gevaar te vermijden.
▪Gebruik de geschikte maat zekering die op de lader aangegeven
staat.
▪Bedek de lader niet tijdens gebruik.
▪Het laden moet worden uitgevoerd in een beschutte plaats met
voldoende ventilatie.
▪Afzonderlijke inzameling vereist. Gooi het niet in het huishoudelijk
afval.AANWIJZINGEN EN ACCESSOIRES
a) Aanwijzing:
N°
Voyant
Algemene omschrijving
1
Standby LED
gaat uit bij omschakelen van modus 1
naar 3
2
“Modus 1” (14.4V/0.8A)
3
“Modus 2” (14.4V/3.8A )
4
“Modus 3” (14.7V/3.8A )
5
Polariteitsfout
6
Aan het laden
7
Einde laden
8
Selectie knop
b) Omschrijving van accessoires
9
Lader
10
Bevestiging gat
11
Voedingskabel met stekker
12
13
Vaste aansluitkabel voor moto
“+” pool (rood) met poolklemmen
“-” pool (zwart) met poolklemmen
14
Laadklem “+”pool
15
Laadklem “-”pool
ACCU SOORT &INSTELLINGEN
De volgende aanbevelingen zijn indicatief. Voor meer informatie
verwijzen wij u naar de instructies van de fabrikant van uw accu.
14.4V/0.8A modus
Deze modus is geschikt voor <14Ah accu’s
14.4V/3.8A modus
Deze modus is geschikt voor de vloeibare of zonder
onderhoud accu’s en voor de meeste GEL accu’s.
14.7V/3.8A modus
Deze modus wordt aanbevolen voor de meeste AGM
accu’s en alle andere soorten accu’s als de
omgevingstemperatuur lager is dan 0 °C .
LADEN
Laden van een accu dia aangesloten is op het voertuig
a- Voor het aansluiten / loskoppelen, moet de lader losgekoppeld
worden van het stopcontact.
b- Controleer de polariteit van de accupolen. De pluspool ("+") is
in algemeen breder dan de negatieve pool.
c- Identificeer de acuupool die aangesloten is op een chassis van
het voertuig (massa). Het is meestal de negatieve pool.
d- Het opladen van een accu met de massa aan de negatieve
pool:
• Controleer of de zwarte kabel (aangesloten op de "-" pool)
niet in contact is met de brandstofleiding of de accu.
• Sluit de rode kabel ("+") op de positieve pool van de accu
("+"), en vervolgens de zwarte kabel ("-") aan het chassis van
het voertuig.
e- Het opladen van een accu met de massa aan de positieve pool:
• Controleer of de rode kabel (aangesloten op de "+" pool)
niet in contact is met de brandstofleiding of de accu.
• Sluit de zwarte kabel op de negatieve pool van de accu ("-"),
en vervolgens de rode kabel ("+") aan het chassis van het
voertuig.
Het opladen van een accu die niet aangesloten is aan het
voertuig.
a- Voor het aansluiten / loskoppelen, moet de lader losgekoppeld
worden van het stopcontact
b- Sluit de rode kabel ("+") op de positieve pool ("+"), en
vervolgens de zwarte kabel ("-") aan de negatieve pool van de
accu.
Makkelijk aansluiten via de kabels met accupoolklemmen (acc. n°12 et
13)
Waarschuwing: bij de montage, de kabels met accupoolklemmen niet
op de lader aansluiten.
5- bevestig de rode klem kabel op de positieve pool van de accu.
6- bevestig de zwarte klem kabel op de negatieve pool van de accu.
7- Bevestig de kabels aan het chassis van het voertuig. Let op: de
kabels mogen niet worden afgekneld of in contact met hete of
scherpe oppervlakken komen.
8- Pas na deze montage kunt u de kabel aan de lader aansluiten.
Na het opladen, haal eerst de lader uit het stopcontact,
verwijder vervolgens de chassis-verbinding en aan het einde de
accu-verbinding.
LAAD MODUS SELECTIE
Sluit de acculader aan de accu. Na het aansluiten op het
stopcontact, gaat de LED aan .
Kies uw laad modus door op de knop te drukken De
verschillende modi worden in de volgende volgorde weergegeven
MODUS , , MODE 2 , MODE 3 .
Mocht de accu aan het einde van het laden nog steeds verbonden
is, zal de lader een druppelladen uitvoeren, zelfs als de gebruiker
van de modus verandert. Deze beveiliging vermijdt de beschadiging
van de accu.
MODUS 1(14.4/0.8A)
Selecteer Modus 1 met de knop .
Het lampje gaat aan. Als er geen modus is ingeschakeld, zal
het elektronische systeem automatisch opladen (0.8A ± 10%). Het
laden wordt aangegeven door het LED "Charge".
Tijdens het laden blijft dit lampje aan totdat de accu wordt
opgeladen (14.4V ± 0,25 V). Het einde van het laden wordt
aangegeven door het LED "OK"
MODUS 2(14.4/3.8A)
Selecteer Modus 2 met de knop .
Het volgende lampje gaat aan. Als er geen modus is
ingeschakeld, zal het elektronische systeem automatisch opladen
(3.8A ±10%). Het laden wordt aangegeven door het LED
Tijdens het laden blijft dit lampje aan totdat de accu wordt
opgeladen (14.4V ± 0,25 V). Het einde van het laden wordt
aangegeven door het LED.
MODUS 3(14.7/3.8A)
Selecteer Modus 3 met de knop
Het volgende lampje gaat aan. Als er geen modus is
ingeschakeld, zal het elektronische systeem automatisch opladen
(3.8A ±10%).
Het laden wordt aangegeven door het LED. Tijdens het
laden blijft dit lampje aan totdat de accu wordt opgeladen
(14.7V±0.25V). Het einde van het laden wordt aangegeven door
het LED "OK"
HERSTEL VAN EEN ZEER LEGE ACCU
Vόόr opstarten, voert de GYSTECH 3800 een analyse van de accu
spanning. Als de spanning tussen 7.5V en 10,5 V is, wordt een
gepulseerde laden met een zeer lage stroom uitgevoerd om de accu
te "herstellen ' totdat de spanning 0.5V ± 10.5V bereikt.
BEVEILIGINGEN
In geval van problemen, schakelt de lader automatisch over op
beveiliging (). Om schade aan de accu te voorkomen, zal het
systeem in deze positie blijven totdat de gebruiker ingrijpt.
Problemen
Oorzaken
Oplossingen
Lampje randt
Kortsluiting
Open circuit
Accu spanning
< 7,5V ± 0,5
1- Controleer of er geen normaal
of afwijkend gebruik is van het
circuit van het voertuig
2- Controleer of de klemmen
goed aangesloten zijn
3- Na deze correcties, als het
licht
blijft branden , dient u de
gesulfateerde of verslechterde accu
te vervangen
De verlichtin
brandt
Polariteitomwisseling
Controleer of de klemmen goed
aangesloten zijn
THERMISCHE BEVEILIGING
De Gystech 3800 heeft een temperatuur sensor. Als de lader
gedurende het laden te warm wordt, vermindert hij de laadstroom
om zichzelf te beschermen. De lader en schakelt over naar
druppelladen ( floating ). Zodra de omgevingstemperatuur weer
aanvaardbaar wordt hervatten Gystech 3800 het normaal laden.
LAADTIJD
Capaciteit
Accu (Ah) Modus
Laadtijd van 20%
tot 80% (uren)
2
1u30 laden + druppelladen
8
7u laden + druppelladen
20
3u30 laden + druppelladen
60
10u laden + druppelladen
100
Druppelladen
120 Druppelladen
11
11
13
12
2
15
14
10
1
3
4
6
7
5
8
10
9
220307

5 6 7
Cachet du revendeur:
N° de série:.....................................................................
Référence de l'appareil:.................................................
Date de l'achat : :...........................................................
Nom de l'acheteur : ....................................................
Valable 1 an à compter de la date d'achat
PER LA VOSTRA SICUREZZA
Questo manuale contiene le indicazioni sul funzionamento del
caricabatterie e le precauzioni da seguire per la sicurezza. Leggetelo
attentamente prima dell'uso e conservatelo con cura per poterlo
consultare in futuro
DESCRIZIONE GENERALE
GYSTECH 3800 è stato sviluppato per ricaricare la maggior parte
delle batterie al piombo senza manutenzione, usate solitamente per
le moto, le autovetture e per numerosi altri veicoli. Queste batterie
possono essere di differente tipologia, ad esempio: liquide
(elettrolito liquido), GEL (elettrolito gelificato), AGM (elettrolito
impregnato). E' stato concepito per la ricarica di batterie 12V da 1.2
Ah a 60 Ah o per il mantenimento in carica di batterie 12V da 60 a
120 Ah. Il caricatore individua una batteria la cui tensione è
superiore a 7.8 V.
SICUREZZA
▪ Non provare a ricaricare pile e batterie non ricaricabili.
▪ Se il cavo di alimentazione è danneggiato, esso deve essere
sostituito dal fabbricante, dal suo servizio post vendita o da una
persona con qualifiche simili, per evitare pericoli.
▪ Rispettate la misura del fusibile indicata sul dispositivo
▪ Non coprite il caricabatterie durante l'utilizzo
▪ La carica dev'essere effettuata in un locale riparato e
sufficientemente aerato o appositamente organizzato.
- Prodotto soggetto a raccolta differenziata. Non smaltire con i rifiuti
domestici.
INDICAZIONI EACCESSORI
a) Indicazioni:
N°
Descrizione
1
Spia di standby
si spegne passando da mode1 a 3
2
“Mode 1” (14.4V/0.8A)
3
“Mode 2” (14.4V/3.8A)
4
“Mode 3” (14.7V/3.8A)
5
Errore di polarità
6
In carica
7
Carica terminata
8
Tasto di selezione
b) Descrizione degli accessori
9
Carica batterie
10
Foro di fissaggio
11
Cavo corrente con presa
12
13
Cavo di connessione permanente per il motociclo o
tosaerba:
terminale “+” (rosso) con capocorda
terminale “-” (nero) con capocorda
14
Morsetto di carica per terminale "+”
15
Morsetto di carica per terminale "-"
TIPI DI BATTERIE EREGOLAZIONI
Le seguenti raccomandazioni sono indicative. Per maggior
precisione vogliate far riferimento alle istruzione del fabbricante
della vostra batteria.
Mode 14.4V/0.8A
Questa modalità è adatta alle batterie <14 Ah
Mode 14.4V/3.8A
Questa modalità è adatta per le batterie a liquido o
senza manutenzione e per la maggior parte delle
batterie a GEL.
Mode 14.7V/3.8A
Questa modalità è raccomandata per la maggior parte
delle batterie AGM e per tutti gli altri tipi di batterie
quando la temperatura dell'ambiente è inferiore a 0°C.
CARICA
Carica di una batteria installata su un veicolo
a- Prima di qualsiasi collegamento/scollegamento il caricabatterie
dev'essere scollegato dalla presa di corrente.
b- Verificare la polarità dei terminali della batteria. Il terminale
positivo (“+”) di solito è più largo di quello negativo.
c- Identificare il terminale della batteria collegato al telaio del
veicolo (massa). Di solito è il terminale negativo.
d- Caricare una batteria con la massa sul terminale negativo:
• Verificare che il cavo nero (connesso al terminale “-”) non sia
a contatto con nessuna canaletta di carburante, col serbatoio o
con la batteria.
• Collegare il cavo rosso (“+”) al terminale positivo della
batteria (“+”) e il cordone nero (“-“) al telaio del veicolo.
e- Caricare una batteria con la massa sul terminale positivo:
• Verificare che il cavo rosso (connesso al terminale “+”) non
sia a contatto con qualsiasi canaletta di combustibile, serbatoio
o con la batteria.
• Collegare il cavo nero al terminale negativoe il cavo rosso
(“+“) al telaio del veicolo.
Caricare una batteria non collegata al veicolo.
a- Prima di qualsiasi collegamento/scollegamento il caricabatterie
dev'essere scollegato dalla presa di corrente.
b- Collegare il cavo rosso (“+”) al terminale positivo (“+”) della
batteria e il cavo nero (“-“) al terminale negativo (“-“).
Collegamento permanente grazie ai morsetti ad occhiello (acc. n°12 et
13)
Attenzione: non collegare i morsetti ad occhiello al momento stesso
dell'installazione.
1- collegare il morsetto ad occhiello rosso sul terminale positivo
della batteria
2- collegare il morsetto ad occhiello nero sul terminale negativo
della batteria.
3- Fissare i cavi sul telaio del veicolo. Attenzione: i cavi non devono
toccarsi, e non devono essere messi in contatto con superfici
calde o taglienti.
4- Solo dopo il montaggio potrete collegare i cavi del caricabatterie.
Dopo la carica, scollegare il caricabatterie dalla rete di
alimentazione, poi scollegare i cavi dal telaio del veicolo e infine il
collegamento alla batteria in questo preciso ordine.
SELEZIONE DELLA MODALITA' DI CARICA
Collegare il caricabatterie alla batteria. Dopo il collegamento alla
presa di alimentazione, la spia di accensione si accende. .
Selezionare la vostra modalità di carica premendo il pulsante
Le varie modalità appaiono nel seguente ordine,
MODE 1 , MODE 2 , MODE 3
A fine carica, se la batteria è ancora collegata, il caicabatterie
effettuerà una carica di mantenimento anche se l'utilizzatore
cambierà modalità. Questa protezione evita di danneggiare la
batteria.
MODE 1(14.4/0.8A)
SELEZIONARE CON IL PULSANTE la modalità Mode 1. La spia
Se successivamente non viene selezionata nessun' altra modalità, il
sistema elettronico avvierà automaticamente la carica (0,8A ±10%).
La carica è indicata dalla spia "Charge".
Durante tutta la carica questa spia resterà accesa finchè la batteria
sarà ricaricata (14.4V±0.25V). La fine della carica è indicata dalla
spia "OK".
MODE2(14.4/3.8A)
Selezionare con il pulsante la modalità Mode 2. La spia
seguente si accende . Se successivamente non viene
selezionata nessun' altra modalità, il sistema elettronico avvierà
automaticamente la carica (3,8A ±10%).
La carica è indicata dalla spia "Charge". Durante tutta la carica
questa spia resterà accesa finchè la batteria sarà ricaricata
(14.4V±0.25V). La fine della carica è indicata dalla spia "OK".
MODE3(14.7/3.8A)
Selezionare con il pulsante la modalità Mode 3. La spia
seguente si accende . Se successivamente non viene
selezionata nessun' altra modalità, il sistema elettronico avvierà
automaticamente la carica (3,8A ±10%).
La carica è indicata dalla spia "Charge". Durante tutta la carica
questa spia resterà accesa finchè la batteria sarà ricaricata
(14.7V±0.25V). La fine della carica è indicata dalla spia "OK" .
RECUPERO DELLE BATTERIE PROFONDAMENTE SCARICHE
Prima di iniziare la carica, GYSTECH 3800 analizza la tensione della
batteria. Se la tensione è compresa tra 7,5V e 10,5V, effettua una
carica pulsata con una corrente molto debole per "recuperare" la
batteria finchè la tensione si assesta a 10,5V±0.5V.
PROTEZIONI
In caso di problema, il caricabatterie si metterà automaticamente in
protezione. Per evitare di danneggiare la batteria il sistema resterà in
questa posizione fino all'intervento dell'utilizzatore.
Problemi
Cause
Rimedi
Spia accesa
- Cortocircuito
- Circuito aperto
- Tensione batteria
< 7,5V ± 0,5
1- Verificare che non ci siano
perdite di corrente nel circuito del
veicolo.
2- Verificare che i morsetti siano
ben collegati.
3- Dop queste verifiche, se la spia
rimane accesa, la batteria solfatata
o danneggiata è enza dubbio da
sostituire.
Spie e
accese.
Inversione di
polarità
Verificare che i morsetti siano
correttamente collegati.
PROTEZIONE TERMICA
Il Gystech 3800 è controllato da un sensore di temperatura. Per
tutta la durata della carica, se il caricabatteria diventa troppo caldo,
la potenza fornita viene automaticamente ridotta per preservarlo da
qualsiasi danno. Il caricabatterie passa in carica di mantenimento
(floating). Quando la temperatura sarà ritornata accettabile,
Gystech 3800 riprenderà la sua carica normale.
TEMPO DI CARICA
Capacità
Batteria (Ah) Modalità
Tempo di carica dal 20 %
al 80% (ore)
2
Carica 1H30 + carica di
mantenimento
8 Carica 7H + carica di
mantenimento
20
Carica 3H30 + carica di
mantenimento
60 Carica 10H + carica di
mantenimento
100
Carica di mantenimento
120 Carica di mantenimento
DICHIARAZIONE DI CONFORMITA'
La Società GYS attesta che il caricabatterie descritto in questo
manuale è fabbricato in conformità alle esigenze delle direttive
europee seguenti :
- Direttiva Bassa Tensione: 2006/95/EC - 12/12/2006 (modificata
da 93/68/EEC)
- Direttiva CEM : 2004/108/EC - 15/12/2004 (modificata da
92/31/EEC, 93/68/EEC, 91/263/EEC, 93/97/EEC).
E' pertanto conforme alle norme armonizzate :
EN60335-1 - EN60335-2-29 – EN55014-1 - EN55014-2 – EN61000-
3-2– EN61000-3-3 – EN62233.
SPECIFICHE TECNICHE /TECHNICAL DATA
Tensione d'entrata AC
220-240VAC, 50/60Hz
Tensione di uscita
Nominale: 12V
Corrente d'entrata
0.6A RMS max
Rendimento
75%
Tensione di carica
14.4V±0.25V of 14.7V±0.25V
Corrente di carica
3.8A±10% of 0.8A±10%
Consumo batterie in
riposo
1 mA
Ondulazione
Max 150mV
Temperatura ambiente
-20°C to 50°C
Tipo di batteria
Batteria al piombo 12V (elettrolito liquido,
senza manutenzione, AGM, gel)
Capacità batteria
1.2-120Ah
Dimensioni (lxPxH)
172x62x42mm
Indice di protezione
IP65 (Protetto contro la polvere e gli
spruzzi d'acqua/Dust and Splash proof)
Peso
0.486kg
Livello di rumore
<50 dB (rilevato ad una distanza di 50cm)
Curva di carica
A seconda delle selezioni, vedere il testo

2 3 4
HANDLEIDING
INSTRUCTION MANUAL
CONTENTS SAMENVATTING
For your safety.............
2
Voor uw veiligheid ........
5
Product
Feature
........................
2
Algemene omschrijving.
5
Safety Information ......
2
Veiligheid......................
5
Equipment
Description
..................
2
Aanwijzingen
en accessoires
..............
6
Battery Type &
Settings
.......................
3
Accu soort
& instellingen
................
6
Charging ......................
3
Laden............................
7
Select Charging
Mode
............................
3
Laad modi selectie ........
6
Rescuing drained
battery
.........................
4
Herstel
van de accu
...................
7
Abnormality
Protection
...................
4
Beveiligingen ................
7
Overheating
Protection
....................
4
Thermische beveiliging .
7
Charging time .............
4
Laadtijd ........................
7
Declaration of
Compliance
..................
4
Certificaat van
overeenstemming
.........
7
Technical Data .............
8
Technische
bijzonderheden
.............
8
FOR YOUR SAFETY
This manual contains important safety and operating instructions.
Read this manual carefully before using the charger for the first
time and keep the manual in a safe place for future reference.
PRODUCT FEATURE
GYSTECH 3800 is designed for charging a variety of SLA (sealed
lead acid) batteries, widely used in motorbikes, cars and several
other vehicles. The batteries may be of various types i.e.
WET/Flooded (Liquid Electrolyte), GEL (Gelatin type Electrolyte,
absorbed into the plates), AGM (Absorbed Glass Mat) batteries.
Gystech charges 12V batteries from 1.2 Ah to 60Ah and provides
maintenance charge for 12V batteries from 60 to 120 Ah. The
charger detects a battery with a voltage above 7.8 V.
SAFETY INFORMATION
▪Do not use it for any other purposes
▪Do not attempt to charge non rechargeable batteries
▪Respect the rating of the fuse, which is indicated on the charger.
▪In case the power cord is damaged, be sure to stop using it at
once. Sent it to nearby appoint repair center that is authorized by
manufacturer in order to avoid any danger.
▪Do not cover the charger while charging.
▪Charging should be carried out in a well-ventilated, weather
protected facility.
▪Separate collection required. Do not throw in a domestic dustbin.
EQUIPMENT DESCRIPTION
a) Indication:
N°
State
Description
1
Standby indicator
Lights off after user selects mode 1 to 3
2
“Mode1” (14.4V/0.8A)
3
“Mode2” (14.4V/3.8A )
4
“Mode3” (14.7V/3.8A )
5
“Incorrect polarity/Fault
6
“Charging in progress”
7
“Fully charged”
8
“Mode” selection button
b) Component Description
9
Charger
10
Mounting holes
11
Mains cable with power plug
12
13
Permanent connection cable for motorbike or
riding lawn mowers :
- “+” Pole with ring terminal (red)
-“-” Pole with ring terminal (black)
14
“+” Pole quick clamp (red)
15
“-” Pole quick clamp (black)
BATTERY TYPE &SETTINGS
The following recommendations should only be referred to as
guidelines. For precise details, you must refer to battery
manufacturer for instructions.
Mode 14.4V/0.8A
This mode is normally suitable for batteries <14 Ah
batteries
Mode 14.4V/3.8A
This mode is normally used for WET, MF
(maintenance Free) and most GEL batteries
Mode 14.7V/3.8A
This mode is recommended for several AGM batteries.
This mode is also suitable for charging batteries in
sub-zero temperatures.
CHARGING
Charging of a permanently installed battery in a vehicle
a- Before connecting or disconnecting the battery leads, the power
cord should be removed from the mains.
b- Check polarity of battery post. A positive (“+”) battery post
usually has a larger diameter than a negative (“-”) post.
c- Identify the pole of battery which is connected to the chassis
(earth). Normally the negative terminal is connected to the chassis.
d- Charging of negative earthed battery:
• Make sure the black wire (“-” pole connection) has not contact
with the fuel line or the battery.
• Connect the red wire (“+”) to the positive (“+”) pole of the
battery and the black wire (“-“) to the vehicle chassis.
e- Charging of positive earthed battery:
• Make sure the red wire (“+” pole connection) has no contact
with the fuel line or the battery.
• Connect the black wire (“-”) to the negative (“-”) pole of the
battery and the red wire (“+“) to the vehicle chassis.
Charging of a battery not connected to a vehicle
a- Before connecting or disconnecting the battery leads, the power
cord should be removed from the mains.
b- Connect the red wire (“+”) to the positive (“+”) pole of the
battery and the black wire (“-“) to the negative (“-“) pole.
Permanent connection to the vehicle battery ( cable with eyelet
terminals=accessories n°12-13)
Warning: During the mounting, do not connect the charger to the
cable with eyelet terminals.
a- connect the red cable to the positive battery's pole.
b- connect the black cable to the negative battery's pole.
c- Fix your cable to the vehicle chassis.
Make sure that the cable is not being pinched or in contact with
warm surfaces or sharp edges.
d- After this, the quick contact of the charger can be connected
After charging, disconnected the battery charger from supply
mains. Then remove the chassis connection and the battery
connection, in this order.
SELECT CHARGING MODE
Connect the charger to the battery. After connection to the power
supply, the power indicator lights on .
By repeatedly pressing the selection button displays the
charging modes in the following order , MODE 1 ,
MODE 2 , MODE 3 and repeats this
cycle.
If you press , charging mode automatically switches to the next
operation mode and begins functioning in that specific mode.
However after a full charge, if battery is not disconnected from the
charger, it remains in float charge mode, even if user switches it
over to another mode. This protects battery from being damaged.
MODE 1(14.4/0.8A)
Press the selection button to select Mode 1. LED display will
light up. If no further process is activated, the electronic system will
automatically start the charging process with the LED displaying
and charging starts with a current of 0.8A ±10%. If this
procedure runs smoothly, the LED display will remain on
during the entire charging process, until battery is fully charged up
to 14.4V±0.25V. At this stage LED display will turn off and
LED display will turn on.
MODE 2(14.4/3.8A)
Press the selection button to select Mode 2. The corresponding
LED display will light up. If no further process is activated, the
electronic system will automatically start the charging process with
the LED displaying and charging starts with a current of 3.8A
±10%. If this procedure runs smoothly, the LED display will
remain on during the entire charging process, until battery is fully
charged up to 14.4V±0.25V. At this stage LED display will
turn off and LED display will turn on.
MODE 3(14.7/3.8A)
Press the selection button to select Mode 3. The corresponding
LED display will light up immediately. If no further action is
taken, the electronic system will automatically start the charging
process with a set delay. In this mode, the charging current is
identical to that of Mode 2. If this procedure runs smoothly, the LED
display remains on, the electronic system becomes active and
remains in this condition until battery is fully charged upto
14.7V±0.25V. At this stage LED display will turn off and LED
display will turn on.
RECOVERY OF DEEP DISCHARGED BATTERY
At the beginning of the charging process, GYSTECH 3800
automatically checks the voltage of the battery. If voltage is
between 7,5V and 10,5V, it begins pulse charging with small current
to recover the battery until 10,5V±0.5V.
PROTECTIONS
In case of problem, the charger automatically switches on
protection mode . The system will remain in that position until the
user intervene.
Problem
Causes
Solutions
Indicator
switched on.
- Short circuit
- Circuit open
- Battery voltage
<7,5V +/- 0,5V.
- Check that there is no
voltage loss in the vehicle
circuit.
- Check that the clamps are
well connected.
- After corrections, if the
indicator is still on, the
sulfated or damaged
battery may be replaced.
Indicators and
switched on.
Polarity reversal
Check that the clamps are
well connected
OVERHEATING PROTECTION
Gystech 3800 charger is protected by a thermal sensor. During the
charging process, if the charger becomes too hot or due to extreme
ambient temperature, the power output is automatically reduced to
protect itself from damage. The charger continues to work trickle
charge. Charger increases power automatically when the ambient
temperature drops.
CHARGING TIME
Battery
size (Ah) Mode
Charging time from 20% to
80% Charge(hours)
2 Charge 1H30 + maintenance
8 Charge 7H+ maintenance
20
Charge 3H30 + maintenance
60 Charge 10H+ maintenance
100 Maintenance
120 Maintenance
DECLARATION OF COMPLIANCE
The company GYS certifies that the product described on this manual is
manufactured in compliance with the requirements of the following
European directives :
- Low Voltage Directive : 2006/95/EC - 12/12/2006 (amended by
93/68/EEC)
- EMC Directive : 2004/108/EC, 15/12/2004 (amended by 92/31/EEC,
93/68/EEC, 91/263/EEC, 93/97/EEC),
It therefore complies with the following harmonized standards :
- EN60335-1 - EN60335-2-29 – EN55014-1 - EN55014-2 – EN61000-3-2
– EN61000-3-3 – EN62233.
11
11
13
12
2
15
14
10
1
3
4
6
7
5
8
10
9
01/11/2015
Afzonderlijke inzameling vereist-
Gooi het niet in het huishoudelijk afval.
Separate collection required -
Do not throw in a domestic dustbin
Table of contents
Languages:
Other GYS Batteries Charger manuals

GYS
GYS CT 160 User manual

GYS
GYS GYSFLASH 30-24 HF Maintenance and service guide

GYS
GYS Wattmatic 100 User manual

GYS
GYS GYSFLASH 8.12 PL User manual

GYS
GYS GYSTECH 12/12 User manual

GYS
GYS GYSFLASH 32.12 PL User manual

GYS
GYS STARTIUM 330E User manual

GYS
GYS STARTPACK TRUCK User manual

GYS
GYS BATIUM 25/24 User manual

GYS
GYS ARTIC 4000 User manual

GYS
GYS SCM54E User manual

GYS
GYS WATTMATIC 80 User manual

GYS
GYS START 200 User manual

GYS
GYS GYSFLASH 1.12 PL User manual

GYS
GYS GYSFLASH 100.12 HF User manual

GYS
GYS CA170 User manual

GYS
GYS GYSFLASH 30-24 HF User manual

GYS
GYS TCB 60 User manual

GYS
GYS STARTPACK TRUCK User manual

GYS
GYS BATIUM Series User manual