GYS toPARC PORTABLE TRIPOD LAMP User manual

V2_13/04/2021
FR 2-4 / 11-12
EN 5-7 / 11-12
www.gys.fr
IT 8-10 / 11-12
LAMPE BALADEUSE TRIPODE 250L
PORTABLE TRIPOD LAMP 250L
LAMPADA PORTATILE TREPPIEDE 250L

AVANT D’UTILISER L’APPAREIL POUR LA PREMIÈRE FOIS, LIRE LES INFORMATIONS SUIVANTES DANS LE MANUEL
ET TENIR COMPTE DES AVERTISSEMENTS, MÊME SI VOUS ÊTES FAMILIER AVEC LES APPAREILS ÉLECTRONIQUES.
METTRE LE MANUEL DANS UN LIEU SÛR POUR CONSULTATION ULTÉRIEURE.
AVERTISSEMENT
An d’éviter tout accident ou incendie :
• Lire les avertissements avant tout usage
• Garder au sec. NE PAS ouvrir, laisser tomber, court-circuiter, incinérer ou exposer à de fortes températures au-dessus de 140°F, et
changer si endommagé.
• Utiliser seulement l’adaptateur de charge fourni avec la lampe de travail. Utiliser un autre bloc-batterie peut engendrer un risque
d’incendie et des dommages.
• Ne pas plonger dans de l’eau ou tout autre liquide. Produit non étanche.
• Ne pas utiliser dans des atmosphères explosives, par exemple en présence de liquides inammables, de gaz ou de poussière.
• Ne pas charger la lampe plus de 8 heures. Une surcharge risque de réduire la durée de vie de la lampe.
DESCRIPTION
Lampe LED multi-usage sur trépied.
Projecteur LED - 3 lampes à forte puissance - positionné sur trépied. Les barres lumineuses individuelles sont conçues pour être
assemblées en un système lumineux puissant avec un faisceau lumineux ajustable. Dédié à la mécanique automobile, l’entretien
routier, les travaux extérieurs, les urgences et pannes de courant. Batterie à faible consommation.
Structure solide et résistante en caoutchouc.
SPÉCIFICATIONS
Besoin en énergie: 6V DC 500 mA
Type de batterie: Interne, rechargeable, NI-MH
Pack batterie:3 x 3.6V 300 mAh
Type d’ampoule: LED
Durée de vie LED: 100.000 heures dans des conditions normales d’utilisation.
DURÉE DE FONCTIONNEMENT
La durée de fonctionnement, quand la batterie est complètement chargée et à puissance maximum, est la suivante :
Mode forte puissance : 1 heure
Mode faible puissance : 3 heures
BASE MAGNÉTIQUE
La lampe de travail présente une base magnétique, ce qui lui permet d’être placée magnétiquement sur un véhicule ou autre support
métallique.
NOTE
Ne pas placer la lampe près d’équipement informatique, de disques ou autre type d’équipement magnétique. Le champ magnétique
risque d’endommager ou d’eacer les données.
INSTRUCTIONS D’INSTALLATION DE LA BATTERIE
LA LAMPE PEUT SE SÉPARER EN 3 TORCHES INDÉPENDANTES COMME INDIQUENT LES ILLUSTRATIONS :
OU SE COMBINER EN UNE TORCHE PLUS PUISSANTE DANS L’ORDRE OPPOSÉ DES ILLUSTRATIONS CI-DESSUS:
2
LAMPE BALADEUSE TRIPODE 250L FR
Notice originale

MODE D’EMPLOI
NOTE: Chaque torche LED est équipée d’un bouton ON/OFF et peut être utilisée indépendamment sans être assem-
blée avec les autres torches LED.
LED MODE FORTE PUISSANCE: Appuyer une première fois sur ON/OFF, la lumière s’allume. La lumière fonctionne avec un éclai-
rage maximum. La durée de fonctionnement atteint 1 heure avec une recharge totale.
LED MODE FAIBLE PUISSANCE: Appuyer sur ON/OFF une fois de plus, la lumière se change en faible intensité, la durée de
fonctionnement atteint les 3 heures avec une recharge totale.
LED WARNING MODE: Appuyer à nouveau sur ON/OFF, la lumière LED va clignoter en mode warning.
Appuyer sur le bouton ON/OFF une fois de plus, la lampe s’éteint.
INFORMATION IMPORTANTE: Toujours éteindre la lampe quand elle n’est pas utilisée.
Embout du pivot
Bas de l’aimant
Base de recharge
Indicateur LED de charge
Prise de charge courant continu
2pcs 0.5W LED
CONSIGNES DE RECHARGE
Cette lampe rechargeable 3 en 1 doit être chargée à plein avant la première utilisation. La batterie doit être rechar-
gée tous les trois mois.
Ceci an d’assurer les meilleures performances possibles de la batterie. L’ adaptateur de charge doit seulement être utilisé pour
recharger les batteries. Il ne doit pas être utilisé pour l’alimentation de la lampe.
AVERTISSEMENT IMPORTANT : SEUL LE CHARGEUR ORIGINAL DOIT ÊTRE UTILISÉ, TOUT AUTRE CHARGEUR PEUT
ENDOMMAGER LE PRODUIT.
UTILISATION DE L’ADAPTATEUR DE CHARGE SUR PRISE SECTEUR
1. Positionner la lampe verticalement sur la base. Connecter la prise jack à la base.
2. Brancher l’adaptateur de charge sur une prise 110V ou 230V.
3. Les 3 indicateurs LED de charge sont rouges quand la charge est en cours.
4. La charge prend entre 4 et 6 heures, et 3 indicateurs LED passent au vert quand le produit est rechargé.
5. Déconnecter la prise de l’adaptateur de charge puis la prise jack.
POUR ÉVITER LA SURCHAUFFE DU PRODUIT, NE PAS CHARGER PENDANT PLUS DE 8 HEURES.
CONSEILS LIÉS À LA SÉCURITÉ
Utiliser l’adaptateur de charge dans un milieu intérieur sec uniquement. L’exposition à l’humidité peut causer des électrocutions et
endommager l’adaptateur de charge.
Ne pas utiliser le chargeur en présence de liquides ou gaz inammables.
Entreposer dans un endroit sec et ne pas laisser le chargeur entrer en contact avec l’eau, la pluie ou la neige.
Si l’adaptateur de charge entre en contact avec de l’eau, l’entreposer dans un endroit sec sur une une surface absorbante : textiles
divers, chions, torchons...
Ne pas utiliser tant que le produit est humide.
Utiliser l’adaptateur de charge fourni avec la lampe. Ne pas essayer de recharger la lampe avec un adaptateur de charge qui n’est
pas compatible, car cela peut créer un incendie, endommager la lampe ou blesser quelqu’un.
UTILISATION DE L’ADAPTATEUR DE CHARGE SUR PRISE ALLUME-CIGARE
1. Mettre la lampe dans son socle à la verticale. Connecter la prise jack à la base.
2. Brancher l’adaptateur de charge à la prise allume-cigare 12V du véhicule.
3. Les 3 indicateurs de charge LED s’allumeront en ROUGE pendant que le chargement est en cours.
4. La charge prend entre 4 et 6 heures, et 3 indicateurs LED passent au vert quand le produit est rechargé.
5. Déconnecter la prise de l’adaptateur de charge puis la prise jack. 3
LAMPE BALADEUSE TRIPODE 250L FR
Notice originale

4
LAMPE BALADEUSE TRIPODE 250L FR
Notice originale
REMPLACEMENT DES BATTERIES (3*3.6V 300MAH NI-MH)
1. Détacher les 3 torches LED en enlevant la torche 1 de la torche 2. Maintenir fermement les torches 1 et 2 ouvrir par eet de
levier comme démontré sur le schéma Fig.1.
2. Détacher les torches 2 et 3 en répétant l’étape 1 pour les torches 2 et 3.
3. Retirer le couvercle du compartiment à batterie en le faisant glisser à l’opposé du corps de torche (Fig. A).
4. Installer (9 batteries NI-MH , chacune de 1.2V 300mAH) les batteries conformément à l’orientation indiquée à côté de la torche
dans le compartiment à batteries. Insérer la borne négative (-) batteries vers la tête de la LED pivotante (Fig. B).
5. Remettre le couvercle du compartiment à batterie dans le compartiment désigné et le faire claquer pour s’assurer d’un bon
maintien (Fig. A).
6. Répéter les étapes 3 à 5 pour les autres torches
Remplacer la batterie en fonction des illustrations ci-dessous :
MAINTENANCE ET STOCKAGE
Entreposer la lampe de travail et les adaptateurs de charge dans un endroit propre et sec. Assurez-vous que les adaptateurs de
charge fournis avec ce produit ne sont pas entreposés avec des produits similaires an d’éviter l’utilisation de chargeurs non com-
patibles par erreur. Utiliser un chargeur incompatible peut endommager la lampe de travail ou causer des blessures.
La lampe peut aussi être entreposée dans un véhicule pour assistance en bord de route. An d’éviter d’endommager la lampe ou
les accessoires, il est indispensable d’attacher la lampe dans le véhicule.
ENTRETIEN
Toutes les surfaces de la lampe de travail peuvent être nettoyées avec de l’eau et du savon à l’aide d’une serviette. Ne pas immer-
ger la lampe dans de l’eau ou du solvant. Ne jamais utiliser des solvants ou des produits d’entretien contenant des produits pétro-
liers, des diluants pour peinture, de la térébenthine, de l’alcool ou de l’ammoniaque. Ce type de produits corrosifs peut endomma-
ger les surfaces.
MAINTENANCE
Seul le personnel qualié est autorisé à réparer la lampe. Ne pas démonter le produit, car il n’y a pas de pièce à remplacer à l’in-
térieur. L’ouverture du produit ou toute tentative évidente d’ouverture ou de réparation du produit rend la garantie invalide et peut
causer des dégâts ou blessures.
Ce produit contient une batterie interne hybride nickel-métal fabriquée en respect avec l’environnement. Ce produit
doit être mis au rebut de façon appropriée et pas dans une poubelle domestique. Merci de retourner ce produit chez
le revendeur ou de le déposer dans un centre de recyclage où les batteries seront recyclées.
GARANTIE
La garantie couvre tous défauts ou vices de fabrication pendant 2 ans, à compter de la date d’achat (pièces et main d’oeuvre).
La garantie ne couvre pas :
• Toutes autres avaries dues au transport.
• L’usure normale des pièces (Ex. : câbles, pinces, etc.).
• Les incidents dus à un mauvais usage (erreur d’alimentation, chute, démontage).
• Les pannes liées à l’environnement (pollution, rouille, poussière).
En cas de panne, retourner l’appareil à votre distributeur, en y joignant :
- un justicatif d’achat daté (ticket de sortie de caisse, facture….)
- une note explicative de la panne.

5
PORTABLE TRIPOD LAMP 250L EN
Translation of the original instructions
BEFORE YOU USE THIS DEVICE FOR THE FIRST TIME, PLEASE READ THE FOLLOWING NOTES IN THIS MANUAL AND
HEED ALL WARNINGS, EVEN IF YOU ARE FAMILIAR WITH HANDLING ELECTRONIC DEVICES. KEEP THIS MANUAL IN
A SAFE PLACE FOR FUTURE REFERENCE.
WARNING
To prevent serious injury, FIRE and Explosion:
• Read warnings on the package before use.
• Keep dry. DO NOT open, drop, short-circuit, incinerate, expose temperatures higher than 140°F, or change /use
if damaged.
• Only use the Charging Adaptors provided with the Work Light. Use of any other adaptors may damage the tool
or result in a re.
• Do not submerge in water or any other liquid. It is not waterproof.
• Do not operate in explosive atmospheres, such as in the presence of ammable liquids, gases or dust.
• Do not charge the Work Light more than 8 hours. Overcharging will cause overheating and shorten battery life.
DESCRIPTION
Multi-Purpose LED Worklight with detachable Tripod Design
Detachable Tripod style LED Spotlight features 3 powerful High Intensity Flashlights. These individual light bars engineered to be
assembled as one combined powerful lighting system with adjustable light beam. Designed for automotive work, roadside repairs,
outdoors, emergencies and power outage. Low Battery Power Consumption.
Robust and Impact Resistant Rubberized Housing.
SPECIFICATIONS
Power Requirements: 6V DC 500mA
Battery Type: Internal, Rechargeable, NI-MH
Battery Pack: 3* 3.6V 300mAh
Bulb Type: LED
LED Life: 100,000 hours under normal conditions
RUNNING TIME
The approximate running times for this light when the battery is fully charged and in maximum performance state are as follows:
High mode : 1 hour
Low mode: 3 hours
MAGNETIC BASE
The Work Light features a magnetic base on the bottom, allowing the light to be magnetically attached to a vehicle or other metal
objects.
NOTE
Do not place the light on or near computer equipment, computer disks or other types of magnetic storage equipment as strong
magnetic elds can erase or corrupt data.
BATTERY INSTALLATION INSTRUCTIONS
THIS WORK LIGHT CAN SEPARATE INTO 3 INDEPENDENT FLASHLIGHTS AS FOLLOWING ILLUSTRATIONS:
OR COMBINES INTO ONE POWERFUL FLASHLIGHT IN OPPOSITE ORDER ACCORDING TO ABOVE DIAGRAMS.

6
PORTABLE TRIPOD LAMP 250L EN
Translation of the original instructions
OPERATING INSTRUCTIONS
NOTE: Each LED ashlight is equipped with the dedicated ON/OFF Push Button and can be operated independently
without being assembled with other LED ashlights.
LED HIGH MODE: Press the ON/OFF switch, the work light will turn on. In this mode the work light operates as a maximum illu-
mination. Working time in this mode is up to 1 hour on a full charge.
LED LOW MODE: Press the ON/OFF switch one more time, the work light will turn on with a low light mode, working time in this
mode is up to 3 hours on a full charge.
LED WARNING MODE: Press the ON/OFF switch again, the LED light will blinking with warning light mode.
Press the ON/OFF switch one more time, the light will turn o.
IMPORTANT NOTE: Always turn the switch to OFF the light when the work light is not being used or during storage.
CHARGING INSTRUCTIONS
This 3 in 1 rechargeable led work light must be fully charged before being used for the rst time as soon as taken
from the package. The battery should be recharged every three months.
This will ensure that the battery gives its best performance now and on future re-charging cycles. The AC and DC charging adap-
ters are for re-charging the battery only. They can not be used to directly power the light. Always ensure the light is switched o
while charging.
IMPORTANT NOTE : USE THE SUPPLIED CHARGER ONLY, OTHER CHARGERS MAY CAUSE THE DAMAGE TO THE UNIT.
USING THE AC CHARGING ADAPTER
1. Put the light vertically into the base. Plug the adapter’s jack plug into the socket of the base.
2. Plug the adapter into a 120V socket and switch the socket on(if applicable).
3. The 3 charge LED indicators will glow RED while charging is in progress.
4. The battery will be fully charged after approximately 4-6 hours, and 3 RED charging indicator will be turned to GREEN when the
unit is fully charged.
5. Disconnect the jack plug from the light, remove the adapter from the wall socket or switch o.
TO PREVENT OVERHEATING DO NOT CHARGE FOR MORE THAN 8 HOURS.
SAFETY PRECAUTIONS
Use provided charging adapter indoors in a dry location only. Exposure to damp or wet conditions could cause electrocution or
damage to adapter.
Do not use the charger in the vicinity of ammable liquids or materials.
Store in dry location and do not allow the charging adapter to come in contact with water, rain or snow.
If the charging adapter comes into contact with water, place in a dry location at room temperature, on a soft absorbent towel and
allow to dry thoroughly.
Do not operate the unit until it is completely free of moisture.
Use only the AC charging adapter supplied with light. Do not attempt to charge the light with an adapter that is not compatible as
this could result in a re, damage to the light or personal injury.
USING THE DC CHARGING ADAPTER
1.Put the light vertically into the base. Plug the adapter’s jack plug into the socket of the base.
2.Plug the adapter into the vehicles 12V DC cigarette lighter or accessory power socket.
3.The 3 charging indicator lamp will glow RED while charging is in process.
4. The battery will be fully charged after approximately 4-6 hours, and 3 RED charging indicator will be turned to GREEN when the
unit is fully charged.
5.Disconnect the jack plug from the light, and remove the DC adapter from the outlet socket.

7
PORTABLE TRIPOD LAMP 250L EN
Translation of the original instructions
BATTERY REPLACEMENT (3*3.6V 300MAH NI-MH)
NOTE : FOR SAFETY’S SAKE, THE USER IS NOT ADVICED TO CHANGE THE BATTERY BY HIMSELF OR HERSELF.
PLEASE ASK A PROFESSIONAL FOR HELP.
1. Detach the 3 LED Flashlights by removing the ashlight 1 away from ashlight 2. Hold the ashlight 1 and 2 rmly and pry open
the assembly by twisting action shown in Fig.1.
2. Detach the ashlight 2 and 3 by repeating the step 1 above for the ashlight 2 and 3.
3. Remove the battery compartment cover by sliding it away from the ashlight body.
4. Install (9pcs NI-MH batteries, each 1.2V 300mAH) batteries following the orientations of batteries shown on the ashlight hou-
sing into the battery compartment. Insert the Negative (-) terminal of batteries toward the LED pivotal head direction
5. Replace the battery compartment cover back into the designated location and snap to engage securely.
6. Repeat steps 3 through 5 for other ashlights
Replace the battery according to the following illustrations :
CARE AND MAINTENANCE STORAGE
Store the work light and charging adapters in a clean and dry area. Be sure to keep the charging adapters supplied with this pro-
duct stored separately from similar items as only charging adapters included with this light are compatible. Using a non-compatible
charger could cause damage to the light or personal injury.
The light may also be stored in a vehicle for use in roadside emergencies. To prevent the light and any of the accessories being
damaged, please ensure that it is properly secure and in a safe place inside the vehicle.
CLEANING
All exterior surfaces of the work light can be wiped clean with soft cloth dampened with a soap and water solution. Do not immerse
or submerge any part of light in water or any other solvent. Never use solvents or cleaning agents containing petroleum (petrol,
kerosene, oil), paint thinner, turpentine, alcohol, or ammonia. Harsh materials like these can damage surfaces.
MAINTENANCE
Only qualied service personnel must perform repairs. Do not open the exterior casing of the work light as there are no user ser-
viceable parts inside. Opening or visible attempts to open or repair a light may void any guarantee and / or cause damage to the
product or personal injury.
This product contains an internal nickel-metal hybrid battery pack formulated from environmentally sensitive ma-
terials. This product must be disposed of properly, with due care for the environment. Please return this product to
your local dealer or to your local recycling station, where batteries will be recycled or disposed of properly.
WARRANTY
The warranty covers faulty workmanship for 2 years from the date of purchase (parts and labour).
The warranty does not cover:
• Transit damage.
• Normal wear of parts (eg. : cables, clamps, etc..).
• Damages due to misuse (power supply error, dropping of equipment, disassembling).
• Environment related failures (pollution, rust, dust).
In case of failure, return the unit to your distributor together with:
- The proof of purchase (receipt etc ...)
- A description of the fault reported

8
LAMPADA PORTATILE TREPPIEDE 250L IT
Traduzione del manuale originale
PRIMA DI UTILIZZARE QUESTO DISPOSITIVO PER LA PRIMA VOLTA, LEGGERE LE SEGUENTI NOTE NEL MANUALE E
PRESTARE ATTENZIONE A TUTTE LE AVVERTENZE, ANCHE SE SI HA FAMILIARITA’ CON L’UTILIZZO DI DISPOSITI-
VI ELETTRONICI. RIPONETE AL SICURO QUESTO MANUALE PER FUTURE CONSULTAZIONI.
AVVERTENZE
Per prevenire lesioni gravi, INCENDIO ed Esplosione:
• Mantenere asciutto. NON aprire, lasciar cadere, cortocircuitare, incenerire, esporre a temperature superiori a 140°F, o cambiare /
usare se danneggiato.
• Utilizzare solo gli adattatori di carica forniti con la torcia elettrica. L’utilizzo di altri adattatori può danneggiare il dispositivo o pro-
vocare un incendio.
• Non immergere in acqua o in qualsiasi altro liquido. Non è impermeabile.
• Non utilizzare in atmosfera esplosiva, ad esempio in presenza di liquidi, gas o polveri inammabili.
• Non caricare la torcia elettrica per più di 8 ore. Il sovraccarico causerà il surriscaldamento e ridurrà la durata della batteria.
• Leggere le avvertenze presenti nella confezione prima dell’utilizzo.
DESCRIZIONE
Torcia elettrica a LED multiuso con treppiede rimovibile
Proiettore LED Spotlight con 3 potenti luci ad alta intensità posizionato su treppiede rimovibile. Queste singole barre luminose sono
state progettate per essere assemblate come un potente sistema di illuminazione combinata con fascio di luce regolabile. Progettato
per il lavoro in campo automotive, riparazioni su strada, all’aperto, emergenze e interruzioni di corrente. Batteria a basso consumo
energetico. Custodia in gomma robusta e resistente agli urti.
SPECIFICHE
Requisiti di alimentazione: 6V DC 500mA
Tipologia Batteria: Interna, Ricaricabile, NI-MH
Batteria: 3* 3.6V 300mAh
Tipo di lampadina: LED
Durata del LED: 100,000 ore
TEMPO DI FUNZIONAMENTO
I tempi di funzionamento approssimativi per questa torcia quando la batteria è completamente carica e nello stato di massima pres-
tazione sono i seguenti:
Modalità alta : 1 ora
Modalità bassa: 3 ore
SUPPORTO MAGNETICO
La lampada da lavoro è dotata di un supporto magnetico, che consente di ssarla magneticamente ad un veicolo o ad altri oggetti
metallici.
NOTA
Non posizionare la torcia sopra o vicino ad apparecchiature informatiche, dischi di computer o altri tipi di supporti magnetici di me-
moria perchè forti campi magnetici possono cancellarne o corromperne i dati.
ISTRUZIONI PER L’INSTALLAZIONE DELLA BATTERIA
QUESTA TORCIA ELETTRICA PUO’ SEPARARSI IN 3 TORCE INDIPENDENTI COME NELLE SEGUENTI ILLUSTRAZIO-
NI:
O AL CONTRARIO COMPORSI IN UNA POTENTE TORCIA ELETTRICA.

9
LAMPADA PORTATILE TREPPIEDE 250L IT
Traduzione del manuale originale
ISTRUZIONI PER L’USO
NOTA: Ogni torcia a LED è dotata di un interruttore ON/OFF dedicato e può essere azionato indipendentemente
senza essere assemblato con altre torce LED.
MODALITA’ LED ALTA: Premere l’interruttore ON/OFF, la torcia elettrica si accenderà. In questa modalità la torcia elettrica opera
con una luminosità massima. Possibilità di lavorare in questa modalità per circa 1 ora con una carica completa.
MODALITA’ LED BASSA: Premere l’interruttore ON/OFF una volta di più, la torcia da lavoro si accenderà con una luminosità
bassa, lavorando in questo modo per circa 3 ore con una carica completa.
MODALITA’ LED DI AVVISO: Premere l’interruttore ON/OFF nuovamente, la luce del LED lampeggerà.
Premere ulteriormente l’interruttore ON/OFF, la luce si spegnerà.
NOTA IMPORTANTE: Spegnere sempre l’interruttore quando la torcia elettrica non viene utilizzata o è in stoccag-
gio.
Suggerimento
Bas de l’aimant
Base di ricarica
Indicatore di carica a LED
Presa di carica in corrente continua
2pcs 0.5W LED
ISTRUZIONI PER LA CARICA
QUESTA TORCIA A LED 3 IN 1 RICARICABILE DEVE ESSERE COMPLETAMENTE CARICA PRIMA DI ESSERE UTILIZ-
ZATA PER LA PRIMA VOLTA NON APPENA PRELEVATA DALL’IMBALLAGGIO. LA BATTERIA DOVRA’ ESSERE RICARI-
CATA OGNI TRE MESI.
Questo garantirà che la batteria fornisca le migliori prestazioni ora e nei cicli di ricarica futuri. Gli adattatori di carica AC e DC ricari-
cano solo la batteria. Non possono essere utilizzati per alimentare direttamente la torcia. Assicurarsi sempre che la luce sia spenta
durante la carica.
NOTA IMPORTANTE : USARE SOLO IL CARICABATTERIE IN DOTAZIONE, ALTRI CARICABATTERIE POSSONO CAU-
SARE DANNI AL DISPOSITIVO.
UTILIZZO DELL’ADATTATORE DI CARICA AC
1. Inserire il dispositivo verticalmente nella base. Collegare la presa dell’ adattatore alla presa della base.
2. Inserire l’adattatore in una presa da 230V.
3. I 3 LED indicatori di carica si illumineranno di ROSSO mentre la carica è in corso.
4. La batteria sarà completamente carica dopo circa 3-5 ore; L’ indicatore di carica ROSSO diventerà VERDE quando il dispositivo è
completamente carico.
5. Scollegare la spina dalla torcia, rimuovere l’adattatore dalla presa a muro o spegnere.
PER PREVENIRE IL SURRISCALDAMENTO NON CARICARE PER PIU’ DI 8 ORE.
PRECAUZIONI DI SICUREZZA
Utilizzare l’adattatore di carica 230V AC solo in ambienti asciutti. L’esposizione a condizioni umide o bagnate può causare folgora-
zione o danni all’adattatore.
Non utilizzare il caricabatterie in prossimità di liquidi o materiali inammabili.
Conservare in luoghi asciutti ed evitare che l’adattatore di carica entri in contatto con acqua, pioggia o neve.
Se l’adattatore di carica entra in contatto con l’acqua, collocare l’adattatore in un ambiente asciutto, su un panno morbido as-
sorbente e lasciare asciugare accuratamente.
Non far funzionare l’unità nchè non è completamente priva di umidità.
Utilizzare solo l’adattatore di carica AC fornito con la torcia. Non caricare la torcia con un adattatore non compatibile in quanto ciò
potrebbe causare un incendio, danni alla torcia o lesioni personali.

10
LAMPADA PORTATILE TREPPIEDE 250L IT
Traduzione del manuale originale
UTILIZZO DELL’ADATTATORE DI CARICA DC
1.Inserire la luce verticalmente nella base. Collegare l’adattatore alla presa della base.
2.Collegare l’adattatore 12V DC alla presa accendisigari o presa di alimentazione accessori del veicolo.
3.I 3 indicatori di carica della torcia si illumineranno di ROSSO mentre il processo di carica è in corso.
4.La batteria sarà completamente carica dopo circa 3-5 ore, i 3 indicatori di carica ROSSI diventeranno VERDI quando il dispositivo
sarà completamente carico.
5.Scollegare la spina dalla torcia, e rimuovere l’adattatore di corrente DC dalla presa di corrente.
SOSTITUZIONE DELLA BATTERIA (3x3.6V 300MAH NI-MH)
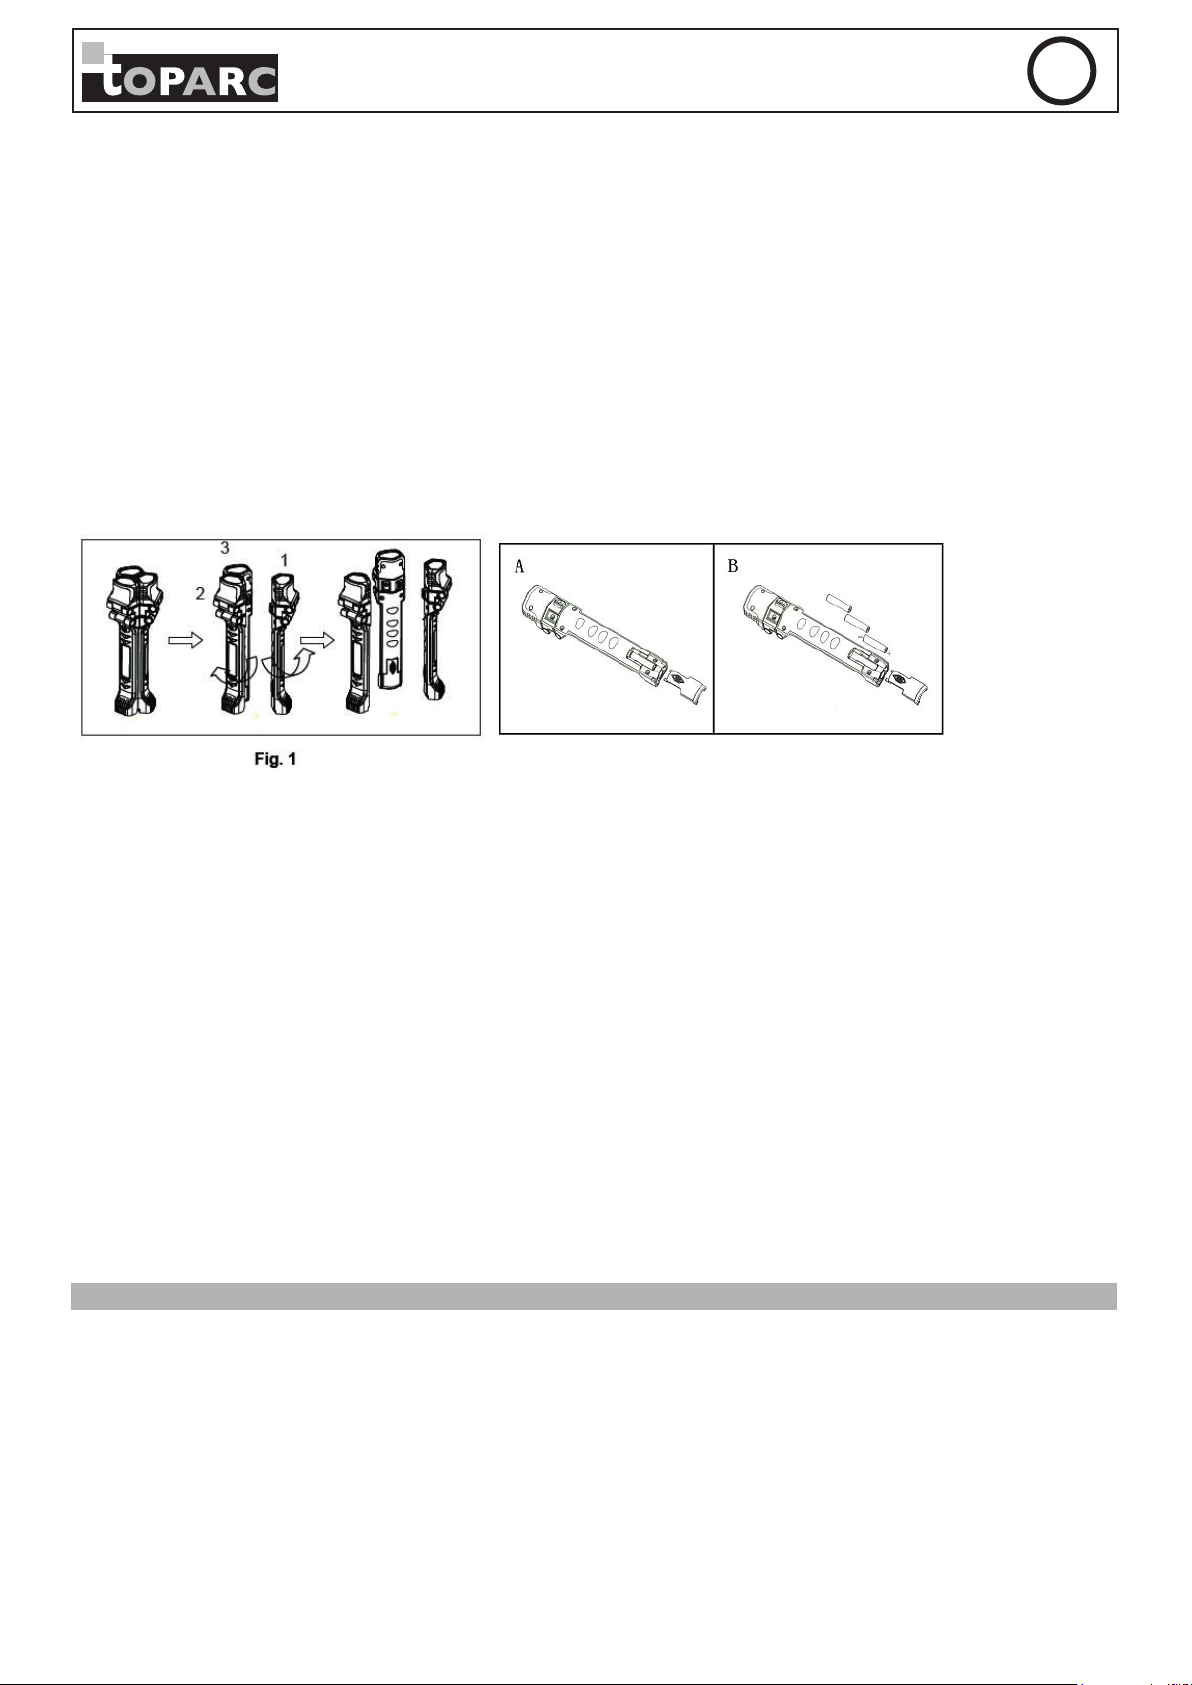
1. Staccare le 3 torce a LED rimuovendo la torcia 1 dalla torcia 2 e 3, aprire il gruppo con torsione come mostrato in Fig.1
2. Staccare la torcia 2 e 3 ripetendo il passaggio, riportato sopra per la torcia 1
3. Rimuovere il coperchio del vano batteria facendolo scivolare dal corpo torcia
4. Installare (9pcs NI-MH batterie, ogni 1.2V 300mAH) le batterie seguendo le orientazioni delle batterie mostrate nella custodia
della torcia nel vano batteria. Inserire il terminale Negativo (-) delle batterie verso la direzione della testa centrale del LED
5. Riposizionare il coperchio del vano batteria nella sede designata no ad eettuare lo scatto che indica l’avvenuta chiusura.
6. Ripetere i passaggi da 3 a 5 per le altre torce
Sostituire la batteria secondo le seguenti illustrazioni :
CONSERVAZIONE PER LA CURA E LA MANUTENZIONE
Conservare la torcia e gli adattatori di carica in una zona pulita e asciutta. Assicurarsi di tenere gli adattatori di carica, forniti con
questo prodotto, separati da articoli simili in quanto solo gli adattatori di carica inclusi con questa torcia sono compatibili. L’utilizzo
di caricabatterie non compatibili potrebbe causare danni alla torcia o lesioni personali.
La torcia può essere conservata all’interno di un veicolo per l’uso in situazioni di emergenza lungo la strada. Per evitare che la torcia
e qualsiasi altro accessorio siano danneggiati, assicurarsi che il dispositivo sia correttamente protetto e in un luogo sicuro all’interno
del veicolo.
PULIZIA
Tutte le superci esterne del proiettore possono essere pulite con un panno morbido inumidito con una soluzione di acqua e
sapone. Non immergere le parti della torcia in acqua o in qualsiasi altro solvente. Non usare mai solventi o detergenti contenenti
petrolio (benzina, cherosene, olio), diluente per vernici, trementina, alcool o ammoniaca. Materiali aggressivi come questi possono
danneggiare le superci.
MANUTENZIONE
Solo personale qualicato deve eseguire riparazioni. Non aprire l’involucro esterno della torcia in quanto non ci sono parti utilizzabili
all’interno. L’apertura, i tentativi di apertura o riparazione possono annullare qualsiasi garanzia della torcia, causare danni al prodot-
to o lesioni personali. Le lampadine a LED non si usurano mai in condizioni normali e non hanno bisogno di essere sostituite.
Questo prodotto contiene una batteria interna ibrida nichel- metallo idruro formulata con materiali sensibili per
l’ambiente. Questo prodotto deve essere smaltito correttamente con la dovuta attenzione per l’ambiete. Si prega di
restituire questo prodotto al rivenditore locale o alla stazione di riciclaggio locale, dove le batterie saranno riciclate
o smaltite correttamente.
GARANZIA
La garanzia copre qualsiasi difetto di fabbricazione per 2 anni, a partire dalla data d’acquisto (pezzi e mano d’opera).
La garanzia non copre:
• Danni dovuti al trasporto.
• La normale usura dei pezzi (Es. : cavi, morsetti, ecc.).
• Gli incidenti causati da uso improprio (errore di alimentazione, cadute, smontaggio).
• I guasti legati all’ambiente (inquinamento, ruggine, polvere).
In caso di guasto, rinviare il dispositivo al distributore, allegando:
- la prova d’acquisto con data (scontrino, fattura...)
- una nota esplicativa del guasto.

11
PORTABLE TRIPOD LAMP 250L
PICTOGRAMMES / PICTOGRAMS / PITTOGRAMMI
Appareil conforme aux directives européennes. La déclaration de conformité est disponible sur notre site in-
ternet. / The device complies with European Directive.The certicate of compliance is available on our website
/ Materiale in conformità alle Direttive europee. La dichiarazione di conformità è disponibile sul nostro sito
(vedere sulla copertina).
Matériel conforme aux exigences britanniques. La déclaration de conformité britannique est disponible sur
notre site (voir à la page de couverture). / Equipment in compliance with British requirements. The British
Declaration of Conformity is available on our website (see home page). / Materiale conforme alla esigenze bri-
tanniche. La dichiarazione di conformità britannica è disponibile sul nostro sito (vedere pagina di copertina).
Appareil conforme aux normes Marocaines. La déclaration Cم (CMIM) de conformité est disponible sur notre
site internet. / Equipment in conformity with Moroccan standards. The declaration Cم (CMIM) of conformity is
available on our website (see cover page). / Materiale conforme alle normative marocchine. La dichiarazione Cم
(CMIM) di conformità è disponibile sul nostro sito (vedi scheda del prodotto).
Ce matériel fait l’objet d’une collecte sélective. Ne pas jeter dans une poubelle domestique. / This product
should be disposed of at an appropriate recycling facility. Do not dispose of in domestic waste. / Questo mate-
riale è soggetto alla raccolta dierenziata seguendo la direttiva europea 2012/19/UE. Non smaltire coni riuti
domestici!
Produit recyclable qui relève d’une consigne de tri (selon le décret n°2014-1577). / Recyclable product that
falls within waste sorting recommendations (according to Decree n° 2014-1577). / Recyclebares Gerät, das
spezisch entsorgt werden muss (nach dem Dekret N°2014-1577) / Prodotto riciclabile soggetto a raccolta
dierenziata.

Société JBDC
1, rue de la Croix des Landes
CS 54159
53941 SAINT-BERTHEVIN Cedex
Other manuals for toPARC PORTABLE TRIPOD LAMP
1
This manual suits for next models
1
Table of contents
Languages:
Other GYS Work Light manuals

GYS
GYS toPARC MINI INSPECTION LAMP User manual

GYS
GYS toPARC SUNCOLOR 3 User manual

GYS
GYS toPARC PORTABLE TRIPOD LAMP User manual

GYS
GYS toPARC WATERPROOF PORTABLE LAMP User manual

GYS
GYS toparc PRO 600L User manual

GYS
GYS toPARC INSPECTION LAMP User manual

GYS
GYS Toparc 059979 User manual

GYS
GYS toPARC Pro User manual

GYS
GYS toPARC SUNCOLOR User manual