Haier LD1510A User manual

Please read this manual carefully
before using this TV set and keep it
for future reference.
LCD TV
USER MANUAL

WARNING AND CAUTION
CAUTION:
TO REDUCE THE RISK OF ELECTRIC SHOCK, DO NOT REMOVE
COVER (OR BACK). NO USER SERVICEABLE PARTS INSIDE.FOR
ANY PROBLEM, REFER SERVICING TO QUALIFIED SERVICE
PERSONNEL.
THERE IS A LIGHTNING ARROW SYMBOL IN THE TRIANGLE:
THIS SYMBOL INDICATES HIGH VOLTAGE IS PRESENT INSIDE.
IT IS DANGEROUS TO MAKE ANY KIND OF CONTACT WITH ANY
INSIDE PART OF THIS PRODUCT.
THERE IS A EXCALMATION MARK IN THE TRIANGLE: THIS
SYMBOL ALERTS YOU THAT IMPORTANT LITERATURE
CONCERNING. OPERATION AND MAINTENANCE HAS BEEN
INCLUDED WITH THIS PRODUCT.
CAUTION
DO NOT OPENDO NOT OPEN
RISK OF ELECTRIC SHOCKRISK OF ELECTRIC SHOCK
!!
!!
CAUTION:
TO REDUCE THE RISK OF ELECTRIC SHOCK AND FIRE,
DO NOT PUT THE TV SET NEAR SOURCES OF HUMIDITY.
DO NOT USE ANY ABRASIVE CLEANSERS WHICH MAY
SCRATCH OR DAMAGE THE LCD SCREEN. AVOID CONTACT
WITH OBJECTS THAT MAY SCRATCH THE LCD SCREEN.
NOTE: SERVICING THE UNIT YOURSELF IS UNAUTHORIZED
AND COULD LEAD TO INJURY OR PRODUCT DAMAGE.

IMPORTANT SAFETY INSTRUCTIONS
1) Read these instructions.
2) Keep these instructions.
3) Heed all warnings.
4) Follow all instructions.
5) Do not use this apparatus near water.
6) Clean only with a dry cloth.
7) Do not block any ventilation openings. Install in accordance with the
manufacturer's instructions.
8) Do not install near any hear sources such as radiators, heat registers,
stoves, or other apparatus (including amplifiers) that produce heat.
9) Do not defeat the safety purposes of the polarized or grounding type plug.
A polarized plug has two blades with one wider than the other. A grounding
type plug has two blades and a third grounding prong. The wide blade or
the third prong is provided for your safety. When the provided plug does
not fit into your outlet, consult an electrician for replacement of the obsolete
outlet.
10) Protect the power cord from being walked on or pinched particularly at
plugs, convenience receptacles, and the point where they exit from the
apparatus.
11) Only use the attachments/accessories specified by the manufacturer.
12) Use only with the cart, stand, tripod, bracket, or table specified by the
manufacturer, or sold with the apparatus.
When a cart is used, use caution when moving the cart/apparatus
combination to avoid injury from tip-over.
13) Unplug this apparatus during lightning storms or when unused for long
periods of time.
14) Refer all serving to qualified service personnel. Servicing is required when
the apparatus has been damaged in any way, such as power supply cord
or plug is damaged, liquid has been spilled or objects have fallen into the
apparatus, the apparatus has been exposed to rain or moisture, does not
operate normally, or has been dropped.
15 Apparatus shall not be exposed to dripping or splashing and no objects
filled with liquids, such as vases, shall be placed on the apparatus.

CONTENT
Safety Notice Items...................................................................................
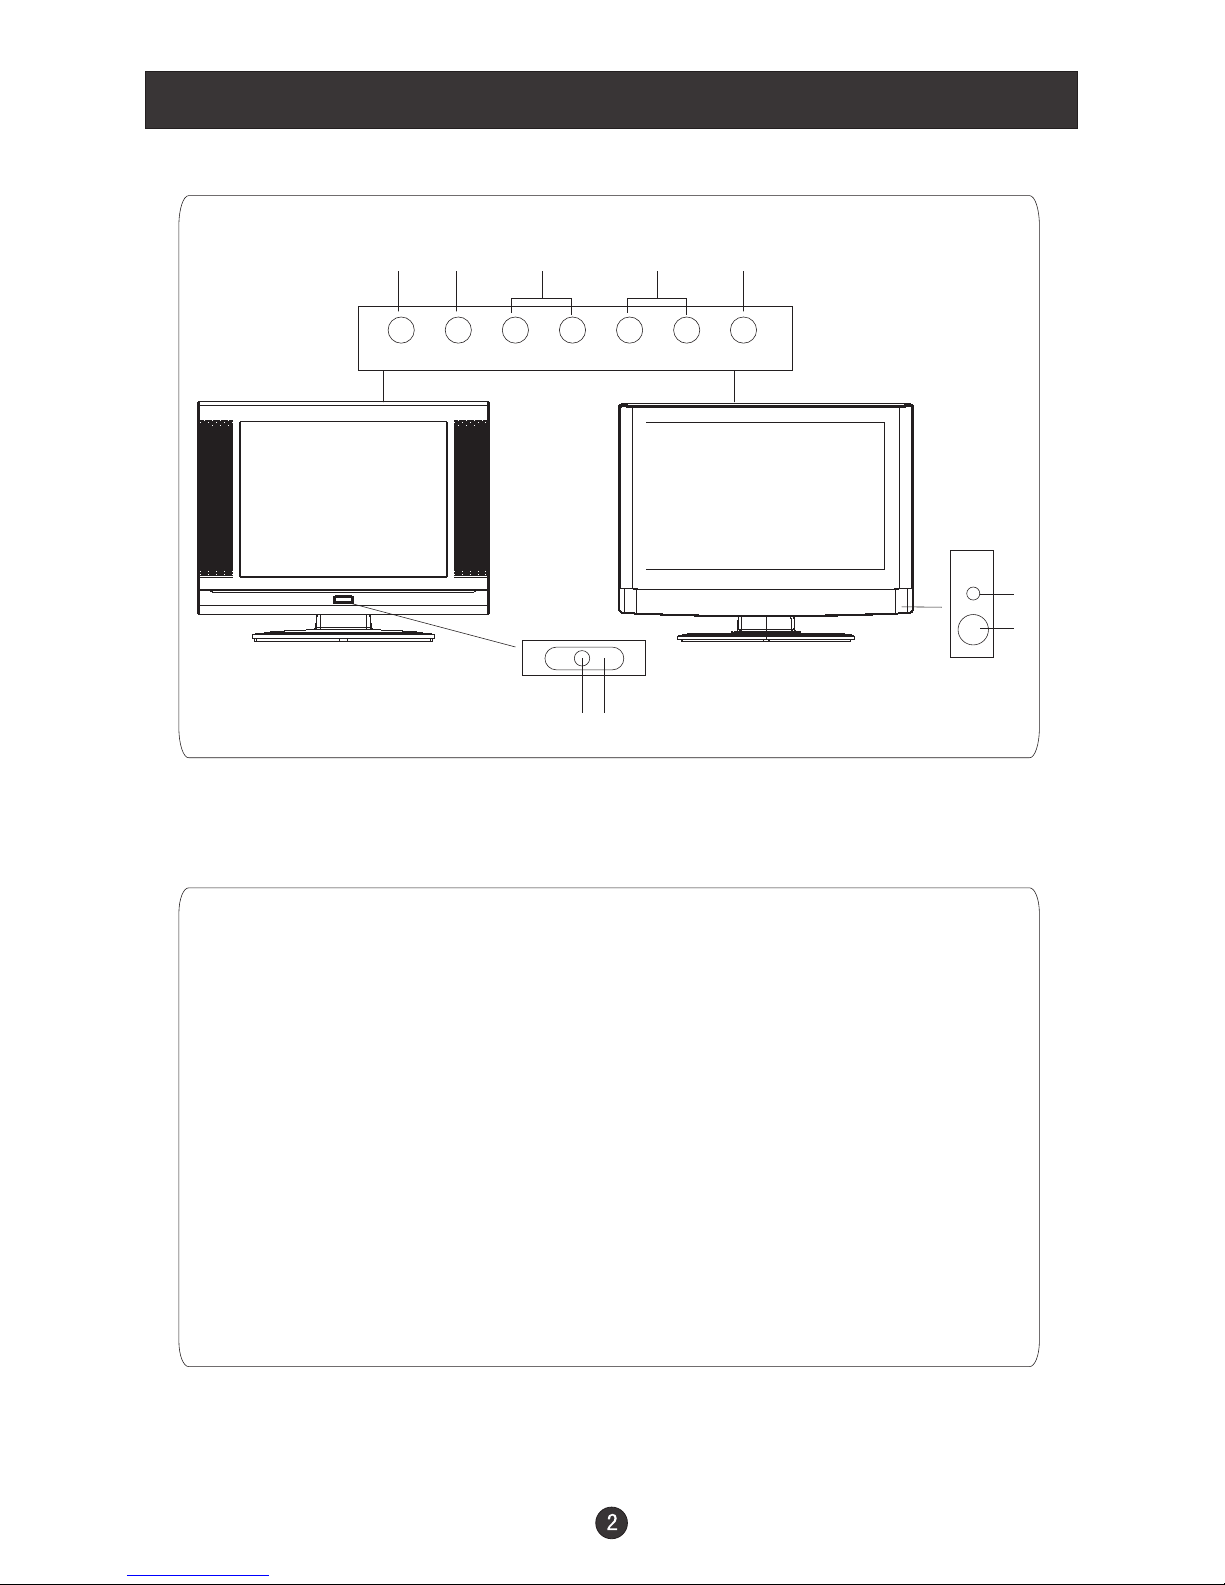
Front Panel Controls..................................................................................
Connection Options...................................................................................
Remote Control Key Functions...................................................................
Remote Control ..................................................................................
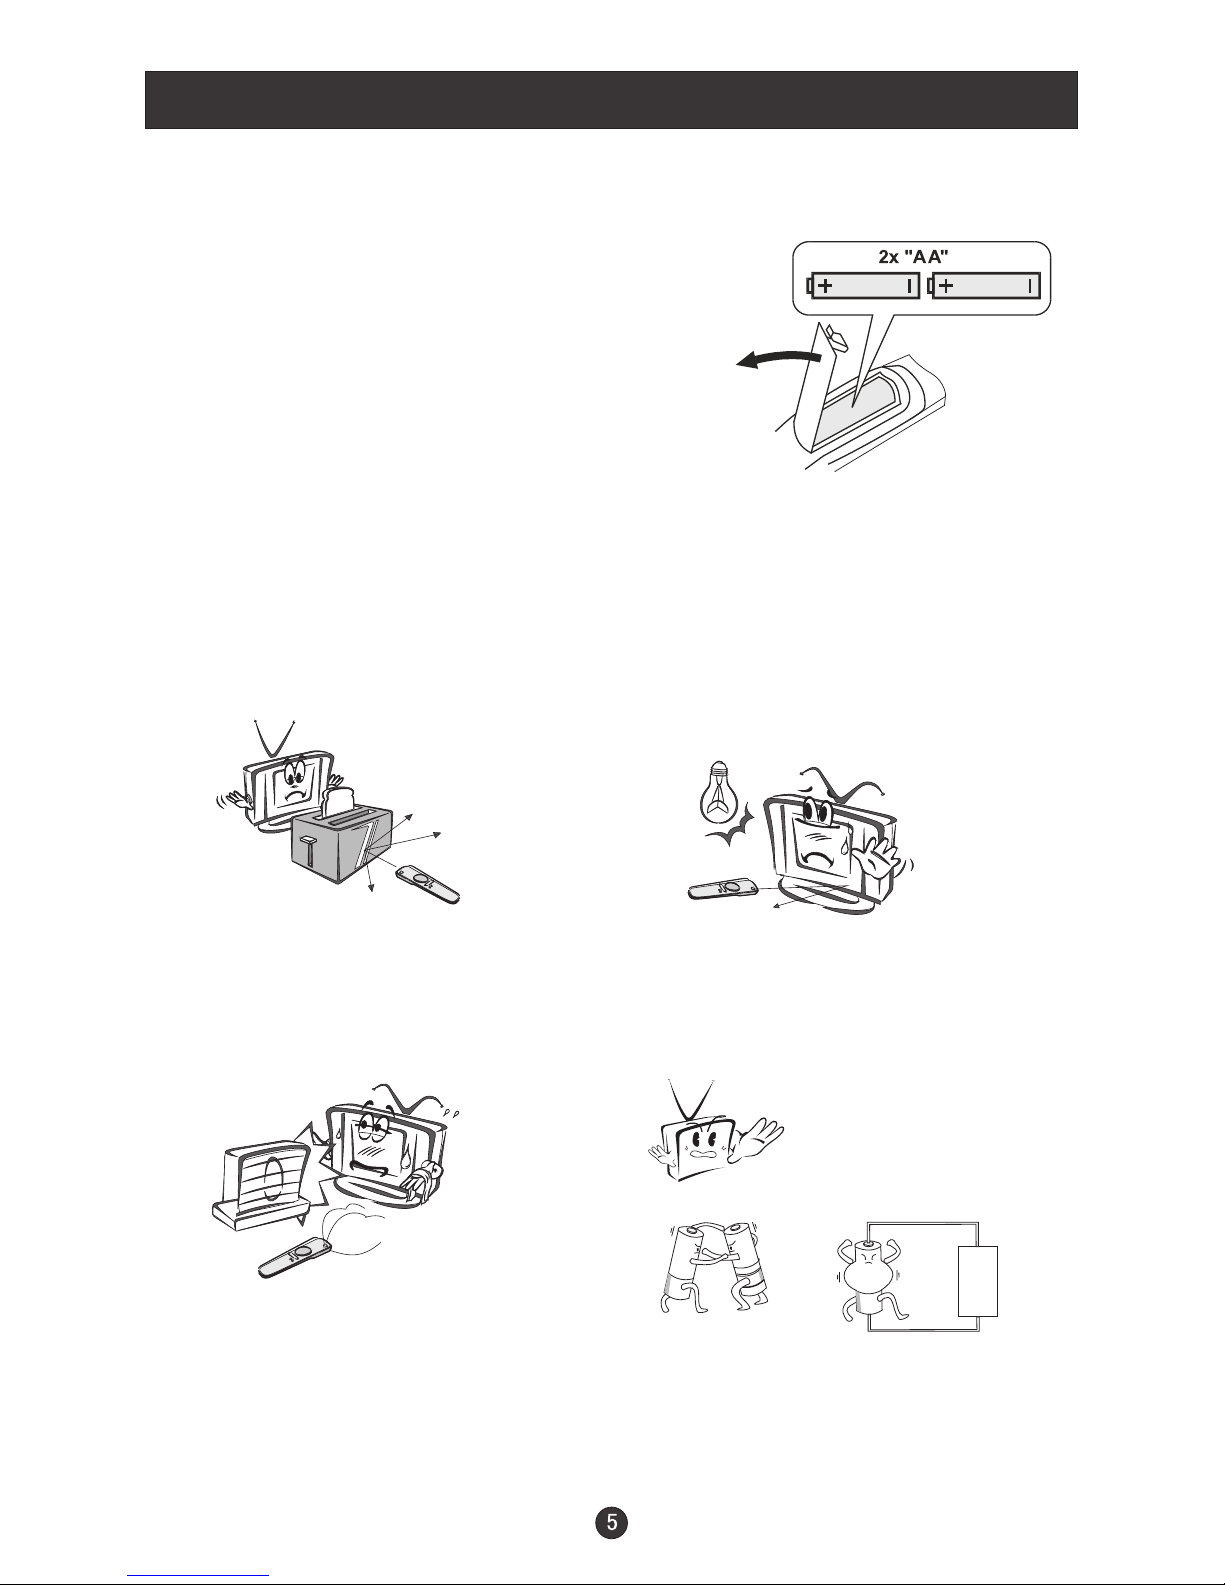
Installing Batteries..................................................................................
Connection Instructions.............................................................................
Grounding..............................................................................................
External equipment Connections..............................................................
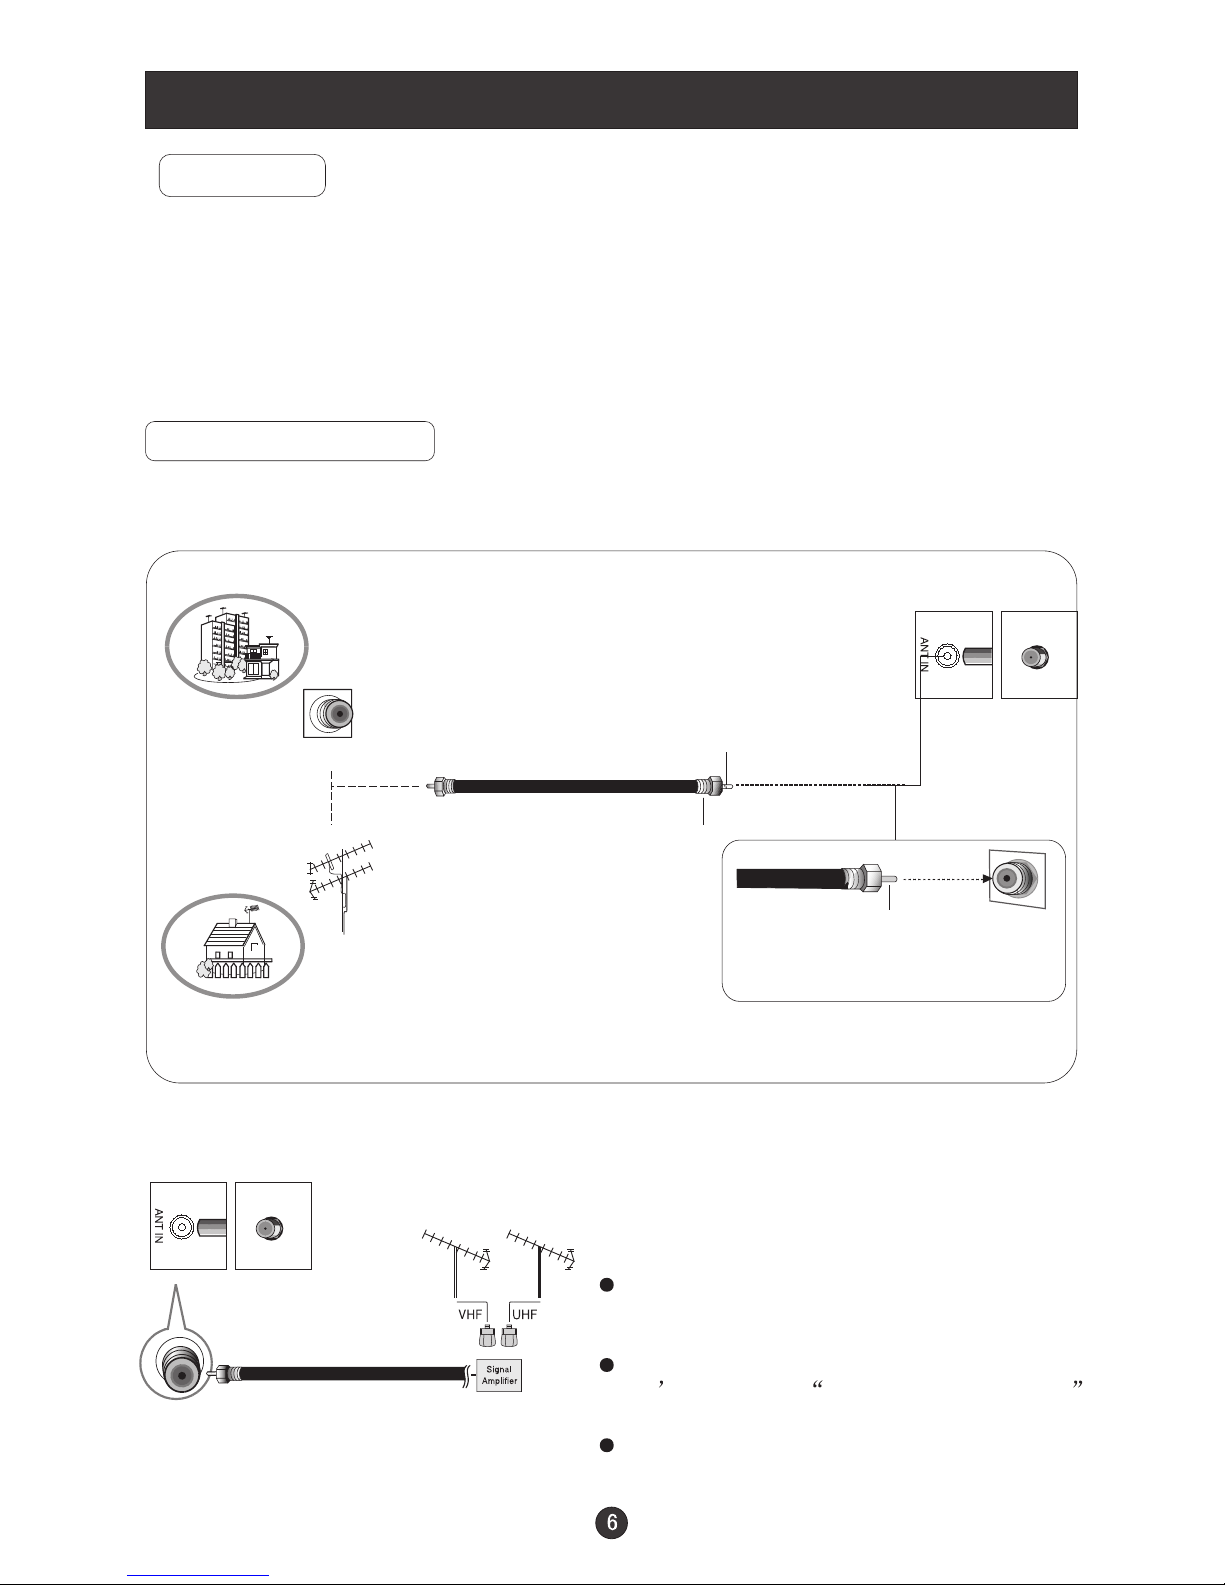
Antenna Connection.............................................................................
PC Setup.............................................................................................
VCR Setup...........................................................................................
Cable TV Setup....................................................................................
External AV Source Setup......................................................................
Basic Operating Instructions.......................................................................
Turn on the LCD-TV.................................................................................
Audio Control..........................................................................................
Mute......................................................................................................
Select the TV Channel You Want...............................................................
Picture Mode...........................................................................................
Program Scan.........................................................................................
Sleep......................................................................................................
Menu Operations.......................................................................................
Picture Menu Options...............................................................................
Picture Menu Options Continued...............................................................
Sound Menu Options................................................................................
Sound Menu Options Continued................................................................
Function Menu Options.............................................................................
Function Menu Options Continued.............................................................
Adjust Menu Options................................................................................
Tuning Menu Options..............................................................................
Tuning Menu Options Continued..............................................................
Parental Menu Options.............................................................................
Parental Menu Options Continued.............................................................
DVD Features..........................................................................................
Special Function Playback.......................................................................
DVD System Setup...................................................................................
Playable Discs.........................................................................................
Disc Protection and DVD Characteristics...................................................
Troubleshooting Guide...............................................................................
Specifications...........................................................................................
Warranty terms.........................................................................................
1
2
3
4
5
5
6
6
6
6
7
8
9
9
10
10
10
10
11
11
11
11
12
12
13
13
14
15
16
16
17
18
18
19-21
22
24
25
29
30
31
32
33
To users:
Thank you for our LCD-TV.purchasing
Before connecting the LCD-TV and turning on the power, please
read this book carefully. Please keep this book for later use.
If the unit is disabled by an electrostatic discharge, please turn off
the power to the unit and turn it back on to reset.

Safety Notice Items
Incorrect usage maycause fire orelectric shock.
Please keep this manual for later use;
Please comply strictly with the warning instructions on the machine and
in this book;
Before operation, please make sure that the operating voltage of your unit is
correct;
Do not remove the back cover. If service is needed, please contact an
Authorized service technician.
To prevent this, please do as
required when you are installing, using and cleaning this machine. To insure your
safety and extend the life-span of LCD-TV, please readthe following items
carefully before using:
lPlease read and understand all the instructions before operation;
l
l
lPlease comply with the instructions provided;
lPlease do not use additional devices that are not recommended by
manufacturer:
l
lDo not placethe unit onunstable, dusty andhumid places;
lNever put theunit in directsunlight or nearheat sources;
lAllow enough space for proper ventilation;
lPlease keep water away from the LCD-TV . If water comes in contact with the
LCD-TV, disconnect the power cord from the power source, then wipe the set
with a dry soft cloth;
l

Front Panel Controls
Control Panel Function
1. Power supplyswitch
2.TV/AV PC/COMPONENT/AV/SV/TV
3. MENU Press to select the main menu
4. VOL- Volume down/ Left orientation to adjust the item in the OSD
VOL+ Volume up / Right orientation to adjust the item/Press to enter
5. CH- TV channel down / to select the item in the menu
CH+ TV channel up / to select the item in the menu
6. Power indicator
Illuminates red in standby mode, illuminates green when the display is
turned on
7.Remote Sensor
Selects the input signals:
Receives the signals from the remote control
6
7
67
TV/AV MENU VOL- VOL+ CH- CH+ POWER
23451
LD1510A LD1910A/LD2010A

Connection Options
The figure is just for reference, please see the real.
VGA Input
Connect to theVGA
15PIN analog output
connector of aPC
display card to use set
as a PC display
DVD/DTV Input
Connect a component
video/audiodevice to
these jacks
Video Input
Connect video output
from an external
device to thisjack
AV/S-VIDEO/
COMPONENT Audio
Input
Connect audio output
from an externaldevice
to these jacks
PC Audio Input
Connect the PC output
connector from aPC to
the audio inputport
Earphone port
Antenna Input
Connect cable or
antenna signals to
the TV, either direc-
tly or through your
cable box.
S-Video Input
Connect S-Video out
from an S-Video device
to the jacks.
ANT IN S-VIDEO VGA IN
PC AUDIO IN AUDIO IN
R L
VIDEO IN
V
Pb
Pr Y
COMPONENT IN
ANT IN S-VIDEO VGA IN
PC AUDIO IN AUDIO IN
R L
VIDEO IN
V
Pb
Pr Y
COMPONENT IN
DVD insert
DVD
STOP PLAY/PAUSE OPEN/CLOSE
PREV NEXT
Disc Label

Remote Control Key Functions
When using the remote control, aim it
towards the remotesensor on theTV
Stand By
DVD Open/close
Scan
TV/DVD
Mute
Call Screen Display
Program Number
TV Sleep button
Volume/Channel Selection
MENU
DVD 10+
DVD STOP
DVD SUBTITLE
DVD SETUP
DVD PAUSE/STEP
DVD FAST REVERSE
DVD FAST FORWARD
DVD MENU
DVD NEXT
DVD PREVIOUS
DVD REPEAT
DVD PLAY/ENTER
DVD A-B REPEAT
DVD Cursor Move button
DVD SLOW
DVD ANGLE
DVD SEARCH
DVD TITLE/PBC
DVD PROGRAM
DVD CALL
TV/AV and input selection
Return to Previous Channel
CCD ( closed caption) On / Off
Adjust Picture Mode
Exit On Screen Display
Mode
Zoom Function
Select MONO,STEREO, SAP in NTSC system
DVD AUDIO
Buttons on the remote control
UP
DOWN
LEFT RIGHT
POWER TV/DVD OPEN/CLOSE
SCAN RECALL DISPLAY MUTE
1234
5678
9900
CCD
P.STD
CH+
CH-
VOL
-
VOL
+
MENU
EXIT 10+
STOP SETUP PAUSE/STEP
REV FWD .PREV NEXT
D.MENU REPEAT A-B
PLAY/ENTER SLOW
ANGLE TITLE/PBC SEARCH
ZOOM D.CALL
PROGRAM
SUBTITLE
MTS/SAP
TV/AV
SLEEP
AUDIO

Remote Control
Installing Batteries
Remove the battery cover.
Insert two size AA batteries matching
the +/-polarities of the battery to the +/-
marks inside the battery compartment.
!
!
Precautions
Make sure that there is no
obstacle between theremote
controller and televisionset.
As strong light may interfere with the
signals, change yourposition to
operate the remote control if
the television cannot be turned
on or off as expected.
Keep the remote control
away from heat sources or
humid areas toensure
effective performance of
the remote.
Make sure that two AA1.5V alkaline
batteries are loaded. The batteries
must be of the same type, must be
inserted properly, and must not be
rechargeable.

Connection Instructions
Ensure that you connect the grounding / earth wire to prevent possible
electric shock. If grounding methods are not possible, have a qualified
electrician install a separate circuit breaker. Do not try to ground the
unit by connectingit to telephone wires, lightening rods, or gas pipes.
Grounding
External Equipment Connections
Antenna Connection
- Antenna or Cable Service with a Cable Box Connections
- For optimum picture quality, adjust antenna direction if needed.
Multi-family Dwellings/Apartments
(Connect to wallantenna socket)
wall antenna
socket
VHF antenna
UHF antenna
outdoor
antenna
Single-family Dwellings /Houses
(Connect to walljack for outdoorantenna)
Bronze Wire
Be careful notto bend thebronze
wire when connectingthe antenna.
Bronze Wire
Turn clockwise to tighten.
RF coaxial wire(75 ohm)
To improve picture quality in a poor
signal area, purchase and install a
signal amplifier.
If the antenna needs to be split for two
TV s, install a 2-Way Signal Splitter
in the connections.
If the antenna is not installed properly,
contact your dealer for assistance.
NOTE: Cables shownare not included with the TV

Connection Instructions
You can use your LCD-TV as a monitor for your personal computer using a VGA
cable (not supplied).
PC Setup
Connection and use steps:
1.Read the userguide supplied with
your computer and ensure that it has
a VGAconnector;
2.Make sure that the power of the LCD
-TV and thePC are off;
3.Connect a Dtype 15-pin VGAinterface
cable ( not supplied ) to the VGA video
interface connector on the PC. Then
connect the other end to the VGA video
interface connector on the back of the
LCD-TV.Tighten the screws on the VGA
connectors once they are firmly
connected;
4.Turn on the power of the LCD-TV first ,
and then turn on the power of the PC;
5.Press the TV/AV button to set the video
input mode ofthe LCD-TV toPC-RGB;
6.Check the image on your TV. There may be noise associated with the resolution,
vertical pattern, contrast or brightness in PC mode. If noise is present, change
the PC mode to another resolution, change the refresh rate to another rate or
adjust the brightness and contrast on the menu until the picture is clear. If the
refresh rate of the PC graphic card can not be changed,change the PC graphic
card or consult the manufacturer of the PC graphic card.

Connection Instructions
VCR Setup
Connection and use steps:
1.Read the user guide supplied with your AV devices and ensure that it has
Composite or S-Video connectors;
2.Make sure that the power of the LCD-TV and the AV device are off;
.Turn on the power of the LCD-TV first ;
and then turn on the power of the AV
device;
4.Press the TV/AV button to set the video
input mode of the LCD-TV to S-VIDEO
mode or AV mode.
Connection Option 1
Set VCR output switch to 3 or 4 and then
tune TV to the same channel number.
Connection Option 2
1. Connect the audio and video cables from
the VCR's output jacks to the TV input jacks,
as shown in the figure.
When connecting the TV to VCR, match
the jack colors (Video = yellow, Audio
Left = white,and Audio Right = red).
If you connect an S-VIDEO output from
VCR to the S-VIDEO input, the picture
quality is improved; compared to conne-
cting a regular VCR to the Video input.
2. Insert a video tape into the VCR and press
PLAY on the VCR. (Refer to the VCR owner s
manual.)
3
- To avoid picture noise (interference), leave an adequate distance between the
VCR and TV
.
VCR
1
2

Connection Instructions
Cable TV Setup
- After subscribing to a cable TV service from a local provider you can watch cable
TV programming. The TV cannot display TV programming unless a TV tuner
device or cableTV converter box is connectedto the TV.
- For furtherinformation regarding cable TV service, contact your local cable TV
service provider(s).
Connection Option 1
1. Select 3or 4 with channel switch on cable
box.
2. Tunethe TV channel to thesame selected
output channel oncable box.
3. Select channelsat the cable box or with
the cable boxremote control.
Connection Option 2
1. Connect theaudio and video cables from
the Cable Box'soutput jacks tothe TV
input jacks, asshown in thefigure.When
connecting the TV to a Cable Box, match
the jack colors
(Video = yellow, Audio Left =white, and
Audio Right= red).
2. Select theinput source by using the TV/AV
button on theremote control.
3. Select yourdesired channel with the
remote control forcable box.
External AV Source Setup
How to connect
Connect the audioand video cables from
the external equipment'soutput jacks to the
TV input jacks,as shown in the figure.
When connecting theTV to external equip-
ment, match thejack colors (Video = yellow,
Audio Left =white, and Audio Right = red).
How to use
1. Select theinput source by using the TV/AV
button on theremote control.
2. Operate thecorresponding external equi-
pment. Refer toexternal equipment ope-
rating guide.

Basic Operating Instructions
Turn on the LCD-TV
When the POWER button is pressed and the LCD-TV
is turned on, the indicator light on the front of the LCD-TV
changes from red to green. When the LCD-TV is turned off
using the power button, the LCD-TV will go into standby
mode and the indicator light turns red.
Note:
The display of the input mode
will disappear in3 seconds. PC
COMPONENT
AV
SV
Switch AmongDifferent Inputs: TV / PC / COMPONENT / AV / SV
Each time you press the TV/AV button, TV, PC, COMPONENT, AV, SV,
will appear on the screen in order.
Audio Control
1.Press the VOL+ button to increase the volume. A number will appear
on screen indicating the volume level.
2.Press the VOL- button to decrease the volume. A number will appear
on screen indicating the volume level.
Mute
1.Press the MUTE button to mute the sound temporarily. A mute icon
appears on the screen.
2.Press the MUTE button or VOL+/VOL- again to restore the sound.
The mute icon disappears.
TV
30
POWER TV/DVD OPEN/CLOSE
SCAN RECALL DISPLAY MUTE
1234
5678
9900
CCD
P.STD
CH+
CH-
VOL
-
VOL
+
MENU
EXIT 10+
STOP SETUP PAUSE/STEP
REV FWD .PREV NEXT
D.MENU REPEAT A-B
PLAY/ENTER SLOW
ANGLE TITLE/PBC SEARCH
ZOOM D.CALL
PROGRAM
SUBTITLE
MTS/SAP
TV/AV
SLEEP
AUDIO

Basic Operating Instructions
Select the TV Channel You Want
You can use the number keys on the remote control to directly select TV
channels.
The LCD-TV can store up to channels , and you can press the keys on the
remote control or on the panel to make a selection.
181
Program Scan
Press SCAN button to scan through all the memorized TV channels. The scan
will pause for about 2 seconds on each channel .
If you want to stop the function during auto scanning, simply press the SCAN
button again .
Picture Mode
Press P.STD button on the remote control for menu display . For desired mode as
follows:
PERSONAL STANDARD MILD FRESH
Sleep
Press SLEEP button to set the time : SLEEP 240-SLEEP 180-SLEEP 120
-SLEEP 90-SLEEP 60-SLEEP 45-SLEEP 30-SLEEP 15-SLEEP OFF
This feature allows you to turn off the television after a pre-selected
minutesnumber of

Menu Operations
Picture Menu Options
1. Press MENU button to display the main menu, and VOL+/VOL-to select the
main menu .
2. Press CH+/CH- to scroll through the parameters
3. Press VOL+/VOL- buttons to make changes tothe parameters
4. Press the EXIT button to exit the menu
* In this manual,the OSD (On Screen Display) may be differ from your TV
These are examplesto illustrate the TV's operation.
Press TV/AV to selectthe input source. The menu for each source is
different .
Picture quality can be adjusted for any input separately .
The picture qualityon the screen can be adjusted as follows:
1. Press MENU button and VOL+/VOL- until the followingmenu appears
on the screen.
PC/COMPONENT MENU
TV/AV/SV MENU
PICTURE
BRIGHTNESS
CONTRAST
SHARPNESS
COLOR
HUE
PICTURE
BRIGHTNESS
CONTRAST
SHARPNESS
COLOR TEMP
COLOR
30
Note: Symbols ontop of themenu in thismanual may differ from the actual set display
30
30
2
COOL
50
50
2
50
50 Only available inNTSC system
Not available incomponent
0Not available inPC
Note: Asthe source of signal is component, the color adjustmentfunction of this television
is only forminor adjustment to avoid distortion and to achieve theauthenticity of color.

Menu Operations
2. Press CH+/CH- button to enter the picture menu and to go up and down to
select the desired option .
3.Press VOL+/VOL- button to increase and decrease the level to adjust the
selected option toyour preference .
4. Repeat step 2 and step 3 until desired picture quality has been achieved .
Function:
BRIGHTNESS :
CONTRAST :
SHARPNESS :
COLOR : Press VOL+/VOL- to adjust the color
HUE :
COLOR TEMP : Press to select the color temperature from
Adjust the brightness of the picture . By increasing the level, it
will lighten the dark parts of the picture and by decreasing the level it will
darken the lighter parts of the picture.
Adjust the contrast of the picture . The contrast becomes higher as
the number increases.
Adjust the amount of the detail enhancement , the image
sharpness rises as the number increases (By increasing the level, it will show
cleaner and clearerimages and bydecreasing the level,it will makethe picture
smoother).
Adjust the tone of the picture . This will appear and can be adjusted only in
NTSC mode
WARM/NEUTRAL/COOL .
Picture Menu Options continued
Sound Menu Options
Sound can beadjusted for anyinput as follows:
1. Press MENU and VOL+/VOL- button until the following menu appears on
the screen
VOLUME
BALANCE
BASS
TREBLE
AUDIO MODE
AVL
SOUND
50
50
30
70
VOICE
OFF

Menu Operations
Sound Menu Options continued
You can adjust sound options to the levels you prefer.
2. Press CH+/CH- button to enter the audio menu and to go up and down to
select the desired option .
3.Press VOL+/VOL- button to increase and decrease the level to adjust the
selected option toyour preference .
4. Repeat step2 and step3 until desired sound quality has been achieved ..
Function :
VOLUME :Adjust the volumeof your TV
BALANCE :
BASS :
TREBLE :
mode .
AUDIO MODE : Press VOL+/VOL- to select amongPERSONAL, VOICE, MUSIC
and THEATRE .
AVL:
Adjust the balanceof the audio output from left to right . When
indication value of balance increases toward +50 , sound from the left speaker
becomes weaker . When indication value of balance decreases toward -50 ,
sound from the right speaker become weaker .
Adjust the bass of the sound . Can only be adjusted under PERSONAL mode.
: Adjust the trebleof the sound. Can onlybe adjusted underPERSONAL
Automatic Volume Limit Control reduces the effect of high volumes by
limiting the same volume peaks across all channels .

Menu Operations
Function Menu Options
Menu Language Selection:
The OSD menus can be shown onscreen in the various languages. First select the
system language.
1. Press MENU button and VOL+/VOL- until the followingmenu appears
on the screen.
2. Press CH+/CH- button to enter the function menu and to go up and down to
select the desired option .
3.Press VOL+/VOL- button to increase and decrease the level to adjust the
selected option toyour preference .
4.
Functions:
1. INPUT SOURCE : Display current mode . There are DVD, PC, COMPONENT ,
AV , SV ,TV to display .
2. LANGUAGE :Press VOL+/VOL- to select the OSD language.
3. CC MODE:Press VOL+/VOL-buttons to selectthe Closed Caption options.
Closed Captioning helpsthe hearing impairedwith the broadcast program,
as well as helping children learn how to read. A builtin decoder displays the
audio portion of a program as text on the screen when this option is selected.
OFF: When OFFis displayed on CC MODE isturned off.
CC1: When CC1 on TV means CC MODE is turned on.
CC2 to CC4: For other modes of video related broadcast information.
TT1: For program guide and other information displayed by broadcasters.
(This blocks alarge portion of the picture on your screen).
TT2 to TT4 :For other modes of information displayed by broadcasters.
(This blocks a large portion of the picture on yourscreen).
Repeat step 2 and step 3 until desired settings have been achieved .
TV, it means
is displayed
IMPORTANT: Closed captioning availability entirely depends on broadcasters
supplying the signal. Therefore, closed captioning might not always be
available and languageavailability will differ by broadcast.
INPUT SOURCE TV
LANGUAGE ENGLISH
CC MODE ON
BLUE SCREEN ON
RESET
FUNCTION

Menu Operations
Function Menu Options Continued
Note: Select CC1for full translation of the primarylanguage such as English in
your area. SelectCC2 for secondary language translation suchas French or
any other languagethat may be broadcast in yourarea.
4.BLUE SCREEN:
5. RESET :
Press VOL+/VOL- to select ON or OFF. To set ON, the screen
will turn blue after 3 seconds if there is no signal.
Press VOL+ to reset some settings to the factory default .
Adjust Menu Options
1. Press MENU and VOL+/VOL- button until the following menu appears on the
screen
ADJUST
AUTO CONFIG
PHASE
CLOCK
H POSITION
V POSITION
Note: This menu appears only inPC mode .
2. Press CH+/CH- button to enter the adjust menu and to goup and down to
select the desired option .
3.Press VOL+/VOL- button to increase and decrease the level to adjust the
selected option toyour preference .
4. Repeat step2 and step3 until desired quality has been achieved ..
Functions:
AUTO CONFIG :
PHASE :
CLOCK :
H-POSITION : Picture horizontal position adjust
V-POSITION : Picture vertical position adjust .
Automatically adjusts picturelocation frequency and phase
parameters .
Removes any horizontal distortion and clears or sharpens the displayed
characters .
Adjust the TFT-LCD tomatch the PCinput source clock frequency
0
50
50
50
This manual suits for next models
2
Table of contents
Other Haier LCD TV manuals

Haier
Haier LE48M600 User manual

Haier
Haier LT32C360 User manual

Haier
Haier LT26K3A User manual

Haier
Haier L32B1120 User manual

Haier
Haier L37A9A-A User manual

Haier
Haier L26C300 User manual

Haier
Haier L32F1120 User manual

Haier
Haier HL32D1 User manual

Haier
Haier LE19B610 User manual

Haier
Haier HLC32K2 User manual

Haier
Haier L32M9 User manual

Haier
Haier LE32B7500 User manual

Haier
Haier SRT32HC4433 User manual

Haier
Haier L26V6-A8 User manual

Haier
Haier P60A11-AK User manual

Haier
Haier L42A9-AK User manual

Haier
Haier HL32P2 User manual

Haier
Haier LE24D33800 User manual

Haier
Haier LE19Z6 User manual

Haier
Haier 40D3505T User manual