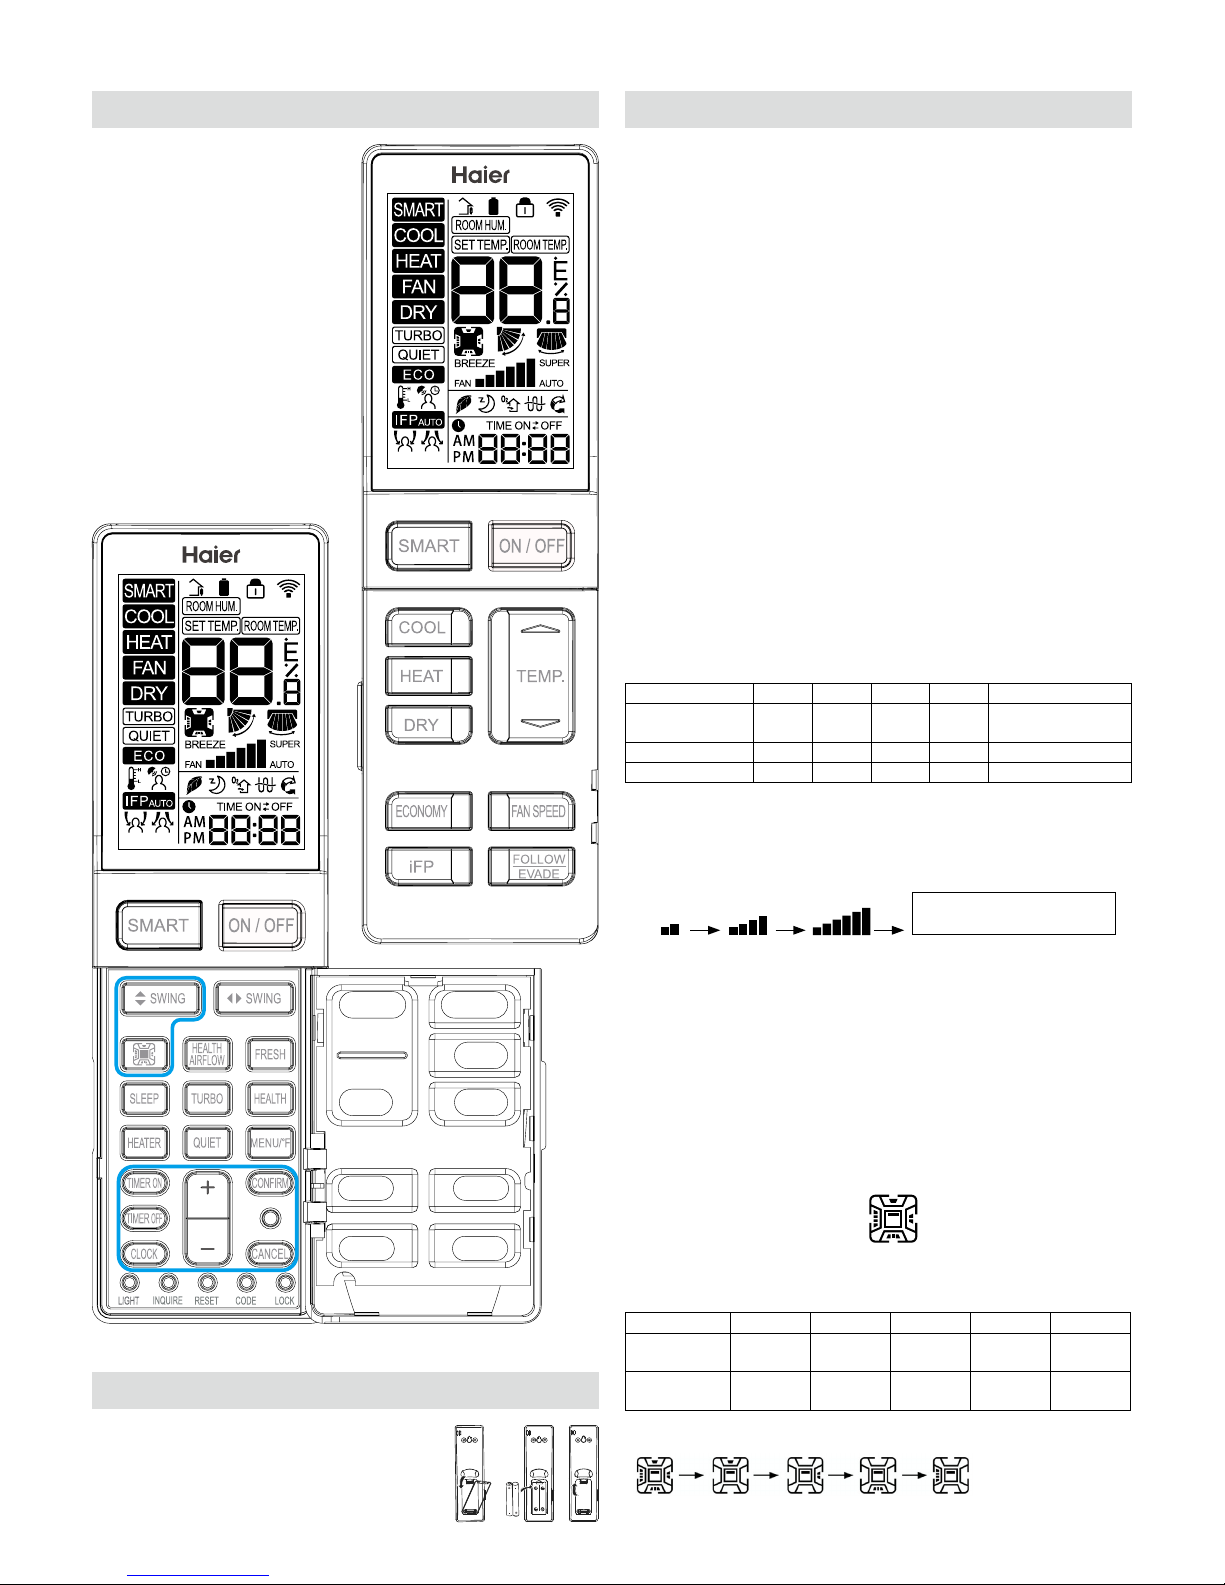
8. Vertical SWING Buttion
Air Flow Direction Adjustment
Press the SWING UP/DOWN button to choose the position of the
vertical airow louvers.
Status display of air ow
COOL/DRY
HEAT
9. Horizontal SWING Button
Press the SWING LEFT/DOWN button to choose the
position of the horizontal airow louvers.
Status display of air ow
COOL/DRY/HEAT:
10. HEALTH AIRFLOW (Available for some models):
Health Airow function will stir the air in the room.
(1) Press the "HEALTH AIRFLOW" button to show icon on LCD
display.
(2) The Quadrant icon will cycle to each quadrant.
(3) Horizontal swing default is oscillate. It can be adjusted with each
press of the Horizontal SWING Button between narrow, mid, wide
and left to right.
(4) Vertical swing is not adjustable.
(5) Fan speed default is variable. It can be adjusted by pressing FAN
SPEED Button between low, medium and high.
REMOVE IMAGES
11. Sleep Operation Mode:
1. SLEEP mode during COOL, DRY modes
One hour after SLEEP mode starts, the temperature will rise 2°F
.above set temperature, after another hour, the temperature rises
an additional 2°F. The unit will run for an additional six hours, then
turns off. The nal temperature is 4°F higher than the initial set
temperature. Using this feature will help with achieving maximum
efciency and comfort from your unit while you sleep.
2. SLEEP mode during HEAT mode
One hour after SLEEP mode starts, the temperature will decrease
4°F below set temperature, after another hour, the temperature
will decrease an additional 4°F. After an additional three hours, the
temperature will rise by 2°F. The unit will run for an additional three
hours, then turns off. The nal temperature is 6°F lower than the
initial set temperature. Using this feature will help with achieving
maximum efciency and comfort from your unit while you sleep.
3 In SMART mode
The unit operates in corresponding sleep mode adapted to the
automatically selected operation mode.
Note:
When the TIMER ON function is set, the sleeping function cannot
be set. If the sleeping function has been set, and the user sets the
TIMER ON function, the sleeping function will be canceled, and the
unit will be set to the timer function.
12. HEALTH:
(1) During power-on or power-OFF, press “HEALTH” button to display
icon on LCD display, and press “HEALTH” button again to cancel.
(2) During power-OFF, press “HEALTH” button to enter Fan mode,
start low wind and HEALTH function, display icon .
(3) Switch among modes, and keep HEALTH function.
(4) If HEALTH function is set, power OFF and then on to stay in
HEALTH mode.
(5)HEALTH function is not available for some units.
13. ECO:
(1) Press ECO button and the display will show .
(2) ECO is valid under all modes, it is memorized among switch of all
modes.
(3) ECO function power-on or power-OFF is memorized.
(4)ECO function is not available for some units.
14. Turbo/Quiet:
The TURBO function is used for fast heating or cooling.
Press TURBO button, the remote control will display the TURBO and
switch the fan to SUPER high. Press TURBO button again to cancel
function.
Press QUIET button,the remote control will display the QUIET and
1
2
3
654
switch fan to BREEZE. Press QUIET button again to cancel function.
Note:
TURBO/QUIET modes are only available when the unit is under
cooling or heating mode (not for smart or dry mode).
Running the unit in QUIET mode for a long period of time may
cause the room temperature to not reach the set temperature.If this
occurs,cancel QUIET mode and set the fan speed to a higher setting.
15. Requires optional motion sensor part
(1) Smart Focal Point (iFP) will operate the unit at set point only
when the room is occupied.
16. Evade/Follow
When the iFP sensor is installed the airow can be set to follow
occupants or evade them.
17. FRESH:
(1) FRESH function is valid under the state of ON or OFF. When air
conditioner is OFF, press “FRESH” button, display icon on LCD
display to enter Fan mode and low speed. Press “FRESH” button
again, this function is cancelled.
(2) After FRESH function is set, ON or OFF functions are kept.
(3) After FRESH function is set, mode switch function is kept.
(4)FRESH function is not available for some units.
18. °C/°F function
Press “MENU/°F” to toggle between [set temp]°F; [set temp]°C;and
10°C/50°F Low Temperature Heating mode. Low Temperature
Heating is only available when set to HEAT. When set to Low
Temperature Heating, the set point is dropped to a minimum
temperature to prevent damage from freezing temperatures.
19. HEATER:
(1) When HEAT mode is chosen and is displayed on LCD display,
pressing “HEATER” button can cancel and set HEATER function.
(2) Auto mode will not start HEATER function automatically, but can
set or cancel HEATER function.
(3) HEATER function is not available for some units.
20. Timer:
ON-OFF Operation
1.Start the unit and select the desired operating mode.
2.Press the TIMER OFF button to enter TIMER OFF mode.The
remote control will start ashing "OFF",adjusting time by"+/-" button.
3.Once the desired timer is selected for the unit to turn off,press the
CONFIRM button to conrm this setting.
Cancel TIMER OFF setting:
With a TIMER OFF set,press the CANCEL button once to cancel the
TIMER OFF.
Note:
Holding the "+/-"button down will rapidly adjust the time.After
replacing batteries or a power failure occurs,the time setting will need
to be reset.
According to the Time setting sequence of TIMER ON or TIMER OFF
,either Start-Stop or Stop-Start can be achieved.
21. Button +/-:
"+” Every time the button is pressed,the time increases 1 minute.
"-" Every time the button is pressed,the time decreases 1 minute.
Holding the "+" or "-" button down will rapidly adjust the time.
22. Clock:
Press “Clock” button, “AM” or “PM” will ash when remote is in
clock set mode. Use “+/-“ it set mode Use " clos mode. Use M.to
adjustclock and then press “CONFIRM” to exit set mode.
23. LIGHT:
Turns indoor unit display on and off.
24. RESET:
If the remote control is not functioning properly,use a pen point or
similar object to depress this button to reset the remote.
25. LOCK:
Used to lock buttons and LCD display.
26. CODE: Function reserved.
27. INQUIRE Function reserved.
1236
5
4
NO. 0150523321
Auto
Auto
Auto