Haier TDC2014S User manual

Please read this manual carefully
before using this TV set and keep it
for future reference.
USER MANUAL
20 TV/DVD
Combo
"
TDC2014S
TDCF2014S

PRECAUTIONS
FCC WARNING-This equipment may
generate or use radio frequency
energy.Changes or modifications to this
equipment may cause harmful
interference unless the modifications are
expressly approved in the instruction
manual.The user could lose the authority
to operate this equipment if an
unauthorized change or modification is
made.
LASER SAFETY
This unit employs a laser.Only a qualified
service person should remove the cover
or attempt to service this device,due to
possible eye injury.
CAUTION:USE OF CONTROLS OR
ADJUSTMENTS OR PERFORMANCE
OF PROCEDURES OTHER THAN
THOSE SPECIFIED HEREIN MAY
RESULT IN HAZARDOUS RADIATION
EXPOSURE.
CAUTION:VISIBLE AND INVISIBLE
LASER RADIATION WHEN OPEN AND
INTERLOCK DEFEATED.DO NOT
STARE INTO BEAM.
LOCATION:INSIDE,NEAR THE DECK
MECHANISM.
CONTENTS
Before Operation
Basic operation
Warning and cautions...........................................................................
Installation..............................................................................................3
..............................................................................
Preparation of the remote control..........................................................3
Function buttons and ........................................
Front panel of the TV set.....................................................................4
Rear panel of the TV set.......................................................................4
Using the remote control......................................................................5
Menu
........................................................................29
Specifications .....................................................................................30
Warranty
Antenna Connection
External Connections
Functions
Connection to the external audio and video equipment..................28
Troubleshooting guide
......................................................................................
DVD Operation
DVD Features.......................................................................................18
Advanced Playback..............................................................................19
Special Function Playback...................................................................20
DVD System Setup................................................................................22
Playable Discs.......................................................................................26
Disc Protection and DVD Characteristics..........................................27
Others
............................................................................................... 30
2
4
4
4
5
5
5
6
9
19
20
21
23
27
28
29
30
31
32

Important safety Instructions
22
Cleaning the tube
Should the picture tube require cleaning, disconnect the power and use a dry soft cotton cloth. Do not
use any cleaner or abrasive cloths.
CAUTION: TO REDUCE THE RISK OF ELECTRIC SHOCK, DO NOT REMOVE
COVER (OR BACK). NO USER SERVICEABLE PARTS INSIDE.
REFER SERVICING TO QUALIFIED SERVICE PERSONNEL.
DANGEROUS VOLTAGE
Uninsulated Dangerous Voltage, that may be of sufficient magnitude to constitute a risk
of electric shock, is present within the cabinet of this unit.
ATTENTION
The Owner's Manual contains important operating and maintenance instructions. For
your safety, it is necessary to refer to the manual.
1. READ INSTRUCTIONS
All the safety and operating instructions should be read before the unit is operated.
2. RETAIN INSTRUCTIONS
The safety and operating instructions should be retained for future reference.
3. HEED WARNINGS
All warnings on the unit and in the operating instructions should be adhered to.
4. FOLLOW INSTRUCTIONS
All operating and use instructions should be followed.
5. CLEANING
Unplug this unit from the wall outlet before cleaning. Do not use liquid cleaners or aerosol cleaners.
Use a damp cloth for cleaning the exterior cabinet only.
6. ATTACHMENTS
The manufacturer of this unit does not make any recommendations for attachments, as they may
cause hazards.
7. WATERAND MOISTURE
Do not use this unit near water. For example, near a bathtub, washbowl, kitchen sink, laundry tub,
in a wet basement, or near a swimming pool.
8. ACCESSORIES
Do not place this unit on an unstable cart, stand, tripod, bracket, or table.
The unit may fall, causing serious injury, and serious damage to the unit.
When a cart is used, use caution when moving the cart / apparatus
combination to avoid injury from tip-over.
WARNING:
TO REDUCE THE RISK OF FIRE ORELECTRIC SHOCK, DO NOT EXPOSE THIS
EQUIPMENT TO RAIN OR MOISTURE.
TO REDUCE THE RISK OF FIRE OR ELECTRIC SHOCK, AND ANNOYING
INTERFERENCE, USE THE RECOMMENDED ACCESSORIES ONLY.
9. VENTILATION
Slots and openings in the cabinet back or bottom are provided for ventilation, and to ensure reliable
operation of the unit, and to protect it from overheating. These openings must not be blocked or
covered. The openings should never be blocked by placing the unit on a bed, sofa, rug, or other
similar surface. This unit should never be placed near or over a radiator or heat source. This unit
should not be placed in a built-in installations such as a bookcase or rack unless proper ventilation
is provided or the manufacturer=s instructions have been adhered to.

Important safety Instructions
10. POWER SOURCES
This unit should be operated only from the type of power source indicated on the rating plate. If you are
not sure of the type of power supply to your home, consult your appliance dealer or local power company.
For units intended to operate from battery power, or other sources, refer to the operating instructions.
11. POWER-CORD PROTECTION
Power-supply cords shouldbe routed sothat they arenot likely tobe walked onor pinched by
items placed uponor against them,paying particular attentionto cords atplugs,convenience
receptacles, and thepoint where theyexit from theappliance.
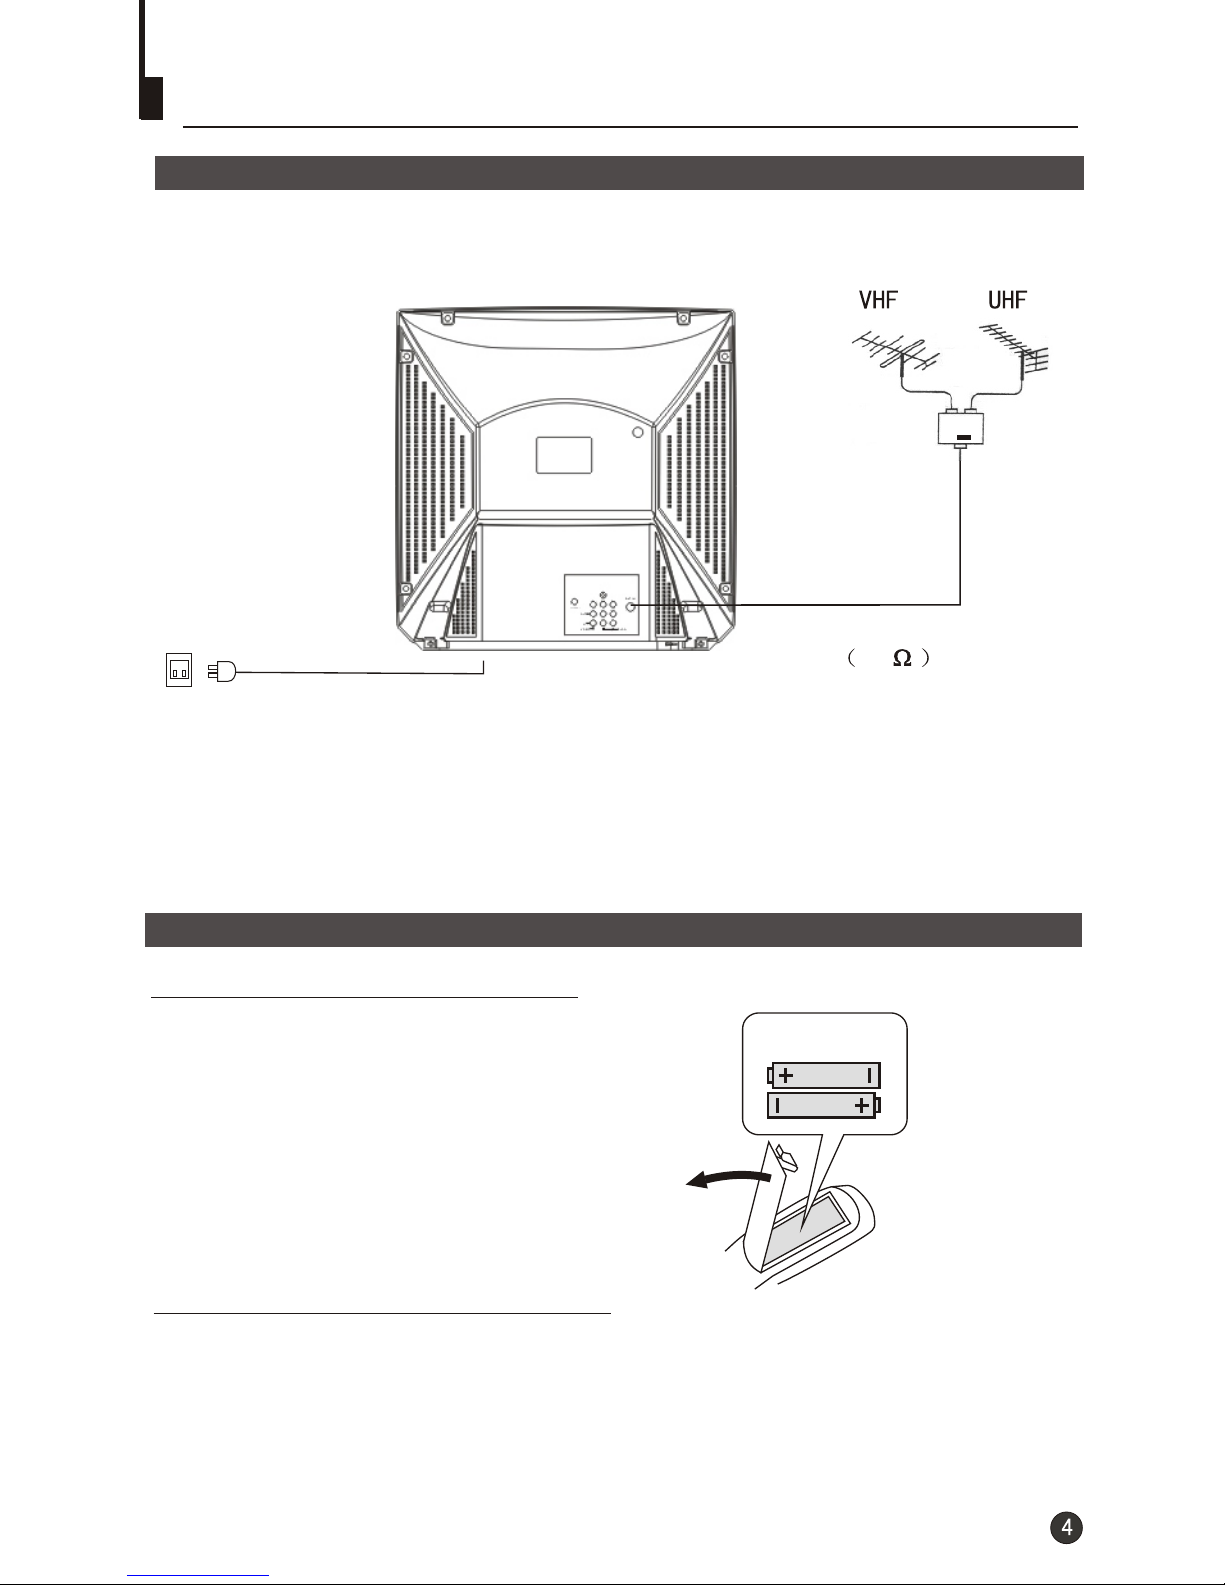
12. LIGHTNING
Toprotect your unitfrom a lightningstorm, or whenit is leftunattended and unusedfor long
periods of time,unplug it fromthe wall outletand disconnect theantenna or cablesystem. This
will prevent damageto the unitdue to lightningand power linesurges.
13. POWER LINES
An outside antennasystem should notbe located inthe vicinity ofoverhead power linesor other
electric light orpower circuits, orwhere it canfall into suchpower lines orcircuits. When installing
an outside antennasystem, extreme careshould be takento keep fromtouching such powerlines
or circuits, ascontact with themmight be fatal.
14. OVERLOADING
Do not overloadwall outlets andextension cords, asthis can resultin a riskof fire orelectric
shock.
15. OBJECT AND LIQUID ENTRY
Do not pushobjects through anyopenings in thisunit, as theymay touch dangerousvoltage
points or shortout parts thatcould result infire or electricshock. Never spillor spray anytype of
liquid into theunit.
16. SERVICING
Do not attemptto service thisunit yourself asopening or removingcovers may exposeyou to
dangerous voltage orother hazards. Referall servicing toqualified service personnel.
17. DAMAGE REQUIRING SERVICE
Unplug this unitfrom the walloutlet and referservicing to qualifiedservice personnel underthe
following conditions:
a. When thepower-supply cord orplug is damaged.
b. If liquidhas been spilled,or objects havefallen into theunit.
c. If theunit has beenexposed to rainor water.
d. If theunit does notoperate normally byfollowing the operatinginstructions. Adjustonly those
controls that arecovered by theoperating instructions, asan improper adjustmentof other
controls may resultin damage andwill often requireextensive work bya qualified technicianto
restore the unitto its normaloperation.
e. If theunit has beendropped or thecabinet has beendamaged.
f . Whenthe unit exhibitsa distinct changein performance, thisindicates a needfor service.
18. REPLACEMENT PARTS
When replacement partsare required, besure the servicetechnician uses replacementparts
specified by themanufacturer or thosethat have thesame characteristics asthe original part.
Unauthorized substitutions mayresult in fire,electric shock orother hazards.
19. SAFETY CHECK
Upon completion ofany service orrepairs to thisunit, ask theservice technician toperform safety
checks to determinethat the unitis in properoperating condition.
20. HEAT
The product shouldbe situated awayfrom heat sourcessuch as radiators,heat registers, stoves,
or other products(including amplifiers) thatproduce heat.
21. DISC TRAY
Keep your fingerswell clear ofthe disc trayas it isclosing. It maycause serious personalinjury.
22. CONNECTING
When you connectthe product toother equipment, turnoff the powerand unplug allof the
equipment from thewall outlet. Failure to do so may cause an electric shock and serious personal
injury. Readthe owner's manualof the otherequipment carefully andfollow the instructionswhen
making any connections.
23. SOUND VOLUME
Reduce the volumeto the minimum level before you turn on the product. Otherwise, sudden high
volume sound maycause hearing or speaker damage.

Installation
Antenna connection
Generally speaking, to enjoy a clearer picture, we recommend that you use a CATV
system or an outdoor antenna .In different places, the suitable antenna type and position
may vary.
Preparation for the remote control
Battery installation
Tips for remote operation
Remove the battery cover.
!When the remote control will not be used for a long period of time or when the
batteries are worn out, remove the batteries to prevent leakage.
! Do not throw the batteries into fire. Dispose of used batteries in the specified
manner.
! Do not drop, dampen or disassemble the remote control.
Insert two size AA batteries matching
the +/-polarities of the battery to the +/-
marks inside the battery compartment.
!
!
AC power socket
Mixer
(not incl.)
Note:
* It is recommended that a 75 ohm coaxial antenna is used to avoid
interference.
*To avoid interference from electrical signals, do not bind the antenna
cable together with any mains lead.
2x "AA"
Antenna/ CATV input
75 standard
coaxial type

Function Buttons and External
Connections
Rear panel of the TV set
Front panel the TV set
Video
Audio
Power Indicator
Signal Receiver
TV/DVD
Menu
Volume up/ down
Channel Position
up/down
OPEN
CLOSE PLAY STOP
Play the DVD Power Switch
Open/close the DVD
Stop the DVD
VIDEO L-AUDIO-R TV/DVD MENU V- V+ CH- CH+
Coaxial terminal
Video input terminal
Video output terminal
Antenna/ CATV input socket
Audio right channeloutput terminal
Audio left channeloutput terminal
Audio right channelinput terminal
Audio left channelinput terminal
DVD Video Yinput terminal
DVD Video input terminal
COAXIAL
OUT
IN
VIDEO AUDIO
LR
YCb Cr ANT IN

DVD/TV OPEN/CLOSE
NEXTNEXTPREVPREV
REVREV FWDFWD
STOPSTOP
PAUSE/FRAMEPAUSE/FRAME
D.MENUD.MENU
CH+CH+
CH-CH-
PLAY/ENTERPLAY/ENTER
VOL+VOL+
VOL-VOL-
SETUPSETUP
SUBTITLESUBTITLE
A-BA-B REPEATREPEAT
112233
PROGRAMPROGRAMTITLE/PBCTITLE/PBC
ANGLEANGLE
CCDCCD
AUDIOAUDIO
MENU
MUTE
SCAN
RECALL
EXIT
TV/AVP.STD
SLOWSLOW
DISPLAY
POWER
SLSL
SEARCHSEARCH
SLEEPSLEEP
D.CALL D.SCAN
10+
Using the Remote Control
DVD SEARCH
DVD SETUP
DVD Open/close
TV/DVD
Mute
Program Number
Multi-digit Channel Selection
Display
Exit Screen Display
I/II Menu
Picture Mode
TV/AV Exchange
Volume Selection
Channel Selection
MENU
ZOOM
Scan
DVD FAST REVERSE / FAST FORWARD
DVD Cursor Move button
SLEEP
DVD PAUSE/FRAME
DVD PLAY/ENTER
DVD STOP
DVD MENU
1O+ BUTTON
DVD SUBTITLE
DVD REPEAT
DVD PROGRAM
DVD ANGLE
DVD TITLE
DVD AUDIO
DVD SCAN
DVD CALL
Standby Power
CCD ( closed caption)
Channel Recall
DVD next Chapter
DVD previous Chapter
DVD Slow Motion
Buttons on the remote control
DVD A-B REPEAT
ZOOMZOOM
UP
DOWN
LEFT RIGHT

Remote Features
Power Button:
To turn power ON or OFF , press power button on remote control.
System and Channel Display Button:
This will showyou the current channel number.System will also
be displayed ifset.
Sleep TimerButton
This feature allows you to turn off the television in pre-selected
minutes (180.170,160, ........,10 and 0). To cancel, keep
pressing button untilyou exit out.
TV/AV input Button:
This button hasfive setting A)Video1, B)Video 2,C)DVD,D)TV .
Pressing this button will cycle you through each option.
Mute Button:
Press mute button to turn off the TV volume.
Direct AccessChannel Select & digital selector:
Follow the procedure select the channel.
One Digit ChannelSelect:
When you want to select one digit channel ,press 0 and other
digit.
Two DigitChannel Select:
When you want to select two-digit channel. Press the digit
select button twice, then enter the two digits.
Three Digit ChannelSelect:
When you want to select a three digit channel .Press the digit
select twice ,then enter the three digits .
Audio Button:(4)
You can stereo, Mono or SAP (Second Audio Programming)
choice by pressing audio button .Whenever you change the
channel ,you will see the text message on the button left corner
such as ¡°Stereo Received¡±Stereo SAP Received ¡±or ¡°Mono
Received ¡±. This message depends on the broadcast format of
the TV program.
DISPLAY
TV/AV
MUTE
POWER
SLEEP
112233
CCD
CCD Button:
Press CCD buttonto set the C.Caption ON orOFF.
DVD/TV
DVD/TV Button:
Press this buttonto change between TV and DVD.
OPEN/CLOSE
OPEN/CLOSE Button:
Press this button to open or close the DVD disc tray .

Channel (+/-) Select Button:
You can go upand down thechannels by pressing CH (+)
button and CH (-) button. This button can also be used in adjusting the functions in
Menu Select Button:
You can select the menu by pressing the MENU button. You
can call onthe menu (PICTURE, TIME, TUNE andFUNCTION)
by pressing the corresponding button on the remote control.
the Menu Mode.
Volume (+/-) Select Button:
You can increase the volume by pressing VOL (+)button and
decrease VOL(-) button.This button can also be used in adjusting the function
selections in the Menu Mode.
Picture Preference Select Button:
By pressing this exclusive personal preference button, you can
select different preset brightness shades for various viewing
environments.
RECALL
P.STD
Program Scan Button:
This feature automaticallyscans the available channels.
Pressing it again stops the channel scanning.
SCAN
System and Channel Display Cancel Button:
This button allows you to turn off the channel display and exit
system menus.
EXIT
Last Channel Recall Button:
This feature allows you to recall the previously viewed channel.
I/II Button:
When pressed itto select the Mono, theAutosap or the Stereo..
CH+CH+
CH-CH-
VOL+VOL+
VOL-VOL-
MENU
10+
10+ Button:
This button canalso be used to select 2digit channel numbers.

Menu Functions
Video Setup:
Pressing MENU buttononce will bringthe Video Setup menu on the TV.
The following is shown on your TV screen:
Follow the procedure below to adjust the picture quality of your choice:
1.Press the CH(+) and CH(-) button to go up and down the menu.
2.Press the VOL(+) and VOL(-) button to increase and decrease the level to your
preference for eachitem.
Adjustment of PictureQuality:
To adjust the picture quality from the factory preset read the following:
Picture: By increasing the level. It will adjust white areas of picture and by decreasing
the level , it will adjust black areas of picture.
Brightness: By increasing the level, it will add more light todark parts of the picture
and by decreasing the level, it will add more dark to light parts of the picture.
Color: By increasing the level. It will adjust the low and the high level of the picture.
Sharpness: By increasing decreasing the level, it will show cleaner and clearer images
and by decreasing the level, it will make picture smoother.
Tint: You can adjustthe tint of the picture bygoing into picture set up menu. By
decreasing the level, it will give red tint to skin color and by increasing the color
it will give green tint to skin color.
Color Temp : By pressing the VOL(-/+) buttons to select the three setting A)Neutral,
B)Warm,C)Cool.
Picture 70
Color 50
Sharpness 40
Tint 50
Color Temp. Neutral
Brightness 32
Video
Information to user:This television receiver is equipped with
close caption decoder and parental blocking technology as
required by the FCC.

Audio Setup:
By pressing MENUbutton ,and thenpressing VOL(-/+) buttons it will bringyou to
Audio Setup display. Youwill see the following menu on your TV screen:
Audio
Volume 45
Bass 30
Treble 75
Balance 0
Surround Off
Follow the procedurebelow to adjust
1.Press the CH(+) and CH(-) button to go up and down the menu.
2.Press the VOL(+) and VOL(-) button to increase and decrease the level to your
preference for eachitem.
the sound quality:
Volume:
Bass:
Treble:
Balance: 00 beingthe even distribution of sound for both speakers andyou must
keep at this level . The range of distributions is -50 to +50. If you increase the
level, you willhere more sound coming out of right hand sidespeaker only .If
you decrease the level, you will here more sound coming out of left hand side
speaker only.
Surround: Press VOL(-/+)buttons to have Surround On or OFF. Surround is a term
for audio effect.
By increasing the level. It will adjust the volume of sound and by decreasing
the level , it will adjust the volume of sound.
By increasing the level. It will adjust the volume of bass and by decreasing
the level ,it will adjust the volume of bass.
By increasing the level. It will adjust the volume of treble and by decreasing
the level , it will adjust the volume of treble.
Note: You must distribute the volume evenly to both speakers otherwise you may
blow up oneof the speakers.

Timer Setup:
By pressing MENU button ,and then pressing VOL(-/+) buttons it will bring you to Timer
Setup display. You will see the following menu on your TV screen:
Follow the procedurebelow to selectone of the above options:
1.Press the CH(+) and CH(-) button to go up and down the menu.
2.Press VOL (+) button or VOL (-) button to select your preference.
Clock: Press VOL(-/+) buttons for HOURS and VOL(-/+) buttons for MINUTES
adjustment.
Time-On: Press VOL(-/+) buttons for HOURS andVOL (-/+) buttons for MINUTES
adjustment. This feature works like an alarm clock. YourTV will turn on at the
set time.
Ch. Select: This exclusive feature switches you to your favorite channel at the
appropriate set time. Press VOL(+) and VOL(-) buttons to select the channel.
Time-Off :Press VOL (+/-) buttons for HOURS and VOL (+/-) buttons for MINUTES
adjustment. This feature works like an alarm clock. YourTV will turn off at the
set time.
Sleep Time: This feature allows you to turn off television in pre-selected minutes (180,
170,160, ........,10 and 0).
Remind Time: Press VOL(+/-) buttons to set HOURS of attention and VOL (+/-) buttons
to set MINUTES of attention. You will see the flashing time on your TV when the
the reminder time arrives. Note: This exclusive feature can remind you of
important chores whilewatching TV.(e.g. Time to take pills, time to check
cooking, time tocall , timeto do homework ,etc.)
Ch. Switch: This feature lets you store your favorite channel. Once you store the
channel number in this function, when the set time is up, it will switch over
to the set channel. This feature is used with the Exchange feature. Press
VOL(+) or VOL(-) button to select the channel.
Timer
Time-on 18:00
Ch. Select 1
Time-off --:--
Sleep Time 0
Remind Time --:--
Ch. Switch 1
Clock 17:18

Setup
Language English
Background on
VNR on
Fade off
AVL off
C. Caption on
Demo Mode
Black Stretch on
Demo Mode: This will displaythe main functionsof the TV set.
OFF: When off is displayedon TV means C.Caption is turned off.
CC1: When CC1displays on TV means C.Caption is turned on.
CC2 to CC4: For other modes of video related broadcast information.
T1: For program guide and other information displayed by broadcasters.
(This blocks alarge portion ofthe picture on your screen).
T2 to T4 :For other modes of information displayed by broadcasters.
(This blocks alarge portion ofthe picture on your screen).
Note: Select CC1 for full translation of the primary language such as English in your
area. Select CC2 for secondary language translation such as Spanish or any other
language that may be broadcast in your area.
1.Press the CH(+) and CH(-) button to go up and down the menu.
2.Press the VOL(+) and VOL(-) button to increase and decrease the level to your
preference for eachitem.
Language: Use VOL(-/+) buttons to select the OSD in either English, French or Spanish.
Background: Press the VOL(-/+) buttons to select between Background ON or
Background OFF. When the Background ON function is chosen, a moving
"NO SIGNAL" signwill be displayedif there is no input signalto the set.
Black Stretch: PressVOL (-/+) buttons to turnthe Black Stretch feature on or off.
When the Black Stretch function is on the screen automatically increases the
contrast range.
VNR: Press VOL (-/+) buttons to turn the VNR function on or off. VNR is a term for
Video Noise Reduction, a built-in device on theset that reduces video noise
interference so the viewer is assured a clear picture.
Fade: The FADE control allows for the picture tube to warm up and gently turn on,
C.Caption: Press VOL (-/+) buttons to select the Closed Caption options. Closed
Captioning helps the hearing impaired with the broadcast program, as well as
helping children learn how to read. Abuilt in decoder displays the audio portion
of a program as text on the screen when this option is selected.
which can help prolong the life of the picture tube.
AVL: Press VOL (-/+) buttons to turn theAVL feature on oroff.
Function Setup:
By pressing theMENU button, andthen pressing VOL(-/+) buttons will bringyou to
Function Setup menu. You will see the following menu on your screen:

Channel setup:
By pressing MENUbutton ,and thenpressing VOL-/+ button it will bringyou to
Channel Setup. Youwill see the following display on TV screen.
Follow the procedurebelow to selectabove options:
1.Press the CH(+) and CH(-) button to go up and down the menu.
2.Press VOL (+) button or VOL (-) button to select your preference.
Channel System: Press the VOL(-/+) buttons to select the correct channel system.
In general, you can set it as "AUTO" AUTO,NTSC and NTSC443 will
display in turn
Antenna: Press VOL(+) button or VOL(-) button toselect TV or CATV.
Skip :Press VOL(+) button or VOL(-) button to add or delete the channel from the
stored memory.
Current Ch. : Press VOL(+) button to go up and VOL (-) button to go down to set the
channel position. The display will show the current playing channel.
Channel Coverage by Antenna:
Antenna Type Channel Range
VHF 2-13
UHF 14-69
CATV 1-125
Fine: If the picture and/or sound are poor,try using the FINE TUNE feature.
Do not use this feature unless reception is poor. Press VOL (+/-) to start the Fine
Tune function.
Auto Program: PressVOL (+) button to autoprogram in channels.
This search automaticallyadds only theactive channels in your area tothe TV's
memory. It deletes any channels on which there is no broadcast or a poor signal.
Note: The Auto Search function will scan the channels on the selected antenna
input. If the TV is connected to cable, please select Cable under Antenna.
Channel
Antenna TV
Skip off
Current Ch. 2
Fine
Auto Program
Channel System Auto

Calendar:
Your TV has been designed with a calendar. By pressing MENU button ,and then
pressing VOL(-/+) buttons it will bring you to Calendar. You will see the following
display on TV screen.
Calendar
OCT
OCT
OCT
Follow the procedurebelow to adjust the Calendar quality:
1. +/-) buttonsPress the CH( to select the year item, the month itemor the dateitem.
2. Press the VOL(-/+) buttons to change calendar setup (1900.01-2099.12.).
3. Press EXIT button to exit the calendar mode.
Calendar 2001 11 14

V-CHIP Setup:
Press the MENUButton on yourremote control to go to Passwordmenu, then input
the password (0000). It will bring Parental Lock set up display on the screen. You
will see thefollowing menu onyour screen:
This function enablesyou to lockcertain TV channels in accordance to the V-CHIP
requirement established by the FCC.
To set the V-CHIP function:
Select the TV Rating option. You will see the TV Rating menu on your TV screen:
1.Press CH(+/-) buttons to go up and down the menu.
2. Press VOL(-/+) buttons to go into TV Rating and Movie Rating menus.
3.Press VOL(-/+) buttonsto set theParental Lock ON and Parental LockOFF.
When TV rating is selected, you will see the following rating table on your TV screen.
Note: You can press CH(+/-) buttons to go up and down the menu,then press VOL(+)
button to select "B" or "U' .
Parental Lock
Parental Lock off
TV Rating
MPAA Rating
Lock Menu
Change Password
Passsword
Password ----
TV Rating
Rating FV
TV-Y
TV-Y7
TV-G
TV-PG
TV-14
TV-MA
D L S V
U U U U
U U U U
U U U
U
U
U
U
U
U
>
U

When MPAA Ratingis selected, you will see the following rating tableon your TV
screen.
Parental Lock off means thelock function is turned off . If the Parental Lock
is in "off" mode thenV-CHIP function will not be active to accept the V-CHIP
signal.
Parental Lock on means the lock function is turned on. If the lock is in the "on"
mode then V-CHIP function is activated to accept the V-CHIP signal.
Password
The "Default Password" preset by the manufacturer is "0000" . If you want to change
the preset password to your own password, just choose any four digits that can be
easily remembered and set. Once you set password for a particular channel, that
channel will be blocked. This channel can only be accessed with the password.
MPAARating
G U
PG U
R U
NC-17 U
X U
PG-B U
Lock Menu
AV Lock: When it is set ON, you can not use the AV.
Program Lock: When it is set ON, the current channel is locked, you can not see
the program of this channel.
Note: You can press CH(+/-) buttons to go up and down the menu,then press VOL(+)
button to select "B" or "U' .

V-Chip Technology:
The "V-ChipTechnology" allow you to use U.S.And Canada Movies and TV
PROGRAMS Guide ratingsto block certain types of TV programs andmovies.
Tounderstand clearly about TV programs rating codes, readthe following list:
U.S. TV Program Ratings
NR: Not Rated-this means that programs are not rated or rating does not apply.
TV-Y:For all children-this type of rated programs are designed for a very young
audience, including children from ages 2-6.
TV-Y7:Directed for older children - this type of rated programs may include comedic
violence of mild physical, or may frighten children under the age of 7.
TV-G:General Audience-this type of rated programs contains little or no
violence, no stronglanguage, and little or no sexualdialogue and situations.
TV-PG:Parental Guidance Suggested-this type of rated programs may contain
limited violence, somesuggestive sexual dialogue and situations, andrare
language.
TV-14:Parents strongly cautioned-this type of rated programs may contain sexual
content, strong language and more intense violence.
TV-MA:Mature audience only-this type of rated programs may contain sexual
violence, explicit sexual content and profane language.
FV: This type of rated programs contain Fantasy and cartoon violence.
Violence: This type of rated programs contain violence.
S: This type of ratedprograms contain sex.
L: This type of rated programs contain offensive language.
D: This type of ratedprograms contain dialogue with sexual content.

Tounderstand clearly about movies rating codes, read the followinglist:
U.S. Movies Rating Chart
NR: This means movie is not rated yet. It is pending government rating approval.
G:General Audience-this type of movie rating means all ages admitted to see the
movie.
PG-13:Parents Strongly Cautioned - this type of movie rating means some material
may not be appropriate for children under13.
R:Restricted- This type of movierating means childrenunder 17 of age requires to
be with parent or guardian.
NC-17:This type of movie rating means no one 17 and under admitted.
X:This type of movie rating means adults only.
To understand clearly about Canadian programs rating codes, read the
following list:
Canadian English RatingChart
E:Exempt - this type of rated programs contain news, sports, documentaries, talk
shows, music videos,and variety ofother programs.
C:This type of rated programs are intended for children under age 8. There is no
offensive language, nudity or sexual content.
C8+:This type of rated programs generally considered acceptable for children 8
years and over. There is no profanity, nudity or sexual content.
G: This type of ratedprograms generally suitable for all audiences.
PG: Parental Guidance Suggested -in this type of rated programs, some material
may not be suitable for children.
14+:In this type of rated programs, some content may notbe suitable for viewers
under the age of 14.Parents are strongly cautioned not to have their children
view 14+ ratedprograms by pre-teensand early teens.
18:Adults Only-this type of rated programs are only for adult viewers only.

DVD Features
Basic Playback
Preparations
1. Press OPEN/CLOSE to open the disc tray,
place a disc on the disc tray.
There are two different disc sizes. Place the
disc in the correct guide on the disc tray. If the
disc is out of the guide, it may damage the disc
and cause the DVD player to malfunction.
Do not place a disc which is unplayable in this
DVD player.
2. Press OPEN/CLOSE to close the disc tray, the
playback will automatically start.
3. Some discs may start playback with a menu. Use
the cursor buttons on the remote control to select
menu options and press PLAY/ENTER to start. You
may also press the digit buttons to select a menu
option directly. Many DVDs will not allow this during
start-up.
1. Press PAUSE/FRAME to pause playback (still
mode). The sound will be muted during still mode.
2. Press PLAY/ENTER to resume normal playback.
Pause playback
1. Press STOP button to go to stop mode, the TV
screen will show the start logo. As some disc the
player can recall the location where stopped, such
as DVDs and audio CDs.
2. Press PLAY/ENTER to playback to resume play-
back from the location where playback is stopped
or from the beginning of the disc.
3. Press STOP twice to stop completely.
Stop playback
Previous and Next
Fast forward and Fast reverse
1. Press FWD to fast forward through the disc.
Each time the FWD button is pressed, the
fast forward motion speed changes.
2. Press PLAY/ENTER to resume normal playback.
3. Press REV to fast reverse through the disc.
Each time the REV button is pressed, the
fast reverse motion speed changes.
4. Press PLAY/ENTER to resume normal playback.
Basic playback
1. When paused,press PAUSE/STEP continuous
to single step forward to the next frame in the video.
2. Press PLAY/ENTER to resume normal playback.
Single step playback
Some discs donot start automatically. Press
PLAY/ENTER tostart playback.
During Playing, pressingthe PREV key will
restart the currentchapter and skip chapters
backwards with eachsubsequent press untilthe
start of thedisc is reached.
Each press ofNEXT key duringplaying will
skip the currentchapter and play the next one.
Preparations
Press the DVD/TV button on the remote control
or the TV to enter the DVD status.
Pause playback
1. Press STOP button to go to stop mode, the TV
screen will show the start logo. As some disc the
player can recall the location where stopped, such
as DVDs and audio CDs.
2. Press PLAY/ENTER to playback to resume play-
back from the location where playback is stopped
or from the beginning of the disc.
3. Press STOP twice to stop completely.
Stop playback
Previous and Next
Fast forward and Fast reverse
1. Press FWD to fast forward through the disc.
Each time the FWD button is pressed, the
fast forward motion speed changes.
2. Press PLAY/ENTER to resume normal playback.
3. Press REV to fast reverse through the disc.
Each time the REV button is pressed, the
fast reverse motion speed changes.
4. Press PLAY/ENTER to resume normal playback.
Basic playback
1. When paused,press PAUSE/STEP continuous
to single step forward to the next frame in the video.
2. Press PLAY/ENTER to resume normal playback.
Single step playback
Some discs donot start automatically. Press
PLAY/ENTER tostart playback.
During Playing, pressingthe PREV key will
restart the currentchapter and skip chapters
backwards with eachsubsequent press untilthe
start of thedisc is reached.
Each press ofNEXT key duringplaying will
skip the currentchapter and play the next one.
This manual suits for next models
1
Table of contents
Other Haier TV DVD Combo manuals

Haier
Haier TX-DM1420 User manual

Haier
Haier TCF20 User manual

Haier
Haier NX-565 User manual

Haier
Haier DTA-2198PF User manual

Haier
Haier DTA-2198 User manual

Haier
Haier HLTDC19 - 19" LCD TV User manual

Haier
Haier 90502138 User manual

Haier
Haier DTA-2189 User manual

Haier
Haier TDC1354AD User manual

Haier
Haier TDC1314S User manual

Haier
Haier HL Series User manual

Haier
Haier DTA-1492 User manual

Haier
Haier TDC2015S User manual

Haier
Haier LY19K3CW User manual

Haier
Haier LY22T1CBW User manual

Haier
Haier L15C10B User manual

Haier
Haier LT22R3CBW User manual

Haier
Haier LY22R1CBW1 User manual

Haier
Haier HLC22E User manual

Haier
Haier HLC26R1 - 26" LCD TV User manual