Haier TCF20 User manual

Before operating the unit, please read this manual thoroughly.
OWNER S MANUAL'OWNER S MANUAL
ATSC TV/DVD COMBO
POWER TV/DVD OPEN/CLOSE
Q.VIEW INFO MUTE
1234
5678
9900
CC
P.MODE
CH+
CH-
VOL
_
MENU
OK
STOP SETUP PAUSE/STEP
REV FWD.PREV NEXT
D.MENU REPEAT A-B
PLAY/ENTER SLOW
ANGLE TITLE/PBC SEARCH
AUDIO
EXIT
D.CALL
TV/AV
PROGRAM ZOOM
10+ ARC
VOL
+
SUBTITLE
-
TV/DTV
SAP
S.MODE
GUIDE
CH.LIST FAV.LIST
TCR13
TCR20
TCF20

1
PRECAUTIONS
FCC WARNING-This equipment may generate
or use radio frequency energy. Changes or
modifications to this equipment may cause
harmful interference unless the modifications
are expressly approved in the instruction
manual. The user could lose the authority
to operate this equipment if an unauthorized
change or modification is made.
LASER SAFETY
This unit employs a laser. Only a qualified
service person should remove the cover
or attempt to service this device, due to
possible eye injury.
CAUTION: USE OF CONTROLS OR
ADJUSTMENTS OR PERFORMANCE
OF PROCEDURES OTHER THAN
THOSE SPECIFIED HEREIN MAY
RESULT IN HAZARDOUS RADIATION
EXPOSURE.
CAUTION: VISIBLE AND INVISIBLE
LASER RADIATION WHEN OPEN AND
INTERLOCK DEFEATED. DO NOT
STARE INTO BEAM.
LOCATION:INSIDE,NEAR THE DECK
MECHANISM.
CONTENTS
Before Operation
Basic operation
Important Safety Instructions............................................................
Installation...........................................................................................
..........................................................................
Preparation of the remote control......................................................
Function buttons and ...................................
Front panel of the TV set..................................................................
Rear panel of the TV set....................................................................
Using the remote control...................................................................
The other video and audio equipment .................................................
Antenna connections ...........................................................................
Cable TV connections .........................................................................
Connections for other equipment .......................................................
Setting the language and blue screen .................................................
Channel menu .....................................................................................
Channel selection ................................................................................
Volume adjustment .............................................................................
Screen information ..............................................................................
Video menu ........................................................................................
Manual time setting ............................................................................
Setting the ON/OFF timer ..................................................................
Function menu ...................................................................................
Closed caption ...................................................................................
DTV setup menu ................................................................................
Other function ...................................................................................
........................................................................
Specifications .....................................................................................
Warranty ............................................................................................
Antenna Connection
External Connections
Troubleshooting guide
s
DVD Features...................................................................................
Special Playback Functions..............................................................
DVD System Setup..........................................................................
Playable Discs...................................................................................
Disc Protection and DVD Characteristics..........................................
Others
1
5
5
5
6
6
6
7
8
9
10
11
12
13
15
16
17
18
20
21
22
27
28
33
35
37
38
42
43
44
45
46
DVD Operation

1. READ THESE INSTRUCTIONS
All the safety and operating instructions should be read before the unit is operated.
2. KEEP THESE INSTRUCTIONS
The safety and operating instructions should be retained for future reference.
3. HEED ALL WARNINGS
All warnings on the unit and in the operating instructions should be adhered to.
4. FOLLOW ALL INSTRUCTIONS
All operating and use instructions should be followed.
5.CLEAN ONLY WITH DRY CLOTH.
Unplug this unit from the wall outlet before cleaning. Do not use liquid cleaners or aerosol cleaners.
Use a damp cloth for cleaning the exterior cabinet only.
6. DO NOT BLOCKANY VENTILATION OPENINGS. INSTALL INACCORDANCE WITH THE
MANUFACTURER`S INSTRUCTIONS.
7. DO NOT USE THIS APPARATUS NEAR WATER
Do not use this unit near water. For example, near a bathtub, washbowl, kitchen sink, laundry tub, in a wet
basement, or near a swimming pool.
12. VENTILATION
Slots and openings in the cabinet back or bottom are provided for ventilation,
to ensure reliable operation of the unit, and to protect it from overheating.
These openings must not be blocked or covered. The openings should never be blocked by placing the unit
on a bed, sofa, rug, or other similar surface. This unit should never be placed near or over a radiator or heat
source. This unit should not be placed in a built-in installation such as a bookcase or rack unless proper
ventilation is provided and/or the manufacturer`s instructions have been adhered to.
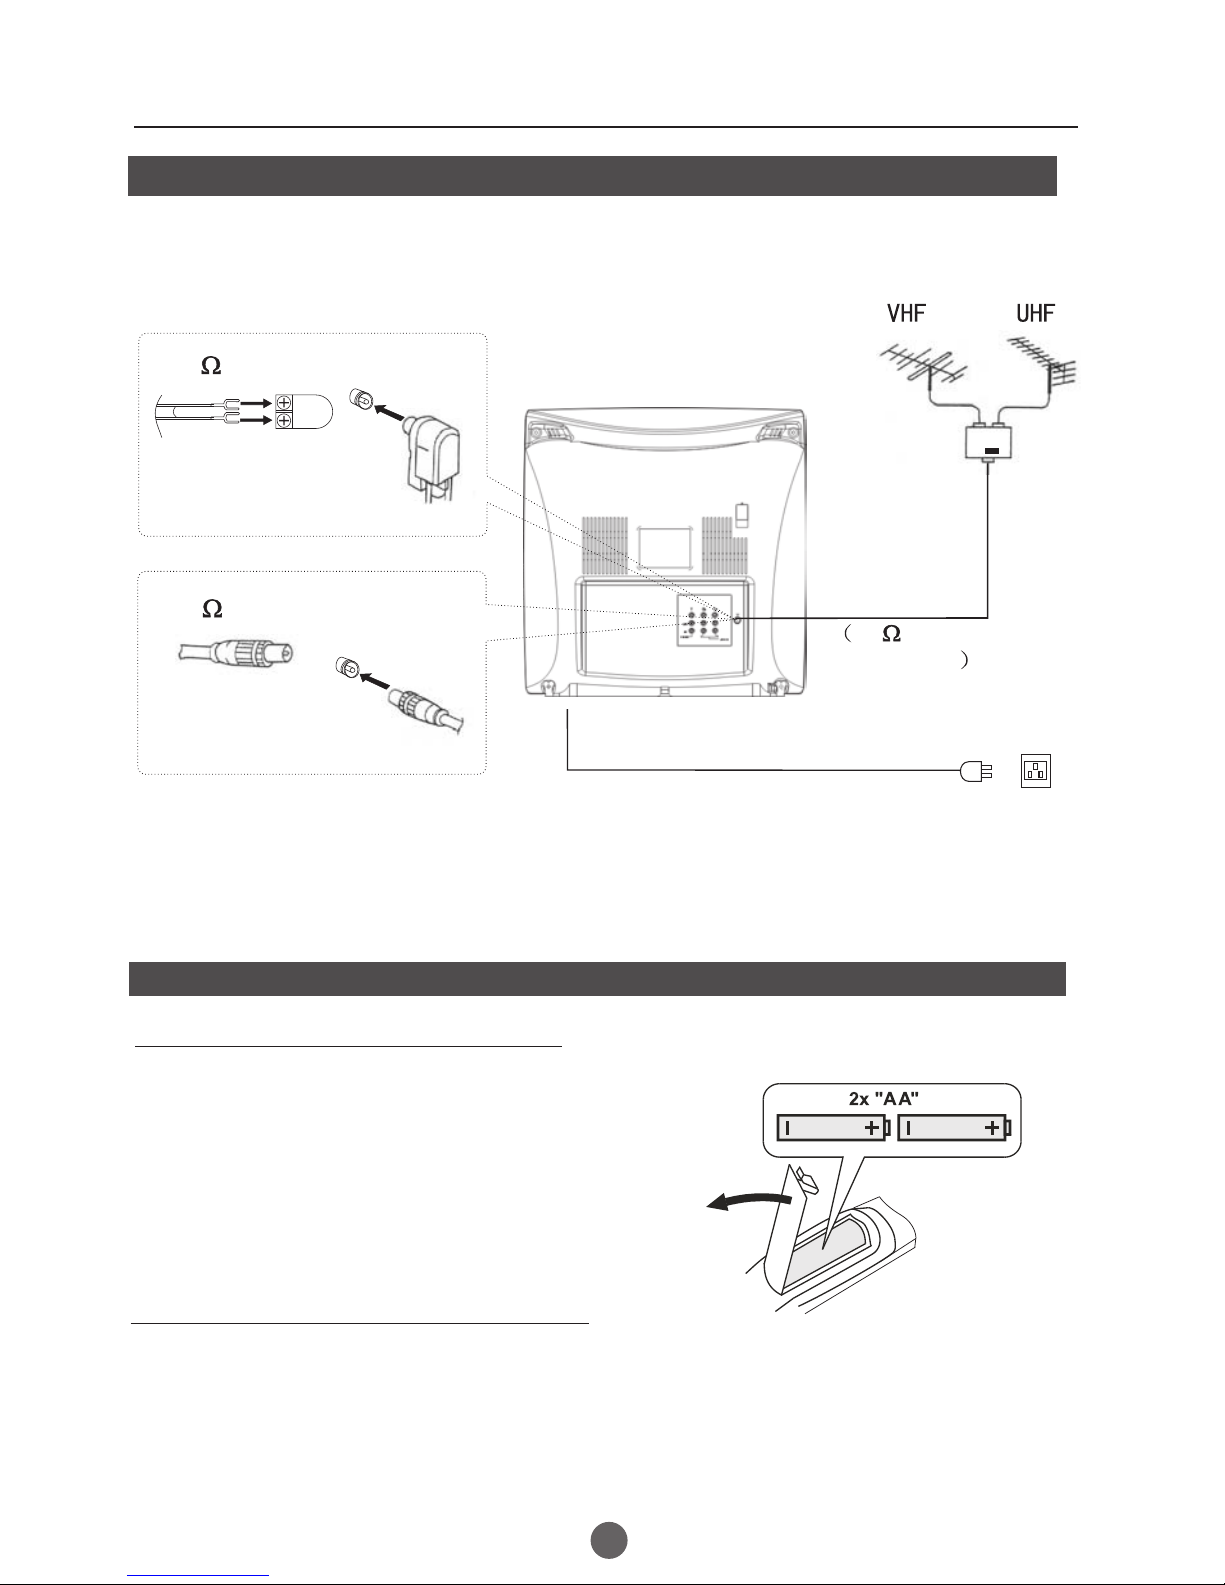
13. POWER SOURCES
This unit should be operated only from the type of power source indicated on the rating plate. If you are not
sure of the type of power supply to your home, consult your appliance dealer or local power company. For
units intended to operate from battery power, or other sources, refer to the operating instructions.
IMPORTANT SAFEGUARDS
S3126A
PORTABLE CART WARNING
(symbol provided by RETAC)
Caution - Useof controls or adjustments or performanceof procedures other than those specified
herein may resultin hazardous radiation exposure
Product complies withradiation performance standards under the FederalFood, Drug and Cosmetic Act
11.Use onlywith the cart, stand, tripod, bracket,or table specified by
the manufacturer,or sold with the apparatus. Whena cart is used,
use caution whenmoving the cart/apparatus combination to avoid
injury from tip-over.
8. Do notinstall near any heat sources suchas radiators, heat registers,
stoves, or otherapparatus (including amplifiers) that produce heat.
10. Only useattachments/accessories specified by the manufacturer.
WARNING:TO REDUCE THE RISK OF FIRE ORELECTRIC SHOCK, DONOT EXPOSE
THIS APPLIANCE TO RAIN OR MOISTURE.
CAUTION
RISK OF ELECTRICSHOCK
DO NOT OPEN
CAUTION: TO REDUCETHE RISK OFELECTRIC
SHOCK, DO NOTREMOVE COVER (OR BACK).
NO USER SERVICEABLEPARTS INSIDE.REFER
SERVICING TOQUALIFIED SERVICE PERSONNEL
This symbol indicates thatdangerous
voltage constituting a riskof electrical
shock is present inthis unit.
This symbol indicates thereare important
operating and maintenance instructions
in packaged with thisproduct.
2

3
Important safety Instructions
18. POWER LINES
An outsideantenna system shouldnot be located in the vicinity of overhead powerlines or
other electric lightor power circuits,or where it can fall onto or against suchpower lines or
circuits. When installingan outside antennasystem, extreme care should be taken to keep
from touching suchpower lines orcircuits, as contact with them might be fatal.
19. OVERLOADING
Do not overloadwall outlets andextension cords, as this can result in a riskof fire orelectric
shock.
20. OBJECT AND LIQUID ENTRY
Do not pushobjects through anyopenings in this unit, as they may touch dangerousvoltage
points or shortout parts thatcould result in fire or electric shock. Never spillor spray any
type of liquidinto the unit.
21. OUTDOOR ANTENNA GROUNDING
If an outsideantenna or cablesystem is connected to the unit, be sure theantenna or cable
system is groundedto provide someprotection against voltage surges and built-up static
charges, Section 810of the NationalElectrical Code (NEC), ANSI/NFPA70, provides
information with respectto proper groundingof the mast and supporting structure,
grounding of thelead-in wire toan antenna discharge unit, size of grounding conductors,
location of antennadischarge unit, connectionto grounding electrodes, and requirements
for the groundingelectrode.
22. SERVICING
Do not attemptto service thisunit yourself as opening or removing covers may exposeyou
to dangerous voltageor other hazards.Refer all servicing to qualified service personnel.
14. GROUNDING OR POLARIZATION
Do not defeatthe safety purpose of the polarizedor grounding-type plug. Apolarized plug has two
blades with onewider than the other.A grounding type plug hastwo blades and a third grounding
prong. The wideblade or thethird prong is provided for yoursafety. Ifthe provided plug does not
fit into youroutlet, consult an electrician for replacementof the obsolete outlet.
15. Protect thepower cord from being walked onor pinched particularlyat plugs, convenience
receptacles, and thepoint where they exit from theapparatus.
16. Unplug thisapparatus during lightning storms or whenunused for longperiods of time.
17. Refer allservicing to qualified service personnel. Servicingis required whenthe apparatus
has been damagedin any way, such as power-supply cord orplug is damaged, liquid has been
spilled or objectshave fallen into the apparatus, theapparatus has beenexposed to rain or
moisture, does notoperate normally,or has been dropped.

4
Important safety Instructions
23. DAMAGE REQUIRINGSERVICE
Unplug this unitfrom the walloutlet and refer servicing to qualifiedservice personnel under
the following conditions:
a. When thepower-supply cord orplug is damaged.
b. If liquidhas been spilled,or objects have fallen into theunit.
c. If theunit has beenexposed to rain or water.
d. If theunit does notoperate normally by following the operatinginstructions. Adjust
only those controlsthat are coveredby the operating instructions, as animproper
adjustment of othercontrols may resultin damage and will often requireextensive
work by aqualified technician torestore the unit to its normaloperation.
e. If theunit has beendropped or the cabinet has beendamaged.
f. When the unit exhibits a distinct change inperformance, this indicates a need for
service.
24. REPLACEMENT PARTS
When replacement partsare required, besure the service technician uses replacementparts
specified by themanufacturer or thosethat have the same characteristics asthe original part.
Unauthorized substitutions mayresult in fire, electric shock or other hazards.
25. SAFETY CHECK
Upon completion ofany service orrepairs to this unit, ask theservice technician toperform
safety checks todetermine that theunit is in proper operating condition.
26. HEAT
The product should be situatedaway from heat sources such asradiators, heat registers,
stoves, or otherproducts (including amplifiers)that produce heat.
27. DISC SLOT
Keep your fingerswell clear ofthe disc slot as it isclosing. It maycause serious personal
injury.
28. CONNECTING
When you connectthe product toother equipment, turn off the power and unplugall of the
equipment from thewall outlet. Failureto do so may cause anelectric shock andserious
personal injury. Read theowner's manual ofthe other equipment carefully and follow the
instructions when makingany connections.
29. SOUND VOLUME
Reduce the volumeto the minimumlevel before you turn on theproduct. Otherwise, sudden
high volume soundmay cause hearingor speaker damage.
30. SOUND DISTORTION
Do not allowthe product output to be distorted sound fora long time.It may cause speaker
overheating and fire.
31. LASER BEAM
Do not lookinto the openingof the disc slot or ventilationopening of theproduct to see the
source of thelaser beam. Itmay cause sight damage.
32. DISC
Do not usea cracked, deformed,or repaired disc. These discs are easily brokenand may
cause serious personalinjury and productmalfunction.
33. NOTE TO CABLE TVSYSTEM INSTALLER
This reminder is provided tocall the Cable TV system installer's attention toArticle 820-40 of
the NEC thatprovides guidelines forproper grounding and, in particular,specifies that the
cable ground shallbe connected tothe grounding system of the building,as close tothe point
of cable entryas practical.

Installation
Preparation for the remote control
Battery installation
Tips for remote operation
Remove the battery cover.
!When the remote control will not be used for a long period of time or when the
batteries are worn out, remove the batteries to prevent leakage.
! Do not throw the batteries into fire. Dispose of used batteries in the specified
manner.
! Do not drop, dampen or disassemble the remote control.
Insert two size AA batteries matching
the +/-polarities of the battery to the +/-
marks inside the battery compartment.
!
!
5
Antenna connection
300 twin-lead cable
Antenna adapter
75 coaxial cable
Plug
AC power socket
Aerial input
75 standard
coaxial type
Note:
* It is recommended that a 75 ohm coaxial antenna is used to avoid
interference.
*To avoid interference from electrical signals, do not bind the antenna
cable together with any mains lead.
(Not supplied)
(Not supplied)
If the picture is not clear or is snowy, it is recommended that an External Aerial
is used, this is usually mounted outside.

Parts and functions
Front panel the TV set
Power Switch
Power Indicator
Signal Receiver
Video R/L
Audio
Menu
TV/AV/DVD
Switching Volume up/ down
Channel Position
up/down
Open/close
the DVD
Play
the DVD
Stop
the DVD
The DVD Player
POWER
6
Rear panel of the TV set
Antenna input socket
Video Cr inputterminal
Audio left channelinput terminal
Audio right channelinput terminal
Audio left channeloutput
terminal
Audio right channeloutput terminal
Video Cb inputterminal
Video Yinput terminal
Video 1
Video output terminal OUT
IN
VIDEO1
YCb Cr
L R
AUDIO1
COMPONENT
COAXIAL
OUTPUT
COAXIAL OUTPUT

Using the Remote Control
Q.VIEW button:
SAP button:
CC
P.MODE (picture mode):
TV Sleep button
CH.LIST (channel list)
GUIDE
FAV.LIST (favorite list)
SIZE: Aspect Ratio Control under 16:9 digital signal input
P
DVD FAST REVERSE
DVD PAUSE/STEP
DVD FAST FORWARD
DVD MENU
DVD A-B REPEAT
DVD Cursor Move button
DVD SLOW
DVD SEARCH
DVD TITLE
DVD PROGRAM
10+
CLR: clear
Power Switch
TV / AV Mode Selection
TV / DTV Mode Selection
TV / DVD Mode Selection
Mute Sound
Return to Previous Channel
Channel / Track Selection
Second Audio Program
Mode Selection: Closed captioning (selects mode).
Adjust Picture Mode
Adjusting
Go to TV Menu
Exit On Screen Display
reference (may not operate using some systems)
Enter
Playback
Selection
Chapter / Track
Chapter / Track
Playback / Confirm Menu Selection
Mode
Change
Mode
DVD INFORMATION
Zoom Function
Open/close DVD Tray
On Screen Display
Volume/Channel
DVD STOP
DVD SETU
DVD CAPTION (SUBTITLE)
DVD NEXT
DVD
DVD REPEAT
DVD ANGLE
DVD AUDIO
DVD PREVIOUS
Buttons on the remote control
UP
DOWN
LEFT RIGHT
POWER TV/DVD OPEN/CLOSE
Q.VIEW INFO MUTE
1234
5678
9900
CC
P.MODE
CH+
CH-
VOL
_
MENU
OK
STOP SETUP PAUSE/STEP
REV FWD .PREV NEXT
D.MENU REPEAT A-B
PLAY/ENTER SLOW
ANGLE TITLE/PBC SEARCH
AUDIO
CLR
D.CALL
TV/AV
PROGRAM ZOOM
10+
VOL
+
SUBTITLE
-
TV/DTV
SAP
SLEEP
CH.LIST FAV.LIST SIZE GUIDE
7
- button: select additional channels being broadcasted.
For example, to select channel “54-3”, press “54”, “-”, “3”,
and then press “OK”.

8
The other video and audio equipment Connections
Youcan connect the DVD,VCR and stereo system to the output to enjoy a
higher quality of picture and sound effect.
COAXIAL OUT
Coaxial cable
To COAXIAL
type digital
audio input
Amplifier
ANT IN

If you are using an indoor or outdoor antenna, follow the instructions below that correspond to your antenna
system. If you are using a cable TV service (CABLE), see the Cable TV connections.
Combination VHF/UHF antenna (Separate VHF and UHF 300 ohm twin-lead wires)
Combination VHF/UHF antenna (Single 75 ohm cable or 300 ohm twin-lead wire)
Antenna connections
75 ohm
coaxial
cable 300-75 ohm
matching
transformer
300-75 ohm
matching
transformer
UHF 300 ohm
VHF 300 ohm
UHF 300 ohm
VHF 75 ohm
Separate VHF/UHF antennas (75 ohm VHF cable and 300 ohm UHF twin-lead wires)
RF IN
jack RF IN
jack
RF IN
jack
Combiner
RF IN
jack
Combiner
Connect the 75 ohm cable from the combination
VHF/UHF antenna to the RF IN jack.
Connect the UHF 300 ohm twin-lead wire to the
combiner (not supplied). Connect the VHF 300
ohm twin-lead wire to the 300-75 ohm matching
transformer. Attach thetransformer to the combiner,
then attach the combiner to the RF IN jack.
Connect the VHF 75 ohm cable and UHF 300 ohm
twin-lead wire to the combiner. Attach the combiner
to the RF IN jack.
9
If using aflat UHF 300ohm twin-lead wire,
connect these flatwires to anoptional 75/300
ohm matching transformer/adapter(available
at many retailers),and then connectthe
adapter to the'RF' IN connectoron the back
of the television.

FOR SUBSCRIBERS TO BASIC CABLE TV SERVICE
For basic cable service not requiring a Converter/Descrambler
box, connect the 75 ohm Coaxial Cable directly to the RF IN
Jack on the back of the unit.
Cable TV connections
FOR SUBSCRIBERS TO SCRAMBLED CABLE TV SERVICE
75 ohm
coaxial cable
If you subscribe to a cable TV service in which basic channels are unscrambled and premium channels require the
use of a converter/descrambler box, you may wish to use a signal splitter and an A/B switch box (available from the
cable company or an electronics supply store). Follow the connections shown below. With the switch in the "B"
position, you can directly tune any nonscrambled channels on your unit. With the switch in the "A" position, tune your
unit to the output of the converter/descrambler box (usually channel 3 or 4) and use the converter/descrambler box
to tune scrambled channels.
FOR SUBSCRIBERS TO UNSCRAMBLED BASIC CABLE TV SERVICE WITH
SCRAMBLED PREMIUM CHANNELS
Incoming
75 ohm
cable TV cable 75 ohm cable to
unit
RF IN
jack
RF IN
jack
A
Splitter B
Incoming
75 ohm
cable TV cable
A/B switch
75 ohm cable
to unit
Converter/
descrambler RF IN
jack
Converter/
descrambler
This unit has an extended tuning range and can tune most cable channels without using a Cable TV
Converter box. Some cable companies offer "premium pay channels" in which the signal is
scrambled. Descrambling these signals for normal viewing requires the use of a descrambler device
which is generally provided by the cable company.
If you subscribe to a cable TV service which requires the use of a converter/descrambler box, connect the
incoming 75 ohm coaxial cable to the converter/descrambler box. Using another 75 ohm coaxial cable, connect
the output jack of the converter/descrambler box to the RF IN jack on the unit. Follow the connections shown
below. Set the unit to the output channel of the converter/descrambler box (usually channel 3 or 4) and use the
converter/descrambler box to select channels.
10

Video Game
Using the audio/video inputs
If you connect the TV to a camcorder or Video Game, you can select different modes by pressing TV/AV.
Press TV/AV repeatedly to select the desired mode.
"AV1 V channel will display on the screen for 4 seconds, No signal
will be displayed on the screen when there is no signal input.
", "AV2" ,"COMPONENT","DVD" or T
To connect the TV to a camcorder
To playback from the camcorder, connect the camcorder to the unit as shown.
To connect the TV to a Video Game
The TV can also be used as a display device for many video games. However, due to the wide variety
of formats, they have not all been included in the suggested connection diagram. Youl need to consult
each component's Owner's Manual for additional information.
Audio/Video cord (not supplied)
To Audio/Video OUT
AV 1
Camcorder
To Audio/Video OUT
Audio/Video cord (not supplied)
VIDEO IN
AUDIO IN (L)
AUDIO IN (R)
AV1 AV2 COMPONENT DVD TV Channel
Connections for other equipment
11
VIDEO IN
AUDIO IN (L)
AUDIO IN (R)
Front of TV
Front of TV

POWER TV/DVD OPEN/CLOSE
Q.VIEW INFO MUTE
1234
5678
9900
CC
P.MODE
CH+
CH-
VOL
_
MENU
OK
STOP SETUP PAUSE/STEP
REV FWD .PREV NEXT
D.MENU REPEAT A-B
PLAY/ENTER SLOW
ANGLE TITLE/PBC SEARCH
AUDIO
CLR
D.CALL
TV/AV
PROGRAM ZOOM
10+
VOL
+
SUBTITLE
-
TV/DTV
SAP
SLEEP
CH.LIST FAV.LIST SIZE GUIDE
Setting the language and blue screen
You can choose from three different
languages (English, French and
Spanish) for the on-screen displays.
1Press POWER ( ) toturn on theTV.
2 Press MENU, and then
press VOL+/- button to
select FUNCTION menu,
then press CH- button to
enter.
3 Press CH+/- button to select the LANGUAGE option,
then press VOL+/- to select the desired language:
English, Spanish orFrench.
4 Press MENU until the MENUscreen disappears.
SETTING THE LANGUAGE
0101
LANGUAGE ENGLISH
BLUE SCREEN ON
NTSC CAPTION C1
PARENTALLOCK
FUNCTION
SETTING THE BLUE SCREEN
1 Press MENU, and then
press VOL+/- button to
select FUNCTION menu,
then press CH- button to
enter.
2 Press CH+/- button to select the BLUE SCREEN option,
then press VOL+/- to select OFF or ON.
3 Press MENU until the MENUscreen disappears.
0101
LANGUAGE ENGLISH
BLUE SCREEN ON
NTSC CAPTION C1
PARENTALLOCK
FUNCTION
12

AUTO SCAN(DTV/ATV)
(When using antenna)
The channels broadcastedin DTV andATV are
automatically scanned and memorized. Only the
receivable channels in the area where this TV is
used will be memorized.
AUTO SCAN (CATV)
(When using basic cable)
The channels broadcasted in CATV are automatically
scanned and memorized.
NOTE:
Be sure thatantenna or cable is connected properlybefore plugging the
power cord.
This describes thecase for searching and memorizing channels for DTV/ATV.
1 Press MENU, and then press VOL+/- button to select
CHANNEL menu, then pressCH- button to enter.
2 Press CH+/- button to
select the RECEPTION
option.
3 Press VOL +/- button
to select AIR/ CABLE.
0101
SKIP OFF
RECEPTION AIR
AUTO SCAN
COLOR SYSTEM AUTO
CHANNEL
When scanning is completed, the memorized
smallest channel will be displayed.
When you press the MENU button while scanning, the
scanning is interrupted and the lowest memorized
channel is displayed.
When you pressVOL+ on the remote control,
scanning the channels in both analog and digital
modes will automaticallystart.
Channel menu
Only in analogsignal
4 Press CH +/- button
to select AUTO SCAN option.
5 Press VOL+ button to start scanning.
13
POWER TV/DVD OPEN/CLOSE
Q.VIEW INFO MUTE
1234
5678
9900
CC
P.MODE
CH+
CH-
VOL
_
MENU
OK
STOP SETUP PAUSE/STEP
REV FWD .PREV NEXT
D.MENU REPEAT A-B
PLAY/ENTER SLOW
ANGLE TITLE/PBC SEARCH
AUDIO
CLR
D.CALL
TV/AV
PROGRAM ZOOM
10+
VOL
+
SUBTITLE
-
TV/DTV
SAP
SLEEP
CH.LIST FAV.LIST SIZE GUIDE

Channel menu
SETTING SKIP
0101
SKIP OFF
RECEPTION AIR
AUTO SCAN
COLOR SYSTEM AUTO
CHANNEL
1 Press MENU, and then
press VOL+/- button to
select CHANNEL menu,
then press CH- button to
enter.
2 Press CH+/- button to
select the SKIP option,
then press VOL+/- button
to select ON or OFF.
SETTING COLOR SYSTEM(only in ATV mode)
After the programs are preset,you can skipsome
programs to select your favorite channels only.
If you wantto recover theskipped channel
1. Use Direct-digit Choosing button to select the number
of the channel to be recovered.
2. Do the above steps again.
3. Press VOL+/- button to set SKIP as Off.
1 Press MENU, and then
press VOL+/- button to
select CHANNEL menu,
then press CH- button to
enter.
2 Press CH+/- button to
select the COLOR
SYSTEM option, then
press VOL+/- button
to select AUTO or NTSC.
0101
SKIP OFF
RECEPTION AIR
AUTO SCAN
COLOR SYSTEM AUTO
CHANNEL
14
NOTE: When tuningDTV channels andno signal is present,
the SKIP-over optionwill be available.
POWER TV/DVD OPEN/CLOSE
Q.VIEW INFO MUTE
1234
5678
9900
CC
P.MODE
CH+
CH-
VOL
_
MENU
OK
STOP SETUP PAUSE/STEP
REV FWD .PREV NEXT
D.MENU REPEAT A-B
PLAY/ENTER SLOW
ANGLE TITLE/PBC SEARCH
AUDIO
CLR
D.CALL
TV/AV
PROGRAM ZOOM
10+
VOL
+
SUBTITLE
-
TV/DTV
SAP
SLEEP
CH.LIST FAV.LIST SIZE GUIDE

You can select the channel by using either CH +/- button
or Channel number buttons. How to select the channel
in each way is shown below.
Channel selection
CABLE
VHF
2-13
STD/HRC/IRC
14-36
(A) (W)
37-59
(AA) (WW)
60-85
(AAA) (ZZZ)
86-94
(86) (94)
95-99
(A-5) (A-1)
100-125
(100) (125)
01
(5A)
TV
VHF
2-13
UHF
14-69
CABLE Mode Direct Channel Selection
When the Antenna/Cable menu option is in the Cable position, channels
can be selected as follows:
Press the Direct Channel selection buttons to select the channel.
Antenna Mode Direct Channel Selection
When the Antenna/Cable menu option is in the Antenna position, all channels
can be instantly selected by using
2
2-9: Press 2-9 as needed.
Example, to select channel 2, press"2".
10-69: Press the 2 digits inorder. If you select the channel higher than 69,
the channel will not change, becauseit is not available.
1-9: Press 1-9 asneeded. Example, to select channel 2,
press "2".
10-99: Press the 2digits in order. Example, to select channel 32,
press "3" then "2".
100-125: Press the digital1 button, the "1--" will appear
on the screen, thenpress the 2 digitsof remain in order.
1 Using CH +/- button
Using CH +/- button on the remotecontrol, change thechannel.
Same operation isavailable with CH +/- button on the front panel
of the mainunit.
digits button. For example:
15
NOTE:
In the DTVbroadcasting, one channel sometimes broadcasts
multiple programs depending on the air time. In thiscase, the
main channel iscalled major channel and the subchannel is
called minor channel.
POWER TV/DVD OPEN/CLOSE
Q.VIEW INFO MUTE
1234
5678
9900
CC
P.MODE
CH+
CH-
VOL
_
MENU
OK
STOP SETUP PAUSE/STEP
REV FWD .PREV NEXT
D.MENU REPEAT A-B
PLAY/ENTER SLOW
ANGLE TITLE/PBC SEARCH
AUDIO
CLR
D.CALL
TV/AV
PROGRAM ZOOM
10+
VOL
+
SUBTITLE
-
TV/DTV
SAP
SLEEP
CH.LIST FAV.LIST SIZE GUIDE

This section describes how to adjust the volume when
viewing TV. The MUTE function, which is useful when
you have a visitor or a phone call, will be also described.
1 Using VOL +/- button
Youcan adjust theaudio volume withVOL +/- button on
the remote control.
The volume bar is displayed at the bottom of the screen
when adjusting the volume.
Same operation isavailable with VOL +/- on the front
panel of themain unit.
2 Using MUTE button
Press MUTE button on the remote control to mute the
sound.
The colored volume bar is displayed on the screen while
muting.
To release theMUTE status, press MUTE button again
or press VOL+ button.
MUTE will displayedcontinuously when CCis OFF, MUTE
will disappear 5 seconds later when CC is ON.
SWITCHING AUDIO
This section describes how to switch the audio language
in the digital mode.
2 Switch the audio language.
When you pressSAP button on the remote control, the
currently selected language and the number of received
languages will be displayed on the screen.
Every time you press SAP button on the remote control,
the language will be switched.
Languages you can switch differ depending on the
receiving broadcast.
NOTE:
Pressing the SAPbutton works only with some TV channels,
and does notwork with externalequipment such as DVD players.
Volume adjustment
16
POWER TV/DVD OPEN/CLOSE
Q.VIEW INFO MUTE
1234
5678
9900
CC
P.MODE
CH+
CH-
VOL
_
MENU
OK
STOP SETUP PAUSE/STEP
REV FWD .PREV NEXT
D.MENU REPEAT A-B
PLAY/ENTER SLOW
ANGLE TITLE/PBC SEARCH
AUDIO
CLR
D.CALL
TV/AV
PROGRAM ZOOM
10+
VOL
+
SUBTITLE
-
TV/DTV
SAP
SLEEP
CH.LIST FAV.LIST SIZE GUIDE

You can display the currently selected channel number or
other information such as the audio mode on the screen
for checking.
In the analog mode, the currently selected channel
number and the audio mode are displayed.
1 Display the channel number and the audio mode.
Press INFO button on the remote control.
The currently selected channel number and the audio
mode are displayed at the top right of the screen.
To clear thedisplay, press INFO button again.
In the digitalmode, the detailedinformation for the
currently selected channel such as the program
GUIDE is displayed.
Display the detailed information for the channel.
Every time you press INFO button, the display mode
will be switched as below.
The following information is displayedin the INFOmode.
(1) Program airtime
(2) Channel number
(3) Closed caption
(4) Channel title
(5) Audiolanguage
(6) Program content
Screen information
13
AUTO
14.1
DTV-AIR
ENCODE 17:00-18:30
INFORMATION
America Masters 9.2
ENGLISH 1/3 CC
Satchmo: The Life of Lauis
Armstrong A self-taught
1
2
3
4
5
6
17
NOTES:
When the programguide is displayed in more than6 lines, use VOL+/-
button and scroll forreading.
"No description provided"is displayed when the program guideis not
provided.
POWER TV/DVD OPEN/CLOSE
Q.VIEW INFO MUTE
1234
5678
9900
CC
P.MODE
CH+
CH-
VOL
_
MENU
OK
STOP SETUP PAUSE/STEP
REV FWD .PREV NEXT
D.MENU REPEAT A-B
PLAY/ENTER SLOW
ANGLE TITLE/PBC SEARCH
AUDIO
CLR
D.CALL
TV/AV
PROGRAM ZOOM
10+
VOL
+
SUBTITLE
-
TV/DTV
SAP
SLEEP
CH.LIST FAV.LIST SIZE GUIDE

Video menu
1Press MENU button. The main menu screen will appear.
2 Press VOL+/- button to
select VIDEO Option,
then press CH- button
to enter.
3 Press CH+/- to select the desired option,then press
VOL+/- to adjust.
SETTING VIDEO
18
0101
CONTRAST 80
BRIGHTNESS 80
COLOR 50
SHARPNESS 50
TINT 0
VIDEO
Contrast
This will adjustthe intensity ofbright parts in the picture butkeep
the dark partsunchanged.
Brightness
This will adjustthe light outputof the complete picture, which will
mainly affect the darker areasof the picture.
Color
This will adjustthe saturation levelof the colors to suit your
personal preference.
Sharpness
This will adjustthe sharpness offine details in the picture.
Tint
Allows you toselect the colormix (Tint) of the picture.
POWER TV/DVD OPEN/CLOSE
Q.VIEW INFO MUTE
1234
5678
9900
CC
P.MODE
CH+
CH-
VOL
_
MENU
OK
STOP SETUP PAUSE/STEP
REV FWD .PREV NEXT
D.MENU REPEAT A-B
PLAY/ENTER SLOW
ANGLE TITLE/PBC SEARCH
AUDIO
CLR
D.CALL
TV/AV
PROGRAM ZOOM
10+
VOL
+
SUBTITLE
-
TV/DTV
SAP
SLEEP
CH.LIST FAV.LIST SIZE GUIDE

Audio menu
1Press MENU button. The main menu screen will appear.
2 Press VOL+/- button to
select AUDIO Option,
then press CH- button
to enter.
3 Press CH+/- to select
the desired option, then
press VOL+/- to adjust.
SETTING AUDIO
19
0101
VOLUME 20
AUDIO
Volume
This will adjustthe sound outputlevel.
POWER TV/DVD OPEN/CLOSE
Q.VIEW INFO MUTE
1234
5678
9900
CC
P.MODE
CH+
CH-
VOL
_
MENU
OK
STOP SETUP PAUSE/STEP
REV FWD .PREV NEXT
D.MENU REPEAT A-B
PLAY/ENTER SLOW
ANGLE TITLE/PBC SEARCH
AUDIO
CLR
D.CALL
TV/AV
PROGRAM ZOOM
10+
VOL
+
SUBTITLE
-
TV/DTV
SAP
SLEEP
CH.LIST FAV.LIST SIZE GUIDE
This manual suits for next models
4
Table of contents
Other Haier TV DVD Combo manuals

Haier
Haier HLC22XSLW2 User manual

Haier
Haier LY22R1BW User manual

Haier
Haier L15C10B User manual

Haier
Haier LT19R1CBW User manual

Haier
Haier DTA-2198 User manual

Haier
Haier DTA-2198PF User manual

Haier
Haier DTA-2198 User manual

Haier
Haier HLC26B - 26" LCD TV Instruction Manual

Haier
Haier DTA-2189 User manual

Haier
Haier LV1513 User manual

Haier
Haier TDC2014S User manual

Haier
Haier DTA-1486 User manual

Haier
Haier DTA-1498 User manual

Haier
Haier TCR13-A User manual

Haier
Haier 90502138 User manual

Haier
Haier HL19R1 - 18.5" LCD TV User manual

Haier
Haier TDC1314S User manual

Haier
Haier HLC22E User manual

Haier
Haier HL Series User manual

Haier
Haier NX-565 User manual