Haier HIH-V90HM-P1 User manual

Range Hood
Model:
HIH-V90HM-P1
HIH-V90HM-P2
INSTALLATION GUIDE/USER GUIDE

CONTENTS
1 Introduction 1
2 Safety and warnings 2
3 Installation instructions 4
4 About your range hood 8
5 Operating Instructions-Control Panel 9
6 Cleaning and maintenance 1 1
7 Troubleshooting 1 3
8 Warranty 15
IMPORTANT!
The models shown in this user guide may not be available in all markets
and are subject to change at any time. For current details about model a
-nd specification availability in your country, please contact your local
Haier dealer.
SAVE THESE INSTRUCTIONS

1
INTRODUCTION
Thank-you for purchasing a Haier range hood.
This user guide explains the features and functions, and will help
you get the most out of your range hood.
We hope you enjoy your new range hood.

2
IMPORTANT SAFETY INSTRUCTIONS
WARNING! When using this appliance always exercise basic safety precautions
including the following:
● Disconnect the power supply when cleaning or inspecting the product.
● Do not damage or place heavy objects on the power cord.
● There must be adequate ventilation of the room when the range hood is used at the
same time as appliances burning gas or other fuels. (A partial vacuum in the room could
result in too high a concentration of gas in the air).
● Never expose the range hood to a burner or element that is turned on without a pot or
pan covering it.
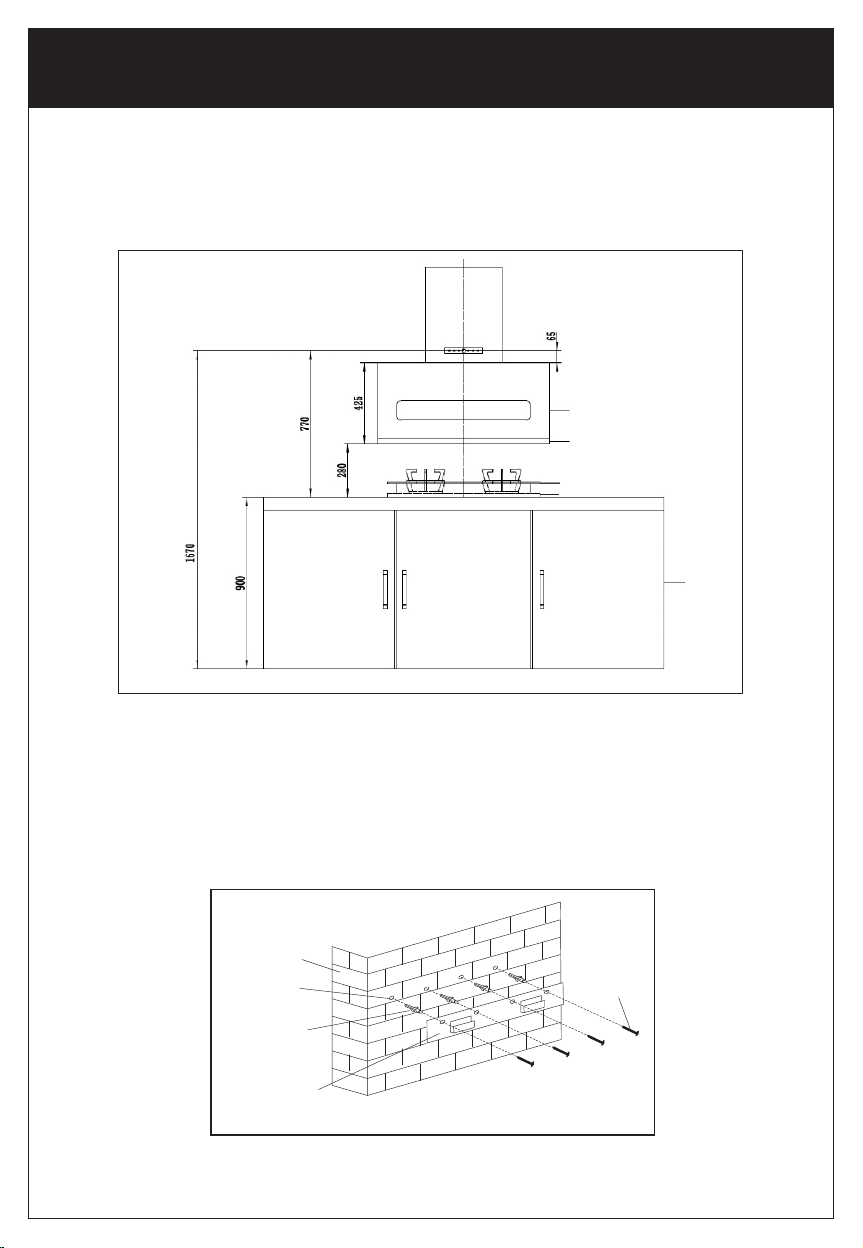
● If the hood is installed above the gas appliance, the minimum distance between the
support surface of the cooking vessel on the cooktop and the lowest part of the range
hood should beat least 650mm. If the gas stove installation instructions specify a larger
installation distance,this should be considered.
● Never use aluminium foil on the cooktop.
● If using shared ducting, the air outlet must be well secured and sealed.
● Exhaust gases must not be discharged into a hot flue being used to vent appliances
burning gas or other fuels.
● Do not flambe directly under the range hood.
● Children and persons with reduced physical, sensory or mental capabilities shall not
use the range hood without supervision.
● This appliance can be used by children aged from 8 years and above and persons with
reduced physical,sensory or mental capabilities or lack of experience and knowledge if
they have been given supervision or instruction concerning use of the appliance in a sa
fe way and understand the hazards involved. Children shall not play with the appliance.
Cleaning and user maintenance shall not be made by children without supervision.
● There is a fire risk if cleaning is not carried out in accordance with the instructions.
● If installation is performed by a qualified person, the product should be tested to
Electric Shock Hazard
Read and follow the safety and warnings outlined in this user guide before
operating this appliance.
Never touch the power plug or electrical components, or manipulate the
power switch with wet hands.
Altering of the internal wiring is strictly prohibited, unless performed by
professional maintenance personnel.
When cleaning, never allow electrical components such as the motor,
switch and connector to get wet.
Failure to do so can result in death, electric shock, fire or injury to persons.
Children should be supervised to ensure that they do not play with the
appliance. Details for cleaning refer to part of ‘Cleaning and maintenance’.
WARNINGS
SAFETY AND WARNINGS
!

3
confirm proper operation, and the correct use of the product explained to the user.
● If the power supply cord is damaged, it must only be replaced by your Haier trained
and supported service technician or qualified person.
● Use a dedicated power outlet; the power cord must not be connected to an extension
cord or multi-socket power board. Secure grounding is required.
● Regulations regarding the discharge of air must be fulfilled.
● This appliance is an external exhaust hood, air and smoke is discharged to the outside
through the air duct. To properly exhaust air ensure the duct is straight.
● Do not clean the inside of the range hood. If you need to clean the inside, please
contact your Haier trained and supported service technician.
● The appliance shall be able to work normally under the following envi-ronmental
conditions:temperature -15°C ~ 40°C, relative humidity ≤ 90% (at 25°C), altitude ≤
1000m.
● Remove all packaging, including protective wrappings, before use.
● CAUTION: Accessible parts may become hot when used with cooking appliances.
● If installation is performed by a qualified person, the product should be tested to
confirm proper operation, and the correct use of the product explained to the user.
● If the power supply cord is damaged, it must only be replaced by your Haier trained
and supported service technician or qualified person.

INSTALLATION INSTRUCTIONS
Installation
This product is heavy and requires two persons for installation.
Failure to install the screws or fixing device in accordance with these
instructions may result in electrical hazards.
WARNING!
WARNING!
The range hood must have secure grounding. It has a 3-pin plug. The plug
must be connected to a socket with grounding.The grounding could offer an
electricity circuit to avoid electric shock caused by electricity leakage.
Please make sure the electricity supply system in your home (current,
voltage, connecting wires) can meet the requirements of range hood’s normal
supply load.
Please do not use high capacity fuse in electrical circuit and select the
correct ones as required on rating label.
1 Prepare the range hood for installation
● Before commencement, unpack the range hood and check that it functions
correctly.
● The room in which the range hood is used should be well ventilated and contain
no flammable, explosive or corrosive materials or articles.
● The wall used for mounting the range hood should have sufficient strength and
a flat surface.
● When drilling holes in the wall, do so away from water, electricity or gas lines to
prevent hazards such as electric shocks or gas leaks.
● Temporarily mark the height of the bottom of the range hood and the centre of
the cooktop on the wall.
4

CABINET
1670MM MAXIMUM HEIGHT FROM FLOOR TO SWITCH
BODY
OIL COLLECTOR
TOP SURFACE OF CABINET TO BOTTOM OF OIL COL LEC OT( 280 MM)
TABLE T HOB
BUILT-IN HO B
● The suitable height of mounting shall be 280mm above the cooking stove.
The real installation height is subject to the construction of kitchen and user’s
height. The installation instruction of gas stove has given the suitable
installation distance, please take it into consideration.
INSTALLATION INSTRUCTIONS
5
Fig. 1
hole
expension
plug
wall plate
wall
2.Install the wall plate
● Use an impact drill with a φ8 mm masonry bit to drill 40mm deep holes in
the wall in the locations of the wall plate holes as shown in Fig.1.
● Fit the expansion plugs into the holes.
● Secure the wall plate to the wall using the mounting screws.
4 screws

INSTALLATION INSTRUCTIONS
6
3. Connect the panel and the chimney
● The panel and the chimney is packed in different boxes. Open the
packages and make sure they are in good conditions.
● There are 2 concave rails at the bottom of the chimney and 2 convex rails
on the top of the panel. These rails are aligned when installed.
Put the chimney on the floor, uplift the panel facing the convex rails down.
Aim at the concave rails of the chimney.
Slide the convex rails of the panel into the concave rails of the chimney.
Make sure they are locked properly.
Install the fixing plate to the back of the unit. Make sure it's tightened.
Install the check valve onto the top of the chimney with screws. Put the al
uminum pipe onto the check valve, make sure it is sealed properly.
Install the fixing plate to the
back of the unit. Make sure
it's tightened.
Slide the convex rails of the
panel into the concave rails of
the chimney. Make sure they
are locked properly.
Put the chimney on the floor, uplift the
panel facing the convex rails down.
Aim at the concave rails of the chimney.
Concave rails on
the chimney
Convex rails on
the panel
Fig. 2

INSTALLATION INSTRUCTIONS
4.Install the main unit (this requires 2 persons)
● Aim at the wall plate and secure the range hood to the wall. Ensure the main
unit and wall plate are firmly locked together.(Fig3)
5.Connect the universal ducting hose
●Connect one end of ducting hose with the check valve and seal it.
●Connect the other end of the hose to a shared flue or external wall hole as
shown in Fig4.
●The length of the universal ducting hose should not exceed 3 metres to
prevent impact on venting performance. The number of bends should be
minimised. Flexible ducting should be stretched tight and trimmed to suit the
installation.
7
Ø 150mm Ø 150mm
Mi nim um 3 0m m
Flue External wall Direct exhaust
6.Extend the inner decorative cover (if inner decorative cover extension
is to be used)
Pull the inner decorative cover up and hook it onto the decorative cover holder.
7. Fit the oil collector
● Slide the oil collector into the slot.
● Make sure the oil collector is pushed all the way in.
8.Remove packaging
Remove all protective wrappings.
Wall plate
Fig3 Fig4

8
ABOUT YOUR RANGEHOOD
Technical Data
LED Lamp
Type of Power
Motor Rated Power Input
Heater Power
Rated Power Input
Max Air Flow
Noise
Max Air Pressure
Universal Ducting Hose
Net Weight
1x2W
Rated Voltage:220-240V Rated Frequency:50Hz
240W
55W
297W
1350m³ /h
58dB(A)
420Pa
Outer Diameter 160mm, Length 180mm
Panel-8.7/10kg Chimney-13.5/15kg

OPERATING INSTRUCTIONS - CONTROL PANEL
CONTROL PANEL FEATURES
1.Press this button the hood will connect to electricity.
2.When fan is on, press this button the hood will enter Delay off mode
and turns off in 3 minutes.
3.In Delay off mode press this button to turn off the hood.
Touch this button on the panel, the cooker hood will start operating on
LOW speed.
Touch this button on the panel, the cooker hood will start operating on
MEDIUM speed.
Touch this button on the panel, the cooker hood will start operating on
HIGH speed.
Light:Touch this button on the panel to turn on the lights . Repeat
the action to switch-off the lights.
Auto-clean:Touch this button for 3 seconds, the hood enters into
stand-by mode. Secondly, heating pad starts working for 9 minutes.
After that, blower will run at low speed for 1 minute to clean the
inside of the range hood.
1.Gesture control:Wave hand from " "to" ",the range hood will
start operating at LOW speed.Repeat same gesture,the cooker hood
will switch to MEDIUM and HIGH speed, Wave hand from" "to" ",
the cooker hood will start DELAY mode and switch off in 3 minutes.
Repeat same gesture, cooker hood will switch off immediately.
2.Long touch the" "button for 5 seconds, the gesture control function
will be locked. Repeat this action,it will be turned on.
9

OPERATING INSTRUCTIONS - CONTROL PANEL
10
HEAT AUTO-CLEAN
A unique "Heat Auto-Clean" function has been provided in this range hood. This range hood
comes with an oil collector. During cooking, the oil and dirt may go into the oil collector.
Over the time,some stubborn grease and oil can get stuck inside the range hood.
This unique function was designed to eliminate the stubborn grease ane oil and keep the range
hood clean.
Please first touch" "button, then touch" "button on the panel for 3 seconds. The light of auto
clean will start blinking. After preheating for 9 minutes, the low speed indicating light " " is on
at the same time.The motor will start working automatically for 1minute. Once auto-clean function
stops working, the cooker hood system will switch to stand-by mode. To avoid any bad influence for
cleaning performance, please do not cook during the auto clean process.
All the grease are melt and goes into the inside oil outlet pipe, then drops into oil collector.The
auto-clean function will stop operating at the end of 1 minute. Wait for a moment and then carefully
remove the oil collector, make sure that you do not spill the grease. Pull the grease into a sink and
clean the oil collector with a soft cloth. Install the oil collector back in place. Your range hood is
clean as new from inside now.

CLEANING AND MAINTENANCE
11
We recommend following ‘Cleaning and maintenance’ instructions for safety and optimal
performance of your range hood.
Preparation for cleaning and maintenance
● Be sure to unplug the power cord before commencing cleaning or servicing of the
range hood.
● Always wear rubber gloves during cleaning and maintenance to guard against injury
from sharp metal parts.
● Always handle removed parts carefully to avoid damaging them.
● Clean and service your range hood regularly, depending on the frequency of use.
Cleaning the main housing (daily)
● The outer surface of the range hood and filter should be wiped every day after use.
● To protect the finish, use a neutral detergent and a soft cloth. Never use hard brushes.
● Never wipe surfaces with corrosive chemicals such as gasoline or alcohol, or abrasive
cleaning agents.
Cleaning the oil collector (as necessary)
● When the oil collector is almost full,it should be removed promptly to avoid overflow.
● Pull the oil collector straight out to detach it from the filter.
● Empty the oil collector.
● The oil collector should be washed in
warm water with detergent (do not use
corrosive chemicals).
● To replace the oil collector, slide it into
the slot and ensure it is pushed all the way in.
Cleaning the entire unit (every 6 months) (this requires 2 persons)
● The entire unit should be cleaned once every six months so as to maintain venting
performance and ensure a long service life.
● Unplug the power cord if the range hood will not be used for a prolonged period of time.
● It should be done by professional personnal.

12
TROUBLESHOOTING
Solutions for common faults
In case of a fault, first try the suggestions below. If the problem cannot be fixed, please get in
touch with your local Haier after-sales service centre. Only professional technicians may
dismantle and repair the range hood.
PROBLEM POSSIBLE CAUSE WHAT TO DO
No power. Power supply plug is not
plugged in or not properly
connected.
Connect the power plug.
No power is supplied to the
electrical outlet.
Restore the power supply or contact
an electrician for repair.
Power is not connected or a
fuse is blown.
Restore or contact an electrician for
repair.
Product not
working.
The power supply is not
connected, or the voltage is
incorrect.
Restore the power supply or contact
an electrician for repair.
No fan speed has been
selected.
Select a fan speed.
Light button not pressed. Press the light button.
Light has burned out. Replace the light (please contact the
after-sales service centre).
Light not
working.
Main unit is not securely
fastened to wall.
Check that the main unit is fastened
securely.
Blower is not well fitted. Fit the blower properly.
Product
vibrates.
Blower is damaged. Replace the blower (please contact the
service centre).
Hand-tightened nut is loose. Tighten the hand-tightened nut.
Windows and doors are open
too wide during use or are
closed.
Open or close doors and windows
as necessary to ensure venting
performance.
Poor suction.
Range hood body is not
installed at the correct height.
Re-install the appliance at the
required height.
Universal ducting hose is too
long, has not been stretched
tight, or has too many bends.
Reduce the length of the ducting hose
or the number of bends.
Shared flue aperture is too
narrow or the air outlet is
poorly sealed.
Widen the flue aperture or improve
the outlet sealing.
The check valve blade is stuck
and cannot function properly
Fix the blade and ensure the valve is
working correctly.
Range hood has not been
cleaned.
Clean the rangehood in accordance
with the instructions.

13
TROUBLESHOOTING
PROBLEM POSSIBLE CAUSE WHAT TO DO
Oil leak. Too much oil in the oil
collector.
Remove waste oil in the oil collector.
Filter has not been
cleaned.
Clean the filter in accordance with
the instructions.
Main housing hasn't been
cleaned.
Wipe the main housing every day
after use in accordance with the
instructions.
Filter is
difficult to remove.
Filter has
not been cleaned.
Clean the filter weekly in accordance
with the instructions.
Note: if you are unable to fix the problem by following the above prompts, or one of the
situations below occurs, please unplug the range hood straight away and contact our
after-sales service centre.
1 The range hood runs unevenly when turned on;
2 The range hood makes an unusual noise during operation;
3 Strange odours, heat or smoke are discovered, or other unusual circumstances not
mentioned above occur.
The following phenomenon is not a malfunction
PHENOMENON CAUSE
The product makes a clicking
noise after the power is switched
off for a few seconds.
Air pressure causes the two blades of the check valve
to open during operation. After the power supply is
switched off, the blower gradually stops rotating and the
blades fall back by themselves, emitting a clicking
noise.

Inspired Living
Inspired Living
This manual suits for next models
1
Table of contents
Other Haier Ventilation Hood manuals

Haier
Haier HHN1230DBBB User manual

Haier
Haier IT9001 User manual

Haier
Haier 3000 Series User manual

Haier
Haier HHX2030 User manual

Haier
Haier HHX1030 User manual

Haier
Haier HCH6500ALS User manual

Haier
Haier HATS9DS6BPLWI User manual

Haier
Haier HIH-T60HM-V User manual

Haier
Haier HHX7030 - 05-05 User manual

Haier
Haier HDSV985B User manual

Haier
Haier HDSV985B User manual

Haier
Haier HHX3030 - 05-05 User manual

Haier
Haier HIH-G60HM-G User manual

Haier
Haier HADD9SS6B User manual

Haier
Haier HHX6130 User manual

Haier
Haier HH-S900C User manual

Haier
Haier IT9002 User manual

Haier
Haier HH-DTS1 User manual

Haier
Haier HATS6DS2XWIFI User manual

Haier
Haier HHX6030 - 05-05 User manual