Hammer K2 M Quick guide

Operating instructions
Keep this manual to hand and in good condition for future reference.
Please read this operating manual carefully before using the machine.
Translation of the original operating instructions
K2 M - Part 2/2
Circular saws
http://fg.am/ba-manuals
Download your local language
RU SV
RO
DE EN ES
CZ DA
PLNLIT
HU
FR
510010-901-2, 1, en_GB

©2023
FELDER KG
KR-Felder-Straße 1,A-6060 HALL in Tirol, AUSTRIA
Telephone: +43 5223 5850 0
Email: info@felder-group.com
Internet: www.felder-group.com

3
K2 M - Part 2/2
Table of contents
Table of contents
1 Adjustments and tool changes. . . . . . . . . . . . . . . . . . . . . . . . . . . . . . . . . . . . . . . . . . . . . . . . . . 5
1.1 Rip fence. . . . . . . . . . . . . . . . . . . . . . . . . . . . . . . . . . . . . . . . . . . . . . . . . . . . . . . . . . 5
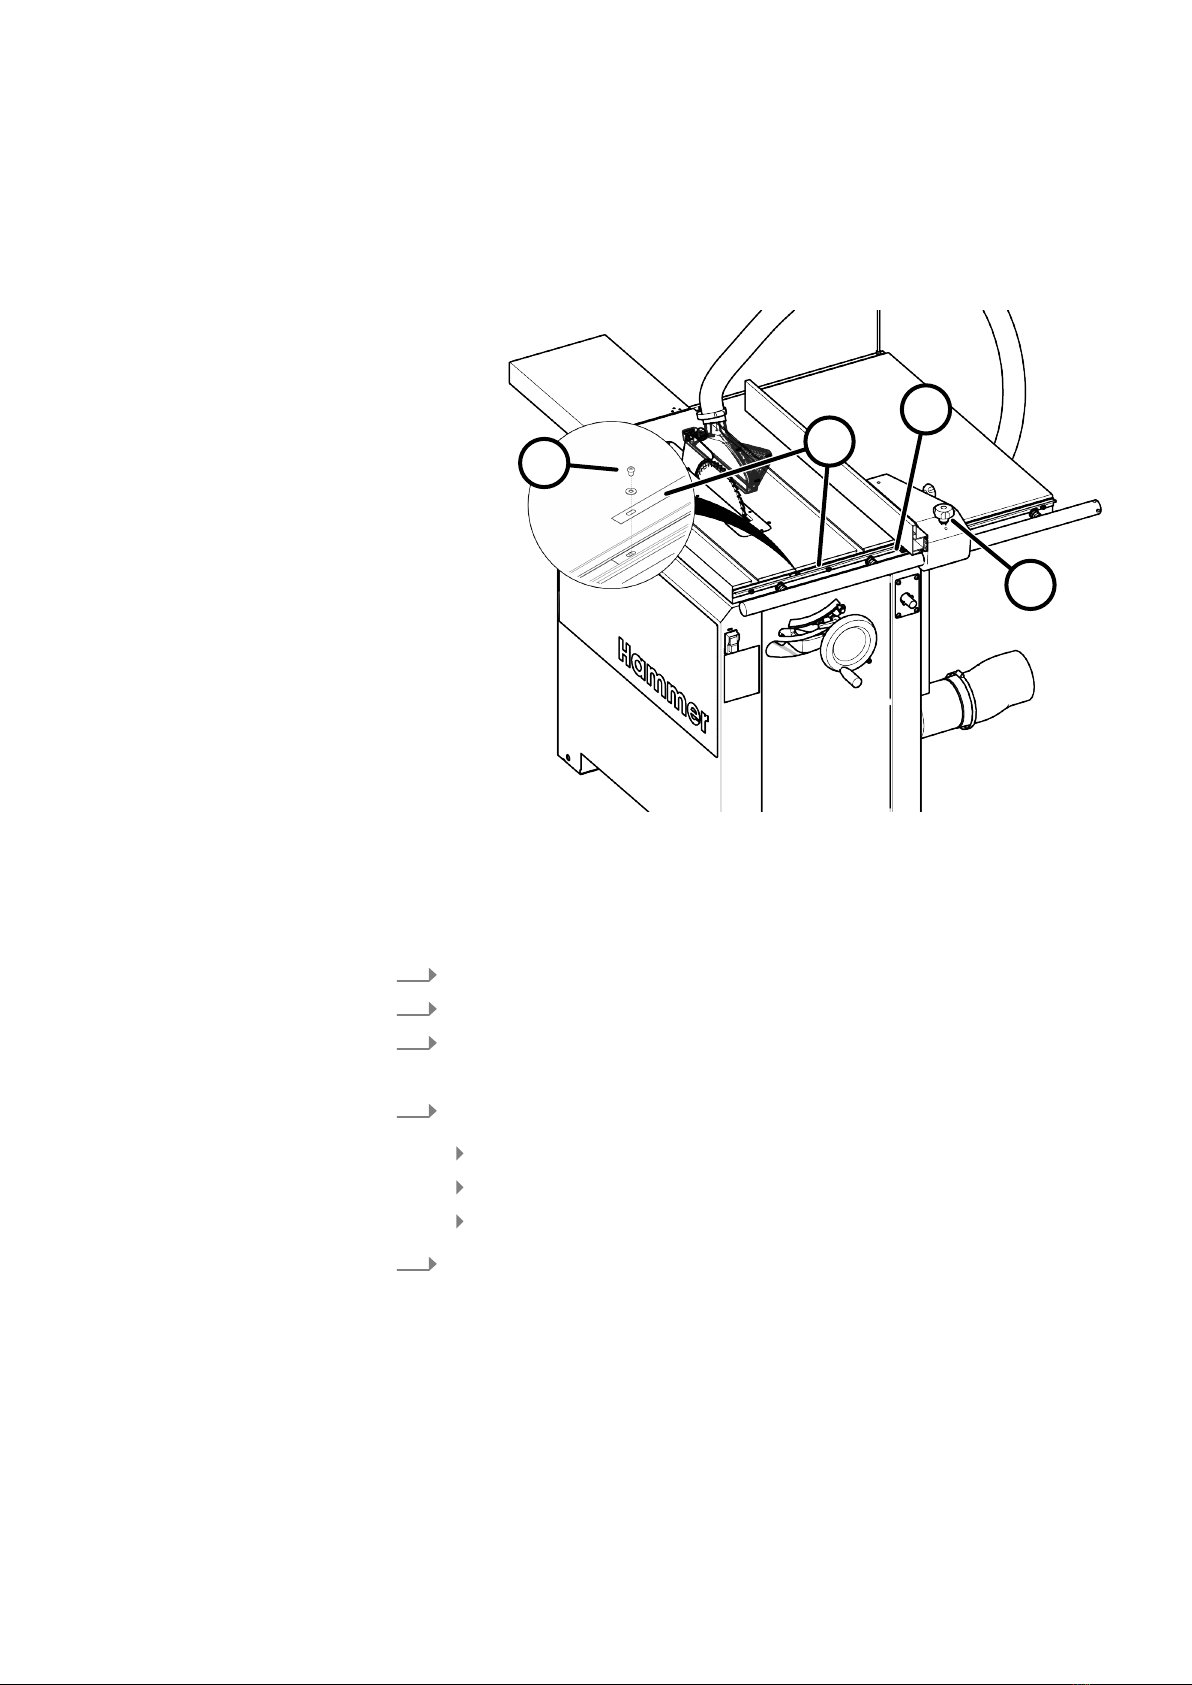
1.1.1 Positioning the rip fence. . . . . . . . . . . . . . . . . . . . . . . . . . . . . . . . . . . . . . . . . . . . . . . 5
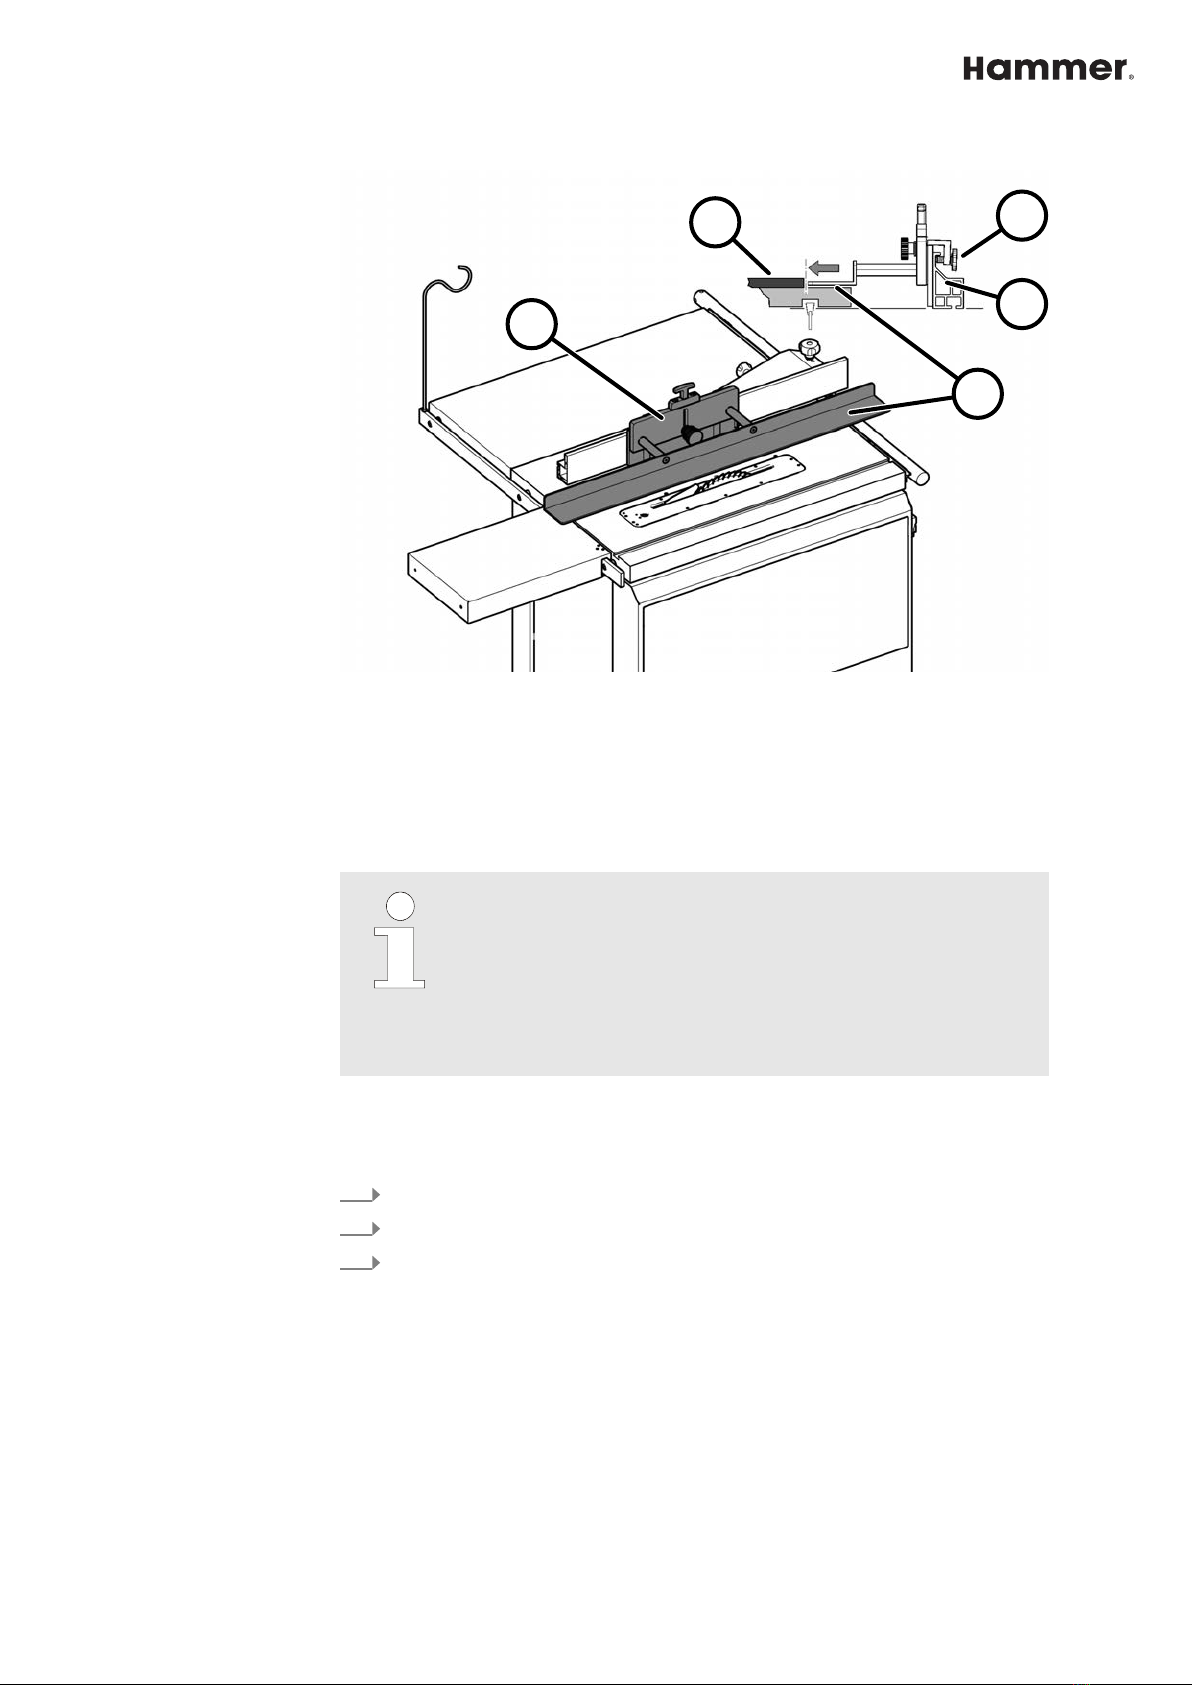
1.1.2 Change the fence plate (guide) over. . . . . . . . . . . . . . . . . . . . . . . . . . . . . . . . . . . . . . 6
1.1.3 Remove the rip fence. . . . . . . . . . . . . . . . . . . . . . . . . . . . . . . . . . . . . . . . . . . . . . . . . 7
1.1.4 Mounting the "Sägeboy" auxiliary fence to the rip fence. . . . . . . . . . . . . . . . . . . . . . . . 7
1.2 Setting the height/angle of cut (standard configuration). . . . . . . . . . . . . . . . . . . . . . . . . . 9
1.3 Tool change. . . . . . . . . . . . . . . . . . . . . . . . . . . . . . . . . . . . . . . . . . . . . . . . . . . . . . . . 10
1.3.1 General information relating to saw blades and grooving tools. . . . . . . . . . . . . . . . . . . . 10
1.3.2 Prepare to change tooling. . . . . . . . . . . . . . . . . . . . . . . . . . . . . . . . . . . . . . . . . . . . . . 11
1.3.3 Establish operational readiness. . . . . . . . . . . . . . . . . . . . . . . . . . . . . . . . . . . . . . . . . . 12
1.4 Changing the saw blade. . . . . . . . . . . . . . . . . . . . . . . . . . . . . . . . . . . . . . . . . . . . . . . 14
1.4.1 Installing the saw blade in the machine. . . . . . . . . . . . . . . . . . . . . . . . . . . . . . . . . . . . 14
1.4.2 Loosen / adjust riving knife. . . . . . . . . . . . . . . . . . . . . . . . . . . . . . . . . . . . . . . . . . . . . 15
1.4.3 Fit /change the riving knife. . . . . . . . . . . . . . . . . . . . . . . . . . . . . . . . . . . . . . . . . . . . . 17
1.4.4 Remove the riving knife. . . . . . . . . . . . . . . . . . . . . . . . . . . . . . . . . . . . . . . . . . . . . . . . 19
1.5 Grooving tools. . . . . . . . . . . . . . . . . . . . . . . . . . . . . . . . . . . . . . . . . . . . . . . . . . . . . . 20
1.5.1 Retooling to an operation with grooving tools. . . . . . . . . . . . . . . . . . . . . . . . . . . . . . . . 20
1.5.2 Clamping the grooving tool. . . . . . . . . . . . . . . . . . . . . . . . . . . . . . . . . . . . . . . . . . . . . 21
1.5.3 Removing the grooving tools - Retool to a saw blade operation. . . . . . . . . . . . . . . . . . . . 23
1.6 Fitting and adjusting circular saw guard. . . . . . . . . . . . . . . . . . . . . . . . . . . . . . . . . . . . 25
2 Use. . . . . . . . . . . . . . . . . . . . . . . . . . . . . . . . . . . . . . . . . . . . . . . . . . . . . . . . . . . . . . . . . . . . . . 25
2.1 Auxiliary aids for safe operation. . . . . . . . . . . . . . . . . . . . . . . . . . . . . . . . . . . . . . . . . 25
2.2 Switch on / switch off / shutdown due to an emergency stop. . . . . . . . . . . . . . . . . . . . . . 26
2.3 Working techniques. . . . . . . . . . . . . . . . . . . . . . . . . . . . . . . . . . . . . . . . . . . . . . . . . . 27
2.3.1 Working area. . . . . . . . . . . . . . . . . . . . . . . . . . . . . . . . . . . . . . . . . . . . . . . . . . . . . . 27
2.3.2 Authorised working methods. . . . . . . . . . . . . . . . . . . . . . . . . . . . . . . . . . . . . . . . . . . . 27
2.3.3 Prohibited working methods. . . . . . . . . . . . . . . . . . . . . . . . . . . . . . . . . . . . . . . . . . . . 28
2.3.4 General procedures for authorised working techniques. . . . . . . . . . . . . . . . . . . . . . . . . . 28
2.3.5 Longitudinal cut / cutting of strips. . . . . . . . . . . . . . . . . . . . . . . . . . . . . . . . . . . . . . . . 29
2.3.6 Cutting short, narrower workpieces. . . . . . . . . . . . . . . . . . . . . . . . . . . . . . . . . . . . . . . 30
2.3.7 Crosscutting with the crosscut and rip fence. . . . . . . . . . . . . . . . . . . . . . . . . . . . . . . . . 31
2.3.8 Covered cuts (Sägeboy auxiliary fence). . . . . . . . . . . . . . . . . . . . . . . . . . . . . . . . . . . . 32
2.3.9 Working with grooving tools (Sägeboy auxiliary fence). . . . . . . . . . . . . . . . . . . . . . . . . 33
3 Maintenance. . . . . . . . . . . . . . . . . . . . . . . . . . . . . . . . . . . . . . . . . . . . . . . . . . . . . . . . . . . . . . . 34
3.1 Maintenance schedule. . . . . . . . . . . . . . . . . . . . . . . . . . . . . . . . . . . . . . . . . . . . . . . . 34
3.2 Preparations for maintenance work / Removing the cover plate. . . . . . . . . . . . . . . . . . . . 35
3.3 Cleaning and lubricating. . . . . . . . . . . . . . . . . . . . . . . . . . . . . . . . . . . . . . . . . . . . . . . 36

4
Table of contents
3.4 General maintenance procedures. . . . . . . . . . . . . . . . . . . . . . . . . . . . . . . . . . . . . . . . . 36
3.4.1 Clean the machine thoroughly. . . . . . . . . . . . . . . . . . . . . . . . . . . . . . . . . . . . . . . . . . . 36
3.4.2 Belt tension. . . . . . . . . . . . . . . . . . . . . . . . . . . . . . . . . . . . . . . . . . . . . . . . . . . . . . . . 37
3.4.3 Lubricate the height guide of the circular saw unit. . . . . . . . . . . . . . . . . . . . . . . . . . . . . 37
3.4.4 Check dust extractor. . . . . . . . . . . . . . . . . . . . . . . . . . . . . . . . . . . . . . . . . . . . . . . . . 38
3.4.5 Check safety devices (emergency stop). . . . . . . . . . . . . . . . . . . . . . . . . . . . . . . . . . . . . 38
3.4.6 Check effectiveness of safety devices (end switch). . . . . . . . . . . . . . . . . . . . . . . . . . . . . 40
3.4.7 Lubricating the circular saw height spindle and tilting spindle. . . . . . . . . . . . . . . . . . . . . 41
3.5 Checking/changing the circular saw drive belt. . . . . . . . . . . . . . . . . . . . . . . . . . . . . . . . 42
3.5.1 Check belt tension and belt condition. . . . . . . . . . . . . . . . . . . . . . . . . . . . . . . . . . . . . . 42
3.5.2 Replacing the drive belt. . . . . . . . . . . . . . . . . . . . . . . . . . . . . . . . . . . . . . . . . . . . . . . 43
3.5.3 Re-tensioning the drive belt. . . . . . . . . . . . . . . . . . . . . . . . . . . . . . . . . . . . . . . . . . . . . 44
4 Troubleshooting. . . . . . . . . . . . . . . . . . . . . . . . . . . . . . . . . . . . . . . . . . . . . . . . . . . . . . . . . . . . . 45
4.1 What to do in the event of a malfunction. . . . . . . . . . . . . . . . . . . . . . . . . . . . . . . . . . . . 45
4.2 What to do after rectifying the fault. . . . . . . . . . . . . . . . . . . . . . . . . . . . . . . . . . . . . . . 45
4.3 Faults, causes and repairs. . . . . . . . . . . . . . . . . . . . . . . . . . . . . . . . . . . . . . . . . . . . . . 45
4.4 Adjust the height of the rip fence above the machine table. . . . . . . . . . . . . . . . . . . . . . . . 47
4.5 Correcting the rip fence angle. . . . . . . . . . . . . . . . . . . . . . . . . . . . . . . . . . . . . . . . . . . 47
4.6 Correct crosscut fence settings. . . . . . . . . . . . . . . . . . . . . . . . . . . . . . . . . . . . . . . . . . . 50
5 Attachment. . . . . . . . . . . . . . . . . . . . . . . . . . . . . . . . . . . . . . . . . . . . . . . . . . . . . . . . . . . . . . . . 52
5.1 Information relating to spare parts. . . . . . . . . . . . . . . . . . . . . . . . . . . . . . . . . . . . . . . . 52
5.2 Disposal. . . . . . . . . . . . . . . . . . . . . . . . . . . . . . . . . . . . . . . . . . . . . . . . . . . . . . . . . . 53

5
K2 M - Part 2/2
Adjustments and tool changes
1 Adjustments and tool changes
1.1 Rip fence
1.1.1 Positioning the rip fence
1
2
3
4
Fig. 1: Positioning the rip fence
1 Rip fence scale
2 Indicator
3 Thumb screw (clamping of the rip fence)
4 Scale clamping screw
1. Switch off the machine.
2. Loosen the thumb screw.
3. Read the measurement set using the scale.
🡆Read the measurement from the front edge of the indicator.
4. Adapting the scale to different saw blade thicknesses:
Loosen the clamping screw.
Move the scale by the missing dimension.
Tighten the clamping screw.
5. Tighten the thumb screw.

6
Adjustments and tool changes
1.1.2 Change the fence plate (guide) over
1
2
3
45
Fig. 2: Mount the guide in a flat position
1 Thumb screw (clamping of the fence plate)
2 Guide (fence plate)
3 Groove
4 Clamping rail
5 Scale indicator
When the fence plate is mounted flat, the distance to the saw blade changes. By
moving the scale indicator, the change in the cutting width can be corrected.
1. Loosen the thumb screw.
2. Pull the fence plate (guide) out backwards.
3. Turn the fence plate (lay it flat on the table) and then slide it back on, using
the respective groove.
4. Tighten the knurled thumb screw.
5. Slide the scale indicator in the direction of the saw blade until it reaches the
locking point.
🡆Read the corrected measurement from the front edge of the indicator.

7
K2 M - Part 2/2
Adjustments and tool changes
1.1.3 Remove the rip fence
1
2
3
Fig. 3: Remove rip fence
1 Thumb screw 1 (clamping of the fence plate)
2 Clamping screw 2 (clamping the rip fence)
3 Fence support bar
When processing large panels or when carrying out maintenance work it may be
necessary to remove the rip fence.
1. Tighten thumb screw 1.
2. Loosen thumb screw 2.
3. Push the rip fence right to the back.
4. Lift the rip fence slightly and pull it backwards off the fence support bar.
1.1.4 Mounting the "Sägeboy" auxiliary fence to the rip fence

8
Adjustments and tool changes
1
2
3
4
5
Fig. 4: Mount the "Sägeboy" auxiliary fence
1 Sägeboy auxiliary fence (Art.-No. 01.0.022)
2 Guide rail
3 Thumb screws
4 Fence plate
5 Template (mounted to the workpiece)
Tenoning hood and auxiliary fence "Sägeboy"
On machines without overhead saw guard, covered cuts and
grooving work may be carried out if the "Sägeboy" is placed
over the saw blade.
Assembly, operation and adjustment: See individual operating
instructions
The "Sägeboy" is an additional, anodised aluminium fence and is mounted to the
saw rip fence.
The Sägeboy guide rail also serves as a fence for sawing with templates.
1. Clamp the Sägeboy auxiliary fence to the fence plate with thumb screws.
2. Adjust the rip fence so that the tool is covered by the Sägeboy guide rail.
3. For settings on the Sägeboy auxiliary fence, see individual operation instruc-
tions.

9
K2 M - Part 2/2
Adjustments and tool changes
1.2 Setting the height/angle of cut (standard configuration)
1
2
3 4
Fig. 5: Adjusting the cutting height / cutting angle
1 Handwheel height adjustment
2 Handwheel angle adjustment
3 Clamping lever cutting angle adjustment
4 Scale cutting angle
Adjusting the cutting height
Only set the cutting height to the height actually required.
1. Adjust the cutting height with the handwheel on the side.
●Clockwise: higher
●Anti-clockwise: lower
2. Check the set cutting height with a measuring device on the saw blade.
Adjusting the cutting angle
When tilting beware of any possible collisions between fences, workpieces etc.
1. Pull off the handwheel and put it on the tilt arbour.
2. Release the cutting angle adjustment clamping lever.
3. Adjust the cutting angle using the right handwheel.
●Clockwise: towards 45°
●Anti-clockwise: towards 0°
4. Read the cutting angle set on the scale.
5. Lock the clamping lever for cutting angle adjustment.

10
Adjustments and tool changes
1.3 Tool change
1.3.1 General information relating to saw blades and grooving tools
NOTICE
Danger of collision when using grooving tools
Damage to the grooving tools and machine table.
−Do not adjust the 90° angle when working with grooving
tooling.
−A spacer ring has to be placed onto the saw arbour before
using grooving tooling with a width measuring less than 10
mm.
1
2
Fig. 6: Anti-rotation saw shaft
1 Saw shaft diameter
2 Anti-rotation saw flange
Only use saw blades and grooving tools,
●which have an authorised speed higher than the speed of the saw arbour
●and comply with the norm DIN EN 847-1
●which are marked with "MAN"
Only use grooving tools,
●which are suited to manual operation
●which are suitable to work with wood
Note
We recommend you use manufacturer original Felder Group tools
exclusively.
The processing of workpieces at the maximum cutting height indicated is only
possible under certain conditions. Whether it is possible is in direct relation to the
following factors:
●Type of wood (hardwood or softwood)
●Wood dampness
●Feed speed
●Saw blades
●The motor power of your machine

11
K2 M - Part 2/2
Adjustments and tool changes
1.3.2 Prepare to change tooling
1
2
4
3
Fig. 7: Prepare to change tooling
1 Thumb screws
2 Saw guard
3 Riving knife
4 Insert board
1. Position the saw aggregate in the 90° position (cutting angle 0°) and move
to the uppermost position.
2. Switch off the machine and secure it against being switched on again.
3. Loosen the thumb nut and push it in.
4. Pull the protective hood upwards off of the riving knife.
5. Remove insert board.
🡆Pull upwards over the riving knife.

12
Adjustments and tool changes
1.3.3 Establish operational readiness
Operational readiness when using saw blades
1
2
3
4
Fig. 8: Operational readiness - Saw blade work
1 Insert board
2 Saw guard
3 Spring catches
4 Thumb nut
Operational readiness
The saw blade only operates if the limit switch inside the machine
frame has not been actuated by the locking system.
1. Inserting the insert board.
Hook the insert board into the machine table on the right (front).
Engage the insert board on the left (rear) in the snap springs.
🡆Ensure that the insert board locks in place correctly on the right and the
left side.
2. Place the saw guard on the riving knife from above.
🡆The insert board must sit flush with the machine table.
3. Check settings of the protective hood. ⮫
Chapter 1.6 ‘Fitting and adjusting
circular saw guard’ on page 25
4. Tighten thumb nut.

13
K2 M - Part 2/2
Adjustments and tool changes
Operational readiness when using grooving tools
1
2
4
3
Fig. 9: Operational readiness - grooving tool
1 Insert board (Art.-no. 500-07-206)
2 Flat head screws M6x16
3 Tenoning hood "Sägeboy"
4 Grooving tool
Operational readiness
The saw blade only operates if the limit switch inside the machine
frame has not been actuated by the locking system.
Tool:
●Allen key 4 mm
1. Inserting the insert board.
Position the insert board in the machine table from above.
Screw in 7 countersunk screws with an Allen key.
🡆The insert board must sit flush with the machine table.
2. Mount the tenoning hood and "Sägeboy" auxiliary fence to the rip fence.
⮫
Chapter 1.1.4 ‘Mounting the "Sägeboy" auxiliary fence to the rip fence’
on page 7
Clamp the Sägeboy to the rip fence with thumb screws.
Adjust the rip fence so that the tool is covered by the Sägeboy guide
rail.
🡆Assembly, operation and adjustment: See own operating instructions.

14
Adjustments and tool changes
1.4 Changing the saw blade
1.4.1 Installing the saw blade in the machine
Note
For precision cuts, we recommend you to use the smallest saw
blade possible.
See technical data for authorised saw blades.
2
4
3
5
1
6
Fig. 10: Change the saw blade.eps
1 Riving knife
2 Locking pins
3 Saw arbour
4 Clamping screw (M10x27 L)
5 Flange
6 Saw blade
WARNING
Sharp and hot tool cutting edges
Cuts and burns due to sharp and hot tools.
−Wear protective gloves.
−Adjustments to the machine or changing the tools may only be
done once the machine has stopped.
Tool:
●Spanner 17 mm
●Locking pins
1. Preparing the machine for a tool change. ⮫
Chapter 1.3.2 ‘Prepare to
change tooling’ on page 11
2. To install a larger saw blade loosen the riving knife. ⮫
Chapter 1.4.2
‘Loosen / adjust riving knife’ on page 15

15
K2 M - Part 2/2
Adjustments and tool changes
3. Secure the saw arbour against rotation.
Insert the locking pin into the hole on the circular saw table.
Turn the circular saw shaft until the locking pin engages.
4. Loosen the clamping screw with a fork wrench.
Left screw thread, loosen by turning clockwise.
5. Remove the clamping bolt and saw flange.
6. Remove the old saw blade and place the new saw blade on the arbour.
7. Replace the flange (take note of the assembling position).
🡆Insert the flange with the drivers into the holes of the saw arbour.
8. Hold the circular saw flange and fit the clamping screw.
9. WARNING Flying pieces
Severe injuries and damage to property.
●Minimum tightening torque of the clamping bolt: 20 Nm.
Tighten the clamping screw with fork wrench.
Left screw thread, tighten by turning counter clockwise.
10. Remove the locking pin from the hole.
11. Adjust the riving knife if a larger or smaller saw blade has been fitted.
12. Prepare the machine to operate. ⮫
Chapter 1.3.3 ‘Establish operational
readiness’ on page 12
1.4.2 Loosen / adjust riving knife
1
2
3
4
Fig. 11: Adjust the riving knife
1 Clamping screw
2 Riving knife / markings
3 Distance
4 Saw blade

16
Adjustments and tool changes
NOTICE
Incorrectly adjusted distance between the saw blade and riving
knife
Material damage and possible malfunction with covered cuts.
−The gap between the riving knife and saw blade must be
between 3 and 8 mm.
−When carrying out covered cuts, the highest point of the riving
knife must be 0-2 mm below the highest point of the saw
blade.
Tool:
●Spanner 17 mm
1. Preparing the machine for a tool change. ⮫
Chapter 1.3.2 ‘Prepare to
change tooling’ on page 11
2. Loosen the clamping screw.
3. Move the riving knife so that there is, at any given point, a distance of 3 to
8 mm between the saw blade and the riving knife.
4. The marking on the riving knife must match the top edge of the machine
table at the max. cutting height (independently of the saw blade used).
5. When carrying out covered cuts, the highest point of the riving knife must be
0-2 mm below the highest point of the saw blade.
6. WARNING Flying pieces
Severe injuries and damage to property.
●Minimum tightening torque of the clamping bolt: 25 Nm.
Tighten the clamping screw.

17
K2 M - Part 2/2
Adjustments and tool changes
1.4.3 Fit /change the riving knife
1
2
3
4
5
Fig. 12: Fitting the riving knife
1 Clamping screw
2 Riving knife
3 Serrated washers
4 Bolts
5 Saw blade
Tool:
●Combination wrench 17 mm
1. Loosen the clamping screw.
2. Remove the riving knife if required.
3. Insert the riving knife into the holder.
🡆The riving knife holder bolt must sit in the riving knife groove.
4. Move the riving knife into the correct position. ⮫
Chapter 1.4.2 ‘Loosen /
adjust riving knife’ on page 15
5. WARNING Flying pieces
Severe injuries and damage to property.
●Minimum tightening torque of the clamping bolt: 25 Nm.
Tighten the clamping screw.

18
Adjustments and tool changes
Correct selection of the riving knife
1 2 3
Fig. 13: Suitable riving knife for the saw blade
1 Riving knife thickness (d)
2 Saw tooth width (D)
3 Saw blade body (S)
The riving knife has to be adapted to the thickness of the saw blade. The thickness
of the riving knife must be between that of the saw blade body and the width of
the saw tooth.
The riving knife must be adapted to the saw blade diameter. Observe the mark-
ings on the riving knife.
1
2
3
Fig. 14: Riving knife markings
1 Saw blade diameter
2 Riving knife thickness
3 Saw blade diameter markings

19
K2 M - Part 2/2
Adjustments and tool changes
1.4.4 Remove the riving knife
12
3
Fig. 15: Remove the riving knife
1 Clamping screw
2 Riving knife holder
3 Riving knife
WARNING
Serious injury arising from contact with the rotating saw blade
If working without a riving knife, the workpiece could become
jammed after the saw blade.
−Operation without the riving knife is only allowed when using
grooving tools.
−A riving knife is required when working with circular saw
blades.
Remove the riving knife:
Tool:
●Combination wrench 17 mm
1. Preparing the machine for a tool change. ⮫
Chapter 1.3.2 ‘Prepare to
change tooling’ on page 11
2. Loosen the clamping screw.
3. Pull the riving knife upwards out of the riving knife holder.
4. WARNING Flying pieces
Severe injuries and damage to property.
●Minimum tightening torque of the clamping bolt: 25 Nm.
Tighten the clamping screw.

20
Adjustments and tool changes
1.5 Grooving tools
1.5.1 Retooling to an operation with grooving tools
1
2
3
4
Fig. 16: Rear flange / riving knife holder / insert board
1 Insert board
2 Rear flange
3 Flange for circular saw blades
4 Riving knife removed
WARNING
Sharp and hot tool cutting edges
Cuts and burns due to sharp and hot tools.
−Wear protective gloves.
−Adjustments to the machine or changing the tools may only be
done once the machine has stopped.
Tool:
●Spanner 17 mm
1. Preparing the machine for a tool change. ⮫
Chapter 1.3.2 ‘Prepare to
change tooling’ on page 11
2. Remove insert board.
3. Remove the saw blade.
4. Remove the riving knife.
5. Remove the rear flange.
6. Position the saw aggregate in the 90° position (cutting angle 0°).
This manual suits for next models
2
Table of contents
Other Hammer Saw manuals