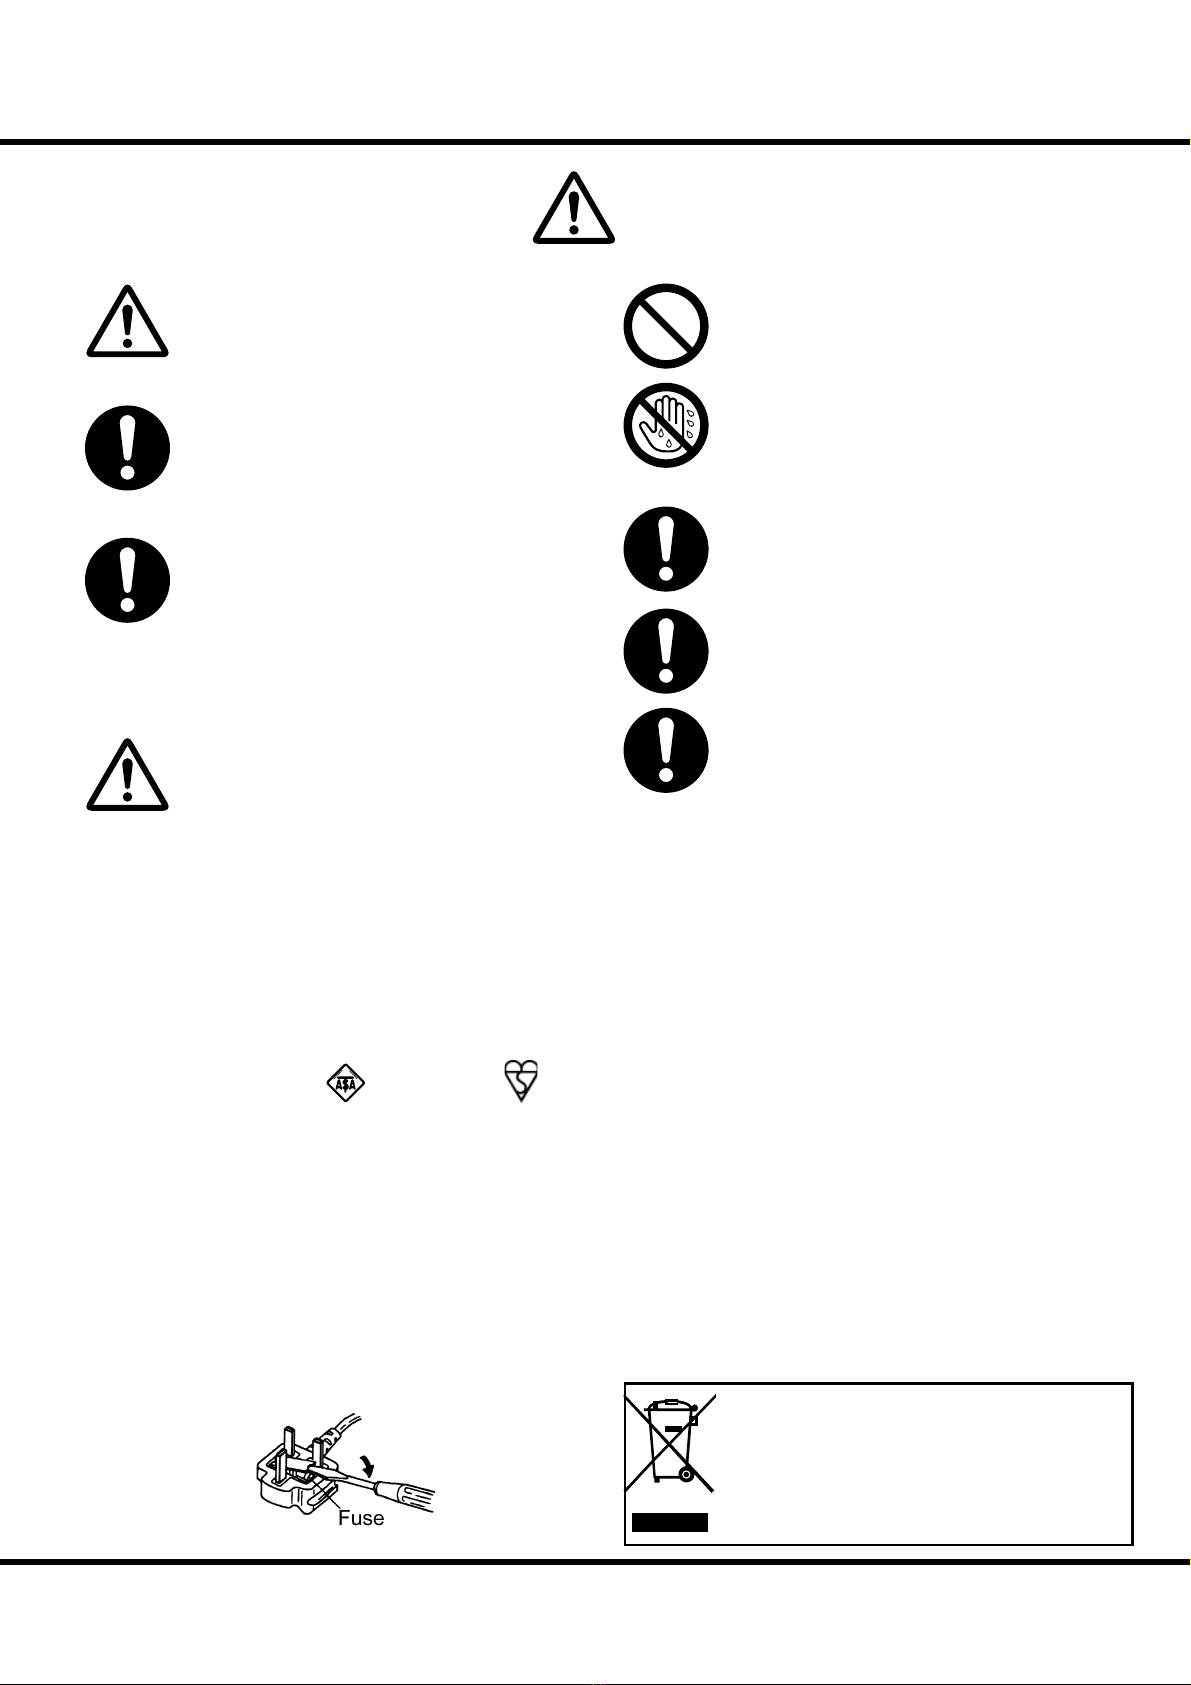
Hammond SKX User manual

Model: Skx
Owner’s Manual
ank you, and congratulations on your choice of the Hammond SKX
Stage Keyboard.
e Hammond SKX features authentic Hammond Organ Sound along
with high-quality keyboard and orchestral voices to make it the perfect
instrument for all musical occasions.
Please take the time to read this Manual completely in order to full ad-
vantage of the many features of your SKX, and please retain it for future
reference.
STAGE KEYBOARD
PLAYER
MIX
BALANCE
EXV1 EXV2

Skx Owner’s Manual
2IMPORTANT SAFETY INSTRUCTIONS
Before using this unit, please read the following Safety instructions, and adhere to them.
Keep this manual close by for easy reference.
In this manual, the degrees of danger are classied and explained as follows:
WARNING
CAUTION
WARNING
is sign shows there is a risk of death or severe injury if this unit is not properly used
as instructed.
is sign shows there is a risk of injury or material damage if this unit is not properly
used as instructed.
*Material damage here means a damage to the room, furniture or animals or pets.
Do not open (or modify in any way) the unit or its AC
adaptor.
Do not attempt to repair the unit, or replace parts in
it. Refer all servicing to your retailer, the nearest Ham-
mond Dealer, or an authorized Hammond distributor,
as listed on the “Service” page.
Never use or store the unit in places that are:
Subject to temperature extremes (e.g., direct sun-
light in an enclosed vehicle, near a heating duct,
on top of heat generating equipment)
Damp (e.g., baths, washrooms, on wet oors)
Humid
Exposed to rain
Dusty
Subject to high levels of vibration.
Be sure to use only the AC adaptor supplied with the
unit. And, make sure the line voltage at the installation
matches the input voltage specied on the AC adap-
tor’s case. Other AC adaptors may use a dierent po-
larity, or be designed for a dierent voltage, their use
could result in damage, malfunction, or electric shock.
Do not excessively twist or bend the power cord, or
place heavy objects on it. Doing so can damage the
cord, producing severed elements and short circuits.
Damaged cords are re and shock hazards!
is unit, either alone or in combination with an am-
plier and headphones or speakers, may be capable of
producing sound levels that could cause permanent
hearing loss. Do not operate for a extended periods of
time at a high volume level, or at a level that is uncom-
fortable. If you experience any hearing loss or ring-
ing in the ears, you should immediately stop using the
unit, and consult a physician.
Do not allow any objects (e.g., ammable material,
coins, pins); or liquids of any kind (water, so drinks,
etc.) to penetrate the unit.
Immediately turn the power o, remove the AC adap-
tor from the outlet, and request servicing by your re-
tailer, the nearest Hammond Dealer, or an authorized
Hammond distributor, as listed on the “Service” page
when:
e AC adaptor, the power-supply cord, or the
plug has been damaged; or
If smoke or unusual odor occurs
Objects have fallen into, or liquid has been spilled
onto the unit; or
e unit has been exposed to rain (or otherwise
has become wet); or
e unit does not appear to operate normally or
exhibits a marked change in performance.
In households with small children, an adult should
provide supervision until the child is capable of fol-
lowing all the rules essential for the safe operation of
the unit.
Protect the unit from strong impact. (Do not drop it!)
Do not force the unit’s power-supply cord to share an
outlet with an unreasonable number of other devices.
Be especially careful when using extension cords - the
total power used by all devices you have connected
to the extension cord’s outlet must never exceed the
power rating (watts/amperes) for the extension cord.
Excessive loads can cause the insulation on the cord to
heat up and eventually melt through.
Before using the unit in a foreign country, consult
with your retailer, the nearest Hammond Dealer, or
an authorized Hammond distributor, as listed on the
“Service” page.
Do not put anything that contains water (e.g., ower
vases) on this unit. Also, avoid the use of insecticides,
perfumes, alcohol, nail polish, spray cans, etc., near
the unit. Swily wipe away any liquid that spills on the
unit using a dry, so cloth.

3
Introduction
CAUTION
e unit and the AC adaptor should be located so
their location or position does not interfere with their
proper ventilation.
Always handle the AC adaptor by the plug when plug-
ging into, or unplugging from, an outlet or this unit.
At regular intervals, you should unplug the AC adap-
tor and clean it by using a dry cloth to wipe all dust
and other accumulations away from its prongs. Also,
disconnect the power plug from the power outlet
whenever the unit is to remain unused for an extended
period of time. Any accumulation of dust between the
power plug and the power outlet can result in poor
insulation and lead to re.
Try to prevent cords and cables from becoming en-
tangled. Also, all cords and cables should be placed so
they are out of the reach of children.
Never climb on top of or place heavy objects on the
unit.
Never handle the AC adaptor or its plugs with wet
hands when plugging into, or unplugging from, an
outlet of this unit.
Before moving the unit, disconnect the AC adaptor
and all cords coming from external devices.
Before cleaning the unit, turn o the power and un-
plug the AC adaptor from the outlet.
Whenever you suspect the possibility of lightning in
your area, disconnect the AC adaptor from the outlet.
In the unlikely event that you need to dispose of
this unit, be sure to contact your dealer or your
nearest town or municipal office for its proper
disposal.
Note: is equipment has been tested and found to comply
with the limits for a Class B digital device, pursuant to part 15
of the FCC Rules. ese limits are designed to provide reason-
able protection against harmful interference in a residential
installation.
is equipment generates, uses and can radiate radio frequency
energy and, if not installed and used in accordance with the
instructions, may cause harmful interference to radio com-
munications.
However, there is no guarantee that interference will not occur
in a particular installation.
If this equipment does cause harmful interference to radio or
television reception, which can be determined by turning the
equipment o and on, the user is encouraged to try to correct
the interference by one or more of the following measures:
Reorient or relocate the receiving antenna.
Increase the separation between the equipment and re-
ceiver.
Connect the equipment into an outlet on a circuit dierent
from that to which the receiver is connected.
Consult the dealer or an experienced radio/TV technician
for help.
FOR UNITED KINGDOM:
FOR YOUR SAFETY, PLEASE READ THE FOLLOWING
TEXT CAREFULLY
is appliance is supplied with a molded 3-pin mains plug for
your safety and convenience.
e plug contains a 13 amp fuse.
Should the fuse need to be replaced, please ensure that the re-
placement fuse has a rating of 13 amps and that it is approved
by ASTA or BSI to BSI1362.
Check for the ASTA mark or the BSI mark on the
body of the fuse.
If the fuse cover is lost, the plug must not be used until a re-
placement cover is obtained.
A replacement fuse cover can be obtained from your local
Hammond Dealer.
If the tted moulded plug is unsuitable for the socket outlet in
your home, then the fuse should be removed and the plug cut
o and disposed of safely.
ere is a danger of severe electrical shock if the cut-o plug is
inserted into any 13 amp socket.
To replace the fuse, open the fuse compartment with a screw-
driver and replace the fuse and fuse cover.

Skx Owner’s Manual
4IMPORTANT - PLEASE READ
Power Supply
Do not use this unit on the same power circuit with any
device that will generate line noise (such as an electric mo-
tor or light dimming system).
e AC adaptor will begin to generate heat after long hours
of consecutive use. is is normal, and is not a cause for
concern.
Before connecting this unit to other devices, turn o the
power to all units. is will help prevent malfunctions and/
or damage to speakers or other devices.
Placement
Using the unit near power ampliers (or other equipment
containing large power transformers) may induce hum. To
alleviate the problem, change the orientation of this unit, or
move it farther away from the source of interference.
is device may interfere with radio and television recep-
tion. Do not use this device in the vicinity of such receivers.
Noise may be produced if wireless communications devices,
such as cell phones, are operated in the vicinity of this unit.
Such noise could occur when receiving or initiating a call,
or while conversing. Should you experience such problems,
you should relocate such wireless devices so they are at a
greater distance from this unit, or switch them o.
Do not expose the unit to direct sunlight, place it near
devices that radiate heat, leave it inside an enclosed vehicle,
or otherwise subject it to temperature extremes. Also, do
not allow lighting devices that normally are used while
their light source is very close to the unit (such as a piano
light), or powerful spotlights to shine upon the same area
of the unit for extended periods of time. Excessive heat can
deform or discolor the unit.
When moved from one location to another where the tem-
perature and/or humidity is very dierent, water droplets
(condensation) may form inside the unit. Damage or mal-
function may result if you attempt to use the unit in this
condition. erefore, before using the unit, you must allow
it to stand for several hours, until the condensation has
completely evaporated.
Do not allow rubber, vinyl, or similar materials to remain
on the unit for long periods of time. Such objects can dis-
color or otherwise harmfully aect the nish.
Do not paste stickers, decals, or the like on the SKX. Peel-
ing such matter o the SKX may damage the exterior n-
ish.
Maintenance
To clean the unit, use a dry, soft cloth; or one that is slightly
dampened.
To remove stubborn dirt o plastic parts, use a cloth im-
pregnated with a mild, non-abrasive detergent. Afterwards,
be sure to wipe the unit thoroughly with a soft, dry cloth.
Try to wipe the entire surface using an equal amount of
strength, moving the cloth along with the grain of the
wood. Rubbing too hard in the same area can damage the
nish.
Never use benzine, thinners, alcohol or solvents of any
kind, to avoid the possibility of discoloration and/or defor-
mation.
Additional Precautions
Please be aware that the contents of memory can be irre-
trievably lost as a result of a malfunction, or the improper
operation of the unit. To protect yourself against the risk of
losing important data, we recommend that you periodically
save a backup copy of important data you have stored in the
unit’s memory in another MIDI device (to another storage
medium (such as a USB Flash Drive or an external hard
drive).
Unfortunately, it may be impossible to restore the contents
of data once it has been lost. Hammond assumes no liabil-
ity concerning such loss of data.
Use a reasonable amount of care when using the unit’s but-
tons, sliders, or other controls, and when using its jacks and
connectors. Rough handling can lead to malfunctions.
When connecting / disconnecting all cables, grasp the con-
nector itself - never pull on the cable. is will avoid caus-
ing short circuits, or damage to the cable’s internal ele-
ments.
To avoid disturbing your neighbors, try to keep the unit's
volume at reasonable levels. You may prefer to use head-
phones, so you do not need to be concerned about those
around you (especially when it is late at night).
When you need to transport the unit, package it in the box
(including padding) that it came in, if possible. Otherwise,
you will need to use equivalent packaging materials.
Disclaimer
All trademarks and brand names mentioned in this manual are
the property of their respective owners and not in any way af-
liated or associated with Hammond Suzuki. e trademarks
are only mentioned for explanation purposes.

5
Introduction
INTRODUCTION

Skx Owner’s Manual
6
TableOfContents
IMPORTANT SAFETY INSTRUCTIONS................................................ 2
IMPORTANT - PLEASE READ................................................................. 4
INTRODUCTION ........................5
MAIN FEATURES ....................................................................................... 9
NAMES AND FUNCTIONS ...................................................................10
TOP PANEL......................................................................................................10
REAR PANEL ...................................................................................................13
KEYBOARD......................................................................................................14
ACCESSORIES.................................................................................................14
HOOK-UP .................................15
BASIC HOOK-UP.....................................................................................16
CONNECTING THE LESLIE SPEAKER ................................................17
BASIC CONNECTION ...................................................................................17
USING 3 CHANNEL TYPE (SUCH AS 2101/mk2)........................................17
USING SINGLE CHANNEL TYPE (SUCH AS 122XB, 3300/W)..................17
MIDI CONTROL OF THE LESLIE SPEAKER .............................................17
EXPAND THE KEYBOARD.....................................................................18
PEDALBOARD (13 OR 20 KEYS) ...............................................................18
PEDALBOARD (25 KEYS) ............................................................................19
GETTING READY TO PLAY.......21
SWITCH ON ..............................................................................................22
HOW TO POWER ON ...................................................................................22
BACK UP ..........................................................................................................22
AUTO POWER OFF .......................................................................................22
RESET TO THE FACTORY SETTINGS ........................................................22
PLAY WITH THE PATCHES ....................................................................23
“USER” AND“PRESET”.................................................................................23
HOW TO CALL A PATCH..............................................................................23
Example: Select U041. .......................................................................................23
REGISTER FAVORITE PATCHES (FAVORITES) ..................................24
Register PATCHES to FAVORITES.............................................................24
Ex. Register U041 to“3-2”..................................................................................24
How to recall FAVORITES...........................................................................24
Ex. Call the“3-2”....................................................................................................24
BANK and NUMBER.....................................................................................24
Column: RECORD FAVORITES LIKE PRESET BUTTONS.....................25
USE THE FOOT CONTROLLERS ..........................................................26
EXPRESSION PEDAL ....................................................................................26
FOOT SWITCH................................................................................................26
DAMPER PEDAL............................................................................................26
TRY CREATING YOUR OWN SOUND.................................................27
SELECT [MANUAL] .......................................................................................27
Column: INITIALIZE THE INTERNAL SETTINGS [MANUAL].............27
SWITCH THE ORGAN SECTION ON.........................................................28
PULL OUT DRAWBARS................................................................................28
ADD THE TOUCH-RESPONSE PERCUSSION.........................................28
ADD EFFECTS TO THE ORGAN SECTION ..............................................29
VIBRATO & CHORUS............................................................................................29
LESLIE.......................................................................................................................29
OVERDRIVE ............................................................................................................29
MULTI-EFFECTS ....................................................................................................29
ALLOCATING THE EXTRA VOICES............................................................30
SELECT AN INSTRUMENT ..........................................................................30
ADJUST THE VOLUME BALANCE.............................................................30
Column: To select the other group (e.g.“Wind”).......................................30
ADD EFFECTS TO THE EXTRA VOICE SECTION...................................31
MULTI-EFFECTS ....................................................................................................31
ADD REVERB TO BOTH SECTIONS ..........................................................31
REVERB....................................................................................................................31
WHAT IS A “PART”?.......................................................................................32
MANUAL BASS ..............................................................................................32
LOWER TO PEDAL.........................................................................................33
PEDAL SUSTAIN ............................................................................................33
RECORD THE PATCH TO MEMORY ..........................................................34
Example: RECORD TO U032 .............................................................................34
SETTING UP .............................35
SOUND ENGINE STRUCTURE.............................................................36
ORGAN SECTION..........................................................................................37
EXTRA VOICE SECTION...............................................................................37
MASTER EQUALIZER....................................................................................37
ORGAN SECTION....................................................................................38
ORGAN TYPE..................................................................................................38
TONE-WHEELS (BType1, BType2, Mellow)..................................................38
TRANSISTOR (Vx, Farf) .......................................................................................38
PIPE...........................................................................................................................38
Column: SELECTING THE ORGAN TYPES..............................................39
Example: Switching the Organ Type to“Pipe”...........................................39
HARMONIC DRAWBARS™ ...................................................................40
DRAWBARS (ON TONE-WHEEL: BType1, BType2, Mellow).............40
DRAWBARS FOR THE UPPER AND LOWER PARTS.............................41
DRAWBARS TO USE ON THE PEDAL.......................................................41
DRAWBAR REGISTRATION PATTERNS....................................................42
MODERN DRAWBAR REGISTRATIONS...................................................43
DRAWBARS (Vx)............................................................................................44
DRAWBARS (Farf).........................................................................................45
DRAWBARS (PIPE) ........................................................................................46
OPERATING ORGAN SECTION ...........................................................47
ON / OFF AND VOLUME CONTROL........................................................47
MATCH THE REGISTRATION TO DRAWBARS........................................47
PERCUSSION............................................................................................48
1´ DRAWBAR CANCEL ........................................................................................48
VIBRATO & CHORUS..............................................................................49
TO SELECT THE VIBRATO & CHORUS MODE...............................................49
OVERDRIVE...............................................................................................50
LESLIE.........................................................................................................51
MULTI-EFFECTS, REVERB .....................................................................52
PEDAL SUSTAIN, COUPLER.................................................................53
OCTAVE SHIFT.........................................................................................54
TRANSPOSE .............................................................................................55
EXTRA VOICE SECTION ........................................................................56
ALLOCATE .......................................................................................................56
BUILT IN SOUNDS AND LIBRARY.............................................................56
MULTI-EFFECTS, REVERB .....................................................................57
PATCH.........................................................................................................58
“USER” AND“PRESET”.................................................................................58
NAME THE PATCH.........................................................................................59

7
Introduction
RECORD TO THE PATCH..............................................................................60
Example: RECORD TO“U032”...........................................................................60
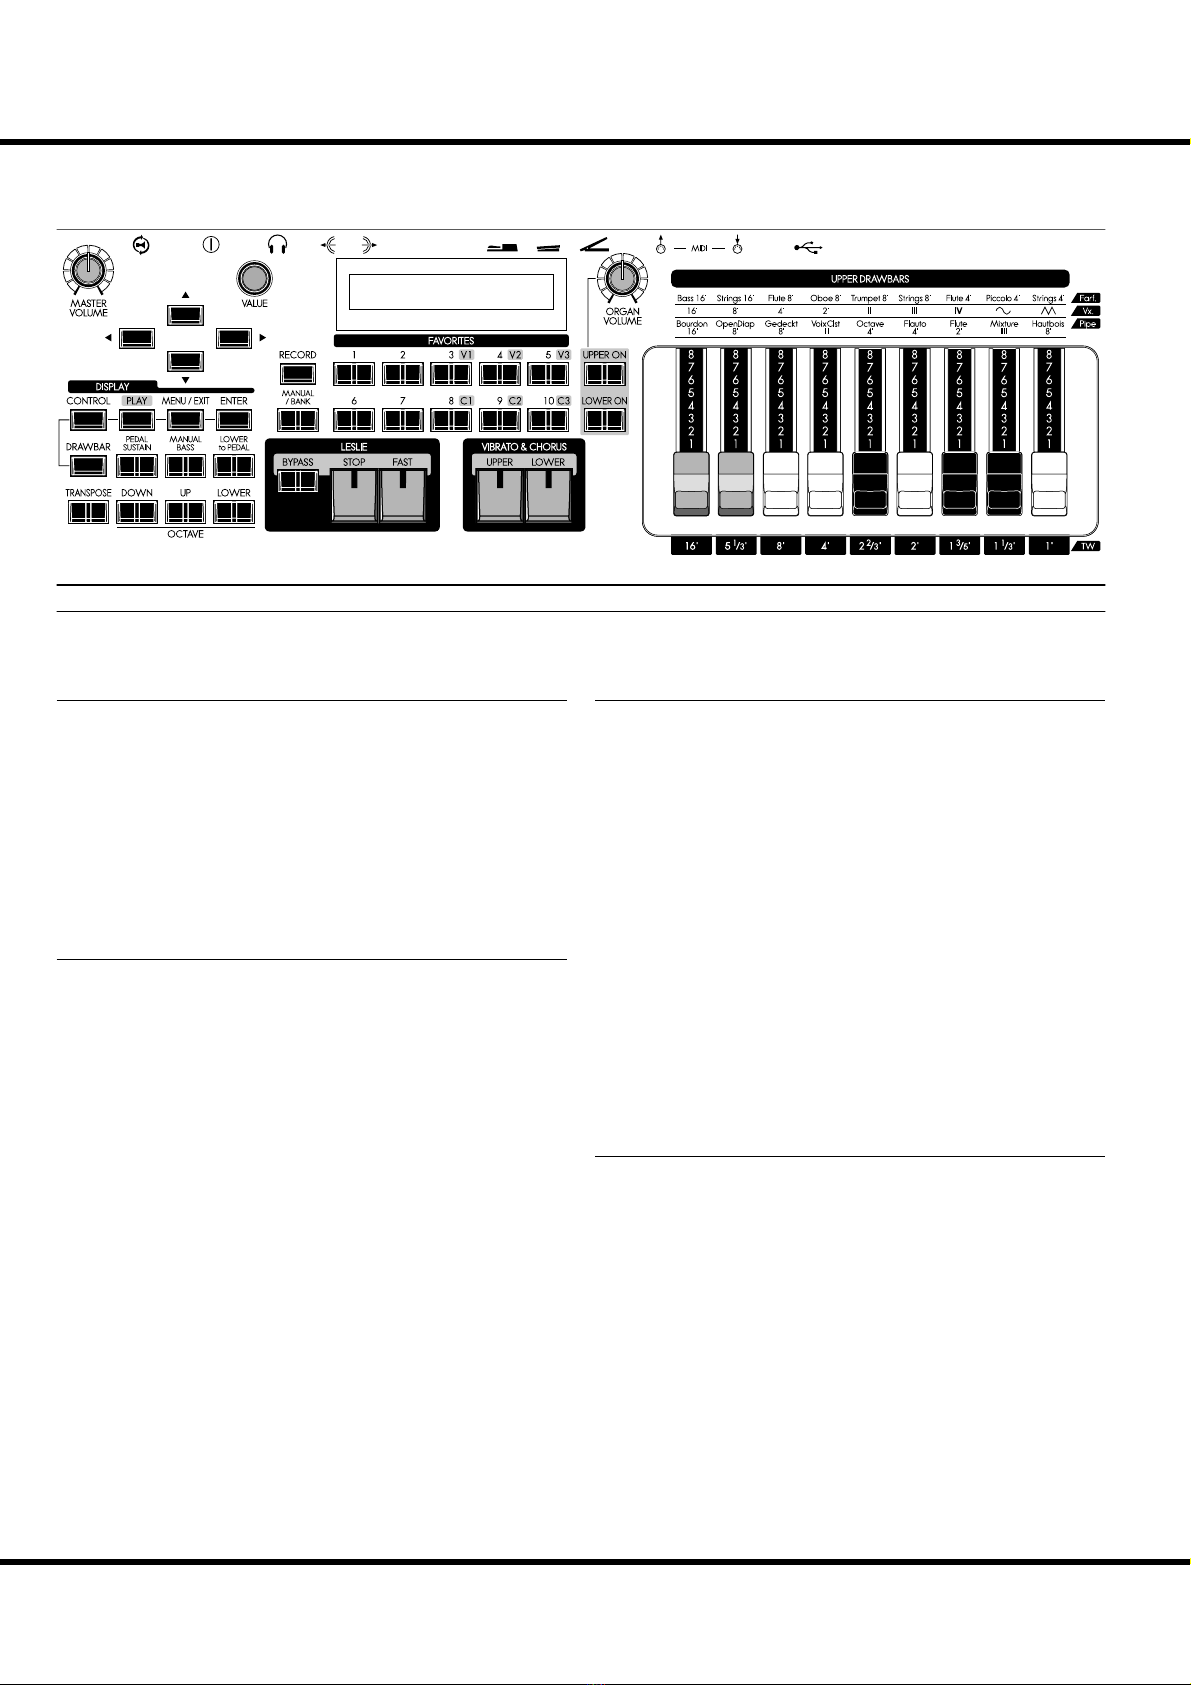
USING THE CONTROL PANEL..61
WHAT YOU CAN DO ON THE CONTROL PANEL...........................62
PLAY MODE..............................................................................................63
HOW TO READ THE DISPLAY ....................................................................63
OPERATION IN THIS MODE .......................................................................63
MENU MODE...........................................................................................64
HOW TO READ THE DISPLAY ....................................................................64
OPERATION IN THIS MODE .......................................................................64
MENU AND THE CONTENTS .....................................................................65
FUNCTION MODE..................................................................................66
HOW TO READ THE DISPLAY ....................................................................66
OPERATION IN THIS MODE .......................................................................66
PARAMETER OPERATION EXAMPLE:......................................................67
SHORT CUT TO FUNCTION MODE ...................................................69
OPERATION EXAMPLE: ...............................................................................69
REGISTER THE PAGES YOU FREQUENTLY USE..............................69
OPERATION EXAMPLE: ...............................................................................69
DISPLAY LOCK MODE...........................................................................70
SETTING THE PARAMETERS ...71
DRAWBAR.................................................................................................72
SETTING FOR MANUAL (LOWER & UPPER) DRAWBARS ....................72
SETTING THE PEDAL PART...........................................................................73
PATCH.........................................................................................................74
PATCH NAME ....................................................................................................74
PATCH LOAD.....................................................................................................74
FAVORITES.........................................................................................................74
EXVOICE (Extra Voices) ........................................................................75
CONTROL..................................................................................................76
FOOT SWITCH...................................................................................................76
EXPRESSION......................................................................................................77
GLIDE...................................................................................................................78
DAMPER.............................................................................................................78
ASSIGN................................................................................................................78
DISPLAY..............................................................................................................79
KEYBOARD ........................................................................................................79
PART.....................................................................................................................79
PERCUSS (Percussion)..........................................................................80
VIB&CHO (Vibrato & Chorus).............................................................81
LESLIE.........................................................................................................82
CABINET NUMBER ..........................................................................................82
LESLIE PARAMETERS......................................................................................82
EXTERNAL LESLIE SPEAKER.........................................................................84
RECORD THE CABINET................................................................................84
CUST. TW (Custom Tone-Wheels) ....................................................85
Record the CUSTOM virtual Tone Wheels...........................................87
PIPE.............................................................................................................88
OD / EFF (Overdrive / Effects)............................................................90
ORGAN SECTION EFFECTS...................................................................90
OVERDRIVE ............................................................................................................90
MULTI-EFFECTS ....................................................................................................91
EFFECTS FOR THE EXTRA VOICE SECTION......................................97
OVERDRIVE ............................................................................................................97
MULTI-EFFECTS ....................................................................................................97
EQUALIZ (Equalizer)..............................................................................98
ORGAN SECTION.............................................................................................98
ORGAN SECTION, EXTRA VOICE SECTION, MASTER...........................98
REVERB ......................................................................................................99
TUNE ....................................................................................................... 100
MASTER TUNE ............................................................................................... 100
DEFAULT................................................................................................. 101
SYSTEM................................................................................................... 102
MIDI .......................................103
ABOUT MIDI.......................................................................................... 104
WHAT IS “MIDI”? ........................................................................................ 104
MIDI JACKS ON THE SKX.........................................................................104
WHAT THE MIDI CAN DO ON THE SKX...............................................104
WHAT IS A “MIDI TEMPLATE?” ............................................................... 104
MIDI CHANNEL...........................................................................................105
MAIN MIDI MESSAGE............................................................................... 105
CHANNEL MESSAGE ........................................................................................ 105
SYSTEM MESSAGE............................................................................................105
MIDI STRUCTURE................................................................................ 106
KEYBOARD CHANNELS .............................................................................. 107
EXTERNAL ZONE CHANNELS................................................................... 107
EXPANDED KEYBOARDS............................................................................ 107
USING AN EXTERNAL SEQUENCER............................................... 108
Recording a performance to an external sequencer...................... 108
Sequencer playback ................................................................................... 108
USING A MIDI SOUND MODULE.................................................... 109
ZONES..................................................................................................... 110
WHAT IS DISPLAYED ON THE UPPER LEFT?.........................................110
INTERNAL ZONE........................................................................................... 110
EXTERNAL ZONE .......................................................................................... 110
PANIC FUNCTION AND PARAMETER RE-LOAD....................................... 111
MIDI......................................................................................................... 112
MIDI TEMPLATE............................................................................................. 112
MASTER........................................................................................................... 112
KEYBOARD CHANNELS .............................................................................. 113
SAVE THE SETUP ...................115
SAVE YOUR SETUP .............................................................................. 116
WHAT YOU CAN DO WITH THE USB FLASH DRIVE.........................116
ABOUT USB FLASH DRIVE......................................................................116
USABLE USB FLASH DRIVE ............................................................................116
USB FLASH DRIVE CONNECTOR.................................................................. 116
FOLDER STRUCTURE ....................................................................................... 116
INITIALIZE THE USB FLASH DRIVE................................................. 117
WORKING WITH SETUPS .................................................................. 118
HOW TO READ THE DISPLAY .................................................................118
SAVING THE SETUP................................................................................... 118
CHANGING THE SETUP NAME ..............................................................119
LOADING THE SETUP ...............................................................................120
DELETING THE SETUP..............................................................................120
WORKING WITH PATCHES................................................................ 121
HOW TO READ THE DISPLAY .................................................................121
SAVING THE PATCH................................................................................... 121
LOADING A PATCH....................................................................................122
DELETING THE PATCH..............................................................................122

Skx Owner’s Manual
8
WORKING WITH CUSTOM TONE WHEEL..................................... 123
HOW TO READ THE DISPLAY .................................................................123
SAVE THE CUSTOM TONE WHEEL FILE............................................... 123
LOADING A CUSTOM TONE WHEEL....................................................124
DELETING A CUSTOM TONE WHEEL...................................................124
MUSIC PLAYER ......................125
BEFORE PLAYING BACK .................................................................... 126
FILE TYPE AND PLACING FOLDER .......................................................126
HOW TO READ THE DISPLAY .................................................................126
WORKING WITH THE MUSIC PLAYER............................................ 127
MUSIC PLAYER MODES ...........................................................................128
VOICE LIBRARY .....................129
WHAT IS VOICE LIBRARY?................................................................. 130
FILE TYPE AND THE PLACING FOLDER............................................... 130
VOICE LIBRARY AND SETUPS................................................................130
WORKING WITH VOICE LIBRARY.................................................... 131
LOADING THE VOICE LIBRARY ..............................................................131
DELETE A VOICE LIBRARY.......................................................................132
CLEAR ALL VOICE LIBRARIES.................................................................132
Troubleshooting ...................133
TROUBLESHOOTING.......................................................................... 134
APPENDIX..............................135
EXTRA VOICE INSTRUMENT LIST ................................................... 136
PRESET PATCH LIST............................................................................. 138
MIDI TEMPLATES................................................................................. 139
MIDI TEMPLATES .......................................................................................139
MIDI INFORMATION........................................................................... 140
MIDI Implementation..............................................................................140
Channel Voice Message ................................................................................ 140
Channel Mode Message ................................................................................ 140
Drawbar Data List 1..................................................................................141
Control Number................................................................................................ 141
Drawbar Data List 2..................................................................................141
System Exclusive Message.....................................................................142
Mode Setting Exclusive Message ............................................................... 142
NRPN Switch ...................................................................................................... 142
Data Set (Rx. only)............................................................................................ 142
Identity Request (Rx. only)............................................................................142
Identity Reply (Tx. only) .................................................................................142
Global Parameters .................................................................................... 143
Patch Parameters......................................................................................144
Leslie Parameters ...................................................................................... 148
System Parameters...................................................................................148
Tone Wheel Parameters..........................................................................148
Pipe Parameters.........................................................................................148
CUSTOM TONE-WHEELS LIST ......................................................... 149
MIDI IMPLEMENTATION CHART..................................................... 150
MIDI CHANNELS AND MESSAGES................................................. 151
SPECIFICATIONS.................................................................................. 152
SERVICE.................................................................................................. 155

9
Introduction
MAIN FEATURES
AUTHENTIC HAMMOND DRAWBAR ORGAN
e SKX is rst and foremost a genuine Hammond Organ with “Virtual Tone Wheels”
to provide the classic Hammond sound. Also available are the tones of vintage “combo”
organs, and a variety of pipe organ ranks to provide church and classical organ voices.
EXTRA VOICE SECTION
e EXTRA VOICE section provides high quality Acoustic and Electric Pianos, as well as
other Keyboard and Orchestral voices. Additional Voice Libraries can be downloaded and
installed using a USB Flash Drive.
e Organ and Extra Voice can be used together, and their outputs can be individually
accessed, using the Leslie Speaker for the Organ section, and the LINE OUT jack(s) for
the Extra Voice section.
DIGITAL LESLIE/VIBRATO
A digital and programmable Leslie is available for the Drawbar voices, as well as the tradi-
tional “Vibrato/Chorus” as used on the legendary B-3/C-3. e Vibrato/Chorus may be
selected for the Upper and Lower parts, independently.
A WIDE VARIETY OF EFFECTS
Digital Multi-eects are available for the Organ and Extra Voice sections independently. A
Master Equalizer allows you to tailor the total tonal response of the SKX.
MUSIC PLAYER
e SKX is equipped to play MP3/WAV type audio les. is makes it very convenient
for accompanying solo performances or practicing.
MIDI MASTER KEYBOARD
External Zones are available to enable the SKX to be used as a master keyboard.
PATCHES AND FAVORITES
In addition to the 100 available user-dened Patches, 10×10 “Favorite” quick-call Patches
are available for on-stage ease.
BUILT-IN USB PORT
is allows you to use a USB Flash Drive to save Patches, Setups, etc. as well as to use the
built-in Music Player, install additional Voice Libraries and update the system software of
the instrument.
LESLIE SOCKET
An 11-pin Leslie receptacle is provided which allows you to use the SKX with a Leslie
Speaker having an 11-pin interface.
SMALL AND LIGHT WEIGHT
e SKX is small and light weight, making transport and setup easy.

Skx Owner’s Manual
10 NAMES AND FUNCTIONS
TOP PANEL
UPPER LEFT
❶MASTER VOLUME knob
Allows you to control the volume of the entire instrument. (P. 22)
❷CONTROL button
Allows you to access a feature from the CONTROL Function
mode. (P. 76)
❸DRAWBAR button
Allows you to access the DRAWBAR Function mode to set the
Organ Type etc. (P. 39)
KEYBOARD CONTROL
❹PEDAL SUSTAIN button
Allows you to add a smooth decay to the PEDAL tones similar
to a string bass. (P. 33)
❺MANUAL BASS button
Allows you to play the PEDAL tones from the LOWER key-
board. (P. 32)
❻LOWER to PEDAL button
Allows you to play the tones from the LOWER part from a
connected MIDI Pedalboard. (P. 33)
❼TRANSPOSE button
Allows you to shift the musical key of the entire instrument.
(P. 55)
❽OCTAVE DOWN button
❾OCTAVE UP button
ese two buttons allow you to move the pitch of the UPPER
part “UP” or “DOWN” by one octave. (P. 54)
❿OCTAVE LOWER button
Allows you to move the pitch of the LOWER part “UP” or
“DOWN” by octaves when used in conjunction with the OC-
TAVE DOWN/UP buttons. (P. 54)
CONTROL PANEL
⓫PLAY button
Allows you to return to the Play, or basic mode. (P. 63)
⓬MENU/EXIT button
Allows you to access Menu mode in the display and return to
the Menu mode from other Function modes. (P. 64)
⓭VALUE knob
Allows you to increases/decrease Patch numbers while perform-
ing or adjusts values during editing.
⓮DIRECTION buttons
Allows you to move the cursor in the display or locate other
pages.
⓯ENTER button
Allows you to conrm the current entry or procedure when
editing sounds or features.
⓰DISPLAY
FAVORITES
⓱RECORD button
Allows you to record user-denable features such as Patches,
Favorites, etc. (P. 34)
⓲MANUAL/BANK button
Allows you to override the current Patch setting in favor of the
current Panel settings. (P. 27)
Also, allows you to selects Favorite Banks by pressing this but-
ton with one of the numbered FAVORITE buttons. (P. 24)
⓳NUMBER buttons
Allows you to recall Patches you frequently use quickly. (P. 24)
R
❶
❶
❷
❷
❸
❸
❹
❹
❺
❺
❻
❻
❼
❼
❽
❽
❾
❾
❿
❿
⓫
⓫
⓬
⓬
⓭
⓭
⓲
⓲
⓳
⓳
⓴
⓴
⓮
⓮
⓯
⓯
⓰
⓰
⓱
⓱

11
Introduction
ORGAN SECTION
⓴UPPER ON, LOWER ON buttons
Allows you to “sound” or “mute” each part of the Organ sec-
tion.
ORGAN VOLUME knob
Allows you to controls the volume of the entire Organ section.
(P. 47)
VIBRATO & CHORUS
UPPER, LOWER buttons
Allows you to select which part receives the Vibrato & Chorus
Eect. (P. 49)
LESLIE
BYPASS button
Allows you to direct the sounds produced by the Organ section
from the Rotary channel to the Stationary channel. (P. 51)
STOP button
Allows you to stop the Leslie Rotors from turning when the
[FAST] button is “OFF”. (P. 51)
FAST button
Toggles the modes of the Rotors FAST or not. When the light
is ON, it is FAST. (P. 51)
DRAWBARS
ese are for adjusting the basic harmonics of the Organ sec-
tion. e function of each drawbar is dierent depending on
the type of Organ (Tone Wheel/Transistor/Pipe). (P. 40)
UPPER Drawbars
Allows you to adjust the UPPER part.
PEDAL Drawbars
Allows you to adjust the PEDAL part.
LOWER Drawbars
Allows you to adjust the LOWER part.
PERCUSSION
ON button
Allows you to add the Percussion eect to the UPPER part.
(P. 48)
SOFT button
Allows you to select “NORMAL” or “SOFT” Percussion vol-
ume. (P. 48)
FAST button
Allows you to select “SLOW” or “FAST” Percussion decay
time. (P. 48)
THIRD button
Allows you to select “SECOND” (4´) or “THIRD” (2 ⅔´)
Percussion harmonic. (P. 48)
MIX
BALANCE
EXV1 EXV2

Skx Owner’s Manual
12
EXTRA VOICES
ALLOCATE UPPER, LOWER button
Allows you to assign the Extra Voice sections to either the UP-
PER, and LOWER parts. (P. 56)
VOICE GROUP buttons
Allows you to select the Voice Group of the Extra Voice sec-
tions. (P. 30)
VOLUME knob
Allows you to adjust the entire volume of the Extra Voice sec-
tions. (P. 30)
BALANCE knob
Allows you to adjust the balance between Extra Voice sections
1 and 2. (P. 30)
EFFECTS FOR THE ORGAN SECTION
DRAWBARS OVERDRIVE ON button
Allows you to turn the Organ Overdrive effect “ON” or
“OFF”. (P. 50)
DRAWBARS OVERDRIVE AMOUNT knob
Allows you to adjust the amount of the Organ Overdrive ef-
fect. (P. 50)
DRAWBARS EFFECT ON button
Allows you to turn the selected Organ Multi-Eect “ON” or
“OFF”. (P. 52)
DRAWBARS EFFECT AMOUNT knob
Allows you to adjust the amount of the Organ Multi-Eects.
(P. 52)
EFFECTS FOR THE EXTRA VOICE SECTION
EXTRA VOICE EFFECT ON button
Allows you to turn the selected Extra Voice Multi-Eect “ON”
or “OFF”. (P. 57)
EXTRA VOICE EFFECT AMOUNT knob
Allows you to adjust the amount of the selected Extra Voice
Multi-Eects. (P. 57)
EFFECTS FOR ALL PARTS
REVERB ON button
Allows you to turn the Reverb eect “ON” or “OFF”. (P. 52)
REVERB DEPTH knob
Allows you to adjust the depth of the Reverb. (P. 52)
NAMES AND FUNCTIONS - continued
MIX
BALANCE
EXV1 EXV2

13
Introduction
REAR PANEL
POWER
❶DC IN jack
Connect the AC adaptor AD3-1250-2P to this jack.
Use with strain relief to avoid accidentally disconnecting the
power during performance. (P. 16)
❷POWER switch
Turns the power to the SKX “ON” or “OFF.” (P. 22)
AUDIO OUTPUT TERMINALS
❸PHONES jack
Connect a set of stereo headphones to this jack.
NOTE: Connecting Headphones does NOT mute the LINE OUT or
LESLIE audio outputs.
❹LINE OUT L/MONO jack
❺LINE OUT R jack
Use these jacks to connect an external audio equipment.
If the connected mixer or monitor speaker is stereophonic,
connect both L and R. If monaural, connect only to the L/
MONOjack(P.16)andsettheAudioModeat“MONO”(P.102).
❻LESLIE 11 PIN socket
Connect a Leslie Speaker equipped with an 11-pin interface
here.
When the connection of a physical Leslie Speaker is detect-
ed, the on-board digital Leslie Simulator is disabled at the
PHONES jack and the LINE OUT jacks. (P. 17)
CONTROLLER TERMINALS
❼DAMPER PEDAL jack
Connect an optional Damper Pedal (optional VFP1 etc.) here.
If you press the connected Damper Pedal while holding down
keys, the sound is sustained even after you release the key(s)
similar to the damper pedal on an acoustic piano. (P. 78)
NOTE: Use ONLY a Damper Pedal equipped with a Monaural con-
necting plug. DO NOT use a pedal having a Stereo or “TRS-
compatible” plug, as it will not function.
❽FOOT SWITCH jack
Connect the Foot Switch here.
Please see (P. 76) for information about the dierent functions
available for the Foot Switch.
e following Foot Switches / Damper Pedals can be used with
SKX:
HAMMOND VFP1, FS-9H
BOSS FS-5U
YAMAHA FC4A, FC5
❾EXP. PEDAL jack
Connect an optional Expression Pedal here.
is allows you to control the volume while playing. (P. 77)
e following Expression/Volume Pedals can be used with the
SKX:
HAMMOND EXP-50J, EXP-20, V-20H, V-20R; NORM
KORG XVP-10, XVP-20; REV
Roland EV-5; NORM
YAMAHA FC7; REV
MIDI TERMINALS
❿MIDI OUT jack
MIDI data is transmitted from this jack. (P. 104)
⓫MIDI IN jack
MIDI data is received via this jack.
NOTE: The SKX is factory-programmed to receive incoming MIDI
data from a connected MIDI Pedalboard regardless of the cur-
rent MIDI Channel setting. (P. 104)
USB TERMINAL
⓬USB FLASH DRIVE port
Use this port to connect a USB Flash drive. (P. 116)
11 P I N
❿
❿
⓬
⓬
⓫
⓫
❾
❾
❽
❽
❼
❼
❻
❻
❺
❺
❹
❹
❸
❸
❷
❷
❶
❶

Skx Owner’s Manual
14
KEYBOARD
ACCESSORIES
❶UPPER keyboard
61 Square-front (“waterfall”-style) keys, velocity sensitive.
is is for playing the UPPER part.
❷LOWER keyboard
61 Square-front (“waterfall”-style) keys, velocity sensitive.
is is for playing the LOWER part.
❶AC adaptor
Supplies power to the SKX.
NOTE: Use only a Hammond-approved AC adaptor AD3-1250-2P,
DO NOT substitute another similar-looking AC adaptor.
❷AC cord set
Plug one end into AC adaptor and the other end into an AC
wall outlet.
NAMES AND FUNCTIONS - continued
PLAYER
MIX
BALANCE
EXV1 EXV2
❶
❶
❷
❷
❶
❶
❷
❷

15
HOOK-UP

Skx Owner’s Manual
16 BASIC HOOK-UP
Connect audio cables and accessories as shown below.
e SKX is not self-contained - an external amplier/speaker system is required in
order to hear the sound. However, if you connect a set of stereo headphones to the
PHONES jack, you can hear the sound through the headphones even if an external
amplier is not connected.
NOTE: Make sure both the instrument and amplier are “OFF” before connecting ampliers
or headphones.
CAUTION
Do not place this unit in direct sun
light, near heat sources, or in a hot
location.
11 P I N
e Expression Pedal and Foot Switch parameters must be set properly. For details
see [CONTROL]. (P. 76)
Set Audio Mode either stereo or mono connection. (P. 102)
to AC outlet
Expression Pedal
EXP-50J (optional)
Foot Switch
FS-9H (optional)
AC adaptor
AD3-1250-2P (included)
Powered Speakers
(optional)
Damper Pedal
VFP1 (optional)

17
Hook-Up
11 P I N
CONNECTING THE LESLIE SPEAKER
An 11-pin type Leslie speaker can be directly connected to SKX.
NOTE: Switch OFF before connecting the Leslie speaker.
BASIC CONNECTION
USING 3 CHANNEL TYPE (SUCH AS 2101/mk2)
1. Connect the Leslie Speaker and the Leslie 11-PIN socket on the SKX with the
exclusive 11-pin Leslie cable (optional LC-11-7M, not included).
2. Turn on the power, and set the EXT. LESLIE CH parameter at “3”. (P. 84)
3. Make the setting of Tone Wheel organ.
4. Switch “ON” the [BYPASS] button, set the [STATIONARY VOLUME] of the
Leslie Speaker at desired volume.
5. Repeat “ON/OFF” the [BYPASS] button with playing the keyboard, set the
[ROTARY VOLUME] of the Leslie Speaker at same volume which you can hear.
USING SINGLE CHANNEL TYPE (SUCH AS 122XB, 3300/W)
1. Connect the Leslie Speaker and the Leslie 11-PIN socket on the SKX with the
exclusive 11-pin Leslie cable (optional LC-11-7M, not included).
2. Connect the audio equipment such as powered speakers and Line Out of the
SKX with audio cable.
3. Turn on the power, and set the EXT. LESLIE CH parameter at “1”. (P. 84)
4. Make the setting of Tone Wheel organ.
5. Switch “ON” the [BYPASS] button, set the audio equipment at desired volume.
6. Repeat “ON/OFF” the [BYPASS] button with playing the keyboard, set the
[VOLUME] of the Leslie Speaker at same volume which you can hear.
MIDI CONTROL OF THE LESLIE SPEAKER
To control the parameters of the Leslie Speaker 2101/mk2 (ne adjustment of the
Rotor speed or the rise time, etc.):
1. Connect the MIDI OUT of the SKX with the MIDI IN of the Leslie Speaker
with a MIDI cable.
2. Set the Keyboard channel - TX UPPER and the Leslie MIDI channel to the same
channel. (P. 113)
When the SKX detects that the Leslie Speaker is connected, the Leslie parameters
sent through MIDI from the SKX are switched from the SKX original to those for
the Leslie Speaker.
LESLIE SPEAKERS TO BE CON-
NECTED
The SKX is designed to connect with 3 channel Le-
slie speakers such as 2101/mk2. However, it is also
possible to connect 1 channel type Leslie speak-
ers such as 122XB, 3300/W sending the stationary
channelstotheLINEOUTjacksindependently.(P.84)
LESLIE CHANNEL
3 channel type Leslie speakers are equipped with
a stereo speaker system, independent of the Rotor,
to provide stereo sound for the Extra Voices and
direct organ sounds.
A traditional single-channel Leslie speakers, such
as a #122 or #147 has no stationary speaker sys-
tem, thus requiring a separate amplier/speaker
for the Extra Voices or direct organ sounds.
Connecting with single channel type Connecting with 3 channel type
11 P I N
11-pin Leslie Cable
MIDI Cable (Optional)
11-pin Leslie Cable
Phone Cable

Skx Owner’s Manual
18 EXPAND THE KEYBOARD
e SKX can be upgraded to dual keyboards by connecting an external MIDI Pedalboard.
PEDALBOARD (13 OR 20 KEYS)
MIDI Pedalboard
INOUT
11 P I N
1. Connect the MIDI OUT of the MIDI pedalboard to the MIDI IN of the SKX with a
MIDI cable.
2. When using a Leslie Switch CU-1, connect the CU-1 to the FOOT SWITCH jack.
NOTE: This illustration shows only the Pedalboard expansion. See P.16 for the basic hook up of the power
source, audio, etc.
3. Switch ON the power of the SKX and call the MIDI template “Pedal KBD”. (P. 112)
4. When using the CU-1, set the CONTROL - FOOT DEVICE” at “CU-1”. (P. 76)
RECOMMENDED MIDI PEDALBOARDS
e following MIDI pedalboards are recommended for use with SKX:
MIDI sound pedalboard XPK-130G (13 keys)
MIDI sound pedalboard XPK-200G (20 keys)
MIDI sound pedalboard XPK-200GL (20 long keys)
XPK-100, -200, -200L also can be used.
MOUNTING THE CU-1(optional)

19
Hook-Up
PEDALBOARD (25 KEYS)
11 P I N
MIDI PEDALBOARD
:2-9
EXPRESSION
FOOT SW
MIDI Cable
MIDI OUT
Mono Phone Cable
Stereo Phone Cable LIS-200
DC IN
AC Adaptor:
AD1-1210 (100-120V region)
AD3-1210 (220-240V region)
Separately purchased
are separately purchased.
The cables which lined
1. Hook up as illustrated above.
2. When using a Leslie Switch CU-1, connect the CU-1 to the FOOT SWITCH
jack.
NOTE: This illustration shows only the Pedalboard expansion. See P.16 for the basic hook up of
the power source, audio, etc.
3. Switch ON the power of SKX and call the MIDI template “Pedal KBD”. (P. 112)
4. If you are using the CU-1, set the CONTROL - FOOT DEVICE” at “CU-1”.
(P. 76)
If using with Leslie Switch CU-1 together, the foot switch on the
XPK-250W can be used as a Damper Pedal.

Skx Owner’s Manual
20
Other manuals for SKX
6
Table of contents
Other Hammond Electronic Keyboard manuals

Hammond
Hammond XK-2 Owner's manual

Hammond
Hammond SK1 Owner's manual

Hammond
Hammond SK1 User manual

Hammond
Hammond XLK-5 User manual

Hammond
Hammond XK-5 User manual

Hammond
Hammond XK-1 User manual

Hammond
Hammond Sk PRO User manual

Hammond
Hammond SKX User manual

Hammond
Hammond S-27H User manual

Hammond
Hammond SKX Reference manual

Hammond
Hammond XK-1 User manual

Hammond
Hammond SKX User manual

Hammond
Hammond XK-3 User manual

Hammond
Hammond XK-5 User manual

Hammond
Hammond SK1 User manual

Hammond
Hammond XK-1c User manual

Hammond
Hammond XK-3C User manual

Hammond
Hammond SK1 User manual

Hammond
Hammond Sk PRO User manual

Hammond
Hammond XLK-3 User manual