Hammond XK-3 User manual

Model :-
Owner’s Manual
*#1 *#1
*#1 *#1
*#1
Thank you, and congratulations on your choice of
a Hammond XK-3.
In order to get the most out of this instrument for
many years to come, first take the time to read this
manual in full.

*#1 :-Owner’s Manual
Read these instructions.
Keep these instructions.
Heed all warnings.
Follow all instructions.
Do not use this apparatus near water.
Clean only with dry cloth.
Do not block any ventilation openings.
Install in accordance with the manufacturer's instructions.
Do not install near any heat sources such as radiators, heat
registers, stoves or other apparatus (including amplifiers) that
produce heat.
Do not defeat the safety purpose of the polarized or grounding-
type plug. A polarized plug has two blades with one wider than
the other. A grounding type plug has two blades and a third
grounding prong. The wider blade or third prong is provided for
your safety. If the provided plug does not fit into your outlet,
consult an electrician for replacement of the obsolete outlet.
The lightning flash with arrowhead symbol within an equilateral
triangle, indicates that dangerous voltage constituting a risk of
electric shock is present within this unit.
The exclamation point witnin equilateral triangle, indicates that
there are important operating and maintenance instructions in
the literature accompanying this unit.
IMPORTANT SAFETY INSTRUCTIONS
Protect the power cord from being walked on or pinched,
particularly at plugs, convenience receptacles, and the point
where they exit from the apparatus.
Only use attachments/accessories specified by the manufac-
turer.
Use only with the cart, stand, tripod,
bracket, or table specified by the
manufacturer, or sold with the
apparatus. When cart is used: use
caution when moving the cart/
apparatus combination to avoid
injury from tip-over.
Unplug this apparatus during lightning storms, or when
unused for long periods of time.
Refer all servicing to qualified service personnel. Servicing is
required when the apparatus has been damaged in any way,
such as power-supply cord or plug is damaged, liquid has
been spilled or objects have fallen into the apparatus, the
apparatus has been exposed to rain or moisture, does not
operate normally, or has been dropped.
Apparatus shall not be exposed to dripping or splashing and
no objects filled with liquids, such as vases, shall be placed
on the apparatus.
WARNING: To reduce the risk of fire or electric shock, do not
expose this apparatus to rain or moisture.

Introduction
FOR UNITED KINGDOM:
FOR YOUR SAFETY, PLEASE READ THE FOLLOWING TEXT CAREFULLY
This appliance is supplied with a molded 3-pin mains plug for your safety and convenience.
A 5 amp fuse is fitted in this plug.
Should the fuse need to be replaced, please ensure that the replacement fuse has a rating of 5
amps and that it is approved by ASTA or BSI to BSI1362.
Check for the ASTA mark or the BSI mark on the body of the fuse.
If the plug contains a removable fuse cover, you must ensure that it is refitted when the fuse is
replaced.
If the fuse is lost, the plug must not be used until a replacement cover is obtained.
A replacement fuse cover can be obtained from your local Hammond Dealer.
IF THE FITTED MOULDED PLUG IS UNSUITABLE FOR THE SOCKET OUTLET IN YOUR
HOME, THEN THE FUSE SHOULD BE REMOVED AND THE PLUG CUT OFF AND DIS-
POSED OF SAFELY.
THERE IS A DANGER OF SEVERE ELECTRICAL SHOCK IF THE CUT-OFF PLUG IS IN-
SERTED INTO ANY 13 AMP SOCKET.
If a new plug is to be fitted please observe the wiring code as shown below.
If in any doubt, please consult a qualified electrician.
IMPORTANT - The wires in this mains lead are coloured in accordance with the following code:
Blue: Neutral
Brown: Live
As the colours of the wires in the mains lead of this unit may not correspond with the coloured
marking identifying the terminals in your plug, proceed as follows.
The wire which is coloured BLUE must be connected to the terminal in the plug which is marked
with the letter N or coloured BLACK.
The wire which is coloured BROWN must be connected to the terminal in the plug which is marked
with the letter L or coloured RED.
Under no circumstances should either of these wires be connected to the earth terminal of the
three-pin plug, marked with the letter E or the Earth Symbol .
How to replace the fuse. Open the fuse compartment with a screwdriver and replace the fuse and
fuse cover.

*#1 :-Owner’s Manual
Your Hammond XK-3 Drawbar Keyboard is designed to give you the true and
authentic sound of Hammond Harmonic Drawbars, as well as provide you a large
variety of features to allow great flexibility in how you want to use the keyboard.
This Owner's Manual is designed to explain the operating features of your Hammond
XK-3 as simply and graphically as possible.
Because we want to make this manual, as well as the keyboard itself, as easy to
understand as possible, the explanations in this manual are grouped by subject matter,
and not in the order in which they necessarily apper in the display (the screen in the
left of the keyboard front panel). For example, all functions pertaining to Drawbars
are grouped together, all Percussion features are treated as a group, and so on.
Also, each feature is treated as an explanation unto itself, and does not require you to
already have prior working knowledge of some other feature. The explanations are
presented such that, if you follow the steps, will be identical to that shown in the
manual at that stage of the explanation.
Do not be daunted by the number of steps required to perform each operation. Each
step is simple. Simply bear these things in mind:
1. Read each step carefully.
2. Don't skip any of the steps.
3. Don't perform the steps out of sequence.
With these guidelines, you are well on your way to mastering all of the many sounds
and features of your Hammond XK-3.
IMPORTANT - PLEASE READ

Introduction
BATTERY BACK UP
Your XK-3 uses a battery-backed RAM to remember your changes to the Parameters.
When the battery voltage becomes low, the Display will show:
If you see these messages, you should immediately back up your parameter changes, if
you have made any. If there is no battery installed in the unit, or if the battery is
compeletely dead, the Display will show:
After the above message is displayed, the XK-3 will re-initialize itself, and the factory
default settings will be restored. Therefore, it is a good idea to periodically save your
data to CompactFlash card.
CAUTION: In order to change batteries, be sure to ask your dealer or store.

*#1 :-Owner’s Manual
Table Of Contents
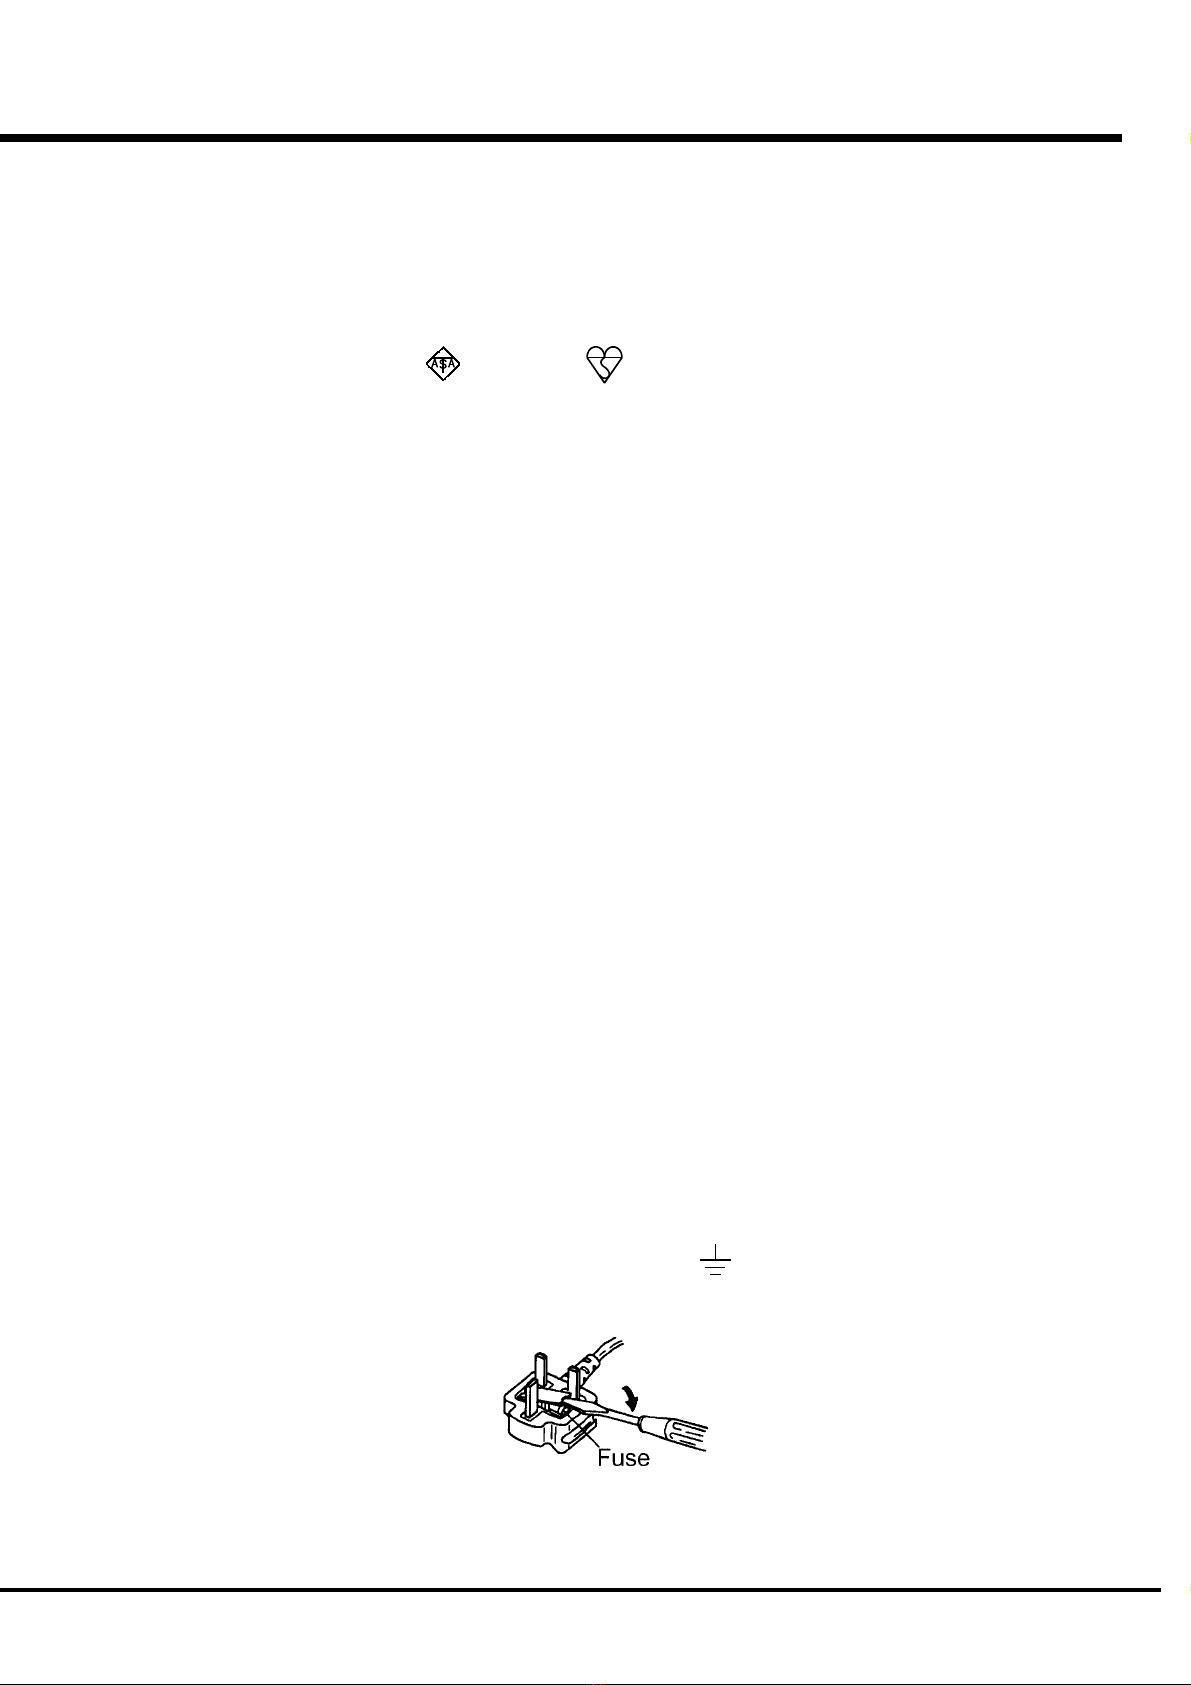
IMPORTANT SAFETY INSTRUCTIONS.................................. 2
IMPORTANT - PLEASE READ ............................................... 4
BATTERY BACK UP .............................................................. 5
MAIN FEATURES ................................................................. 9
NAMES AND FUNCTIONS .................................................. 10
Front Panel ................................................................................... 10
End Block .................................................................................... 12
Rear Panel ................................................................................... 13
HOOK-UP........................................ 15
BASIC HOOK-UP ................................................................ 16
USING EFFECT LOOP ......................................................... 16
CONNECTING THE LESLIE SPEAKER ................................. 17
CONNECTING THE MIDI KEYBOARD .................................. 18
TURN ON AND PLAY ...................... 19
POWER ON ........................................................................ 20
HOW TO POWER ON............................................................... 20
BACK-UP ................................................................................ 20
RESET TO THE INITIAL STATUS .............................................. 20
LISTEN TO THE DEMONSTRATION PERFORMANCE .......... 21
PLAY WITH THE COMBINATION PRESET ........................... 22
HOW TO RECALL THE PRESET............................................... 22
1.Select the BANK ....................................................................... 22
2.Select the KEY. .......................................................................... 22
PLAY WITH THE CONTROLLERS ....................................... 23
PITCH BEND WHEEL ............................................................... 23
EXPRESSION PEDAL ............................................................... 23
FOOT SWITCH ........................................................................ 23
TRY TO MAKE YOUR OWN SOUND .................................... 24
SELECT THE PRESET KEY [B] ................................................ 24
PULL OUT THE LEFT DRAWBARS ........................................... 24
ADD PERCUSSION .................................................................. 24
ADD EFFECTS ......................................................................... 25
VIBRATO/CHORUS ....................................................................... 25
OVERDRIVE ................................................................................. 25
LESLIE ......................................................................................... 25
REVERB ....................................................................................... 25
Divide the keyboard into two parts - left and right. [SPLIT] .... 26
Add bass part on the manual keyboard. [MANUAL BASS] ....... 26
What is "Part"? ....................................................................... 26
STORING REGISTRATIONS IN COMBINATION PRESET ............ 27
EX. Memorize to "F - D". ............................................................. 27
SETTING UP ................................... 29
SOUND ENGINE STRUCTURE ............................................ 30
SYSTEM STRUCTURE OF THIS KEYBOARD ............................ 30
DRAWBARS™ .................................................................... 32
WHITE DRAWBARS ................................................................ 33
BLACK DRAWBARS ................................................................ 33
BROWN DRAWBARS .............................................................. 33
DRAWBAR REGISTRATION PATTERNS ................................... 34
3 SETS OF DRAWBARS AND PARTS ....................................... 36
MATCH THE REGISTRATION TO DRAWBARS .......................... 36
PERCUSSION ..................................................................... 37
NOTES .................................................................................... 37
"Percussion does not sound!" ...................................................... 37
DRAWBAR CANCEL ..................................................................... 37
VIBRATO/CHORUS ............................................................. 38
TUBE AMP ......................................................................... 39
LESLIE ............................................................................... 40
EQUALIZER & REVERB ...................................................... 41
EQUALIZER ............................................................................. 41
REVERB .................................................................................. 41
COMBINATION PRESETS ................................................... 42
BANK AND KEY ....................................................................... 42
NAME THE COMBINATION PRESETS ...................................... 43
RECORD INTO THE COMBINATION PRESETS ......................... 44
USING THE CONTROL PANEL ...... 45
OPERATION CONTROL PANEL ........................................... 46
PLAY MODE ....................................................................... 47
HOW TO READ THE DISPLAY ................................................. 47
MENU MODE ..................................................................... 48
HOW TO READ THE DISPLAY ................................................. 48
BUTTON OPERATION IN THIS MENU ....................................... 48
FUNCTION MODE .............................................................. 49
HOW TO READ THE DISPLAY ................................................. 49
BUTTON OPERATION IN THIS MODE ....................................... 49
Example of operation .............................................................. 50
SHORT CUT TO THE FUNCTION MODE .............................. 52
Example of operation .............................................................. 52
RECORD THE PAGE YOU FREQUENTLY USE ...................... 52
Example of operation .............................................................. 52

Introduction
SETTING THE PARAMETERS ....... 53
DRAWBAR ......................................................................... 54
PRESET ............................................................................. 56
EFFECTIVE USE OF LINK-LOWER/PEDAL ................................ 57
WHEN LINK LOWER/PEDAL IS ON: .............................................. 57
WHEN LINK LOWER/PEDAL IS OFF: ............................................. 57
CONTROL........................................................................... 58
THE EFFECTIVE USE OF THE CONTROL MODE ....................... 62
TUNE ................................................................................. 63
CUSTOM TONEWHEELS .................................................... 64
RECORD THE CUSTOM TONEWHEELS ................................... 66
PERCUSS (PERCUSSion) .................................................. 67
LESLIE ............................................................................... 68
RECORD THE CABINETS ........................................................ 70
OD/VIB (OverDrive / VIBrato) ............................................ 71
EQUALIZ (EQUALIZer) ....................................................... 72
REVERB ............................................................................. 73
DEFAULT ............................................................................ 74
SYSTEM ............................................................................ 75
MIDI ................................................. 77
MIDI .................................................................................. 78
What is "MIDI"?....................................................................... 78
MIDI TERMINALS ON THIS KEYBOARD ................................... 78
WHAT THE MIDI CAN DO ON YOUR KEYBOARD...................... 78
MIDI STRUCTURE OF THIS KEYBOARD ............................. 80
EXPANDING THE KEYBOARD ............................................. 81
RECORDING AND PLAYING THE PERFORMANCE .............. 82
Recording to the Sequencer or the Computer .............................. 82
Playback from the Sequencer or the Computer ............................ 82
CONTROLLING THE EXTERNAL MIDI EQUIPMENTS .......... 83
ZONES ............................................................................... 84
MIDI .................................................................................. 86
SAVE THE SETUP .......................... 89
SAVE THE SETUP .............................................................. 90
CF CARD YOU CAN USE .............................................................. 90
CF CARD SLOT ............................................................................ 90
THE CONTENT AND CAPACITY TO BE SAVED .............................. 90
INITIALIZE THE CF CARD .................................................. 91
OPERATE THE SETUP ........................................................ 92
HOW TO READ THE DISPLAY ................................................. 92
SAVE THE SETUP ................................................................... 92
CHANGE THE SETUP NAME.................................................... 93
LOADING THE SETUP ............................................................. 94
HOW TO DELETE THE SETUP ................................................. 94
TROUBLE SHOOTING ................... 95
TROUBLE SHOOTING ......................................................... 96
APPENDIX ...................................... 97
Custom Tone-wheel Templates.......................................... 98
MIDI Templates ................................................................. 99
Part and MIDI Messages ................................................. 101
MIDI Information ............................................................. 102
Drawbar Data List ........................................................... 103
System Exclusive Message ............................................. 104
Global Parameters .......................................................... 105
Tone-wheel Parameters .................................................. 105
Preset Parameters .......................................................... 106
Leslie Parameters ........................................................... 108
System Parameters ......................................................... 108
Combi. and Bank/Program Messages ............................. 109
Specifications.................................................................. 110
SERVICE .......................................................................... 111
IN THIS MANUAL:
NOTE:s and appear frequently.
The NOTE: is a supplementary explanation.
The are explanations of terms and
applications.

*#1 :-Owner’s Manual

Introduction
9
MAIN FEATURES
ACCURATELY REPRODUCES THE TONE-WHEEL SOUND.
Your new XK-3 contains (96) independent oscillating digital tone-wheels and accurately reproduces the
sound of the Vintage B-3.
In addition, this keyboard has full polyphony.
KEYBOARD OPERATES LIKE THE VINTAGE MODELS.
This keyboard operates exactly like the vintage B-3, C-3, etc did.
Presets are selected by means of the Reverse Colored Keys.
Vibrato effects can be selected by the rotary Vibrato control.
The keyboard has Waterfall keys and you can also attach a Leslie Switch (optional) to the front rail as
well.
VACUUM TUBE PREAMPLIFIER.
Your XK-3 is equipped with a vacuum tube preamplifier.
This will provide you with the warm, crunch, and hard overdrive sounds.
The Overdrive circuit consists of two bands. Thus even if the sound is distorted hard, you can still obtain
purer harmony.
DIGITAL LESLIE / VIBRATO EFFECTS.
The XK-3 keyboard is equipped with a DSP effect generator to simulate the Scanner-Vibrato and Leslie
Speaker.
The range of sounds that you can create is expanded by the use of Vibrato and Chorus effects, and by the
real sounding Leslie effects which effectively simulates the rotation of the two Rotors which are present in
traditional Leslie.
11 PIN LESLIE SPEAKER SOCKET.
Your new XK-3 contains a 11 pin Leslie speaker socket for direct connection to Leslie Speakers.
CAN BE EXPANDED BY USE OF EXTERNAL MIDI PRODUCTS.
You can expand your keyboard by connecting and playing with additional external MIDI equipment.
This includes keyboards, sequencers, etc.
CompactFlash™ CARD
You can use a CompactFlash Card (not included) to save various Parameter files.

*#1 :-Owner’s Manual
10 NAMES AND FUNCTIONS
Front Panel
UPPER LEFT
1. MASTER VOLUME Knob
Controls the total volume.
2. CONTROL Button
Sets up various controls.
3. TONE Knob
Controls the tone quality.
4. TONE TYPE Button
Assigns the function of TONE CONTROL (3).
5. TUBE OVERDRIVE Knob
Controls the distortion of TUBE AMP (6).
6. TUBE AMP Button
Switches whether the sound of the Upper/Lower parts
pass the tube amp circuit.
7. TUBE AMP. LED
Indicates the status of the TUBE AMP.
8. BANK Button
Switches Bank by pressing together the bank switch with
the Preset key (37).
CONTROL PANEL
9. DISPLAY
Indicates various information.
10. PAGE Button
Selects Pages.
11. PARAM Button
Selects Parameters.
12. VALUE Button
Increases and decreases the value.
13. VALUE Knob
Adjusts the value.
14. REC/JUMP Button
Records Presets. This is also used to allow you to quickly
page through the various choices within each function.
15. MENU/EXIT Button
Recall the MENU screen. This is also used to return
from each function screen.
16. PLAY Button
Jumps to the PLAY screen, the basic screen.
135
2 4 6
10
7 8
9
11
12
1314 15 16
17 18

Introduction
11
VIBRATO/CHORUS
17. VIBRATO/CHORUS Button
Switches on and off the Vibrato/Chorus Effects on the
keyboard.
18. VIBRATO/CHORUS MODE Knob
Changes the depth of Vibrato and Chorus Effects.
DRAWBARS
19. LEFT DRAWBARS
Controls UPPER part or B key harmonics.
20. LEFT DRAWBARS LED
Indicates the function of the left drawbars.
21. PEDAL DRAWBARS
Controls PEDAL part harmonics.
22. RIGHT DRAWBARS
Controls LOWER part or A# key harmonics.
23. RIGHT DRAWBARS LED
Indicates the function of the right drawbars.
PERCUSSION
24. SECOND Button
Adds 4' Percussion (Decay sound) to UPPER part.
25. THIRD Button
Adds 2 2/3' Percussion (Decay sound) to UPPER part.
26. FAST Button
Changes Decay time of Percussion.
27. SOFT Button
Changes Percussion volume.
UPPER RIGHT
28. MANUAL BASS Button
Produces Pedal sound by playing the lowest notes on the
manual keyboard.
29. SPLIT Button
Divides the keyboard into two parts: UPPER and
LOWER.
30. REVERB Button
Switches on and off the REVERB Effect.
31. DEMO Button
Plays the built-in demo songs.
19
20
21 22
23
242526 27 28 29 30 31

*#1 :-Owner’s Manual
12
End Block
WHEEL
32. PITCH BEND Wheel
Slides the pitch up or down.
The pitch goes up when moved up, and goes down when
moved down.
33. MODULATION Wheel
On this keyboard, this is used mainly to send MIDI
information to connected MIDI equipment.
LESLIE
34. LESLIE BRAKE Button
This button selects whether to produce sound from the
stopped rotor (=Brake) or not to use the Leslie effect (=
Through) when the LESLIE ON(35) Button is "off".
Brake is ON when the LED is on.
35. LESLIE ON Button
When it is turned ON, the rotor turns and the sound come
from the Rotor.
When the lamp is lighting, it is 'ON'.
36. LESLIE FAST Button
Changes the speed of the Rotor from Slow to Fast and
vice versa.
It is FAST when the LED is on.
KEYBOARD
37. PRESET Key
This is used to select the Combination Presets.
The Bank is selected by pressing this key, holding down
BANK (8).
The selected BANK/PRESET is indicated by the LED
above the Preset Key.
The "C" key is used to cancel all presets or drawbar
settings.
38. MANUAL KEYBOARD
This keyboard contains 61 waterfall shaped keys.
Keyboard is velocity sensitive.
32 33
34 35 36
37 38

Introduction
13
Rear Panel
LEFT SIDE OF REAR
39. AC Inlet
Connects the A.C. Power Cable.
40. POWER Switch
This switches on and off the keyboard.
MIDI TERMINAL
41. MIDI OUT
Sends out the performance information of this keyboard.
42. MIDI IN 1(PEDAL)
This is the MIDI IN Terminal used mainly for the Pedal
Keyboard.
[The factory setting] The MIDI information received by
channel. You can set that through this terminal functions
as PEDAL, regardless of the channel.
43. MIDI IN 2(LOWER)
This is the MIDI IN Terminal used mainly for the Lower
Keyboard.
[The factory setting] The MIDI information received by
channel. You can set that through this terminal functions
as LOWER, regardless of the channel.
STORAGE
44. CF CARD SLOT
Insert the CompactFlash™ Card here.
This is used to store the setting of this keyboard.
Use required CompactFlash™ Card.
CONTROLLER TERMINAL
45. FOOT SWITCH1
This terminal is for the Foot Switch (= FS-9H - optional)
and the Leslie Switch (= CU-1 - optional).
You can switch the speed of the Leslie effect and the
Combination Preset, etc. while playing.
46. EXP. PEDAL1
This terminal is for the Expression Pedal (= V-20R etc. -
optional.)
You can control the volume while you play.
47. EXP. PEDAL2
This terminal is for the exclusive Expression Pedal (=
EXP-100F or EXP-100AN - optional).
39 40
41 42 43 44 45 46 47

*#1 :-Owner’s Manual
14
EFFECT LOOP
48. SEND
This jack is for sending the external Effects.
The signal after passing through the built-in Tube Amp.
is sent out.
If you insert a plug into this jack, it disconnects the
internal unit, and signals are not put out from the output
jack, except the signal input from RETURN jack.
(The rated output level is 1.23V + 4 dBm. The output
impedance is 600Ω.)
49. RETURN/EXT IN
This jack is for receiving external Effects.
This jack can be used as the input jack of the external
sound source.
(The rated input level is 1.23V + 4dBm. The input
impedance is 10kΩ.)
NOTE: Depending on the connected equipment, a setting
may be required for the RETURN jack. (P. 75)
SOUND OUTPUT TERMINAL
50. LINE OUT L/MONO
If your amplifier has only a single (1) female 1/4" audio
input connector (MONO input), use this Jack.
51. LINE OUT R
This is the Right channel output of the XK-3.
Use the Left and Right output Jacks if your mixer or
amplifier has stereo input.
Use only the L/MONO terminal, if the input is monaural.
The built-in Leslie Effect is only on L (the left), when the
Leslie Speaker (53) is connected.
52. HEADPHONE
This is for connecting the stereo headphone.
Sound is sent out from the LINE-OUT (50, 51) and
LESLIE 11PIN (53), also when this terminal is used.
The built-in LESLIE is only on L (the left), when the
LESLIE SPEAKER (53) is connected.
53. LESLIE 11PIN
This is for connecting the Leslie Speaker.
Read "CONNECTING THE LESLIE SPEAKER" for
more details.
48 49 52 535051

*#1 :-Owner’s Manual
15
HOOK-UP

*#1 :-Owner’s Manual
16 BASIC HOOK-UP
USING EFFECT LOOP
The Effect Loop is used when you want to connect the Leslie Speaker and the
external Effects module which provides audio prior to the built-in Leslie Effect.
Use effects modules which have a output gain of less
than +4dB.
NOTE: The Effect Loop is inserted between built-in Tube
Amp and built-in Effect (Leslie, Reverb, etc.)
NOTE: Depending on the connected equipment, a setting
may be required for the RETURN jack. (P. 75)
See the figure below for connection.
Amplifiers or speakers are not mounted in this keyboard.
You must connect an external amplifiers and speakers (or Powerd Speaker) in order
to hear the keyboard sounds.
You can also enjoy playing this keyboard by connecting Stereo Headphones to the
Headphone Terminal.
Be sure to do the connection after you switch the Power OFF on this keyboard and
all connected equipment.
Stereo
Headphone
AC Power Cable
(provided)
Foot Switch FS-9H
(optional)
Amplifier, Speakers etc.

Hook-Up
17
CONNECTING THE LESLIE SPEAKER
This keyboard is equipped with a 11 Pin Leslie Connector, so you can
directly connect the Leslie Speaker.
Do this connection after switching OFF the keyboard.
Connect the Leslie Speaker to the 11 Pin Terminal on the keyboard, with the
exclusive 11 Pin Leslie Cable (= LC-11-7M - to be separately purchased -
with the other Leslie Speaker accessories).
Adjust the setting of the “EXT. LESLIE CH”, in accordance with the Leslie
Speaker connected. (P. 69)
eg. Typical Leslie Speaker Channel
122XB, 771 -- 1CH
2101/2102, 812/814 -- 3CH
Please carefully read the User's Guide of the Leslie speaker.

*#1 :-Owner’s Manual
18 CONNECTING THE MIDI KEYBOARD
You can upgrade this keyboard to an organ by connecting an external MIDI Key-
board and pedal keyboard.
1. Hook-up external MIDI keyboard and pedal keyboard per the figure above.
2. Use the MIDI Template “Seq. Record” of this keyboard. (P. 86)
3. To use Expression Pedal, set the parameter “EXPRESSION SOURCE” for the model of
expression pedal that you have connected. (P. 60)
The MIDI Keyboard connected to the PEDAL Terminal functions as the PEDAL
(part), and the one connected to the LOWER Terminal as the LOWER (part).
Please also read the User's Guide of the connected MIDI Keybaord.
MIDI Keyboard
MIDI Pedal Keyboard
Expression Pedal
EXP-100F

*#1 :-Owner’s Manual
19
TURN ON AND PLAY

*#1 :-Owner’s Manual
20
HOW TO POWER ON
After connecting your XK-3 to the power outlet, please perform the following steps before switch-
ing on the power. To avoid possible damages to speakers, please do not change the order of the
steps.
STEPS TO TAKE
1. Set the MASTER VOLUME Knob at 0 (minimum), before switching the power on.
2. Switch on the POWER on the rear panel. “PLAY” Mode appears, following the TITLE, in the
Display window.
It takes a few seconds before the XK-3 gets ready, because of the circuit-protection
devices.
It requires 10 to 20 seconds to warm up the tubes to get ready, when the [TUBE
AMP] Button is ON.
3. Switch on the power of the amplifiers etc. connected to the XK-3.
4. Holding down a key, adjust the MASTER VOLUME by turning the Knob.
5. Adjust the volume of the amplifiers etc.
Reverse the above steps when you switch off the power. (Switch off the power of
the amplifiers etc. first.)
BACK-UP Your XK-3 memorizes the setting of the keyboard immediately before it is switched off. So, The
keyboard will start with these settings when it is switched on again. This is called “Back-up”.
The XK-3 is initially shipped from the factory with the Preset Key [B] in “pressed” status.
The Preset Key [B] does not produce sound when initially first turned on. Draw the
left Drawbar(s), or press either of the Preset keys [C#] - [A] to start.
RESET TO THE INITIAL STATUS
Please perform the following steps to reset the XK-3 to the initial default setting.
STEPS TO TAKE
1. Switch off the power of the XK-3.
2. Holding the [REC/JUMP] Button, switch on the power.
3. Hold down / Keep pressing the [REC/JUMP] Button until “Loading Default...” appears on the
Display.
4. If everything is in order, PLAY Mode appears on the Display. (Completed)
POWER ON
Other manuals for XK-3
1
Table of contents
Other Hammond Electronic Keyboard manuals

Hammond
Hammond XK-1 User manual

Hammond
Hammond XK-3C User manual

Hammond
Hammond XK-2 Owner's manual

Hammond
Hammond SK1 User manual

Hammond
Hammond XLK-3 User manual

Hammond
Hammond SKX User manual

Hammond
Hammond Sk PRO User manual

Hammond
Hammond SKX Reference manual

Hammond
Hammond XK-5 User manual

Hammond
Hammond Sk PRO User manual

Hammond
Hammond XK-1c User manual

Hammond
Hammond S-27H User manual

Hammond
Hammond Sk PRO User manual

Hammond
Hammond SK1 Owner's manual

Hammond
Hammond PRO-44Hv2 User manual

Hammond
Hammond SKX User manual

Hammond
Hammond XLK-5 User manual

Hammond
Hammond SKX User manual

Hammond
Hammond SK1 User manual

Hammond
Hammond SK1 User manual