HAMPTON BAY HB-7830-02 User manual

THANK YOU
We appreciate the trust and condence you have placed in Hampton Bay through the purchase of this wireless mp3
doorbell kit. We strive to continually create quality products designed to enhance your home. Visit us online to see
our full line of products available for your home improvement needs. Thank you for choosing Hampton Bay!
USE AND CARE GUIDE
WIRELESS MP3 DOORBELL KIT
Questions, problems, missing parts?
Before returning to the store, call Hampton Bay Customer Service
8 a.m. - 5 p.m., CST, Monday - Friday
1-844-760-3644
HAMPTONBAY.COM
Illustrations may vary from actual unit.
Item #1001411382
Model #HB-7830-02

2
Table of Contents
Table of Contents.......................................2
Safety Information.....................................2
Warranty ....................................................2
3-Year Limited Warranty ........................2
Pre-Installation ..........................................3
Planning Installation ..............................3
Specications ........................................3
Tools Required .......................................3
Hardware Included.................................3
Package Contents..................................4
Installation.................................................4
Operation...................................................6
Care and Cleaning .....................................7
Troubleshooting.........................................7
Safety Information
PRECAUTIONS
ƑPlease read and understand this entire manual
before attempting to assemble, install, or operate
this doorbell.
WARNING: To prevent possible SERIOUS INJURY or
DEATH never allow small children near batteries. If a
battery is swallowed, immediately notify a doctor.
WARNING: DO NOT mix old and new batteries. DO
NOT mix battery types - such as alkaline, heavy duty, and
rechargeable - in a single device. Battery leakage may occur.
WARNING: DO NOT DISPOSE OF BATTERIES IN FIRE.
BATTERIES MAY EXPLODE OR LEAK.
NOTE: The push button and doorbell come synced from
the factory. The range of the wireless doorbell can vary
with location, temperature, and battery condition.
This device complies with Part 15 of the FCC Rules and
RSS-210 of Industry Canada. Operation is subject to the
following two conditions: (1) this device may not cause
harmful interference, and (2) this device must accept any
interference received, including interference that may
cause undesired operation.
The user is cautioned that changes or modications
not expressly approved by the party responsible for
regulatory compliance could void the user’s authority to
operate the equipment.
Warranty
3-YEAR LIMITED WARRANTY
WHAT IS COVERED
This product is guaranteed to be free of factory defective parts and workmanship for a period of 3 years from date
of purchase. Purchase receipt is required for all warranty claims.
WHAT IS NOT COVERED
This warranty does not include expendable items (such as light bulbs, batteries, etc.), repair service, adjustment
and calibration due to misuse, abuse or negligence. Unauthorized service or modication of the product or of any
furnished component will void this warranty in its entirety. This warranty does not include reimbursement for
inconvenience, installation, setup time, loss of use, unauthorized service, or return shipping charges. This warranty
is not extended to other equipment and components that a customer uses in conjunction with this product.
Contact the Customer Service Team at 1-844-760-3644 or visit www.hamptonbay.com.

3 HAMPTONBAY.com
Please contact 1-844-760-3644 for further assistance.
Pre-Installation
PLANNING INSTALLATION
Before installing the wireless mp3 doorbell kit, ensure that all parts are present. Compare the parts with the
Hardware Included and Package Contents sections. If any part is missing or damaged, do not attempt to assemble,
install, or operate this wireless mp3 doorbell kit.
Estimated installation time: 15 minutes
SPECIFICATIONS
Doorbell Push button
Power requirements 3 “C” alkaline batteries (not included) Type A23 12V battery (included)
TOOLS REQUIRED
Phillips
screwdriver
Small athead
screwdriver Drill
1/16 in.
(1.5 mm)
Drill bit
3/16 in.
(4.8 mm) Drill bit Safety goggles
HARDWARE INCLUDED
NOTE: Hardware shown to actual size.
AA
BB
CC
DD
EE
FF
Part Description Quantity
AA Jumper 1
BB Screw – small 2
CC Screw – large 2
DD Wall anchor 2
EE Double-sided tape 1
FF USB cable (not to scale) 1

4
Pre-Installation (continued)
PACKAGE CONTENTS
Part Description Quantity
A Doorbell 1
B Push button 1
Installation
1 Installing the doorbell batteries
ƑPush the battery cover tab toward the battery
cover (1) and pull to remove.
ƑInstall 3 alkaline “C”batteries (not included)
into the doorbell (A). Ensure the batteries are
oriented correctly.
ƑReplace the battery cover (1) on the back of the
doorbell(A).
NOTE: In typical use, alkaline batteries will last up to
one year.
2 Removing the battery tab
ƑRemove the back of the push button (B) by
pushing in the tab on the bottom with a small
screwdriver (not included).
ƑRemove the orange battery tab from the push
button (B).
A
B
B
1
A

5 HAMPTONBAY.com
Please contact 1-844-760-3644 for further assistance.
Installation (continued)
3 Testing the push button and
doorbell
ƑTemporarily position the push button (B) and
doorbell (A) where they will be mounted.
ƑPress the push button (B) to verify the
doorbell(A) and push button (B) work properly.
ƑIf the doorbell (A) does not sound, move the
doorbell (A) closer to the push button (B) and
test again.
NOTE: Do not permanently mount the push button until
the push button and doorbell are working properly.
4 Mounting the push button
Use either screws (BB) or double-sided tape (EE) to
mount the push button (B).
ƑTo mount with screws (BB), remove the back of
the push button (B) by pushing in tab on bottom
with a small screwdriver. Place the push button
(B) back on the door jamb and mark the two
screw holes. Attach with screws (BB) and snap
on the front of the push button (B).
ƑWhen attaching the push button (B) with
double-sided tape (EE), remove paper from
both sides of the double-sided tape (EE) and
apply to a clean surface.
5 Mounting the doorbell
Use the large screws (CC) to mount the doorbell (A).
ƑMark two level points 2.75 in. apart on the
mounting surface. Drill two 3/16 in. pilot holes
and insert the wall anchors (DD). Insert the
large screws (CC) into the wall anchors (DD)
leaving about 1/8 in. of the screw threads
exposed. Hang the doorbell (A) on the large
screws (CC) using the keyholes on the back of
the doorbell (A).
NOTE: This doorbell is designed to either hang vertically
or horizontally.
A
A
DD
CC
A
B
BB

6
Operation
1 Adjusting the doorbell volume
The doorbell (A) has an adjustable volume control.
Press the “+” button to increase the volume. Press the
“–” to decrease the volume.
2 Adding tunes to the doorbell
The suggested tune length is 2-15 seconds. The
maximum tune length is 20 seconds. If the tune is
longer than 20 seconds, only the rst 20 seconds will
play.
ƑConnect the USB cable (FF) to the doorbell (A)
and the computer.
ƑClick “Open Folder to View Files.”
ƑDrag the desired tune to the doorbell (A) drive.
ƑDisconnect (eject per computer operating
system) the doorbell (A) from computer.
ƑRemove the USB cable (FF).
IMPORTANT: The door chime will not play when connected to the
computer.
3 Selecting a tune
The doorbell (A) allows you to customize your doorbell
sound with front door tunes. The default setting for the
front door push button (B) is “Ding-Dong” and the rear
door is “Ding”.
ƑUse the arrow buttons to cycle through the
tune list (“ ” - scrolls down the list; “ ” -
scrolls up the list).
ƑStop when the desired tune plays. The last
tune played will play when the front door push
button (B) is pressed. When the desired tune is
selected it will play every time the front door
push button (B) is pressed.
IMPORTANT: Do not delete rear door default le sound.
NOTE: To listen to the selected tune, press and release
the center button “ ”.
4 Setting the wireless push
button
The wireless push button (B) has two options for tune
selection: Play the selected “FRONT” door musical
tune or play the “REAR” door designated tune (Ding).
ƑRemove the single jumper (AA) inside the push
button (B) to play the selected musical tune.
ƑAdd the single jumper (AA) inside the push
button(B) to play only the Ding tune.
Remove jumper to Add jumper to set
set as the “FRONT” door as the “REAR” door
A
A
AA
A
B
FF

7 HAMPTONBAY.com
Please contact 1-844-760-3644 for further assistance.
Care and Cleaning
ƑUse a dry cloth to clean the doorbell and push button.
ƑDo not use cleaners or polishes.
ƑDo not use any uids on the doorbell or push button.
Troubleshooting
Problem Possible Cause Solution
The doorbell does
not sound.
ƑThe batteries are not
installed correctly.
ƑMake sure the batteries are installed according to the
diagram inside the push button and doorbell.
ƑThe batteries are dead. ƑCheck the charge of the push button and doorbell bat-
teries and replace them if necessary.
ƑThe push button and
doorbell are not synced.
ƑSync the push button and doorbell:
ƑPress and hold the center button “ ” on the
doorbell until the doorbell sounds a “Beep-Beep”.
ƑPress the push button within 30 seconds. The
doorbell will sound a “Beep-Beep” tone to indicate
the push button is synced.
ƑPress the push button to ensure operation.
The batteries
seem okay, but
the doorbell does
not work after
installation.
ƑThe doorbell or push but-
ton is mounted on metal
or near metal studs.
ƑMetal reduces transmission range. Use 1/4 in. to 1/2 in.
(6 to 13 mm) wood shims to move the doorbell or push
button away from the metal surface.
ƑThe doorbell is mounted
near a concrete oor or
wall.
ƑConcrete may reduce range. Move the doorbell away
from the concrete surface.
ƑThe doorbell and push
button are installed too
far apart.
ƑLocate the doorbell closer to the push button.
The doorbell
sounds when not
intended (false
triggers).
ƑThe doorbell is receiving
interference from another
wireless device.
ƑReset the doorbell and push button:
ƑRemove the push button batteries. Wait 30
seconds.
ƑPress and hold the push button for 10 to 15 sec-
onds within 60 seconds after installing the battery
into the push button.
ƑPress and hold the center button “ ” on the
doorbell until the doorbell sounds a “Beep-Beep-
Beep-Beep”.
ƑTo re-sync the push button and doorbell, press and
hold the center button “ ” on the doorbell until
the doorbell sounds a “Beep-Beep”.
ƑPress the push button within 30 seconds. The
doorbell will sound a “Beep-Beep” tone to indicate
the push button is synced.
ƑPress the push button to ensure operation.

Questions, problems, missing parts?
Before returning to the store, call Hampton Bay Customer Service
8 a.m. - 5 p.m., CST, Monday - Friday
1-844-760-3644
HAMPTONBAY.COM
Retain this manual for future use.
208195-02A

GRACIAS
Agradecemos la conanza que ha depositado en Hampton Bay al comprar este juego de timbre MP3 inalámbrico.
Procuramos crear continuamente productos de calidad diseñados para mejorar su hogar. Visítenos en internet para
ver nuestra línea completa de productos disponibles que necesita para el mejoramiento de su hogar. ¡Gracias por
escoger Hampton Bay!
GUÍA PARA EL USO Y CUIDADO
JUEGO DE TIMBRE MP3 INALÁMBRICO
¿Tiene preguntas, problemas o piezas faltantes?
Antes de la devolución al almacén llame al Servicio al Cliente de Hampton Bay de
8 a.m.-5 p.m., Hora del Central, de lunes a viernes.
1-844-760-3644
HAMPTONBAY.COM
Las ilustraciones pueden ser diferentes de la unidad comprada.
Articulo #1001411382
Modelo #HB-7830-02

10
Contenido
Contenido ................................................10
Información de seguridad........................10
Garantía ...................................................10
3 años de garantía limitada .................10
Antes de la instalación ............................11
Planicación de la Instalación .............11
Especicaciones..................................11
Herramientas Requeridas ....................11
Ferretería Incluida................................11
Contenido del Paquete.........................12
Instalación ...............................................12
Operación ................................................14
Cuidado y limpieza ..................................15
Análisis de averías...................................15
Información de seguridad
PRECAUCIONES
ƑPor favor lea y entienda todo este manual antes de
tratar de ensamblar, instalar u operar este timbre.
ADVERTENCIA: Para evitar posibles LESIONES GRAVES
o LA MUERTE nunca deje que los niños pequeños estén
cerca de las pilas. Si alguien ingiere una pila, notique
inmediatamente al médico.
ADVERTENCIA: NO mezcle las pilas viejas con las
nuevas. NO mezcle diferentes tipos de pilas - tales como
alcalinas, muy resistentes y recargables - en un solo
dispositivo. Pueden causar goteo de las pilas.
ADVERTENCIA: NO TIRE LAS PILAS AL FUEGO. LAS
PILAS PUEDEN EXPLOTAR O GOTEAR.
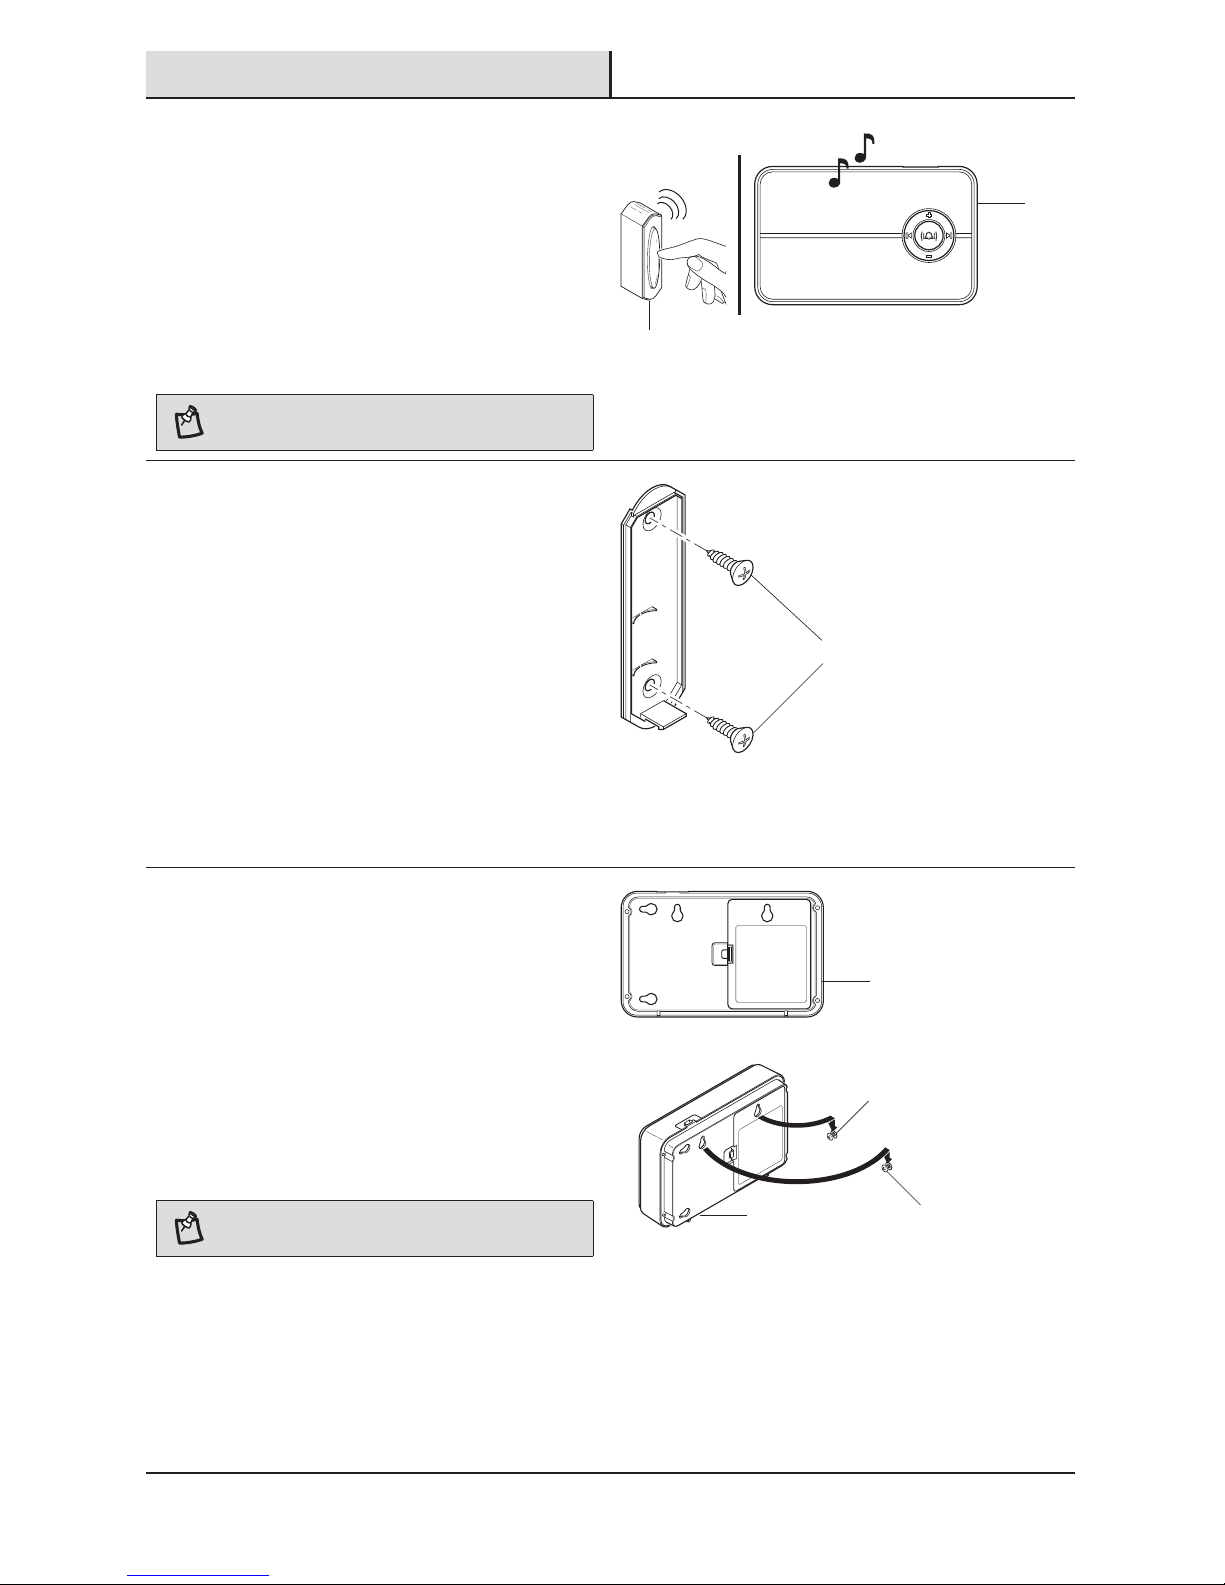
NOTA: El pulsador y el timbre vienen sincronizados de
fábrica. El alcance del timbre inalámbrico puede variar con
el lugar, la temperatura y la condición de la pila.
Este dispositivo cumple con la sección 15 de las
normas de la FCC e RSS-210 de la industria de Canadá.
El funcionamiento está sujeto a las siguientes dos
condiciones: (1) este dispositivo no debe causar
interferencia perjudicial y (2) debe aceptar cualquier
interferencia recibida, incluida la interferencia que
pudiese causar un funcionamiento no deseado.
Se le advierte al usuario que los cambios o
modicaciones a esta unidad que no estén expresamente
aprobadas por la parte responsable del cumplimiento
regulatorio podrían anular la autorización del usuario
para utilizar el equipo.
Garantía
3 AÑOS DE GARANTÍA LIMITADA
LO QUE SE CUBRE
Se garantiza que este producto no tiene partes defectuosas de fábrica o de mano de obra por un período de 3 años
desde la fecha de compra. Se necesita el recibo de compra para todos los reclamos de garantía.
LO QUE NO SE CUBRE
Esta garantía no incluye los artículos reemplazables (como bombillas, pilas etc.), servicio de reparación, ajuste y
calibración debido al mal uso, abuso o negligencia. Los servicios no autorizados o las modicaciones hechas al
producto o a cualquier componente invalidarán esta garantía en su totalidad. Esta garantía no incluye reembolso
por inconveniencia, instalación, tiempo de instalación, perdida de uso, servicio no autorizado, o gastos de envío.
Esta garantía no se extiende a otros equipos o componentes que el consumidor usa junto con este producto.
Póngase en contacto con el personal de servicio al cliente al 1-844-760-3644 o visite el sitio www.hamptonbay.com.

11 HAMPTONBAY.com
Por favor, póngase en contacto al 1-844-760-3644 para obtener más ayuda.
Antes de la instalación
PLANIFICACIÓN DE LA INSTALACIÓN
Antes de instalar el juego de timbre MP3 inalámbrico asegúrese de tener todas las piezas. Compare las piezas
con las secciones Ferretería Incluida y Contenido del Paquete. Si alguna pieza falta o está dañada, no trate de
ensamblar, instalar u operar este juego de timbre MP3 inalámbrico.
Tiempo estimado para la instalación: 15 minutos
ESPECIFICACIONES
Timbre Pulsador
Requisitos de la energía eléctrica 3 baterías alcalinas “C” (no incluidas) Pila de 12V tipo A23 (incluida)
HERRAMIENTAS REQUERIDAS
Destornillador
phillips
Pequeño
destornillador
de cabeza
plana
Taladro
Broca de
1/16 de
pulgada
(1.5 mm)
Broca de 3/16 de pulgada
(4.8 mm) Gafas de suguridad
FERRETERÍA INCLUIDA
NOTA: La ferretería se muestra en su tamaño real
AA
BB
CC
DD
EE
FF
Pieza Descripción Cantidad
AA Puente 1
BB Tornillo – pequeño 2
CC Tornillo – grande 2
DD Ancla de expansión de pared 2
EE Cinta doble faz 1
FF Cable USB (not to scale) 1

12
Antes de la instalación (continuación)
CONTENIDO DEL PAQUETE
Pieza Descripción Cantidad
ATimbre 1
BPulsador 1
Instalación
1 Instalación de las pilas del
timbre
ƑEmpuje la lengüeta de la tapa de las pilas
hacia la tapa de las pilas (1) y hale para quitar.
ƑInstale 3 pilas alcalinas “C” (no incluidas) en
el timbre (A). Asegúrese de que las pilas están
orientadas correctamente.
ƑVuelva a colocar la tapa de las pilas (1) en la
parte posterior del timbre (A).
NOTA: Con uso normal, las pilas alcalinas pueden durar
hasta un año.
2 Retiro de la lengüeta de la pila
ƑCon un destornillador pequeño (no se incluye),
presione la pestaña en la parte inferior
del botón pulsador (B) para retirar la parte
posterior.
ƑRetire la pestaña naranja de la batería del
botón pulsador (B).
A
B
B
1
A

13 HAMPTONBAY.com
Por favor, póngase en contacto al 1-844-760-3644 para obtener más ayuda.
Instalación (continuación)
3 Prueba del pulsador y del
timbre
ƑColoque temporalmente el pulsador (B) y el
timbre (A) donde serán montados.
ƑPresione el pulsador (B) para vericar que
el timbre (A) y el pulsador (B) funcionen
correctamente.
ƑSi el timbre (A) no suena, acerque más el
timbre (A) al pulsador (B) y pruebe de nuevo.
NOTA: No monte permanentemente el pulsador hasta que
el pulsador y el timbre estén funcionando correctamente.
4 Montaje del pulsador
Use tornillos (BB) o cinta doble faz (EE) para montar el
botón pulsador (B).
ƑPara montar con tornillos (BB), presione la
pestaña de la parte inferior del botón pulsador
(B) con un destornillador pequeño y retire la
parte posterior. Coloque la parte posterior del
botón pulsador (B) en la jamba de la puerta y
marque los dos oricios para los tornillos. Fije
con tornillos (BB) y coloque a presión la parte
delantera del botón pulsador (B).
ƑAl colocar el botón pulsador (B) con cinta doble
faz (EE), retire el papel de ambos lados de la
cinta doble faz (EE) y aplique en una supercie
limpia.
5 Montaje del timbre
Use los tornillos grandes (CC) para montar el
timbre(A).
ƑMarque dos puntos a nivel a 2,75 pulg. de
distancia en la supercie de montaje. Taladre
dos oricios guía de 3/16" e inserte anclas de
expansión de pared (DD). Inserte los tornillos
grandes (CC) en los anclajes de pared (DD),
dejando expuestas las roscas del tornillo
cerca de 1/8 de pulg. Cuelgue el timbre (A) en
los tornillos grandes (CC) usando los oricios
situados en la parte posterior del timbre (A).
NOTA: Este timbre está diseñado para colgar ya sea
vertical u horizontalmente.
A
A
DD
CC
A
B
BB

14
Operación
1 Regulación del volumen del
timbre
El timbre (A) tiene un control de volumen ajustable.
Pulse el botón “+” para aumentar el volumen. Pulse el
botón “-” para disminuir el volumen.
2 Añadiendo tonos al timbre
La duración sugerida para la melodía está entre 2 a 15
segundos. La duración máxima de una sintonía es de
20 segundos. Si la sintonía es de más de 20 segundos,
sólo los primeros 20 segundos se escucharán.
ƑConecte el cable USB (FF) al timbre (A) y a la
computadora.
ƑHaga clic en “Abrir carpeta para ver los archivos”.
ƑArrastre el tono deseado a la unidad del timbre(A).
ƑDesconecte (expulsar por sistema operativo de la
computadora) el timbre (A) de la computadora).
ƑRetire el cable USB (FF).
IMPORTANTE: El timbre de puerta no sonará cuando esté
conectado a la computadora.
3 Seleccione un tono
El timbre (A) le permite personalizar el sonido del
timbre con tonos para la puerta principal. El ajuste
predeterminado para el pulsador de la puerta principal(B)
es “Din-Don” y para la puerta de atrás es “Din”.
ƑUse los botones de echa para desplazarse por la
lista de tonos (“ ” - desplaza hacia abajo de la
lista, “ ” - se desplaza hacia arriba de la lista).
ƑDeténgase cuando escucha el tono deseado. El
último tono escuchado se reproducirá cuando
presione el pulsador de la puerta principal (B).
Cuando la melodía deseada es seleccionada
esta se reproducirá cada vez que presione el
pulsador (B) de la puerta frontal.
IMPORTANTE: No borre el archivo del sonido hecho en fábrica de
la puerta trasera.
NOTA: Para escuchar el tono seleccionado, presione y
suelte el botón central “ ”.
4 Configuración del botón
inalámbrico
El pulsador inalámbrico (B) tiene dos opciones para
la selección de tonos: Reproduzca el tono musical
seleccionado de la puerta “PRINCIPAL” o el tono
designado para la puerta “DE ATRÁS” (Ding).
ƑRetire el puente (AA) simple del interior del
pulsador (B) para reproducir el tono musical
seleccionado.
ƑAñada el puente (AA) simple al interior del
pulsador(B) para reproducir solo el tono din.
Retire el puente para Añada el puente para
congurar como puerta congurar como puerta
“PRINCIPAL” “DE ATRÁS”
A
A
A
B
FF
AA

15 HAMPTONBAY.com
Por favor, póngase en contacto al 1-844-760-3644 para obtener más ayuda.
Cuidado y limpieza
ƑUse un paño seco para limpiar el timbre y el pulsador.
ƑNo use limpiadores ni pulidores.
ƑNo use ningún líquido en el timbre ni en el pulsador.
Análisis de averías
Problema Causa Probable Solución
El timbre no
suena.
ƑLas baterías no están
bien instaladas.
ƑAsegúrese que las pilas estén instaladas según los
diagramas del interior del pulsador y del timbre.
ƑLas baterías se acabaron. ƑRevise la carga de las pilas del pulsador y del timbre y
reemplácelas si es necesario.
ƑEl pulsador y el timbre no
están sincronizados.
ƑSincronice el pulsador y el timbre:
ƑPresione y mantenga presionado el botón central
“ ” en el timbre hasta que el timbre suene un
“bip-bip”.
ƑPresione el botón pulsador durante 30 segundos.
El timbre emitirá el pitido “bip-bip” para indicar
que el pulsador está sincronizado.
ƑPresione el botón pulsador para asegurar el
funcionamiento.
Las pilas parecen
estar bien, pero
el timbre no
funciona luego de
la instalación.
ƑEl timbre o el pulsador
está montado sobre me-
tal o cerca de espárragos
metálicos.
ƑEl metal reduce el alcance de transmisión. Utilice
cuñas de madera de 1/4 pulg. a 1/2 pulg. (de 6 a 13
mm) para mover el timbre o el pulsadort lejos de la
supercie de metal.
ƑEl timbre está montado
cerca de un piso o de una
pared de hormigón.
ƑEl concreto puede reducir el alcance. Mueva el timbre
de la puerta lejos de la supercie de hormigón.
ƑEl timbre y el pulsador
están instalados muy
separados entre sí.
ƑColoque el timbre más cerca al pulsador.
El timbre suena
cuando no se
lo requiere
(activaciones
falsas).
ƑEl timbre está recibiendo
interferencia de otro
dispositivo inalámbrico.
ƑReposicione el timbre y el pulsador:
ƑRetire las baterías del botón pulsador. Espere 30
segundos.
ƑMantenga presionado el botón pulsador entre 10 y
15 segundos por un periodo de 60 segundos luego
de instalar la batería en el botón pulsador.
ƑPresione y mantenga presionado el botón central
“ ” en el timbre hasta que el timbre suene un
“bip-bip-bip-bip”.
ƑPara sincronizar de nuevo el pulsador y el timbre
presione y mantenga presionado el botón central
“ ” en el timbre hasta que el timbre suene un
“bip-bip”.
ƑPresione el botón pulsador durante 30 segundos.
El timbre emitirá el pitido “bip-bip” para indicar
que el pulsador está sincronizado.
ƑPresione el botón pulsador para asegurar el
funcionamiento.

¿Tiene preguntas, problemas o piezas faltantes?
Antes de la devolución al almacén llame al Servicio al Cliente de Hampton Bay de
8 a.m.-5 p.m., Hora del Central, de lunes a viernes.
1-844-760-3644
HAMPTONBAY.COM
Guarde este manual para uso futuro.
208195-02A
Table of contents
Languages: