HandI Move SUREHANDS 1030 User manual

V 1.0 - 17-09-2015
© Handi-Move
All rights reserved - Alle rechten voorbehouden - Tous droits réservés
Alle Rechte vorbehalten - Reservados todos los derechos - Tutti i diritti riservati.
SUREHANDS®BODY-SUPPORT
TILBEUGEL
CHASSIS-MAINS
HEBEBÜGEL
SURE HANDS
BRACCIA INOX
HANDI-MOVE MODEL 1030-1035
User guide - Handleiding - Mode d'emploi
Bedienungsanleitung - Manual de usario - Istruzioni per l'uso
Read Thoroughly Before Operating. Have your system inspected at least yearly. See inside user guide for details.
Lees deze handleiding grondig voor gebruik. Laat uw tilsysteem jaarlijks inspecteren. Zie deze handleiding voor meer informatie.
Lire le mode d'emploi avant utilisation. Faites procéder à l’inspection de votre système au moins une fois par an.
Consultez le mode d'emploi pour plus d’informations.
Vor Gebrauch, die Bedienungsanleitung lesen. Für Ihr System sollte mindestens einmal jährlich eine Inspektion durchgeführt werden.
Weitere Informationen finden Sie in der Bedienungsanleitung.
Lea detenidamente antes de usar. Realice una inspeccion anualmente. Lea la giua de usario para mas detalles.
Leggere attentamente il manuale prima dell'uso. Il vostro sistema di sollevamento deve essere controllato annualmente.
Consultare questo manuale per ulteriori informazioni.


USER GUIDE SUREHANDS®BODY SUPPORT
p. 1EN
Table of contents
1. Safety instructions.........................................................................................................................................2
2. Scope of application......................................................................................................................................4
3. Product information.......................................................................................................................................4
3.1. Body support......................................................................................................................................4
3.2. Accessories.........................................................................................................................................4
4. Installation instructions .................................................................................................................................7
5. Explanation of the symbols...........................................................................................................................9
5.1. Symbols on the nameplate and packaging.........................................................................................9
5.2. Nameplate...........................................................................................................................................9
5.3. Safety labels.......................................................................................................................................9
6. Instructions for use......................................................................................................................................10
6.1. Thigh support fix functionality........................................................................................................10
6.2. Lifting from a seated position..........................................................................................................10
6.3. From wheelchair to toilet.................................................................................................................11
6.4. From wheelchair to bath ..................................................................................................................11
6.5. From wheelchair to bed ...................................................................................................................12
6.6. Lifting from a lying position............................................................................................................12
6.7. Lifting from the floor.......................................................................................................................12
6.8. Upright care of incontinent users.....................................................................................................13
6.9. Walking exercises with the body support........................................................................................13
7. Maintenance and storage.............................................................................................................................14
7.1. Cleaning the body support...............................................................................................................14
7.2. Storing the body support..................................................................................................................14
8. Inspection.....................................................................................................................................................14
8.1. Inspection by the user (before each use)..........................................................................................14
8.2. Annual inspection.............................................................................................................................15
9. Troubleshooting...........................................................................................................................................15
10. Technical specifications...............................................................................................................................16
11. Parts list.......................................................................................................................................................16
12. Spare parts, maintenance and yearly inspection .........................................................................................17
13. Limited warranty..........................................................................................................................................18

USER GUIDE SUREHANDS®BODY SUPPORT
p. 2EN
1. Safety instructions
In this document the person who is lifted is referred to as the user and the person assisting him/her as the
caregiver.
Before using the body support, ensure that the following conditions are fulfilled:
■the body support is only used with a Handi-Move hoist;
■the caregivers concerned have received suitable instructions and training;
■you have carefully read and fully understood the user's guide;
■the user is positioned safely and comfortably so that no part of his body is subject to distress;
■the user has been tested for his or her suitability;
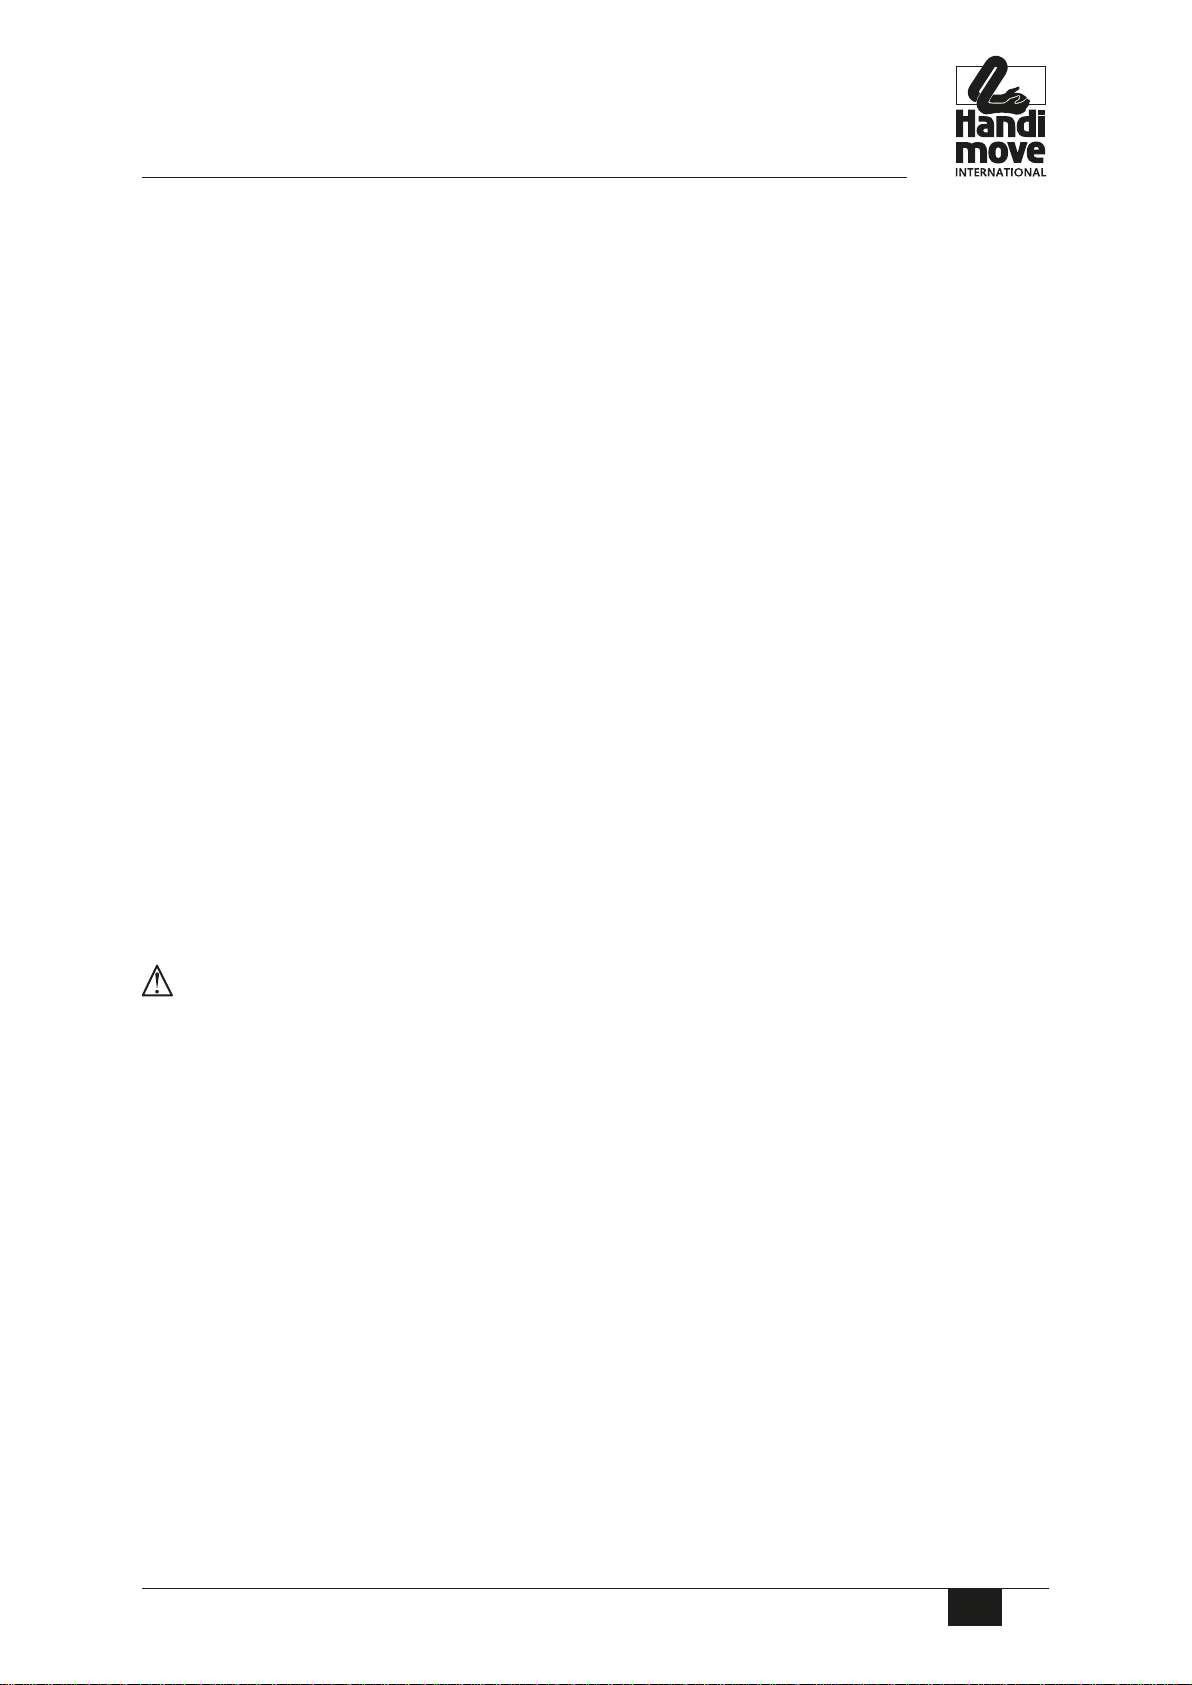
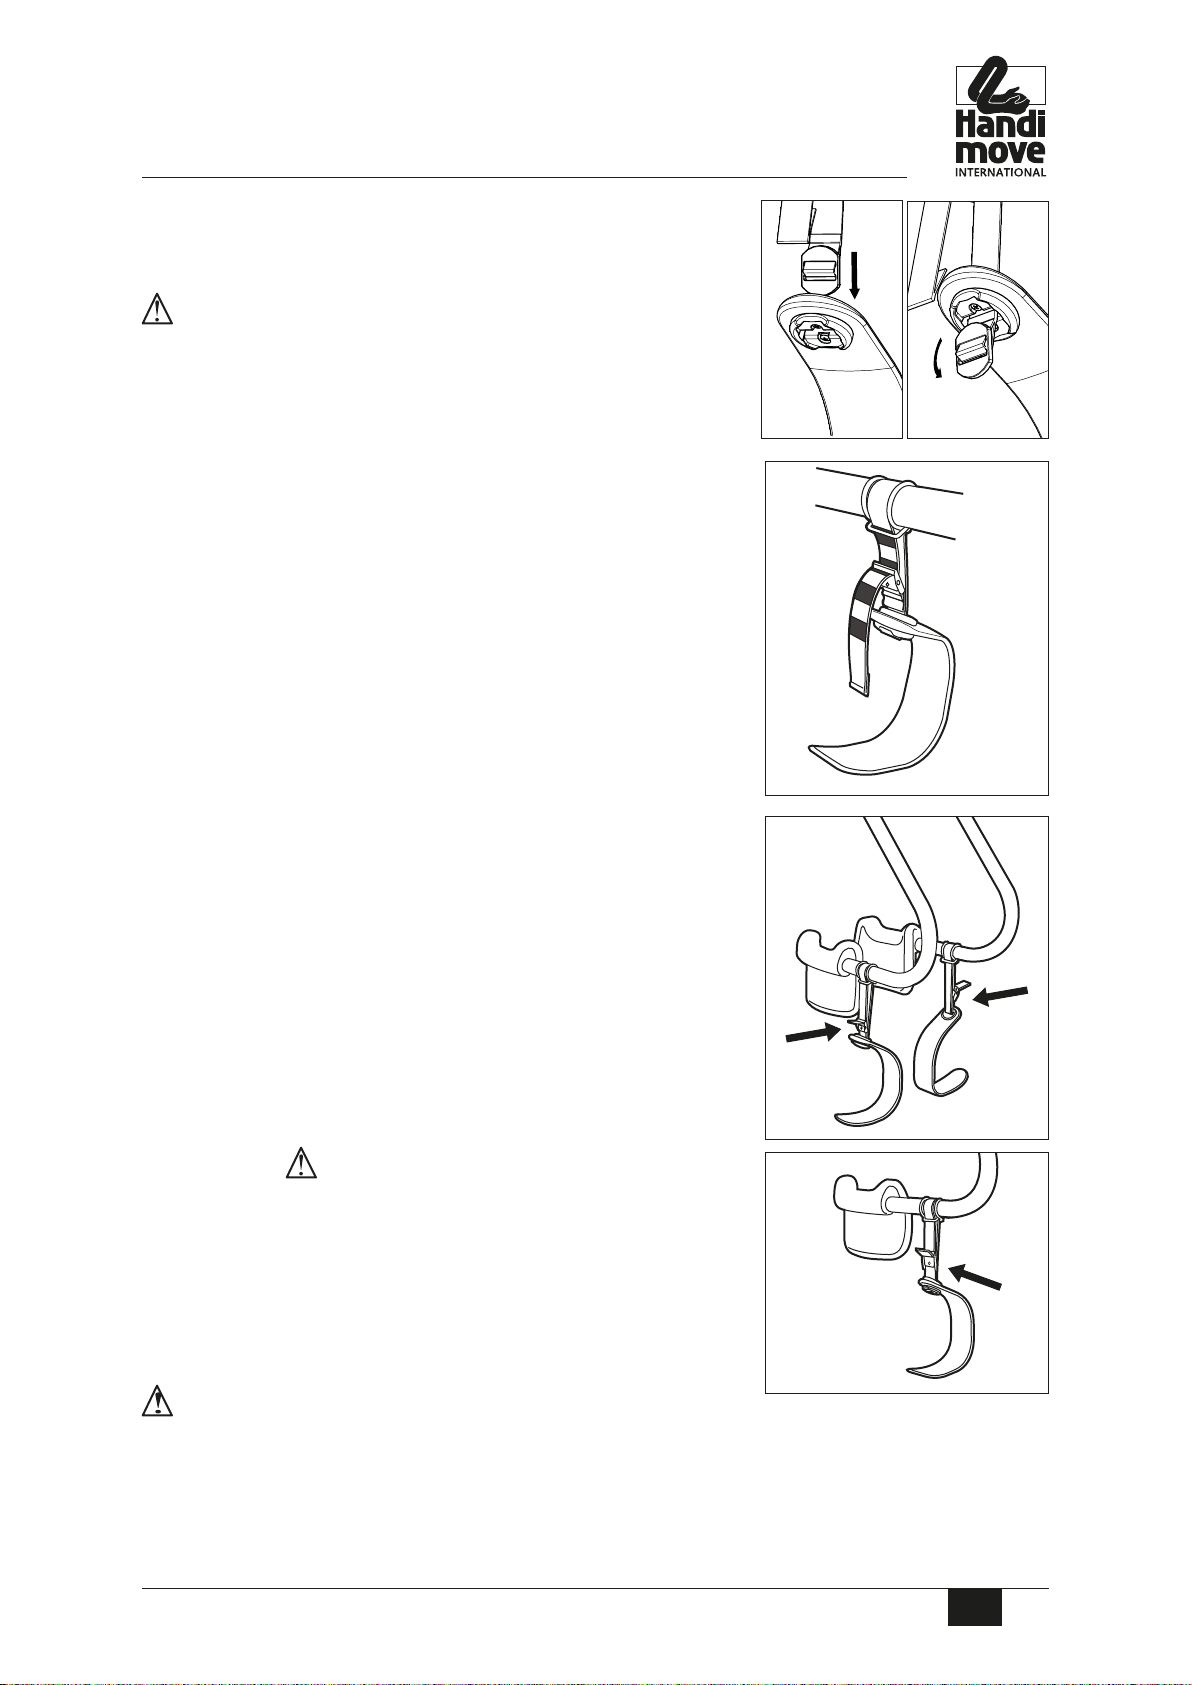
■the body support is securely attached to the hooks;
■the thigh supports are securely attached to the body support;
■the body support is lowered vertically above the user;
■the cups are positioned correctly on the user's chest;
■the user's arms are kept outside of the body support;
■the safety band is used when the user is supported in a standing position or makes (spastic) motions that could
disrupt the support provided by the body support, or when the body support grip needs tightening.
■Do not use the body support if it shows signs of severe wear or if it is damaged.
■Lift the user in a 90-degree sitting posture.
■The body support must under no circumstances (absolute contraindications) be used in the following situa-
tions:
• complete amputation of the arms
• lack of head control
• osteoporosis imperfecta (brittle bone disease)
• permanent oxygen support
• bone cancer
CAUTION!
Incase of weak muscle tone, the body support may not provIde effectIve support and the
user can slIp out of the body support, even If the safety band or muscular dystrophy thIgh
supports are used. for thIs reason, always check to see whether the user Is suItable for
the body support. always test the user'ssuItabIlIty for the body support, payIng partIcu-
lar attentIon to: weIght, shoulder muscle strength, cognItIve lImItatIons... If In doubt,
ImmedIately stop usIng the body support
when auser’sarms angle at more than 90° , It Is aserIous IndIcatIon that the body support
Is unsuItable and should not be used.
touse the body support Independently means wIthout the presence of another person
who could help In the case of an emergency e.g. – user lIves alone or Is alone durIng a
transfer. ItIs strongly recommended that apersonal alarm system (asmall transmItter)
be worn around the neck or wrIst enablIng users to rely 24/24 on an emergency center.
adjust the length of the thIgh supports so that the user'slegs are lIfted at the same tIme
as hIs/her torso.
when you are usIng the body support wIthout thIgh supports (see 6.7 & 6.8):
• the user must contInue to rest hIs or her feet on the floor for support.
• the user must be able to carry most of hIs/her body weIght.
• Ifthe user can support hImself or herself wIth theIr feet on the floor or some other

USER GUIDE SUREHANDS®BODY SUPPORT
p. 3EN
surface, less of theIr weIght Is carrIed by the cups, whIch also reduces the grIp on
theIr torso. asaresult, the user can slIp free of the cups. for thIs reason, always use
the safety band (see sectIon 3.2. accessorIes). the user must be tested for hIs or her
suItabIlIty to stand or walk
Ifany change In the physIcal condItIon or mental state occurs the use of the body
support must be re-evaluated.

USER GUIDE SUREHANDS®BODY SUPPORT
p. 4EN
2. Scope of application
The body support is used in hospitals, rehabilitation centres, geriatric centres, care homes, day centres and
private homes. The body support is suitable for transfers to and from: bed, wheelchair, normal chair or chaise,
armchair, bath, toilet, floor, treatment table,...
3. Product information
3.1. Body support
This user guide refers to the following
parts of your body support:
A. Attachment hooks
B. Cups
C. Thigh support
D. Thigh support band with strap
E. Thigh support fix
F. Arms
3.2. Accessories
Standard thigh supports
Small - art. 1077S
Medium- art. 1077M
Large - art. 1077L
These thigh supports are for independent use.
Slipproof thigh supports
Small - art. 1074S
Medium- art. 1074M
Large - art. 1074L
Slipproof thigh supports are for non-independent use.
A
D
E
F
C
B

USER GUIDE SUREHANDS®BODY SUPPORT
p. 5EN
Contour thigh supports
Medium anti-slip - art. 1075M
The contour thigh supports provide better support thanks to their enclos-
ing shape. The shape places the user in more of a seated posture than the
standard thigh supports. Sliding is reduced.
Muscular dystrophy thigh supports
Small - art. 1079S
Medium- art. 1079M
Muscular dystrophy thigh supports are used to prevent persons with weak muscle tone from slipping out of the
body support. They are often used with muscular dystrophy patients. These thigh supports can also be used with
amputees.
■In order to slide the Velcro strap over the thigh support, first place
the thigh support in the correct position, with the longer end facing
forward.
■Slide the Velcro strap over the thigh support so the longer strip of
Velcro faces downward and the metal buckle is suspended from the
inside of the thigh.
■Secure the Velcro strap to the thigh support by pulling the narrow
portion of the strap over and then under the thigh support and
fastening it to the Velcro material on the bottom side of the Velcro
strap.
■The thigh supports must be fitted near the upper end of the thighs,
with the long end facing the back of the knee. The thigh supports
can be fitted either on the outside or on the inside of the legs.
■Pull the strap through the metal buckle and close it firmly around
the thigh above the knee.

USER GUIDE SUREHANDS®BODY SUPPORT
p. 6EN
Muscular dystrophy thigh supports, slipproof
Small - art. 1076S
Medium- art. 1076M
This version provides extra protection against slipping. This version is not available with a Velcro strap.
Cup cushions
art. 1068M
The cup cushions are pulled over the cups. They should be used if the user
finds the pressure of the body support uncomfortable. The cushions can
help reduce the feeling of pressure.
Safety band
Small - art. 1065
Large - art. 1069
The safety band is secured around the cups or arms of the body support. It
is recommended to strengthen the grip of the body support. It must always
be used when the body support is used for walking exercises or upright
care.
Thigh support covers
art. 1067M
The thigh support covers are pulled over the thigh supports. They are used
with persons who find the bare thigh supports uncomfortable.
CAUTION!
Incase of weak muscle tone, the body support may not provIde effectIve support and the
user can slIp out of the body support, even If the safety band or muscular dystrophy thIgh
supports are used. for thIs reason, always check to see whether the user Is suItable for
the body support.

USER GUIDE SUREHANDS®BODY SUPPORT
p. 7EN
4. Installation instructions
step 1. Clip the attachment hooks for the body support into the swivel hook.
step 2. To suspend the body support from the hooks, lower the
swivel hook to eye level and press the body support against
your body with one hand so the cups touch each other and
you can fit the hooks into the ends of the hollow body
support tubes.
step 3. Attach the thigh support bands through the thigh support fix:
Pull the loose end of the thigh support band through the under-
side of the thigh support fix (in between both legs of the thigh support fix).
Wrap the loose end around the bar and subsequently through the underside of the thigh support fix
again.
Note! The markings on the band and strap should point outwards.
Pull the loose end of the band through the back of the strap.
1
4
2
5
3
6
1 2 3 4

USER GUIDE SUREHANDS®BODY SUPPORT
p. 8EN
step 4. Use the adjustable thigh support straps to attach the thigh
supports to the arms of the body support.
CAUTION!
the thIgh support band should be slId In the thIgh sup-
port through the openIng at the top.
step 5. If you want to fit the thigh supports to the inside of the
user's thighs, attach the thigh supports to the body support
so that they face outward.
step 6. If you want to fit the thigh supports to the outside of the
user's thighs, attach the thigh supports to the body support
so that they face inward.
STEP 7. CAUTION!
adjust the length of the thIgh supports so that the user's
legs are lIfted at the same tIme as hIs or her torso.
CAUTION!
the strap to adjust the thIgh support band may only be used when fIttIng the thIgh sup-
ports, not when lIftIng the user.

USER GUIDE SUREHANDS®BODY SUPPORT
p. 9EN
step 8. Both thigh supports can be positioned at the same height by
using the marks on the thigh support bands.
5. Explanation of the symbols
5.1. Symbols on the nameplate and packaging
Please read the user guide carefully before using the device.
CE certified
Please observe the national and local regulations with respect to collection for recycling and
environmentally friendly processing.
5.2. Nameplate
5.3. Safety labels
TILBEUGEL - CHÂSSIS-MAINS - BODY SUPPORT - HEBEBÜGEL
MANUFACTURED BY
Handi-Move International nv
9400 Ninove, Belgium
✆32 54 31 97 10
DISTRIBUTED IN THE USA BY
SureHands Lift & Care Systems
Pine Island, NY 10969
✆(845)258-6500
NIET GEBRUIKEN BIJ ERNSTIGE SLIJTAGE OF INDIEN BESCHADIGD - REMPLACER D’URGENCE SI ABÎMÉ OU USÉ - DO NOT USE
WHEN DAMAGED OR WORN - NICHT BENUTZEN FALLS BESCHÄDIGT ODER VERSCHLISSEN.
TEST GEBRUIKERS OP HUN GESCHIKTHEID - ASSUREZ-VOUS DE L’APTITUDE DE L’UTILISATEUR - TEST THE USER’S
SUITABILITY - BEI BENUTZER DIE EINSATZFÄHIGKEIT PRÜFEN.
ENKEL GEBRUIKEN MET HANDI-MOVE LIFTEN - UTILISER UNIQUEMENT AVEC DES APPAREILS DE LEVAGE HANDI-MOVE - USE
ONLY WITH A HANDI-MOVE HOIST - NUR MIT HANDI-MOVE LIFTERN VERWENDEN
MODEL - MODÈLE - TYP
❏
1030M
❏
1030S
❏
1030XS
GEPOLIJST - POLI - POLISHED - POLIERT
❏
1035M
❏
1035S
❏
1035XS
01 02 03 04 05 06 07 08 09 10 11 12
‘12 ‘13 ‘14 ‘15
PRODUCTIEDATUM / DATE OF MANUFACTURING
DATE DE PRODUCTION / HERSTELLDATUM
182 kg
400 Lbs
SN

USER GUIDE SUREHANDS®BODY SUPPORT
p. 10EN
6. Instructions for use
6.1. Thigh support fix functionality
The thigh support fix has a self-locking feature: increased load on the
thigh support will secure the thigh support fix more tightly around the bar,
therefore preventing the thigh support from slipping.
To move the thigh support fix, there should be no load on the thigh
support. Press both legs of the thigh support fix together to move the thigh
support fix along the bar..(B)
6.2. Lifting from a seated position
step 1. Lower the body support vertically from above the user until
the lower edge of the cups is approximately 0.79 inch / 2.00
cm above the user's thighs.
step 2. Place the cups on the user's chest and ensure that they
remain far enough below the armpits. To do this, either
stand behind the user with your arms under his or her arms
or stand next to the user.
Ensure that the cups are fitted correctly around the user's
chest.
A
B
A
A
B
±2 cm

USER GUIDE SUREHANDS®BODY SUPPORT
p. 11EN
step 3. Lift each of the user's legs in turn and slide the thigh
support in place, either high on the thigh near the groin or
halfway along the thigh.
step 4. If you fit the thigh supports relatively high, there will be less
weight on the cups. If you fit them lower down, there will be
more weight on the cups.
step 5. Adjust the length of the thigh support bands so that the user's
legs are lifted at the same time as his or her torso. The selected
position of the thigh support bands and thigh supports has a
large effect on the comfort of the user.
step 6. Before continuing, check to make sure that the cups are
properly fitted around the user's chest. Avoid placing them
too high under the user's armpits or too far in front or
behind the users arms.
The user's arms must always remain outside of the body
support.
step 7. Press the "UP" button to lift the body support slightly, and
then check the positions of the cups and thigh supports once
again. The user's legs and torso must be lifted at the same
time. Ensure that the user is comfortable. Continue lifting
until the user is free of the floor.
step 8. Transport the user.
step 9. Lower the user far enough that the thigh supports can be removed easily.
step 10. Let the thigh supports hang gently against the user's legs and remove the cups.
6.3. From wheelchair to toilet
step 1. The user's clothing can be lowered while the user is
suspended above the toilet.
step 2. Press gently against the user's knees while lowering the user to
position him or her correctly on the toilet.
step 3. Maintain light pressure on the cups so the user remains sup-
ported by the body support while seated on the toilet. This
compensates for the user's lack of torso stability.
step 4. Constantly check the comfort of the user.
6.4. From wheelchair to bath
step 1. After undressing the user, you can bathe the user by lifting
him or her in the usual manner and moving the user to a
position next to or behind the bathtub.
step 2. Then lift the user above the rim of the bathtub and guide his or
her legs into the tub.
step 3. Once the user is in the tub, maintain slight pressure with the
cups to provide supplementary security for the user.
step 4. Remove the thigh supports to simplify washing.
OK OK

USER GUIDE SUREHANDS®BODY SUPPORT
p. 12EN
6.5. From wheelchair to bed
step 1. Place the user in the wheelchair next to the bed and lift him
or her up to bed height.
step 2. Position the body support above the bed and guide the user's
legs over the edge of the bed.
step 3. Lower the user into a comfortable sitting position and then
remove the thigh supports.
step 4. Now lower the user further into a lying position. Use pillows
for back support.
6.6. Lifting from a lying position
step 1. Bring the user into a seated position by adjusting the back
support or placing pillows behind the user's back.
step 2. Lower the body support until it is just above the user's pelvis.
step 3. Place your hand on the user's back and press him or her gently
forward into the cups.
step 4. Use the "UP" button to apply enough pressure on the cups to
hold the user securely.
step 5. Now fit the thigh supports. Increase the pressure and check that
the user is sitting comfortably.
step 6. Lift the user. It is not necessary to lift the user far above the
bed. Simply swing the user's legs over the edge of the bed and
then move the user to the desired location.
6.7. Lifting from the floor
step 1. Place the user flat on his or her back. Lower the body
support until the cups are located just above the user's
pelvis.

USER GUIDE SUREHANDS®BODY SUPPORT
p. 13EN
step 2. Kneel down behind the user.
step 3. Place the user's head in you lap and use you knees and thighs to
bring the user into a sitting position.
step 4. Reach your arms under the user's arms, grasp the cups, and pull
them back and around the user's chest.
step 5. Use the "UP" button to apply a bit of pressure to the cups so
the user is held securely.
step 6. Now fit the thigh supports. Lift the user.
6.8. Upright care of incontinent users.
step 1. Arrange the user in a sitting position before you lift the user.
step 2. Always fit the safety band around the cups or arms.
step 3. Use only the cups and allow the user to rest his or her feet on
the floor for support. Do not use the thigh supports here.
CAUTION!
the user must contInue to rest hIs or feet on the floor
for support.
the user must be able to carry most of hIs/her body
weIght.
Ifthe user can support hImself or herself wIth theIr feet
on the floor or some other surface, less of theIr weIght
Is carrIed by the cups, whIch also reduces the grIp on
theIr torso. asaresult, the user can slIp free of the cups.
for thIs reason, always use the safety band (see sectIon
3.2. accessorIes). the user must be tested for hIs or her suItabIlIty to stand or walk.
6.9. Walking exercises with the body support
step 1. Arrange the user in a sitting position before you lift the user. Fit the safety band around the cups or
arms.
step 2. Use only the cups and allow the user to rest his or her feet on the floor for support. Do not use the
thigh supports here.

USER GUIDE SUREHANDS®BODY SUPPORT
p. 14EN
CAUTION!
the user must contInue to rest hIs or feet on the
floor for support.
the user must be able to carry most of hIs/her body
weIght.
Ifthe user can support hImself or herself wIth
theIr feet on the floor or some other surface, less
of theIr weIght Is carrIed by the cups, whIch also
reduces the grIp on theIr torso. asaresult, the
user can slIp free of the cups. for thIs reason,
always use the safety band (see sectIon 3.2.
accessorIes). the user must be tested for hIs or her
abIlIty to stand or walk.
7. Maintenance and storage
7.1. Cleaning the body support
Clean the body support regularly with a soft, damp cloth.
The cleaning interval depends on the ambient conditions. Under very damp conditions, you can use a suitable
cleaning product for stainless steel.
7.2. Storing the body support
Hook the thigh supports over the arms of the body support to hold the
arms closed and keep the thigh supports out of the way.
The body support should preferably be stored in a dry place.
8. Inspection
8.1. Inspection by the user (before each use)
■Check the thigh support bands for adequate strength and signs of wear.
■Check the wear of the hooks and the openings in the tubes where the hooks attach to the arms. Check the
inside as well as the outside.
■Check the cups before each use for damage and if they are not loose.

USER GUIDE SUREHANDS®BODY SUPPORT
p. 15EN
CAUTION!
IfeIther of the "arms" or "cups" Is cracked, the hooks or thIgh support bands are worn,
they must be taken out of servIce ImmedIately.
8.2. Annual inspection
■The body support must be inspected at least once a year.
■The inspection may only be carried out by Handi-Move or a technician approved by Handi-Move.
■After the inspection, a report will be prepared documenting the tests that were carried out and the parts that
were replaced.
9. Troubleshooting
■The cup is worn and must be replaced: contact your Handi-Move distributor.
■The thigh support bands show signs of wear:
• you can order thigh support bands under part number 1030 9200 (see 11. Spare parts).
• instructions how to replace the thigh support bands are being included with the new high support bands.
■If the 'hands' are hanging at different heights or are positioned at a different angle in relation to the bars: con-
tact your Handi-Move distributor.

USER GUIDE SUREHANDS®BODY SUPPORT
p. 16EN
10.Technical specications
Material.....................arms...................................................st. steel 316
...................................hooks.................................................st. steel 316
...................................cups.................................................polyurethane
...................................bands.....................................................polyester
...................................thigh support...........................coated aluminium
Height........................Medium (M).....................31.1 inch / 790.00 mm
...................................small (S).........................27.95 inch / 710.00 mm
...................................extra-small (XS).............26.38 inch / 670.00 mm
Width...................................................................18.9 inch / 480.00 mm
A
B
11. Parts list
Part no. 1030 9200 1 thigh support band
Part no. 1072 Hooks
Part no 1077S Standard thigh supports, Small
Part no. 1077M Standard thigh supports, Medium (grey)
Part no. 1077L Standard thigh supports Large
Part no. 1074S Thigh supports, slipproof Small
Part no. 1074M Thigh supports, slipproof Medium (black)
Part no. 1074L Thigh supports, slipproof Large
Part no. 1075M Contour thigh supports, slipproof Medium
Part no. 1076S Muscular dystrophy thigh supports, slipproof for children
Part no. 1076M Muscular dystrophy thigh supports, slipproof
Part no. 1067M Thigh support covers Medium
Part no. 1031M Cup cushion Medium
Part no. 1065 Safety band, Small
Part no. 1069 Safety band, Large
Art 1078M Standaard zit-beensteunen Medium (grijs)
Art 1079S Standaard spierdystrofie-beensteunen voor kinderen
Art 1079M Standaard spierdystrofie-beensteunen anti-slip

USER GUIDE SUREHANDS®BODY SUPPORT
p. 17EN
12.Spare parts, maintenance and yearly inspection
Contact your Handi-Move distributor for spare parts, maintenance, yearly inspection and advice.
For the USA
Distributed Exclusively By:
SureHandS Lift & Care Systems
982 County Route 1
Pine Island, NY 10969
Tel: 800-724-5305
Fax: 845-258-6634
e-mail: info @surehands.com
website: www.surehands.com
For Europe and the rest of the world
Handi-Move nv Ten Beukenboom 13 9400 Ninove Belgium
Tel. + 32 54 31 97 10 – Fax + 32 54 32 58 27
e-mail: [email protected]
website : www.handimove.com

USER GUIDE SUREHANDS®BODY SUPPORT
p. 18EN
13.Limited warranty
This equipment is sold under an exclusive warranty of two (2) years from date of purchase.
The manufacturer warranties the equipment to be free of defects in material and workmanship. We agree to repair or
replace any products, or parts thereof, which have been returned to our factory within the stated warranty period, and
which after examination shall disclose that the product is defective. Batteries are excluded. Transportation charges
to our factory must be prepaid. Return charges for repaired or replaced products will be borne by the factory. Onsite
labor charges are not covered by the manufacturer warranty. Only labor performed on equipment at the Manufactur-
er or Distributor’s facilities will be covered by the manufacturer warranty.
This warranty does not apply if the equipment has been subject to misuse, neglect, accidents, incorrect wiring (not
our own), improper installation, or put to use in violation of instructions furnished by us or repaired or altered by
other than one of our factory authorized representatives without our prior written consent.
We reserve the right to modify or change the equipment in whole or in part, at any time prior to delivery in order to
include refinements deemed appropriate by us, but without incurring any liability to modify or change any equip-
ment previously delivered, or to supply new equipment in accordance with earlier specifications.
Loss or damage must be reported within 14 days after receipt of equipment. Visible loss of or damage to cartons must
be noted at time of delivery on bill of lading or delivery receipt.
This warranty is expressly in lieu of all other warranties expressed or implied. We neither assume, nor authorize any
other person to assume for us, any other liability in connection with the sale or use of this equipment. In no event
shall we be liable for consequential or special damages. We make no warranty whatsoever in respect to accessories or
parts not supplied by us. The warranty may be voided if the warranty card is not completed and returned and it is
only valid to the original purchaser.
This manual suits for next models
7
Table of contents
Other HandI Move Medical Equipment manuals
Popular Medical Equipment manuals by other brands

OCULUS
OCULUS UB 4 instruction manual

Acuson Corporation
Acuson Corporation Aspen Service manual

BOCK
BOCK Stellar Assembly and operation manual

Dräger
Dräger Alcotest 5000 manual

Cincinnati Sub-Zero
Cincinnati Sub-Zero WarmAir 135 Operation & technical manual

OLYMPIC VETERINARY
OLYMPIC VETERINARY 50901 owner's manual