handi quilter TruStitch User manual

USER MANUAL
05/07/12 © 2012 Handi Quilter, Inc.

2 www.TruStitch.com
Table of Contents
Safety Section
TruStitch Regulator Components
Pre-installation Instructions
Installation Instructions
Indicator LED Identication
Activating Stitch Regulation
Machine Operation
Using the Stitch Regulator
TruStitch Accessories
Tips and Techniques
Limited Warranty Coverage
Recommended for Use with the HQ Sweet Sixteen and TruStitch
Page
2
6
6
7
9
10
11
12
13
14
15
16

TruStitch User Manual 3
Important Information
Regulatory Information
is equipment has been tested and found
to comply with the limits for a Class B digital
device, pursuant to part 15 of the FCC Rules.
ese limits are designed to provide reason-
able protection against harmful interference
in a residential installation. is equipment
generates, uses and can radiate radio fre-
quency energy and, if not installed and used
in accordance with the instructions, may
cause harmful interference to radio com-
munications. However, there is no guarantee
that interference will not occur in a particu-
lar installation. If this equipment does cause
harmful interference to radio or television
reception, which can be determined by
turning the equipment o and on, the user is
encouraged to try to correct the interference
by one or more of the following measures:
• Reorient or relocate the receiving antenna.
• Increase the separation between the equip-
ment and receiver.
• Connect the equipment into an outlet on
a circuit dierent from that to which the
receiver is connected.
• Consult the dealer or an experienced radio/
TV technician for help.
is Class B digital apparatus complies
with Part 15 of the U.S. Federal Communica-
tions Commission (FCC) rules, Canadian
ICES-003 and RSS-210. Operation is subject
to the following two conditions: (1) this de-
vice may not cause interference, and (2) this
device must accept any interference received,
including interference that may cause unde-
sired operation.
e term “IC:” before the certication/
registration number only signies that the
Industry Canada technical specications
were met.
Réglementations
Cet appareil numérique de la classe B est
conforme aux norms NMB-003 et CNR-210
du Canada. Son fonctionnement est assujetti
aux deux conditions suivantes: (1) Cet ap-
pareil ne puet pas provoquer d’interférences
nuisibiles et (2) cet appareil doit accepter
toute interference recue, y compris les
interferences pouvant entraîner un fonction-
nement non desire.
L’expression «IC:» avant le numéro
d’homologation/enregistrement signee
seulement que les specications techniques
édictées par Industrie Canada ont été
respectées.
Radio Frequency Interference
is product uses the unlicensed Indus-
trial, Scientic and Medical (ISM) radio
band, which begins at 2.400 GHz and
extends to 2.483 GHz. Many commonly used
products also share this band, including
WiFi (wireless) network routers and cordless
telephones. Correct and consistent opera-
tion of this product may be aected by these
conicting devices.
RF Technical Specications
RF Output Power: < 92 dbµV/m at 3m
Radio Band: 2.400 GHz to less than 2.483
GHz.
Radio Channels: 34 channels, auto selec-
tion.
Laser Safety Information
CLASS 1 Laser Product
e TruStitch™ controller contains an invis-
ible laser device that complies with stringent
safety requirements. e product meets the
U.S. DHHS and IEC 60825-1 laser safety
standard requirements for and is classied as
a Class 1 laser product. Under this classica-
tion, Class 1 denotes lasers whose radiation
does not pose a hazard under normal or
single fault conditions. ere is no risk to
eyes including use of an optical instrument.
ere is no risk to skin.
Safety Considerations
WARNING: To protect against risk of
re, bodily injury, electrical shock or
damage to the product:
• Do not immerse any part of this product in
water or other liquid.
• Do not spray liquid on this product or al-
low excess liquid to drip inside.
• Do not use this product if it has sustained
damage, such as a damaged cord or plug.
• Clean only with a damp cloth. Use water
and a light detergent such as dishwashing
detergent if needed.

4 www.TruStitch.com
Informations générales en
matiére de sécurité
AVERTISSEMENT: Pour protéger
contre tout les risques de feu, bles-
sures corporelles, chocs électrique ou risque
d’endommager ce produit.
• Ne pas immerger aucune partie de ce pro-
duit dans l’eau ou tout autre liquide.
• Ne jamais vaporiser cette machine ou per-
mettre un excès de liquide de tomber goûte à
goûte a l’intérieur.
• Ne jamais utiliser la machine si elle a été
endommagée, tel que corde électrique ou
prise de courant avarié.
• S’il est nécessaire de nettoyer la machine,
un torchon humide avec un détergent léger
(tel qu’un détergent vaisselle) surais.
Environmental Considerations
Recycling Information
Handi Quilter recommends that customers
dispose of their used electronic products in
an environmentally sound manner. Potential
methods include reuse of parts or whole
products and recycling of products, compo-
nents and/or materials.
Waste Electrical and Electronic
Equipment (WEEE) Directive
In the European Union, this label
indicates that this product should not
be disposed of with household waste. It
should be deposited at an appropriate
facility to enable recovery and recycling. For
information on how to recycle this product
in your country, contact your Handi Quilter
Dealer.
Important Battery Information
Caution – Do not attempt to replace the
battery. Your warranty is void if you at-
tempt to do so. Contact Handi Quilter or an
authorized Handi Quilter representative for
battery replacement.
General Precautions
• Keep batteries out of the reach of children.
• If a battery leaks, remove the battery and
recycle or dispose of it in accordance with
the local and national disposal regulations.
Special Precautions
e precautions below are to prevent the
sudden release of electrolytes, which these
prohibited actions can cause:
• Do not install batteries incorrectly.
• Do not open, puncture, or mutilate a bat-
tery.
• Do not heat batteries.
• Do not use a re to dispose of batteries.
Released battery electrolyte is corrosive, can
cause damage to the eyes and skin, and may
be toxic if swallowed.
Battery Disposal
WARNING: Do not dispose of the
battery in a re or with household
waste. Contact your local waste disposal
agency for the address of the nearest bat-
tery deposit site.
e TruStitch™ controller uses a recharge-
able Lithium-ion battery for power. Do not
attempt to replace this battery. e battery
may only be replaced at the factory or by
authorized, trained Handi Quilter represent-
atives. Contact Handi Quilter should you
require a battery replacement.
Do not dispose of the product’s battery in
a re or with household waste. Battery cells
may explode. Discard a used battery accord-
ing to the manufacturer’s instructions or
contact your local waste disposal agency for
disposal instructions. Dispose of a spent or
damaged battery promptly.
Consignes concernant les batteries
AVERTISSEMENT: ne jetez pas la
batterie au feu ni avec les ordures
ménagères. Contactez le service municipal
de traitement des déchets pour connaître
l’adresse du site de depot de batteries le
plus proche.
Le TruStitch™ controller utilise une pile
lithium rechargeable pour son énergie.
N’essayez pas de remplacer la pile. La Pile
(ou batterie) doit être remplacée à l’usine
par un représentant autorise et entraîné par
Handi Quilter. Contactez Handi Quilter si
vous avez besoin de remplacer la pile (bat-
terie).
Ne jetez pas la batterie de votre produit
au feu ni avec les ordures ménagères. Les

TruStitch User Manual 5
elements de la batterie risquent d’exploser.
Débarrassez-vous de la batterie usagée selon
les instructions du fabricant ou contactez le
service municipal de traitement des déchets
an de connaître les instructions de mise au
rebut. Débarrassez-vous rapidement d’une
batterie usagée ou endommagée.
Batteries Directive
In the European Union, this label
indicates that batteries in this product
should be collected separately and not
be disposed of with household waste.
Substances in batteries can have a potential
negative impact on health and environment
and you have a role in recycling waste batter-
ies, thus contributing to the protection, pres-
ervation, and improvement of the quality of
the environment. You should contact your
local authority of retailer for details of the
collection and recycling schemes available.
Health Warning
When using this product, as with many
activities, you may experience occasional
discomfort in your hands, arms, shoulders,
neck, or other parts of your body. However,
if you experience symptoms such as persist-
ent or recurring discomfort, pain, throb-
bing, aching, tingling, numbness, burning
sensation, or stiness, DO NOT IGNORE
THESE WARNING SIGNS. PROMPTLY
SEE A QUALIFIED HEALTH PROFES-
SIONAL, even if symptoms occur when you
are not working with the product. Symptoms
like these can be associated with painful and
sometimes permanently disabling injuries
and disorders of the nerves, muscles, ten-
dons, or other parts of the body. ese musc-
uloskeletal disorders (MSDs) include carpal
tunnel syndrome, tendonitis, tenosynovitis,
and other conditions.
Avertissement de la Santé
En utilisant ce produit, comme avec de
nombreuses activités, vous pouvez ressentir
des douleurs dans vos mains, bras, épaules,
cou, ou d'autres parties de votre corps.
Cependant, si vous ressentez des symptômes
tels qu'un malaise persistant ou récurrent, la
douleur, lancinante, des douleurs, des picote-
ments, des engourdissements, sensation
de brûlure ou une raideur, ne pas ignorer
ces signes d'avertissement. CONSULTEZ
RAPIDEMENT UN MÉDECIN, même si
les symptômes se produisent lorsque vous ne
travaillez pas avec le produit. Les symptômes
tels que ceux-ci peuvent être associées à des
blessures douloureuses et parfois une inva-
lidité permanente et des troubles des nerfs,
muscles, tendons, ou d'autres parties du
corps. Ces troubles musculo-squelettiques
(TMS) sont le syndrome du tunnel carpien,
la tendinite, la ténosynovite, et d'autres
conditions.
Product Description
e TruStitch™ stitch regulator is de-
signed to turn the HQ Sweet Sixteen™ into
a stitch-regulated quilting machine. It uses
patent-pending technology to track your
sewing motion and thereby regulate the
stitch lengths as you move the fabric around
the table. e TruStitch™ controller uses
high-resolution, optical tracking and radio
frequency circuitry to follow your every mo-
tion while quilting. e TruStitch receiver
receives the motion information from the
TruStitch controller and converts it to a for-
mat the HQ Sweet Sixteen can use to control
the stitching speed.
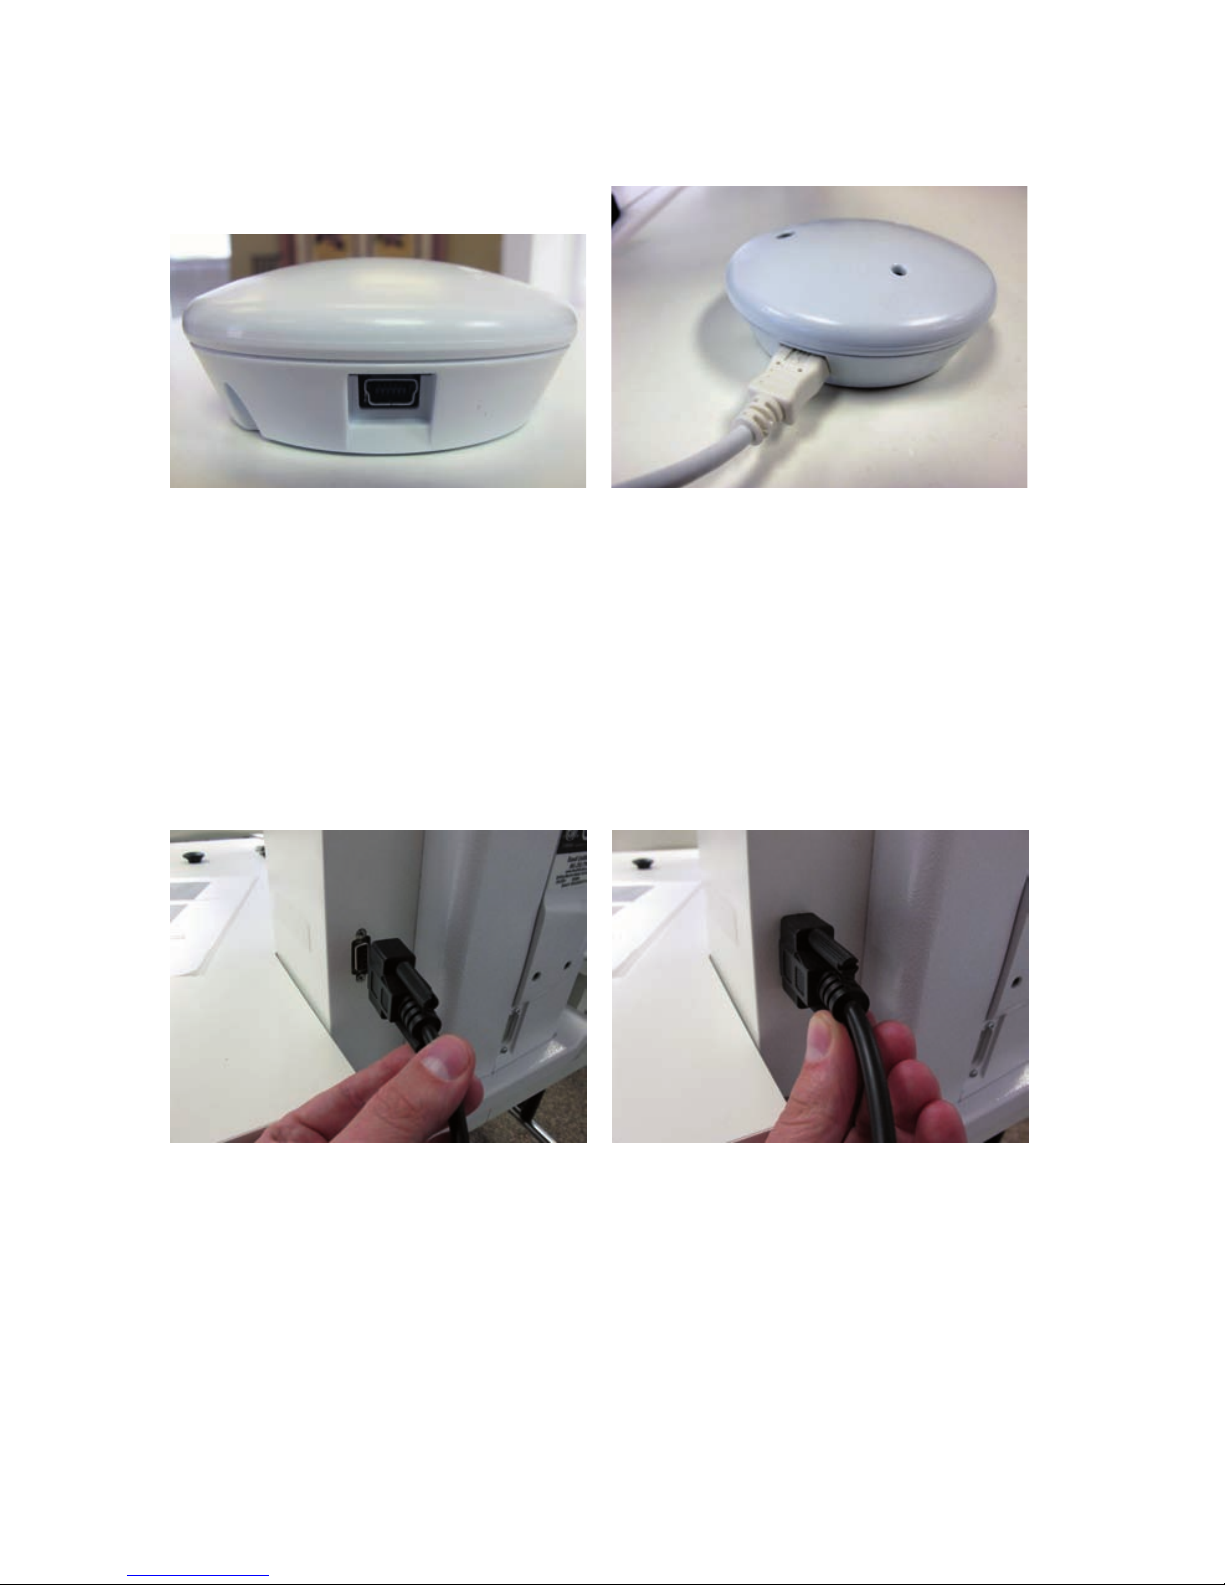
e TruStitch controller contains a long-
life, rechargeable Lithium-ion battery for
wireless operation. A charging cable is
provided to connect the USB-B type connec-
tor on the TruStitch controller to the USB-A
type connector on the TruStitch receiver to
recharge the battery. e TruStitch controller
may still be used for quilting while charg-
ing if care is taken to avoid piercing the
charge cable with the needle. e TruStitch
receiver is powered with a power module.
A machine interface cable connects the
TruStitch receiver to the foot pedal connec-
tor on the machine. e foot pedal plugs into
the TruStitch receiver and acts to enable the
stitch regulation when in regulation mode.

6 www.TruStitch.com
TruStitch Regulator Components
Verify Compatibility
Before connecting the TruStitch Stitch
Regulator to the HQ Sweet Sixteen,
verify that your machine is compat-
ible. Power up your machine, press the
“More” button and select the “System
Info” button. e System Information
screen will appear. Look at the C-pod
Firmware version. If the version is 3.17
or later, you will not need to update
your machine C-pod and display. If the
version is lower than this you will need
an update.
To update your machine, you will
remove the display and C-Pod from the
machine, package them well and ship
them to Handi Quilter. But, rst, call
your HQ Rep or Handi Quilter to make
an appointment for the factory-installed
update, to ensure a quick turnaround
time.
Battery Charging
e battery on the TruStitch Con-
troller may not be fully charged when
the product arrives.
It is a good idea to plug the charging
cable into the Controller and Receiver
and then plug the wall power module
into the Receiver to start the charging.
A blue light will be seen through one
of the clear dots on top of the Control-
ler while it is charging. When that blue
light disappears, the Controller is fully
charged and ready for use.
Figure 1. TruStitch Components
Pre-installation Instructions
Machine Interface
Cable
TruStitch Receiver
Adapter Power Module
TruStitch
Controller
USB-Style Controller
Charging Cable (may
be white or black)
Coaster
Magnet

TruStitch User Manual 7
Installation Instructions
1. Install each cable into the appropri-
ate connector or port (Figures 2 & 3).
Please note that the Machine Interface
Cable has one end that is identical to the
Figure 2. TruStitch Receiver Connectors/Ports/Switch
Figure 3. All Cables Installed
Power Module
Cord
Controller Charging Cable
Foot Pedal Cable
(supplied with your
machine) Machine Interface
Cable
Foot Pedal Connector. Be sure to install
the other (round) end into the Receiver
as shown in Figure 3.
Power Module Connector (DC IN)
Foot Pedal Connector (FOOT
PEDAL)
Machine Interface Cable Port
(MACHINE)
Controller Charging Port (USB
CHARGER)
OFF/ON Switch

8 www.TruStitch.com
2. Install remaining end of Controller
Charging Cable into the Controller as
shown in Figures 4 & 5.
Figure 5. Charging cable in-
stalled. Note at on cable is up.
Figure 4. USB Mini-B style charg-
ing port on the TruStitch Controller.
3. With the machine and TruStitch
Controller turned o, install the Ma-
chine Interface Cable Connector to the
machine foot pedal port (Figure 6). Se-
cure the connector by turning the screw
shas (Figure 7).
Figure 6. Figure 7.
4. e TruStitch Receiver may sit on
top of the table or on the shelf below the
table. It may also be attached to the ma-
chine using the Velcro® strips provided,
to secure it to the side of the control or
power pod.
5. Plug the power module into a power
outlet and turn units on in the following
order:
1. Machine
2. TruStitch Receiver
3. TruStitch Controller

TruStitch User Manual 9
Both the TruStitch Controller and
Receiver have indicator LEDs to guide
the user.
1. e Controller has a ashing
WHITE LED that ashes only in low
light conditions, such as when it is un-
der the quilt. is helps the quilter nd
the Controller. e light shuts o when
the Controller is in full light.
e second LED turns YELLOW when
the Controller needs to be charged.
It turns BLUE during charging and
turns OFF when the Controller is fully
charged (Figure 8).
2. e Receiver has three Indicator
LEDs.
e le LED FLASHES RED when it
is powered on, but not connected to the
machine and/or the Controller.
e middle LED lights up YEL-
LOW when the Controller needs to be
charged. It turns o when charging.
e right LED lights BLUE when the
unit is powered on. See Figure 9 for
placement of these LEDs.
Indicator LED Identication
Figure 8.
Finder LED
Charge Indicator LED
Figure 9. Receiver Indicator LED Placement
Left: Connection Indicator LED
(ashes RED when no connec-
tion)
Middle: Charge Indicator LED
(turns YELLOW when Controller
needs charging)
Right: Power Indicator LED (turns
BLUE when Receiver is powered
on)
White
Yellow/
Blue
Light Sensor

10 www.TruStitch.com
Activating Stitch Regulation
Display Screens Information
e following information assumes you
have received and installed the display
and pod updates. See “Verify Compat-
ibility” on Page 6 for more information.
1. Once the machine is powered up
and the power module for the TruStitch
Receiver is plugged in, the machine will
recognize that the Stitch Regulator is
installed and will display a screen that
looks like Figure 10.
Manual Mode
e two buttons on the le side of the
display are the Stitch Mode selectors,
“Regulated” and “Manual”. Selecting
“Manual” will allow the machine to
operate without stitch regulation. In this
mode, you have access to the stitching
speed Presets and other features that are
standard with the HQ Sweet Sixteen.
Regulated Mode
Pressing the “Regulated” button will
change the display, replacing the “Speed
Adjustment” and “Preset” sections of the
screen with a “Stitches-Per-Inch” section
and a “Cruise” section (Figure 11).
A “Play/Pause” button is also added
above the “More” button on the center-
right side of the screen to allow machine
operation without having to press the
foot pedal (Figure 11).
Figure 10. HQ Sweet Sixteen Main
Screen.
Figure 11. Stitch-Regulation Screen
Manual
Up
Down
Stitch Mode
Needle Stop
More
Limit
DOWN
UP DOWN
UP
Manual 86 %
25 %
25%
25%
25%
Regulated
Manual
Stitch Mode
More
DOWN
UP DOWN
UP
Up
Down
Needle Stop
Regulated 10 SPI
Regulated
SPI
Cruise
3%

TruStitch User Manual 11
Figure 11. Stitch-Regulation Screen
Machine Operation
Manual Mode
When in manual mode, depressing
the foot pedal will cause the sewing
speed to increase, until the pedal is fully
depressed, at which point, the machine
speed matches the top speed setting.
Stitch-Regulated Mode
Turn the TruStitch Controller on by
using the switch on the bottom of the
Controller. A bright white light will
ash until it makes radio contact with
the TruStitch Receiver. Once contact
is made, ashing will only occur if the
ambient light is low, such as when you
have the Receiver under the fabric.
Two Ways to Start/Stop in Stitch-
Regulated Mode
Foot Pedal
In stitch-regulated mode, the foot
pedal acts as a “Regulation Start” switch.
Once sewing is started by depressing
the foot pedal, pressing the foot pedal
further will have no aect on the sewing
speed. e pedal acts as a simple on-o
switch.
Play/Pause Button
ere is also a “foot pedal-free”
mode of regulated operation with the
TruStitch Stitch Regulator. When in
Regulated mode, a “Play/Pause” button
can be found on the main screen at the
center-right of the screen (Figure 11
on Page 10). is button can be used
to start and stop regulated operation
in place of the foot pedal. Please note
that the foot pedal must still be plugged
into the Receiver for the TruStitch to
work.
Two Styles of Stitch Regulation
Cruise
e default Stitch-Regulation Style is
called Cruise. When in Cruise stitching
mode, depressing the pedal will start the
machine at the dened Cruise (starting)
speed. As the fabric and the TruStitch
Controller are moved together, the ma-
chine will regulate the machine speed,
when the Controller motion is faster than
the Cruise speed setting. It speeds up as
you do, maintaining the Stitches-Per-
Inch stitch length that you’ve chosen (see
Using the Stitch Regulator, Page 12).
Using Cruise style allows you to ease
gently into your stitching, creating
smoother starts and stops. It is the best
style choice for most quilting methods.
Precision
Setting the Cruise speed to 0 will auto-
matically engage the Precision Style of
Stitch Regulation.
When in Precision stitching style, de-
pressing the pedal (or pressing the Play/
Pause Button) activates the machine and
starts regulation but the machine does
not start sewing yet.
e status box on the top center part
of the screen will turn from red to green
to indicate the machine is active.
Moving the TruStitch Controller with
the fabric will start the machine stitch-
ing. When the Controller stops moving,
the machine stops stitching, possibly
in mid-stroke. e default Needle Up/
Down choice is overridden by Precision.
Releasing the pedal or pressing the
Pause/Play button stops machine opera-
tion nd moves the needle to the chosen
Needle Up/Down position.
Choosing a non-zero Cruise value will
re-engage the Cruise setting.

12 www.TruStitch.com
e TruStitch Controller is designed
to track the motion of the Controller
across the table, not the motion of the
fabric during quilting. For proper stitch
regulation, always keep the controller
moving with the fabric as described
below.
1. Place the Controller on the table sur-
face, under the quilt sandwich, either to
the right or le side of the machine head
during operation (Figure 12).
2. Position the Controller in the area
where you would typically hold the
fabric when free-motion quilting.
3. Use your hands to hold the quilting
area taut beneath the needle of the ma-
chine. As you move the quilt sandwich,
maintain contact with the Controller
through the fabric with the palm of
the hand or directly with ngers of the
hand.
4. Keep the fabric at between your
hands and move both hands together
while keeping them parallel to your
body. It is best to start your experi-
ence with the Stitch Regulator by using
Cruise style set to a low speed percent-
age setting.
TIP: ink of moving the fabric in the
compass directions: North, South, East,
West. Remember that your quilting will
mimic the speed and direction of the
Controller, but only if you keep your
hand motions parallel to the needle and
to the table edge (Figure 13).
Do not move the Controller in a circle
around the needle. If you do, the needle
will make multiple stitches in one place,
as it tries to keep up with the movement
of the Controller (Figure 14).
Using the Stitch Regulator
Figure 12.
Figure 13. Move quilt north,
south, east and west.
Figure 14. Don’t rotate quilt.

TruStitch User Manual 13
TruStitch Accessories
Two Accessories are provided with the
TruStitch Stitch Regulator to give the
quilter more exibility in quilting.
Magnet
1. e Magnet allows you to quilt
“hands-free” without holding onto the
Controller through the quilt sandwich.
Place the Controller on the table, just
outside of where you wish to place your
hands. Place the Magnet on top of the
Controller and on the top of the quilt
sandwich (Figure 15).
Free-motion quilt as usual while keep-
ing your hands close to the Controller.
e Controller will move with the quilt
sandwich, regulating your stitch length.
WARNING: If the quilt sandwich is
extremely so, you may not be able to
use the Magnet, because the Controller
won’t be able to follow the motion of
your hand if the fabric sandwich buckles
between your hand and the Controller.
Most quilt sandwiches are sti enough
to allow you to use the Magnet.
Coaster
1. e Coaster allows you to quilt close
to the edge of the quilt without losing
stitch-regulation.
Attach the Coaster to the edge of the
quilt sandwich using the two clips. e
clips were designed for one-handed
action. Place the Coaster on the table,
press on both clips at the same time with
one hand. Use the other hand to slide
the quilt edge into the clips, then release
the clips (Figure 16).
Free-motion quilt as usual while keep-
ing your hands close to the Controller.
e Controller will move with the quilt
sandwich, regulating your stitch length.
WARNING: If the quilt sandwich is
Figure 15.
Figure 16.
extremely so, you may choose to fold
the edge of the quilt sandwich to stien
it slightly.

14 www.TruStitch.com
Tips and Techniques
1. Don’t twist the fabric under the nee-
dle, as this will cause the needle to sew
faster or slower than it should and you
will not maintain regulation. As long as
the fabric remains in the same orienta-
tion relative to your body while quilting,
the regulation will be accurate.
2. When you have nished a section
of quilting, readjust the position of the
TruStitch Controller to make the next
section easier to work on. Don’t try to
quilt large sections of the quilt at one
time. Work within a space no farther out
than 6”-15” from the needle.
3. Cruise speed can help you keep
the needle in motion and prevent long
stitches e.g. when doing zigzag, star or
circular patterns.
4. Adjusting your Cruise speed will
give you better results. Experiment with
dierent percentages to nd the level
you like best for each quilting method.
For example, micro-stippling with a
high stitches-per-inch count will require
a higher percentage setting than stitch-
in-the-ditch.
5. When using rulers hold the Con-
troller next to the ruler and move the
ruler with both hands. As you adjust the
ruler, adjust the Controller as well. Some
quilters prefer to use the Magnet when
doing ruler work. Don’t forget to release
the foot pedal or press the Pause button
before moving the controller.
6. A hoop may be used in conjunction
with the Controller for better control of
the fabric being sewn. You can hold the
Controller just outside of the hoop with
your hand or with the Magnet.
7. If you are using a higher stitches-
per-inch setting and the Cruise speed is
set to zero, it is recommended that you
keep the Controller closer to the needle.
Be careful not to let the Controller hang
up on the needle plate.
8. Because the Controller senses its
motion across the table top, it is impor-
tant that it never be allowed to pass over
the gap in the table behind the needle
where the HQ Sweet Sixteen arm is
placed. is gap will cause a break in
the information sent to the Receiver and
will result in unevent stitches.
For the same reason, make sure the
Controller doesn’t extend past the edge
of the table (which could happen when
using the Coaster).
More Help Online
Handi Quilter believes in education.
Go to www.TruStitch.com for videos,
tips and techniques for using TruStitch.
Check back oen, as we will continue to
add more information on a regular
basis. Ask questions and share your
ideas on the HQ Forum at
www.HandiQuilter.com/forum.

TruStitch User Manual 15
If your product does not work properly
because of a defect in materials or work-
manship, Handi Quilter Inc. (hereaer
referred to as “the warrantor”) will, for the
length of the period indicated on the chart
below, which starts with the date of original
purchase ("Limited Warranty period"), at its
option either (a) repair your product with
new or refurbished parts, or (b) replace it
with a new or a refurbished product. e
decision to repair or replace will be made by
the warrantor.
PRODUCT: TruStitch
ALL PARTS : 1 (ONE) YEAR
LABOR: 1 (ONE) YEAR
SERVICE: AT FACTORY AUTHORIZED
REPRESENTATIVE
During the "Labor" Limited Warranty period
there will be no charge for labor. During the
"Parts" Limited Warranty period, there will
be no charge for parts. You must carry-
in your product to a factory authorized
representative during the Limited Warranty
period. is Limited Warranty only applies
to products purchased and serviced in the
United States. Authorized distributors in
other countries may set their own warranty
policy. is Limited Warranty is extended
only to the original purchaser and only cov-
ers product purchased as new. A purchase
receipt or other proof of the original pur-
chase date is required for Limited Warranty
service.
Limited Warranty Limits and Exclusions
is Limited Warranty ONLY COVERS fail-
ures due to defects in materials or workman-
ship, and DOES NOT COVER normal wear
and tear or cosmetic damage. e Limited
Warranty ALSO DOES NOT COVER dam-
ages which occurred in shipment, or failures
which are caused by products not supplied
by the warrantor, or failures which result
from accidents, misuse, abuse, neglect, mis-
handling, misapplication, alteration, faulty
installation, improper maintenance, power
line surge, lightning damage, modica-
tion, or rental use of the product, service by
anyone other than a Factory Service center
or other Authorized Servicer, or damage that
is attributable to acts of God.
THERE ARE NO EXPRESS WARRANTIES
EXCEPT AS LISTED UNDER "LIMITED
WARRANTY COVERAGE". THE WAR-
RANTOR IS NOT LIABLE FOR INCIDEN-
TAL OR CONSEQUENTIAL DAMAGES
RESULTING FROM THE USE OF THIS
PRODUCT, OR ARISING OUT OF ANY
BREACH OF THIS LIMITED WARRANTY.
(As examples, this excludes damages for lost
time, cost of having someone remove or re-
install an installed unit if applicable, or travel
to and from the servicer. e items listed are
not exclusive, but are for illustration only.)
ALL EXPRESS AND IMPLIED WAR-
RANTIES, INCLUDING THE LIMITED
WARRANTY OF MERCHANTABILITY,
ARE LIMITED TO THE PERIOD OF THE
LIMITED WARRANTY.
Some states do not allow the exclusion or
limitation of incidental or consequential
damages, or limitations on how long an
implied Limited Warranty lasts, so the exclu-
sions may not apply to you.
is Limited Warranty gives you specic
legal rights and you may also have others
rights which vary from state to state. If a
problem with this product develops during
or aer the Limited Warranty period, you
may contact your authorized representative
or the warrantor. If the problem is not han-
dled to your satisfaction, then contact the
warrantor’s Customer Relations group at the
phone number listed for the warrantor.
PARTS AND SERVICE WHICH ARE NOT
COVERED BY THIS LIMITED WAR-
RANTY ARE YOUR RESPONSIBILITY.
Limited Warranty Coverage

Handi Gadgets Rulers and
Templates
Recommended for Use with the HQ Sweet Sixteen
and TruStitch
Visit your local Handi Quilter retailer or HandiQuilter.com to purchase the fol-
lowing recommended tools and accessories.
Horizontal Spool Pin
Open-Toe Hopping Foot
Table Overlay
e HQ Sweet Sixteen Table Over-
lay covers the entire table with a slick
surface that allows the quilt sandwich
to glide. At the same time, it covers the
gap where the machine is set into the
tabletop, allowing the TruStitch Con-
troller to operate in the area behind the
needle without interruption in stitch
regulation.
Available July, 2012, from your Handi
Quilter retailer or at HandiQuilter.com.
© 2012 Handi Quilter, Inc. All rights reserved. Printed in the USA. 05/07/12
Handi Quilter, Inc
445 N. 700 W.
North Salt Lake, UT 84054
1-877-697-8458
www.handiquilter.com
Table of contents
Other handi quilter Sewing Machine Accessories manuals