Hanhart PRISMA 200 User manual

PRISMA 200
PRISMA 400
INSTRUCTION BOOK & GUARANTEE


DEUTSCHENGLISHFRANÇAISITALIANOESPA ÑOL
1
BEDIENUNGSANLEITUNG & GARANTIE 3
Quarzgesteuerte Tischstoppuhren
PRISMA 200, PRISMA 400
INSTRUCTION BOOK & GUARANTEE 17
Quarz table stopclock
PRISMA 200, PRISMA 400
MODE D‘EMPLOI & GARANTIE 31
Compteur de table quarz
PRISMA 200, PRISMA 400
ISTRUZIONI PER L'USO E GARANZIA 45
Cronometri da tavolo al quarzo
PRISMA 200, PRISMA 400
INSTRUCCIONES DE USO Y GARANTÍA 59
Cronómetros de mesa de cuarzo
PRISMA 200, PRISMA 400

Wir übernehmen für diese
HANHART -Stoppuhr
NO. ___________________________
welche unter Beachtung sorgfältigster Arbeits- und Kontroll-
methoden bei Verwendung nur besten Materials von Spezialisten
hergestellt worden ist, eine Garantie von
2 (zwei) Jahren.
Sollten sich innerhalb dieser Zeit Mängel ergeben, die auf Fabrika-
tionsfehler oder schlechtes Material zurückzuführen sind, so wird
unter Vorlage dieses Garantiescheines kostenlose Instandsetzung
oder Umtausch vorgenommen. Fehler infolge falscher Behandlung
sowie Schäden, die durch ausgelaufene Batterien entstanden sind,
sowie die Batterien selbst, fallen nicht unter die Garantie.
Verkäufer und Mitgarant: ________________________________
verkauft am: __________________________________________
DEUTSCH
QUALITY MADE
IN THE HEART OF
BLACK FOREST
3

PRISMA200 Technische Daten
Temperaturbereich
- im Einsatz -10 bis +55°C
- bei Lagerung -20 bis +60°C
Batterie
- Typ Mignonzelle AA (R6)
- Kapazität ca. 1,5 Jahre
- Kontrolle Beim Absinken der Batteriespannung auf
einen kritischen Wert wird das Funktions-
fenster blinkend dargestellt. Danach steht
noch eine Gangreserve von mehr als 30 h zur
Verfügung
Display 6 Digit, Ziffernhöhe 22/8 mm
Batterie einlegen bzw.
wechseln:
- Batteriedeckel in der
Bodenplatte nach hin-
ten ausrasten
- Batterie (IEC R6-AA)
einlegen und dabei auf
richtige Polung achten
- Batteriedeckel wieder
einrasten
- Uhr nullstellen und
Uhrzeit neu eingeben
(siehe unter h „Setzen der
Uhrzeit“)
Gehäuse ABS, Durchmesser 115 mm
Gewicht 390g
Genauigkeit +/-7 Sek./Monat
Zeitauflösung 1/10 Sek. oder 1/100 Min.
Funktionen - 2 Timer, wahlweise als UP oder Down-Counter
verwendbar
mit separatem START/STOP pro Timer
und gemeinsamen START/STOP
- automatischer und manueller Repeat
- Umschaltbare Zeiteinheit
- Uhrzeit
Tasten - 1 START/STOP-Taste
- 2 START/STOP pro Timer
- 1 DISPLAY SELECT (Auswahl von Timer 1- 2 u. Uhrzeit)
- 1 SET/DIGIT (Setzen von Timer u. Uhrzeit) bzw.
- AUTO-REP (Auto-Repeat)
- 1 FLYBACK-Taste (auf Gehäuseoberseite)
Alarm - Regelbare Lautstärke
- Max Lautstärke: 100 dB
- Piezo-Alarmgeber mit -3, -2, -1 Sek.
- Vorsignal von 100 ms Dauer
Sekunde
oder
Minute
Uhrzeit
SET - FLYBACK - RESET
Prisma 200
INTERVAL UP - DOWN COUNTER
2 PRECISION TIMERS
DEUTSCH
5

DEUTSCH
SUCHINDEX
a) Reset
b) Umschalten der Zeiteinheit SEK-MIN
c) Start/Stop-Funktion
d) Stoppuhr, Countdown und Uhrzeit
e) Repeat-Funktionen
f) Automatik-Funktion
g) Vorsetzen einer Countdown-Zeit
h) Setzen der Uhrzeit
a) Reset (Nullstellen)
Durch gemeinsames Drücken der Tasten START/STOP- und der
RESET Taste auf der Gehäuseoberseite. Dabei werden alle Zei-
ten und Vorgabespeicher gelöscht. Die Uhrzeit bleibt erhalten.
In der Anzeige ist Timer 1 sichtbar.
b) Umschalten der Zeiteinheit
Drücken und festhalten der Taste SET/DIGIT bei gleichzeitigem
Reset der Uhr mittels den Tasten START/STOP und RESET auf
der Gehäuseoberseite (siehe auch unter a) RESET).
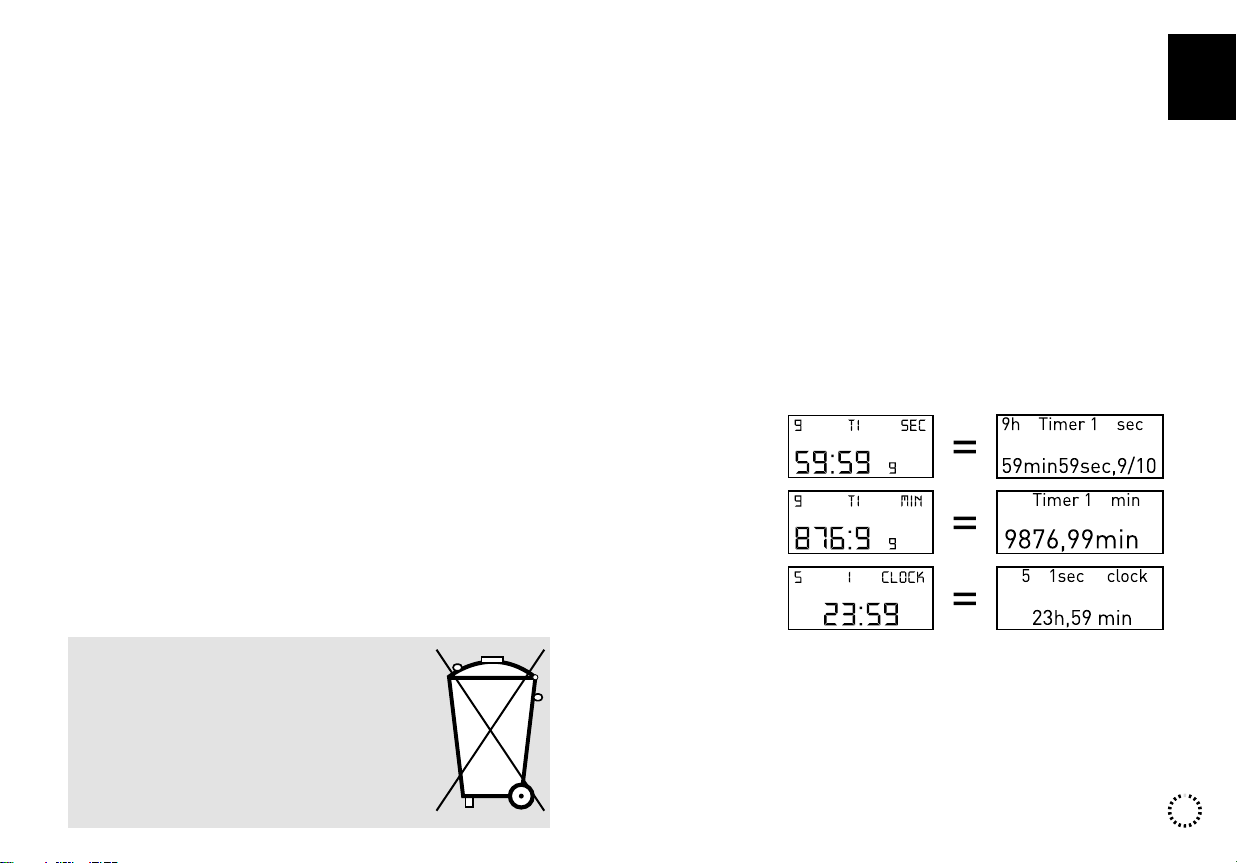
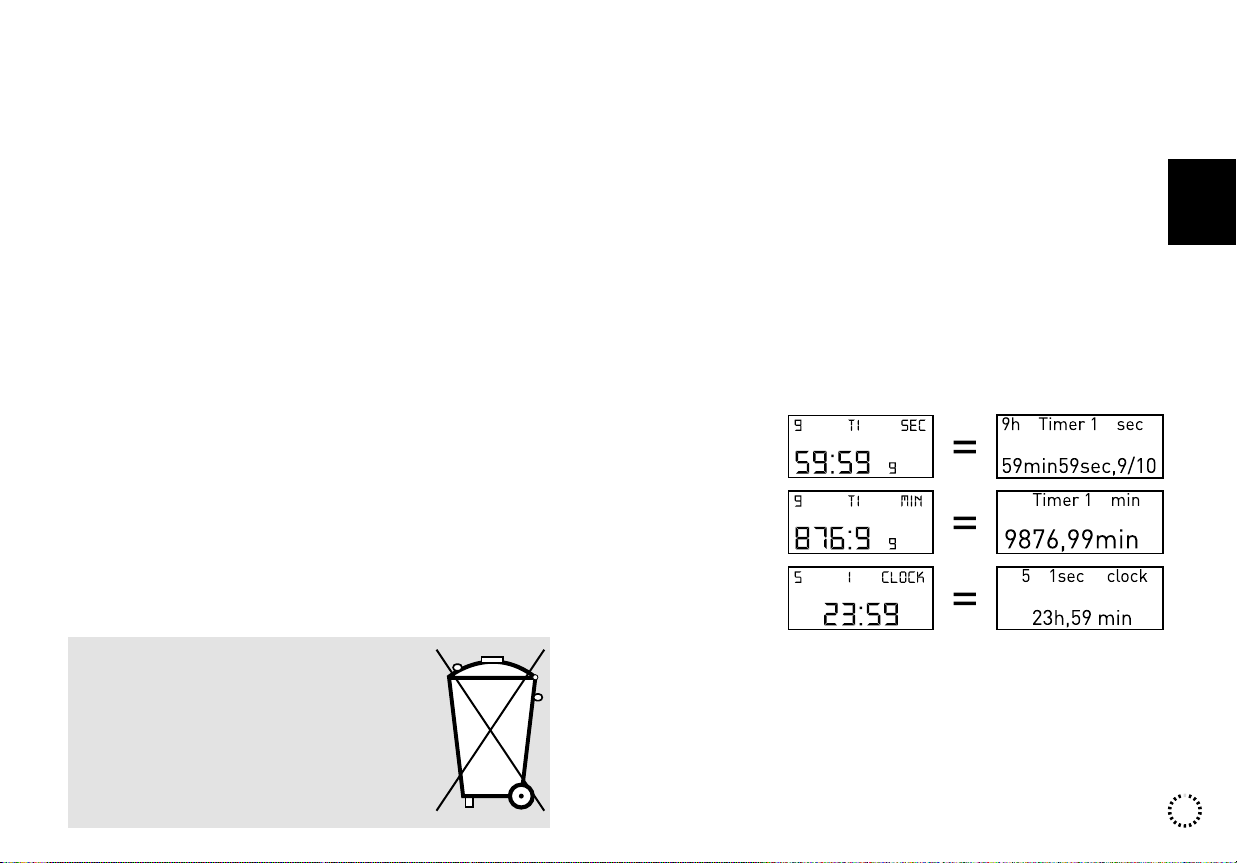
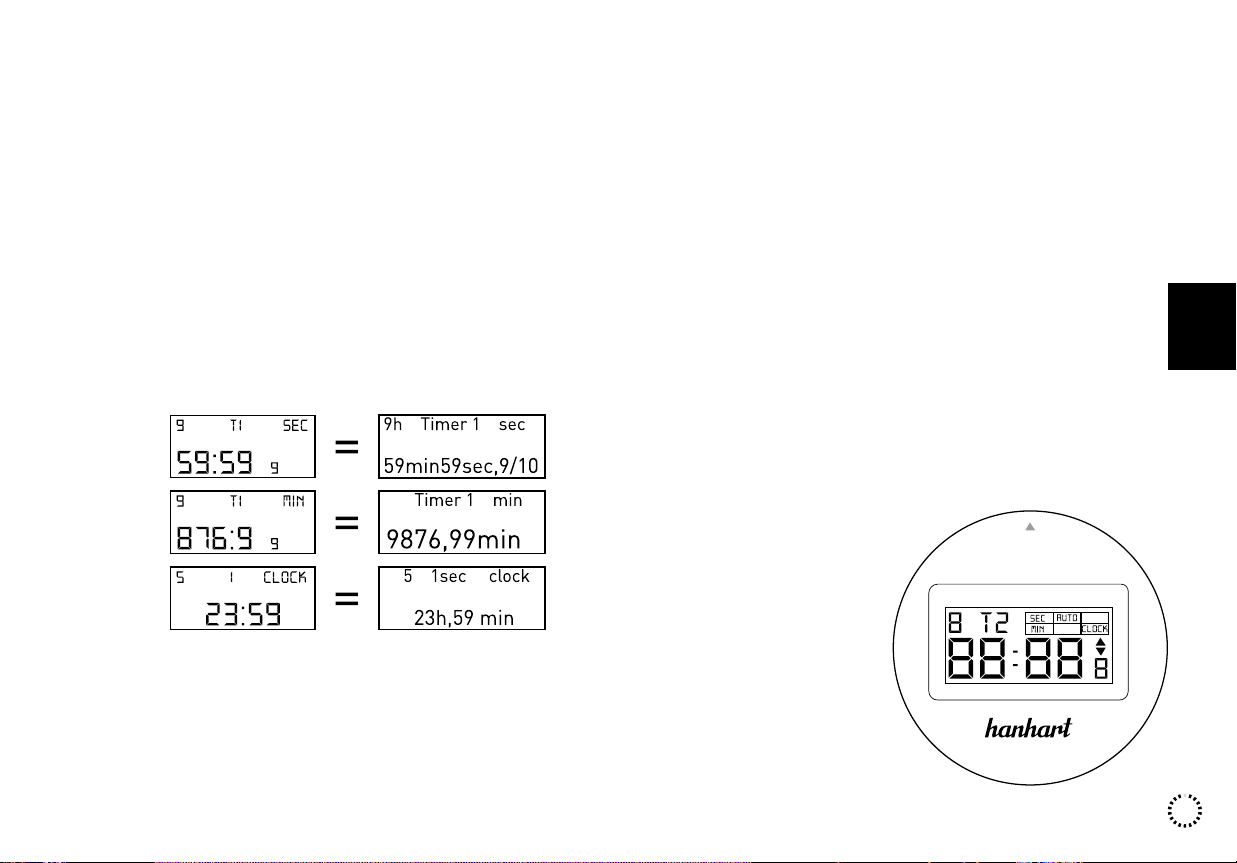
Die eingestellte Zeiteinheit wird im Display bestätigt mit
sec. für 9 h, 59 min, 59 Sek, 9/1O Sek
oder min. für 9999,99 min.
c) Start/Stop-Funktion
- Gemeinsamer START oder STOP beider Timer mittels der
großen START/STOP-Taste.
- Separate Start/Stop-Funktion mit Hilfe der Tasten: TIMER 1
und TIMER 2. Ein aktiver Timer ist im Display durch das Symbol
;t ersichtlich.
d) Stoppuhr, Countdown und Uhrzeit
- Mittels der Taste DISPLAY SELECT wird abwechselnd die Uhr-
zeit (Symbol CLOCK), Timer 1 (T 1) oder Timer 2 (T 2) aktiviert.
- Ist ein Timer beim Erststart (Start/Stop, Timer 1, Timer 2) nicht
vorgesetzt, läuft dieser im normalen Stoppuhrenmodus in
positive Richtung.
- Im Falle eines vorgesetzten Timers läuft dieser vom eingege-
benen Wert nach unten (Countdown) und aktiviert bei -3, -2,
-1 Zähleinheiten ein kurzes Vorsignal und beim Wert „O" ein
längeres Null Signal. Sofern der AUTO-REP-Mode eingeschal-
tet ist, wechselt die Kontrolle zum nächsten Timer (siehe Index
f), andernfalls wiederholt sich der auslösende Timer beim
vorgesetzten Countdown-Wert.
- Eine Mischfunktion der beiden Timer, getrennt nach Stoppuhr
und Countdown ist ebenfalls möglich.
e) Repeat-Funktionen
- Je nach angewähltem Mode wiederholen sich eine oder beide
automatisch beim zuvor eingestellten CD-Wert. Diesen Vor-
gang nennt man Repeat.
- Ein manueller Repeat kann jederzeit beim aktuell sichtba-
ren Timer durch kurzes Drücken der FLYBACK-Taste auf der
Gehäuseoberseite erwirkt werden. (Auch fliegender RESET
genannt.)
f) Automatik-Repeat
- Beide Timer müssen vorgesetzt sein.
- Nach Ablauf eines Timers auf den Wert „O" geht die Count-
down- Funktion auf den nächst vorgesetzten Timer über.
Dieses Wechselspiel kann beliebig oft wiederholt werden.
- Mittels der Taste SET/DIGIT-AUTOREP wird abwechselnd die
beschriebene Automatikfunktion ein- bzw. ausgeschaltet. In
der Anzeige unter Funktionsfenster wird dies mit dem Hinweis
AUTO bestätigt.
- Sie können wahlweise mit Timer 1 oder Timer 2 starten. Ein
Start mit der gemeinsamen Start/Stop-Taste ist in diesem
Zusammenhang nicht sinnvoll.
g) Vorsetzen eines Timers
- Mittels der Taste DISPLAY SELECT den gewünschten Timer
aussuchen.
START - STOP
START - STOP
DISPL.
SELECT TIMER 1 TIMER 2
AUTO-REP
SET/DIGIT
7
DEUTSCH
Verbraucher sind gesetzlich verpflichtet Alt-
batterien zu einer geeigneten Sammelstel-
le/ Verkaufsstelle/ Versandlager zu bringen.
Die durchgestrichene Mülltonne bedeutet:
Batterien und Akkus dürfen nicht in den Haus-
müll. Pb, Cd und Hg bezeichnen Inhaltsstoffe,
die oberhalb der gesetzlichen Werte liegen.
PRISMA400 Technische Daten
Temperaturbereich
- im Einsatz -10 bis +55°C
- bei Lagerung -20 bis +60°C
Batterie
- Typ Mignonzelle AA (R6)
- Kapazität ca. 1,5 Jahre
- Kontrolle Beim Absinken der Batteriespannung auf
einen kritischen Wert wird das Funktions-
fenster blinkend dargestellt. Danach steht
noch eine Gangreserve von mehr als 30 h zur
Verfügung
Display 6 Digit, Ziffernhöhe 22/8 mm
Gehäuse ABS, Durchmesser 115 mm
Gewicht 390g
Genauigkeit +/-7 Sek./Monat
Zeitauflösung 1/10 Sek. oder 1/100 Min.
Sekunde
oder
Minute
Uhrzeit
- Taste SET/DIGIT leitet den Setzvorgang ein und jedes weite-
re Betätigen schaltet zum nächsten Digit, welches blinkend
dargestellt wird.
- Taste START/STOP erhöht das blinkende Digit (0-5 oder 0-9).
- Taste SET (Gehäuseoberseite) übernimmt den Eingabewert und
beendet den Setzvorgang.
- In der Anzeige ist Timer 1 sichtbar.
h) Setzen der Uhrzeit
- Mittels der Taste DISPLAY SELECT die Uhrzeit aktivieren.
- Taste SET/DIGIT leitet den Setzvorgang ein und jedes weite-
re Betätigen schaltet zum nächsten Digit, welches blinkend
dargestellt wird.
- Taste START/STOP erhöht das blinkende Digit (0-5 oder 0-9).
- Taste SET (Gehäuseoberseite) übernimmt den Eingabewert und
beendet den Setzvorgang.
9

DEUTSCH
Batterie einlegen bzw. wechseln:
- Batteriedeckel in der Bodenplatte nach hinten ausrasten
- Batterie (IEC R6-AA) einlegen und dabei auf richtige Polung
achten
- Batteriedeckel wieder einrasten
- Uhr nullstellen und Uhrzeit neu eingeben (siehe unter i) „Setzen der
Uhrzeit“)
SET - FLYBACK - RESET
Prisma 400
INTERVAL UP - DOWN COUNTER
TIMER 1 - 4 FUNCTION
START - STOP
START - STOP
FUNCTION
MODE
DISPL.
SELECT TIMER (1) + 4 SET/DIGIT
SUCHINDEX
a) Reset
b) Umschalten der Zeiteinheit SEK-MIN
c) Stoppuhr, Countdown und Uhrzeit
d) Start/Stop-Funktion
e) Programmwahl
f) Sonderfunktion
g) Repeat, manuell oder automatisch
h) Vorsetzen von Countdown-Zeiten
i) Setzen der Uhrzeit
a) RESET (Nullstellen)
Durch gemeinsames Drücken der Tasten START/STOP- und der
RESET Taste auf der Gehäuseoberseite. Dabei werden alle Zei-
ten und Vorgabespeicher gelöscht. Die Uhrzeit bleibt erhalten.
In der Anzeige ist Timer 1 sichtbar.
b) Umschalten der Zeiteinheit
Drücken und festhalten der Taste SET/DIGIT bei gleichzeitigem
Reset der Uhr mittels den Tasten START/STOP und RESET auf
der Gehäuseoberseite (siehe auch unter a) Reset).
Funktionen - 4 Timer, wahlweise als UP oder Down-Counter
verwendbar
- automatischer und manueller Repeat
- Umschaltbare Zeiteinheit
- Uhrzeit
- 3 Programme:
COM Gemeinsamer Start/ Stop der Timer
SING Einzel Start/Stop der Timer
AUTO/SING Automatische Repeat-Funktion
Tasten -1 START/STOP-Taste
-1 MODE/FUNCTION-Taste (Umschalten der Funktionen)
-1 DISPLAY/SELECT-Taste (Auswahl Timer 1-4/Uhrzeit)
-1 SET/DIGIT (Setzen von Timer u. Uhrzeit)
-1 TIMER (1)+4-Taste (Sonderfunktion siehe unter f)
-1 REPEAT-Taste (auf Gehäuseoberseite)
Alarm -Regelbare Lautstärke
-Max Lautstärke: 100 dB
-Piezo-Alarmgeber mit -3, -2, -1 Sek.
-Vorsignal von 100 ms Dauer
11

Die eingestellte Zeiteinheit wird im Display bestätigt mit
sec. für 9 h, 59 min, 59 Sek, 9/1O Sek
oder min. für 9999,99 min.
c) Stoppuhr, Countdown und Uhrzeit
-Mittels der Taste DISPLAY/SELECT wird abwechselnd die Uhr-
zeit (Symbol CLOCK), Timer 1 (Symbol T 1), Timer 2 (Symbol T
2), Timer 3 (Symbol T 3) und Timer 4 (Symbol T 4) aktiviert.
-Ist ein Timer beim Erststart nicht vorgesetzt, läuft dieser im
normalen Stoppuhrenmodus in positive Richtung (Pfeil zeigt
nach oben).
-Ist ein Timer vorgesetzt (CD-Eingabe), läuft dieser vom vorge-
setzten Wert nach unten (Countdown, Pfeil zeigt nach unten)
und aktiviert bei -3, -2, -1 Zähleinheiten ein kurzes Vorsignal
und beim Wert „O" ein längeres Null-Signal.
d) Start/Stop-Funktion
-Je nach Programm werden die Timer einzeln oder gemeinsam
über die Taste START/STOP beeinflusst.
Im Hintergrund, also nicht direkt sichtbare, aber aktive Timer
werden durch ein blinkendes Männchen bestätigt.
Der im Display sichtbare und aktive Timer wird durch ein wei-
teres, nicht blinkendes Männchen dargestellt.
Beispiele:
-ein blinkendes Männchen ist sichtbar:
ein oder mehrere Timer sind im Hintergrund aktiv, der im Vor-
dergrund sichtbare Timer ist nicht aktiv
-ein nicht-blinkendes Männchen ist sichtbar:
nur der im Display sichtbare Timer ist aktiv
-ein blinkendes & ein nicht-blinkendes Männchen sind sichtbar:
ein oder mehrere Timer im Hintergrund, sowie der im Vorder-
grund sichtbare Timer sind aktiv
-kein Männchen ist sichtbar:
alle Timer sind deaktiviert
-Kombinationen der Programme anhand von zwei Beispielen:
Mit COM alle Timer gleichzeitig starten, danach umschalten
auf SING: Timer werden gleichzeitig gestartet. Nach dem Um-
schalten arbeitet jeder Timer sowohl von der START/STOP-Tas-
te als auch vom Alarm autonom.
Mit SING einzelne Timer nacheinander starten. Danach um-
schalten auf COM. Nach dem Umschalten aktiviert jeder Timer
nach Ablauf nur ein Alarmsignal und zählt danach in positiver
Richtung weiter.
-COM Die START/STOP-Taste wirkt auf alle vier Timer
gleichzeitig. Nach Ablauf der kürzesten Timer-
zeit auf den Wert „O" ist der entsprechende
Alarm für 5 Sek. aktiviert. Der auslösende Timer
läuft in positiver Richtung weiter. (Pfeil zeigt für die-
sen Timer nach oben). Dieser Ablauf wiederholt sich
bis alle Timer den Nullwert durchlaufen haben.
Danach ist kein Alarm mehr möglich. (Ausnahme:
manueller Repeat)
-SING Die START/STOP-Taste wirkt nur auf den im
Display sichtbaren Timer. Jeder Timer arbeitet
autonom und wiederholt nach Ablauf der vorge-
setzten Zeit wieder beim ursprünglich gesetzten
Wert. Anders ausgedrückt macht jeder Timer
einen eigenen Auto-Repeat.
-AUTO-SING Nach Ablauf eines Timers auf den Wert „O"
geht die Countdown-Funktion auf den nächsten
vorgesetzten Timer über.
Beispiel:
Timer 1, 2 und 3 sind mit einem CD vorgesetzt.
Start: Der im Moment sichtbare Timer 1 läuft
vom CD-Wert zurück auf „O" und aktiviert ein
akustisches Signal. Gleichzeitig übernimmt der
nächste Timer den Zählvorgang. Nach dem letz-
ten Timer beginnt der Ablauf wieder bei Timer 1.
DEUTSCH
e) Programmwahl
-Mittels der MODE/Funktion-Taste sind drei Programme an-
wählbar:
13

f) Sonderfunktion (Timer (1) + 4)
- Mit Hilfe der MODE-Taste das Programm „AUTO-SING" anwäh-
len.
- Es ist sinnvoll Timer 1 oder zusätzlich Timer 2 und Timer 3 mit
einem Countdown vorzusetzen und Timer 4, nicht vorgesetzt
als Stoppuhr zu benutzen. In dieser Konstellation haben Sie
die Möglichkeit bis zu drei Counter im AUTO-Mode zu benutzen
und gleichzeitig mit Timer 4 die Gesamtzeit (Summe aller Count-
down-Zeiten) zu erfassen.
-Die Timer (1) + 4-Taste wirkt nur auf den aktiven CD-Timer aber
immer auf Timer 4.
g) Repeat manuell oder automatisch
- Nach Ablauf eines Timers auf den Wert „O", beginnt der Zähl-
vorgang wieder automatisch beim zuvor eingestellten CD-Wert.
Diesen Vorgang nennt man Auto-Repeat. (Siehe auch bei AUTO-SING,
oder SING-Betrieb)
- Ein manueller Repeat kann jederzeit beim aktuell sichtbaren
Timer durch kurzes Drücken der Taste FLYBACK am oberen
Gehäuserand erwirkt werden.
h) Vorsetzen eines Timers
- Mittels der Taste DISPLAY SELECT den gewünschten Timer
aussuchen.
- Betätigen von Taste SET/DIGIT selektiert das zu setzende Digit,
welches blinkend dargestellt wird.
- Taste START/STOP erhöht das blinkende Digit (0-5 oder 0-9).
- Taste SET (Gehäuseoberseite) übernimmt den Eingabewert und
beendet den Setzvorgang.
i) Setzen der Uhrzeit
- Mittels der Taste DISPLAY SELECT die Uhrzeit aktivieren.
- Betätigen von Taste SET/ DIGIT selektiert das zu setzende Digit,
welches blinkend dargestellt wird.
- Taste START/STOP erhöht das blinkende Digit (0-5 oder 0-9).
Verbraucher sind gesetzlich verpflichtet
Altbatterien zu einer geeigneten Sammelstel-
le/ Verkaufsstelle/ Versandlager zu bringen.
Die durchgestrichene Mülltonne bedeutet:
Batterien und Akkus dürfen nicht in den
Hausmüll. Pb, Cd und Hg bezeichnen
Inhaltsstoffe, die oberhalb der gesetzlichen
Werte liegen.
- Taste SET (Gehäuseoberseite) übernimmt den Eingabewert und
beendet den Setzvorgang.
15

ENGLISH
This HANHART -Stopwatch
NO. ___________________________
made under the most careful production and control
methods, by specialists using only the best materials, is
guaranteed for
2 (two) years.
from date of original purchase against defects in material and
workmanship. If this stopwatch should become defective within
this period you are entitled to get it repaired or exchanged free of
charge.
Defects resulting from abuse of the stopwatch are not covered
by this guarantee: for instance, if contact springs are corroded
by batteries which have leaked. Batteries are not covered by this
guarantee.
Shop-owner and co-guarantor: ______________________________
sold on: __________________________________________
QUALITY MADE
IN THE HEART OF
BLACK FOREST
17

PRISMA200 TECHNICAL DATA
Temperature range
- in use -10 to +55°C
- in storage -20 to +60°C
Battery
- type AA (R6)
- useful life approx. 1,5 years
- battery life
indicator
When the voltage sinks below a minimum
level, the function window begins to flash. At
this point, there is sufficient power for about
30 hours.
Display 6 Digits, size of digits 22/8 mm
Inserting or changing
battery:
- Disengage battery cover
in the base by sliding it
out toward the rear.
- Insert battery (IEC R6-
AA), observing polarity.
- Slide battery cover
back in.
- Set the dial at zero and
then set the time. (See
“h) Setting the clock
time” below.)
Case ABS, diameter 115 mm
Weight 390g
Accuracy +/-7 sec./month
Time units 1/10 sec. or 1/100 min.
Functions -2 timers, both of which may be used
as an UP or DOWN counter, with a separate
START/STOP for each timer or a combined
START/STOP for both
-automatic or manual repeat
-selectable time interval
-clock time
Keys -1 combined START/STOP
-2 START/STOP for each timer
-1 FLYBACK key (on the upper side of the case)
-1 DISPLAY SELECTION key: choice of timers 1
or 2, or clock time
-1 SET key (to Set timers or clock time) and MODE (to
switch between NORMAL and AUTO-REPEAT)
Alarm -adjustable volume
-maximum volume: 100 dB
-piezo-alarm signal of 100 ms
-duration at intervals of -3, -2, and -1 seconds
second
or
minute
clock
SET - FLYBACK - RESET
Prisma 200
INTERVAL UP - DOWN COUNTER
2 PRECISION TIMERS
ENGLISH
19

INDEX
a) Reset
b) Toggling between the time units SEC and MIN
c) Start/Stop function
d) Stop-watch, countdown and clock time
e) FLYBACK function
f) Automatic Repeat function
g) Pre-setting the countdown time
h) Setting the clock time
a) Reset (delete all values)
By simultaneously pressing the START/STOP and the FLY-
BACK-RESET keys on the upper side of the case, all time
values and the programmed memory are deleted. Afterwards,
the display shows Timer 1.
b) Toggling between time units (SEC. & MIN.)
Pressing and holding down of SET/DIGIT-key during effecting
of Reset at the same time by means of START/STOP- and
RESET-keys.
The selected time unit will be shown in the display as:
sec. for 9 hours, 59 minutes, 59 seconds, 9/1O second
or min. for 9999,99 min
c) Start/Stop function
- Combined START or STOP of both timers by means of the large
START/STOP key.
- Separate START/STOP function by means of the TIMER 1 and
TIMER 2 keys. An active timer is indicated in the display by the
symbol ;t .
d) Stop-watch, countdown, and clock time
- By repeatedly pressing the DISPLAY/SELECT key, the clock
time (symbol: CLOCK), Timer 1 (T 1), or Timer 2 (T 2) may be
selected.
- If no value has been entered when the timer is started (START/
STOP, then either T 1 or T 2), the timer selected counts from
zero upward in the normal stop-watch manner.
- If a value has been entered when the timer is started, then the
timer selected counts down from the value entered; at -3, -2,
and -1 time units, a short signal is sounded, and at zero a long
zero-signal.
- The two timers may be used simultaneously in either function,
i. e., one may be used as a stop-watch while the other is in the
countdown function.
e) FLYBACK function
- The Flyback function occurs when a timer in the countdown
function reaches zero; the counting process then begins again
from the previously entered value.
- The timer which is displayed may also be reset manually by
briefly pressing the upper case key (”flying reset").
f) Automatic-Repeat
- A timer which has just emitted a zero-signal is deactivated, and
the other timer is activated in its place.
- This process can be repeated indefinitely. By means of the
SET/DIGIT-AUTOREP key, the Automatic Repeat function can be
toggled on or off.
- When on, the symbol AUTO appears in the display under the
function window.
- The AUTO function can only be used when a value is entered
into both timers.
- The procedure can be started either with Timer 1 or Timer 2. It
is pointless to start with the combined START/STOP key.
g) Pre-setting the countdown time
- Select the timer desired by pressing the DISPLAY/SELECT key.
- Select the digit to be entered by pressing the SET/DIGIT key, the
digit selected will flash.
START - STOP
START - STOP
DISPL.
SELECT TIMER 1 TIMER 2
AUTO-REP
SET/DIGIT
ENGLISH
21
Consumers are legally required to dispose of
batteries at suitable collection points, ven-
ding points or dispatch bays. The crossed-out
wheeled bin means that batteries must not be
disposed of in the household waste. Pb, Cd
and Hg designate substances that exceed the
legal limits.
- Use the START/STOP key to increment the flashing digit (0-5 or
0-9).
- Press the FLYBACK-SET key (on the upper side of the case) to enter
the value. This completes the entering process.
- In the display, Timer 1 is visible.
h) Setting the clock time
- Select the clock by pressing the DISPLAY/SELECT key.
- Select the digit to be entered by pressing the SET/DIGIT key, the
digit selected will flash.
- Use the START/STOP key to increment the flashing digit (0-5 or
0-9)
- Press the SET-FLYBACK key (on the upper side of the case) to enter
the value. This completes the entering process.
PRISMA400 TECHNICAL DATA
Temperature range
- in use -10 to +55°C
- in storage -20 to +60°C
Battery
- type AA (R6)
- useful life approx. 1,5 years
- battery life
indicator
When the voltage sinks below a minimum
level, the function window begins to flash. At
this point, there is sufficient power for about
30 hours.
Display 6 Digits, size of digits 22/8 mm
Case ABS, diameter 115 mm
Weight 390g
Accuracy +/-7 sec./month
Time units 1/10 sec. or 1/100 min.
second
or
minute
clock
ENGLISH
23

SET - FLYBACK - RESET
Prisma 400
INTERVAL UP - DOWN COUNTER
TIMER 1 - 4 FUNCTION
START - STOP
START - STOP
FUNCTION
MODE
DISPL.
SELECT TIMER (1) + 4 SET/DIGIT
INDEX
a) Reset
b) Toggling between the time units SEC and MIN
c) Stop-watch, countdown, and real-time clock
d) START/STOP function
e) Selection of program
f) Special Function
g) Manual or automatic Repeat
h) Pre-setting the countdown time
i) Setting the clock time
a) Reset
By simultaneously pressing the START/STOP and the FLY-
BACK-RESET keys on the upper side of the case, all time valu-
es and the programmed memory are deleted except the one of
the real time clock. Afterwards, the display shows Timer 1.
b) Toggling between time units (SEC & MIN)
Pressing and holding down of SET/DIGIT-key during effecting
of Reset at the same time by means of START/STOP- and
RESET-keys.
Inserting or changing battery:
- Disengage battery cover in the base by sliding it out toward the
rear.
- Insert battery (IEC R6-AA), observing polarity.
- Slide battery cover back in.
- Set the dial at zero and then set the time. (See “i) Setting the
clock time” below.)
Functions - 4 timers, each of them may be used as an Up or
Down counter
- automatic and manual repeat
- time unit toggle
- real time clock
- 3 programs:
COM common Start/Stop of timers
SING individual Start/Stop of timers
AUTO/SING automatic Repeat function
Keys -1 START/STOP key
-1 MODE/FUNCTION key (toggle of functions)
- 1 DISPLAY/SELECT key (selects Timers 1-4 or real time
clock in display)
-1 SET/DIGIT key (Setting timer and clock)
-1 TIMER (1)+4 key (See "f) Special function" below)
-1 FLYBACK key (on the upper side of the case)
Alarm -adjustable volume
-maximum volume: 100 dB
-piezo-alarm signal of 100 ms
-duration at intervals of -3, -2, and -1 seconds
ENGLISH
25

The selected time unit will be shown in the display as:
sec. for 9 hours, 59 minutes, 59 seconds, 9/1O second
or min. for 9999,99 min
c) Selection (Stop-watch, countdown, and real time clock)
-By repeatedly pressing the DISPLAY/SELECT key, the real time
clock (symbol: CLOCK), and Timers 1 to 4 (symbols: T 1, T 2, T
3, T 4) may be selected one after the other.
-If no value was entered into any of the timer memories, then
when the timer is started, it counts from zero upward in the
normal stop-watch manner.
-If a value was entered into a timer memory, then when the
timer is started, the timer selected counts down from the value
entered; at -3, -2 and -1 time units, a short signal is sounded
and at zero a longer zero-signal.
d) START/STOP function
-Depending on the program, the timers are controlled individu-
ally or jointly by the START/STOP key.
The operation of a timer in the background, i. e., not directly
visible, is indicated by a flashing figure. The operation of a
timer visible in the display is indicated by a second figure which
is not flashing.
Examples:
-when a flashing figure is visible:
one or more timers are active in the background, but the timer
visible in the display is not active
-when a non-flashing figure is visible:
then only the timer visible in the display is active
-when both a flashing and a non-flashing figure are visible:
then one or more timers in the background as well as the timer
visible in the display are active
-when no figures are visible:
then all of the timers are inactive
-Examples showing combinations of these programs:
1) By pressing COM, all timers start simultaneously.
After pressing SING, each timer functions independently of the
START/STOP key; as well as of sound.
2) By pressing SING, each timer is started individually, one
after the other. After pressing COM, an alarm signal will sound
when each timer reaches the time entered. However, the count
will continue without interruption in a positive direction.
-COM The START/STOP key affects all four timers
simultaneously. When the first timer reaches “O"
(zero), an alarm sounds for 5 seconds. This timer
then continues in the positive direction (the arrow
corresponding to this timer points upward). This process is
repeated until all the timers have passed zero.
After this, the alarm will no longer sound (excepti-
on: manual Repeat).
-SING The START/STOP key affects only the timer visib-
le in the display. Each timer functions individual-
ly, and after the time entered is reached begins
all over again at that time, i.e., each time carries
out an Auto-Repeat.
-AUTO-SING After the first timer reaches zero, the countdown
function is transferred to the next timer into
which data have been entered.
Example:
Timers 1, 2, and 3 have data entered through the
countdown function. The program is started. As
soon as Timer 1 reaches zero, a signal sounds.
At the same time, the next Timer 2 begins the
Countdown function from the value entered. Af-
ter Timer 3 has reached zero, the process begins
again with Timer 1.
e) Selection of program
-Three programs may be selected by means of the MODE/
FUNCTION key:
ENGLISH
27

f) Special function (Timer (1) + 4)
- Timers 1 and 4 are started simultaneously. Normally, a value is
entered into Timer 1, which then serves as a countdown timer,
but no value is entered into Timer 4, which then serves as a
stop-watch.
- In this situation, Timer 1 functions as an Auto-Repeat timer,
and Timer 4 as a stop-watch measuring the entire time elap-
sed.
- In addition, data can be entered into Timers 3 and 4. By so
doing, Timers 1 through 3 operate as described above under
AUTO-SING, and at the end of the process, Timer 4 records the
sum of the repeated times.
- The special key (Timer (1) + 4) affects the current countdown
timer and Timer 4.
g) Manual or automatic Repeat
- After a timer reaches zero, the countdown procedure auto-
matically begins again at the value previously entered. This
procedure is called “Auto-Repeat".
- A manual Repeat can be effected at any time on the timer visib-
le by briefly pressing the key on the upper part of the case.
h) Pre-setting the countdown time
- By means of the DISPLAY/SELECT key, the timer desired is
selected.
- By pressing the SET/DIGIT key, the digit into which a number is
to be entered is selected. This digit begins to flash.
- By pressing the START/STOP key, the flashing digit is in-
cremented (from O to 5, or from O to 9).
- By pressing the FLYBACK-SET key (on the upper side of the case),
the value chosen is entered. This completes the data entry
procedure.
i) Setting the clock time
- By means of the DISPLAY/SELECT key, the real time clock is
selected.
Consumers are legally required to dispose of
batteries at suitable collection points, ven-
ding points or dispatch bays. The crossed-out
wheeled bin means that batteries must not be
disposed of in the household waste. Pb, Cd
and Hg designate substances that exceed the
legal limits.
- By pressing the SET/DIGIT key, the digit into which a number is
to be entered is selected. This digit begins to flash.
- By pressing the START/STOP key, the flashing digit is in-
cremented (from O to 5, or from O to 9).
- By pressing the FLYBACK-SET key (on the upper side of the case), the
values chosen are entered and the clock is set.
ENGLISH
29

Ce chronomètre-compteur
NO. ___________________________
fabriqué selon les méthodes de production et de contrôle les plus
strictes en utilisant les meilleurs matériaux, comporte une garantie
de
2 (deux) ans.
à compter de la date d'achat contre tout vice de fabrication
et de matière. Si un défaut apparaissait durant cette période, nous
échangerions ou réparerions ce compteur gratuitement. Cette pro-
messe de garantie ne couvre pas les dégradations causées par un
emploi abusif: par exemple, si les ressorts de contact sont corrodés
par des piles ayant coulé. Les piles ne sont pas couvertes par cette
garantie.
Vendeur et co-garant: ______________________________
vendu le: __________________________________________
FRANÇAIS
QUALITY MADE
IN THE HEART OF
BLACK FOREST
31
PRISMA200 CARACTERISTICS TECHNIQUES
Température
- en utilisation -10 à +55°C
- hors service -20 à +60°C
Piles
- Type AA (R6)
- durée 1,5 ans
- avec indicateur
de durée
Quand le voltage atteint le niveau minimum
cet indicateur commence à clignoter. A ce
moment, il reste environ 30 heures d’utilisa-
tion.
Affichage 6 chiffres, taille des chiffres 22/8 mm
Installation et remplace-
ment de la pile:
- Retirer la pile après
avoir fait glisser le cou-
vercle vers l’arrière.
- Installer la nouvelle pile
(IEC R6-AA) en respec-
tant les polarités.
- Replacer le couvercle
de la pile.
- Mettre l'affichage à zéro
et introduire l’heure
(voir "h) mise à l'heu-
re")
Boîtier ABS, diamètre 115 mm
Poids 390g
Précision +/-7 secondes/mois
Unité de mesure 1/10 seconde ou 1/100 minute
Fonctions -2 timer, ensemble ou séparés, utilisables
en compteur, avec commande START/STOP
séparée pour chaque temps ou une combinai-
son START/STOP automatique pour les 2, ou
sélection pour répétition manuelle
-Sélection pour temps intermédiaires
-Heure
Touches -1 START/STOP pour combinaison 2 temps
-2 START/STOP pour chaque temps
-1 FLYBACK (sur le dessus du boîtier)
-1 DISPLAY SELECT 1° ou 2° temps ou l'heure
ou AUTO-REP (Auto-Repeat)
-1 SET-DIGIT pour l’introduction (valeur temps et
heure) et MODE (sélection NORMAL ou AUTO-REPEAT)
Alarme -Volume de réglage
-Volume maximum: 100 dB
-Signal alarme de 100 ms à -3, -2, -1 seconde
seconde
ou
minute
montre
SET - FLYBACK - RESET
Prisma 200
INTERVAL UP - DOWN COUNTER
2 PRECISION TIMERS
FRANÇAIS
33
INDEX
a) Remise à zéro
b) Basculer entre les unités (SEC et MIN)
c) Fonction START/STOP
d) Chronomètre, décompteur et heure
e) Fonction répétion
f) Fonction répétion automatique
g) Introduction du temps à décompter
h) Mise à l'heure
a) Remise à zéro
Par action simultanée des touches START/STOP et FLYBACK-
RESET sur le dessus du boîtier, tous les temps affichés et
mémorisés sont effaces, après cette remise à zéro, le temps n°
1 s'affiche.
b) Basculer entre les unités (SEC et MIN)
Par pression permanente sur la touche SET/DIGIT pendant
effectuer le remise à zéro au même temps avec les touches
START/STOP et RESET. L'unité des temps choisie s'affiche
comme suit:
sec. 9 heures, 59 minutes, 59 secondes, 9/10 seconde
ou min. 9999,99 min
c) Fonction START/STOP
- combinaison des touches START au STOP pour les 2 temps
simultanés par touche START/STOP
- Utilisation des touches START/STOP pour chaque temps T1 au
T2. L'affichage indique cette fonction par symbole .
d) Chronomètre, décompteur et heure
- Par pression successive de la touche DISPLAY/SELECT, sélecti-
on de l'heure (symbole CLOCK) 1er temps (symbole T1) et
2eme temps (symbole T2).
- Si aucune valeur n'a été entrée, quand le compteur est déclen-
ché (START/STOP pour compteur T1 au T2), le compteur sélec-
tionné commence son chronométrage normal à partir de zéro.
- Si une valeur a été entrée le compteur commence son dé-
compte à rebours depuis cette valeur commence. A -3, -2, et -1
unité de temps, un court signal sonore se fait entendre. Le zéro
atteint un signal plus long est émis. Les 2 compteurs peuvent
utiliser simultanément chaque fonction, i. e. un en compteur,
l'autre ensuite en décompteur.
e) Fonction répétion
- La fonction répétition est utilisée quand le temps du compte à
rebours atteint la valeur zéro; le temps est à nouveau affiché et
le décompte commence à nouveau à partir de la valeur précé-
demment entrée.
- Le temps affiché peut aussi être remis à zéro manuellement
par une brève pression sur la touche FLYBACK-RESET sur le
dessus du boîtier.
f) Fonction répétion automatique
- Quand le compteur a émis le signal à zéro, il se désactive et un
autre temps est programmé à sa place.
- Cette procédure peut être répétée indéfiniment.
- Par pression de la touche SET/DIGIT-AUTO REP, la fonction de
répétition automatique peut être activée ou désactivée. Activée
le symbole AUTO apparaît sur l'affichage.
- La fonction AUTO peut être activée seulement si une valeur a
été introduite dans les 2 compteurs. Cette procédure est lancée
pour chaque T1 au T2. II est inutile d'utiliser la touche START/
STOP.
g) Introduction du temps à décompter
- Sélectionner le compteur à utiliser par pression sur la touche
DISPLAY/SELECT
- Sélectionner le chiffre ou doit être entrée la valeur par pres-
sion sur la touche SET/DIGIT; le chiffre sélectionné se met à
clignoter
START - STOP
START - STOP
DISPL.
SELECT TIMER 1 TIMER 2
AUTO-REP
SET/DIGIT
FRANÇAIS
35
Other manuals for PRISMA 200
1
This manual suits for next models
1
Table of contents
Languages:
Other Hanhart Clock manuals


