Hanwha Techwin SHP-1560FW User manual
In-ceiling Housing
SHP-1560FW
SHP-1560FPW
ENG
ENG
Product Features
FRA
FRA
GER
GER
SPA
SPA
ITA ITA
RUS
RUS
POL
POL
TUR
TUR
CHI
CHI
KOR
KOR
SWE
SWE
POR
POR
JAP
JAP
Installation Precautions
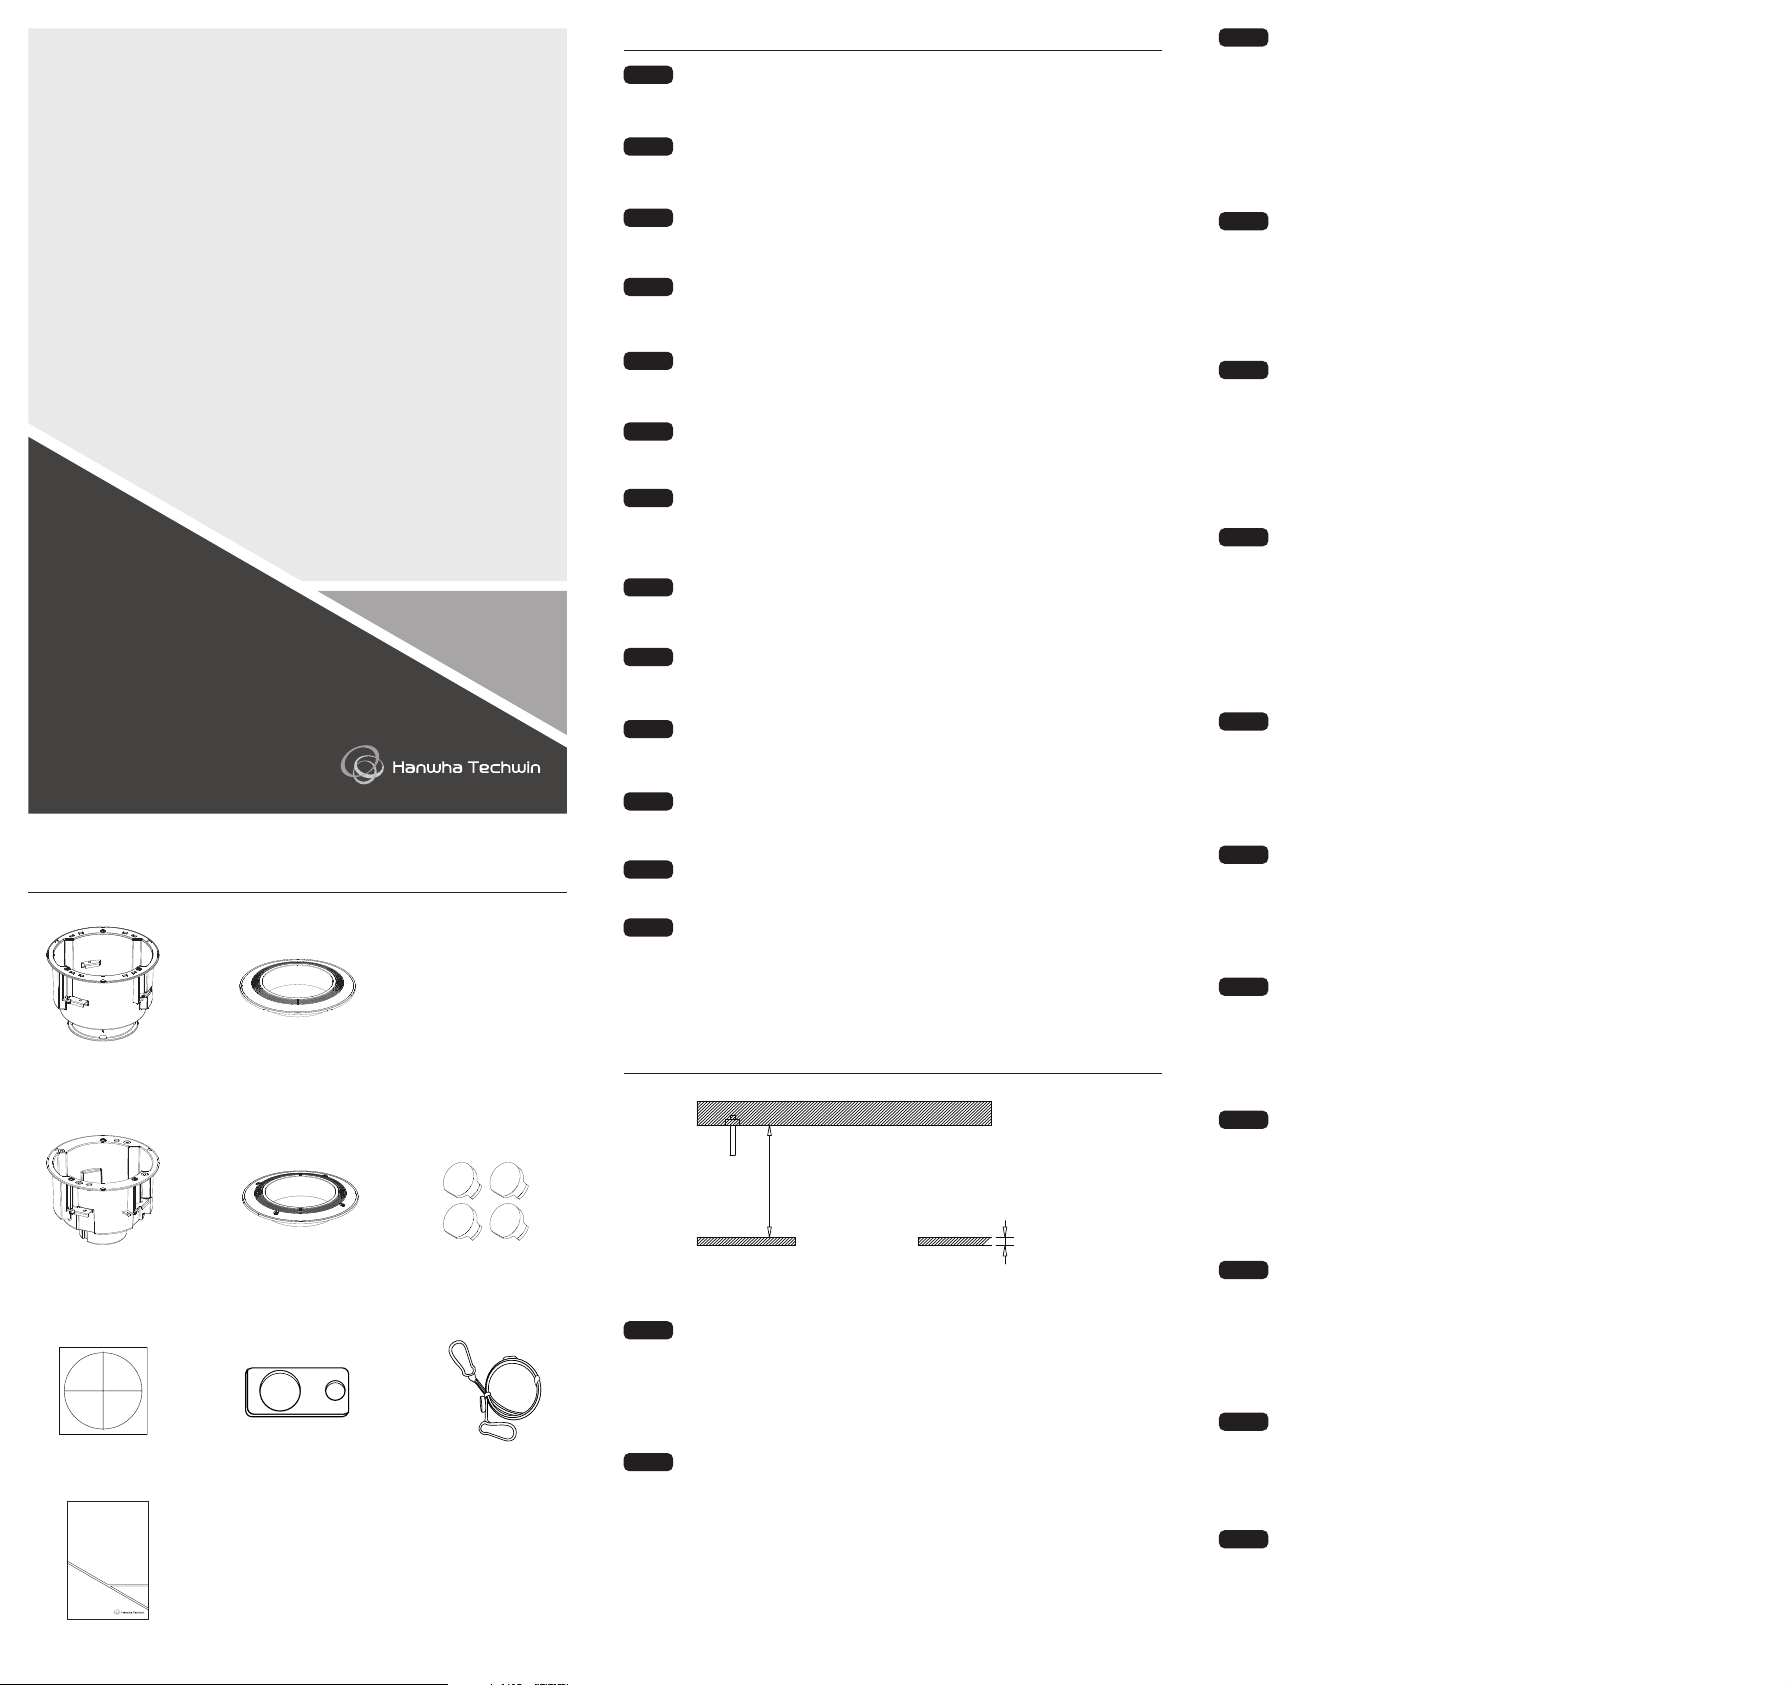
More than 250mm
CEILING BOARD
More than 5 mm and
less than 70 mm
Package
This In-Ceiling Housing is a mounting adaptor that is designed to mount the WN7
PTZ camera in built-in style on a double-layer ceiling.
(For compatible models, please visit our website.)
Ce boîtier encastré au plafond est un adaptateur de montage conçu pour monter la
caméra PTZ WN7 en style encastré sur un plafond à double couche.
(Pour les modèles compatibles, veuillez consulter notre site Web.)
Dieses Deckeneinbaugehäuse ist ein Montageadapter, der zur Montage der
PTZ-Kamera WN7 im Einbau in eine angehängte Decke gedacht ist.
(Für kompatible Modelle, siehe unsere Webseite.)
Esta carcasa de techo es un adaptador de montaje que ha sido diseñado para
montar la cámara WN7 PTZ en estilo incorporado en un techo de doble capa.
(Para modelos compatibles, visite nuestra página web).
Questo alloggiamento a soffitto è un adattatore di montaggio progettato per
montare la telecamera PTZ WN7 a incasso su un controsoffitto a doppio strato.
(Per i modelli compatibili, visitare il nostro sito web.)
Этот встраиваемый в потолок корпус представляет собой адаптер для установки
встраиваемой PTZ-камеры WN7 на двухслойный потолок.
(Список совместимых моделей см. на веб-сайте Hanwha.)
Ta Sufitowa Obudowa jest montażowym adapterem przeznaczonym do instalacji
kamery WN7 PTZ w wbudowanym stylu na dwuwarstwowym suficie.
(Informacje dot. kompatybilnych modeli znaleźć można na naszej stronie
internetowej.)
Tavan Muhafazası, WN7 PTZ kamerayı çift katmanlı tavanda entegre stilde monte
etmek için tasarlanmış bir montaj adaptörüdür.
(Uyumlu modeller için, lütfen web sayfamızı ziyaret edin.)
Detta innertakshölje är en monteringsadapter som har utformats för inbyggd
montering av kameran WN7 PTZ på innertak med dubbelt lager.
(Gå till vår webbplats för att se kompatibla modeller.)
Este suporte de teto é um adaptador de montagem desenvolvido para a instalação
da câmera WN7 PTZ em estilo embutido em teto de forro duplo.
(Para ver os modelos compatíveis, acesse o nosso site.)
In-ceiling HousingはWN7 PTZカメラをデュアル天井に埋立型でインストールする
場合に使用するアダプターです。
(互換できる型名は当社のウェブサイトを確認してください。)
In-ceiling Housing是在双天花板上安装WN7 PTZ摄像机时使用的适配器。
(有关兼容型号,请参阅我们的网页。)
In-ceiling Housing은 WN7 PTZ 카메라를 이중 천장에 매립형으로 설치할 경우
사용되는 어댑터입니다.
(호환 가능 모델은 당사 웹페이지를 참고 바랍니다.)
`Select an installation position or place that can endure more than 4 times of the
total weight of the installation structure.
`At least 250mm or more of spare height is required above the CEILING BOARD.
`Be sure to secure the SAFETY WIRE to avoid a product fall.
`Use the provided screws to install the mount bracket and camera.
`CEILING BOARD must be able to sustain the weight of at least 10 kg.
`Choisissez une position ou un endroit d’installation qui peut supporter plus de
4 fois le poids total de la structure d’installation.
`Il convient de laisser in espace libre d’au moins 250 mm au-dessus du PANNEAU
PLAFOND.
`Veillez à protéger le FIL DE SÉCURITÉ pour éviter la chute d’un produit.
`Utilisez les vis fournies pour installer le support de montage et la caméra.
`Le PANNEAU PLAFOND doit être capable de supporter un poids d’au moins 10 kg.
HOUSING
(SHP-1560FW)
HOUSING
(SHP-1560FPW)
SAFETY WIRE (1SET)
TOP COVER
(SHP-1560FW)
TOP COVER
(SHP-1560FPW)
TEMPLATE
INSTALLATION MANUAL
SCREW CAP (4EA)
(SHP-1560FPW)
SAFETY BRACKET (1EA)
In-ceiling Housing
SHP-1560FW
SHP-1560FPW
`Eine Installationsposition oder einen Installationsort auswählen, der mehr das
Vierfache des Gesamtgewichts der Installationsstruktur aushalten kann.
`Mindestens 250 mm oder mehr freie Höhe ist erforderlich über der
DECKENPLATTE.
`Sicherstellen, dass das SICHERHEITSKABEL befestigt ist, um ein Herunterfallen des
Produkts zu verhindern.
`Mit den mitgelieferten Schrauben die Montagehalterung und die Kamera
installieren.
`Die DECKENPLATTE muss ein Gewicht von mindestens 10 kg tragen können.
`Seleccione una posición o lugar de instalación que pueda soportar 4 veces más el
peso total de la estructura de la instalación.
`Se requiere al menos 250 mm o más de espacio libre sobre el TABLERO DEL
TECHO.
`No olvide asegurar el CABLE DE SEGURIDAD para evitar la caída del producto.
`Use los tornillos suministrados para instalar el soporte de montaje y la cámara.
`El TABLERO DEL TECHO debe ser capaz de soportar un peso de al menos 10 kg.
`Selezionare una posizione per il montaggio o un posto che possa sopportare più
di 4 volte il peso totale della struttura di installazione.
`Sono necessari almeno 250 mm o più di spazio libero al di sopra del PANNELLO
DEL SOFFITTO.
`Assicurarsi di fissare il FILO DI SICUREZZA per evitare la caduta del prodotto.
`Utilizzare le viti in dotazione per installare la staffa di montaggio e la telecamera.
`Il PANNELLO DEL SOFFITTO deve essere in grado di sostenere un peso di almeno
10 kg.
`Выберите место для установки или поверхность, которая может выдержать
вес, превышающий четырехкратный общий вес конструкции для установки.
`Над ПОТОЛОЧНОЙ ПАНЕЛЬЮ должно присутствовать свободное
пространство высотой не менее 250 мм.
`Во избежание падения устройства обязательно закрепите СТРАХОВОЧНЫЙ
ТРОС.
`Для крепления монтажного кронштейна и камеры используйте входящие в
комплект винты.
`ПОТОЛОЧНАЯ ПАНЕЛЬ должна выдерживать вес не менее 10 кг.
`Wybierz pozycję montażu lub miejsce, które wytrzyma ponad 4-krotność
całkowitego ciężaru konstrukcji montażowej.
`Wymagane jest co najmniej 250 mm wolnej przestrzeni nad PŁYTĄ SUFITOWĄ.
`Należy zabezpieczyć PRZEWÓD BEZPIECZEŃSTWA, aby uniknąć upadku produktu.
`Użyj dostarczonych śrub, aby zainstalować wspornik montażowy i kamerę.
`PŁYTA SUFITOWA musi wytrzymać ciężar co najmniej 10 kg.
`Kurulum yapısının toplam ağırlığının 4 katından fazlasına dayanabilecek bir
kurulum konumu veya yeri seçin.
`TAVAN PANELİNİN üzerinde en az 250 mm veya daha fazla boş yükseklik gereklidir.
`Ürünün düşmesini önlemek için GÜVENLİK KABLOSUNU taktığınızdan emin olun.
`Montaj braketini ve kamerayı takmak için ürünle birlikte verilen vidaları kullanın.
`TAVAN PANELİ en az 10 kg ağırlığa dayanabilmelidir.
`Välj en installationsposition eller plats som kan hålla minst 4 gånger den totala
vikten av installationsstrukturen.
`Minst 250 mm eller mer fritt utrymme krävs ovanför TAKSKIVAN.
`Se till att säkra SÄKERHETSLEDNINGEN så att produkten inte faller.
`Använd de medföljande skruvarna för att installera monteringsfästet och kameran.
`TAKSKIVAN måste kunna hålla en vikt på minst 10 kg.
`Selecione um local ou posição de instalação capaz de aguentar mais de 4 vezes o
peso total da estrutura de instalação.
`É necessário pelo menos 250 mm ou mais de espaço de sobra acima das PLACAS
DO TETO.
`Certifique-se de prender o FIO DE SEGURANÇA para evitar a queda do produto.
`Use os parafusos fornecidos para instalar o suporte de montagem e a câmera.
`As PLACAS DO TETO precisam aguentar um peso de pelo menos 10 kg.
`インストールする製品の総重量の4倍以上を耐えられるインストール場所を選定
してください。
`天井ボードの上の空間が250mm以上になる場所にインストールしてください。
`落下防止用の安全ワイヤーを必ず使用してインストールしてください。
`インストールブラケット&カメラを組み立てる時には提供されたネジを使用してく
ださい。
`天井ボードは最小10kgの重量に耐えられる必要があります。
`请选择一个可以承受要安装产品的总重4倍以上的安装位置。
`请安装在天花板上方的空间为250mm以上的地方。
`必须使用防止跌落安全线进行安装。
`组装安装支架和摄像机时,请使用随附的螺钉。
`天花板必须能够支撑至少10kg的重量。
`설치할 제품의 총 중량의 4배 이상을 견딜 수 있는 설치 장소를 선정하세요.
`천장보드 위의 공간이 250mm 이상이 되는 장소에 설치하세요.
`낙하방지용 안전와이어를 반드시 사용하여 설치하세요.
`설치브라켓 및 카메라 조립시에는 제공된 나사를 사용하세요.
`천장보드는 최소 10kg의 무게를 지탱할 수 있어야합니다.
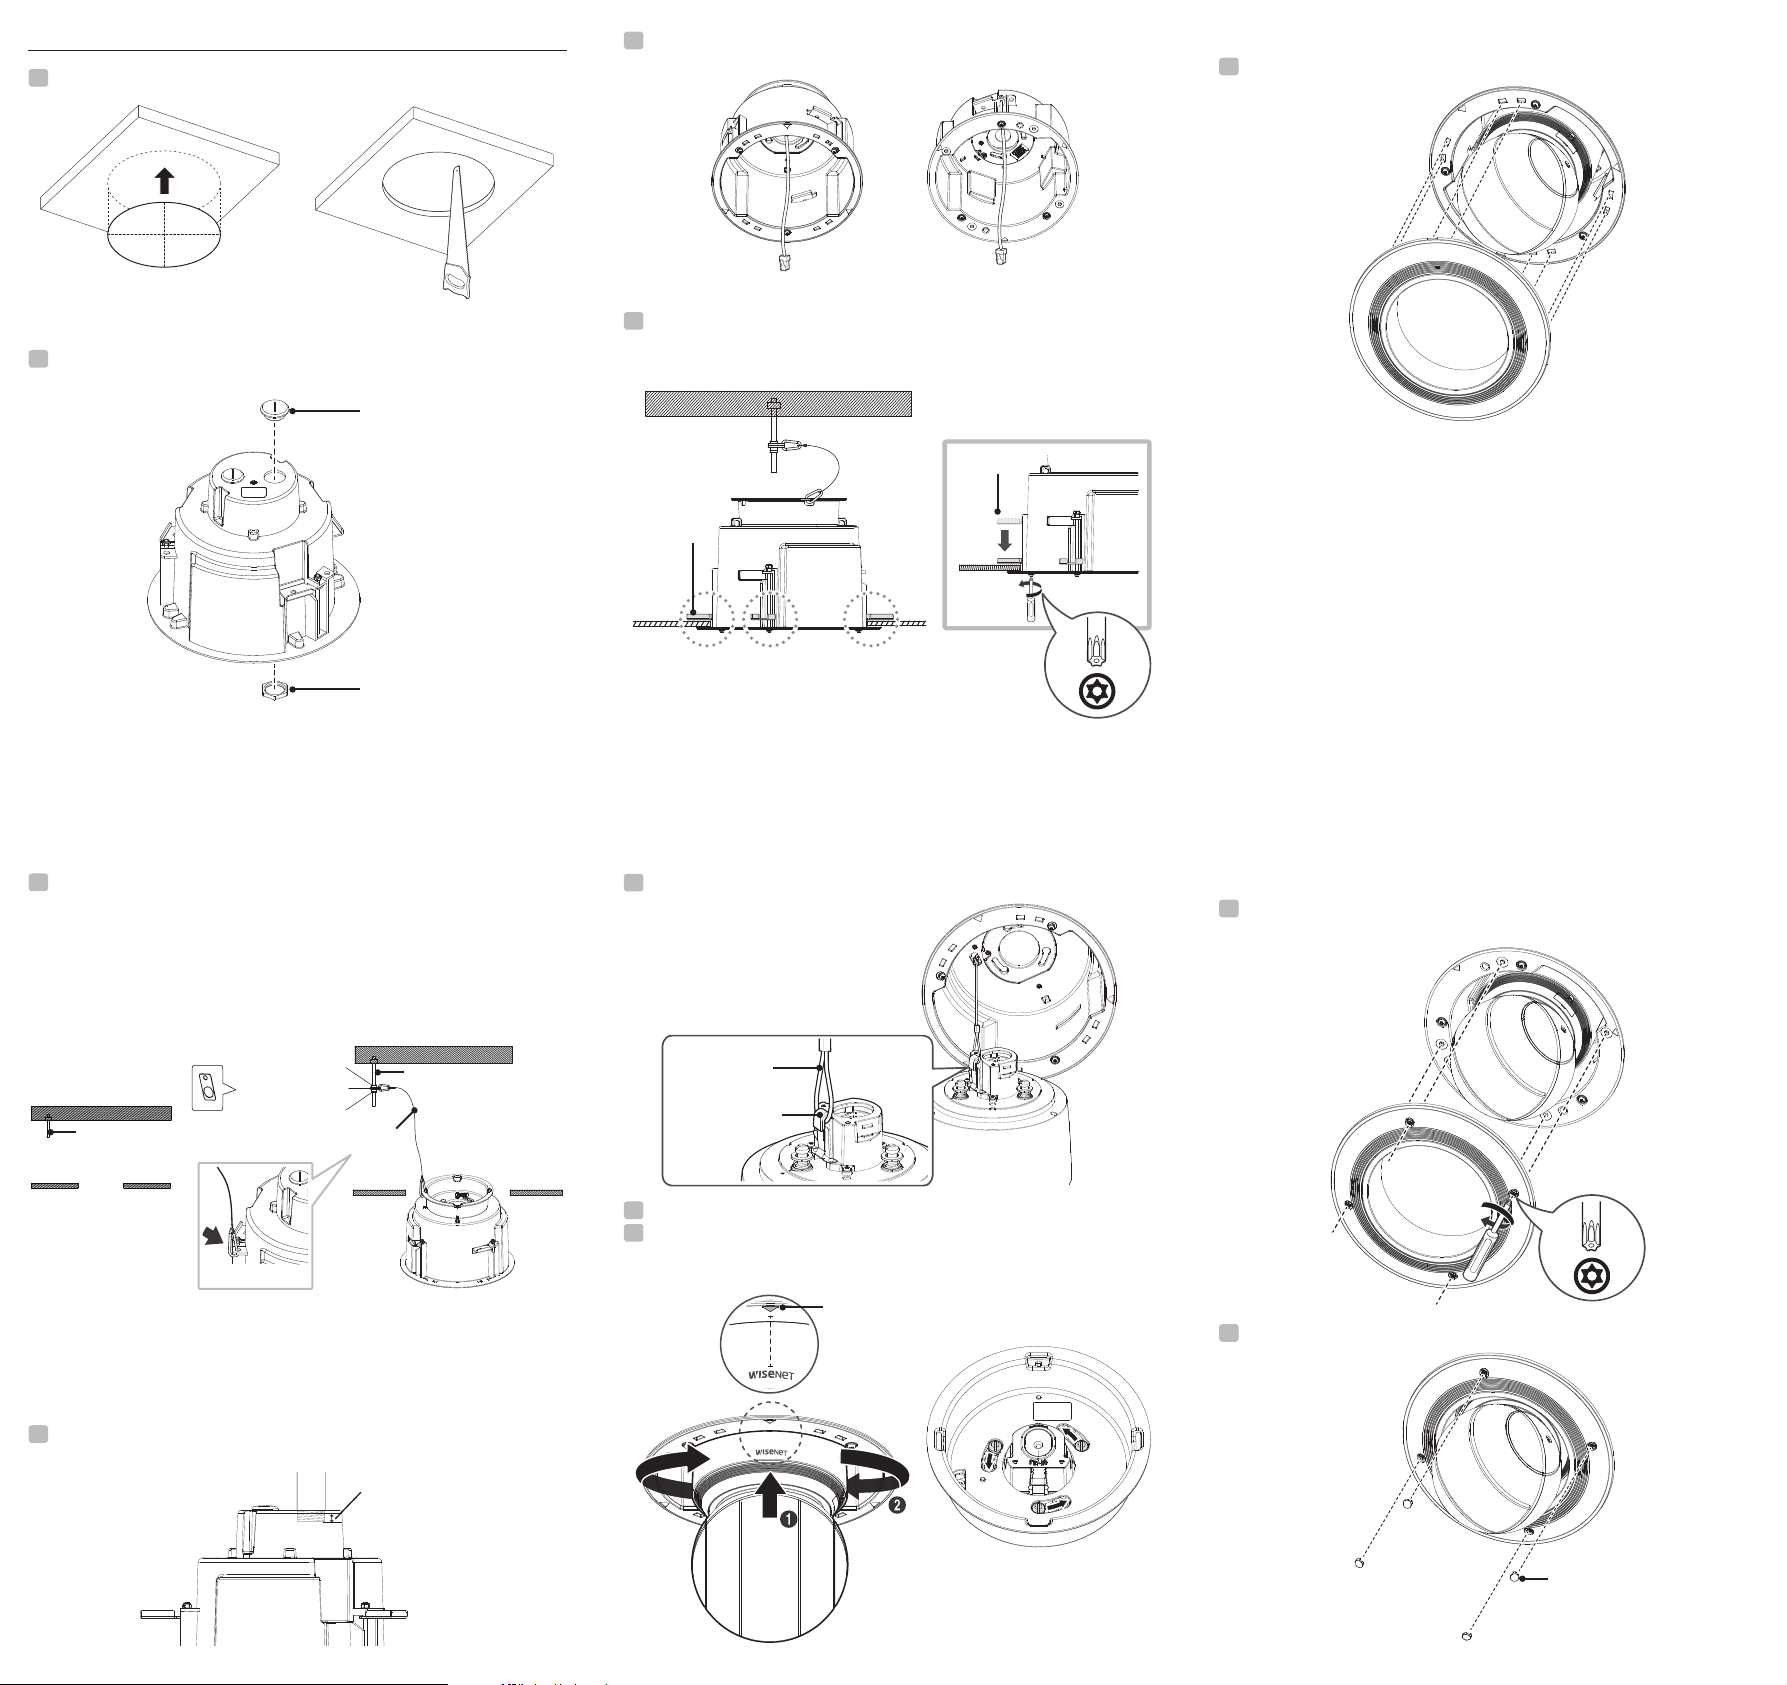
Installation
1
Attach the TEMPLATE on the CEILING BOARD and drill a guided hole.
2
Remove the CABLE HOLE CAP and the HEX NUT with a tool such as a coin.
(SHP-1560FPW only)
HEX NUT
CABLE HOLE CAP
3
Fix the ANCHOR BOLT onto the concrete CEILING, and secure the SAFETY WIRE to the
ANCHOR BOLT as below:
1. Tighten the NUT (“N1”) on the ANCHOR BOLT.
2. Insert the provided SAFETY BRACKET into the ANCHOR BOLT.
3. Tighten two NUTs (“N2”,”N3”) onto the ANCHOR BOLT.
4. Hook and fix one end of the SAFETY WIRE onto the SAFETY BRACKET.
5. Hook and fix the other end of SAFETY WIRE onto the HOUSING as shown below:
SHP-1560FPW
ANCHOR BOLT
CEILING
Nut (N1)
SAFETY BRACKET ANCHOR BOLT
Nut (N2,N3)
SAFETY WIRE
CEILING
SHP-1560FW
HOUSING
I`The ANCHOR BOLTs and nuts are optional and not included in the product package.
`ANCHOR BOLTS must be able to sustain the weight of at least 30 kg.
`If you proceed without following the instructions in the manual, that is if you work with the
camera body already attached from the beginning, the safety wire could exceed its limit and
be broken when the housing is accidentally dropped, which could result in an accident.
4
In the case that the pipe is to be connected to the External Cable hole, the pipe must
be inserted within the depth of 15mm or less. (SHP-1560FPW only)
Less than 15mm
5
To connect to the camera, insert the network cable through the cable hole on the
housing to the inside of the housing as shown in the figure.
SHP-1560FW SHP-1560FPW
6
Push the HOUSING inside the CEILING through the CEILING hole, and tighten the
SCREWs (x3) clockwise to fix the HOUSING on the CEILING.
(Adjust the height of the bracket to secure the housing to the ceiling.)
BRACKET
BRACKET
CEILING
TR20
I`Using a power tool for installation could cause product damage.
If you are going to use a power tool, the torque must be 30 Nm or less.
`Ensure that the HOUSING is firmly secured to the CEILING BOARD.
7
Hang the SAFETY WIRE inside the housing on the SAFETY WIRE HOOK of the camera.
SAFETY WIRE
SAFETY WIRE HOOK
8
Refer to the camera user manual to connect the network cable to the camera.
9
As shown in the figure, align the direction of the camera logo and INSTALLATION DIRECTION
GUIDES (△) of the housing, and then turn it in the direction of the arrow as you push the
camera upward to join them.
View from the top of the housing
INSTALLATION DIRECTION GUIDES
Assembling the Top Cover (SHP-1560FW)
1
Mount the TOP COVER to the HOUSING.
I`To use as a Smoke Dome, please purchase and replace the SPB-PTZ85W Dome cover
separately.(SHP-1560FW, SHP-1560FPW)
Assembling the Top Cover (SHP-1560FPW)
1
Attach the TOP COVER to the HOUSING, and tighten the four SCREWS
on the COVER to fix it to the HOUSING.
TR20
2
Insert the SCREW CAPS into the screw holes.
SCREW CAP
PT01-005721A_(v1.1)
This manual suits for next models
1
Other Hanwha Techwin Camera Accessories manuals

Hanwha Techwin
Hanwha Techwin WISENET SHD-1600FPW User manual

Hanwha Techwin
Hanwha Techwin SBP-300HM5 User manual

Hanwha Techwin
Hanwha Techwin SBV-158G User manual

Hanwha Techwin
Hanwha Techwin SBP-317HM User manual

Hanwha Techwin
Hanwha Techwin SBV-253WCW User manual

Hanwha Techwin
Hanwha Techwin SBP-125HMW User manual

Hanwha Techwin
Hanwha Techwin SBO-126B User manual

Hanwha Techwin
Hanwha Techwin SBP-300NB User manual

Hanwha Techwin
Hanwha Techwin Wisenet SPM-4210 User manual


