Harmony Hi Lo Tilt HS Installation and operating instructions

PART#532K0498
REV:
2022-10-08
Assembly and Operation
Manual
Adjustable Base
Hi Lo Tilt HS

Weight Capacity
880 lb
Height
14.5~23.5 inches
Incline Degree
Backrest: 0°~65°
Legrest: 0°~35° Wall Hugger
X
Power Input
AC 100–240 50/60 HZ
Power Transformer
Output DC 29V 1.8A
Radio Frequency
2.4MHZ Massage Vibrator
✓
USB Charger
Bluetooth Control
Inbuilt
Floor Light
✓
Flash Light on
Remote ✓
Specifications
X

1
Table of Contents
Safety Precaution and Usage Guide .............................................................................................2
To decrease the risk of electronic shock ...............................................................................2
Adjustablebaseperformance ...................................................................................................2
Restrictions of your adjustable base ......................................................................................3
Electronic system information .................................................................................................3
Parts List ...............................................................................................................................................4
Electronics Overview ........................................................................................................................6
Assembly Guide ..................................................................................................................................7
Operating Your Adjustable Base ...............................................................................................
14
Bluetooth and APP .....................................................................................................................
18
Wireless pairing operation .....................................................................................................
22
Synchronization of two bases_ Wireless Pairing (Option) ..........................................
22
Synchronization of two bases_ Wired Pairing (Option) ................................................
23
Power outage or failure of remote control........................................................................
23
Troubleshooting .............................................................................................................................
24
20 YEAR LIMITED WARRANTY

2
Safety Precaution and Usage Guide
.Yournewadjustablebase hasbeenstrictly tested andinspectedpriortodispatch. It is highly recommended to read
these instructions thoroughly before you try your new adjustable base, in order to keep your high-quality adjustable
baseperformingwellinits lifetime but also to reduce the risk of fire, electric shock, burns or any injury to users.
To decrease the risk of electronic shock, burns, or injury to users, children or
pets, please follow these instructions.
1. After unpacking your adjustable, be aware of your small children and pets. Its packing material may put
your
small children
or
pets
in
smothering dangers
.
2. Unplug the power cord from the power outlet before installing parts or cleaning your adjustable base.
3. Keep the power cord away from water and heated areas. If your adjustable base is wet or has a frayed
power cord, please do not operate it.
4. Before you disconnect the power cable, please return your adjustable base to the flat position and stop all
operations.
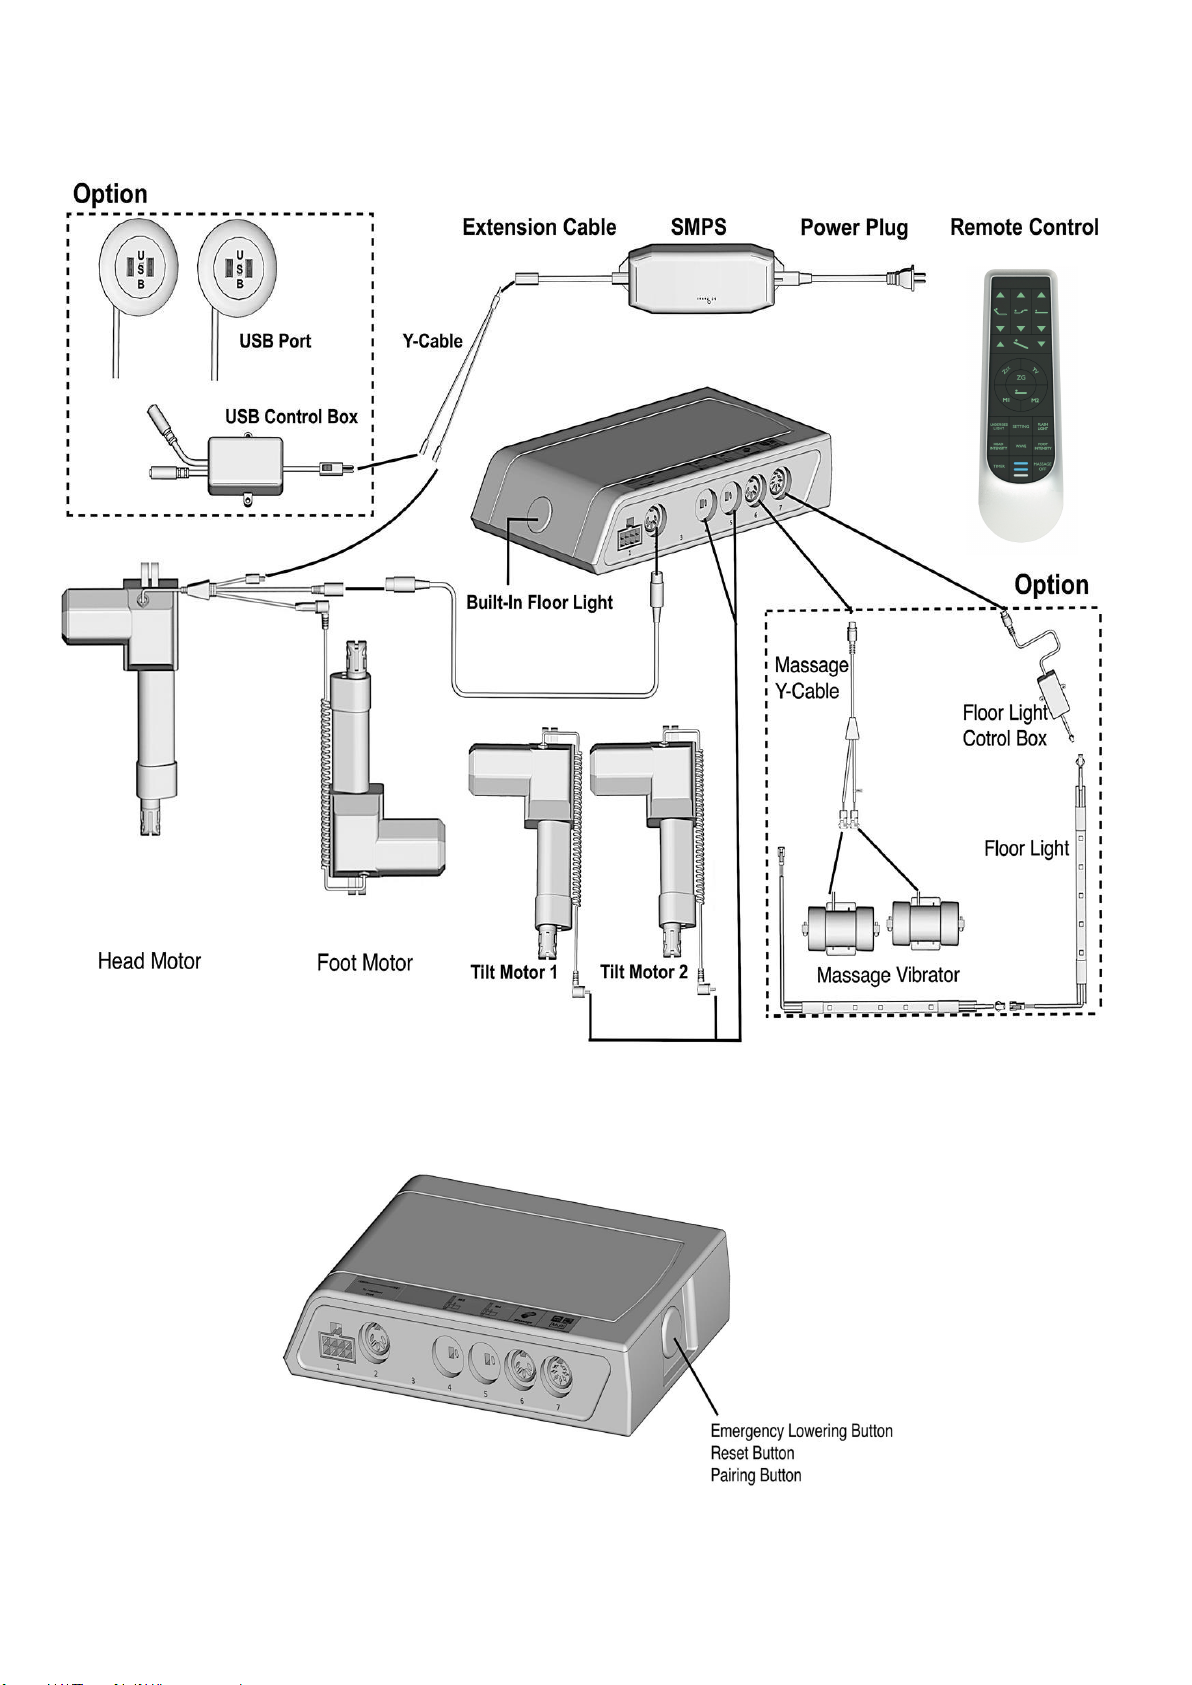
5. Unplug your electronic gadgets from the USB port (option) of your adjustable base if they are fully charged.
6. Do not operate your adjustable base if small children or pets are under your adjustable base. Supervision
is required for operating your adjustable base if small children or pets are around your adjustable base.
Small children are not allowed to operate your adjustable base without parents or adult supervision.
7. AdjustyourHi-LoBasetotheverticallylowestheightwhensleepingtopreventfrom
8. InordertoavoidtrappedinjureswhenoperatingHi-Lomodeontwosinglebasesusemattresswithatleast
20cmthickness.
9.
Useyouradjustablebaseincompliancewiththe
restrictions
.
Tokeepyourhigh-qualityadjustablebaseperformingwell in its lifetime, please
follow these instructions.
1. Your adjustable base is only designed for In-Home Use. This adjustable base is not designed for outdoor or
commercial
purpose.
2. Do not unscrew or open the control box, lift motors, massage vibrators (option), SMPS, wired handset or
remote control (option), and other electronic components on your adjustable base, except for opening the
battery compartment on your remote control or SMPS. The warranty will be void if there is any component
damaged by users. Only authorized service personnel are allowed to repair or replace parts.
3. Do not mix different types of batteries or old batteries with a fresh one for your handset or SMPS.
4. Remove the batteries from your remote control (option) and SMPS if your adjustable base will not be used
for a long time period to prevent damage caused by battery leakage.
5. Do not sit on the head or leg section while in the raised position. It can damage your adjustable base and
lead to shorter life expectancy.
6.
Do not
lift or move the base
during operation
. It might cause damage to your system.
Attention: SAVE THESE PRECAUTIONS AND USAGE GUIDES

3
7. Do not lift or move your adjustable base by grabbing its mattress platform or its wood lower frame
(option) furnished with fabric. If it is necessary to lift or move your adjustable base, please do it by
grabbing the cross bars of its metal frame.
8. Your adjustable base must be on flat ground to avoid damage to your product.
9. Use a compatible mattress for your adjustable base. A memory foam mattress or latex mattress is
recommended. Some spring mattresses or pocket spring mattresses, for example, may not suit your
adjustable base. Consult your mattress specialist to verify your mattress is compatible.
Restrictions of your adjustable base
1. Do not operate lift motors above the 10% duty cycle. For example, after continuous 2-minute operation 18-
minute rest is required.
2. Do not continuously or intensively operate the massage vibrators (option) above maximum 2 hours within 6
hours.
3. Weight Restrictions: the maximum weight limits on your adjustable base for Twin, Twin XL, Full and Queen
are at a maximum of 400kg/880lbs (evenly allocated across the mattress platform). This capacity includes
the mattress and occupants. The warranty of your adjustable base will be void if excessive weight of
400kg/880lbs is loaded on your adjustable base.
Electronic system information
RadioFrequencyCompliance:
RadioFrequency:2.4MHZ.
FCCID:
YourDevicecomplieswithpart15oftheFCCRules.Operationissubjecttothefollowingtwoconditions:
1. This device may not cause harmful interference.
2. This device must accept any interference received, including interference that may cause undesired
operation.
Attention:
IncompliancewithFCCRFexposurerequirements,theremustbenochangetotheantennaorthedevicewithout
permission.Usersmaybedeprivedofhis/herrighttothedeviceifthedeviceexceedstheRFexposure
requirementscausedbyanychangetheantenna.
PowerRatings:
Input:AC100-240V50/60Hz1.5A
Output:DC29V1.8A
ProtectionClass:ClassII

4
Parts List
A.
Remote Control * 1
B.
SMPS * 1
(Switched
-
Mode Power Supply)
C.
AC Main Cable * 1
D
AAA Battery * 3
E.
Support Leg * 8
F.
Head Motor & Foot Motor
G.
Hex Key * 1
H.
Headboard Brackets *
2sets
I.
Wrench * 1
J.
Bolt for Headboard * 8
K.
Nut for Headboard * 8
L.
Washer for Headboard*
16
M.
Mattress Retainer * 1
N.
KD Connector *2
IMPORTANT NOTE:
Check and confirm the following items are included in the carton,
BEFORE disposing of any packing materials.
O.
Clevis Pin * 8
P.
Cotter Pin * 8
( TXL *6 ) ( TXL *6 )

5
Q.
R.
Center Cross Brace * 2
( TXL *1 )
Connecting U-shape Bar
*2
S.
Connecting Rod * 2
T.
Wing Bolt * 8
U.
U-shape Bracket * 4
V.
Spring Washer * 8
W.
Bolts for Center Cross
Brace*4
Rail C
Sync Cable * 1
(TXL ONLY)
OPTIONAL
Side Retainer * 2
X.
Rail A & B
( TXL *2 )

6
Electronics Overview

7
Assembly Guide
STEP 1
Leave the 2* cartons in the
flat position.
After opening the cartons,
carefully unbox them.
Leave both Head Section and
Foot Section on the unboxed
cartons until you fully set up
your Adjustable Base.
STEP 2
Remove Rail A, Rail B and
Rail C from the Head Section.
Put them aside and install
them after completing the
following processes.
Take out 2*KD
Connectors(N), 2*Connecting
U-
shape Bars(R) and 2*
Connecting Rods(S) from the
accessories box
and insert
to
Head
Section.
Slide
Foot
Section onto the
other side.
IMPORTANT NOTE:
Two people are required to set up your adjustable base.
Head Section
N
N

8
STEP 3
Put Center Cross Braces
(Q) into their
corresponding brackets of
the two cross tubes (one
on the Head Section and
the other one on the Foot
Section), as shown in the
picture.
Insert each Clevis Pin (O)
Then, insert each Cotter
Pin (P) through the holes
of each Clevis Pin (O), as
shown in the picture.
Take out 2*Center Cross
Braces (Q), 4*Clevis
Pins(O),
4*Cotter Pins (P),
4*Bolts
for Center Cross
Brace(W) from the
accessory box.
*There's only 1*Center
Cross Brace, 2*Clevis Pin,
2*Cotter Pin, 2*Bolts for
TXL Base.*
through the brackets and
holes of Center Cross
Braces (Q).
To make it
Center Cross
Braces
(Q)
securely
locked, insert the Bolts for
Center Cross Braces (W)
through the holes on it.

9
STEP 4
Take out 8*Wing Bolts (T),
8* Spring Washers (V) and
4* U-shaped Brackets (U)
from your accessory box.
Insert each Wing Bolt (T)
through each Spring Washers
(V) and the each hole of U-
shaped Brackets (U) , as
shown in the picture.
Securely tighten these
components and each
junction ( two junctions on
the left side and two
junctions on the right side)
by twisting 8* Wing Bolts(T).
STEP 5
Take out Head Motor and
Foot Motor(F), 4*Cotter
Pins(P) and 4*Clevis Pins (O)
from your accessory box.
Respectively allocate Head
Motor and Foot Motor (F)
into their corresponding
brackets on your Adjustable
Base
Insert each Cotter Pins (P)
into the holes on each Clevis
Pins (O), as shown in the
picture.
Make sure Head Motor and
Foot Motor(F) are installed
properly.
Step6
Follow the instruction,
shown in th picture, to install
Rail A and Rail B.

10
STEP 7
Option:
Plug Floor Strap to Floor Light
Control Box and plug Floor
Light Control Box into the
connector of HE150 Cotrol Box,
as shown in the picture.
Plug the massage motor cords
from Head Section and Foot
Section into their corresponding
conncectors of the Massage Y-
Cable of HE150 Control Box, as
shown in the picture.
Find the cord of Foot Motor,
Connecting Cable from the Foot
Motor and plug them into their
corresponding connectors of
Head Motor.
Find Extension Cable from the
Head Section of your Adjustable
Base and plug it into SMPS (B).
Take out AC Main Cable (C)
from accessories box and plug it
into SMPS (B).
Step8
Find Tilt Motor Cord from Foot
Section and plug it into its
corresponding port of HE150
Control Box, as shown in the
picture.

11
STEP 9
Insert three AAA Batteries (D) into the compartment of the Remote Control (A).
STEP 10
Take out 8*Support Legs(E) from the accessories box.
You have adjustable height choices and can use any of or three all leg height choices of 5", 2-1/2",2".
Once the height is determined, securely tighten the legs onto your Adjustable Base and leave no gap
between leg and base.
STEP 11
Carefully flip over your topside
-
down Adjustable Base. Lift up the Base to desired location.
IMPORTANT NOTE:
Be Careful when flipping your Base:
The installed legs could get damaged or bent by excessive pressure, if you lean your
Adjustable Base on the legs.
1. Do not recline the Base against the installed legs to flip it over.
2. Do not drag the Base across the floor.
STEP 12
Plug the AC Main Cable (C) in an electrical outlet with 100-240V, 50/60 Hz. A surge protector (not
included) is recommended for longer life of your Adjustable Base.

STEP 13
STEP
14
Scenario 1: Not Installing Headboard
Tilt your Adjustable Base by using Remote Control (A) and hook up the Rail C onto your Adjustable Base,
referring to the following picture.
12
Take out 1*Retainer (M) and 2*Side Retainers (X). Insert the retainers into the corresponding holes on the
Retainer Bar Fixation at the bedside and the foot of your adjustable base.

13
Scenario 2: Installing Headboard
Raise the Backrest by using Remote Control (A) and remove the Head Rail.
Take out the Wrench (J), two Bolts (K), two Washers (M) and two Nuts (L) from the accessories box.
Refer to the following picture. Place the Headboard Bracket (H-2) on the tube of the right hand side of
your Adjustable Base. Insert the Bolt (K) with its Washer (M) through the pre-drilled holes on the
Bracket (H-2) and the tube.
Fasten the two Bolts (K) with the two Washers (M) and the two Nuts (L) with the two Washers (M) by
using the Wrench (J).
Redo this step on the left hand side of your Adjustable Base.
The Bracket (H-1)allowsadjustmenttomeetthedimensionofuser’sHeadboard(notincluded). After
choosing desired pre-drilled holes on the H-1 Bracket, pass the Bolts (K) with the Washers (M) through
the holes on H
-
1 and H
-
2 Brackets. Fasten these Bolts (K), Washers (M) and Nuts (L) by using the
Wrench (J).
Step 15
Now place your mattress on your Adjustable Base.
All the installation procedures have been completed.

14
Operating Your Adjustable Base
ADJUST BACKREST
UP AND DOWN
ADJUST LEGREST
UP AND DOWN
ADJUST HI-LO FUNCTION
PRESET POSITION OF ZERO GRAVITY
PRESET POSITION
OF TV POSITION
PRESET POSITION
OF QUIET SLEEP
ADJUST TO FLAT POSITION
MEMORY 1 FOR
PREFERRED POSITION MEMORY 2 FOR
PREFERRED POSITION
FLASH LIGHT
FLOOR LED LIGHT
MEMORY SETUP
HEAD VIBRATION ON/OFF
AND INVENSITY FOOT VIBRATION ON/OFF
AND INVENSITY
ACTIVATE WAVE
VIBRATION TIMER
AND INDICATOR LED VIBRATION OFF
ADJUST TILT FUNCTION

15
A.
B.
C.
D.
E.
F.
G.
H.
I.
J.
Press and hold the button to
RAISE or LOWER
BACK REST. Stops
when
released.
Press and hold the button to
RAISE or LOWER
LEG REST. Stops
when
released.
Press and hold the button to
RAISE or LOWER
the BED. Stops
when
released.
Click the button to automatically adjust user’s bed to the Memory 1 position
preset by user. Stops by clicking any button.
Click the button to automatically adjust user’s bed to
zero gravity position.
Stops by clicking any button.
Click the button to automatically adjust user’s bed to the Memory 2 position
preset by user.
Stops by clicking any button.
Click the button to automatically adjust user’s bed to FLAT position. Stops by
clicking any button.
Press and hold the button to TILT the BED. Stops when released.
Click the button to automatically adjust user’s bed to have
QUIET SLEEP
position. Stops by clicking any button.
Click the button to automatically adjust user’s bed to have
WATCHING TV
position. Stops by clicking any button.

16
K.
L.
M.
N.
O.
Q.
R.
Click the button to STOP ALL MOVES, including the actuators and massage
vibrators.
Click the button to set up the time periods of vibration.
Blue LED on the handset will turn on for responding your selection.
Highest is 10 minutes,
Middle is 20 minutes and Lowest is 30 minutes
If start the vibration without setting TIMER, default time will be 10 minutes
and the Highest LED will turn on.
When the vibration is active, click TIMER again can stop the vibration.
Click the button to turn on the FLASHLIGHT on the remote control or click to
turn it off. The
FLASHLIGHT will stay on as long as the button is pressed.
After releasing the button, the FLASHLIGHT will stay on for several seconds
then turn off
simultaneously when the backlight turns off.
Click the button to turn on the FLOOR LED LIGHT or push to turn it off.
FLOOR
LED LIGHT
will stay on for five minutes if the button is not clicked again.
* Click the button to turn On/ Off the HEAD VIBRATOR.
The head massage motor will start from strongest vibration, click again to
adjust the four levels INTENSITY of HEAD VIBRATOR.
STRONGMEDIUMWEAKNONESTRONGMEDIUM….
* Click the button to stop and save the intensity status when you exit for the
next activation.
* Click the button to turn On/ Off the FOOT VIBRATOR.
The foot massage motor will start from strongest vibration, click again to
adjust the four
levels INTENSITY of FOOT VIBRATOR.
STRONGMEDIUMWEAKNONESTRONGMEDIUM….
* Click the button to stop and save the intensity status when you exit for the
next activation.
* Click the button to turn On/ Off the WAVE MODE VIBRATOR.
The wave mode will start from strongest vibration, click again to adjust
the four levels
INTENSITY of FOOT VIBRATOR.
STRONGMEDIUMWEAKNONESTRONGMEDIUM….
* Click the button to stop and save the intensity status when you exit for the
next activation.

17
Preset Memory Position
Step
1: Click
to flatten the bed.
Step 2: Adjust the Head and Foot position to a desired position.
Step 3: Press and hold
until backlight of handset blink twice.
Step 4: Release
and click
or
. The control box will response
with Beep sound and floor light will blink twice which indicate the memory
learning has completed successfully.
Step 6: To default all, press and hold and simultaneously until
system response with Beep sound.
Step 5: To reset preprogrammed position, following Step1 to Step 3, then press
or or before LED stop flashing.

Bluetooth and APP
STEP 1
Go to the APPLE STORE (iOS) or PLAY STORE (Android) to download and install App Comfort Enhancement 2.
STEP 2
Click‘STARTPAIRING’andagreethe‘TERMSofUSE’bytickbelow.
STEP 3
The Control Box is equipped with RF & Bluetooth control inside. Therefore, the Control Box will make RF pairing with handset
first, then Bluetooth pairing be the next when you start pairing.
There will be the following Scenarios:
1. Handset & Mobile are both not yet paired.
2. Handset is paired. Mobile is not yet paired.
3. Handset is not around you. You want to use mobile phone to control your adjustable bed.
For all above situation, please follow the procedures as following page.
OR
18
Table of contents
Other Harmony Indoor Furnishing manuals

Harmony
Harmony HPI-8199 User manual

Harmony
Harmony Hi Lo Installation and operating instructions

Harmony
Harmony Folding Adjustable Base Installation and operating instructions

Harmony
Harmony 1 Installation and operating instructions

Harmony
Harmony STUDY CARREL User manual

Harmony
Harmony GOOD NEIGHBOUR User manual
Popular Indoor Furnishing manuals by other brands

Costway
Costway OP70295 user manual

HOMCOM
HOMCOM 831-685V00 manual

Living Spaces
Living Spaces 3/3 STORAGE RAIL & 3/3 METAL ROD BED & 3/3 SLAT... Assembly instructions

Home Decorators Collection
Home Decorators Collection THORNABY 19091-VS31-LW Assembly instructions

Kartell
Kartell Clap 04188NA manual

Suncast
Suncast BMC3601 Assembly instructions