HARTMANN TRESORE HS 460 Series User manual

8
123
456
789
*0#
OPERATING INSTRUCTIONS
for HS 460 series hotel safes
GB

HARTMANN TRESORE
2
TABLE OF CONTENTS
1. Instructions
2. Technical specifications
3. Putting into operation
4. Opening/closing the safe
5. Emergency opening
6. Checking battery power
7. Displays
8. Functions of the reader (CEU)
9. Advanced programming functions
10. Reading out operations
11. Tips and help
12. Cleaning and care
13. Disposal
14. Guarantee

HARTMANN TRESORE
3
Please read the operating instructions first.
Dear Customer,
thank you very much for choosing this product. Please read the operating instructions
carefully before you put the product into operation – the manual will help you to operate
the safe correctly.
This high-quality product has been manufactured on modern machinery taking environ-
mental aspects into account, and tested by a detailed quality check. Please follow all
instructions for long and optimum function.
Keep the operating instructions for later reference. Please also read the other docu-
ments delivered with the product.
IMPORTANT NOTE:
The manufacturing company reserves the right to make changes to the product!
HARTMANN TRESORE AG is not liable for damage caused by improper use.
Please follow the following instructions:
• Fix the safe on a flat and solid surface using the fixing material supplied.
• Erect the safe in a cool, dry location.
• Avoid direct sunlight.
• Please do not use the safe to step on.
• Please do not mix battery types or old and new batteries.
• Please make sure that the batteries are inserted correctly.
• If the batteries are not replaced until they are fully discharged, you can use the
emergency power adapter temporarily. Depending on the side the door hinges, you will
find the connection for this under the left or right trim next to the keypad.
• Any user-inflicted damage is not covered by the guarantee provided by the contract.
PLEASE NOTE! Please follow the following safety instructions.
• Some safes tend to be top-heavy; please note this when carrying them.
• Watch out for your hands when opening and closing the safe – danger of crushing!
1 | INSTRUCTIONS
!
!

HARTMANN TRESORE
4
8
123
456
789
*0#
1.
2 | TECHNICAL SPECIFICATIONS
1. Display
2. Control panel
3. I-button contact
4. Emergency power supply
5. Emergency lock (mechanical)
Positions 4 and 5 are swapped if the door is hinged on the left.
Control panel (door)
2.
3.
The sketch may differ from the actual product.
5.4.

HARTMANN TRESORE
5
• Check the safe for any defects and make sure all the accessories included
are complete before putting it into operation.
• The safe must be screwed securely to a surface. The fixing material is included
with the delivery.
• Insert the batteries supplied into the battery compartment. The battery compartment
is on the rear of the door.
• “Good” appears on the display, meaning that the system is in start mode.
• Once “Okay” appears, the safe is ready to use.
• If no further action is performed after a key operation, all previously performed actions
are deleted after a few seconds/minutes and the initial state is restored.
• Incorrect inputs can be corrected using the “clear” key.
PLEASE NOTE!
Optionally, 4 different I-buttons can be used. Their functions are described in chapter 7.
To obtain I-buttons, please contact Hartmann Tresore.
The safe requires a basic setting so that a code can be assigned to the I-button sup-
plied. Depending on which type of I-button it is, this code can vary. It must be assigned
to the safe as follows: Hold the I-button against the receiver.
An audible signal (beep) confirms that the owner’s I-button has been assigned.
The Smart Safe System, whose function is described in Chapter 8, can also be optio-
nally used to read out operations. To purchase the Smart Safe System, please contact
Hartmann Tresore.
3 | PUTTING INTO OPERATION
!

HARTMANN TRESORE
6
1. Locking the safe (with a 3–6-digit code)
• Close the door.
• Enter a 3–6-digit code of your choice.
(Code can be reassigned as required each time the safe is locked).
• Press “close”.
The safe now closes automatically. “CLSD” appears in the display.
2. Opening the safe
• Enter the code that was used to lock the safe.
The safe now opens automatically. “OPEN’’ appears in the display.
In case of emergency, for example if you forget the user code or in the event of a technical mal-
function, you have the option of opening the safe by means of a master code, with the emergen-
cy opening key or with the reader.
1. Emergency opening with master I-button
• Hold the master I-button (blue) against the contact.
• The safe opens automatically. “OPEN’’ appears in the display.
PLEASE NOTE:
A master I-button can only be used if it has previously been assigned to the safe using
the user I-button (red) (see chapter 7).
2. Emergency opening with emergency-opening key
• The emergency-opening lock is located on the control panel (see chapter 2).
• Insert the emergency-opening key into the lock and turn it anti-clockwise.
• The safe now opens automatically. “OPEN’’ appears in the display.
4 | OPENING/CLOSING THE SAFE
5 | EMERGENCY OPENING
!
An error message on the display means that an operating error has occurred. In this case, please
follow the steps below:
“Err”
An incorrect code has been entered. Please enter the correct code.
After 4 consecutive incorrect entries of the code, the safe enters a hold time and cannot be ope-
ned during this time. The hold time lasts for one minute and is indicated by means of a continu-
ous “Err” display and audible signals.
6 | ERROR MESSAGES

HARTMANN TRESORE
7
!
The HS 460 series has 4 different I-buttons. Their functions are described in this chapter.
• Owner’s key (red I-button)
• Master key (blue I-button)
• Time key (yellow I-button)
• Data key (black I-button)
Red (owner’s key)
• Every safe is dispatched with factory settings and without any programming.
• The owner’s I-button (red) is the most important I-button.
It is required for authorising all programming.
• Each safe can only be assigned to one owner’s I-button (red).
The button must be initialised once the safe has been installed.
• To do so, please hold the owner’s I button (red) against the receiver. The safe must be open
to do this. An audible signal (beep) confirms that the code has been assigned.
PLEASE NOTE!
• If the owner’s I-button (red) is lost, a new owner’s I-button must be requested.
The assignment of the old I-button must then be deleted from the circuit board.
• Remove the door’s rear cover to access to the circuit board.
• Press the reset button on the circuit board.
• Carry out initialisation of the new I-button.
Blue (master key)
• The owner’s I-button (red) – in addition to allowing emergency opening – can also be used
to program additional master I-buttons (blue).
• These are used to authorise employees to open safes in an emergency without having to
have the owner’s I-button (red) in their possession.
PLEASE NOTE:
The master I-button can only be used for emergency opening. All programming procedu-
res are the exclusive domain of the owner’s I-button.
Assigning a master key (blue)
• Please press the “clear” key. “LIGHT_ON” appears on the display.
• Hold the owner’s I-button (red) against the receiver. After a beep, the display shows “P”.
• Now, please hold the owner’s I-button (red) against the receiver again.
• Hold a master I-button (blue) against the receiver. After a beep, the display shows “P_S1”.
The master I-button (blue) has been successfully assigned. (You can continue assigning
a master I-button (blue) before the display goes out – the display will then show “P_S2”…
“P_S5” and up to “FULL”.)
7 | USING THE I-BUTTONS
!

HARTMANN TRESORE
8
PLEASE NOTE!
If certain master keys are no longer needed, they can be deleted.
Deleting a master key
• Please press the “clear” key. “LIGHT_ON” appears on the display.
• Hold the owner’s I-button (red) against the receiver. After a beep, the display shows “P”.
• Now, please hold the owner’s I-button (red) against the receiver again.
• Hold the master I-button (blue) that you would like to delete against the receiver.
After two beeps, the display shows “P_S1”. The master I-button (blue) has been
successfully deleted. (You can keep deleting master keys until the display goes out.)
Deleting all master keys
• Please press the “clear” key. “LIGHT_ON” appears on the display.
• Hold the owner’s key against the receiver. After a beep, the display shows “P”.
• Now, please hold the owner’s key against the receiver twice more.
The display shows “P_ED”. All master keys have been successfully deleted.
Yellow (time key)
• The time I-button is used to program the safes with the date and time. You can find more
detailed information in chapter 8 from page 13 on.
Black (data key)
• The data I-button is required to read out the last 300 operations and to transfer and view
them on a computer using software. You can find more detailed information in chapter 8.
PLEASE NOTE:
Pressing the reset button also deletes any assigned master keys.
!
!

HARTMANN TRESORE
9
!
This system logs all opening operations in a database. The system manages the archive ac-
cording to the customer code used and the type of key used (I-button or mechanical key) and
displays the date and time of opening operations.
PLEASE NOTE:
The following system requirements are the minimum needed for successful program
installation: OS: Windows 7, Windows 8
8 | FUNCTION OF THE SMART SAFE SYSTEM
1.
1. Installation CD
2. USB interface
3. Serial interface
4. Encoder
5. Data card (black)
6. Time card (yellow)
2.
4.
3.
5.
6.
Software installation
• Insert the installation CD into your PC’s CD tray.
• Follow the instructions in the Installation Manager.
HARTMANN TRESORE
10
Encoder installation
The encoder has two ports for connecting it to a PC: the USB port (DS9490R) and the serial
port (DS9097U). The serial port is not required for driver installation. If, however, you select
the USB port, drivers must be installed.
PLEASE NOTE:
The RW 32 folder contains two types of software driver: Depending on the Windows ope-
rating system you are using, please select the file WinUSB_32 for a 32-bit system or
WinUSB_64 for a 64-bit operating system. You can find information about your opera-
ting system in your Windows system info.
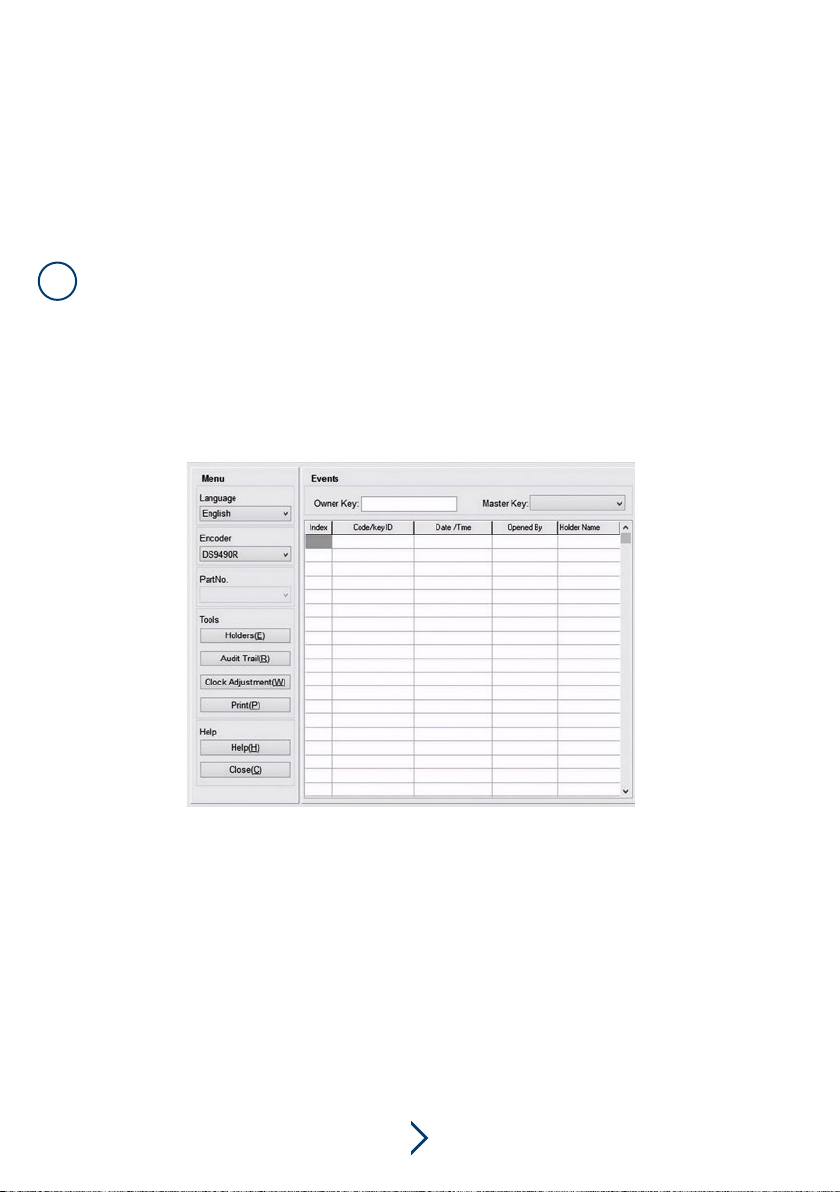
User interface
!
Initial settings
• The Holders button is used to read the key ID and to register, review and
delete key holders.
• The Audit Trail button is used to create a data card with which information
about Smart Safe can be queried.
• The Clock Adjustment button is used to create a time card to set the safe’s time directly.

HARTMANN TRESORE
11
I-Registering a button holder
Click the Holders button in the user interface. The following window appears:
This window shows you what the I-button ID is. Please proceed as follows:
• Insert the I-button into the encoder.
• Then click on Read Key ID.
The I-button’s key ID is now displayed in the same window (see screenshot below):
As you can see in the upper window, the key ID is 01790C07050000A1.
• You can now enter the name of the I-button holder, e.g. “Lucy”.
• Please click on Register Key Holder to complete the process or on
Cancel to cancel the process.
A new window confirms that Lucy has been set as the holder of this I-button
and that her name has now been registered by the program.
PLEASE NOTE:
Before you scan the I-button ID, you must ensure that you have selected the correct
interface. For the serial interface, please select DS9097U under “Encoder” in the user
interface. For the USB interface, select DS9490.
Before registering the holder’s name, you must scan the I-button ID.
The operation will otherwise fail.
!

HARTMANN TRESORE
12
Setting date and time on the safe
Before you can use the program, you must set the date and time on the safe. The data stored
on the time card matches the data stored on the computer. Please proceed as follows:
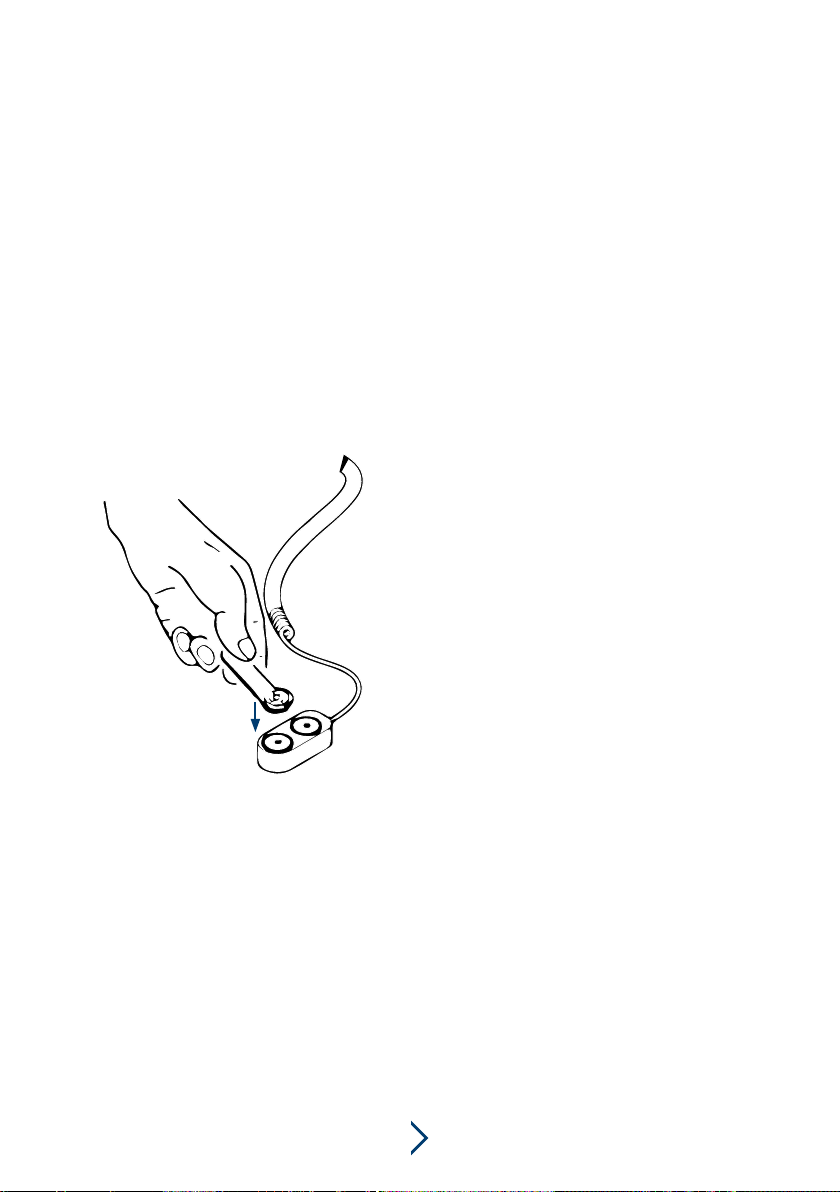
• Hold the time card (yellow) against the encoder.
• Press the “Clock Adjustment” button (see user interface).
• A window will now prompt you to confirm your input. Please click “Yes”.
• Another confirmation window will then open soon after. Here, please click on “OK”.
The date and time are now saved on the time card.
PLEASE NOTE:
The deviation between the date stored on the safe and the date stored on the computer
is due to the time lost between storage of the date on the time card and storage of the
date on the safe.
!
Please hold the time key (yellow) against
the encoder.
Please press the “clear” on the keypad of the safe. Hold the owner’s key (red)
against the receiver.
An audible and visual signal confirms that this detection step was successful.
Please hold the time key (yellow) against the receiver until the message “P_ED” appears
and the audible signal sounds. The date and time have now been successfully set.
Time card
Encoder
HARTMANN TRESORE
13
Data storage
To store data on the computer, you must transfer the data from the safe using the data key
(black). Each file can hold up to 300 opening operations.
Please proceed as follows:
Please press the “clear” on the keypad of the safe. Hold the owner’s key (red)
against the receiver.
“P” appears in the display. Please hold the data key (black) against the receiver.
Audible signals will sound at intervals to confirm that data transmission is taking place.
The audible signals stop as soon as transmission is completed successfully.
Data card
Encoder
Now place the data key on the encoder on the PC.
Then, please press the “Audit Trail” button.
A window will open and prompt you to confirm your
selection. Here, please click Yes .

HARTMANN TRESORE
14
• The data transfer from data card to computer now begins and takes a few minutes.
• Once the data has been transferred, a confirmation window opens. Here, please click on
OK.
The user interface now lists all the opening operations carried out. You can also print this
data out if desired.
The following screenshot shows an example:
Sequential number of
opening operations Date and time of opening
Key type or combination
set used
(defined by the user)
PLEASE NOTE:
Please hold the data card and the owner‘s key at a slight angle when scanning
it at the receiver. Make sure that the owner‘s key touches the centre of the
receiver.
Before data transmission, press the “clear” key on the keypad of the safe
before holding the owner’s key against the receiver. Otherwise, the safe opens
and the desired operation cannot be performed.
“Password“ = Open via code input
“Master Key“ = emergency opening via blue I-button
“Owner Key“ = emergency opening via red I-button
“Machine“ =emergency opening using a mechanical emergency key
!

HARTMANN TRESORE
15
9 | TIPPS UND HILFEN
PROBLEM POSSIBLE CAUSE SUGGESTED SOLUTION
Keyboard and/or display
do not respond.
Battery power is too low. Change the batteries.
Batteries have been inserted
incorrectly. Insert the batteries as intended.
Fault in the electronics. Contact a service employee at
Hartmann Tresore AG*.
I-button and/or I-button
contact is not working.
Battery power is too low. Change the batteries.
Batteries have been inserted
incorrectly. Insert the batteries as intended.
The contacts on the I-button and/
or on the I-button contact are
soiled.
Clean the contacts (see chapter 11).
Safe does not open
although correct code was
entered.
The closing pins are jammed.
Try to loosen the jam by shaking
and tapping gently. If this does not
work, contact a HARTMANN
TRESORE AG* service employee.
Malfunction of the drive for
retracting/extending the locking
pins.
Contact a service employee at
HARTMANN TRESORE AG*.
The door does not close
properly.
The locking pins cannot be
extended, or can only be partially
extended.
Make sure that the door is fully
engaged in the door frame.
Malfunction of the drive for
retracting/extending the locking
pins.
Contact a service employee at
HARTMANN TRESORE AG*.
*Tel. +49 (0)5251 1744-179 | Fax +49 (0)5251 1744-999 | E-mail: support@hartmann-tresore.de
10 | CLEANING AND CARE
!PLEASE NOTE!
Do not use any strong detergents or hard objects for cleaning.
• To clean the safe, please use a soft cloth and a mild, commercially available cleaning agent.
Do not use aggressive cleaning agents.
• Lubricate the door hinge regularly with a little commercial machine oil to maintain mobility.

HARTMANN TRESORE
16
11 | DISPOSAL
12 | GUARANTEE
PLEASE NOTE!
This appliance is marked in accordance with the European Directive 2002/96/EC
on waste electrical and electronic equipment!
The appliance packaging is made of reusable materials
• The correct separate collection of these appliances and its eco-friendly treatment and
disposal contribute to preventing potential negative impact on the environment and
health.
• The packaging materials can be hazardous for children. For this reason, keep these
materials out of the reach of children and dispose of them in accordance with the waste
instructions.
• Do not dispose of the packaging materials together with normal waste.
• If necessary, contact your authorised sales agent or the waste collection centre in your
region for information on disposal.
• Remove the mains plug and any locks before disposal to protect children from possible
hazards
This symbol, which you can see on the product itself and in the
product documents, means that the safe must not be disposed of
with normal household waste. The product must be taken to a special
waste collection centre to guarantee the regulation-compliant disposal
required for electronic appliances. If necessary, contact the waste
collection centre or your sales agent for further information.
!
The guarantee period begins with product purchase and lasts 12 months.
Please note! The guarantee is rendered invalid if
• the installation and operating instructions are not followed correctly and lead to
malfunctions.
• the appliance is modified in any way.
• no original spare parts are used.
The guarantee is not applicable for any personal injury or property damage caused by non-
observance of the operating manual or incorrect use of the appliance.
IMPORTANT: Product characteristics may be changed without advance notice.
!

HARTMANN TRESORE
1717
HARTMANN TRESORE AG
Pamplonastraße 2
33106
Paderborn,
Germany
+49 (0)5251 1744-179
support@hartmann-tresore.de
© HARTMANN TRESORE AG Operating Instructions for HS 460 (1120). Errors and misprints excepted.
www.hartmann-tresore.de
Table of contents
Other HARTMANN TRESORE Safe manuals

HARTMANN TRESORE
HARTMANN TRESORE Signature Safe Experience User manual

HARTMANN TRESORE
HARTMANN TRESORE HES User manual

HARTMANN TRESORE
HARTMANN TRESORE HS 420 Series User manual

HARTMANN TRESORE
HARTMANN TRESORE HES 15 User manual

HARTMANN TRESORE
HARTMANN TRESORE Bjork User manual

HARTMANN TRESORE
HARTMANN TRESORE HS 480 Series User manual


