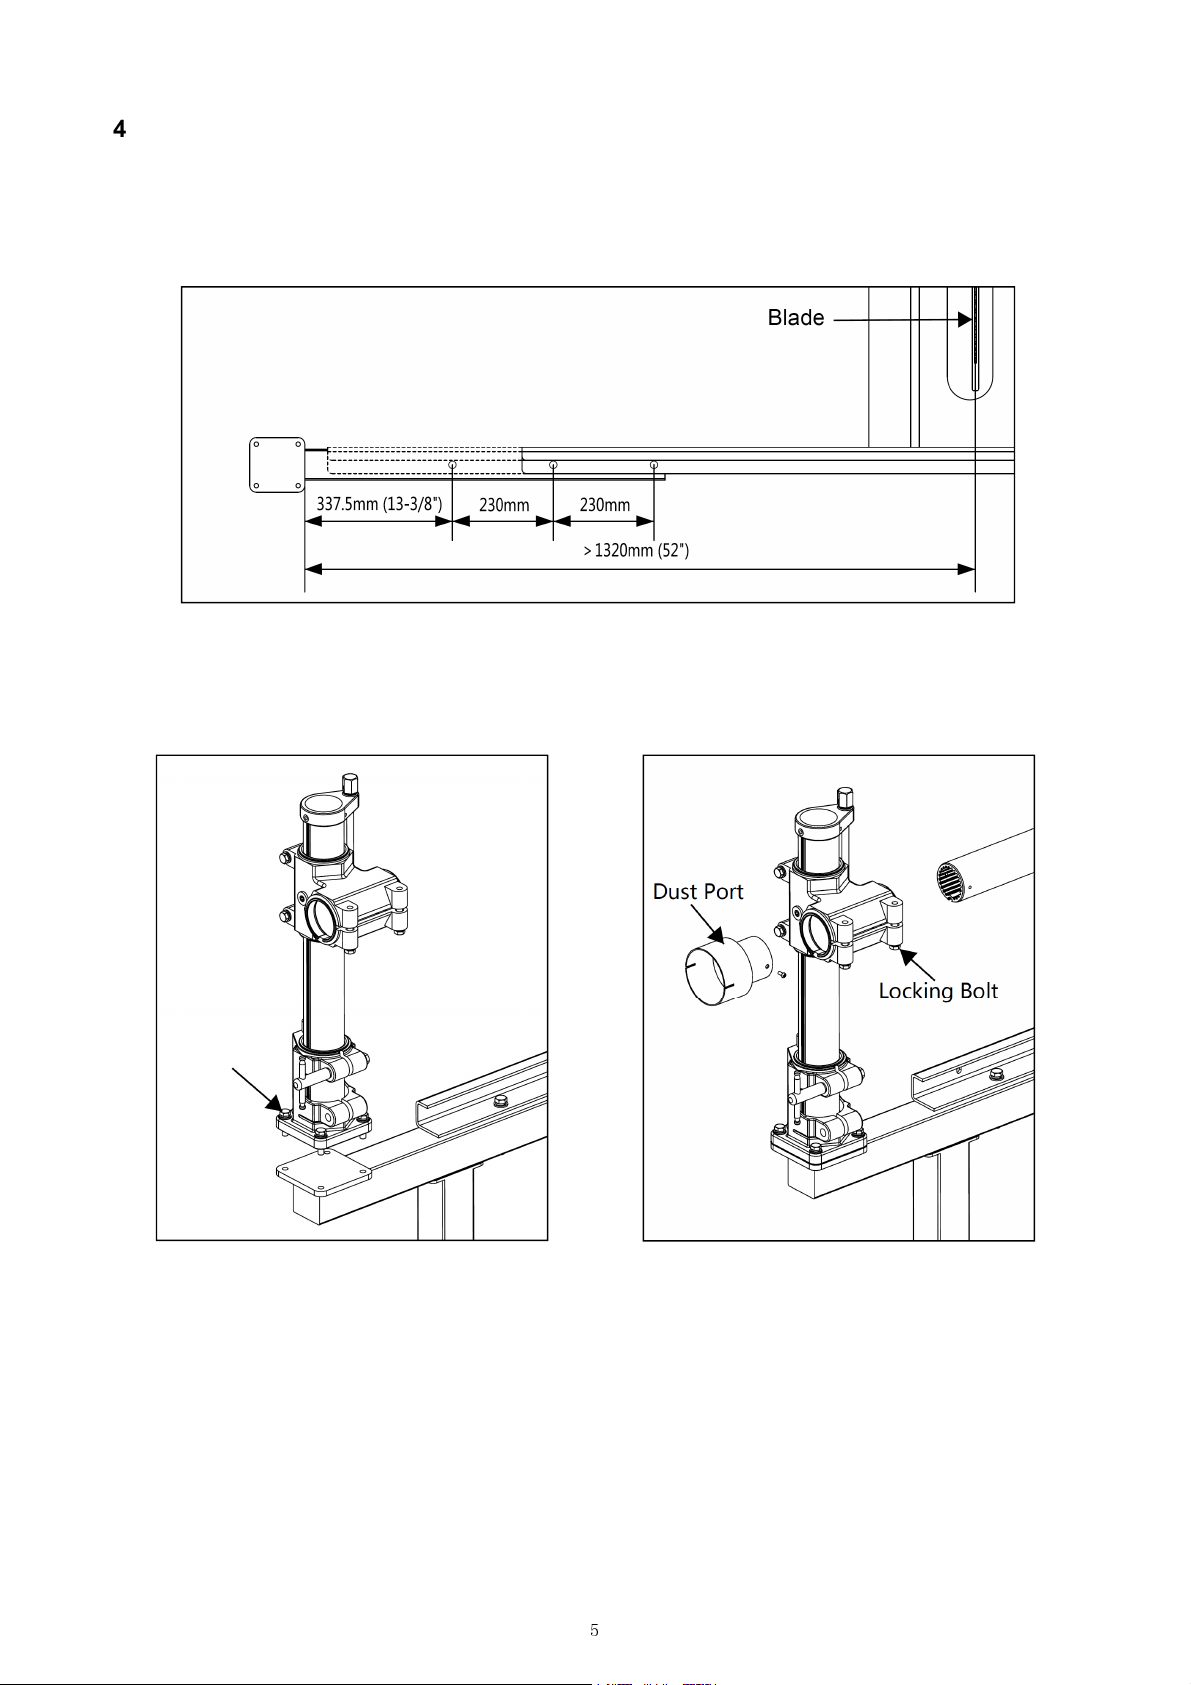
HARVEY S-12S User manual

Shark Universal Overhead Guard Manual
Model: S-12S
Revision B (2019-02-15)
298000903

1
Con en s
1. In roduc ion......................................................................................................................................................... 3
2. Unpacking............................................................................................................................................................ 3
3. Overall Dimensions........................................................................................................................................... 4
4. Ins alla ion........................................................................................................................................................... 4
5. Using and Adjus ing..........................................................................................................................................6
6. Lubrica ion& Cleaning...................................................................................................................................... 8
1.
概述
..................................................................................................................................................................... 10
2.
拆包
..................................................................................................................................................................... 10
3.
整体尺寸
............................................................................................................................................................. 11
4.
安装
..................................................................................................................................................................... 11
5.
使用与调节
......................................................................................................................................................... 13
6.
润滑和清理
......................................................................................................................................................... 14
Exploded View and Par s Lis ........................................................................................................................... 15

2
English Version

3
1. In roduc ion
The model S-12S Shark Universal Overhead Guard attachment is used for the safety
protection and dust collection while operating the ta le saw. The diameter of the dust port is
4”(100mm). This attachment is suita le for the saw with maximum diameter of 12”(305mm).
Its cutting capacity is up to 52”(1320mm). This attachment can e installed on the rear rail
of your ta le saw easily with convenient operation and maintenance. It is fit for the most of
the mainstream products in the market.
Main Fi Model:
------110LG (C300), 110S, 110LC-36
------ G0690, G0691
------ W1819, W1820
2. Unpacking
S-12S is packaged y a high strength corrugated ox, refer to elow ta le for detailed
package information. Please check the contents of the shipping ox y the inventory list
and Fig.1.
NOTE: If you can' find an i em on his lis , check he moun ing loca ions or examine
he packaging ma erials carefully. Occasionally we pre-ins all cer ain componen s
for shipping purposes.
Inven ory
A. Dust port(100mm)
B. Stand pole unit
C. Arm unit
(contains 1 dust port and 2 M5x12 pan head screws)
D. Guard unit
(contains 2 flat transparent shields and 1 spherical
transparent shield)
E. Support arm
(contains 4 sets of M10x40 hex screws for mounting
stand pole; 3 sets of M12x110 screws for mounting
support arm and 2 sets of M8x20 cap screws for
mounting support leg)
F. Support leg unit
(contains 2 sets of M12x110 screws for mounting
support plate Fig. 1
Type Ne /Gross weigh (Kg) Dimensions of Box(mm)
Box 46/54 1732X542X282(H)

4
3. Overall Dimensions (Fig.2)
Fig.2
4. Ins alla ion
Do not connect the machine to electricity before installation!
4.1 Moun ing he Suppor Arm
As shown in Fig.3, mount the support arm (the mounting screws are pre-installed on the
support arm).For 50” rear rail (as shown y dotted line in Fig. 3), the support arm is
mounted y 3 sets of screws; for 30” rear rail, it is mounted y 2 sets of screws.
NOTE: There is no moun ing holes on he mos rear rails, you can drill and ap
moun ing holes wi h diame er of 13mm in o he rear rail if needed , see Fig.5 (30” rear
rail needs wo moun ing holes; 50” rear rail needs hree moun ing holes).
Fig.3 Fig.4

5
4.2 Moun ing he Suppor Leg
As shown in Fig.4, mount the support leg (the mounting screws are pre-installed on the
support arm and support leg).Then adjust the support foot against the floor and tighten.
Remark: Dimension Diagram of Drilling and apping Mounting Holes on the Rear
Rail. (Fig. 5)
Fig.5
4.3 Moun ing he S and Pole
Mount the stand pole unit to the support arm and tighten (the mounting screws are
pre-installed on the support arm), as shown in Fig. 6.
Fig. 6 Fig. 7
4.4 Moun ing he Arm Uni
Remove the dust port (it may e pre-installed on the arm unit), pass the arm unit through
the mounting hole on the stand pole and tighten the locking olt, then re-mount the dust
port, see Fig.7.
4.5 Moun ing he Guard Uni
As shown in Fig. 8, insert the guard unit into the taper socket of the fixed lock on the end
of the arm unit, rotate the locking olt clockwise to tighten it. Then connect the corrugated
pipe installed on the arm unit with the dust port on the guard unit (the pipe fastener is
pre-mounted on the corrugated pipe).

6
No e: This produc is equipped wi h 2 fla ransparen shields and 1 spherical
ransparen shield, you can choose for use as desired. There is no need o remove
any screws while replacing he shield. The shield can be removed by being pushed
a he posi ion and in he direc ion as he arrow shows in Fig. 9. Moun he new
shield in he direc ion opposi e o he removing direc ion.
Fig.8 Fig.9
5. Using and Adjus ing
Fig. 10 shows the overhead guard with every supplied part installed. The dust collecting
device can e connected y the 4” (100mm) dust port on the end of the arm. By using the
handle (A), you can raise the guard up. By releasing the handle (B), you can rotate the
guard counter-clockwise for making it far away from the lade.
Fig. 10

7
No e: You need o adjus he guard posi ion rela ive o he blade before using i .
You mus make sure ha he limi block shown in Fig. 10 is a he limi ing posi ion
when he overhead guard is in working s a e.
You mus make sure ha he guard will no in erfere wi h he riving knife and he
blade .
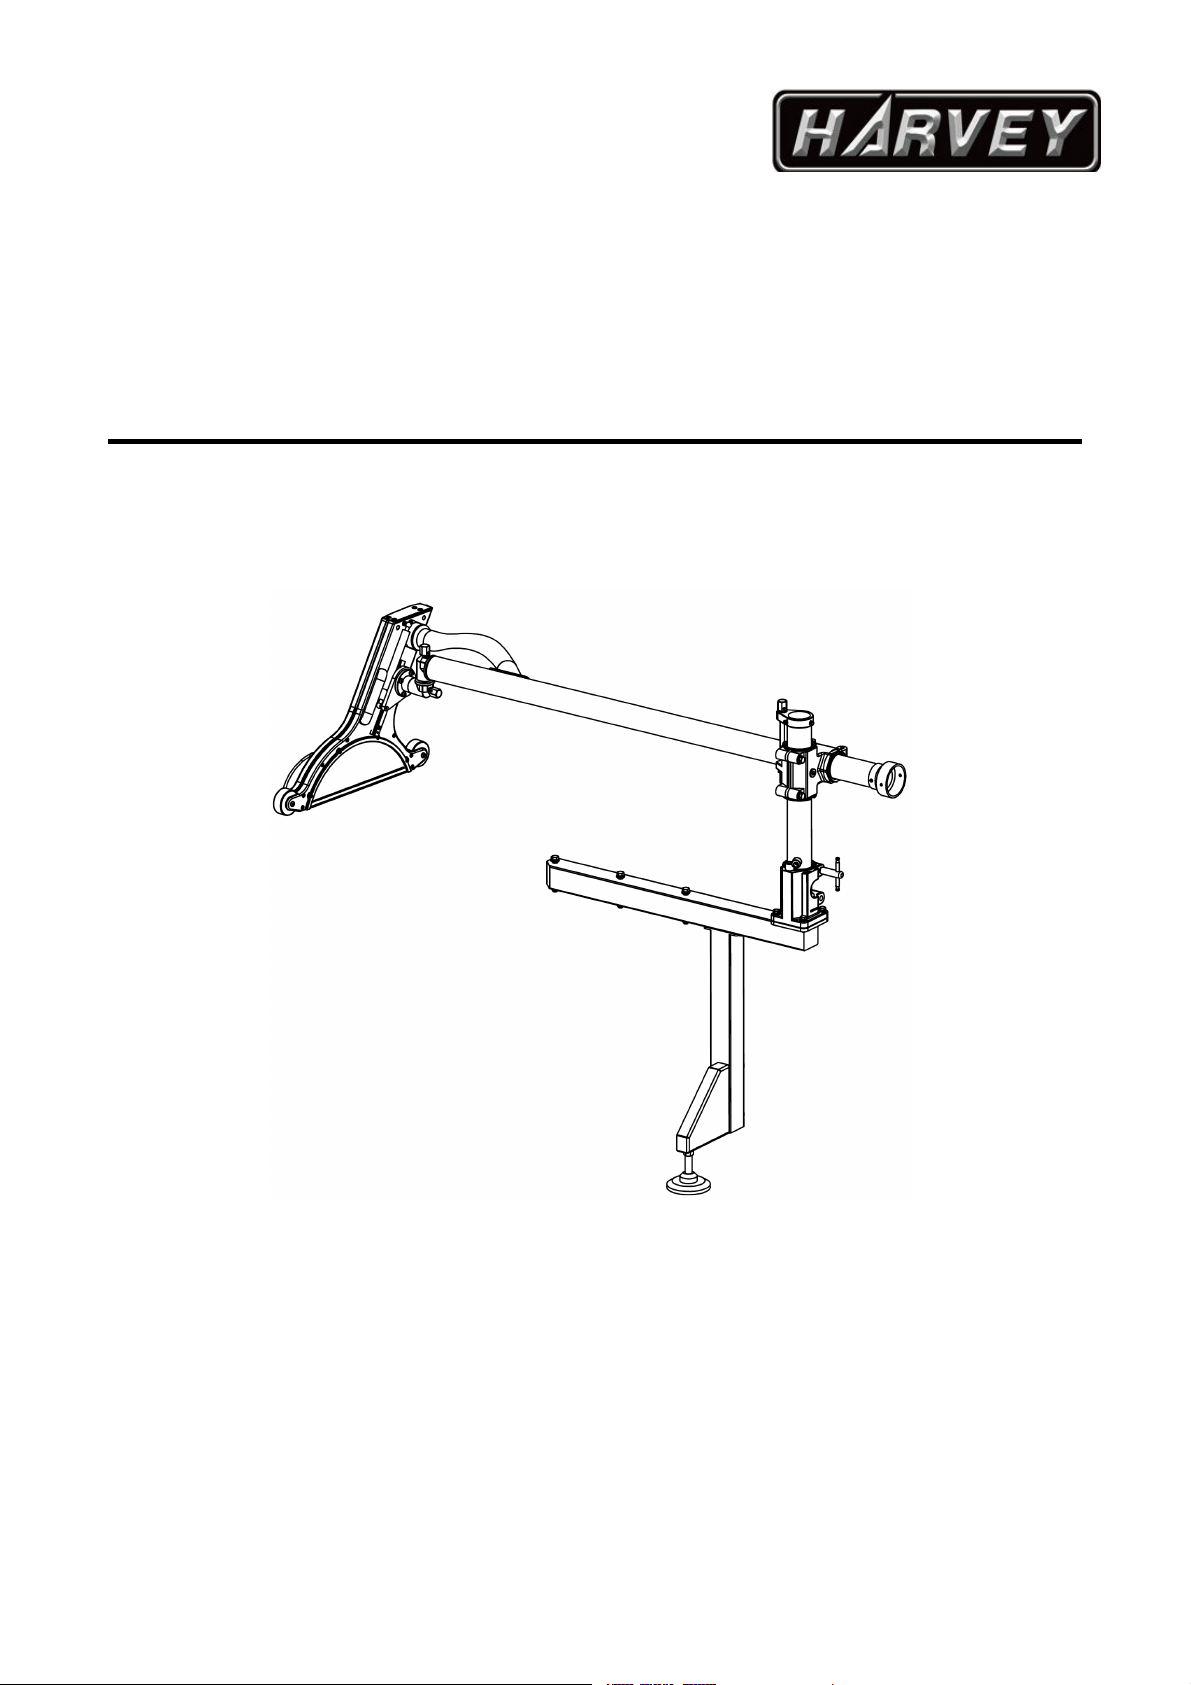
5.1 Adjus ing he Guard Posi ion Rela ive o he Blade (Lef and Righ & Up and
Down)
As shown in Fig.11 ①, loosen the olt (C), the arm unit can e e moved forward or
ackward to adjust the guard position relative to the lade (left and right) for ensuring the
gap etween the lade and guard is less than or equal to15mm, as Fig.11 ②shows.
As shown in Fig.11 ①, loosen the olt (D) and nut (E), rotate the hex nut (F) clockwise or
counterclockwise to ensure the gap etween the lade top teeth and guard is less than or
equal to 5mm when the guard is placed at the highest position,as Fig.11 ③shows. After
adjusting, tighten the olt (D) and nut (E).
Fig.11
5.2 Adjus ing he Parallelism of he Overhead Guard wi h he Blade and Table
As shown in Fig. 12, y releasing the kno (G) counterclockwise, you can swing the guard
to left or right to adjust the parallelism of the overhead guard with the lade; y releasing
the kno (H) counterclockwise, you can flip the guard to adjust the parallelism of the
overhead guard with the ta le.
Fig. 12

8
6. Lubrica ion & Cleaning
Lu rication: You need to lu ricate the guide rail monthly.
Cleaning: You need to clean the dust accommodated on the guide rail and air spring daily.

9
中文版本

10
1. 概述
本款 S-12S“鲨鱼”护罩附件主要用于木工圆锯机的锯切防护及集尘的需要,集尘口直
径4”(100mm ,适合最大锯片直径 12”(305mm ,满足 52”(1320mm 锯切加工的需
要。该附件安装在圆锯机后导轨上,安装及维护简单,操作便捷,可以适配绝大多数市场主
流产品。
主要适配型号:
------110LG (C300), 110S, 110LC-36
------ G0690, G0691
------ W1819, W1820
2. 拆包
该产品采用高强瓦楞纸盒进行包装,包装尺寸信息见下表。参考图 1和对应的清单,核
对包装信息。
注意:
如果您在清点时发现缺失部件,请检查安装位置或 细检查包装材料,可能有些部件出
于运输目的,我们会预装在产品上。
类型 净/毛重 (Kg) 纸箱尺寸(mm)
纸箱
46/54 1732X542X282(
长
X
宽
X
高
)
包装清单
A. 集尘口(100mm)
B. 立柱组件
C. 悬臂组件
含集尘口及安装标准件
(
平圆头螺钉
M5x12) 2PCS
D. 护罩组件
含
2
个平面透明护罩,
1
个球面透明护罩。
E. 支撑臂
含立柱安装标准件
(
角头螺钉
M10x40) 4sets
。
含支撑臂安装标准件
(
角头螺钉
M12x110) 3sets
。
含支腿安装标准件
(
圆柱头螺钉
M8x20) 2sets
。
G. 支腿组件
含支撑板安装标准件
(
角头螺钉
M12x110) 2sets
。
图
1

11
3. 整体尺寸(图 2)
图
2
4.安装
在进行安装前,必须切断设备电源!
4.1 支撑臂安装
如图 3所示,进行支撑臂的安装(安装螺钉预固定在支撑臂上),针对 50inch 导轨(如
图3中虚线所示),采用 3螺钉进行固定,针对 30inch 导轨,采用 2螺钉进行固定。
注意:
大部分后导轨无安装孔,可 据图 5所示,在后导轨上自行加工直径 13mm 的安装孔
(30”导轨配置 2个安装孔,50”导轨配置 3个安装孔)。
图
3
图
4

12
4.2 支腿安装
如图 4所示进行支腿的安装(安装螺钉预固定在支撑臂和支腿上),调整支脚顶住地面
锁紧。
备注:导轨钻孔尺寸示意图
图
5
4.3 立柱安装
如图 6,将立柱安装到支撑臂上(安装螺钉预固定在支撑臂上),锁紧。
图
6
图
7
4.4 悬臂组件安装
拆下集尘口(集尘口可能预装在悬臂上),将悬臂组件穿过立柱安装孔,锁紧锁紧螺钉,
然后重新安装集尘口。(如图 7)
4.5 护罩组件安装
如图 8,将护罩组件,插入悬臂组件头部固定块的锥孔中,顺时针旋转锁紧螺钉锁紧;将
悬臂组件上安装的波纹软管连接到护罩组件的集尘口上。(波纹管管扣预装在波纹管上)
备注:
本附件随机配置了 2平面透明护罩及一 球面透明护罩,可根据需求选用,更换护罩
时,无需拆卸螺钉,只需如图 9箭头所示位置及方向用力推护罩,即可完成透明护罩的拆卸,
按照拆卸的反方向进行新护罩的安装。

13
图 8 图 9
5. 使用与调节
护罩安装完的效果如图 10 所示,通过悬臂尾部 4“(100mm)吸尘口连接集尘装置;
通过把 A可抬起集尘罩;松开把 B可逆时针旋转护罩,让护罩远离锯片。
图 10
注意:
在护罩正常使用前,需要调整护罩相对于锯片的位置。
护罩工作状态时,需确 图 10 所示的限位块处于限位状态(可旋转限位块进行调整)。
必须确 锯片、分料刀与护罩无干涉。

14
5.1 护罩相对于锯片左右及上下位置的调节
如图 11①所示,松开螺钉(C),可向前或者向后移动悬臂,调整锯片护罩与锯片左右相
对 置,确保锯片和护罩的间距小于或等于 15mm,如图 11②所示。
如图 11①所示,松开螺钉(D)和螺母(E),顺时针或逆时针旋转六角螺帽 (F),确保在护
罩移至最高点时,顶端锯齿与护罩的间距小于 5mm,如图 11③所示。完成调节后,锁紧螺
钉(D)和螺母(E) 。
图 11
5.2 护罩相对于锯片及台板平行度的调节
如图 12 所示,逆时针松开旋钮(G),可左右摆动护罩,调节护罩与锯片的平行度;逆时
针松开旋钮(H),可翻转护罩,调节护罩与台板台面的平行度。
图 12
6. 润滑和清理
清理:清理导轨及气弹簧上的灰尘,每天一次。
润滑:对导轨进行润滑,每月一次。

15
Exploded View and Par s lis

16
Par s Lis
REF DESCRIPTION REF DESCRIPTION REF DESCRIPTION
4 Support arm 48 Flat washer 6 78 Dust guide tu e
5 Foot 49 Cover 79 Seal
8 Leg 50 Screw cap 80 Top cover
9 Bottom plate 51 Spring pin 5x18 81 Flat washer 5
10 Plastic ushing 52 Arm 82 Spring washer 5
11 Supporting seat 53 Dust port 83 Cap screw M5-0.8x30
12 Cap screw M6-1x12 54 Cap screw M5-0.8x12 84 Spherical cover
13 Spring washer 6 55 Connection lock C 85 Flat cover
14 Flat washer 6 56 Hex olt M8-1.25x25 86 Cover holder
15 Clamp handle 57 Spring washer 8 87 Shaft circlip
16 Spring washer 12 58 Flat washer 8 88 Bearing
17 Flat washer 12 59 Lock olt 89 Axle pin
19 Hex olt M12-1.75x100 60 Connection lock B 90 Roller
20 Hex olt M10-1.5x40 61 Connection lock A 91 Cap screw M8-1.25x16
21 Spring washer 10 62 Cap screw M8-1.25x25 92 Flat HD screw M4-0.7x16
22 Flat washer 10 65 Cap screw M5-0.8x16 93 Cover ody
36 Column 66 Spring washer 5 94 Cap screw M5-0.8x35
37 Dust port 67 Fixed plate 95 Pan HD screw M8-1.25x20
38 Gasket 68 Linear guide rail 96 Cap screw M5-0.8x25
39 Hex olt M12-1.75x70 69 Air spring 97 Support plate
40 Spring washer 10 70 Thin nut M8-1.25 98 Spring washer 8
41 Flat washer 10 71 Handle 101 Cap screw M8-1.25x20
42 Set screw M12-1.75x16 72 Cap screw M5-0.8x12 102 Limit stop
43 Bracket 73 Spring washer 5 103 Flat washer 12
44 Bolt 74 Flat washer 5 104 Nut M12-1.75
45 Nut 12-1.75 75 Dust port 105 Spring washer 12
46 Hex olt M6-1x20 76 Tu e Clasp 106 Hex olt M12-1.75x110
47 Spring washer 6 77 Tu e

Table of contents
Other HARVEY Industrial Equipment manuals
Popular Industrial Equipment manuals by other brands

BE Ag & Industrial
BE Ag & Industrial BE-P2BFK Operations & parts manual

OmniOn Power
OmniOn Power G391 quick start guide

Rittal
Rittal CMC-TC Master II instruction manual

Masterbuilt
Masterbuilt HITCH-HAUL HDMF Operation manual & safety instructions

BroadAccess
BroadAccess CAG40D-MIN installation guide

Horizon Fitness
Horizon Fitness H-500 user manual

Langmatz
Langmatz EK278 Installation and assembly instructions

Swift-Cut
Swift-Cut Swifty 1250 Installation and operation manual

Pepperl+Fuchs
Pepperl+Fuchs PXV100AQS-F200-R4-V19- 6011 manual

Tescom
Tescom 44-3200 Instructions for use

Dorner
Dorner 3200 Series Installation, maintenance & parts manual

IMS
IMS NANO easy operating instructions