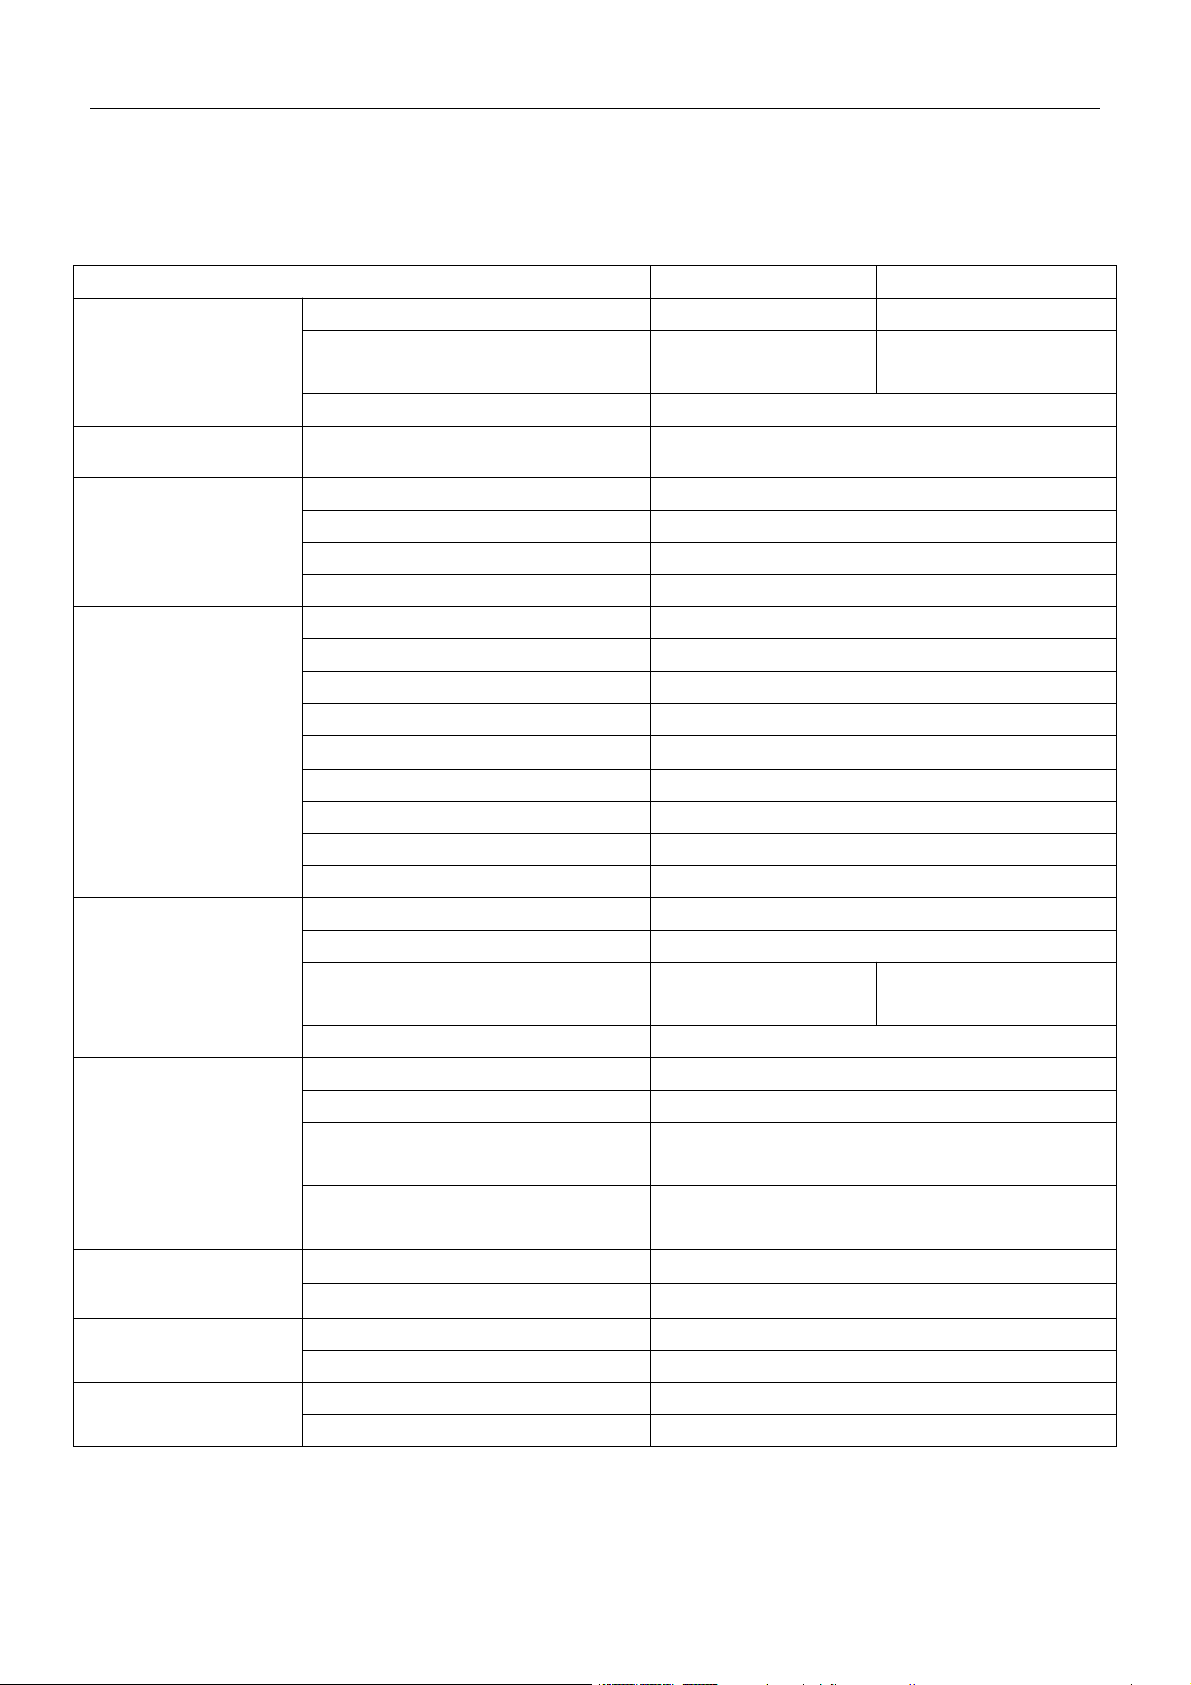
HARVEY C300-30 User manual


Contents
1. Foreword...............................................................................................................................................
2. Warranty Information.........................................................................................................................
3. Machine Description..........................................................................................................................
.................................................................................................................
...................................................................................................................
.....................................................................................................................
................................................................................................................................
.................................................................................................
4. Safety Regu ations.............................................................................................................................
! "# .......................................................................................................
$ " "# ..................................................................................................
%............................................................................................................................ &
"# ..................................................................................................................... &
5. Insta ation of the Machine............................................................................................................... '
(........................................................................................................'
%)..................................................................................................................................... '
*........................................................................................................................................ +
..................................................................................................................................... ,
6. Adjustment.........................................................................................................................................
& -.) ...........................................................................................................
& -)) $ / 0..................................................................
& -.) 1 ,213 "................................................................................
& -)) 3) 4 0....................................................................................... &
7. Operations.......................................................................................................................................... '
' ................................................................................................................... '
' 0 3 ) -.................................................................................. '
' *)................................................................................................................................'
' )........................................................................................................................................ '
8. Maintenance....................................................................................................................................... +
9. Troub e Shooting.............................................................................................................................. ,
10. Exp oded View and Parts List..................................................................................................... 2

1
1. Foreword
$
$
) #
3
3 #
3 #
$
#
$ )
-# 3
$ #
2. Warranty Information
Limited Warranty
#
Proof of Purchase
% #
# 3)
Limited Too Warranty
5 % 3#
) # $# 5
)
/#
# # $)
# #
# # 6 $6
6 )) 6
$# 7 3 6
% 5
36 $ $ 6 .
# 6
) )
% 3) #6
# $ 3
- 86
# 9: 3
# 3 %
9: ) #
; * <
8 # 6 %
" *
6 ) &5))3

2
3. Machine Description
3.1 Technica Parameters
*22/2 *22/2
; 5) ++$ 9 4): 2$ 92 4):
=)>>)
&&??2@
+82282&
+&??2@
2,282282&
9)>: 2?2@ 922 8 2+ :
" ) 3
(
# *
A>3)> A 9 %5:/2B/A
"># 2 (>&2A7 9+2 (>2A7:
B/$ C3
0
(8 $ 2@ 9 :
3) %> % 2@ 9 :
$ $# % 22'/22,@ 9+/ :
$ % % 22/2&@ 9&/ :
(8 C >&@ 92& :
0 2/1
-$ 7 >+@ 9+' :
-$ 22 (
-$ $) # $
*)
(8 ,21 />+@ 9', :
(8 1 />&@ 9 :
(8 )
0/ 2@ 9'& : 2@ 9'2 :
(8 $ @ 92 :
$
$ ) @ 9+&2 :
( $//)>>% 2?'?/>@ 98&+8+ :
C )
$ $ '/>@ 92 :
C )
$ $ 8 />@ 92 :
A) 7 /'>&?,/>+@ 9+'8222 :
= 7 >?,/>+@ 9'8222 :
( ))
( )) # /
( )) #// >) >?>+@ 9,2 8 , :
C 7 @ 922 :

3
3.2 Feature Identification
Fig. 1.
Fig. 1
= 8 5)
( !)
0 !
( $
) 8 5)
&
' 8 $
+
, $
2 0 A
C
0 A) A
( *3
> "
" =)
3.3 Optiona Equipment
S iding tab e
Mode : "/22"
Fig. 1-1
Universa Overhead Guard
Mode : "/"
Fig. 1-2
Router Tab e
Mode : /22
Fig. 1-3
Universa Mobi e Base
Mode : (0/&22
Fig. 1-4

4
3.4 Intended Use
$ % )
$ 83#
) <
D= $ 9)
$6 $6 (C $6 :
D"
D!# $6 *$6 B
$ ) 3
DC# $ 9 6
:
Too s:
D $ $ $ $
% #
D# $
3 9*B: ) $ 9*:
3 92E:6 $ 7
+' 9>+E: 26 8
) 2
Site of insta ation / use:
D $ 6
$. %
8
D 33
$# 8
#
D 33
)6
#
)
D $ # # $ 6
$#
)
D 3 )
# )# )7
# $ $3
D % $ $#
3 $# 7
# ) $
5 # #
) $# ) /)
The machine is prohibited from being used in a
potentia y exp osive atmosphere!
3.5 E ectrica Power Requirements
= ) F / 3)
3 .# )
6 %
# # #
(
A
(
%5
)
B)9B: 2 B
A
9 A7: &2 A7
(5
2 A7
)
-
3
2 B> A
*
* 0% 2-

5
4. Safety Regu ations
4.1 Genera Safety Instructions
1. KNOW YOUR MACHINE.
G
$ 8 =
7H
2. GROUND THE MACHINE.
3 6 ))
% H
3. KEEP THE BLADE GUARDS IN PLACE.
4 ) %) 6 # .
)H
4. REMOVE THE ADJUSTING TOOLS
$ %) %# .)
3 $
) H
5. KEEP THE WORK AREA CLEAN.
* $ 3
(% #
8 $/H
6. AVOID A DANGEROUS ENVIRONMENT
CG
8 4 %
3 ) % H
7. KEEP CHILDREN AWAY.
- 3 $ %
% H
8. MAKE WORKSHOP CHILD-PROOF.
5 %6 $# 3)
%#H
9. USE THE PROPER SPEED.
- $ .$
H
10. USE THE RIGHT MACHINE.
CG
.$ )H
11. WEAR THE PROPER APPAREL.
C )6 )36 %
.# 9)6 : $ # )
) 3) ;/
5 3 3)
) ) 3 $3
$H
12. MAINTAIN PROPER FOOTING.
4 ) $ C
3/ H
13. MAINTAIN THE MACHINE WITH CARE.
4 $
H
14. DISCONNECT MACHINES.
0 3)6 ))
H
15. AVOID ACCIDENTAL STARTING.
(% IE
$ ))) H
16. USE RECOMMENDED ACCESSORIES.
*
#
#
7H
17. NEVER STAND ON THE MACHINE.
" .# 3
C #
H
18. CHECK FOR DAMAGED PARTS.
0 6 )
) $ #
% # #
*%
) 3) 6 $%) 6
)6 # #
- )
) $ # H
19. NEVER LEAVE THE MACHINE RUNNING
UNATTENDED.
@@ C % #
H
20. ADEQUATE LIGHT
) 7 ))
3 % H
4.2 Tab e Saw Safety Instructions
1. ALWAYS USE A GUARD.
-# )6 I/)E
/)
$ # ) %
) )H
2. ALWAYS HOLD THE WORK.
-# % # )
)) H
3. ALWAYS USE A PUSHSTICK OR PUSH
BLOCKS.
$% % $
) %
# %
) H
4. NEVER PERFORM UNSAFE OPERATIONS.
;3 # I/E
) # )
% -#
)) ) % H

6
5. STAND TO THE SIDE WHEN FEEDING
MATERIAL.
;3 3 # # $#
$H
6. USE CAUTION WHEN REACHING FOR
OBJECTS.
;3 $ 3 )
# H
7. SAFE CROSSCUTTING OPERATIONS.
(3 #
)H
8. ENSURE CORRECT FEEDING OF MATERIAL.
% $ )
H
9. CORRECT USAGE WITH THE FENCE.
;3 / )) #
/)H
10. ALWAYS TURN THE POWER TO THE "OFF"
POSITION.
5 ) $6
# @@ H
11. PROVIDE ADEQUATE SUPPORT.
$
) % H
12. AVOID KICKBACKS.
-3 %%$% 9% $% #:
$# %) $ 6 $# %)
$6 $# %)
) )6 $#
) % $ #
$6 $# ) %
3 ) )
) ) H
13. AVOID AWKWARD OPERATIONS.
-3 %
#
3 ) $H
14. CORRECT SAW BLADE USAGE.
; $ $ 8
% 8
H
15. CHIP AND DUST.
$ 8
8 #H
8 $
$ ) )H
16. CHECK
# % $ %
$
2
4.3 Residua Risks
% 7
9) )
%:H
5 3 ) H
-# # ) -6
% % ) #H
) 7 $)
) $
) H
C ; # 3
) $ 3)H
& C ;
) # 3 #
) %)
4.4 Safety Equipment
5 ) %6 0%
$ % )
# - $% $ #
$# Fig. 2
% />E 92 :6 #
%6 )6
3 # ))
$
Fig. 2
Fig. 3

7
5. Insta ation of the Machine
5.1 Transportation of Machines
$ %)
33 3 $ %
# * $ %
) ) ) 3)
-$ /2 2
℉
9/
℃
: $ $#
0 8
3
Whi e transporting or hand ing the machine, be
carefu and et the activity be done by qua ified
personne especia y trained for this kind of
activity!
Whi e the machine is being oaded or un oaded,
make sure a persons are out of the way so
that no person is crushed by the machine.
Se ect the proper transportation device
according to the weight of the machine. Make
sure the ifting capacity of the transportation
device is sufficient for the weight of the
machine.
$ %)
% $ $ $8
Fig. 4 3 $
%
Fig. 4
5.2 Unpacking
J # %)
3 %))
# #
3 )6
# * "3 3
"3 %)
$ $# )
6 ) ) $
Note: If you can't find an item on this ist, check
the mounting ocation on the machine or
examine the packaging materia s carefu y.
Occasiona y we pre-insta certain components
for shipping purposes, or in other packing.

8
5.3 Contents
Main machine box contents:
(Fig. 5-1-----Fig. 5-5)
- ( $ KKKKKKKK
0 ( 3KKKKKKKKKKK
* 8 )KKKKKKKK
C8 $
9 2 > />+E:
(On y for C300-30)
C8 $ KKK
9 + > /'>&E:
(On y for C300-50)
" )KKKKKKKKKKK
" $KKKKKKKKKKKKK
! 0 ) $#KKKKKKK
A 3) %KKKKKKKKKK
A KKKKKKKK
L C $ KKKKKKKKK
4 A8 9) :KK
= %KKKKKKKKKK
( 5 / ' KKKKK
; 5 / > KKK
( ))KKKKKKKKK
Fig. 5-1
Fig. 5-2
Fig. 5-3
Fig. 5-4
Fig. 5-5

9
Fence box contents: (Fig. 5-6)
- $#KKKKKKKKKK
0 K K K K K K KK K K
Fig. 5-6
Rai box contents: (Fig. 5-7)
- KKKKKKKKKKKK
0 KKKKKKKKKKKK
* ) $KKKK
C KKKKKKK
Note
:
The assemb y contains the corresponding
hardware which is not shown in the figure, and
can be checked with the exp oded view.
Fig. 5-7
Note
:
There are two types of the guide rai s, p ease
have a check according to the name p ate of the
machine:
1. 30” guide rai is for C300-30.
2. 50” guide rai is for C300-50.
5.4 Insta ation
0 $)) $#6 %
) ))<
FLOOR: $ )
) 3 (%
$ ) $ )
$
3 $$ %
6 $ $$ $# )
WORKING CLEARANCES:
/>E 92+ :
6 %)
# ) $ 6 #
3 $
$
OUTLET PLACEMENT: $
)
8
) 7
DO NOT assemb e the machine unti you are
certain that the machine is not p ugged in and
the power switch is in the OFF position.
DO NOT connect the machine to the power
source unti you read and understand the entire
User Manua .
5.4.1 Remove the pa et
8 $# (+ 8 $
0 )6 %
$ 3
3) $
6 Fig. 6 =
Fig. 6

10
5.4.2 Hand-whee hand e insta ation
0 /
Fig. 7.
Fig. 7
5.4.3 Extension wings insta ation(Fig.8)
8
) $ )
$ 8 ) /
$
8 ) <
3
$H
8 ) $
) $ )
# $ $#H ) )
$ $ 6 $
# )H
- ) $ $# )
3 H
)) %
$ 8 )
6 %)
8 ) 6 $#
Fig. 8
Fig. 8
5.4.4 Insta the rai & fence
$ $%
0 )) 6 % %
) /
,
) )) #
6 ) ,
Fig. 9
)
$ Fig. 10
Make sure the cam foot contacts the cam on
the fence ock hand e before you p ace the
fence on the rai , otherwise the fence can not
be p aced we ( Fig. 10).
If you need to use the fence on the eft side of
the b ade, remove the knobs (A), as shown in
Fig.10, and move the fence p ate and ocking
bar to the right side of the fence body, secure
them on the eft side of the fence body.
Fig. 10
*%
#
(
Fig.11
)
- )6 ) 6
6
$ # -
% =M=6 =/=N>&@6
)# ) ) $
-

11
$6 $6
% % $) $)
)
Fig. 11
-. #
9Fig.12:
$ /6
$6 #
. ) <
a. A ign the the para e ism between the b ade
and T-s ot.
0 )) #
6 # ) $
$ /6 6.2 A igning
the Tab e T-s ot Para e with the B ade.
b. A ign the the para e ism between the fence
and T-s ot or b ade.
0# .) 9-:6 # .
$ $6 #
. %) ) 0# .) $
% ) 6 #
. # $
$ 0# .) 90:6 #
. )
Fig. 12
By adjusting the support screw (not shown) at
the underneath of the fence, you can raise or
ower the fence to ensure that the underneath
of the fence is para e to the tab e.
5.4.5. Post the tape sca e and ca ibrate
the pointer window (Fig.13)
Post the Tape Sca e
" ) $6 %
H
$6 % $6
I2E #
6 )# % I2E $
6 3 H
# ) I2E %
% #
Ca ibrate the Pointer Window
" ) $6 %
I2E % #
90:6 # 3 6
%$ 9C:6 /. 90:6
3 I2E %
6 %$ 9C:
"
) $6 % I2E %
#
9-:6 # 3 6 %$ 9*:6
/. 9-:6
3 I2E % 6
%$ 9*:
Fig. 13
=
=
-
=% A
0
0
-

12
5.4.6 Insta the switch
(
Fig.14
)
)
) $ $# ) $
/ ) $
Fig. 14
5.4.7 Insta the b ade
3 $ H
$ # $
) 2OH
3 $ $ )
$6 $ $6 %)
6
$ ) $ $H
) $
9 % ):6 Fig. 15.
Fig. 15
5.4.8 Insta the b ade guard
" % %$ 9 Fig. 16)
)) $%
Fig. 16
" $ ) #
$%6 % %$
)) $% %)
))
Fig.17 $ )
Fig. 17
Check if the saw b ade is tightened before
operating the machine.
Give the spreader an upward tug to verify if it is
ocked in p ace.

13
5.4
.
9
Extraction
system
A dust co ection device shou d be used by the
customer
,
the dust extraction equipment must
be switched on before commencing machining.
E 922:
(Fig.18:
Fig. 18
<
< '2 *( 9+22 P>:
#) < 22
C# < ,' ( 92 >:
5 < ( 9+ >: 9
+Q:
5.4.10 Motor cover insta ation
3 $# )
) % $
Fig. 19.
Fig. 19
5.4.11 Miter gauge insta ation
))
)) # )) %
) )
" )) / $
6 . $
# )
/
5.4.12 E ectrica insta ation
Wiring shou d on y be done by professiona
e ectricians.
A ways make sure the machine is proper y
grounded. A exposed conductive parts shou d
be connected to the protective ground circuit.
An over-vo tage protection device shou d be
provided by end user.
The circuit breaker sha be insta ed to supp y
e ectric power to this machine, in order to
protect peop e against e ectrica shock due to
incidenta contact.
*% 3) # $#
6 G
6
# 3) #
- ) 3 6
Checking:
- ) ) 6 6 %
) <
*% )
) #
*% 6
) $ )
*% IE $

14
ELECTRICAL DIAGRAM
3HP (2.2kW) / 230V / 1PH

15
6. Adjustment
Before operation, P ease make adjustments as
fo owings:
6.1 Adjusting the Rip Fence
0 ) 6
# $ ) #
5.4.4 Insta the rai & fence
6.2 A igning the Tab e T-s ot Para e with
the B ade
$ / $ )
$ ) $
$% ) $
$ / 3 $ +2O
/ ) 8
$ $ $
$ 2
Fig. 20.
Fig. 20
. #6
Fig. 21 $
$ (% .
$ 2
/)
Fig. 21
6.3 Adjusting the 45° and 90° Positive
Stops
.$ 1
,21 #/ $ #
) 3 $ 6 #
/.
. 1 3 "< 3 $6
%) 9-: 90:
. 3
) %) 9-:6 Fig.22
Fig. 22
. ,21 3 "< 36
9-: 90:
. 3 )
%) 9-:6 Fig.23
Fig. 23

16
6.4 A igning the Riving Knife with B ade
3) % $ ) $
# )6 3) %
% # ) 6 )
% %%$% )) )
$ 3) % % 3)
% @) 76@ Fig. 24
Fig. 24
) #6 .
) 9Fig. 25:<
C
3 $
= 90:6
. 9-:
) # 6 )
9-: 90:
/ $
Fig. 25
3) %3 $
) +2 ;>
²
$ 6 3 9
2 22 : 3 %
9%:
2 ) $ -
Fig. 26.
Fig. 26
Key:
e riving knife thickness
b sa blade base
B kerf ( idth of sa blade cut)
3) % )
$ $ +
# ) -
Fig. 27.
Fig. 27
) 3) % $
$

17
7. Operations
7.1 E ectrica Operation
Fig. 28.
“ON” Button: "
“OFF” Button: "
Ho e for Safety Lock: 5 )
6 # 3
/
Fig. 28
7.2 B ade E evation and Ti ting Adjustment
To adjust the b ade e evation : = %
%$ 9*: Fig. 29 3
9C: 5 )
$6 /) %$ 9*: $
$ >+E >E $3
$)
To adjust the b ade ti ting : = %
%$ 90: 9-: 5
) $6 /) %$ 90:
Fig. 29.
Fig. 29
7.3 Crosscutting
@*)@ ) )
% /
6 (C #6 )
) %
*) ))
) % %
) )) 3 $
)) % $
" # % # )
)) $
) # 3 )
% A 6
) % 6
)) % $%
) 0 ) % $%6
) )3 % #
3 % )# # $
;3 % # ) %
$ ) -
3 /
) ;3 / ))
) ;3 ))
$
7.4 Ripping
@ )@ ) )
% /
(C #6 ) #
) )
)
% ) % )
$
$ " % ) 6
3 ) ) %
$ ) $
) 3 %
)
" 3 % )
) ;36
) A %
$ )
$
-#6
$6 % $)
$% ) )
% $
) ) 3
Other manuals for C300-30
1
This manual suits for next models
1
Table of contents
Other HARVEY Saw manuals

HARVEY
HARVEY HW110S-36G User manual

HARVEY
HARVEY HW110TC User manual

HARVEY
HARVEY C200 Series User manual

HARVEY
HARVEY HPS1600E User manual

HARVEY
HARVEY C14 User manual

HARVEY
HARVEY HW615 User manual

HARVEY
HARVEY Axminster AT254LTS User manual

HARVEY
HARVEY C-18VS User manual

HARVEY
HARVEY C300-30 User manual

HARVEY
HARVEY HW110LC-36 User manual