manuals.online logo
Brands
  1. Home
  2. •
  3. Brands
  4. •
  5. Hatteras Hammocks
  6. •
  7. Baby Swing
  8. •
  9. Hatteras Hammocks Single Swing With Oak Arms User manual

Hatteras Hammocks Single Swing With Oak Arms User manual

Weight limit: 350 pounds
YOUR BOX SHOULD CONTAIN:
1 - Single Swing Cushion
1 - Oak Top Stick (4 Sided)
1 - Oak Bottom Stick (5 Sided)
1 - Oak Spreader Bar
2 - Curved Oak Arms
2 - Chain and Ring Assemblies
1 - Hanging Bracket Assembly
1- Bracket
2 - Lag Bolts 2” x ¼”
1 - S-Hook
1 - Hardware Pack:
2 - Carriage Bolts 3” x 3/8”
2 - Carriage Bolts 2½” x 3/8”
2 - Carriage Bolts 1¼” x 3/8”
10 - Nuts 3/8”
14 - Washers 3/8”
Before beginning assembly,
check that you have all parts!
Single Swing With Oak Arms
Congratulations on your purchase of a Hatteras Hammocks®Single Swing With
Oak Arms! We believe you’ll nd it to be a product of unsurpassed quality, dura-
bility and relaxation potential, a source of enjoyment for you and yours for years
to come. Once assembled, your new swing may be hung from a wooden beam
sturdy enough to support at least 350 pounds, or from one of the quality swing
stands that we offer.
ASSEMBLY INSTRUCTIONS
NOTE: If you plan to hang your Hatteras Hammocks® Single Swing With Oak Arms
on a swing stand, it’s a good idea to assemble the stand, according to its instruc-
tions, before beginning assembly of your swing itself.
STEP 1. Insert the Oak Top Stick through the top fabric sleeve at the back of the Single
Swing Cushion (the sleeve attached to the smallest section of cushion). Next, slide the
Oak Bottom Stick into the fabric sleeve at the bottom front of the cushion (the sleeve at-
tached to the largest section of cushion). The narrowest part of the
Oak Bottom Stick should be facing upward (into the curve of the
Curved Oak Arm, once you install it); improper positioning can lead
to chafing and tearing of cushion fabric.
STEP 2. To connect the Curved Oak Arms, first position each arm so
the end with the two holes is at the top (FIGURE 1). Next, insert (from
front to back) a 2½” Carriage Bolt through the Curved Oak Arm’s
topmost hole, and then through the second hole from the end on
the Oak Top Stick (FIGURE 2). Add first a Washer and then a Nut to
the end of the bolt, hand-tightening only.
STEP 3. To connect the other end of the same Curved Oak Arm to
the Oak Bottom Stick, insert (from front to back) a 3” Carriage Bolt
through the single hole at the bottom of the arm, and then also
through the second hole from the end on the Oak Bottom Stick
(FIGURE 3). Add first a Washer and then a Nut to the end of the bolt,
hand-tightening only.
Questions about our
products? Please call our
toll-free customer service
line at (800) 643-3522.
Visit us online at
hatterashammocks.com.
PARTS LIST
TOOLS YOU’LL NEED:
9/16” wrench or socket,
or adjustable wrench
(not included)
NOTE: If you’re NOT hanging
your swing from a Hatteras
Hammocks® swing stand and
instead are installing it onto a
wood beam or tree limb, you’ll
need a few additional tools
(also not included):
ADDITONAL TOOLS:
• 7/16” wrench or socket,
or adjustable wrench
• Drill with ¼” bit
• Sharpened pencil
Instructions continue on back of page
FIGURE 3
FIGURE 2
FIGURE 1
WARRANTY | Product guaranteed free of defects in workmanship and materials for up to one year from date of pur-
chase. If an item is found to be defective within that time, Hatteras Hammocks® will replace it at no charge. Normal wear
and tear, including prolonged exposure to snow, rain and heavy humidity, is not covered, nor is mold, mildew or damage
from improper storage, maintenance or installation. An original sales receipt must accompany any returned product,
along with a Return Authorization Number from Hatteras Hammocks® customer service; call toll-free at (800) 643-3522.
#6000-HH/ 022111
STEP 4. Repeat STEP 2 and STEP 3 to attach the other
Curved Oak Arm.
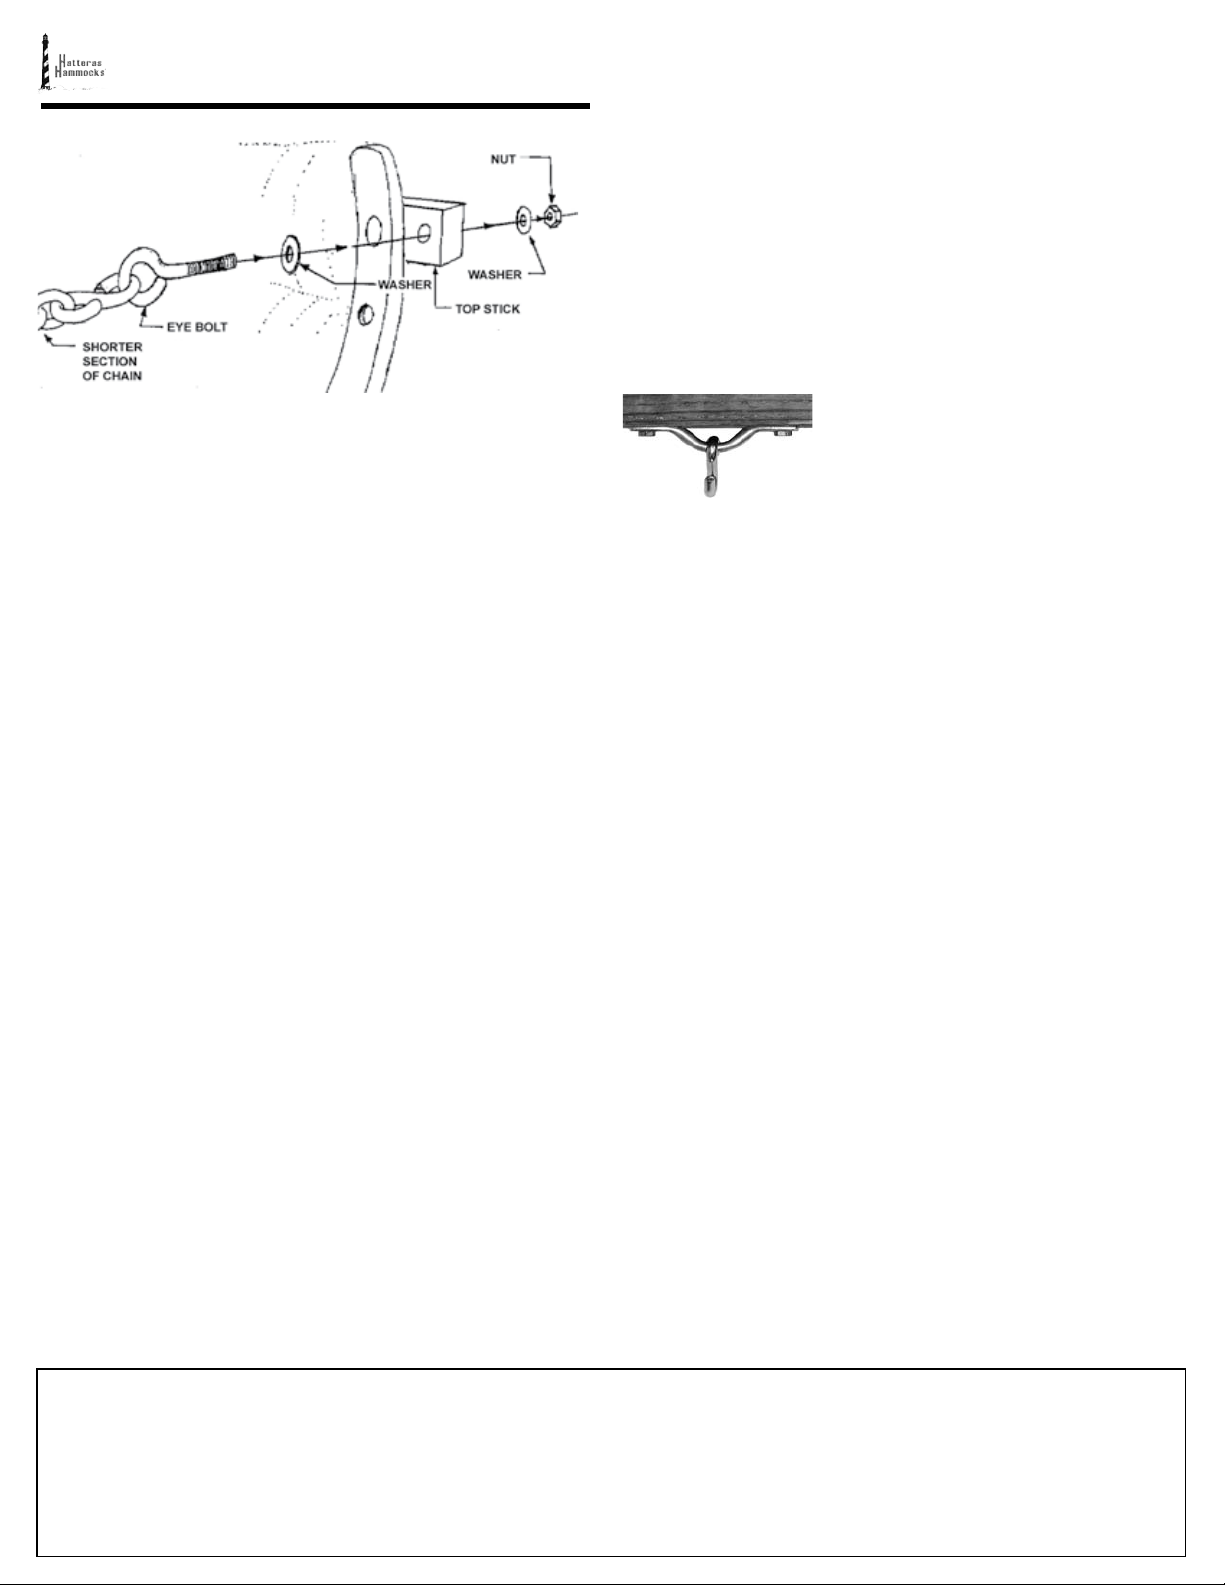
STEP 5. To attach the hanging chains, first place a Washer
on the eye bolt end of the shorter section of one Chain
and Ring Assembly, then insert the end of the eye bolt
through the outside hole on one Oak Top Stick. On the
protruding end of the eye bolt, add first a Washer and then
a Nut (FIGURE 4). Tighten with your 9/16” wrench or adjust-
able wrench, but do not over-tighten.
STEP 6. On that same Chain and Ring Assembly from STEP 5,
place a Washer on the eye bolt end of the longer section
of chain, then insert the eye bolt through the outside hole
on the Oak Bottom Stick on the same side of the swing; this
hole is drilled through the narrow side of the stick. On the
eye bolt’s protruding end, add first a Washer and then a
Nut (FIGURE 3, previous page). Tighten with your 9/16” wrench
or socket, or adjustable wrench, but do not over-tighten.
STEP 7. Repeat STEP 5 and STEP 6 to attach other Chain and
Ring Assembly.
STEP 8. Take the remaining two Carriage Bolts (size 1¼” x
3/8”) and fit them (from front to back) through each re-
maining hole on the Curved Oak Arms. Add first a Washer
and then a Nut, then tighten with your 9/16” wrench or
socket, or adjustable wrench, but do not over-tighten.
These bolts are for appearance only.
STEP 9. Slide each hole of the Oak Spreader Bar over one
free length of chain on the Chain and Ring Assembly, until
the wood rests atop an O-ring.
STEP 10. Fully tighten all the Carriage Bolts only AFTER you
have already hung your swing.
HANGING FROM A WOODEN BEAM
STEP 1. Choose a hanging location 6½-8½ feet above
ground/floor level that will safely support 350 pounds. The
hanging beam should be wood, though NOT spruce or
white pine, that’s free of knots, cracks and rot.
NOTE: The hanging bracket should ONLY be used with
wood; it’s NOT safe or approved for use with concrete
or steel surfaces, plastic construction, particle board or
other composite material, or vinyl siding. For installing in
any other surface but wood, consult a building expert for
advice on proper installation, including questions about
weight capacity of a potential installation surface. Hatteras
Hammocks® is not responsible for improper installation.
STEP 2. Position the hanging bracket along the center of
the wooden beam you’ve chosen for hanging your swing.
Mark drill holes on the beam using a pencil through the
bracket’s two bolt holes.
STEP 3. Drill approximately 2½ inches deep at the spots you
marked through the bracket bolt holes.
STEP 4. Fit the S-hook onto the hang-
ing bracket BEFORE bracket installa-
tion; the S-hook will NOT fit onto the
bracket once the bracket is installed.
Next, position bracket holes over drill
holes, and install the two bolts by
hand. Tighten the bolts with a 7/16” wrench or socket, or
adjustable wrench. Do not overtighten, as bolts can strip
the wood, compromising the swing’s weight capacity.
STEP 5. Hook both free links of swing chain to the bottom of
the S-Hook. Adjust swing height by changing the length of
the hanging chains.
FINAL INSTALLATION ADJUSTMENTS
Before using your new swing, make sure it’s hanging
squarely; differing numbers of chain lengths on each side
can cause the swing to hang unevenly.
When sitting in the swing, your feet should touch the
ground with your knees slightly bent, for maximum comfort
and safety. Adjust the height of your swing to your tastes by
changing the chain lengths.
CARE & MAINTENANCE
Your Hatteras Hammocks® Single Swing With Oak Arms,
crafted of the highest quality outdoor fabric available, is
made to be weather-durable and resistant to both fading
and staining. However, in order to keep your swing in the
best condition for the longest possible time, it’s nonetheless
advisable to bring it indoors during extreme weather condi-
tions, or extended periods of wet weather.
Periodic cleaning of the fabric will likewise help ensure
its longest possible life. Wash the fabric briskly with a mild
solution of liquid dishwashing soap and warm water, rinse
thoroughly with clean water and then allow the fabric to
air-dry. For stubborn stains or to remove suntan oil, use a
soft brush for scrubbing, or even a mild bleach-and-water
solution, again rinsing thoroughly and then allowing the
fabric to air-dry before re-hanging your swing, or storing it.
Single Swing With Oak Arms, Instructions, P. 2
INSTALLED
BRACKET,
S-HOOK
FIGURE 4

Other Hatteras Hammocks Baby Swing manuals

Hatteras Hammocks Deluxe Cushioned Double Swing User manual

Hatteras Hammocks

Hatteras Hammocks Deluxe Cushioned Double Swing User manual

Popular Baby Swing manuals by other brands

SPIELWERK SWKS001 manual

SPIELWERK

SPIELWERK SWKS001 manual

stilum simius2 Maintenance instructions

stilum

stilum simius2 Maintenance instructions

GiFi Bali manual

GiFi

GiFi Bali manual

babymoov A055017 Instructions for use

babymoov

babymoov A055017 Instructions for use

Fisher-Price BMM27 quick start

Fisher-Price

Fisher-Price BMM27 quick start

VERTBAUDET 70334 0022 manual

VERTBAUDET

VERTBAUDET 70334 0022 manual

Fisher-Price T1828 user manual

Fisher-Price

Fisher-Price T1828 user manual

Fisher-Price BMF34 instructions

Fisher-Price

Fisher-Price BMF34 instructions

Fisher-Price CMR54 instructions

Fisher-Price

Fisher-Price CMR54 instructions

Pragma A030.135.01 user manual

Pragma

Pragma A030.135.01 user manual

ABC Design Twister Instruction

ABC Design

ABC Design Twister Instruction

Outsunny Tete-to-Tete Assembly instructions

Outsunny

Outsunny Tete-to-Tete Assembly instructions

Graco Lovin' Hug 1757814 owner's manual

Graco

Graco Lovin' Hug 1757814 owner's manual

Fisher-Price V0206 manual

Fisher-Price

Fisher-Price V0206 manual

Graco 4E02LJG - Bumper Jumper in Little Jungle owner's manual

Graco

Graco 4E02LJG - Bumper Jumper in Little Jungle owner's manual

Jamara Grow With Me 3in1 instructions

Jamara

Jamara Grow With Me 3in1 instructions

Joie serina swivel instruction manual

Joie

Joie serina swivel instruction manual

goba Sports Group VivaActive VASW001 manual

goba Sports Group

goba Sports Group VivaActive VASW001 manual

manuals.online logo
manuals.online logoBrands
  • About & Mission
  • Contact us
  • Privacy Policy
  • Terms and Conditions

Copyright 2025 Manuals.Online. All Rights Reserved.