HAUL MASTER 66552 Installation manual

MOTOCROSS DIRT BIKE STAND
66552
SET UP AND OPERATING INSTRUCTIONS
Distributed exclusively by Harbor Freight Tools®.
3491 Mission Oaks Blvd., Camarillo, CA 93011
Visit our website at: http://www.harborfreight.com
Read this material before using this product.
Failure to do so can result in serious injury.
SAVE THIS MANUAL.
Copyright©2008 by Harbor Freight Tools®. All rights reserved. No portion of this manual or any artwork
contained herein may be reproduced in any shape or form without the express written consent of
Harbor Freight Tools. Diagrams within this manual may not be drawn proportionally. Due to continuing
improvements, actual product may differ slightly from the product described herein. Tools required for
assembly and service may not be included.
For technical questions or replacement parts, please call 1-800-444-3353.

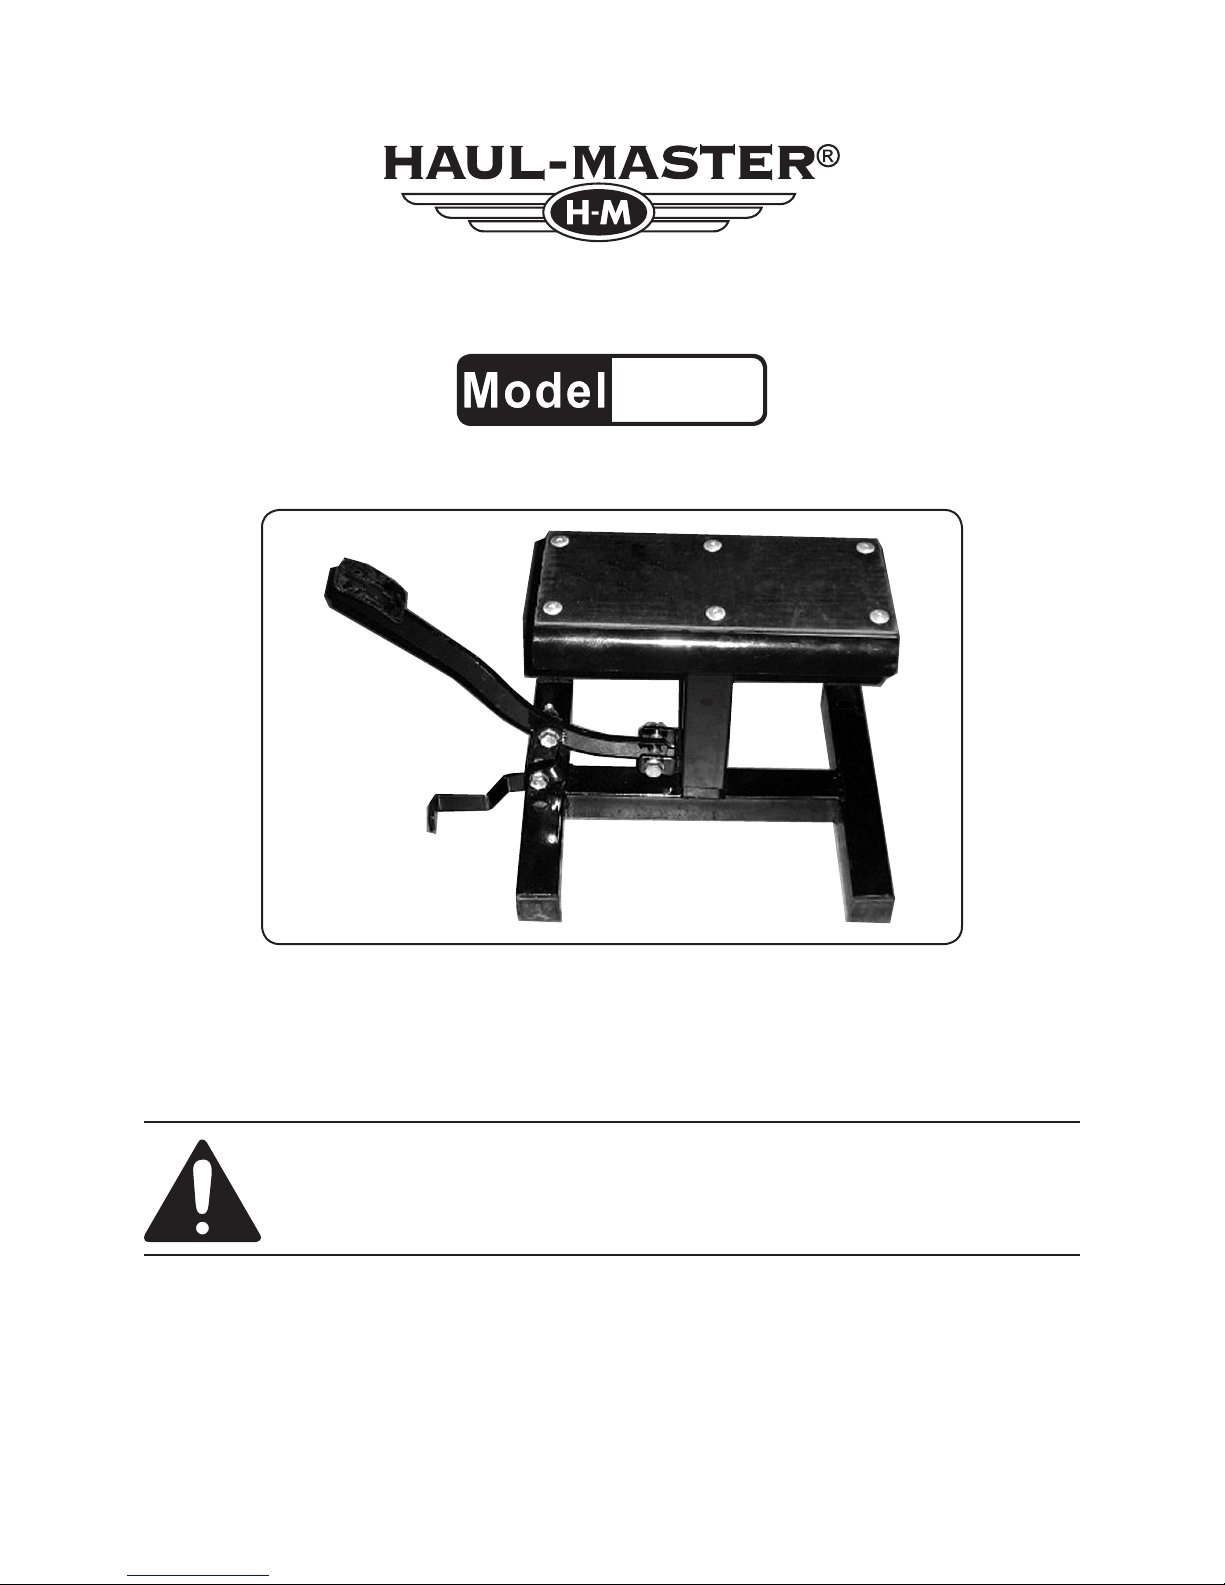
SKU 66552 For technical questions, please call 1-800-444-3353. Page 2
SAVE THIS MANUAL
Keep this manual for the safety warn-
ings and precautions, assembly, operat-
ing, inspection, maintenance and cleaning
procedures. Write the product’s serial
number in the back of the manual near the
assembly diagram (or month and year of
purchase if product has no number). Keep
this manual and the receipt in a safe and
dry place for future reference.
IMPORTANT SAFETY
INFORMATION
In this manual, on the labeling,
and all other information provid-
ed with this product:
This is the safety alert
symbol. It is used to alert
you to potential personal
injury hazards. Obey all
safety messages that
follow this symbol to avoid
possible injury or death.
DANGER indicates
a hazardous
situation which, if not
avoided, will result in death or
serious injury.
WARNING
indicates a
hazardous situation which, if
not avoided, could result in
death or serious injury.
CAUTION, used
with the safety
alert symbol, indicates a
hazardous situation which, if
not avoided, could result in
minor or moderate injury.
NOTICE is used to
address practices
not related to personal injury.
CAUTION, without
the safety alert
symbol, is used to address
practices not related to
personal injury.
General Safety Warnings
WARNING Read all safety
warnings and instructions.
Failure to follow the warnings and
instructions may result in serious
injury.
Save all warnings and
instructions for future reference.
Work area safety1.
Keep work area clean and well lit.a.
Cluttered or dark areas invite acci-
dents.
Keep children and bystandersb.
away while operating a tool. Dis-
tractions can cause you to lose con-
trol.
Personal safety2.
Stay alert, watch what you are do-a.
ing and use common sense when
operating a tool. Do not use a
tool while you are tired or under
the inuence of drugs, alcohol or
medication. A moment of inattention
while operating tools may result in
serious personal injury.
Use personal protective equip-b.
ment. Always wear eye protection.
Safety equipment such as dust mask,
non-skid safety shoes, hard hat, or
hearing protection used for appropri-
ate conditions will reduce personal
injuries.

SKU 66552 For technical questions, please call 1-800-444-3353. Page 3
Do not overreach. Keep properc.footing and balance at all times.
This enables better control of the tool
in unexpected situations.
Dress properly. Do not wear loosed.
clothing or jewelry. Keep your
hair, clothing and gloves away
from moving parts. Loose clothes,
jewelry or long hair can be caught in
moving parts.
Only use safety equipment thate.
has been approved by an appropri-
ate standards agency. Unapproved
safety equipment may not provide
adequate protection. Eye protection
must be ANSI-approved and breath-
ing protection must be NIOSH-ap-
proved for the specic hazards in the
work area.
Motocross Bike Stand
Safety Warnings
Strap load to Saddle before lifting.1.
Keep clear of Release Bar and do not2. leave unattended while supporting
load.
Do not exceed 350 lb. capacity.3.
Center load on Saddle.4.
Raise and lower using second person5. to stabilize load.
Keep out from under load while low-6. ering.
Inspect before every use; do not use7. if parts are loose or damaged.
Use as intended only.8.
Operate on at and level surface.9.
Do not rock load on Stand.10.
Keep out of reach of children.11.
Maintain labels and nameplates on12. the tool. These carry important safety
information. If unreadable or miss-
ing, contact Harbor Freight Tools for a
replacement.
The warnings, precautions, and in-13. structions discussed in this instruction
manual cannot cover all possible con-
ditions and situations that may occur.
It must be understood by the operator
that common sense and caution are
factors which cannot be built into this
product, but must be supplied by the
operator.
SAVE THESE
INSTRUCTIONS.

SKU 66552 For technical questions, please call 1-800-444-3353. Page 4
SPECIFICATIONS
Weight Capacity 350 lb.
UNPACKING
When unpacking, make sure that the
item is intact and undamaged. If any parts
are missing or broken, please call Harbor
Freight Tools at the number shown on the
cover of this manual as soon as possible.
ASSEMBLY
Read the ENTIRE IMPORTANT
SAFETY INFORMATION
section at the beginning of this
manual including all text under
subheadings therein before set
up or use of this product.
Note: For additional information regarding
the parts listed in the following pages,
refer to the Assembly Diagram near
the end of this manual.
Make sure rubber end caps are se-1. cured into feet of Base (2).
Steps 2 and 3Steps 6 and 7
Steps 4 and 5
U-Shaped
Bracket
Pedal
Long
Bolt
2. Insert Long Bolt (6) through:
Washer (9);•
One hole in U-shaped Bracket un-• der Saddle (1);
Bushing (10);•
Hole in end of Pedal (3);•
Bushing (10);•
Other hole in U-shaped Bracket;•
Washer (9).•
Secure Long Bolt3. with a Lock Nut (8).
Insert Short Bolt (7) through:4.
Washer (9);•
Mounting Bracket (5);•
Washer (9);•
Remaining hole in Pedal (3);•
Washer (9);•
Remaining Mounting Bracket (5);•
Washer (9).•
Secure Short Bolt with a Lock Nut (8).5.
Insert remaining Short Bolt (7)6. through:
Washer (9);•
Release Bar (4);•
Washer (9);•
Remaining hole in Mounting Brack-• et (5);
Washer (9);•

SKU 66552 For technical questions, please call 1-800-444-3353. Page 5
Hole in foot on Base (2);•
Washer (9);•
Remaining hole in second Mounting• Bracket (5);
Washer (9).•
Secure Short Bolt with Lock Nut (8).7.
Before using the Bike Stand with a8. load, test the operation of the Pedal
and Release Bar, without any load,
following the operating instructions
below.
OPERATING INSTRUCTIONS
Read the ENTIRE IMPORTANT
SAFETY INFORMATION
section at the beginning of this
manual including all text under
subheadings therein before set
up or use of this product.
Locate Stand on hard, at, and level 1. surface able to withstand load without
deforming.
Center dirt bike over Saddle and2. se-
cure to Saddle with tie-down strap
(sold separately) before lifting.
Using second person to stabilize3. load, slowly raise Saddle by de-
pressing Pedal with your foot until
Saddle is fully raised.
Locking
Pin (11)
R-Pin
(12)
4. Insert Locking Pin (11) fully through
the hole in the saddle and the base
to secure the stand in the up position.
Lock it in place with the R-Pin (12)
5. WARNING! Stay clear of Release
Bar while Saddle is elevated and in
use.
Remove tools from under stand be-6. fore lowering.
To lower Saddle, keep clear and7. remove the R-Pin and Locking Pin.
Place foot on Release Bar and Pedal.
Using second person to stabilize
load, press on Release bar while
guiding Pedal up to smoothly lower
Saddle.
This manual suits for next models
1
Table of contents
Other HAUL MASTER Bicycle Accessories manuals
Popular Bicycle Accessories manuals by other brands

Specialized
Specialized Elite CylcoComputer user manual

Sigma
Sigma BC 16.16 manual

Playcore
Playcore Dero Setbacks installation instructions

VDO Cyclecomputing
VDO Cyclecomputing x3dw instruction manual

Cateye
Cateye RAPID X2 manual

buratti meccanica
buratti meccanica Clorofilla Trail Use and maintenance manual