Havso Nikolina 3.0 User manual

Nikolina 3.0
Bruksanvisning
Blender Mix & Go
Blandar enkelt dina favoritsmoothies
Svenska, English

2

3
Svenska
Delar och innehåll 4
Säkerhetsanvisningar 5–6
Användning 7–9
Tips 10
Rengöring 11
English
Parts 12
Safety Instructions 13–14
How to use 15–17
Tips 18
Cleaning and maintenance 19
Nikolina 3.0
Blender Mix & Go
Blandar enkelt dina favoritsmoothies
4
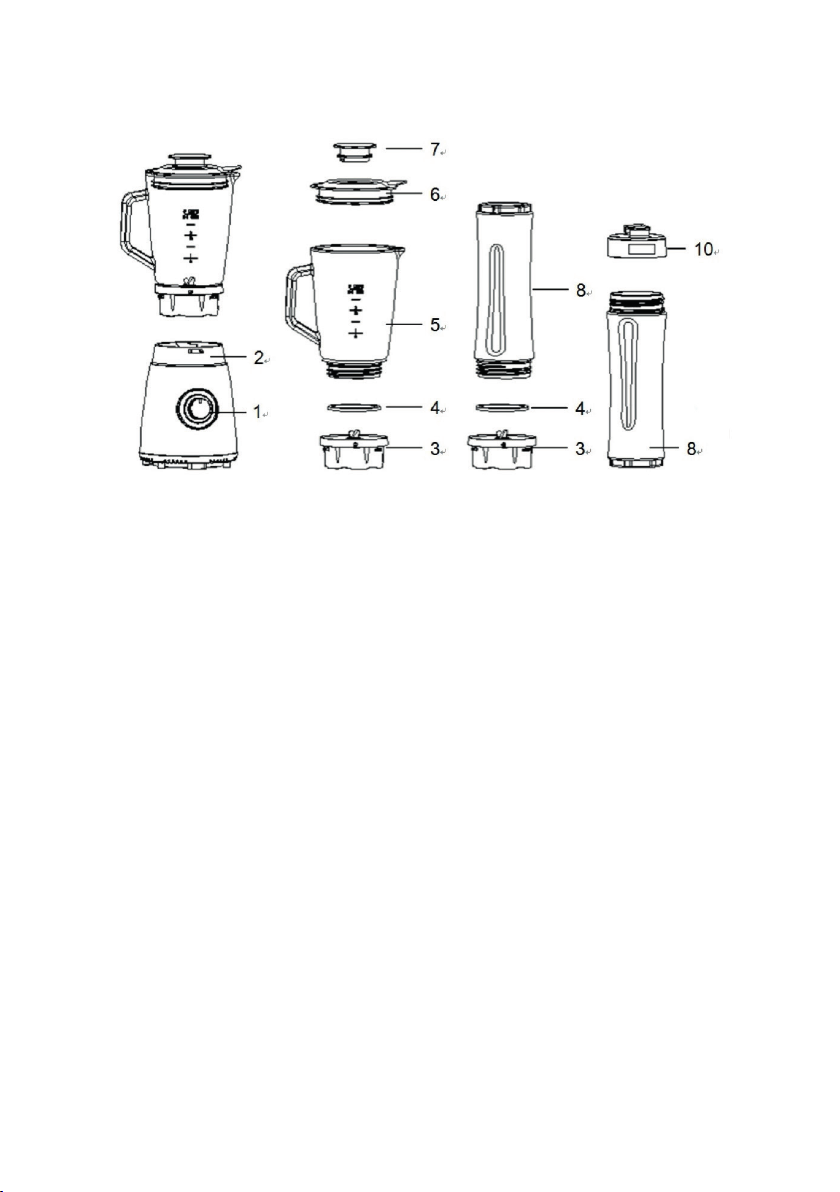
Delar och innehåll
1. Hastighetsväljare 2. Hölje 3. Knivenhet 4. Packning 5. Glaskanna (800 ml) 6. Lock
7. Påfyllningslock 8. Mugg (600 ml) 10. Lock till mugg
Montera tillbringaren
• Placera packningen (4) över knivenheten (3) och lås genom att vrida
medsols.
• Placera knivenheten (3) under tillbringaren (5) och lås genom att vrida
medsols.
• Placera tillbringaren (5) över höljet (2) och lås genom att vrida medsols.
• Placera locket (6) på kannan (5).
• Placera påfyllningslocket (7) i locket (6) och lås genom att vrida medsols.
Montera muggen
• Lossa på locket (10) (8).
• Placera packningen (4) över knivenheten (3) och lås muggen (8) genom
att vrida medsols.
• Vänd på muggen (8) och placera den över höljet. Lås muggen (8) genom
att vrida medsols.

5
SVENSKA
Läs igenom den här bruksanvisningen noga och spara den för
framtida bruk.
1. Läs alla anvisningar.
2. Vidrör inte några varma ytor. Använd handtag eller knappar.
3. Sänk inte ner apparaten, sladden eller kontakten i vatten eller
annan vätska.
4. Låt inte barn använda apparaten på egen hand.
5. Dra ur sladden när apparaten inte används och när du gör rent
den. Låt den svalna innan du tar bort eller lägger till delar.
6. Använd inte apparaten om sladden eller kontakten är skadad
eller om apparaten slutat fungera eller har skadats på något
vis. Lämna i stället in apparaten till närmaste auktoriserade
verkstad så att den kan undersökas och eventuella fel
åtgärdas.
7. Apparaten kan skadas om du använder andra tillbehör än dem
som tillverkaren rekommenderar.
8. Apparaten får endast användas inomhus.
9. Dra inte sladden över vassa kanter eller varma ytor.
10. Placera inte apparaten nära gaslåga, spisplatta eller varm ugn.
11. Sätt alltid i kontakten i apparaten först innan du kopplar den
till vägguttaget. När du är klar sätter du apparaten på OFF och
tar ut kontakten ur vägguttaget.
12. Om du använder för stora bitar eller placerar metalldelar i
apparaten kan detta orsaka eldsvåda eller elektrisk stöt.
13. På grund av brandrisken får apparaten inte övertäckas eller
placeras nära gardiner, draperier, väggar och liknande.
Säkerhetsanvisningar

6
14. Apparaten ska inte rengöras med svamp med metalliskt skikt,
eftersom metallen kan bli strömförande och orsaka elektrisk
stöt.
15. Var särskilt försiktig med behållare av annat material än
metall och glas.
16. Förvara inget annat än av tillverkaren rekommenderade
tillbehör i apparaten när den inte används.
17. Placera inte papper, kartong, plast eller liknande material i
apparaten.
Säkerhetsanvisningar
Produkter med denna märkning ska inte slängas tillsammans med
vanliga hushållsartiklar. För att hindra skada på miljön och människor bör
denna produkt återvinnas under kontrollerade former. Lämna antingen in
produkten på en återvinningsstation som tar emot elektriska produkter
eller kontakta återförsäljaren som sålde produkten. De kan ta emot och
se till att produkten återvinns på ett säkert och miljövänligt sätt.
Specifikationer: 220-240V, 50/60Hz, 250W

7
Användning
SVENSKA
Före första användningen
•Rengör alla delar innan du använder apparaten för första gången
(se avsnittet om rengöring).
•Dra ut kabeln från apparatens undersida och anslut till ett uttag.
Sätta på och stänga av
Tänk på följande när du sätter på och stänger av apparaten:
•Använd inte apparaten om glaskannan eller muggen är tom.
•Mixa högst 2 minuter i taget. Låt apparaten vila i 3 minuter om du
vill mixa ingredienserna i ytterligare 2 minuter.
•När du vil köra på låg hastighet ställer du in hastighetsväljaren (1)
på läge I.
•När du vil köra på hög hastighet ställer du in hastighetsväljaren (1)
på läge II.
•När du vill använda pulsfunktionen ställer du in hastighetsväljaren (1)
på läge P.
•Du stänger av apparaten genom att ställa in hastighetsväljaren (1)
på läge O.
Tänk på detta
Tänk på följande när du använder apparaten:
•Överskrid inte markeringen för maximal mängd vätska.
•Överbelasta inte apparaten. Lägg inte i för mycket i glaskannan eller
muggen.
•Om motorn stannar stänger du omedelbart av apparaten, drar ur
kontakten och låter apparaten svalna under minst 10 minuter.

8
•Skär frukt och grönsaker i mindre bitar. Se till att bitarna inte är för
stora för glaskannan.
•Lägg ner bitarna i glaskannan eller muggen.
•Sätt ihop delarna. Läs anvisningarna under rubriken ”Montera”.
•Sätt i kontakten i uttaget. Lampan tänds på apparaten
•Ju längre du mixar, desto mer finfördelat blir resultatet.
•Lägg vid behov till flera bitar med frukt eller grönsaker.
Glaskannan
•Stäng av apparaten.
•Vrid locket motsols så att det kan tas loss.
•Skär frukt och grönsaker i mindre bitar. Se till att bitarna inte är för
stora.
•Lägg ner bitarna i glaskannan eller muggen.
•Om bitarna är för stora för påfyllningslocket tar du bort locket så att
du kan lägga i bitarna.
•Skruva tillbaka locket.
•Sätt i påfyllningslocket.
•Sätt på apparaten. Ingredienserna mixas. Ju längre du mixar, desto
mer finfördelat blir resultatet.
Muggen
•Stäng av apparaten.
•Ta loss muggen genom att vrida den motsols och ställ den upp.
•Ta loss knivenheten.
Användning

9
SVENSKA
Användning
•Skär frukt och grönsaker i mindre bitar. Se till att bitarna inte är för
stora.
•Lägg i ingredienserna.
•Sätt fast knivenheten.
•Vänd muggen och montera den på apparaten. Lås genom att vrida
medsols.
•Sätt på apparaten. Det tar några sekunder att mixa innehållet.
Ju längre du mixar, desto mer finfördelat blir resultatet.
•Stäng av apparaten.
•Dra ut kontakten ur uttaget så att lampan på apparaten släcks.
•Låt apparaten svalna.
Obs! Undvik överhettning och skador genom att mixa högst
2 minuter i taget. Låt apparaten vila i 2 minuter om du vill
fortsätta mixa.

10
Tips
Några tips
•Om du mixar fasta ingredienser är det bäst att ta en mindre del i taget
i stället för att mixa allt på en gång.
•Fasta ingredienser ska alltid skäras i mindre bitar (2–3 cm) innan de
mixas.
•När du mixar fasta ingredienser börjar du alltid med en mindre mängd
vätska. Fyll sedan gradvis på med mer vätska.
•Placera alltid ena handen ovanpå mixerns när du mixar.
•Var alltid försiktig när du hanterar varm vätska.
•Vi rekommenderar pulsfunktionen när du mixar fasta ingredienser
eller mycket trögflytande vätskor. Då minskar risken för att knivarna
fastnar.

11
ENGLISH
Rengöring
Höljet
Höljet får inte nedsänkas i vatten. Rengör det med en fuktig trasa.
Snabb ursköljning av glaskannan
Töm glaskannan och fyll den med vatten. Placera på höljet och kör puls-
funktionen (läge P) flera gånger. Töm och skölj tills glaskannan är ren.
Diskning av glaskannan
Töm glaskannan innan du tar bort packningen. Var försiktig när du
hanterar knivenheten. Alla lösa delar kan maskindiskas.

12
Parts
1. Rotary switch 2. Housing 3. Cup base 4. Sealing ring 5. Glass Jar (800 ml) 6. Jar Lid
7. Jar Lid insert 8. Bottle (600 ml) 10. Bottle Lid
Assembling the Glass Jar:
•Place the seal ring (4) onto the blade (3),turn clockwise to lock the sealing
ring and the cup base.
•Mount the blade (3) to the bottom of the jar (5). Lock the blade (5) by
turning it clockwise.
•Mount the jar (5) onto the appliance. Lock the jar (5) by turning it
clockwise.
•Mount the jar lid (6) onto the jar (5).
•Mount the jar lid insert (7) into the jar lid (6). Lock the jar lid insert (7) by
turning it clockwise.
Assembling the bottle:
•Loosen the lid (10) from the bottle (8).
•Place the seal ring (4) onto the blade (3). Tighten the blade (3) onto the
bottle (8).

13
ENGLISH
•Turn the bottle (8) upside down. Place the bottle (8) onto the appliance.
•Lock the bottle (8) by turning it clockwise until it clicks into place.
When using electrical appliances, basic safety precautions should
always be followed, including the following:
1. Read all instructions before operating.
2. Do not touch hot surfaces. Use handles or knobs.
3. To protect against electrical shock, do not immerse cord, plug or
appliance itself in water or other liquids.
4. Close supervision is necessary when appliance is used by or near
children.
5. Unplug from outlet when not in use and before cleaning.
Allow to cool before putting on or taking o parts.
6. Do not operate any appliance with a damaged cord or plug or
after the appliance malfunctions or has been damaged in any
manner. Return the appliance to the nearest authorized
service facility for examination, repair or adjustment.
7. The use of accessory attachments not recommended by the
appliance manufacturer may cause injuries.
8. Do not use outdoors.
9. Do not let cord hang over edge of table or counter or touch hot
surfaces.
10. Do not place on or near a hot gas or electric burner, or in a
heated oven.
Safety instructions

14
11. Always attach plug to appliance first, then plug cord into wall
outlet. To disconnect, turn any control to OFF position, then
remove plug from wall outlet.
12. Oversized foods or metal utensils must not be inserted in the
appliance as they may cause a fire or risk of electrical shock.
13. A fire may occur if the appliance is covered or touching flam-
mable material including curtains, draperies, walls and the like
when in operation.
14. Do not clean with metal scouring pads. Pieces can break o
the pad and touch electrical parts, involving a risk of electrical
shock.
15. Extreme caution should be exercised when using containers
constructed of other material other than metal or glass.
16. Do not store any materials other than manufacturers
recommended accessories in this unit when not in use.
17. Do not place any of the following materials inside the unit:
Paper, cardboard, plastic and the like.
Safety instructions
This marking indicates that this product should not be disposed with
other household wastes throughout the EU. To prevent possible harm
to the environment or human health from uncontrolled waste disposal,
recycle it responsibly to promote the sustainable reuse of material
resources. To return your used device, please use the return and collec-
tion systems or contact the retailer where the product was purchased.
They can take this product for environmental safe recycling.
Specifications: 220-240V, 50/60Hz, 250W

15
ENGLISH
How to Use
Before first use
•All parts of the blender are to be thoroughly cleaned before being used
for the first time. (see Section: Cleaning).
•Take out the required length of cable from the cable tidy on the base of
the blender and connect the device to the mains supply.
Switching on and o
Before you proceed, we need you to pay attention to the following notes:
•Do not switch on the appliance when the jar or the bottle is empty.
•Do not leave the appliance switched on continuously for more than two
minutes. After two minutes, switch o the appliance and allow it to cool
down for three minutes before switching it on again.
•To switch on the appliance with continuous low speed, set the on/o
switch (1) to the ”I” position.
•To switch on the appliance with continuous high speed, set the on/o
switch (1) to the ”II” position.
•To switch on the appliance in pulse mode, set the on/o switch (1) to the
”P” position.
•To switch o the appliance, set the on/o switch (1) to the ”O” position.
Hints for use
Before you proceed, we need you to pay attention to the following notes:
•Do not exceed the maximum mark on the juice level indicator.
•Do not overload the appliance. Do not put too many ingredients into the
jar or the bottle at one time. If the motor stops, immediately switch o
the appliance, remove the mains plug from the wall socket and allow the
appliance to cool down for at least 10 minutes.

16
•Cut the fruit and/or vegetables into pieces. Make sure that the pieces
of fruit and/or vegetables fit in the jar or the bottle.
•Put the pieces of fruit and/or vegetables into the jar or the bottle.
•Assemble the appliance. Refer to the section ”Assembly”.
•Insert the mains plug into the wall socket. The power indicator comes
on in a few seconds. The longer the appliance is switched on, the finer
the ingredients will be blended.
•If necessary, add more pieces of fruit and/or vegetables.
Jar
•Switch o the appliance.
•Turn the jar lid insert counterclockwise to remove it from the jar lid.
•Cut the fruit and/or vegetables into pieces. Make sure that the pieces
of fruit and/or vegetables fit in the jar.
•Put the pieces of fruit and/or vegetables into the jar.
•If the pieces are too large for the filling opening of the jar lid, remove
the jar lid and add the pieces of fruit and/or vegetables.
•Mount the jar lid onto the jar.
•Mount the jar lid insert into the jar lid.
•Switch on the appliance. The appliance blends the ingredients in a few
seconds. The longer the appliance is switched on, the finer the ingre-
dients will be blended.
Bottle
•Switch o the appliance.
•Unlock the bottle by turning it counterclockwise. Remove the bottle
from the appliance. Turn the bottle straight up again.
How to Use

17
ENGLISH
How to Use
•Loosen the blade from the bottle.
•Cut the fruit and/or vegetables into pieces. Make sure that the pieces
of fruit and/or vegetables fit in the bottle.
•Put the pieces of fruit and/or vegetables into the bottle.
•Tighten the blade onto the bottle.
•Turn the bottle upside down. Place the bottle onto the appliance.
•Lock the bottle by turning it clockwise until it clicks into place.
•Switch on the appliance. The appliance blends the ingredients in a few
seconds. The longer the appliance is switched on, the finer the ingre-
dients will be blended.
•After use, switch o the appliance.
•Remove the mains plug from the wall socket. The power indicator
goes o.
•Allow the appliance to cool down completely.
NB: Operate the motor for a maximum of 2 minute or alternating
2 minute on, then 2 minute o to prevent overheating or conse-
quent damage.

18
Tips
Useful tips:
•To achieve the best results when pureeing solid ingredients, place
small portions into the glass jar one by one instead of placing a large
quantity all at once.
•If you are processing solid ingredients, cut them into small pieces
(2–3 cm) first.
•When mixing solid ingredients start o first with a small amount of
liquid. Gradually add more and more liquid through the opening in the
lid.
•Always place your hand on top of the blender when you are operating
the device.
•Be careful when processing hot liquids.
•For stirring solid or very thick liquid ingredients we recommend that
you use the blender in impulse mode to prevent the blades from
becoming stuck.

19
ENGLISH
Cleaning and maintenance
Housing:
Never immerse the Housing in water. Wipe it only with a moist cloth.
Simple cleaning/ rinsing out the assembled glass jar:
Empty the glass jar and fill it with water. Place the glass jar on the
Housing and turn the switch to “P” setting several times. Empty the glass
jar and rinse until clean.
Thorough cleaning of the dismantled glass jar:
Ensure that the glass jar is completely empty before you unscrew the
retaining ring. Be careful when handling the cutting blade. All removable
parts are suitable for the dishwasher.

Table of contents
Languages:
Other Havso Blender manuals


