HBX SURVIVOR XB User manual

240mm340mm 280mm 158mm 98mm 1:12.4 48mm 50mm
240mm360mm 240mm 115mm 74mm 1:11.46
LENGTH WIDTH HEIGHT
WHEELBASE
WHEEL DIA. WHEEL WIDTH GROUND
CLEARANCE
30mm(Fr.)
GEAR RATIO
38mm
38mm (Rr.)
12811B
CAR NO.:
12812
12813
This data is subject to change without prior notification as the improvement and modification occur.
If you do not use it for any extended period of time (e.g. during storage), disconnect and remove the rechargeable
batteries inserted in the vehicle to prevent damage from leaking rechargeable batteries.
To prolong battery life ,do not allow the vehicle to be used to a standstill resulting in the battery being completely
over-discharged.
Always stop use with power remaining to preserve battery life.
RTR
Hobby Grade
Four Wheel Drive
Ball Bearings
Splash-resistent
Metal Diff.
FUN-AFFORDABLE
CAR TYPE
BUGGY
TRUGGY
TRUCK


1) Steering Wheel
2) Trigger
3) Steering Trim
4) Throttle Trim
5) Steering Reverse Switch
6) Power Indicator
7) Power ON/OFF
8) AUX. Button
(This button is disabled for
the car)
1
2
4
7
6
3
5
8
Steering Wheel: It proportionally operate the right and left steering control of the model.
Battery Case: It requires 2pcs of AA size batteries.
Power Switch: It is applied to turn ON/OFF the radio controller.
Steering Trim: It is applied to adjust the centre trim of the steering channel.
Steering Reverse: It allows you to switch the directions of the steering servo travel.
Power Indicator: When the radio controller is turned on, LED flashes sharply which indicates
that the radio controller is seeking the receiver's signal and binding is in process. When the
power is enough, LED is solid on. When the power is not enough, LED will have two flashes in
turn.If it is the case, you are required to replace with the new batteries.
Slide the battery cover as shown in the
photos, install two AA size batteries into
the battery compartment, and replace the
battery cover.
( NOTE: Do not insert the batteries with
incorrect polarities.)
Power Switch

Ensure reliable steering performance.
1)Place the steering wheel at Center to enable the vehicle to run straightly in line.
(NOTE: Flipping to trim the steering wheel is occasionally needed. It largely depends on the conditions of
the terrains on which the vehicle runs.
2)Turn the steering wheel to the left, and the car turns left.
3)Turn the steering wheel to the right, and the car turns right.
A.Pull the trigger to accelerate, release it to decelerate, and push it to brake.
B.Release the trigger to Center to stop.
C.Release the trigger to Center, and push it a second time to go backwards.
The trigger is unmoved and the vehicle is static. Tune the steering trim to enable the front wheels to be aligned.
Under this case, the steering Center Point is set. You can tune this switch to obtain your desired Left/Right
steering angles.
Place the vehicle with four wheels off ground. Trim the switch and you will see the wheels run either forwards
or backwards. When the wheels are trimmed to stop, this point is throttle Center Point.

It enables you to switch the direction of the steering servo's travel.
One way is Normal position, and the other is Reverse position. Please refer to the photos below:
Normal Position Reverse Position
ADJUSTING FRONT STEERING TOE ANGLE
Your vehicle can be customized to enhance performance. Simple adjustment and easily maintaining setting will
assure optimum operation and performance. When making adjustments, do so only in small increments and
always check for other parts of the vehicle that are affected.
Many after market options are available to make your R/C vehicle faster and stronger. Please read this section
carefully and it always makes sure you write down your base settings in case you need to refer to them at a later
date. The front steering toe angle has a dramatic on how your car performs and your tires wear. You can have
toe-in, zero toe or toe-out. This can be adjusted by tuning the length of the steering linkage bars with the help
of the wrench. Before tuning, the steering linkage bars should be taken out from the vehicle. Measure them for
desired length by unscrewing or screwing in. Reinstall them to the vehicle after adjustment is complete.
Toe-in:
It will be less reactive and cause the vehicle to under
steer (the front wheels push straight on while turning.)
This can be advantageous for operators struggling to
get to grips with the driving of the vehicle.
Toe-out:
It will be more aggressive on the steering response
especially on small steering inputs. This will make the
car want to over steer (rear wheels slide on small
steering inputs). This is useful as a race tuning aid to
gain extra steering
Zero toe will make the front wheels run straight and
make the car very neutral. Tire wear will also be
reduced and the vehicle will feel easier to drive.
Zero Toe
Toe-in
Zero Toe
Toe-out Toe-in Toe-out
steering linkage bar steering linkage bar

Please run the vehicle in a slow speed when you are not a skilled driver.
Once you become conformable driving the vehicle, perform driving practice on the tracks as shown in the figure
above. Keep practicing until you feel comfortable with the steering, throttle and brake at low speeds. Once you
are feeling comfortable , try operating the vehicle on another track. When you have mastered the basics, you will
be able to drive the vehicle at higher speeds in a more controlled fashion.
Open the battery compartment and remove the batteries from the car.
Use Only the provided charger and charger box to charge the batteries for your car.
Connect the charger box with the charger, and load the batteries onto the charger box.
Always observe correct polarity (plus/+ and minus/-) . The polarity is indicated in the charger box.
Plug the charger into a proper mains socket of the public
mains. (Wall Outlet).
One LED per charging tray will indicate charging.
LED is lit red: The battery is being charged.
LED is lit green: Charging is completed.
Charging time is approx. 3.5-4 hours (for 2pcs of 3.7V,
1500mAH Li-ion batteries)
TIP: The LEDs flash alternately when no battery is loaded.
For the sake of safety , this charger will NOT charge the batteries
which are over-discharged.
(Battery voltage is very low which is damaged).
Once you confront the situation below, you must replace with new
batteries.
After the batteries are properly loaded:
1) LED (A )flashes: The battery in the tray A is over-discharged
and damaged.
2) LED (B )flashes: The battery in the tray B is over-discharged
and damaged.
3) Both LED (A) and LED (B) flash: Both batteries are
over-discharged and damaged.
LED A LED B
Tray B
TrayA
To prolong battery life ,do not allow the vehicle to be used to a
standstill resulting in the battery being completely over-
discharged. Always stop use with power remaining to preserve
battery life.

A.The vehicle does not work at all:
1)Check to ensure that radio controller and car are switched on.
2)Check the battery power, and replace with the new batteries if necessary
3)Check if there are damaged parts/wires/connectors, repair or replace if necessary
4)Car battery is flat. Charge the battery pack.
B. The vehicle runs slowly:
1)Car battery is flat. Charge the battery pack.
2)Check if the vehicle is properly geared and no dirty or stripped gears are found, and make sure the reliable
gear mesh for motor pinion and the spur gear.
3)Check if there is something troubling to the moving parts , and clean them immediately.
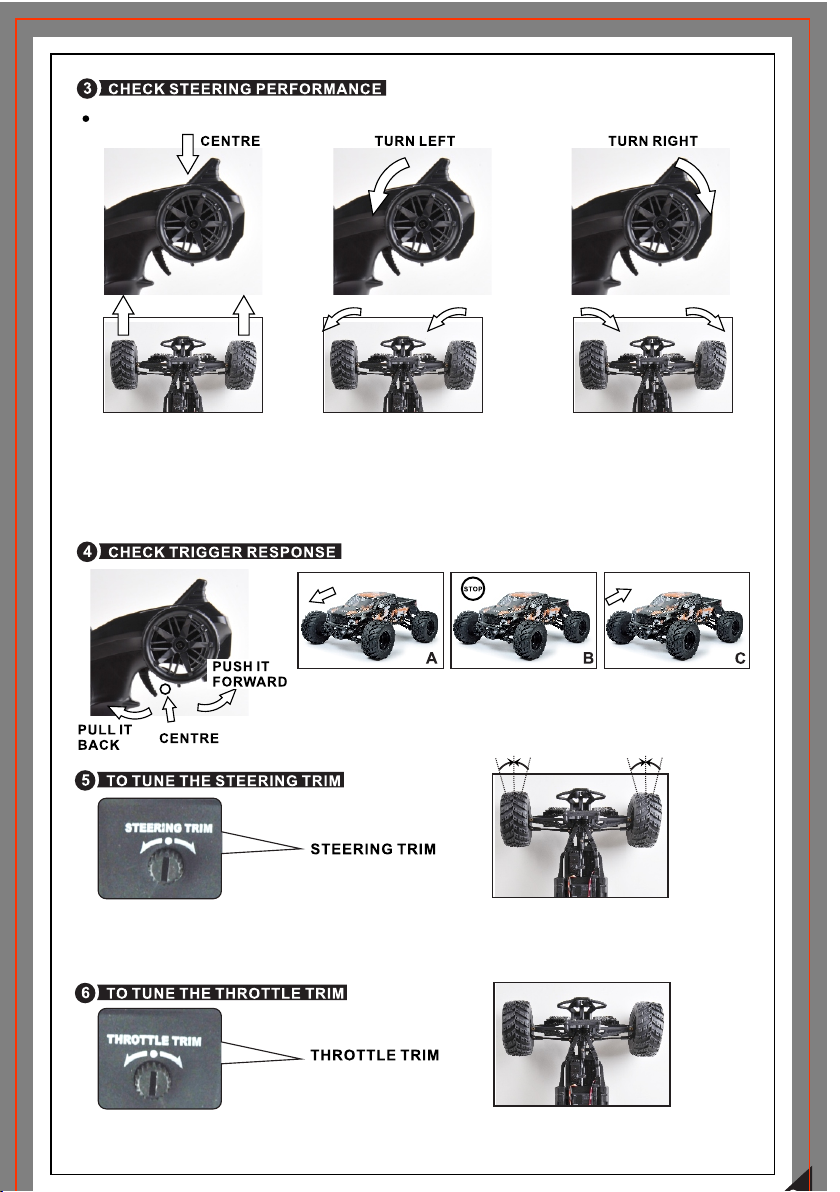
C.The throttle works but not the steering:
1)Check if the servo feels jammed, and try centering it gently if it is the case.
2)Check if the servo link is loose or the servo breaks. Repair or replace with the new one if possible.
D. It steers, but throttle is uncontrollable:
1)Check if there are damaged parts in the entire drivetrain.
2)Check the batteries both for radio controller and the car.
E. The vehicle runs noisily:
1)Check gear mesh between spur gear and motor pinion.
2) Check if there are stripped and/or dirty gears.
3) Check if there are some parts getting damaged in the entire drivetrain.
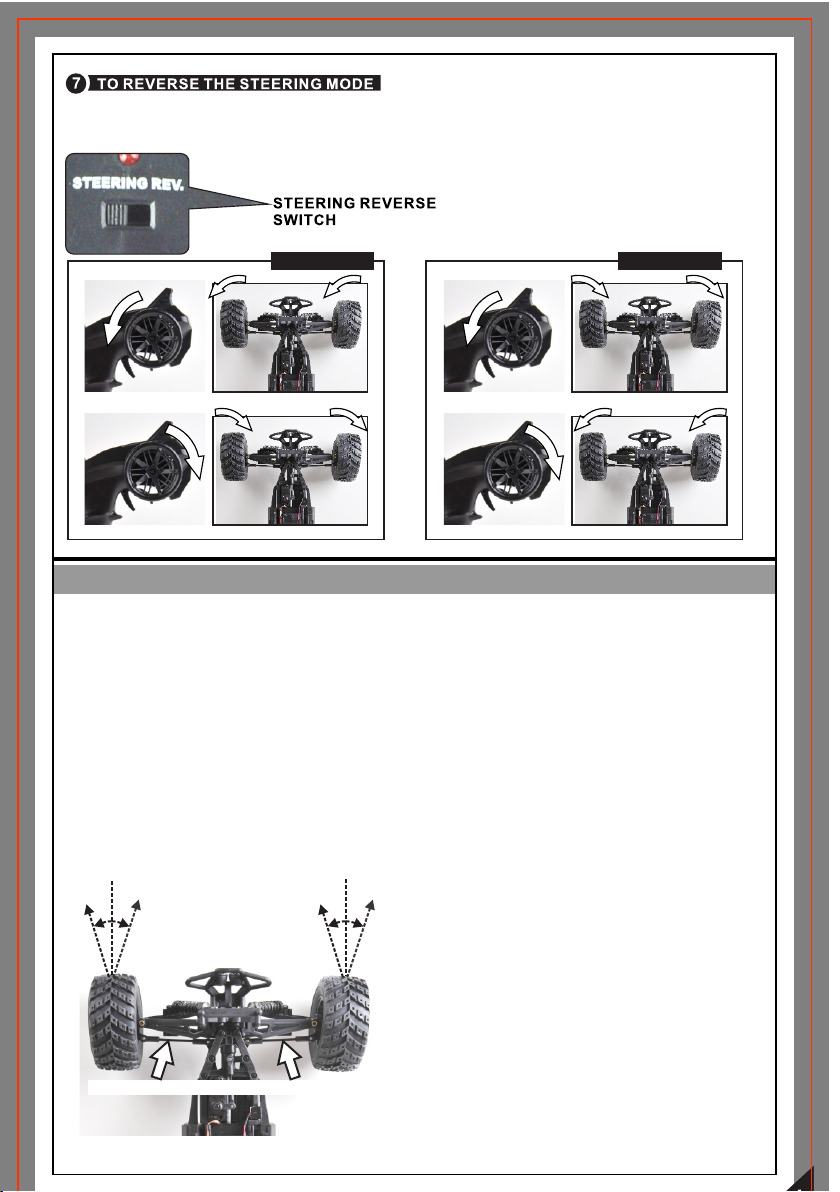
F. You do not pull or push the trigger , but the vehicle goes forwards/backwards:
Please set the Throttle Trim to Throttle Center Point.
G. The vehicle is found one direction's steering travel is not same to the other
Please set the Steering Trim to Steering Center Point.
H. Not able to charge the batteries:
Check both the charger and the batteries if they are damaged.
For Li-PO, Li-ion batteries: Check if the batteries are over-discharged. Replace with the new batteries.
We warmly recommend that you check and maintain the vehicle after use. The items in the list below will facilitate
you , and follow the list to do will maintain performance of vehicle.
--Disconnect and remove the batteries from the car and the radio controller.
--Inspect the vehicle for any obvious damage.
--Check the gears for wear, debris or broken/slipping teeth.
--Check the wheels and tighten the wheel screws/nuts properly.
--Check of loose screws in the chassis.
--Check the wiring for frayed or damaged wires and/or connectors.
--Check the steering servo which will wear out over time and require replacement.
--Check all batteries in the car and in the radio controller. Charge or replace them.
--Keep the chassis clean and free of sand, dust and moisture.
--Check there are no grass (or something) getting twisted in the drivetrain and clean them.
--Clean the motor if necessary. ( Never attempt to re-assemble the motor.)
--Clean the car body with a soft lint-free cloth.
--Store the vehicle in a clean and dry place out of children's reach. Storage should not expose the
vehicle to any source of heat and water.

NOTE: THE PART IMAGES MAY VARY FROM THE ACTUAL PARTS.
12600R 12601R 12602R
12604R
Only For 3.7V, 1100mAH batteries
12605R
12611R
Diff. Gears(Metal)+Diff. Case+
Shims+Mount Screws
12619A
3.7V,1100mAH Batteries
(Li-ion) 2pcs

NOTE: THE PART IMAGES MAY VARY FROM THE ACTUAL PARTS.
79513
Ball bearing
7.95x13x3.5mm(8P)
12600BT
Only For 3.7V, 1500mAH batteries
12633
3.7V,1500mAH Batteries
(Li-ion) 2pcs
OPTIONAL OPTIONAL

NOTE: THE PART IMAGES MAY VARY FROM THE ACTUAL PARTS.
12522
ESC/Receiver Unit
12640 12030
RC 390 motor 5-wire Servo (19g)
Buggy Body(Survivor XB)
-Yellow
12686 12689

NOTE: THE PART IMAGES MAY VARY FROM THE ACTUAL PARTS.
12641 12642 12643 12644
Only For 3.7V, 1100mAH batteries Only For 3.7V, 1100mAH batteries Only For 3.7V, 1100mAH batteries Only For 3.7V, 1100mAH batteries
Only For 3.7V, 1500mAH batteries Only For 3.7V, 1500mAH batteries Only For 3.7V, 1500mAH batteries Only For 3.7V, 1500mAH batteries
12710C 12711C
Front CVD Shaft(metal)+
nuts+screws+wheel pins+
Diff. Outdrive Cups(metal)
Rear CVD Shaft(metal)+
nuts+screws+wheel pins+
Diff. Outdrive Cups(metal)

12604R
12604R
Ball Bearings
7.935*13*3.5
Ball Bearings
7.935*13*3.5
12611R
12611R
12611R
12611R
12611R
12611R
12611R
11

12602R
12602R
12602R
12611R
12611R
Ball Bearings
7.935*13*3.5
Ball Bearings
7.935*13*3.5
Ball Bearings
7.935*13*3.5 Ball Bearings
7.935*13*3.5
12601R
12601R
12

12605R
12605R
12604R
12604R 12604R 12604R
12605R
12605R
Ball Bearings
7.935*13*3.5
Ball Bearings
7.935*13*3.5
12604R
12604R
12604R
12604R
13

12602R
12060
12640
12601R
12607
12607
12607
12607
14

15
12056+12618 12056+12618
12056+12618 12056+12618

-This R/C vehicle is intended for persons over 14 years of age. Children under 14 years of age should
only operate this car under supervision by an adult.
-To avoid losing control of your car, do not operate near other electric remote controlled products.
-Please operate your vehicle in a spacious area. Never operate your vehicle in crowded street.
-This product is fully assembled at factory. We do not take any responsibility for damage and/or
accidents that occur as the result of custom modifications and/or incorrect operation.
Thank you for purchasing our product.
This product is an authentic remote controlled vehicle (RC vehicle). It is not a toy.
Read and understand this instruction manual thoroughly before operating the vehicle.
If you are not familiar with RC vehicles, we recommend that seek out RC experts for reliable
advice.
WARNINGS
Please completely read and understand the entire manual before using, assembling and/or
disassembling your remote controlled car.
This manual suits for next models
5
Table of contents
Other HBX Motorized Toy Car manuals

HBX
HBX Dune Racer User manual

HBX
HBX WildFire 3378 User manual

HBX
HBX 2098B User manual

HBX
HBX Rocket 6588 User manual

HBX
HBX 1/10th Scale Electronic Rock Crawler 5628 User manual

HBX
HBX THRUSTER 12889 User manual

HBX
HBX Onslaught User manual

HBX
HBX Vortex 12881 Dune Buggy User manual

HBX
HBX Sand Racer User manual

HBX
HBX Buggy 16881 User manual