manuals.online logo
Brands
  1. Home
  2. •
  3. Brands
  4. •
  5. HDL
  6. •
  7. Indoor Furnishing
  8. •
  9. HDL OLYMPUS Series User manual

HDL OLYMPUS Series User manual

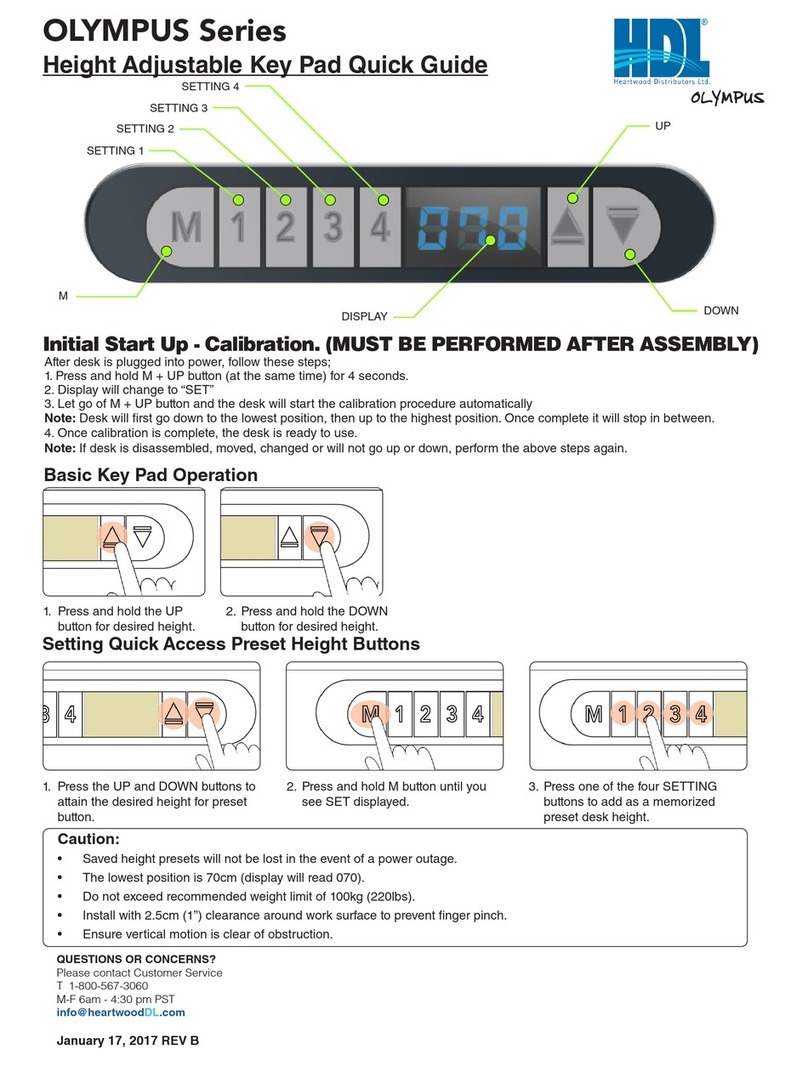
Setting Quick Access Preset Height Buttons
1. Press the UP and DOWN buttons to
attain the desired height for preset
button.
After desk is plugged into power, follow these steps;
1. Press and hold M + UP button (at the same time) for 4 seconds.
2. Display will change to “SET”
3. Let go of M + UP button and the desk will start the calibration procedure automatically
Note: Desk will rst go down to the lowest position, then up to the highest position. Once complete it will stop in between.
4. Once calibration is complete, the desk is ready to use.
Note: If desk is disassembled, moved, changed or will not go up or down, perform the above steps again.
2. Press and hold M button until you
see SET displayed.
3. Press one of the four SETTING
buttons to add as a memorized
preset desk height.
OLYMPUS Series
Height Adjustable Key Pad Quick Guide
Basic Key Pad Operation
1. Press and hold the UP
button for desired height.
January 17, 2017 REV B
2. Press and hold the DOWN
button for desired height.
M
SETTING 1
SETTING 2
SETTING 3
SETTING 4
DISPLAY
UP
DOWN
OLYMPUS
QUESTIONS OR CONCERNS?
Please contact Customer Service
T 1-800-567-3060
M-F 6am - 4:30 pm PST
info@heartwoodDL.com
Caution:
• Saved height presets will not be lost in the event of a power outage.
• The lowest position is 70cm (display will read 070).
• Do not exceed recommended weight limit of 100kg (220lbs).
• Install with 2.5cm (1”) clearance around work surface to prevent nger pinch.
• Ensure vertical motion is clear of obstruction.
Initial Start Up - Calibration. (MUST BE PERFORMED AFTER ASSEMBLY)
Application de l’accès rapide aux touches programmables
1. Peser sur les touches du HAUT
et du BAS pour régler la hauteur
désirée de la touche programmable.
QUESTIONS OU PRÉOCCUPATIONS?
COMMUNIQUER avec le Service à la clientèle
Tél: 1-800-567-3060
du lundi au vendredi entre 6h00 et 16h30
(Heure Normale du Pacique HNP)
info@heartwoodDL.com
Mise en garde:
• Les hauteurs programmées et sauvegardées ne seront pas perdues en cas de panne d’électricité.
• La position la plus basse est de 70cm (sera affichée comme 070).
• Ne pas dépasser la limite de poids recommandée de 100kg (220 lbs).
• Installer le bureau avec autour un espace dégagé de 2,5cm, an de prévenir le pincement des doigts.
• S’assurer que la motion verticale est libre de toute obstruction.
Une fois le bureau branché dans une prise de courant, suivre les étapes suivantes:
1. Peser et tenir les commandes M + Touche vers le haut (en même temps) pendant 4 secondes.
2. Le régulateur affichera (SET)
3. Relâcher les commandes M + Touche vers le haut et l’étape d’étalonnage du bureau commencera automatiquement.
À noter: Le bureau descendra vers la position la plus basse, ensuite vers la position la plus haute. Une fois l’initialisation
complétée il arrêtera entre les deux.
4. Une fois l’initialisation complétée, le bureau est prêt à utiliser.
À noter: Si le bureau est démonté, déplacé ou modié ou s’il ne monte ou ne se baisse pas, répéter de nouveau les étapes
ci-haut.
2. Peser et tenir la touche M, jusqu’à
ce que le mot SET soit affiché.
3. Peser sur une des quatre touches de
réglage pour ajouter en mémoire la
hauteur désirée programmable du bureau.
Séries OLYMPUS
Guide pratique des touches réglables en hauteur
Opération de base des touches
Phase initiale de démarrage – Étalonnage (DOIT ÊTRE EFFECTUÉ
APRÈS L’ASSEMBLAGE)
1. Peser et tenir la touche
vers le HAUT pour la
hauteur désirée.
17 janvier 2017, RÈV B
2. Peser et tenir la touche vers le
BAS pour la hauteur désirée.
M
RÉGLAGE 1
RÉGLAGE 2
RÉGLAGE 3
RÉGLAGE 4
AFFICHAGE
NUMÉRIQUE
TOUCHE
VERS LE HAUT
TOUCHE
VERS LE BAS
OLYMPUS
1 of 10 1 de 10
OLYMPUS
FEBRUARY 8, 2017, REV C LE 8 FÉVRIER, 2017, RÉV B
IMPORTANT! BEFORE PLUGGING INTO POWER
SEE QUICK GUIDE FOR UNIT SETUP, CALIBRATION
AND KEY PAD OPERATION.
AVIS IMPORTANT! AVANT DE BRANCHER À UNE
PRISE DE COURANT, CONSULTER LE GUIDE DE
RÉFÉRENCE RAPIDE DE MONTAGE, D’ÉTALONNAGE
ET D’OPÉRATION DE BASE DES TOUCHES.
A
T
T
E
N
T
I
O
N
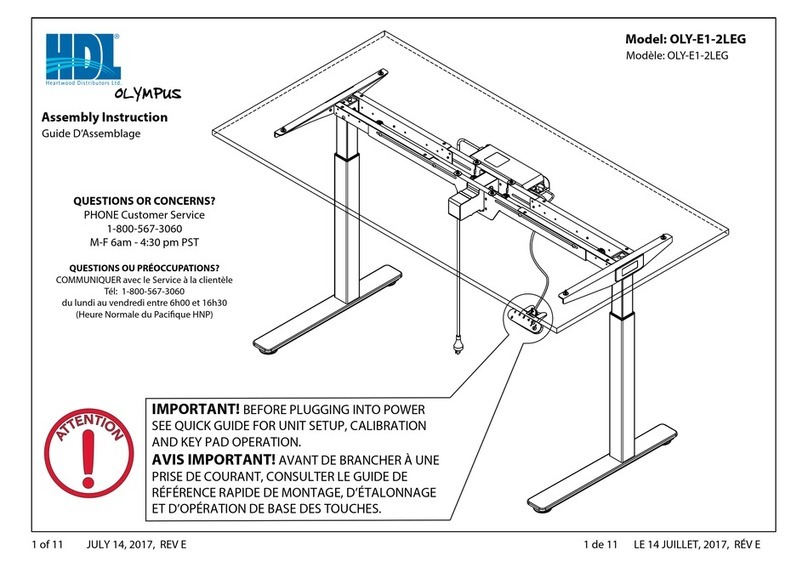
Assembly Instruction
Model: OLY-E1-2LEG
Guide D’Assemblage
Modèle: OLY-E1-2LEG
QUESTIONS OR CONCERNS?
PHONE Customer Service
1-800-567-3060
M-F 6am - 4:30 pm PST
QUESTIONS OU PRÉOCCUPATIONS?
COMMUNIQUER avec le Service à la clientèle
Tél: 1-800-567-3060
du lundi au vendredi entre 6h00 et 16h30
(Heure Normale du Pacique HNP)
2 of 10 FEBRUARY 8, 2017, REV C LE 8 FÉVRIER, 2017, RÉV B2 de 10
1. LEG FOOT/PIÈTEMENT
2. LEFT LEG COLUMN/COLONNE DE
LEVAGE GAUCHE
3. SIDE CHANNELS/CONDUIT DE CÂBLE
LATÉRAL
4. LEG TOP PLATE/BRAS EN PORTE À FAUX
5. DESK TOP/DESSUS DU BUREAU
6. FRONT CENTER CHANNEL/CONDUIT DE
CÂBLE (DEVANT – CENTRE)
7. REAR CENTER CHANNEL/CONDUIT DE
CÂBLE (ARRIÈRE – CENTRE)
8. POWER CABLE/CÂBLE D’ALIMENTATION
9. MOTOR/MOTEUR
10. CONTROL BOX/BOÎTE DE CONTRÔLE
11. HEX DRIVE SHAFT/TIGE D’EN
TRAÎNEMENT HEXAGONALE
12. CONTROL BOX SHELF/SUPPORT DE LA
BOÎTE DE CONTRÔLE
13. KEY PAD/PANNEAU DE COMMANDE
RÉGLABLE
14. ADJUSTABLE HEX DRIVE SHAFTS/TIGE
D’ENTRAÎNEMENT HEXAGONALE
AJUSTABLE
15. RIGHT LEG COLUMN/COLONNE DE
LEVAGE DROITE
16. JUMPER CABLE/CÂBLE DE
RACCORDEMENT
PARTS:/LISTE
DES PIÈCES:
FEBRUARY 8, 2017, REV C LE 8 FÉVRIER, 2017, RÉV B3 of 10 3 de 10
HARDWARE/QUINCAILLERIE:
FEBRUARY 8, 2017, REV C LE 8 FÉVRIER, 2017, RÉV B4 of 10
STEP 1
ÉTAPE 1
4 de 10
NOTE:
IF YOU ARE ASSEMBLING THIS PRODUCT FOR
USE WITH A 48” WIDE TOP, PLEASE CALL
CUSTOMER SERVICE AT 18005673060.
À NOTER:
S.V.P. TÉLÉPHONER AU SERVICE A LA CLIENTÈLE
AU 18005673060 SI VOUS ASSEMBLEZ CE
PRODUIT POUR USAGE AVEC UN DESSUS DE BUREAU DE 48”.
A
T
T
E
N
T
I
O
N
ENSURE LEG LEFT AND RIGHT
LEG COLUMNS ARE INSTALLED
CORRECTLY.
S’ASSURER QUE LES COLONNES
DE DROITE ET DE GAUCHE SONT
INSTALLÉES CORRECTEMENT.
FEBRUARY 8, 2017, REV C LE 8 FÉVRIER, 2017, RÉV B
STEP 2
ÉTAPE 2
5 of 10 5 de 10
FERMÉOUVERT
FEBRUARY 8, 2017, REV C LE 8 FÉVRIER, 2017, RÉV B
STEP 3
ÉTAPE 3
6 of 10 6 de 10
FEBRUARY 8, 2017, REV C LE 8 FÉVRIER, 2017, RÉV B
STEP 4
ÉTAPE 4
7 of 10 7 de 10
FEBRUARY 8, 2017, REV C LE 8 FÉVRIER, 2017, RÉV B
STEP 5
ÉTAPE 5
8 of 10 8 de 10
FEBRUARY 8, 2017, REV C LE 8 FÉVRIER, 2017, RÉV B
STEP 6
ÉTAPE 6
9 of 10 9 de 10
FEBRUARY 8, 2017, REV C LE 8 FÉVRIER, 2017, RÉV B
STEP 7
ÉTAPE 7
10 of 10 10 de 10
IMPORTANT! BEFORE PLUGGING INTO POWER SEE QUICK
GUIDE FOR UNIT SETUP, CALIBRATION AND KEY PAD OPERATION.
AVIS IMPORTANT! AVANT DE BRANCHER À UNE PRISE DE COURANT,
CONSULTER LE GUIDE DE RÉFÉRENCE RAPIDE DE MONTAGE, D’ÉTALONNAGE
ET D’OPÉRATION DE BASE DES TOUCHES.
A
T
T
E
N
T
I
O
N

Other manuals for OLYMPUS Series

1

This manual suits for next models

1

Other HDL Indoor Furnishing manuals

HDL Heartwood 100-DTHA User manual

HDL

HDL Heartwood 100-DTHA User manual

HDL OLYMPUS Series User manual

HDL

HDL OLYMPUS Series User manual

HDL Olympus OLY-E1-2LEG User manual

HDL

HDL Olympus OLY-E1-2LEG User manual

HDL Heartwood 100-DRAWER-BL User manual

HDL

HDL Heartwood 100-DRAWER-BL User manual

HDL TUCANA TU 97Q-3030 User manual

HDL

HDL TUCANA TU 97Q-3030 User manual

Popular Indoor Furnishing manuals by other brands

modway EEI-4310-CAP-WHI manual

modway

modway EEI-4310-CAP-WHI manual

Home Decorators Collection WAKEFIELD FZA71024-2PK Use and care guide

Home Decorators Collection

Home Decorators Collection WAKEFIELD FZA71024-2PK Use and care guide

Rauch MZ091 Assembly instructions

Rauch

Rauch MZ091 Assembly instructions

Dauphin Bionic syncro owner's manual

Dauphin

Dauphin Bionic syncro owner's manual

Songmics VASAGLE LSC087 manual

Songmics

Songmics VASAGLE LSC087 manual

TRANSLAND 2853 instructions

TRANSLAND

TRANSLAND 2853 instructions

LDI Spaces SAFCO 1950 Assembly instructions

LDI Spaces

LDI Spaces SAFCO 1950 Assembly instructions

Sedus open mind Instructions for use

Sedus

Sedus open mind Instructions for use

Woood TEUN manual

Woood

Woood TEUN manual

ME MARCKERIC SIA 2 14006 Assembly instructions

ME MARCKERIC

ME MARCKERIC SIA 2 14006 Assembly instructions

Forte FRTK231 Assembling Instruction

Forte

Forte FRTK231 Assembling Instruction

Donco kids 9019 Assembly instructions

Donco kids

Donco kids 9019 Assembly instructions

Impact Acoustics Chatpod 350 Assembly instructions

Impact Acoustics

Impact Acoustics Chatpod 350 Assembly instructions

Happy Babies HAPPY SZ04-A L Assembly instructions

Happy Babies

Happy Babies HAPPY SZ04-A L Assembly instructions

Universal Furniture Explore Home 311736 instruction sheet

Universal Furniture

Universal Furniture Explore Home 311736 instruction sheet

L.L.Bean MISSION UNDER WINDOW BOOKCASE Assembly instructions

L.L.Bean

L.L.Bean MISSION UNDER WINDOW BOOKCASE Assembly instructions

Trinity TLS-0201C owner's manual

Trinity

Trinity TLS-0201C owner's manual

Madeli B100-36-022-XX installation guide

Madeli

Madeli B100-36-022-XX installation guide

manuals.online logo
manuals.online logoBrands
  • About & Mission
  • Contact us
  • Privacy Policy
  • Terms and Conditions

Copyright 2025 Manuals.Online. All Rights Reserved.