Heal Force Real-Time PCR User manual

Real-Time PCR Detection System
User Manual
(For X960A/X960B)

Contents
Introduction
P3 How to use this manual
Instructions on Safety and Use
P4 Considerations for Use
Section I - Instrument Installation
P6 Locating the Instrument
P8 Installation of Instrument
P9 Connection of Instrument
Section II - Instrument Appearance and Internal
Components
P10 Overview
P11 Construction & Function
Section III - Instrument Description and
Performance Properties
P14 Instrument Description
P15 Instrument Performance Indicators
P16 Operating Environment and Storage Condition
Section IV - Use and Installation of Software
P17 Installation Instructions
P18 Computer Setting (Win 7)
P21 Start Installation
P24 Overview of User Interface

Section V - Test Introduction and Description
P33 Software Connection to Instrument
P34 New Project File
P40 Specific Test Procedure
P50 Test Considerations
Section VI - Other Function Introduction
P52 Grade Calculation and Retrieval
P53 Auxiliary TM Value Calculator
P54 Logs Recording and Retrieval
P55 Other Internal Operational Functions

How to use this manual
About this manual
This manual is intended to solve your any question and technical problem in installation,
operation and maintenance of this equipment, and provides instructions on proper
installation, use and maintenance of this instrument.
Safety Cautions
Before installation, use and maintenance of this instrument, read and observe any cautions
and considerations in this guide to ensure normal operation of the equipment and user's
personal and property safety.
Introduction

Considerations for Use
Operation Safety
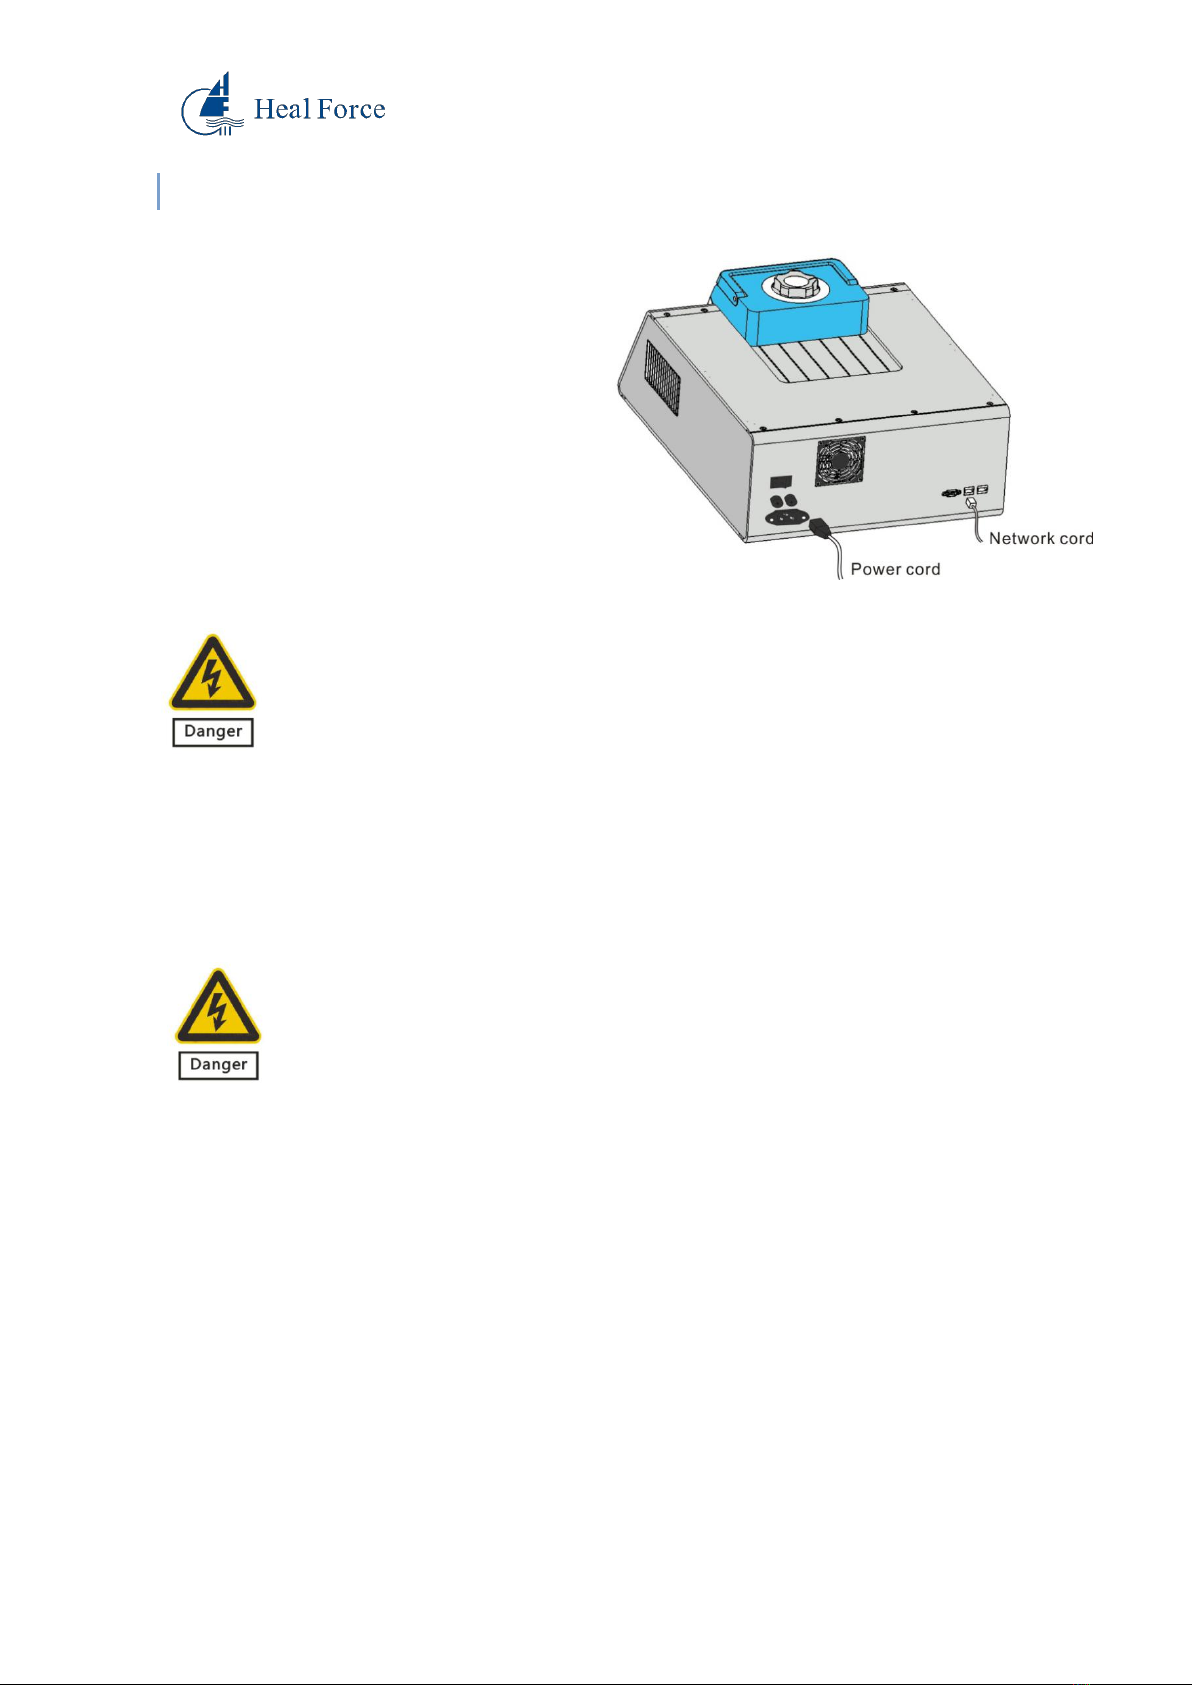
●The power supply for this instrument must be earthed reliably. A three-pole
plug is provided for this instrument, with the additional pole connected to
earthing wire, which shall be used with an earthed power socket. Before
connecting power supply, ensure it meets the voltage requirement for this
instrument, and make sure rated load of the power socket is not lower than
the load requirement for this instrument.
●In case of any damage to the power cable, replace it with a new one of the
same model and specification. No object shall be placed onto the power
cable. The cable shall not be located at area subject to busy traffic of persons.
Connect/disconnect the power cable by holding the plug rather than any
portion of the cable itself.
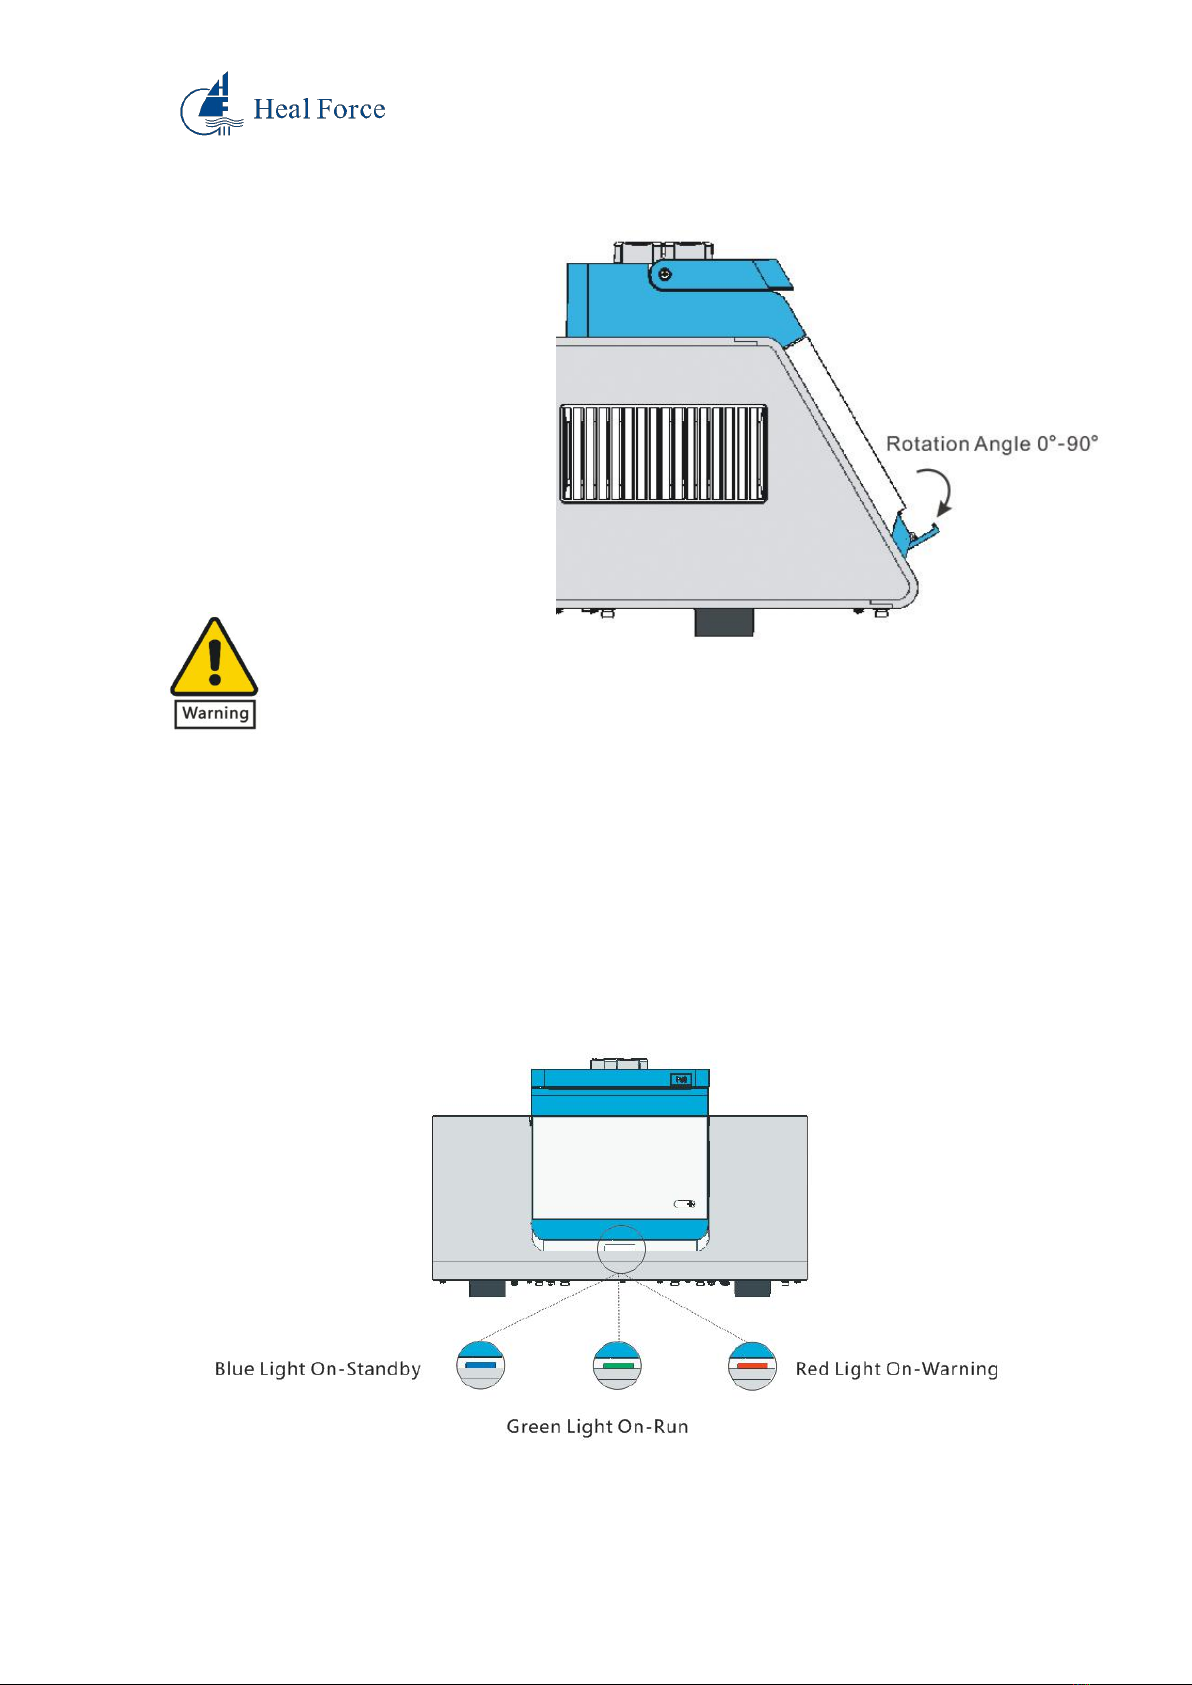
●As high heat will be generated during operation of the instrument, do not
touch any metal module of the instrument with any part of body to prevent
burn.
●No object shall be located within an area of 30cm around the instrument to
ensure good heat dissipation during operation.
Maintenance Safety
●Modules of this instrument shall be maintained to ensure precision of testis
is recommended to clean the instrument with clean soft cloth soaked with
absolute alcohol. Do not use any corrosive detergent or make any detergent
Instructions on Safety and Use

enter the instrument to prevent any damage to it.
●Immediately switch off the power supply, stop test and contact your supplier
or any professional service personnel in any of the following cases:
1) Any reagent, water or other liquid enters the instrument.
2) The instrument falls down from an elevation or the enclosure is
damaged.
3) The instrument generates any abnormal noise or pungent smell during
operation.
4) Functions of the instrument vary substantially, such as failure to
start/shut down or operate it normally.

Locating the Instrument
This instrument must be located properly after being unpacked.
Place the packing case upright in horizontal position, cut off the packing strip around the
case and the adhesive tape sealing the case.
Take out the accessories of the case and store them in a secure place for future use.
Remove EPE foam covered on the instrument, and lift it up by supporting its bottom with
two persons, and then locate it on a proper lab desk. Handle the instrument with caution.
Store the packing case properly for containing in future.
Section I - Instrument Installation

Risk of personal injury! Unless you have been trained properly, do not attempt
to lift the instrument or any heavy component of it. Lifting the packing case in any
improper way may cause ache in or permanent injury to body, or fall of the instrument.
Lift or move the instrument with proper handling tool or in a correct way. Two persons
must be used to lift the instrument up.
This instrument shall be mounted upright on a horizontal surface, around
which there shall not be any vibration, EMI or any high-inductance equipment (e.g.
refrigerator, centrifuge, and stirrer).

Installation of Instrument
Place the instrument on a testing platform
and then take out the power cable
provided along with it. Connect the power
cable by inserting the plug at one end of
the cable into the socket at the rear of the
instrument, and inserting the plug at the
other end into a power socket earthed
properly.
Do not touch the power cable with wet hand. Do not disconnect the cable
during operation of the instrument. In case of any damage in the power cable, replace
it with an acceptable one. The instrument shall be always connected to a socket
earthed properly. When the power supply is disconnected, connect one end of the
network cable provided to the LAN port at the back of the instrument and the other
end to the LAN port on a PC.
Do not connect power supply until the instrument has been connected to a
PC network cable.

Connection of Instrument
Connect laptop to the instrument
Connect PC to the instrument

Overview
①Knob ②Lid ③Handle ④USB Port ⑤Pad Tray ⑥Operation Indicator LED
⑦Power Switch ⑧Power Socket & Fuse ⑨Air Outlet ⑩232 Interface ⑪LAN Port
⑫WAN Port ⑬Air Outlet ⑭Foot Pad ⑮Air Inlet
Section II - Instrument Appearance and
Internal Components

Construction & Function
The lid is operated with a sliding guide to a
range as customized by the user. As shown in
the figure at the right side, you switch the knob
to the point UNLOCK and slide the lid
backwards to load the test tube into the
instrument, and then close the lid by sliding it
forwards and switch the knob to a proper
position to run the program for testing.
The handle provided on the instrument is intended for push/pull. Do not lift up or press
down the handler with force to prevent damage to the lid structure.
When the knob is switched to the point
UNLOCK, the lid can be slide back and
forth for loading/unloading of test tube.
After loading the test tube, close the lid
and rotate the knob clockwise to a proper
position and run the program for testing. It
is recommended to align mark on the
knob with the point LOCK.
Do not slide lid component forwards/backwards when the mark aligns with LOCK to
prevent damage to the lid.

Turn pad tray down clockwise to a
position at an angle of 90° to the
enclosure to open the tray, and then
place a pad on the tray.
For this instrument, the tray moves in a range between 0°~90° to the enclosure; do not
move the tray out of this range to prevent damage to the instrument.
There is a status indicator LED under the front panel, which turns on in any of three colors - blue,
green, and red, respectively indicating Standby, Operating, and Alarm.

To ensure a safe and reliable testing procedure, place this instrument on a flat platform,
and reserve areas of at least 30cm wide
around the four sides of it, so as to make
sure proper ventilation and heat
dissipation.
Do not place any object (e.g.
paper, plastic film) at the air inlet to
prevent it from being absorbed in and
thereby permanent damage to the fan or
cooler and damage to the instrument
resulted from overheating of module
component due to poor ventilation.
Do not place any object at any of the air outlets to prevent overheating and
thereby permanent damage to the instrument resulted from poor ventilation.
Do not place any inflammable, explosive or heat-sensitive material near any
air outlet to prevent property damage or potential accident.

Instrument Description
[Product Name]
Real-time fluorescence quantitative PCR unit
[Product Model]
X960A
X960B
[Construction]
It consists of power module, control module, driver module, display module,
heated lid module, sample base module, camera module, light source module, and
optical fiber module.
[Application Range]
It is applicable to polymerase chain reaction (PCR).
Section III - Instrument Description and
Performance Properties

Instrument Performance Indicators
Product Name:
Real-Time Fluorescence Dosing PCR Unit
Product Model:
X960A
X960B
Compatible OS:
Windows XP/VISTA/Windows 7
Bits:
32/64
32/64
Minimum Memory:
512M
512M
Display Unit:
256MB
256MB
CPU:
Pentium IV 1.6GHZ or higher
Overall Dimensions:
590mm (L)*442mm (W)*285mm (H)
Weight:
28.5kg
28.7kg
Connection Pattern:
LAN WIFI
LAN WIFI
Power Supply:
AC 220V 50HZ/60HZ
Input Power:
1000VA
1000VA
Fuse:
AC 250V 10A
AC 250V 10A
Sample Capacity:
96 holes x 0.2ml
96 holes x 0.2ml
Light Source:
Ultrahigh-luminance mono-
color LED
Ultrahigh-luminance mono-
color LED
Detector:
High-sensitivity refrigerator
CCD
High-sensitivity refrigerator
CCD
Dynamic Testing Range:
100-1010
100-1010
Minimum Testing
Template:
Single copy
Single copy
Reaction Volume:
15μl-100μl
15μl-100μl
Fluorescence Excitation
Wavelength:
470nm-525nm
470nm-625nm
Fluorescence Detection
Wavelength:
520mm-570mm
520nm-675nm
Fluorescein and Dye
Detected:
Channel 1:FAM, SYBR
Channel 2:VIC, HEX, JOE,
TET, TAMRA
Channel 1:FAM, SYBR
Channel 2:VIC, HEX, JOE,
TET, TAMRA
Channel 3:ROX, TEXRAD
Channel 4:CY5
Channel 5:Reserved for user
Temperature Range:
0℃~100℃
0℃~100℃

Heating Rate:
≥5℃/s (45℃—99℃)
≥5℃/s (45℃—99℃)
Cooling Rate:
≥5℃/s (45℃—99℃)
≥5℃/s (45℃—99℃)
Temperature Control
Uniformity:
At constant 95 ℃within
10s:±0.4℃
at constant 55 ℃within
At constant 95 ℃within
10s:±0.4℃
at constant 55 ℃within
Temperature Accuracy:
≤±0.1℃(45℃≤T≤95℃)
≤±0.1 ℃(45 ℃≤T≤95 ℃)
Gradient Temperature
Width:
1℃—30℃
1℃—30℃
Gradient Temperature
Range:
30℃—100℃
30℃—100℃
Heated Lid Temperature
Range:
(Rt +2℃) —110℃
(Rt +2℃) —110℃
Temperature Control
Mode:
Semi-conductor
thermoelectric module
Semi-conductor
thermoelectric module
Temperature Control
Programming:
Max. 999 cycles
Max. 999 cycles
Special Functions:
Threshold analysis, dissolution curve analysis, grade, and
customized parameters
Operating Environment and Storage Condition
Operating Environment
Ambient temperature
10℃~30℃
Relative humidity
<70%
Storage Condition
Ambient temperature
-20℃—55℃
Relative humidity
<80%
To ensure Normal Operation of the instrument and accuracy of test result,
be sure to operate/store the instrument in accordance with the specified
operating/storage conditions; or otherwise the instrument may be damaged or
personal injury may be caused to the operator.

Installation Instructions
Preparations
Items to be prepared: instrument, PC, and connecting wires
Installation Environment
Note: A genuine edition of windows XP/VISTA/7/10 shall be used, or
otherwise any compatibility error may occur. Shut down any anti-
virus software running in the computer during installation to prevent
any false alarm (which shall be ignored if occurring). Shut down any
firewall installed in the computer.
Installation Considerations
Note: To avoid failure of installation resulted from any error occurring
during installation and facilitate your installation, please observe the
following procedure.
Before Start
Note: Before installation of the software, set your computer properly to
prevent interruption of test and thereby data loss.
Note:Do not install on system disk.
Note:Cable and wireless networks can only choose one!
Section IV - Use and Installation
of Software

Computer Setting (Win 7)
Display Setting:
1. Navigate to Start > Control Panel.
2. Select "Power Options" in Control Panel.
3. Select "Change when the computer sleeps" in the window

4. Select "Never" under "Turn off the display" in the window
Select "Never" under "Put the computer to sleep".
5. Return to the window in Step 3 and click on "Personalization" button.
Table of contents
Other Heal Force Medical Equipment manuals
Popular Medical Equipment manuals by other brands

Kyoto Kagaku
Kyoto Kagaku NCPR Simulator instruction manual

Atos Medical
Atos Medical PROVOX Brush Care Tips

Wellspect
Wellspect LoFric Series instructions

Innovia
Innovia SUMMIT medical INSTRUSAFE XL TRANSPORT... Instructions for use

CYMEDICA Orthopedics
CYMEDICA Orthopedics QB1 user manual

Nidek Medical
Nidek Medical Nuvo8 user guide