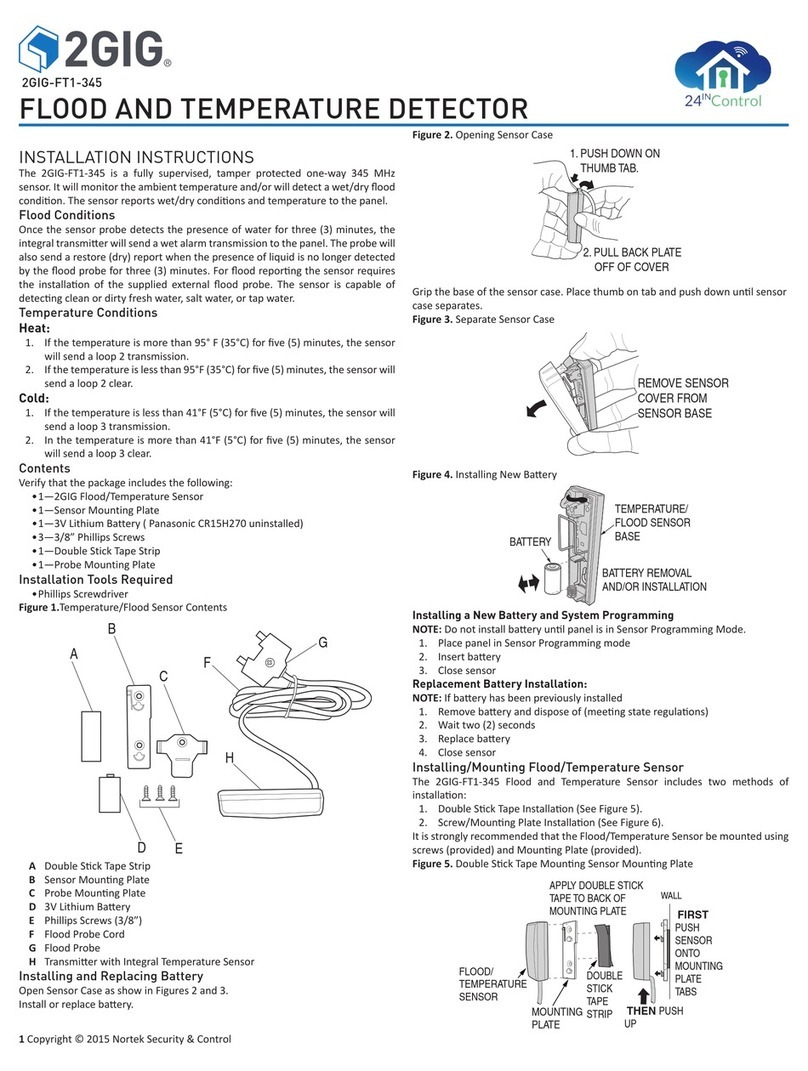
Healthcraft SP-SI User manual

SuperPole™ with Safety Island™
Technical Specifications:
1234
M
I
N
ASSISTANCE LEVEL M
A
X
Features and Benefits
H
H
HealthCraft Products Inc., 2790 Fenton Road, Ottawa, Ontario, Canada K1T 3T7
Toll Free: (888) 619-9992 Tel: (613) 822-1885 Fax: (613) 822-1886
360 Degree Support
360 Degree Support
– Effective ring design provides continuous support
to make small, safe steps, reducing unnecessary reaching and twisting.
Ring & tray will not spin freely around the pole, providing fixed support
and an ideal weight bearing surface when gripping strength is weak.
Convenient
Convenient
– Easy to clean tray can be accessed from around the
SuperPole™. Perfect for reading material, medication or items needed
within arms reach. The Safety Island™ will mount to the SuperPole™ at
virtually any height.
Ideal for Kitchens
Ideal for Kitchens
– Install in the center of the kitchen to create secure
support when moving between chair, table, sink or counter. Use the tray
to place meals while moving from cooking surface to kitchen table.
Tubular Ring
Tray
Floor to Ceiling Range
Uni-Fit Extender™
SuperPole™Ultra
Ceiling Plate Extender™
Pole Material
Grip Material
Expansion Mechanism
Weight Capacity
Assistance Level
Typically 28-38"/71-97cm from floor, 18"/46cm diameter, 1.25"/3.175cm diameter
tube for easy gripping.
14"/36cm diameter A.B.S. tray, easy to wipe clean. Weight capacity 15lbs/7kg.
93-99"/236-251cm (standard).
Increase floor to ceiling range to 100-120"/254-305cm. Sold separately. NOT TO
BE USED WITH SUPERTRAPEZE™.
NOT TO BE USED WITH SAFETY ISLAND™.
Allows standard ceiling plate (20”/51cm length) to span 30”/76cm with holes for
ceiling attachment to 24”/61cm ceiling beam centers. Sold separately.
Heavy gauge steel, 1.5"/3.81cm diameter. High temperature baked powder coat
gloss white enamel.
Grey, premium high quality grip, 20"/51 cm long. Does not contain natural dried
rubber or latex. Washable.
Steel jackscrew, zinc plated, 1-1/8" fine cut thread.
250lbs/113kg. Bariatric model 450lbs/205kg capacity.
A unique circular ring with a tray that mounts at any height to the
SuperPole™. Combines the fixed support benefits of a grab bar with the
simplicity and convenience of a tray.
HospitalBathroomBedroom
Call to Order: (919) 844-9402

INSTALLATION
INSTRUCTIONS
Model SP-SI
"Innovative Products for Independent Living"
TM/MC
SuperPole
TM
Safety Island
TM
CAUTION
RISK OF INJURY!
Understand these instructions prior to using product.
Also, refer to the SuperPole
TM
System instructions.
HealthCraft Products Inc., 2790 Fenton Rd., Ottawa, Ontario, Canada, K1T 3T7
Copyright 2004. Specifications subject to change without notice.
Prior to installing the Safety Island
TM
option, we strongly
recommend that you first read through these instructions.
We would also recommend that you set aside a space on
the floor or a table to prepare the SuperPole
TM
System prior
to raising the pole for final installation.
D1. See steps A1 and A2 on page 2. Complete these
instructions and then continue with step D2.
D2. Unpack the Safety Island
TM
unit (27). Slide the Safety
Island
TM
unit (27) onto the pole assembly (2) as shown in
Figure D1 (side of tray on top of spokes to go onto pole
first). Slide it on as straight as possible to avoid scratching
the paint on the pole.
D3. See steps A3, A4, and A5 on page 2. Complete these
instructions and then continue with step D4.
D4. The next step is to fix the Safety Island
TM
to the pole as
shown in Figure D2. It is recommended that the tubular ring
of the Safety Island
TM
is approximately 28" - 36" from the
floor (this height is determined by the height of the user -
consult your therapist).
Fasten the Safety Island
TM
to the pole by installing and
tightening the three set screws (28) with the provided hex
key wrench (29). You will need to slide the spring ring (30)
downwards to gain access to the screw holes.
IMPORTANT - These screws MUST be tightened until they
are flush with the collar or injury may result. NOTE: By
tightening the set screws, the cone points will penentrate
the pole for positive engagement, thereby leaving
permanent indentations in the pole. BE CERTAIN THE
SAFETY ISLAND
TM
IS AT THE CORRECT HEIGHT AND
ORIENTATION BEFORE PROCEEDING.
D5. Slide the spring collar upwards on the Safety Island
TM
collar as shown (Figure D3) to retain the set screws (28)
while in service. Inspect frequently to ensure screws and
collar are tight.
D6. See steps A2 to A9 on page 2. Complete these
instructions to finish the installation of your Safety Island
TM
.
FIGURE D1
227
SLIDE ONTO POLE
FIGURE D2
D1
INCORRECT!
CORRECT!
Ensure all three set screws
are screwed in completely
until back end of screw is
flush as shown.
TUBULAR RING
HEIGHT RANGE
FROM FLOOR
28"-36"
SET HEIGHT AND TIGHTEN SCREWS
FIGURE D3
Slide the spring collar
upwards over as shown
to retain the screws whle
in service.
INSTALL SPRING COLLAR
28
29 30

HealthCraft Products Inc., Ottawa, Ontario, Canada. Copyright 2006. Specifications subject to change without notice. Page 1 of 8
www.healthcraftproducts.com
SuperPole™System
Installation Instructions: SP-S, SP-HD, SPB-S,
SPB-HD, STP-S, STP-SPB-AK
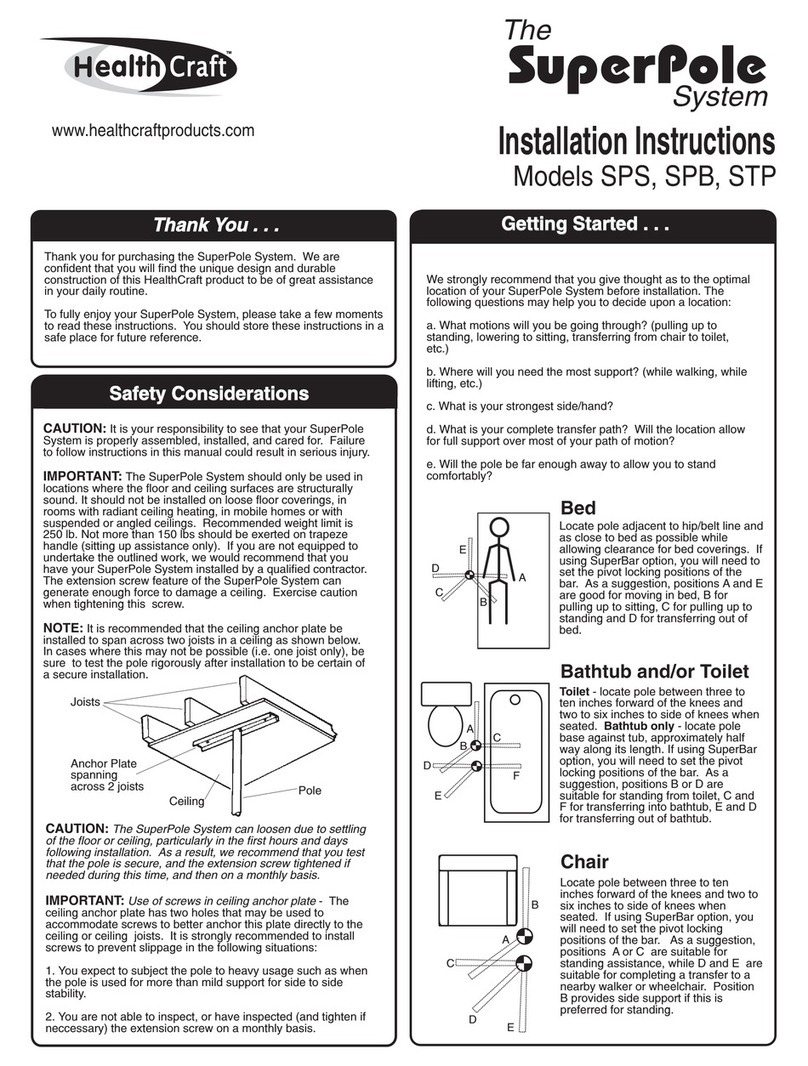
THANK YOU...
Thank you for purchasing the SuperPole™ System. We are confident
that you will find the unique design and durable construction of this
HealthCraft™ product to be of great assistance in your daily routine.
To fully enjoy your SuperPole™ System, please take a few moments
to read these instructions. You should store these instructions in a
safe place for future reference.
SAFETY CONSIDERATIONS
CAUTION: It is your responsibility to see that your SuperPole™
System is properly assembled, installed, and cared for. Failure to
follow instructions in this manual could result in serious injury.
SUPERPOLE™ INSTALLATION / MAINTENANCE
The SuperPole™ System should only be used in locations where the
floor and ceiling surfaces are structurally sound. It should not be
installed on loose floor coverings, in rooms with radiant ceiling heating,
in mobile homes or with suspended or angled ceilings. Recommended
weight limit is 250 lbs. Not more than 150 lbs should be exerted on
trapeze handle (sitting up assistance only). If you are not equipped to
undertake the outlined work, we would recommend that you have your
SuperPole™ System installed by a qualified contractor. The extension
screw feature of the SuperPole™ System can generate enough force
to damage a ceiling. Exercise caution when tightening this screw.
CAUTION: The SuperPole™ System can loosen due to settling of the
floor or ceiling, particularly in the first hours and days following installa-
tion and sometimes with a change of season. As a result, we recom-
mend that you test that the pole is secure, and the extension screw
tightened if needed during this time, and then on a monthly basis.
CEILING ANCHOR PLATE
It is recommended that the ceiling anchor plate be installed to span
across two joists in a ceiling as shown above. In cases where this may
not be possible (i.e. one joist only), be sure to test the pole rigorously
after installation to be certain of a secure installation.
IMPORTANT: The ceiling anchor plate has two holes that may be used
to accommodate screws to better anchor this plate directly to the
ceiling or ceiling joists. It is strongly recommended to install screws to
prevent slippage in the following situations:
1. You expect to subject the pole to heavy usage such as when the
pole is used for more than mild support for side to side stability.
2. You are not able to inspect, or have inspected (and tighten if necces-
sary) the exension screw on a monthly basis.
WARNING - PATIENT ENTRAPMENT!
The potential risk of entrapment (limb, neck, head, torso) between the
pole and adjacent item (i.e. bed) can be reduced or avoided by the
following strategies:
1. Situate the pole at a distance that is considerably smaller or larger
than that which could result in entrapment.
2. Consider situations that could change with time or usage such as
mattress compression, patient movement, bed position changes due
to electrically powered beds, etc.
3. Realize that this product is not intended as a physical constraint or
barrier to exiting the bed.
GETTING STARTED
We strongly recommend that you give thought as to the optimal
location of your SuperPole™ System before installation. The follow-
ing questions may help you to decide upon a location:
a. What motions will you be going through? (pulling up to standing,
lowering to sitting, transferring from chair to toilet, etc.)
b. Where will you need the most support? (while walking, while
lifting, etc.)
c. What is your strongest side/hand?
d. What is your complete transfer path? Will the location allow for full
support over most of your path of motion?
e. Will the pole be far enough away to allow you to stand comfort-
ably?
SUPERPOLE™ PLACEMENT
BEDROOM
Locate pole adjacent to hip/belt line and as close to bed as possible
while allowing clearance for bed coverings. If using SuperBar™
option, you will need to set the pivot locking positions of the bar. As
a suggestion, positions A and E are good for moving in bed, B for
pulling up to sitting, C for pulling up to standing and D for transferring
out of bed.
TOILET and / or BATHTUB
Toilet - locate pole between three to ten inches forward of the knees
and two to six inches to side of knees when seated. Bathtub only -
locate pole base against tub, approximately half way along its length.
If using SuperBar™ option, you will need to set the pivot locking
positions of the bar. As a suggestion, positions B or D are suitable
for standing from toilet, C and F for transferring into bathtub, E and
D for transferring out of bathtub.
CHAIR
Locate pole between three to ten inches forward of the knees and
two to six inches to side of knees when seated. If using SuperBar™
option, you will need to set the pivot locking positions of the bar. As
a suggestion, positions A or C are suitable for standing assistance,
while D and E are suitable for completing a transfer to a nearby
walker or wheelchair. Position B provides side support if this is
preferred for standing.
CD
E
B
A
BA
C
E
D
F
B
A
C
E
D
Ceiling
Anchor Plate
spanning
across 2 joists
Joist
Ceiling
Pole

Figure 1.
Figure 2.
Figure 3.
Correct! LevelIncorrect!
Figure 4.
HealthCraft Products Inc., Ottawa, Ontario, Canada. Copyright 2006. Specifications subject to change without notice. Page 2 of 8
FOR SUPERPOLE™ INSTALLATION, CONTINUE BELOW...
Prior to installing the SuperPole™, we strongly recommend that you
first read through these instructions.
SUPERPOLE™ PREPARATION
A1. Unpack the ceiling anchor plate (1) from the rectangular box, and
the pole assembly (2) from the cardboard tube (remove staples to
avoid scratching the paint on the pole). Remove the clevis pin (3) from
the pole receptacle in the center of the ceiling anchor plate.
A2. Slide the top end of the pole (2) onto the receptacle of the ceiling
anchor plate (1) as shown in Figure 1. Align the locking pin holes of
the pole and the receptacle. Insert the clevis pin (3) removed in step
A1, and secure with nylon washer (4) and hitch pin (5).
A3. Raising the Pole. Place the circular base (7) on the floor at the
intended location of the SuperPole™ as shown in Figure 2. The
SuperPole™ is most easily raised by holding the pole up at an angle,
inserting the stem on the bottom of the extension screw (8) into the
hole on the circular base (7), and then pivoting the pole up above the
base plate as shown in Figure 3.
HINT - to prepare, set the extension screw (8) such that the distance
from the top of the ceiling anchor plate (1) to the bottom of the
extension screw is about two inches less than the actual floor to
ceiling height. You may need to unscrew the jam nut (9) downward to
allow the extension screw to rotate.
A4. Set the SuperPole™ to a true vertical position. This may be
facilitated using a construction level, plumb bob, or by visually
comparing the pole with other vertical line features in the room such
as wall corners, etc.
HINT - It is easier to swing the pole up from one of the sides of the
ceiling anchor plate as shown in Figure 3. If the ceiling anchor plate
hits the ceiling prior to reaching vertical you will need to shorten the
length of the extension screw.
SUPERPOLE™ INSTALLATION
A5. While the cover sleeve (6) is held up, insert a bar such as the
shaft of a screwdriver, through the drive hole at the bottom of the
extension screw. Turn the extension screw (clockwise) as shown in
step 1 of Figure 4 to make the ceiling anchor plate contact the ceiling.
IMPORTANT - The ceiling anchor plate must be made to contact the
ceiling squarely. This can be facilitated by having a second person
hold the pole exactly vertical while turning the extension screw.
Continue turning the extension screw until the anchor plate contacts
the ceiling squarely. From this point continue to turn the extension
screw approximately two to five turns until the SuperPole™ is secure
and ready for testing in step A6.
TESTING INSTALLATION
A6. Test the SuperPole™ by firmly holding onto the pole at mid-height
and rigorously attempting to force the pole from side to side. Use
considerable body weight momentum to conduct an aggressive test.
If either the base, or the ceiling anchor plate appear to slide or shift,
tighten the extension screw one more turn and repeat the test until the
pole will not move during this test.
EXTENSION SCREW
A7. IMPORTANT - Lock extension screw after installing pole by
turning jam nut (9) up until touching the bottom of the pole, then,
simultaneously turning jam nut (9) and extension screw (8)
backwards until jammed tight as shown in steps 2 & 3 of Figure 4.
When finally tight, remove the turning rod, slide the cover sleeve
down to cover the extension screw.
Your SuperPole™ is now installed.
1
2
7
6
6
8
5
4
9
98
3
(1) (2) (3)
SUPERTRAPEZE™
INSTRUCTIONS
BEGIN ON
PAGE 6
SUPERBAR™
INSTRUCTIONS
BEGIN ON
PAGE 4

HealthCraft Products Inc., Ottawa, Ontario, Canada. Copyright 2006. Specifications subject to change without notice. Page 3 of 8
PARTS DIAGRAM: POLE / CEILING ANCHOR PLATE
ASSEMBLY
PARTS DIAGRAM: POLE / EXTENSION SCREW /
BASE PLATE ASSEMBLY
SP 402 Base Plate Assembly
SP 112P Base Plate
SP 118 Base Plate Rubber
SP 403 Ceiling Anchor Plate Assembly
SP 115 Top Plate
SP 117 Top Rubber
HW 302 Clevis Pin
HW 318 Nylon Washer
HW 323 Hitch Pin
SP 500 SuperPole™ Parts Pack
DC 100 Instructions, SuperPole™
SP-P Pole Assembly
SP 113P Pole
GR 101 Grip, 20” long
SP 114 Plastic, Cover Sleeve
SP 107E Extension Screw
SP 105E Collar
SP 172E Jam Nut
SP 145 Plastic Washer
PARTS DIAGRAM: SUPERPOLE™
HW 323 Hitch Pin
HW 302 Clevis Pin
HW 318 Nylon Washer
SP 117 Top Rubber
SP 115P Top Plate
SP 115PA Top Plate, Heavy Duty
SP 115PB Top Plate, Ultra
GR 101 Grip, 20” long
SP 113P Pole
SP 113PA Pole, Heavy Duty
SP-P Pole Assembly
SP 402 Base Plate Assembly
SP 403 Ceiling Anchor Plate Assembly
SP 500 SuperPole Parts Pack
SP 114 Plastic Cover Sleeve
SP 113P Pole
SP 113PA Pole, Heavy Duty
SP 107E Extension Screw
SP 172E Jam Nut
SP 105E Threaded Collar
SP 105EB Threaded Collar, Heavy Duty
SP 105EC Threaded Collar, Ultra
SP 145 Base Washer
SP 112P Base Plate
SP 118 Base Plate Rubber

Figure 5.
Figure 7.
Figure 8.
UNINSTALLED POLE,
HEIGHT OF BAR
INSTALLED POLE,
HEIGHT OF BAR
HealthCraft Products Inc., Ottawa, Ontario, Canada. Copyright 2006. Specifications subject to change without notice. Page 4 of 8
11
12
10
13
Figure 6.
10
14
13
6
2
17
HEIGHT OF HAND RAIL
Spring
Ring
Installed
Locking
Positions
ROTATIONAL
LOCKING POSITION
2
14
16
15
1
24
86
3
7
5
SUPERPOLE™ PREPARATION
B1. See steps A1 and A2 on page 2. Complete these instructions and
then continue with step B2.
SUPERBAR™ PREPARATION
B2. Unpack the SuperBar™ hand rail unit (10). Using the small hex
key wrench (11) and countersunk screw (12), attach one white plastic
pivot bushing (13) to top side of the SuperBar™ hand rail unit as
shown in Figure 5. Set aside the other plastic pivot bushing and
screw. Remove the cover sleeve (6) from the pole assembly (2).
B3. Slide the SuperBar™ hand rail unit (10) onto the pole assembly
(2) as shown in Figure 6 (side with attached pivot bushing to go on
first). Slide it on as straight as possible to avoid scratching the pole.
B4. Unpack and slide the grooved collar (14) onto the pole (2) as
shown in Figure 6. Gently slide the collar up the pole to avoid scratch-
ing the pole. Next slide the other white plastic pivot bushing (13) and
the cover sleeve (6) (removed in step B2) up the pole (2).
IMPORTANT- The next step is to fix the grooved collar (14) to the
pole (2). The position of the grooved collar determines the height of
the bar and the rotational locking position of the bar.
Alternate Installation Option
Steps B5 and B6 can be completed after the pole has been raised in
place (steps A3 to A7 on page 2) to better determine optimal height
and locking positions of the SuperBar™. You may also install just one
set screw to test a height/angle setting of the SuperBar™.
BE CERTAIN THAT THE GROOVED COLLAR IS AT THE
CORRECT HEIGHT AND ORIENTATION BEFORE PROCEEDING.
SUPERBAR™ INSTALLATION
B5. Once the grooved collar (14) has been set to its desired location,
fasten the grooved collar to the pole (2) by installing and tightening
the three set screws (15) with the larger hex key wrench (16). You will
need to slide the spring collar (17) upward to gain access to the screw
holes. IMPORTANT - These screws MUST be tightened until the
back end of the screw is flush with the collar or injury may result.
By tightening these set screws, the cone points will penetrate the pole
for positive engagement, thereby leaving permanent indentations in
the pole (refer to Figure 8).
NOTE! Should you need to change the position of the height/angle
setting, we recommend that you change the height by at least one
inch. This will avoid set screw indentations from being too close to
each other and thereby weakening the pole.
B6. Next, slide the spring collar (17) downward on the grooved collar
(14) as shown in Figure 8 to retain set screws (15) while in service.
Inspect frequently to ensure screws and collar are tight.
B7. Install the remaining white plastic pivot bushing (13) and secure it
with the countersunk screw (12) using the small hex key wrench (11).
B8. See steps A3 to A7 on page 2. Complete these instructions to
finish the installation of your SuperPole™ with SuperBar™.
Your SuperPole™ with SuperBar™ is now installed.
1. Height of Hand Rail - The height at which you fix the
grooved collar determines the height of the SuperBar™ hand
rail unit (10). Consider the optimal height of the bar from
sitting and standing positions. The height of the bar will
change as the pole is installed (dependant on the difference
in height between the ceiling and the pole - see Figure 7).
2. Rotational Locking Position - Each of the grooves
correspond to a rotational locking position of the hand rail unit
(refer to Figure 8). You will want to fix the grooves to have the
hand rail lock in the most advantageous positions for your
assistance as discussed on page 1 ("Getting Started").
SUPERBAR™ INSTRUCTIONS
Prior to installing the SuperPole™ with SuperBar™, we
recommend that you first read through these instructions.

PARTS DIAGRAM: POLE / EXTENSION SCREW /
BASE PLATE ASSEMBLY
PARTS DIAGRAM: SUPERBAR™
HealthCraft Products Inc., Ottawa, Ontario, Canada. Copyright 2006. Specifications subject to change without notice. Page 5 of 8
PARTS DIAGRAM: POLE / CEILING ANCHOR PLATE
ASSEMBLY
SP 102 Pivot Bushing (x2)
HW 100
FHSCS #8-32x⅜”
18-8 SS Screws (x2)
GR 100
Grip, 16” long
HW 112 Set Screw
5/16”-24x3/8
Cone Point (x3)
SP 170E
Spring Ring
SP 116P T Bar
SP 106E
Collar
HW 300
Hew Key Wrench
3/32” short arm
HW 320 Hex Key Wrench
5/32” long arm
SP 501 SuperBar™ Parts Pack
DC 100 Instructions, SuperPole™
HW 100 FHSCS #8-32x⅜”
18-8 SS Screws (x2)
HW 300 Hew Key Wrench
3/32” short arm
HW 112 Set Screw, 5/16”-24x⅜”
Cone Point (x3)
HW 320 Hex Key Wrench
5/32” long arm
SPB SuperBar™
SP 116P T Bar
GR100 Grip, 16” long
SP 102 Pivot Bushing (x2)
SP 106E Collar
SP 170E Spring Ring
SP 501 SuperBar™ Parts Pack
PARTS DIAGRAM: SUPERPOLE™ with SUPERBAR™
GR 101 Grip, 20” long
SP 402 Base Plate Assembly
SP 112P Base Plate
SP 118 Base Plate Rubber
SP 403 Ceiling Anchor Plate Assembly
SP 115 Top Plate
SP 117 Top Rubber
HW 302 Clevis Pin
HW 318 Nylon Washer
HW 323 Hitch Pin
SP-P Pole Assembly
SP 113P Pole
GR 101 Grip, 20” long
SP 114 Plastic, Cover Sleeve
SP 107E Extension Screw
SP 105E Collar
SP 172E Jam Nut
SP 145 Plastic Washer
HW 323 Hitch Pin
HW 302 Clevis Pin
HW 318 Nylon Washer
SP 117 Top Rubber
SP 115P Top Plate
SP 115PA Top Plate, Heavy Duty
SP 115PB Top Plate, Ultra
SP 113P Pole
SP 113PA Pole, Heavy Duty
SP-P Pole Assembly
SP 402 Base Plate Assembly
SP 403 Ceiling Anchor Plate Assembly
SPB SuperBar™
SP 114 Plastic Cover Sleeve
SP 113P Pole
SP 113PA Pole, Heavy Duty
SP 107E Extension Screw
SP 172E Jam Nut
SP 105E Threaded Collar
SP 105EB Threaded Collar, Heavy Duty
SP 105EC Threaded Collar, Ultra
SP 145 Plastic Washer
SP 112P Base Plate
SP 118 Base Plate Rubber

Figure 9.
21
2
20
Figure 10.
Figure 11.
Figure 12.
HealthCraft Products Inc., Ottawa, Ontario, Canada. Copyright 2006. Specifications subject to change without notice. Page 6 of 8
SUPERPOLE™ PREPARATION
C1. See step A1 on page 2. Complete these instructions and then
continue with step C2.
SUPERTRAPEZE™ PREPARATION
C2. Unpack the support arm (20) from the rectangular box. Slide
support arm (20) onto the top end of the pole (2) such that the strap
hook is down as shown in Figure 9. Move it gently down the pole until
it rests against the top of the grey grip (21).
C3. Determine Location of Pole (bedside use) - Refer to Figure 10.
The actual user of the SuperTrapeze™ should lie down in bed in their
normal resting position. The location of the pole alongside the bed is
recommended to be directly beside the hip/belt line as shown. Also,
it is recommended to situate the pole as close to the side of the bed
as possible while leaving enough clearance for the bed coverings.
SUPERPOLE™ INSTALLATION
C4. See steps A2 through A7 on page 2. These steps will guide you
to raise and secure the pole in the location as determined in steps C3.
Complete these instructions and then continue with step C5.
SUPERTRAPEZE™ INSTALLATION
C5. Once the pole has been installed beside the bed, hold the trapeze
handle under the support arm, such that the upper rail of the handle
is closest to the head of the bed as shown in Figure 10. Next, open
the loop on the end of the trapeze strap (22), rotate the strap 180
degrees, and slide it on to the upper rail of the trapeze handle (23) as
shown in Figure 11. Slide it past the grip and along the trapeze tube
until it reaches the top bend of the trapeze as shown in Figure 11.
SETTING HEIGHT OF SUPPORT ARM
C6. Using a tape measure, make a small pencil mark on the pole at a
suggested height of 84" from the floor as shown in Figure 10. Have
the actual user lie down in bed in their normal lying position with their
hands placed palm down on their thighs. Locate the cone point set
screws (25) and allen wrench (24) and have them close at hand.
Gently slide the support arm up the pole until the top of the barrel
reaches the 84" mark as shown by "Y" in Figure 10. Next, swing the
support arm so that the strap hangs directly over the palms of the user
as shown by "X". Secure the support arm to the pole with one of the
set screws (25) and allen wrench (24) as shown in Figure 12.
SETTING HEIGHT OF TRAPEZE HANDLE
C7. Set the trapeze at an appropriate height by adjusting the length of
the strap. This is done by pulling some slack through the cross pieces
of the strap buckle and pulling the buckle down to shorten the strap,
or sliding it up to lengthen the strap. The trapeze handle is at an
appropriate height when ones fingers can comfortably grasp around
the bottom rail of the trapeze when lying down in bed as shown by "Z"
in Figure 10.
TESTING THE LOCATION
C8. Have the user gently try the installed location of the trapeze
handle and pole. Ensure that the trapeze handle is not too close to
allow a comfortable sit up action. Should the trapeze support arm
need to be moved, remove the set screw installed in step C6, and lift
the support arm up by at least one inch and reinstall the screw with
the arm at a new angle to avoid the set screw being too close to the
previous indent created in the pole by step C6.
SECURE SUPPORT ARM
C9. Once the trapeze has been confirmed as the correct location, fully
install all three set screws. IMPORTANT - The set screws should be
installed such that the back end of the screw is flush with the outer
surface of the support arm or injury may result. Slide the spring collar
(26) down over the top of support arm as shown to retain the screws
in service.
Your SuperPole™ with SuperTrapeze™ is now installed.
25
24
22
26
23
Y=84”
X
Z
SUPERTRAPEZE™ INSTRUCTIONS
Prior to installing the SuperPole™ with SuperTrapeze™,
we recommend that you first read these instructions.

STP SuperTrapeze™
SP 123P Trapeze Arm
SP 170E Spring Ring
HW 500 Plug
SP 124P Trapeze handle
GR 102 Grip, 6” long
GR 103 Grip, 10” long
SP 125 Strap
HW 305 Buckle
SP 501 SuperTrapeze™ Parts Pack
HW 500
Plug
SP 123P
Trapeze Arm
SP 125A
Strap
HW 305
Buckle
GR 103
Grip, 10” long
GR 102
Grip, 6” long
SP 170E
Spring Ring
HW 112
Set Screw,
5/16”-24x⅜”
Cone Point (x3)
HW 320
Hex Key Wrench
5/32” long arm
SP 409
E-Handle
PARTS DIAGRAM: POLE / EXTENSION SCREW /
BASE PLATE ASSEMBLY
PARTS DIAGRAM: SUPERTRAPEZE™
HealthCraft Products Inc., Ottawa, Ontario, Canada. Copyright 2006. Specifications subject to change without notice. Page 7 of 8
PARTS DIAGRAM: POLE / CEILING ANCHOR PLATE
ASSEMBLY
PARTS DIAGRAM: SUPERPOLE™ with SUPERTRAPEZE™
SP 501 SuperTrapeze™ Parts Pack
DC 100 Instructions, SuperPole™
HW 112 Set Screw, 5/16”-24x⅜”
Cone Point (x3)
HW 320 Hex Key Wrench
5/32” long arm
GR 101 Grip, 20” long
SP 402 Base Plate Assembly
SP 112P Base Plate
SP 118 Base Plate Rubber
SP 403 Ceiling Anchor Plate Assembly
SP 115 Top Plate
SP 117 Top Rubber
HW 302 Clevis Pin
HW 318 Nylon Washer
HW 323 Hitch Pin
SP-P Pole Assembly
SP 113P Pole
GR 101 Grip, 20” long
SP 114 Plastic, Cover Sleeve
SP 107E Extension Screw
SP 105E Collar
SP 172E Jam Nut
SP 145 Plastic Washer
HW 323 Hitch Pin
HW 302 Clevis Pin
HW 318 Nylon Washer
SP 117 Top Rubber
SP 115P Top Plate
SP 115PA Top Plate, Heavy Duty
SP 115PB Top Plate, Ultra
SP 113P Pole
SP 113PA Pole, Heavy Duty
SP-P Pole Assembly
SP 402 Base Plate Assembly
SP 403 Ceiling Anchor Plate Assembly
STP SuperTrapeze™
SP 114 Plastic Cover Sleeve
SP 113P Pole
SP 113PA Pole, Heavy Duty
SP 107E Extension Screw
SP 172E Jam Nut
SP 105E Threaded Collar
SP 105EB Threaded Collar, Heavy Duty
SP 105EC Threaded Collar, Ultra
SP 145 Plastic Washer
SP 112P Base Plate
SP 118 Base Plate Rubber

Joist
HealthCraft Products Inc., Ottawa, Ontario, Canada. Copyright 2006. Specifications subject to change without notice. Page 8 of 8
www.healthcraftproducts.com
SuperPole™Accessories
& Custom Options
Add a Safety Island™! Add a SuperTray™!
Uni-Fit Extender™Ceiling Plate Extender™
The SuperTray™ is easy to
install, remove and adjust in
height or position. It is a
compact alternative to bulky
floor based over bed tables.
The SuperTray™ can be
removed from the metal
frame and used to transfer
meals from the kitchen.
NOTE: SuperTray™ not to be
used as a weight bearing
surface.
The SuperTray™ simply snaps to the SuperPole™ to
provide the convenience of a bed-side or over bed table.
Ideal For Kitchens. Install
in the center of the kitchen
for support when moving
between chair, table, sink,
or counter. Use the tray to
place items while moving
from cooking surface to
kitchen table.
The Safety Island™ is a unique circular ring with a tray
that mounts at any height to the SuperPole™.
The Uni-Fit Extender™ is added to the SuperPole™ to increase its
height range from 93-99” to 100-120“.
NOTE: Not to be used with the SuperTrapeze™.
The Ceiling Plate Extender™ is added to the standard SuperPole™
ceiling plate to increase its span from 20” to 30”. It may be used in
cases where the SuperPole™ is expected to be subjected to more
aggressive use, or where ceiling structural beams have increased
spacing (such as 24” between centers).
Ceiling
Standard
SuperPole™
Uni-Fit
Extender™
Pole
Standard Ceiling
Anchor Plate
Joist
Ceiling
Pole
Uni-Fit
Extender™
Ceiling Plate
Extender™
Standard Ceiling
Anchor Plate
24”
Sold as SuperPole™ with Safety
Island™, or add Safety Island™
to an existing SuperPole™.
Sold as SuperPole™ with
SuperTray™, or add SuperTray™
to an existing SuperPole™.
STOVE
REFRIGERATOR
SINK
This manual suits for next models
6
Table of contents
Other Healthcraft Security Sensor manuals
