Healthmark Flexible Inspection Scope FIS-007H User manual

Instructions for Use: Flexible Inspection Scope Kit-HDMI
Brand Name of Product
Flexible Inspection Scope Kit-HDMI
Generic Name of Product
Flexible Inspection Scope Kit-HDMI
Product Code Number(s)
FIS-007H, FIS-007HB, CT-101, CT-102
Intended Use
For visually inspecting items.
Range of Applications for
Product
Enhance visual inspection by providing lighted magnification, image capture and the option
for documentation in hard-to-see crevices, channels, and lumens in the areas if instruments
that are not visible to the unaided eye.
Key Specifications of Product
Flexible Inspection Scope™FIS-007H
•CT-101 1.90 mm OD and 110 cm Length
•CT-102 1.06 mm OD and 110 cm Length
•Optical
oResolution Format
oCT-102 1.06 mm- 40,000 pixels (or 200 x 200 pixels)
oCT-102 1.90 mm- 160,000 pixels (or 400 x 400 pixels)
oField of View: 120° in air
oAngle of view: 0°
HDMI Control Module (2 mm): Control module housing Camera processor and LED
illumination HDMI
•Dimensions: 5.24 inches x 3.90 inches x 1.85 inches
•Weight: 1.20 lbs.
•Digital Inspection Scope Connection
•Illumination Control
•Power Cycle
•Power Input: 100-0240VAC, ~1A, 47 - 63 Hz (from wall outlet)
•Power Output: 5V, 2A (to enclosure)
•System Power Button
•All scope lengths and both diameters
•HDMI Mini to HDMI Cable
•Easily change from small and large diameter scopes
Light Settings:
There are four light settings operated by one-button.
Blinking Light:
Indicates transmitting video data
•Splash proof (IPX5 Rating)
•Requires external power
Box Features:
•No Documentation capabilities
•Power plug
•Power Button (On Top of the Box)
•Catheter Holders - Integrated rubber catheter holder
Flexible Inspection Scope Software Requirements:
•Compatible with Windows 10 Operating systems
•No Software-Plug into any HDMI monitor
Shipping & Storage

Shipping Conditions &
Requirements
N/A
Storage Conditions
Storage and transport
Humidity: 10 to 100% (condensing)
Temperature: -20 °C to +60 °C
Pressure: 600 hPA to 900 hPA
Normal Operation
Humidity: Zero (0) to 100% (condensing)
Temperature: +5 °C to +40 °C
Packaging Contents
N/A
Shelf Life
Warranty: One year from the date of purchase.
Instructions for Using Product
Description of Use(s)
For visually inspecting items.
Preparation for Use
Unpacking Flexible Inspection Scope:
Carefully inspect for shipping damage. If there is any damage, contact the shipping carrier
and Heatlhmark customer service 800-521-6224 immediately.
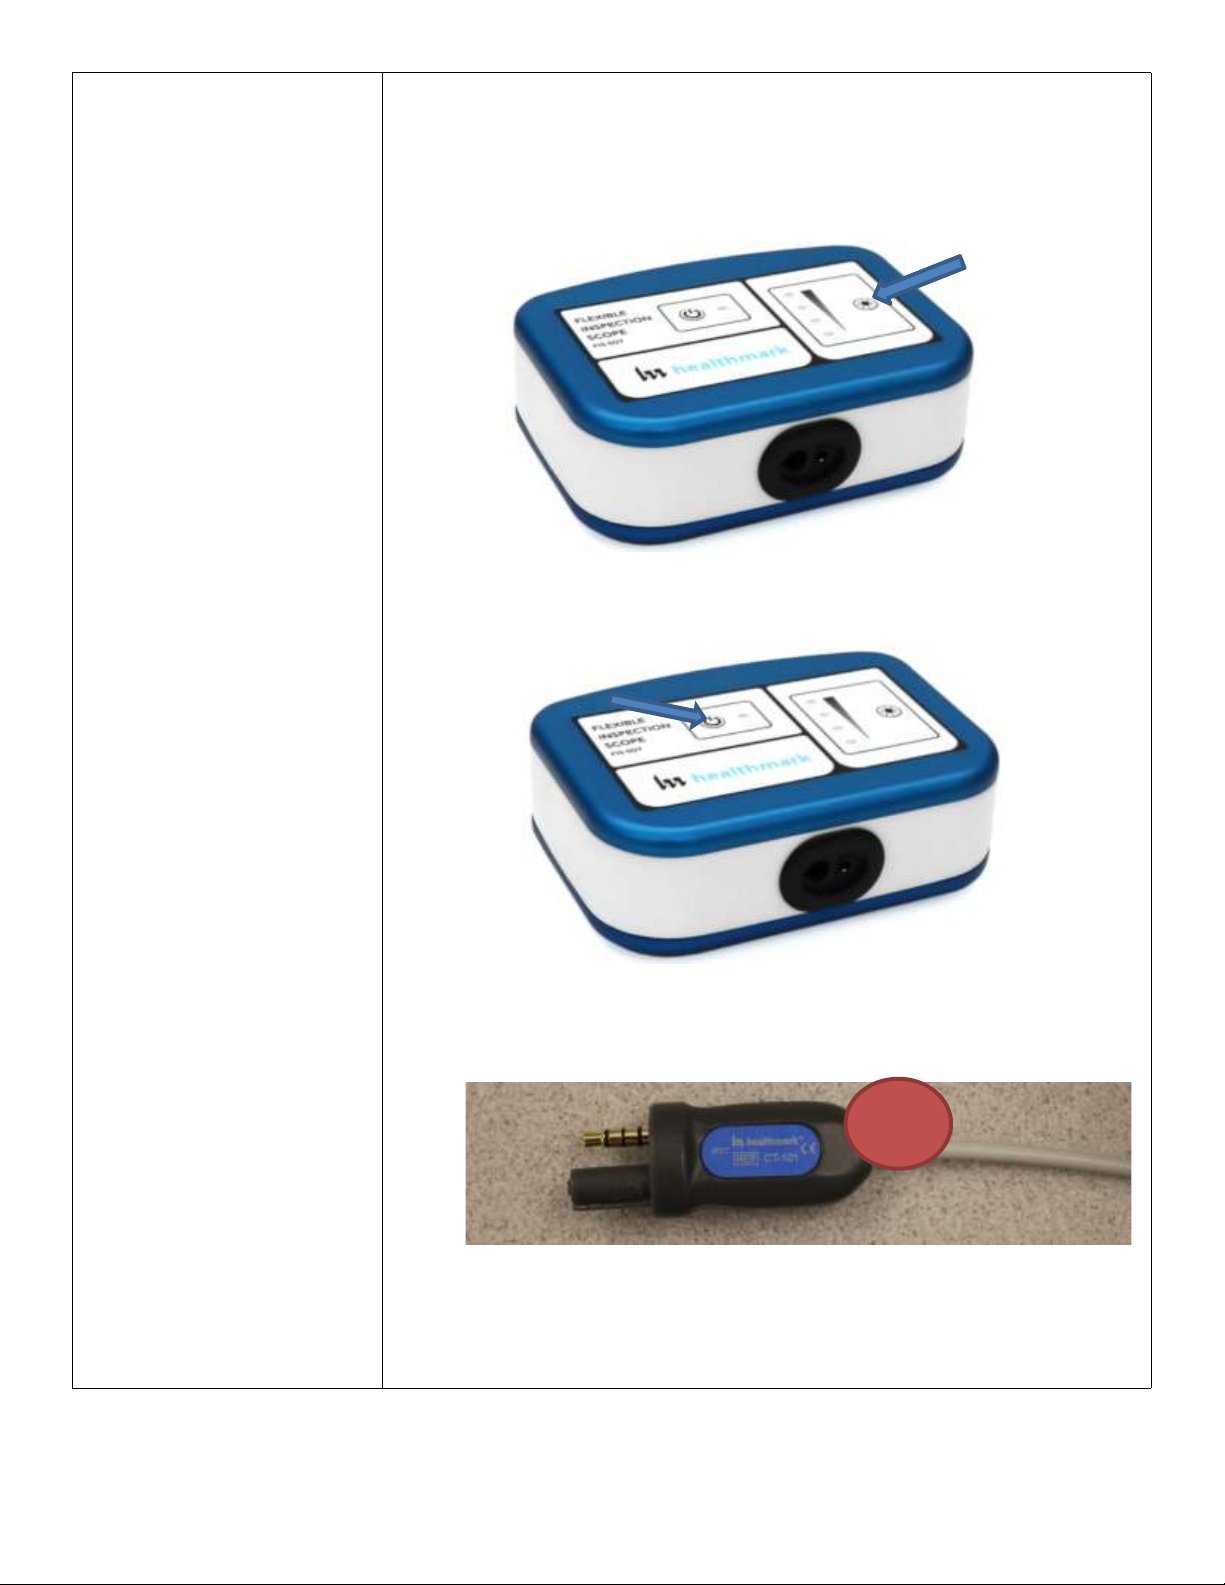
HDMI Control Module: (Fig 1).
1. Digital Inspection Scope Connection
2. Illumination Control
3. Power Cycle
4. N/A
5. Mini HDMI Out
6. Power Input
7. System Power Button
Figure 1
Flexible Working Length: (Fig 2).
•1.9 mm O.D. and 110 cm Length
•1.06 mm O.D. and 110 cm Length
Large 1.90 mm Small 1.06 mm
Figure 2
1
2
3
7
6
5
Flexible Inspection Scope™ Features
Light/Illumination Settings: (Fig 3).
•5-light settings
oLight on control indicated setting level
o5th setting is OFF
•Press light button to advance to next setting
o5th setting turns the light OF
Figure 3
Power Cycle Button
Press button to RESET camera (Fig 4).
Figure 4
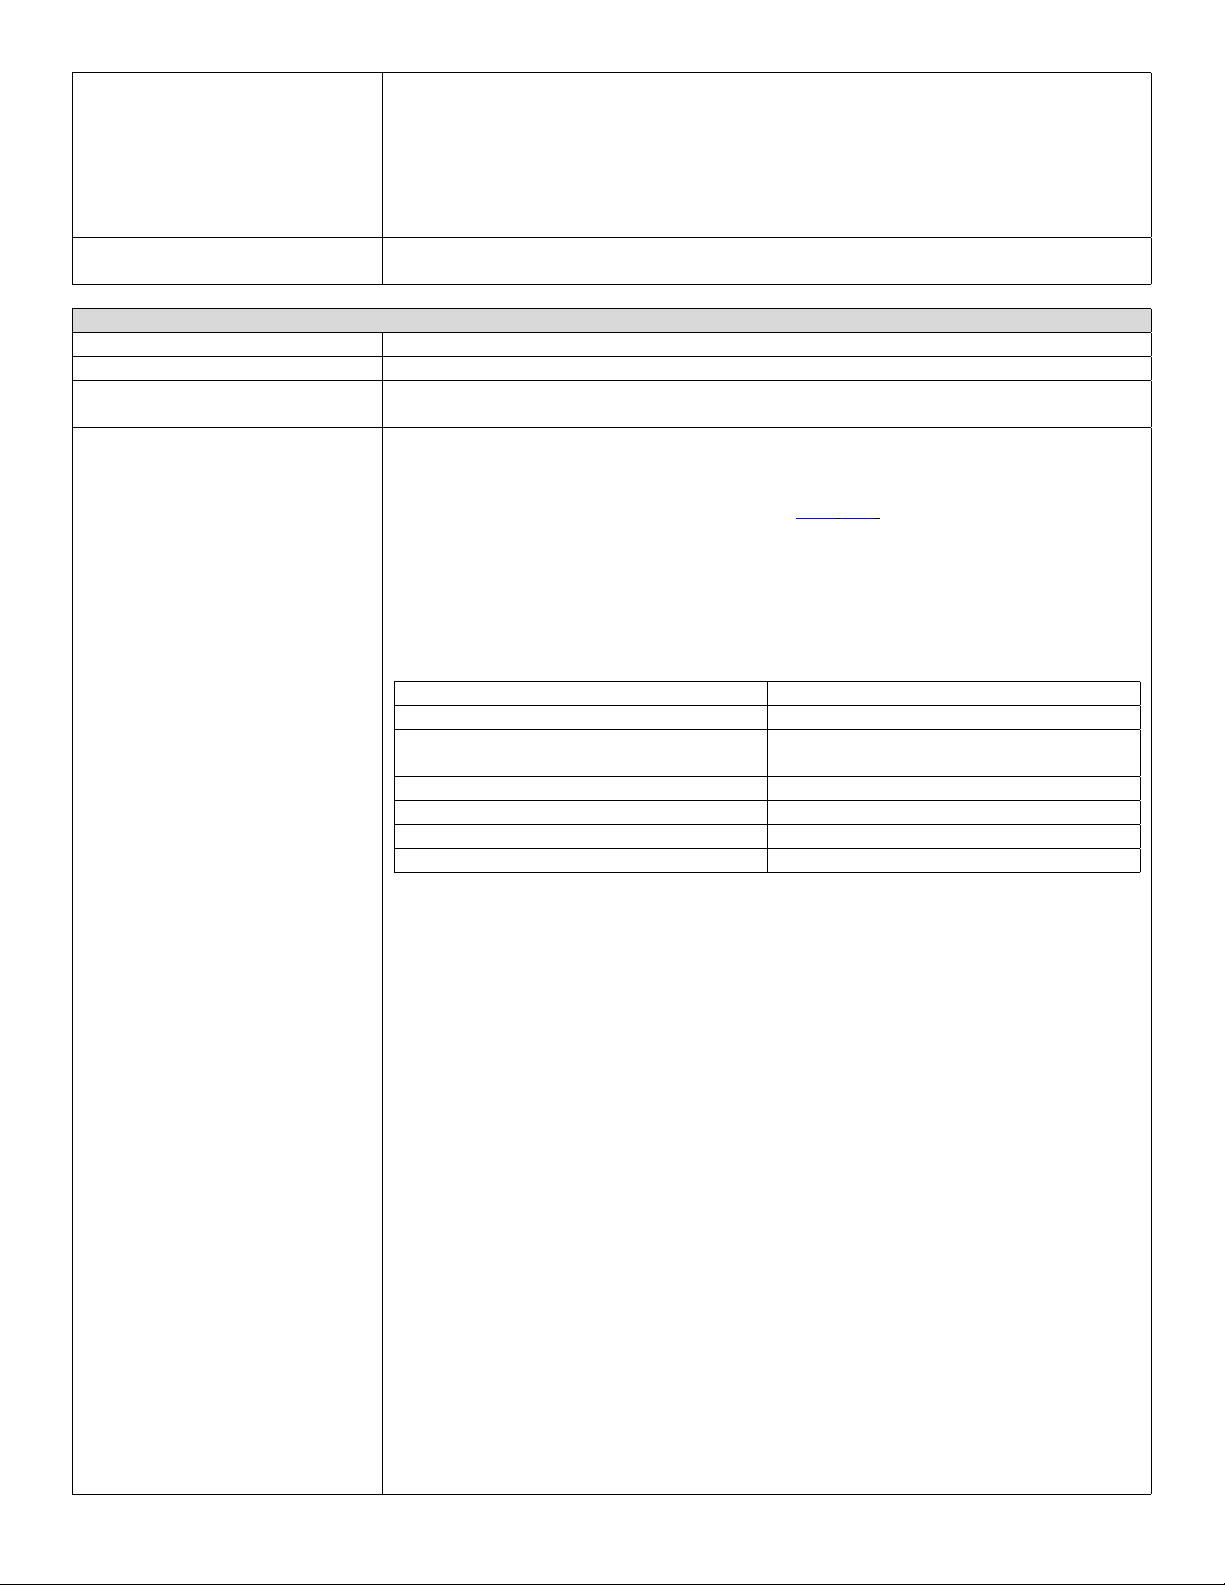
1. Flexible Inspection Scope™ Plug (Fig 5).
Contains camera video connection as well as LED Light for illumination.
Figure 5
2. Flexible Working Length (Fig 6).
The portion of the Flexible Inspection Scope™ that is inserted into an item during
visual inspection. The measuring scale markings on the Flexible Working Length
are in centimeters (accuracy = ± 0.5 cm).
1

Figure 6
3. Distal Camera (Fig 7).
Distal portion of Flexible Inspection Scope™ that contains the camera lens.
Figure 7
Switching to a Different Flexible Inspection Scope™ on the Control
Module
1. Press the Power button on the Control Module.
2. Disconnect the current Flexible Inspection Scope from the Control Module
3. Repeat the steps in the “STARTING SOFTWARE & CONNECTIONS SCOPE TO
PC” procedure.
Diagrams (drawings, pictures)
Inserting Scope in Item
2
3
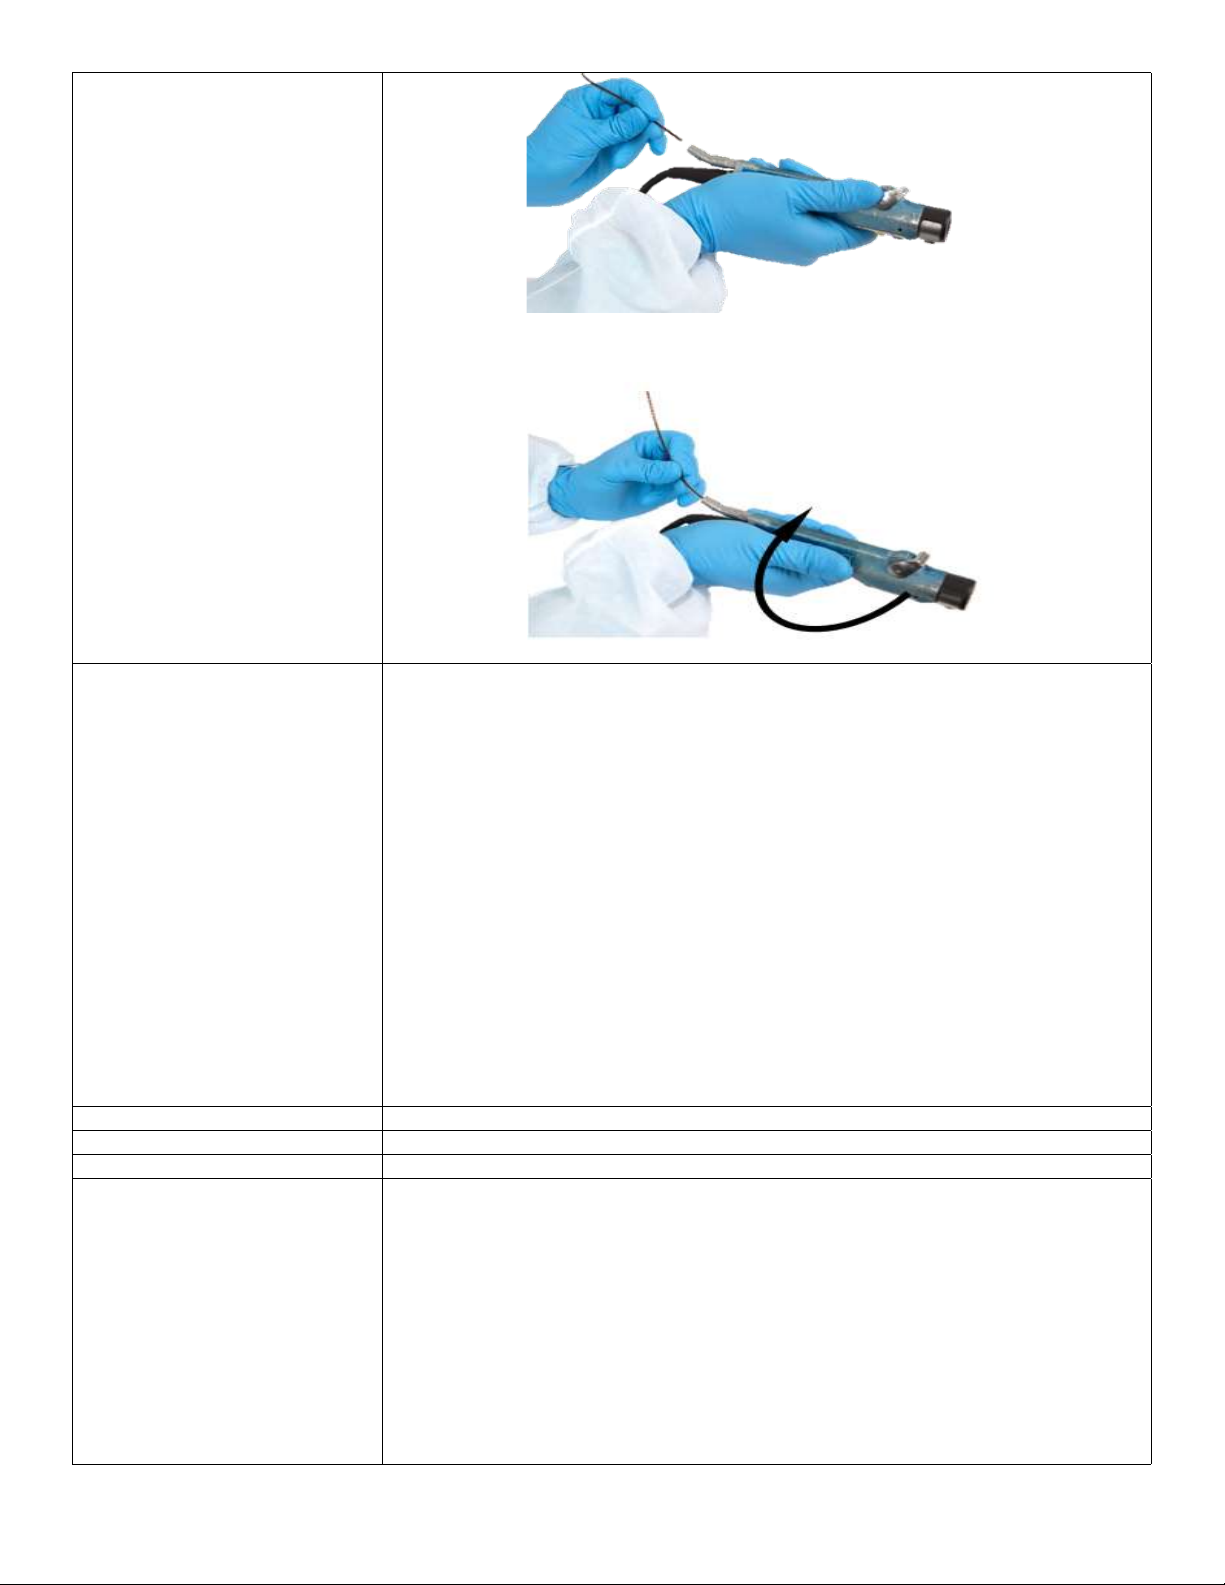
Figure 1
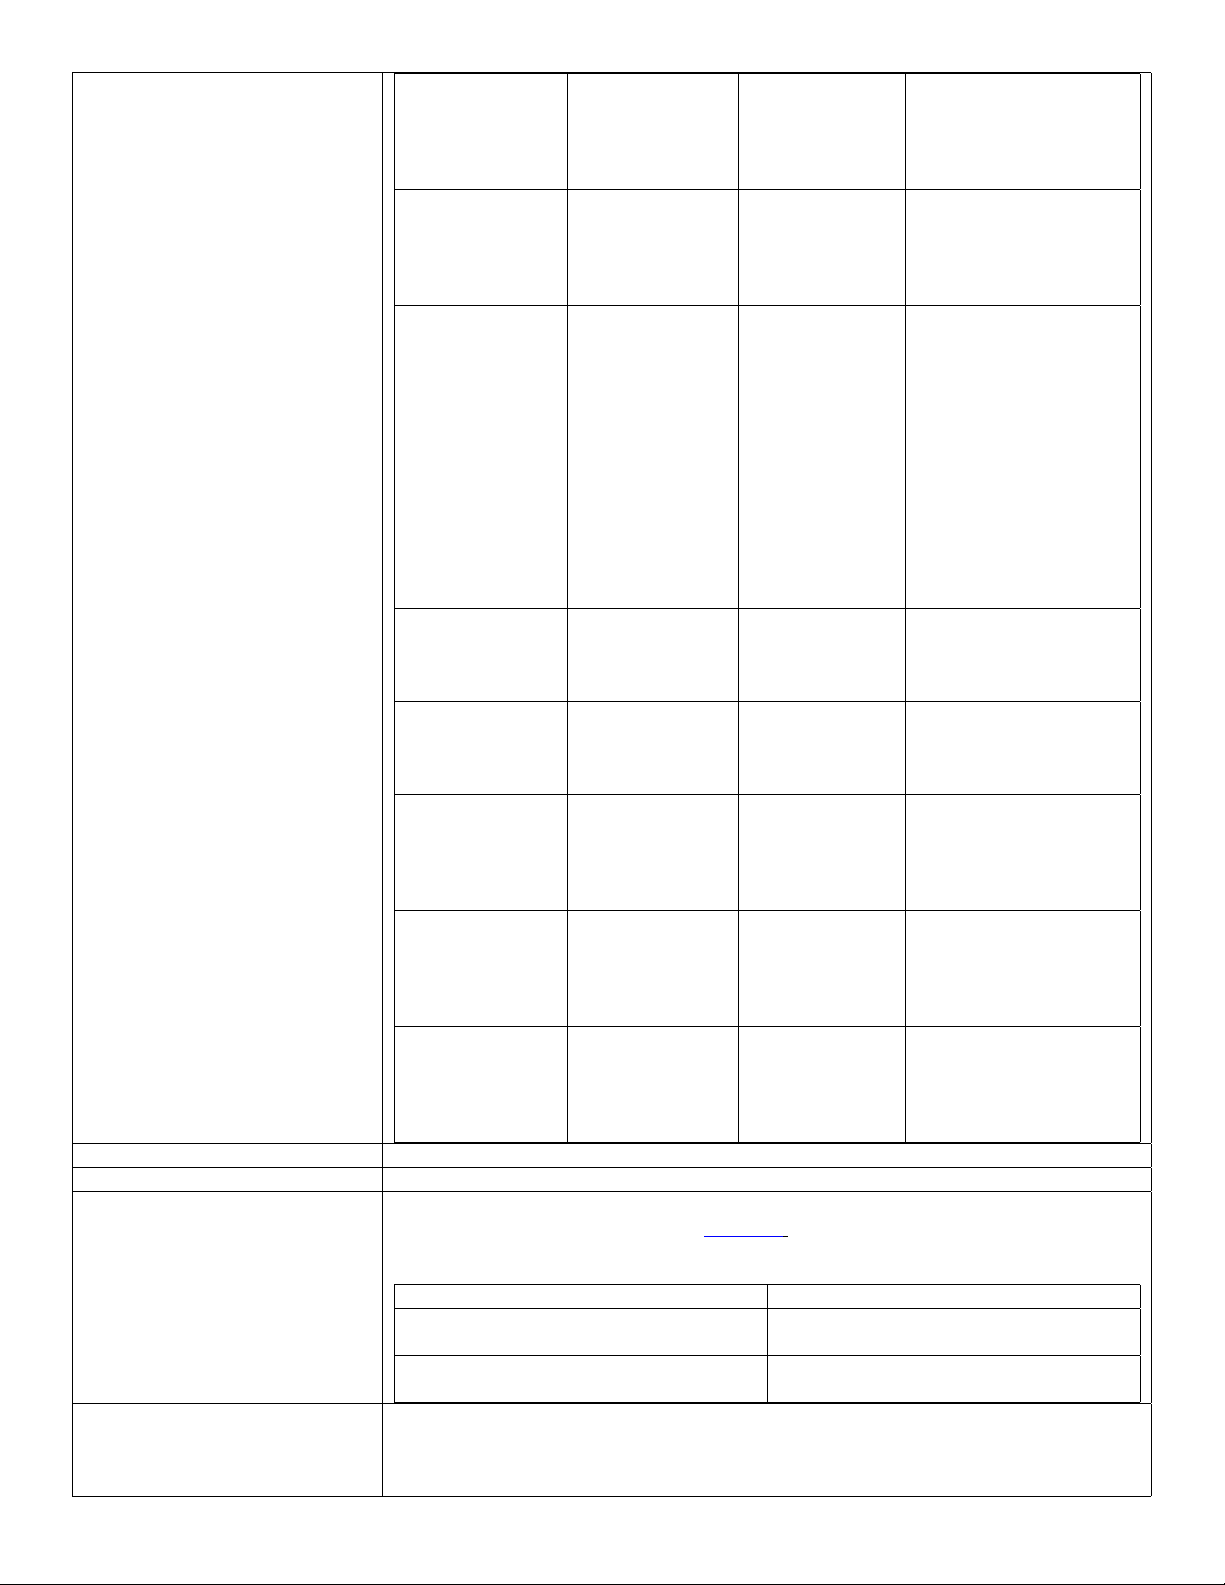
Rotating Device to Avoid Obstacle
Figure 2
Steps for Use of Product
Performing Inspection
Following the steps listed below will ensure the proper use and best performance of the
Flexible Inspection Scope™. Follow the steps prior to inspection.
1. Grasp the Flexible Inspection Scope™ near its distal end and gently insert the
Flexible Working Length into the intended item as shown in. (Fig 1 above).
2. Adjust light with the Illumination button on the Control Box for ideal lighting.
3. Use short advancements while keeping your fingers close to the device’s opening.
View the monitor while inserting into the item. If an obstruction hinders the path of
the Flexible Inspection Scope™, gently attempt to manipulate or rotate it to avoid
the obstacle. (Fig 2 above).
4. Once the Flexible Working Length has reached the end of the area you are
inspecting, retract the scope slowly, while looking for debris or damage.
5. When switching between control boxes, power off the control box that is in use,
then disconnect the Flexible Inspection Scope from the control box.
6. If the HDMI control box is in use, power off the control box, disconnect the
Borescope Catheder and along with the power adapter.
NOTE: If unable to exchange catheters by recycling power, close the program and open
again.
Interpretation of Test Results
N/A
Contraindications of Test Results
N/A
Documentation
N/A
Special Warnings and Cautions
•To ensure operator safety, read and understand this IFU before using the Flexible
Inspection Scope™.
•Do not attempt to use the Flexible Inspection Scope™ if it appears to be damaged.
•The Flexible Inspection Scope™ is not sterile as supplied. The user must follow the
protocol for cleaning and disinfecting, or sterilizing described in the instructions for
Cleaning and Disinfecting or Sterilizing section.
•Do not attempt to service any part of this product.
•To ensure operator safety, read and understand this IFU before using the Flexible
Inspection Scope™.
•The Flexible Inspection Scope™ emits visible light energy from its distal end when
powered on. Avoid looking directly at this emitted light or directing it toward
others.
•Do not bend the Flexible Inspection Scope™ to a radius less than ½ inch (12.7
mm). This may cause damage.
•Do not apply excessive force to the Flexible Inspection Scope™. Applying
excessive force to the Flexible Inspection Scope™ can result in damage.
oIf you feel resistance, or an obstruction hinders its path, you may gently
attempt to manipulate or rotate the scope to avoid the obstacle.
oYou may also slowly withdraw it a short distance and try advancing again.
Disposal
This can be disposed of the same as standard electrical products. Follow your local
regulations for disposal of electrical components.
Reprocessing Instructions
Point of Use
N/A
Preparation for Decontamination
N/A
Disassembly Instructions
Disconnect the Flexible Inspection Scope™ from the control module prior to
cleaning/disinfecting.
Cleaning –Manual
Cleaning Between Uses:
Wipe down the Flexible Inspection Scope™ with a compatible wipe. Follow the wipe
manufacturer’s (Mfr.’s) Instructions for Use (IFU) for appropriate wipe usage. See Chemical
Compatibility Chart for approved cleaning agents click here:
The Flexible Inspection Scope™ is made of the same material as other common endoscopes.
Any wipe, solution, or low temperature (≤ 60 °C (140 °F) method intended for the
reprocessing of endoscopes is likely compatible with the Generation II Flexible Inspection
Scope™ Catheters if used according to the product labeling.
Solution Containing (Flexible Inspection Scope Only):
Alcohol Ethoxylates
Neutral or Near-Neutral pH Detergents
Enzymatic Cleaning Solutions
Enzymatic Detergents
Glutaraldehyde
Hydrogen Peroxide (7.35%) with Peracetic
Acid (0.23%)
Accelerated Hydrogen Peroxide (AHP)
Ortho-phthalaldehyde (OPA)
Peracetic Acid
Sodium Borated, Decahydrate
Sodium Xylene Sulfonate
Tetrapotassium Pyrophosphate
Trisodium nitrilotriacetate
The Flexible Inspection Scope™ has fluid ingress protection rating of IPX7 (Waterproof)
and can withstand immersion in fluid up to 1 m in depth for up to 30 minutes.
Control Module HDMI has a fluid ingress protection rating of IPX4 (Water resistant) can
withstand splashing water from any direction.
For Thorough Cleaning: Cables
Follow the cleaning agent Mfr.’s IFU.
1. Unplug and disconnect all components from the Control box prior to cleaning.
2. Do not submerge or soak the cable for disinfection (cable is not waterproof).
3. Wipe thoroughly with non-linting wipe moistened with facility approved neutral
detergent. Use the appropriate brushes with detergent solution to remove any
residues from areas that cannot be reached with the wipes.
4. Rinse with non-linting wipe moisture with AAMI Utility Water for 45 to 60
seconds, then dry with non-linting wipe.
For Thorough Cleaning: Control Module
1. Unplug and disconnect all components from the Control box prior to cleaning.
2. Do not submerge or soak the cable for disinfection (Control Box is not waterproof).
3. Wipe thoroughly with non-linting wipe moisture with facility approved neutral
detergent. Use the appropriate brushes with detergent solution to remove any
residues from areas that cannot be reached with the wipes.
4. Rinse with non-linting wipe moisture with AAMI Utility Water for 45 to 60
seconds, then dry with non-linting wipe.

NOTE: (Do NOT soak). Control Module and cable are not waterproof and should not be
immersed.
Cleaning –Automated
N/A
Disinfection
Control Module and Cables
These may be cleaned with alcohol based disinfectant wipes.
Compatible agents (wipes and Solutions) for disinfecting Flexible Inspection Scope™
and Control Module:
•Hydrogen Peroxide
•Isopropyl Alcohol (IPA)
•Sodium Hypochlorite (Bleach)
•Ortho-Phenylphenol
•Quaternary Ammonium
High-Level Disinfection (Flexible Inspection Scope™ Only)
•Select only the disinfecting solutions listed in the compatible disinfecting methods.
•Follow all recommendations regarding health hazards, dispensing, measuring, and
storage from the Mfr. of the cleaning and disinfecting agents.
•Soak the Flexible Inspection Scope™ in the selected disinfecting solution per the
solution Mfr.’s Instructions for Use.
•Rinse the Flexible Inspection Scope™ with critical (sterile) water, again, following
the instructions of the disinfecting solutions manufacturer.
Reprocessing Chemical Compatibility Chart click here:
Drying
Flexible Inspection Scope™ Only
•Dry with a sterile, non-Linting wipe or sponge.
•Ensure that the distal tip and proximal ends are dried.
•Air drying could leave deposits on the optical surfaces, which could result in a
degraded image.
Maintenance, Inspection, and
Testing
•(Prior to use), [carefully] inspect the external surfaces of the Flexible Inspection
Scope™ and any accessories to ensure they are smooth and free of any wear or
damage (i.e., protrusions or sharp edges).
•Flexible Inspection Scope™ have to user:
oServiceable parts
oMaintenance beyond cleaning is required.
•Refer all service or replacement needs to Healthmark Industries.
•Light leaks may be common and possibly noticeable when inspecting the flexible
portion of the Flexible Inspection Scope™.
oThis does not influence its function, but it should be monitored for light
output.
oOverly dark images on your monitor may be caused by damaged light
fibers and may require repair or replacement of the Flexible Inspection
Scope™.
Troubleshooting and Servicing
Condition
Appearance
Cause
Correction
No Image
Main image
Window is black.
The Inspection
Scope was not
connected to the
computer when
the software was
opened.
Unplug USB Connection
on Camera Cable and
plug in again.
No Image
Main image
Window is black.
1. USB Video
Device not
selected, or
without the scope
connected.
2.Check HDMI
Monitor “Input”
Selection
If no image, to the
‘Settings’ Tab and select
USB Video Device.
No light
No light when
scope pointed at
surface.
No power to light
source or power
connections are
not secure.
1.Check the Camera
Cable connections and
make sure the computer is
powered on.
2. HMDI is “ON”.
Low Light
No image or very
dark image. Weak
light pattern when
scope pointed at
surface.
Light setting too
low.
Cycle through light
intensity levels/settings
until a clear image is
obtained.
Low light
No image or very
dark image. Weak
or light pattern
when scope
pointed at surface.
Broken light
fibers in scope.
Replace Flexible
Inspection Scope™
•Decide if the
Scope is no
longer adequate
for use.
•Recommendation
is when 10% of
the image or
illumination has
been degraded/
lost to replace
the scope.
No image or
distorted image
No image or
heavily distorted,
cracked
appearance.
Broken image
sensor and/or
internal cables.
1.Press Power Cycle
button
2.Replace Flexible
Inspection Scope™.
Overly bright
image
White-out type
reflection
Light intensity is
too bright
Cycle through light
intensity levels/settings
until a clear image is
obtained.
Blurry image or
overly bright
image
Distorted image.
Light often
reflective and
image appears
brightly colored.
Debris or film on
lens.
Wipe off end of Flexible
Inspection Scope™ with
non-Linting wipe.
Image does not
capture
When you click
the Capture
Button, the still
image or video is
not captured.
The File Loc path
may have
changed, or the
folder names do
not exist.
Set up a new Windows
File Loc folder.
Rapidly takes
pictures
automatically
‘Pictured
Captured’ keeps
flashing and
Image files are
created rapidly.
PC’s internal
camera is selected
as the video
device is Settings.
Disable the PC’s internal
camera (See Advanced
Settings below).
Reassembly Instructions
N/A
Packaging
N/A
Sterilization
Do Not autoclave the Flexible Inspection Scope™.
See the Chemical Compatibility Chart click here:
Low Temperature Sterilization Systems (Flexible Inspection Scope Only)
Ethylene Oxide (EtO)
STERRAD®100S System (Standard)
STERRAD® NX System (Standard,
Advanced)
STERRAD®100NX System (Standard)
STERIS®Liquid Chemical Sterilization
Systems
STERIS V-PRO®Low Temperature
Sterilization Systems (Non-Lumen Cycle)
Storage
Storage and transport
Humidity: 10 to 100% (condensing)
Temperature: -20 °C to +60 °C
Pressure: 600hPA to 900 hPA

Normal Operation
Humidity: Zero (0) to 100% (condensing)
Temperature: +5 °C to +40 °C
Additional Information
1. If upon inspecting an item it is determined not to be clean, reprocess according to
the manufacturer’s instruction for use.
2. Facility needs to do a multidisciplinary risk assessment to determine the
requirement and frequency for cleaning disinfection and sterilization. This
assessment should be based upon clinical use of items and reprocessing
instructions.
Related Healthmark Products
N/A
Other Product Support
Documents
ProSys™ Brochure, ProSys™ Price List
Reference Documents
N/A
Customer Service Contact
Healthmark Industries Company, Inc.
18600 Malyn Blvd.
Fraser, MI 48026
1-586-774-7600
healthmark@hmark.com
hmark.com
2021-12-09 Suzanne Latta
Other Healthmark Laboratory Equipment manuals


Popular Laboratory Equipment manuals by other brands

CGS
CGS Mobile Command Center quick start guide

Forma Scientific
Forma Scientific 1284 instruction manual

InnovaPrep
InnovaPrep Concentrating Pipette quick start guide

Agilent Technologies
Agilent Technologies InfinityLab LC Series user manual

Hettich
Hettich ROTANTA 460 manual

Thermo
Thermo IEC Centra CL5 instruction manual


Heidolph
Heidolph MR Hei-Mix S instruction manual

Streck
Streck ESR-Auto Plus Dismantling Guideline

Thermo Scientific
Thermo Scientific mySPIN 12 instruction manual

Parr Instrument
Parr Instrument 4540 Operating instructions manual

FISNAR
FISNAR F1300N operating manual

Beckman Coulter
Beckman Coulter SW 32 Ti Instructions for use