HealthUp AioCare User manual

© Copyright HealthUp Current edition (6th edition 21.01.2021)
Instructions for use
AioCare spirometry
system
EN

Manufacturer:
HealthUp sp. z o.o.
Twarda 18,
00-375 Warsaw
Address:
Sarmacka 7B/2,
02-972, Warsaw
Contact:
phone: (+48) 798 545 240
e-mail: [email protected]om
Remote monitoring system with
spirometer and peak flow meter module
and pulse oximeter.

Table of contents
Instructions for use AioCare spirometry system
1. Description of the AioCare system 5
1.1. Contraindications for the spirometry test 6
2. Construction of the AioCare spirometry system 7
2.1. Equipment 7
3. Operating conditions and equipment classification 7
3.1. Technical parameters 7
3.2. Measured spirometric parameters 8
4. Construction diagram of the AioCare 9
5. Components of AioCare 10
6. Research 10
6.1. Calibration of the spirometry system 10
6.2. Flow zeroing 10
6.3. Dynamic spirometry 10
6.4. Peak Exhaust Flow Test (PEF) 13
6.5. Pulse (HR) and saturation (SpO2) test 13
7. Operation of the device 13
7.1 . Preparing the AioCare device for operation 13
7.2 . Communication between AioCare and the user 15
7.3. Hardware and software requirements
for a mobile device 15
7.4. Application installation 17
7.5. First start-up of the application 18
8. Maintenance of the AioCare spirometer 22
8.1. Usage guidelines 22
8.2. Maintenance 22
8.2.1. General information on reprocessing 22

4
8.2.2. Daily maintenance 23
8.2.3. Cleaning and disinfection procedure for re-use between
patients (health centre conditions) 23
8.2.3.1. Cleaning and inspection of the flow tube 24
8.2.3.2 Disinfection methods for multiple patient use 26
8.2.3.3. Cleaning procedure for the device used by 1 patient
(domestic use) 28
8.2.3.4. Cleaning procedure 30
9. Power supply 32
9.1. Operating the AioCare spirometer power supply 32
9.2. Changing the battery 34
10. Disposal 35
11. Warranty 35
12. Working environment 35
13. Malfunctions and malfunctioning 35
14. Information on compliance with FCC USA 36
15. Information on compliance with ISED Canada 36
16. Symbols used by the manufacturer 36
17. Declaration of conformity 37
18. Questions and problems - FAQ 37
19. Training 41
20. Precautions: 44
20.1. Warnings for use in electromagnetic fields 45
20.2. Recommended separation distances
for RF communication 46

5
1. Description of the AioCare system
The AioCare system was developed at Healthup by a team of experts with practical
experience in designing and manufacturing medical devices and software
development.
The main novelty of our system is the unique combination of measurement sensors,
developed measurement channel and functional application, cooperating with iOS
and Android operating systems.
AioCare - a remote monitoring system with a spirometer module, which is used
to perform a spirometry test. These tests are the basis for functional diagnostics
and evaluation of mechanical properties of the respiratory system. It allows the
recordingof thespirogramand theevaluation ofthe intensiveinspiratory-expiratory
manoeuvres and maximum ow-volume/volume curves time and values associated
with them, such as force vital capacity (FVC). In addition, it is possible to register
the spirogram as part of the diastolic test. These measurements are used in the
diagnosis and monitoring of lung diseases and interventions during the treatment
of certain types of respiratory diseases.
AioCare also acts as a peak ow meter, measuring peak expiratory ow (PEF) as well
as the pulse oximeter, measuring the average pulse and the level of oxygenation
of the blood (SpO).
Pulse oximetry testing in the AioCare device is carried out by using the reective,
optical sense MAX30102 from Maxim Integrated Circuits. It is located in the upper
part of the measuring module. The MAX30102 sensor is an integrated pulse oximeter
for measuring heart rate and blood oxygenation level (SpO). It consists of two
LEDs,a photo-detector,optical componentsandlow-noise electroniccomponents
together with an external light-levelling module. It is powered by two voltage
sources (the 1.8 V source supplies the electronic components and the 3.3 V source
the LED). Data is transmitted using the standard I2C serial interface.
Indications for use:
The AioCare spirometer is intended for use by a doctor or a patient under the
supervision of a doctor or a technician. The device is intended for testing lung
function and may perform spirometry tests in adults and children > 5 years old
only under the supervision of an adult. The values of standards and interpretative
results are not calculated for children under 5 years old.
Intended use:
1. Evaluation of respiratory system function in the presence of:
a. subjective symptoms (dyspnoea, whistling, coughing, expectoration,
orthopnoea, chest pain),
b. subjective symptoms (abnormal breathing sounds, emphysema features,
prolonged expiratory phase, cyanosis, chest deformities, clubbed ngers)
c. abnormalities in additional examinations (abnormalities in chest X-ray,

6
1.1 Contraindications for the spirometry test
1. Absolute contraindications:
• fresh (during hospitalization) myocardial infarction,
• fresh (during hospitalization) CNS stroke,
• aneurysms (risk of rupture of the aneurysm and haemorrhage at increased chest
pressure),
• fresh ophthalmic surgery (e.g. cataract surgery),
• increased intracranial pressure,
• hemoptysis of unknown etiology,
• pneumothorax.
2. Relative contraindications:
• the presence of a condition that may aect the reliability of the results obtained
(e.g. nausea, vomiting, constant coughing),
• condition after abdominal or intra-abdominal surgery,
• the chest (postoperative pain which makes it impossible to perform breathing
manoeuvres properly during the examination),
• dizziness, heart rhythm disorders,
• a signicant degree of desaturation when oxygen therapy is discontinued for the
duration of the study.
Contraindications for a peak ow meter test: No contraindications.
hypoxemia, hypercapnia, polyglobulia - increased hematocrit value)
2. Screening of persons with risk factors (smoking, exposure to toxic factors -
dusts, gases).
3. Respiratory testing in systemic diseases.
4. Perioperative risk assessment:
a. non-pulmonary surgery,
b. thoracic surgery.
5. Evaluation of the state of respiratory system activity before the beginning
of strenuous physical activity.
6. Monitoring of treatment:
a. bronchospasmodic drugs,
b. corticosteroids (asthma, COPD, interstitial lung diseases),
c. other medicines (e.g. antibiotic therapy in cystic brosis),
d. dehydrating drugs in congestive heart failure.
7. Self-monitoring of respiratory system functions by the patient at home:
a. subjective and objective symptoms (dyspnea, swings),
b. exacerbations of respiratory diseases, including asthma, chronic obstructive
pulmonary disease,
c. after a lung transplantation.

7
2.1. Equipment
3.1. Technical parameters
3. Operating conditions and equipment
classification
• MicroGard II PTF- antibacterial lter (use-by date on the foil seal of the package,
do not use after its expiration, disposable lter),
• nose clip Vyaire V-892892 - use-by date on the foil seal of the package, do not use
after its expiration, disposable clip),
• USB cable,
• quick manual.
The spirometric system allows:
• the performance of tests:
- spirometry (parameters: PEF, FVC, FEV1, FEV1 /FVC ratio, FEF25, FEF50, FEF75),
- peak ow meter (PEF),
- pulse oximetry (the average pulse and SpO).
• Archiving of research results in the application,
• Creating a patient le.
Measuring module in combination with a mobile device:
Ambient temperature optimal for measuring: +15 to +40 °C, humidity
relative: 15-93%
Storage: from 5 °C to 70 °C, humidity <30-70 % Internal powered device
Product class II A
The above mentioned conditions of the device are recommended for
work in home and specialist rooms in the health service: diagnostic
oces, general clinics.
Sensor type for ow measurement: Thermal
Tests: FVC, pre- and post- (bronchodilator)
!
2. Construction of the AioCare
spirometry system
AioCare is a portable spirometer for functional tests of the respiratory system.
The AioCare spirometry system consists of:
• measuring module with ow tube,
• mobile application to be installed from AppStore or Google Play.
The task of the measuring module is to convert the parameters of the ow of
inhaled and exhaled air into an electrical signal. The signal created in the
module is processed by the microcontroller of the spirometer and sent via
Bluetooth® 4.0 to the mobile application, where the data is converted into curves
and numerical values of the parameters displayed on the mobile device screen.

8
3.2. Measured spirometric parameters
• FVC – Forced Vital Capacity,
• FEV1 – Forced Expiratory Volume in 1 sec.
• FEV1/ FVC ratio – ratio between FEV1 and FVC (Tieneau-Pinelli index),
• FEF25 – ow by 25% FVC,
• FEF50 – ow by 50% FVC,
• FEF75 – ow by 75% FVC,
• PEF – peak exhaust ow,
• TPTEF/TE – ratio of peak expiratory ow time to peak expiratory time,
• VPTEF/VE – ratio of volume at peak exhaust ow to exhaust volume.
Spirometric ow measurement range: 0-16 l/s
Flow accuracy: ±5% or 200 mL/s
Resistance: < 0.5 cm HO/L/s
Volume range: 0-8 litres
Volume accuracy: ±2,5% or 50 ml, whichever is greater
Linearity: 2,5%
Flow measurement resolution: Measured 5 ml/sec, usable 10 ml/sec
Accuracy/Repeatability: Standard: ATS/ERS 2019
Automatic BTPS correction: Built-in sensors for measuring temperature,
pressure and humidity
Type of sensor for pulse oximetry
measurement
Optical, reective (in accordance with ISO
80601-2-61:2017)
Saturation measurement range 70%-100%
Saturation measurement accuracy 3,15%
Pulse measurement range 30BPM – 180BPM
Pulse measurement accuracy 60BPM – 164BPM ± 3BPM
Determination of t0: Algorithmic
Expiratory impedance: < 0,15 kPa/(l/s) at 14l/s
Protection of the casing against water ingress,
according to IEC 60529 (spirometer elements) IP 22
Communication: Bluetooth® 4.0. Low Energy
Bluetooth® frequency: 2.4-2.48 GHz
Measurement frequency: 100 Hz
Internal power supply: Battery (LiPo 3.7 V)
50 mA power consumption: 50 mA
Dimensions: 118x38x48 mm
Weight: 0,3 kg

9
4. Construction diagram of the AioCare [Diagram 1]
①Measuring module
②Flow tube
③USB socket
④ON/OFF button
⑤LED indicator
⑥Pulse (HR) and saturation (SpO) meter
⑦Housing latch
⑧Tube holder
①
②
③
⑦
⑧
④
⑤
⑥

10
5. Components of AioCare
6. Research
6.1. Calibration of the spirometry system
6.2. Flow zeroing
6.3. Dynamic spirometry
The parameters of all elements are exactly reproducible. A ow tube is connected
to the measuring module through the tube holder. The air ow is carried out
through two air channels and a microow channel. Before starting to examine a
new patient, an antibacterial lter should be attached to the tube. The measuring
tube maintains its parameters until mechanical damage.
It aims to increase the accuracy of the measurement. The AioCare spirometer
should be placed horizontally, away from sources generating air movement, and
the ow zero function should be called up in the mobile application.
Zeroing takes 5 seconds and the user is informed about its progress through a
visual presentation on the mobile device screen.
Calibration of the device is carried out at the manufacturer. The sensor and ow
tube are calibrated over the full range of measured ows using a precision ow
generator and do not require calibration by the user before rst use.
A calibration check can be carried out with a 3L syringe. The procedure to check
the calibration consists of the following steps:
①Turn o the BTPS correction in Settings.
②Attach the spirometer to the syringe.
③Start a standard spirometry test in the AioCare mobile application
(Patient or PRO).
④Perform several manoeuvres (3-5) using a 3L syringe with dierent ows.
Check that the FVC parameter values are within the calibration limits,
e.g. +/- 3% (+/- 0.09 L).
If the equipment does not pass the calibration check, a new calibration by the
manufacturer is required. In normal use it is recommended to check the calibration
as part of the annual routine maintenance. This service is available in healthcare
facilities or at the headquarters of the AioCare manufacturer. Calibration check
is free of charge. The customer covers only the shipping cost.
The patient breathes through an antibacterial lter and a ow tube. After taking a
few calm breaths, he/she exhales as deep as possible and then exhales as quickly
and intensely as possible. This manoeuvre is repeated several times.
!

11
ATTENTION: Do not repeat the spirometry test more than twice a
day (16 ows). This may cause false results and consequently false
indications for treatment.
Instruction:
1. Position: seat upright, feet at on the oor. Loosen tight clothing. If you have
dentures, you can take them out. Use a chair with an armrest preferably.
2. Prepare the AioCare by connecting the mouthpiece with an antibacterial lter.
3. Open the AioCare application.
4. Select "Spirometry" from the menu.
5. Place the AioCare device on a at surface and wait 5 seconds until the device is
reset. Put the clip on the nose.
6. Click start in the mobile application when you are ready.
7. Take a few normal breaths through the mouthpiece.
Finish the last one with a slow and deep breath.
8. Take a deep breath.
9. Exhale for at least 6 seconds.
10. Place the device on its side and press "stop" in the application.
11. Repeat the sequence 6-10 at least 3 times correctly from 8 possible attempts.
12. If the test was performed correctly, the results will be marked with a green sign
on the mobile device screen.
The manoeuvre should meet the end-of-test criteria (exhalation for ≥6 s at <25
ml exhaled air for at least 1 second.
!
You should rest for at least 15 minutes before the test. The spirometry test is
for safety reasons (for fear of fainting) usually performed in a sitting position.
Before measurement, an antimicrobial filter is attached to the flow tube
(NOTE: in the case of cough infections with individual use of the device and always
with AioCare in outpatient or hospital conditions) and a nose clamp and after a
few calm breaths, a slow, deepest exhalation should be made, followed by the
fastest and deepest possible inhalation. This should be followed by a deep, violent
exhalation that continues for as long as possible.
After the breathing has been regulated, the measurement must be repeated no
sooner than after 30 seconds. A minimum of 3 correct measurements must be taken,
lasting at least 6 seconds, and no more than 8 if not repeated. The ow - volume
curve should be measured correctly at least 3 times. They are reproducible if the
two highest FVC values do not dier by more than 150 mL and the two highest
FEV1 values also do not dier by more than 150 mL.
The result of the measurement is the maximum values of FEV1 and FVC, which
need not be obtained in the same tests.
12
Spirometry test [Diagram 2]
1 2 3 5 6
1211
10
6 - 10
987
4

13
Positioning: usually PEF is measured standing up.
①Prepare the AioCare by connecting a mouthpiece with an anti-microbial lter.
②Open the AioCare application.
③Select "Peak Flow Meter" from the menu.
④Place the AioCare device on a at surface and wait 5 seconds to reset the ow.
⑤Click the Start button on the mobile device when you are ready.
⑥Take in air and blow it out quickly and rmly, with your lips closed around the
mouthpiece.
⑦Repeat sequence 6 twice more.
⑧If the test was carried out correctly, the results will be shown on the mobile device
screen.
In order to prepare the device for work, you must perform the following steps after
washing the AioCare spirometer:
①Make sure that the system contains all the components (measuring module, ow
tube holder, ow tube, mouthpiece and antibacterial lter).
②Download AioCare from the Apple App Store or Google Play and install it according
to the instructions displayed on your mobile device screen.
③Turn on AioCare using ON/OFF button.
④Pair your device with the AioCare application, select “Pair” and choose the model
number of the device you want to pair with.
⑤Check the battery level of your device (this can be done with the application).
⑥Connect the ow tube to the measuring module.
⑦Attach the mouthpiece to the ow tube.
⑧Follow the instructions in the application.
①Warm your ngers if they are cold. If you have painted your nails, it is best to
remove the nail polish before taking a measurement.
②Open the AioCare application.
③Select "Pulse oximetry" from the menu.
④Click the Start button on your mobile device when you are ready.
⑤Place your nger on the heart rate monitor (without applying much pressure)
completely covering the red light.
6.5. Pulse (HR) and saturation (SpO2)
6.4. Peak Exhaust Flow Test (PEF)
7.1. Preparing the AioCare device for operation
7. Operating the device
⑥Hold your nger still on meter for 10 seconds.
⑦If the measurement has been carried out correctly, the average pulse rate and
SpOresult will be displayed on the mobile device screen.

14
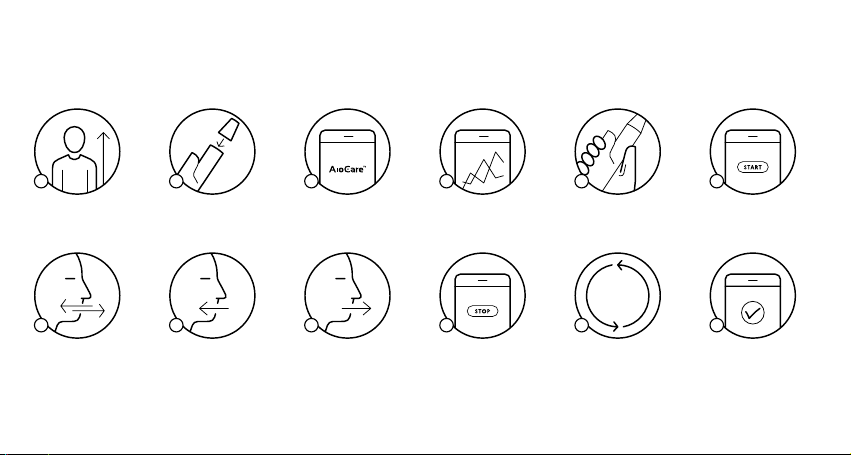
Make sure the system contains
all elements
Check the charging state
of the device
Connect the ow tube with
the measuring module
Download the application
and install
Attach the antibacterial lter
to the ow tube
Turn the spirometer on
with ON/OFF button
7.1.Preparing the AioCare device for operation [Diagram 3]
①② ③
④ ⑤ ⑥

15
The AioCare spirometer communicates with a mobile device using Bluetooth®4.0
(BLE) technology. The messages are displayed in the mobile application on the
smartphone screen. Additionally, there are LEDs on the AioCare device. These are
blue monochromatic LEDs.
Meaning of LED messages:
The AioCare spirometer is operated via AioCare applications for iOS and Android
systems.
The applications are available in Apple App Store and Google Play. The applications
work at least on iOS 9.0+ and Android API 21+ (5.0) versions. Communication of the
AioCare spirometer - Applications is via Bluetooth®4.0 (BT LE). This version of the
module must be equipped with mobile devices on which applications will be installed.
The iPhone version is a minimum iPhone 5S. We do not recommend the use of
applications on tablets and iPads.
7.2. Communication between AioCare and the user
7.3. Hardware and software requirements for a
mobile device
All LEDs ash one after the other by 360° until
the light is stable: Starting up the device
The LEDs ash sequentially in a circular cycle: Pairing AioCare with your smartphone
All LEDs blink smoothly: Bluetooth data transmission during
measurement
4 of 8 LEDs ash: Low battery - connect to power source
More LEDs light up during charging
0-12%: all LEDs ash (0 on + 1 blinking)
13-24%: 1 light on (1 on + 1 ashing)
25-37%: 2 LEDs on (2 on + 1 ashing)
38-49%: 3 LEDs on (3 on + 1 ashing)
50-61%: 4 LEDs on (4 on + 1 ashing)
Battery charge level display
62-74%: 5 LEDs on (5 on + 1 ashing)
75-86%: 6 LEDs on (6 on + 1 ashing)
87- 94%: 7 LEDs on (7 on + 1 ashing)
95-100%: 8 LEDs are on (-)
Battery charge level display

16
One-time ashing of all the diodes
ony by one 360° to the moment the
light is steady: starting the device.
All the LEDs ashing smoothly:
Bluetooth®data transmission during
the measurement.
Diodes ashing in a sequence in a
circular cycle to the moment the
light is steady: synchronization of
AioCare device with a smartphone.
4 of 8 diodes ashing: low battery
level - connect to a power source.
Another one LED is ashing in the
charging mode - represents the
battery charge level.
Communication between AioCare and the user [Diagram 4]

17
7.4. Application installation
Find the App Store or Google Play
icon on your smartphone.
Click the App Store or Google Play icon and
search for an application called AioCare. Select the
application version: AioCare Doctor - for the Doctor
or AioCare Patient - for the Patient
Click "Install" to download the application and install
it on your phone. When the installation is complete,
click the "open" button.
[Diagram 5]
18
7.5. First start-up of the application
After installing the AioCare application, in order to
continue using it, it is necessary to create a doctor's or
user's account or log in, if such an account is already
in the system.
The user shouldcontact the manufacturer if
it is necessary to advise on installation, use,
as well as to inform about an unexpected
action or event.
Log in
If you already have an account, you can use the "Login"
button to log in with your assigned ID and password
received from your doctor.
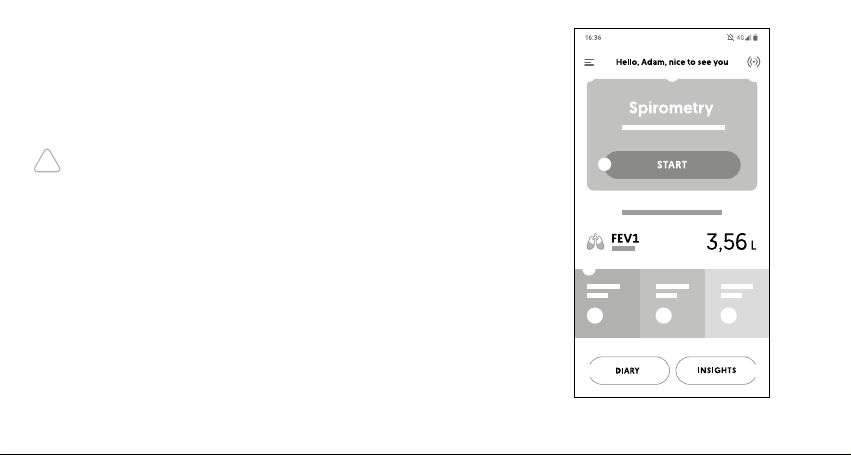
Main screen
On the main screen the user has access to the follo-
wing features:
①A button that opens the main application menu
which consists of:
• Start button for spirometry test,
• Diary,
• Insights,
• My device,
• My prole,
• Help,
• Shop,
• Settings,
• About us
②Welcome User
③Connection to device icon
④Start button for spirometry test
⑤Last spirometric measurement result
⑥Weather conditions: pressure, temperature
and humidity.
⑦Diary button
⑧Insights button
[Diagram 6]
① ③
④
⑤
⑥
⑦ ⑧
②
!
19
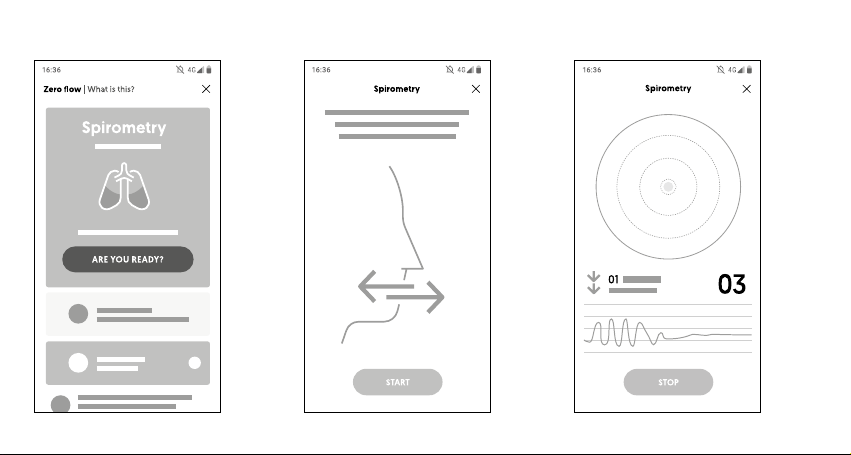
Carrying out the test [Diagram 8]
①The spirometry test starts by pressing the "Start"
button on the main screen. This leads to the test screen.
Make sure that the device is connected and paired with
the application and then perform ow zeroing.
②The next step is to present the preparation screen
for measurement. Prepare the spirometer, lter and
nose clip. When the patient is ready, press the "Start"
button.
③A "live" measurement screen is then presented,
showing a visualisation and ow chart in real mode.
④The measurement is stopped by using the "Stop"
button.
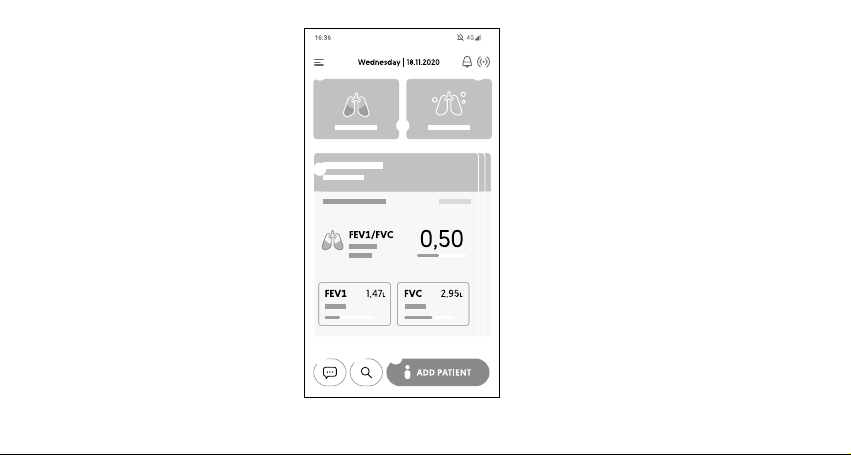
Doctor application home screen
On the main screen user has access to the following
functionalities:
①Main menu button of the application, containing:
• Buttons to start the examination,
• My device,
• My prole,
• Support,
• Store,
• Settings,
• About us
②Date
③Device connection status and notication icon
④Buttons to start the examination
⑤Patient's card with the results of the last
examination
⑥Button for adding a new patient card
⑦Search button
⑧Chat button
[Diagram 7]
① ③
④
⑤
⑥⑦⑧
②
20
Step ②: View for the application in the Patient version Step ③: View for the application in the Patient version
Step ①
Other manuals for AioCare
2
Table of contents
Popular Measuring Instrument manuals by other brands


Oxford Instruments
Oxford Instruments ILM200 Operator's handbook

Industrial Scientific
Industrial Scientific Radius BZ1 product manual

I-Tech
I-Tech IT2800 Series user manual

S.E. International
S.E. International Radiation Alert GammaView Operation manual

Emtec
Emtec BioProTT operating instructions

Ibiza
Ibiza LAS-RG-OUTDOOR user manual