HeartCare LOX100A User manual

Tech Industrial Park, Songbai Road, Xili Street,
Nanshan District, Shenzhen, China
www.lepucare.com
Shenzhen Lepu Intelligent Medical
Equipment Co.,Ltd.
Company name:Lepu Medical (Europe)
Cooperatief U.A.
Add: Abe Lenstra Boulevard 36, 8448 JB,
Heerenveen, The Netherlands
Fingertip Pulse
Oximeter
LOX100A / LOX100B
LOX100C / LOX100D
User's Manual
English
尺寸:65x95mm
材质:封面封底120g书纸,内页80g书纸,胶装,单黑印刷

THANK YOU FOR
CHOOSING LEPU

Copyright
Shenzhen Lepu Intelligent Medical Equipment Co., Ltd
Statement
The company owns all the copyrights of this manual,
including published and unpublished documents, and
classies this manual as a classied document. This manual
can only be used as a reference by the user for operation and
understanding of the company's product or maintenance
policy. Use of the manual for propaganda or any other
misconduct will be considered illegal.
In order to prevent infringement, the company reserves the
right to defend its legal rights and interests through legal
means in accordance with the provisions of the Copyright
Law.
Except authorized in writing by our company, no partner shall
copy, use or disclose the manual information to any other
third party. We are not liable for any illegal events or issues
involving the interests of any third party caused thereof.
All information contained in this manual has been conrmed
to be correct. The company is not liable for any accidental
injury or life-threatening event directly or indirectly caused by
improper use or operation of the device. All the information
contained in this manual is subject to legal protection.
The contents of this manual are subject to change without
notice.
Table of Contents
1. Product Overview .........................................01
1.1 Appearance ...............................................01
1.2 Name and Model .......................................01
2. Intended Use .................................................01
3. Measuring Principle ......................................02
4. Warnings ........................................................02
4.1 Precautions ...............................................02
4.2 Causes of Incorrect Measurements ..........03
5. Symbol Description.......................................04
6. Battery Installation .......................................06
7. Operating Instructions ..................................06
8. Setting ...........................................................08
9. Lanyard Installation ......................................09
10. Product Accessories ......................................09
11. Maintenance, Storage and Transportation ..10
12. Technical Specications ...............................12
13. Electromagnetic Compatibility Guide ..........13
14. Warranty Terms .............................................19
15. Registration Information ..............................20
1. Product Overview
2. Intended Use
3. Principles of measurement
4. Warnings
Thank you for purchasing LOX100 Fingertip Pulse Oximeter.The main use
of this product is for measuring patients oxygen saturation (SpO2), Pulse
Rate (PR) and Perfusion Index (PI). Perfusion Index (PI) is related to the
strength of the patients pulse at the site of measurement. PI is measured
as a percentage(%) and the optimal value is 20% indicating a very strong
pulse. The product includes both visual and audible alerts for high/low
SpO2 and Pulse Rate. The applied part of the LOX100 is constructed from
silica gel. Please carefully read the User Manual before use.
The measuring principles of pulse oximeter is based on Lambert-Beer
law, The spectrum absorption characteristics is different of Reductive
hemoglobin(RHb) and Oxyhemoglobin (Hbo2) in red light and near-
infrared light zones. The pulse oximeter calculate Spo2, PR and PI
from the light intensity absorption dierence by measuring the ratio of
absorbed red and infrared light with each pulse.
The LOX100 Fingertip Oximeter is intended for use in homes or hospitals
for non-invasive measurement of oxygen saturation, pulse rate and
perfusion index. The device can be used for both children and adults.This
device is intended only for spot checking.
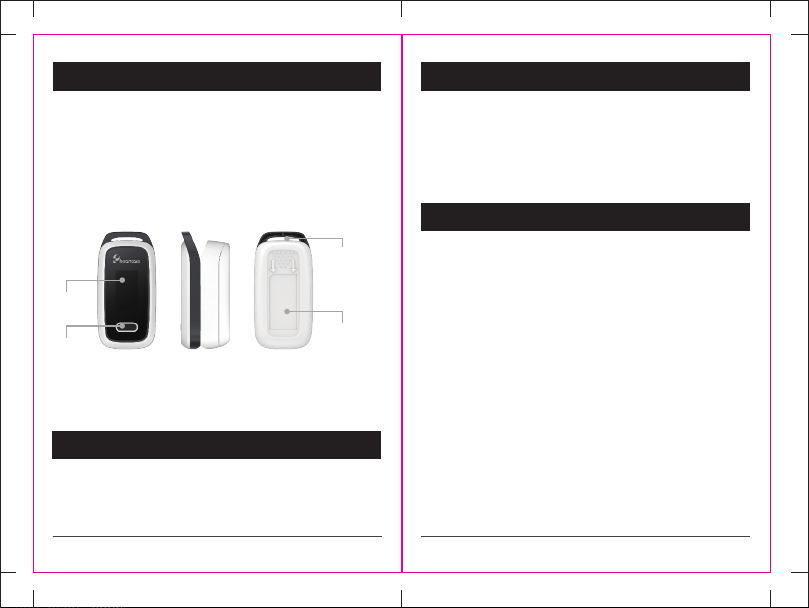
Figure 1 Figure 2 Figure 3
1.1 Appearance
4.1 Precautions
1. Please carefully read the User's Manual before use.
2. The product cannot be used for continuous measurement.
3. Electrosurgical devices and debrillators will aect the use of this
device.
4. The product shall not be used in combination with MRI or CT
equipment.
5. Do not squeeze,crush or apply excessive pressure to the silicone pad
during use.
6. The product shall not be used in ammable or explosive environment.
7. The product plays a supporting role in the patients analysis. Final
diagnosis should be made based on clinical manifestations and
symptoms.
8. During long term use, The test site should be changed periodically.The
patients skin integrity and circulation conditions should be checked every
2 hours to make adjustmests accordingly
9. Autoclaving, vinyl oxide disinfectant or immersing the sensor in liquid
disinfectant will damage the device and cause erroneous readings.
10. The device specied in this manual along with its accessories and
batteries should comply with local law and regulations.
Display
Button
Positon of
hanging hole
Bottom Shell
1.2 Name and Model
Name: Fingertip pulse oximeter
12

34
11. The device complies with electromagnetic compatibility requirements
for electronic medical products or systems in IEC60601-1-2. Radio
transmission equipment or other electromagnetic interference may aect
the performance of this device.
12. Portable radio communication equipment may aect the performance
of this device.
13. The device should not be used in the vicinity of other radio equipment
or stacked on any other equipment.
14. Use of the device is not recommended during transportation of
patients, such as in ambulances or other vehicles.
15. Do not disassemble,or attempt repair of this device without prior
authorization.
16. The materials that will come into contact with the patient is a medical
silica gel pad that conforms to ISO 10993.
17.Temperature shall not exceed 40℃ when in contact with patient. The
recommended maximum application time should not exceed 2 hours.
18. The device is not intended for patients weighing less than
20kg,Pregnant women and nursing Mothers.
19.Please comply with local authority regulations when disposing of
batteries. Never dispose of batteries in re!
20.This device has no audible alarms.
21.The device is ready for its intended use when the ambient temperature
is 40℃ ,The time required to reach ambient temperature from the
minimum/maximum storage temperature is 15±5mins.
4.2 Causes of Incorrect Measurements
1. Dysfunction of important indicators of hemoglobin (such as carbon-
containing hemochrome or methemoglobin);
2. Excessive intravascular staining agent (such as indocyanine green or
methylene blue);
3. Impact of surrounding light; add a protective housing to the sensor if
necessary;
4. Excessive patient movement may be erroneously identied as pulse
signals and may aect the measurements of this device.
5. Venous rhythmic beating;
6. Placement of the sensor and blood pressure cu at the same artery or
blood vessel.
7. Excessively low blood pressure, systolic blood pressure, severe anemia
or hypothermia;
8. Cardiac arrest or shock;
9. Excessively smooth nails or false nails;
10. Weak pulse or weak perfusion;
11. Low hemoglobin;
12. Excessively long nails or nail polish and other cosmetics on nails.
13. Blood oxygen waveform is not normalized; when the signal is too
weak, waveform amplitude decreases; excessively low waveform
amplitude may lead to inaccurate measurement results;
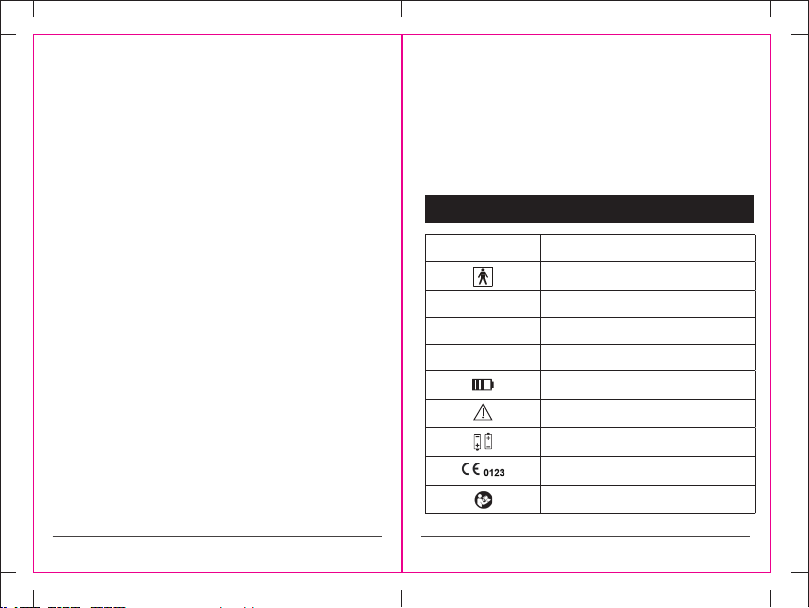
5. Symbol Description
Symbol Description
Type BF applied part
%SpO2Pulse oxygen saturation
PI% Perfusion index
PR Pulse Rate
Battery power indication
Attention

56
Symbol Description
Battery orientation
CE marking
Reference instructions for use
IP22 Moisture rating
Serial number
Manufacturer information
Date of manufacture
European Authorized Representative
Please comply with local authority
regulations when disposing this device
Storage temperature
Storage humidity
Storage atmospheric pressure
Not for continuous monitoring
(no alarm for Spo2)
Pulse intensity bargraph
1. Open the battery cover according to the direction of arrows as shown in
Fig 4.
2. Place 2*AAA batteries into the battery compartment, and ensure correct
positioning as shown in Fig 4.
3. Close the battery cover.
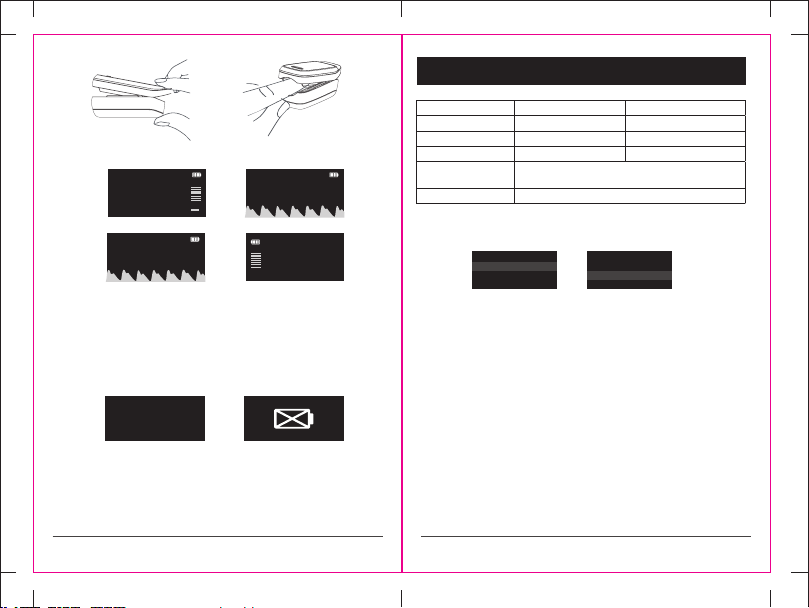
1. Install batteries in accordance with item 6. Battery installation.
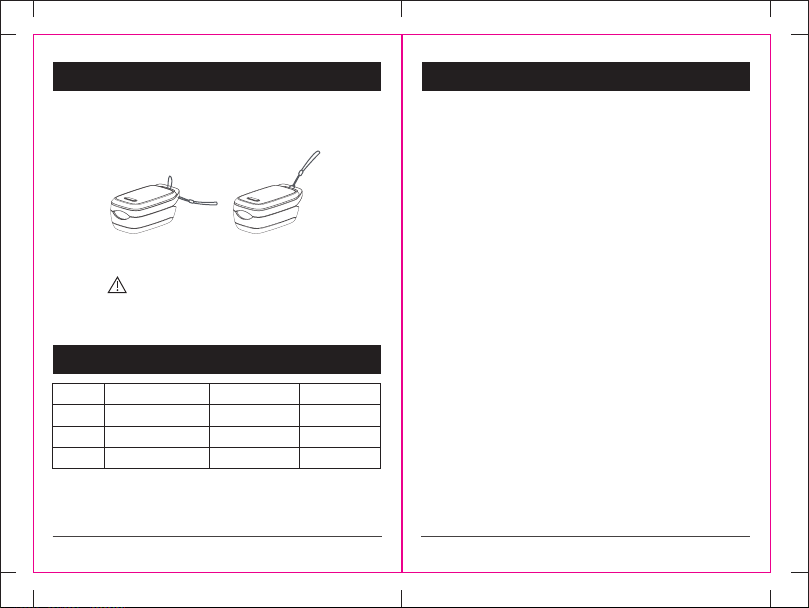
2. Open the oximeter as shown in Fig 5.
3. Fully insert nger as shown in Fig 6.
4. Press the power button to switch on the oximeter.
5. Ensure minimum movement of nger and body during measurement.
6. Read measurement from the device screen.
7. The LOX100 has 4 dierent user screen options. Once the screen
measurement is stable, pressing the power button will change the screen
display as shown in Fig 7.
Note:
The device is at risk of damage if the batteries are installed incorrectly. For
long periods of none use, always remove the batteries
6.Battery Installation
7.Operating Instructions
Press down
from here
to push the
battery cover
open easily
Figure 4

78
8. Once the patients nger has been removed from the device the screen
will dispaly“Finger out”(Fig8). After a period of 8 seconds the device will
shut down automatically
9. When the battery power is low,the screen will display a low battery
symbol(Figure 9).The device will shut down automatically after 8
seconds.
Once in the menu setting as shown in Fig 10, short presses of the power
button will advance through the menu options.Long presses will allow
the user to adjust the parameters in that setting.
To exit the menu setting, select“Exit”press and hold the power button.
The device will automatically exit the menu settings after 30 seconds in
the absence of user activity.
During measurement, if the SpO2 or PR values exceed their setting limit,
the device will periodically beep and the numerical value will ash to alert
the user.
Pressing and holding the power button will disable the alert for
approximately 100 seconds before the alert is reinstated.
Figure 8 Figure 9
Finger out
1 2
98 75
PR
%SpO2
98 6.5
PI%
%SpO2
98 75
PR
%SpO2
98 75
PR
%SpO2
Figure 7
34
8. Setting
Menu Setting range Default setting
SpO2 Limit Lo 85%~99% 90%
PR Limit Lo 30bpm~100bpm 50bpm
PR Limit Hi 100bpm~200bpm 120bpm
Sound Volume Level 1~5 and O can be selected
Exit Long press to exit
During a non-measurement condition“Finger out”, by pressing and
holding the power button the user can enter the menu settings as shown
below.
Figure 10
Figure 11Figure 10
90
50
120
Setting
SpO2 Limit Lo
PR Limit Lo
PR Limit Hi
Setting
Sound
Exit
3
Figure 5 Figure 6
910
9.Lanyard Installation
11.Maintenance, Storage and Transportation
10.Product Accessories
1. Pass the thinner end of the lanyard through the slot on the device as
shown in Fig 12.
2. Then Pass the thicker end of the lanyard through the thinner loop of
the lanyard and pull tightly as shown in Fig 13.
The life cycle of this device is 5 years when used daily for a number of 10
measurements, for periods of 10 minutes each measurement. In order to
conform to this service life please pay information below:
1. Please replace the batteries immediately when the low battery power
symbol is indicated.
2. Wipe the surfaces of the device before and after use.
3. Remove batteries for extended periods of none use.
4. Expected service life is 5 years.
5. The device has been calibrated before delivery,Therefore there is no
need for user calibration.
6. A packaged device should be stored in a clean and well ventilated
environment with an ambient temperature of -20℃ ~55℃ with relative
humidity ≤ 93% and in the absence of corrosive gases,strong mechanical
vibration or electromagnetic elds.
7. For transportation requirements, devices should be loaded correctly
according to the symbols on the outer packaging and should be
protected against collision and impact, severe vibration and severe
weather conditions whilst in transit.
8. The device shall be kept dry at all times.High moisture enviroments will
afect the service life of the device and potentially cause damage.
9. Do not attempt to disassemble, repair or service the device.
10.To recycle or dispose of the device and batteries, please comply with
local authority regulations.
·If there is dust or dirt on the surface of the oximeter, wipe the device with
70% alcohol.Dip a dry cloth or alcohol pad in a small amount of alcohol
before wiping. Avoid drip or ow of alcohol in the device. Dry the device
in the air after wiping. Avoid permeation of any liquid into the device.
·The device does not need scheduled maintenance or calibration except
for battery replacement.
·Please stop using the device and contact your local service center
immediately if any of the following conditions occurs:
1. Abnormal alphabet or number appears on the screen.
2. The device cannot be turned on despite replacement of batteries.
3. The device cannot perform measurement due to squeezing, loose
spring, button failure and so on.
Warning !
1.Due to small parts, always keep the device out of reach of children.
2.Never leave the device hanging on its lanyard in reach of small children.
Figure 12 Figure 13
No. Name Unit Quantity
1 Lanyard Piece 1
2 AAA batteries Piece 2
3 User's Manual Piece 1

11 12
·Clinical testing is a commonly used method for determining oxygen
saturation accuracy. The arterial hemoglobin oxygen saturation measured
with the device should be compared with the result of sampled arterial
blood analyzed with CO-oximeter.
·The name of the simulator used is Index2 FLUKE simulator, version
number: 3.0.0.
·Simulator is used for testing of consistency only; equipment
measurement accuracy is tested by clinical comparisons.
Possible causes Solutions
Boot failure
Low or dead battery,
wrong battery
installation, device
failure
Please replace the battery,
re-install the battery
or contact your local
customer service center
Abnormal
display of SpO2
or PR
Shallow placement of
nger, hard ambient
light, weak perfusion,
or excessively low
oxyhemoglobin for
correct measurement
Correctly put your nger
and retry; avoid use in
strong ambient light; go to
the hospital for accurate
diagnosis
Unstable display
of SpO2 or PR
Shallow placement of
nger, shaking nger
or patient movement
Correctly put your
nger and retry; avoid
movement
Display mode OLED
Oxygen
saturation
Measuring range 70%~99%
Accuracy 80%~99% ±2%;
70%~79% ±3%;
No requirement for 70% below
Resolution 1%
Pulse rate
Measuring range 30 bpm~240 bpm
Accuracy 30 bpm~240 bpm,
±2 bpm or ±2% (which is larger)
Resolution 1 bpm
Measuring range of blood
perfusion index 0.3%~20%
LED probe wavelength RED 660 ±3 nm
IR 905 ±10 nm
Radiation power RED 2 mW
IR 2 mW
Battery model 2 AAA batteries
Power consumption < 30 mA
Battery life Continuous use for 25 hours with 2
AAA1.5 V alkaline batteries
Operating temperature 5 ℃ ~40 ℃
Storage temperature -20 ℃ ~+55 ℃
Relative humidity
≤ 80%: No condensation in working
status
≤ 93%: No condensation in storage
status
Operating atmospheric pressure 86 kPa~106 kPa
Storage atmospheric pressure 70 kPa~106 kPa
Response time < 20 s
12.Technical Specications

13 14
Anti-shock protection category Internal power supply
Anti-shock protection measure Type BF applied part
Waterproof protection measure IP22
Net Weight approx. 60 g (including batteries)
Dimensions 69 mm (L) x 35 mm (W) x 29 mm (H)
Operating mode Non-continuous operation
Data averaging Spo2 Average of successive ve detected
pulses, with exponential smoothing
followed
Pulse rate Average within 8 seconds
Update time
Spo2 Update per second, the update
period is less than 20 seconds.
Pulse rate Update per second, the update
period is less than 12 seconds.
13.Electromagnetic Compatibility Guide
Note:
·This device should not be used close to or stacked with other devices.
If it must be used close to or stacked with other devices, care should be
taken to verify that it functions properly under its intended use.
·Except for the cables of this product sold by the manufacturer as
spare parts for internal components, use of the accessories and cables
other than those specied may result in increased emission or reduced
immunity of this product.
·Since portable and mobile RF communication equipment may aect
the performance of this product, please avoid strong electromagnetic
interference during use, such as mobile phones, microwave ovens and so
on.
·The user should install and use the device according to the
electromagnetic compatibility information provided in the random le.
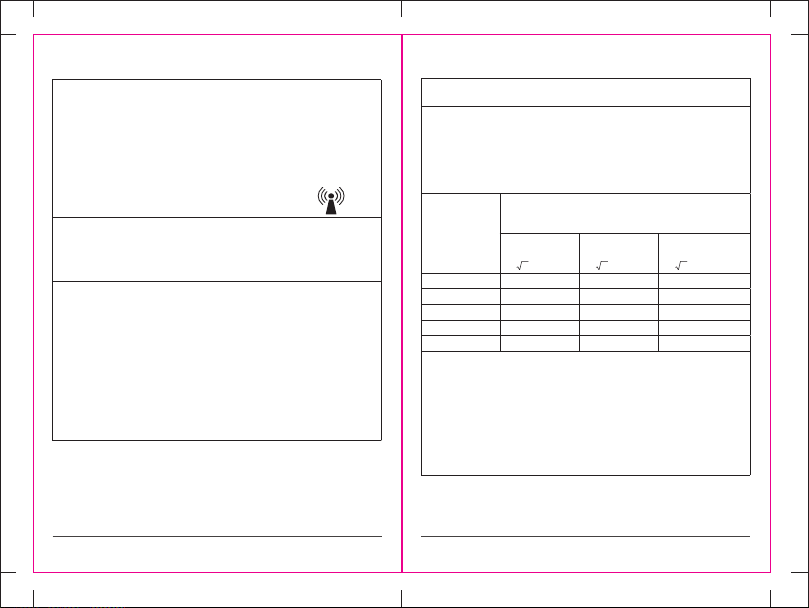
(1)
Guide and manufacturer's statement - Electromagnetic emissions
This product is intended for use in the following electromagnetic
environment.The purchaser or user of theproduct should ensure that it
is used in this electromagnetic environment
Emission test Compliance Electromagnetic environment - Guide
RF emissions Group 1
This product uses RF energy only for
its internal functions. As a result, its
RF emissions are low and there is
very little chance of interference with
nearby electronic equipment.
RF emissions Class B
This product is intended for use in all
facilities including domestic facilities
and the facilities connected directly
to public low-voltage power supply
network for residential homes.
Harmonic
emissions Not applicable
Voltage
uctuation
/ ickering
emissions
Not applicable
(2)
Guide and manufacturer's statement - Electromagnetic immunity
This device is intended for use in the following electromagnetic
environment. The purchaser or user of this device should ensure that it
is used in this electromagnetic environment
Immunity test IEC60601 test
level Compliance
level Electromagnetic
environment - Guide
Electrostatic
discharge
± 8 kV contact
discharge
± 15 kV air
discharge
± 8 kV contact
discharge
± 15 kV air
discharge
The oor should be
wood, concrete or
ceramic tile; if the
oor is covered with
synthetic materials,
the relative humidity
should be at least
30%.

15 16
Electrical fast
transient burst
± 2 kV for power
cord
± 1 kV for input/
output lines
Not applicable Not applicable
Surge
± 1 kV dierential
mode voltage
± 2 kV common-
mode voltage
Not applicable Not applicable
Voltage
dips, short
interruptions
and voltage
changes in
power input
line
<5% UT for 0.5
cycle (> 95% dips
on UT)
40% UT for 5
cycles (60% dips
on UT)
70% UT for 25
cycles (30% dips
on UT)
<5% UT for 5s (>
95% dips on UT)
Not applicable Not applicable
Power
frequency
magnetic eld
(50/60Hz)
3 A/m 3 A/m, 50/60
Hz
The power
frequency magnetic
eld should have
the horizontal
characteristics of
power frequency
magnetic eld of
a typical place in a
typical commercial
or hospital
environment.
Note: UT refers to the AC voltage before applying the test voltage.
(3)
Guide and manufacturer's statement - Electromagnetic immunity
This device is intended for use in the following electromagnetic
environment. The purchaser or user of this device should ensure that it
is used in this electromagnetic environment:
Immunity
test IEC60601 test
level Compliance
level Electromagnetic
environment - Guide
RF
conduction
3 V (eective
value)
150 kHz ~ 80
MHz
Not
applicable
Portable and mobile
RF communication
equipment should
not be used near any
part, including cables,
of the product at a
distance shorter than the
recommended isolation
distance. This distance
should be calculated with
the formula corresponding
to the transmitter
frequency.
RF radiation 3 V/m 80 MHz
~ 2.5 GHz 3 V/m
Recommended isolation
distance
d=1.2
P
80 MHz~800 MHz
d=2.3
P
800 MHz~2.5 GHz
17 18
Where:
P - The transmitter's maximum rated output power, in watts (W),
provided by the transmitter's manufacturer;
d - Recommended isolation distance in meters (m) b.
The eld strength of a xed RF transmitter is determined by a survey of
electromagnetic locations c, which should be lower than the compliance
level in each frequency range d.
Interference may occur near equipment marked with the following
symbol:
Note 1: The higher frequency band formula is used at the frequency of
80 MHz and 800 MHz.
Note 2: The guide may not apply to all situations. Electromagnetic
propagation is aected by the absorption and reection of buildings,
objects and the human body.
a. The eld strength of a xed transmitter, such as base stations for
wireless (cellular/cordless) phones and terrestrial mobile radios,
amateur radio, AM and FM radio broadcasts and television broadcasts,
cannot be accurately predicated in theory. Survey of electromagnetic
sites should be considered to assess the electromagnetic environment
of xed RF transmitters. If the measured eld strength of the place
where the product is located at is higher than the above applicable
RF compliance level, the product should be observed to verify that it
can work properly. If abnormal performance is observed, additional
measures may be necessary, such as readjusting the orientation or
location of the product.
b. The eld strength should be below 3 V/m over the frequency range of
150 KHz ~ 80 MHz.
(4)
Recommended isolation distances between portable and mobile RF
communication equipment and this product
This product is intended for use in electromagnetic environments where
radio frequency radiation harshness is controlled. Depending on the
maximum rated output power of communication device, the purchaser
or user of this product can prevent electromagnetic interference by
maintaining the following recommended minimum distance between
the portable and mobile RF communication equipment (transmitter)
and this product:
Rated
maximum
output power of
transmitter/W
Recommended isolation distances between portable
and mobile RF communication equipment and this
product
150 kHz
80 MHz
d=
P
80 MHz
800 MHz
d=
P
800 MHz
2.5 GHz
d=
P
0.01 Not applicable 0.12 0.23
0.1 Not applicable 0.38 0.73
1 Not applicable 1.2 2.3
10 Not applicable 3.8 7.3
100 Not applicable 12 23
For the rated maximum output power of transmitter not listed in the
above table, the recommended isolation distance d in meters can
be determined using the formula in the corresponding transmitter
frequency column, where P is the maximum output rated power of
transmitter provided by the manufacturer in watts (W).
Note 1: The higher frequency band formula is used at the frequency of
80 MHz and 800 MHz.
Note 2: The guide may not apply to all situations. Electromagnetic
propagation is aected by the absorption and reection of buildings,
objects and the human body.

19 20
14.Warranty Terms 15.Registration Information
1. The user should guarantee that
(1) The user carefully reads the User's Manual before use of this device;
(2) The user performs operation and routine maintenance according to
the requirements in the User's Manual, and ensure that the requirements
for power supply and environment are met.
2. Maintenance regulations
(1) If the product is within the scope of free maintenance in the
maintenance regulations, you may enjoy free maintenance with the
warranty card. If the product is beyond the scope of free maintenance,
you may receive paid maintenance.
(2) With the warranty card and shopping invoice, you may enjoy free
maintenance services for the host for 1 year and for accessories for three
months since the date of purchase.
(3) The following situations are beyond the scope of free maintenance:
Failure or damage caused by human factors; damage caused by
disassembly or repair by the people not authorized by our company;
damage caused by the operating environment not in compliance with our
company's provisions; damage caused by test power; products beyond
the warranty period.
Shenzhen Lepu Intelligent Medical Equipment Co., Ltd
Tel: 400-830-9392
Service E-mail: [email protected]
Website: www.lepucare.com
Company name: Lepu Medical (Europe) Cooperatief U.A.
Add: Abe Lenstra Boulevard 36, 8448 JB, Heerenveen, The Netherlands
Tel: +31-515 573399
Fax: +31-515 760020
All rights reserved. Reproduction, distribution or reprinting of this manual
without the company's permission is prohibited.

www.lepucare.com
Shenzhen Lepu Intelligent Medical
Equipment Co., Ltd.
North side of oor 3, BLD 9, BaiWangxin High-
Tech Industrial Park, Songbai Road, Xili Street,
Nanshan District, Shenzhen, China
Firmenname: Lepu Medical (Europe)
Cooperatief U.A.
Anschrift: Abe Lenstra Boulevard 36, 8448 JB,
Heerenveen, Pays-Bas
Fingerspitzen-
Pulsoximeter
LOX100A / LOX100B
LOX100C / LOX100D
Bedienungsanleitung
Deutsch

VIELEN DANK, DASS
SIE SICH FÜR LEPU
ENTSCHIEDEN HABEN

Copyright
Shenzhen Lepu Intelligent Medical Equipment Co., Ltd
Erklärung
Wir besitzen alle Urheberrechte an diesem Handbuch, einschließlich
veröentlichter und unveröentlichter Dokumente und wir klassizieren
dieses Handbuch als vertrauliches Dokument. Dieses Handbuch kann
vom Benutzer nur als Referenz für die Bedienung und das Verständnis
von Produkt oder Wartung verwendet werden. Die Verwendung des
Handbuchs für Werbezwecke oder sonstiges Zwecke ist unzulässig.
Um Verstöße zu verhindern, behalten wir uns das Recht vor, Rechte und
Interessen nach den Bestimmungen des Urheberrechtsgesetzes mit
rechtlichen Mitteln zu verteidigen.
Mit Ausnahme der schriftlichen Genehmigung durch uns darf kein Partner
die Informationen des Handbuchs kopieren, verwenden oder an Dritte
weitergeben. Wir haften nicht für illegale Ereignisse oder Probleme von
Dritten.
Alle in diesem Handbuch enthaltenen Informationen wurden als korrekt
bestätigt. Wir haften nicht für Unfälle oder lebensbedrohliche Ereignisse,
die direkt oder indirekt durch unsachgemäßen Gebrauch oder Betrieb
des Geräts verursacht werden. Alle in diesem Handbuch enthaltenen
Informationen unterliegen dem gesetzlichen Schutz.
Der Inhalt dieses Handbuchs kann ohne Vorankündigung geändert
werden.
Inhalt
1. Produktübersicht...........................................01
1.1Design....................................................... 01
1.2NameundModell.....................................01
2. BestimmungsgemäßerGebrauch..................01
3. Messprinzipien................................................02
4. Warnhinweise..................................................02
4.1Sicherheitshinweise................................02
4.2UrsachenvonFehlmessungen................. 03
5. Symbole..........................................................04
6. Batterieneinsetzen.........................................06
7. Bedienungshinweise......................................06
8. Einstellungen..................................................08
9. Trageschlaufeanbringen................................09
10. Zubehör...........................................................09
11. Wartung,LagerungundTransport.................10
12. TechnischeDaten............................................ 12
13. ElektromagnetischeVerträglichkeit............... 13
14. Garantie........................................................... 19
15. Registrierung...................................................20
1. Produktübersicht
2. Bestimmungsgemäßer Gebrauch
3. Messprinzipien
4. Warnhinweise
Vielen Dank, dass Sie sich für das LOX100 Fingerspitzen-Pulsoximeter
entschieden haben, das zur Messung der Sauerstoffsättigung (SpO2), der
Pulsfrequenz (PR) und des Perfusionsindex (PI) von Patienten verwendet
wird. Der Perfusionsindex (PI) bezieht sich auf die Stärke des Pulses des
Patienten am Ort der Messung. PI wird als Prozentsatz (%) gemessen und
der optimale Wert ist 20 %, was auf einen sehr starken Puls hinweist. Das
Produkt beinhaltet sowohl visuelle als auch akustische Warnmeldungen für
hohe/niedrige Sauerstosättigung und Pulsfrequenz. Die Beschichtung des
LOX100 besteht aus Silikagel. Bitte lesen Sie die Bedienungsanleitung vor
Gebrauch aufmerksam durch.
Die Messprinzipien des Pulsoximeters basieren auf dem Lambert-Beer-
Gesetz. Die Spektralabsorptionseigenschaften unterscheiden sich von
reduziertem Hämoglobin (RHb) und Oxyhämoglobin (HbO2) in Rotlicht-
und Nahinfrarotlichtzonen. Das Pulsoximeter berechnet SpO2, PR und PI
aus der Lichtintensitätsabsorptionsdierenz, indem es das Verhältnis von
absorbiertem roten und infraroten Licht mit jedem Puls misst.
Das LOX100 Fingerspitzen-Oximeter ist zur Verwendung in Heimen und
Krankenhäusern für die nicht-invasive Messung von Sauerstoffsättigung,
Pulsfrequenz und Perfusionsindex bestimmt. Das Gerät ist für Erwachsene
und Kinder geeignet.
4.1 Sicherheitshinweise
1. Bitte lesen Sie vor Gebrauch die Bedienungsanleitung aufmerksam durch.
2. Das Produkt kann nicht für kontinuierliche Messungen verwendet werden.
3. Elektrochirurgische Geräte und Debrillatoren beeinträchtigen die
Verwendung dieses Geräts.
4. Das Produkt darf nicht in Kombination mit MRT- oder CT-Geräten
verwendet werden.
5. Drücken, quetschen und üben Sie während der Verwendung keinen
übermäßigen Druck auf das Silikonpad aus.
6. Das Produkt darf nicht in einer brennbaren oder explosiven Umgebung
verwendet werden.
7. Das Produkt spielt eine unterstützende Rolle bei der Patientenanalyse. Die
endgültige Diagnose muss auf der Grundlage klinischer Manifestationen und
Symptome gestellt werden.
8. Bei längerem Gebrauch muss die Prüfstelle regelmäßig gewechselt werden
und die Hautintegrität und die Durchblutung des Patienten müssen alle 2
Stunden überprüft werden, um entsprechende Anpassungen vorzunehmen.
9. Autoklavieren, Vinyloxid-Desinfektionsmittel oder Eintauchen des
Sensors in üssiges Desinfektionsmittel führt zu Schäden am Gerät und zu
fehlerhaften Messwerten.
10. Das in dieser Anleitung beschriebene Gerät sowie das Zubehör und die
Batterien müssen den örtlichen Gesetzen und Vorschriften entsprechen.
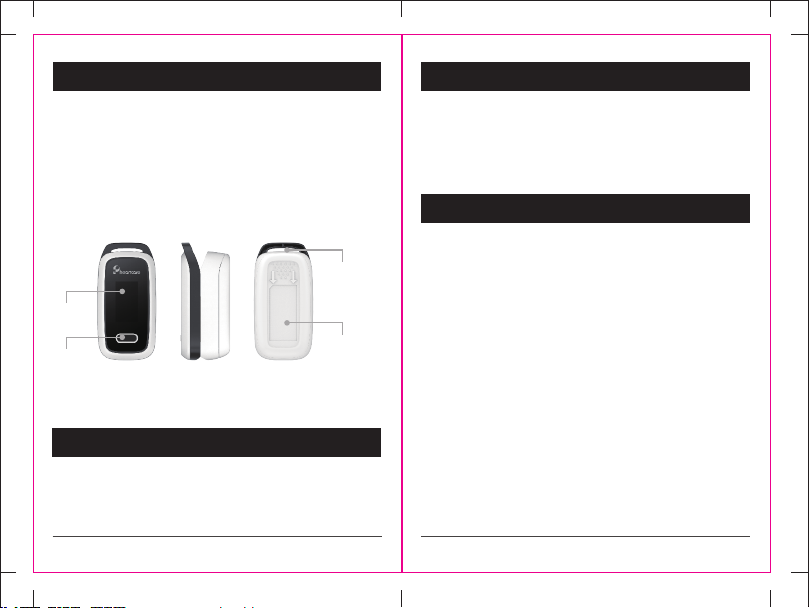
Abbildung 1 Abbildung 2 Abbildung 3
1.1 Design
Achage
Taste
Öse für
Handschlaufe
Untere
Gehäusehälfte
1.2 Name und Modell
Name: Fingerspitzen-Pulsoximeter
12
34
11. Das Gerät erfüllt die Anforderungen an die elektromagnetische
Verträglichkeit von elektronischen Medizinprodukten oder -systemen nach
IEC60601-1-2. Funkgeräte oder andere elektromagnetische Störungen
können die Leistung dieses Geräts beeinträchtigen.
12. Tragbare Funkgeräte können die Leistung dieses Geräts beeinträchtigen.
13. Das Gerät darf nicht in der Nähe anderer Funkgeräte verwendet oder auf
anderen Geräten gestapelt werden.
14. Die Verwendung des Geräts wird beim Transport von Patienten, z.B. in
Krankenwagen oder anderen Fahrzeugen, nicht empfohlen.
15. Demontieren und reparieren Sie dieses Gerät nicht ohne vorherige
Genehmigung.
16. Das Material, mit dem Patienten in Kontakt kommen, ist ein
medizinisches Silikagel-Pad, das ISO 10993 entspricht.
17. Die Temperatur darf 40 ℃ bei Kontakt mit dem Patienten nicht
überschreiten. Die empfohlene maximale Anwendungszeit sollte 2 Stunden
nicht überschreiten.
18. Das Gerät ist nicht für Patienten mit einem Gewicht von weniger als 20 kg,
Schwangere und stillende Mütter bestimmt.
19. Bitte beachten Sie bei der Entsorgung von Batterien die örtlichen
behördlichen Vorschriften. Entsorgen Sie Batterien niemals durch
Verbrennen!
20. Dieses Gerät hat keinen akustischen Alarm.
21. Das Gerät ist für den bestimmungsgemäßen Gebrauch bereit, wenn die
Umgebungstemperatur 40 ℃ nicht übersteigt. Die Zeit, die benötigt wird, um
die Umgebungstemperatur von der minimalen/maximalen Lagertemperatur
zu erreichen, beträgt 15 ±5 Minuten.
4.2 Ursachen von Fehlmessungen
1. Dysfunktion wichtiger Indikatoren für Hämoglobin (z.B. kohlenstohaltiges
Hämochrom oder Methämoglobin).
2. Übermäßiges intravaskuläres Färbemittel (z.B. Indocyaningrün oder
Methylenblau).
3. Einwirkung von Umgebungslicht, ggf. Schutzgehäuse am Sensor
anbringen.
4. Übermäßige Patientenbewegungen können fälschlicherweise als
Pulssignale identiziert werden und die Messungen des Geräts beeinussen.
5. Venöses rhythmisches Schlagen.
6. Platzierung des Sensors und der Blutdruckmanschette an derselben
Arterie oder demselben Blutgefäß.
7. Zu niedriger Blutdruck, systolischer Blutdruck, schwere Anämie oder
Unterkühlung.
8. Herzstillstand oder Schock.
9. Übermäßig glatte Nägel oder falsche Nägel.
10. Schwacher Puls oder schwache Durchblutung.
11. Niedriges Hämoglobin.
12. Zu lange Nägel oder Nagellack und andere Kosmetika auf den Nägeln.
13. Die Wellenform des Blutsauerstos ist nicht normiert. Wenn das Signal
zu schwach ist, nimmt die Wellenformamplitude ab. Eine zu geringe
Wellenformamplitude kann zu ungenauen Messergebnissen führen.
5. Symbole
Symbole Beschreibung
Typ BF Anwendungsteil
%SpO2Pulssauerstosättigung
PI% Perfusionsindex
PR Pulsfrequenz
Anzeige der Batteriekapazität
Vorsicht
Ausrichtung der Batterien
CE-Kennzeichnung
Bedienungsanleitung

56
Symbole Description
IP22 Schutzklasse
Seriennummer
Herstellerdaten
Herstellungsdatum
Europäischer Bevollmächtigter
Bitte beachten Sie bei der Entsorgung
dieses Geräts die örtlichen behördlichen
Vorschriften
Lagertemperatur
Luftfeuchtigkeit bei Lagerung
Luftdruck bei Lagerung
Nicht zur kontinuierlichen Überwachung
(kein Alarm für SpO2)
Balkendiagramm Pulsstärke
1. Önen Sie das Batteriefach in Pfeilrichtung, wie in Abb. 4 dargestellt.
2. Setzen Sie 2 × AAA-Batterien ein und achten Sie auf die korrekte Polarität,
wie in Abb. 4 dargestellt.
3. Schließen Sie das Batteriefach wieder.
1. Setzen Sie die Batterien gemäß Kapitel 6 "Batterien einsetzen" ein.
2. Önen Sie das Oximeter wie in Abb. 5 dargestellt.
3. Führen Sie den Finger wie in Abb. 6 dargestellt, vollständig ein.
4. Drücken Sie die Einschalttaste, um das Oximeter einzuschalten.
5. Achten Sie während der Messung auf eine minimale Bewegung von Finger
und Körper.
6. Lesen Sie die Messung im Display aus.
7. Das LOX100 verfügt über 4 verschiedene Bildschirmoptionen. Sobald
die Bildschirmmessung stabil ist, kann durch Drücken der Taste die
Bildschirmdarstellung geändert werden, wie in Abb. 7 dargestellt.
Hinweis:
Bei falscher Installation der Batterien besteht die Gefahr einer Beschädigung
des Geräts. Bei längerer Nichtbenutzung sollten Sie die Batterien immer
entfernen.
6. Batterien einsetzen
7. Bedienungshinweise
Drücken Sie
hier, um das
Batteriefach zu
önen.
Abbildung 4
78
8. Nachdem der Finger des Patienten aus dem Gerät entfernt wurde,
erscheint auf dem Bildschirm "Finger out" (Finger heraus) (Abb. 8). Nach 8
Sekunden schaltet sich das Gerät automatisch aus.
9. Wenn die Batteriekapazität niedrig ist, zeigt der Bildschirm ein
entsprechendes Symbol an (Abbildung 9). Das Gerät schaltet sich nach 8
Sekunden automatisch aus.
In den Menüeinstellungen, wie in Abb. 10 dargestellt, drücken Sie die Taste,
um die Menüpunkte zu durchlaufen. Halten Sie die Taste gedrückt, um die
Parameter anzupassen.
Um die Menüeinstellungen zu verlassen, wählen Sie "Exit" und halten Sie die
Taste gedrückt.
Das Gerät beendet die Menüeinstellungen automatisch nach 30 Sekunden,
wenn keine weitere Aktivität stattndet.
Wenn die SpO2- oder PR-Werte während der Messung ihre Einstellgrenzwerte
überschreiten, gibt das Gerät regelmäßig einen Signalton aus und der
Zahlenwert blinkt, um den Benutzer zu warnen.
Halten Sie die Taste gedrückt, um den Alarm für ca. 100 Sekunden zu
deaktivieren, bevor er erneut ausgelöst wird.
Abbildung 8 Abbildung 9
Finger heraus
8. Einstellungen
Menü Einstellbereich Standardeinstellung
SpO2 Limit Niedrig 85 % - 99 % 90 %
PR Limit Niedrig 30 bpm - 100 bpm 50 bpm
PR Limit Hoch 100 bpm - 200 bpm 120 bpm
Lautstärke Lautstärkepegel 1 - 5 und Aus können gewählt
werden
Verlassen Taste zum Verlassen gedrückt halten
Während einer Nicht-Messbedingung "Finger out" (Finger heraus) kann der
Benutzer durch Gedrückt halten der Taste die Menüeinstellungen wie folgt
eingeben.
1 2
98 75
PR
%SpO2
98 6.5
PI%
%SpO2
98 75
PR
%SpO2
98 75
PR
%SpO2
Abbildung 7
34
Abbildung 5 Abbildung 6
Abbildung 11Abbildung 10
90
50
120
Einstellungen
SpO2 Limit Niedrig
PR Limit Niedrig
PR Limit Hoch
Einstellungen
Lautstärke
Verlassen
3
This manual suits for next models
3
Table of contents
Languages:
Popular Medical Equipment manuals by other brands

M-TI
M-TI 526 Installation and operation manual

LPA Medical
LPA Medical Thera-Glide R Series instruction manual

Verathon
Verathon GlideScope Operation & maintenance manual

Optimist
Optimist P.O.P Operating instruction

Integra
Integra MAYFIELD A2101 instruction manual

SYAS Technology
SYAS Technology PREMIUM BED 4 MOTOR Manual book


InterTest
InterTest V Series Operation manual

Dictum Health
Dictum Health eVER-HOME Instructions for use

R82
R82 High-low bath frame user guide

Pure Processing
Pure Processing FlexiPump user manual

Carestream
Carestream cs 3500 User and installation guide

Hill Laboratories
Hill Laboratories HA90D Reference manual