manuals.online logo
Brands
  1. Home
  2. •
  3. Brands
  4. •
  5. Hearth & Home
  6. •
  7. Indoor Fireplace
  8. •
  9. Hearth & Home ARCH-KIT-36 User manual

Hearth & Home ARCH-KIT-36 User manual

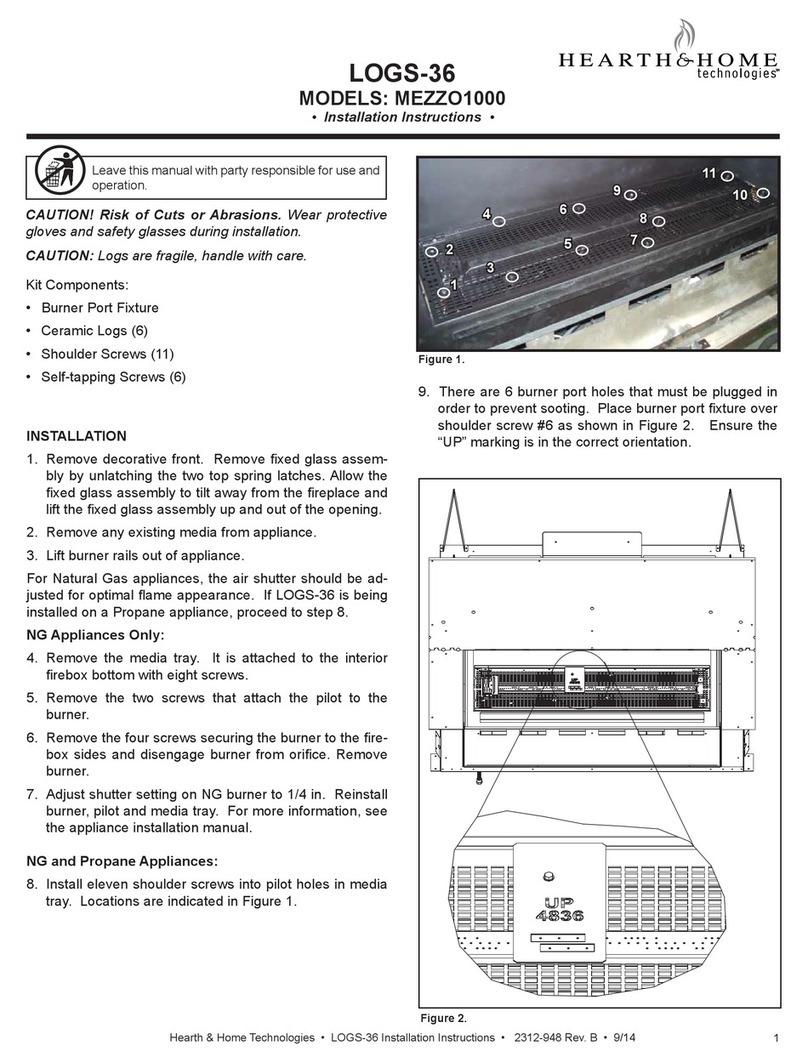
1Hearth & Home Technologies • ARCH-KIT-36, ARCH-KIT-42, ARCH-KIT-50 Instructions • 2281-939 Rev. G • 10/19
Leave this manual with party responsible for use
and operation.
NOTICE: Proper clearances from the replace opening
to any nishing material thicker than one inch MUST be
maintained.
Top and side templates are included to ensure that
nishing materials thicker than one inch do not interfere
with the installation and operation of the door. Refer to
the appliance installation manual for more information
regarding the different nishing methods.
KIT CONTENTS:
• Left and Right Arch Fill Pieces
• Top Arch Template
• Arch Strip
• Left and Right Side Finishing Templates
• Top Finishing Trim
• Left and Right Finishing Trim
• Top Glass Vanity Panels (2)
• Bottom Glass Vanity Panel (Included on Forge Front only)
• (8) 1/2 Inch Self Tapping Screws
• (4) 10-24 x 3/4 Hex Screws
ARCH FILL
PIECE (2)
LEFT AND RIGHT
SIDE TEMPLATES
TOP ARCH
TEMPLATE (1)
ARCH STRIP (1)
THREADED
INSERT (4)
NOTCH
Figure 1. Arch Kit Components
ARCH-KIT-36, ARCH-KIT-42, ARCH-KIT-50
Models: FS-36A, FS-36AIFT, FS-42A, FS-42AIFT, FS-50A, FS-50AIFT, FORGE-36A,
FORGE-36AIFT, FORGE-42A, FORGE-42AIFT, FORGE-50A, FORGE-50AIFT
Installation Instructions
CAUTION! Risk of Cuts, Abrasions or Flying Debris.
Wear protective gloves and safety glasses during instal-
lation. Sheet metal edges are sharp.
CAUTION! Do not install damaged components.
WARNING! Risk of Fire! Combustible materials MUST
NOT overlap or be placed behind a decorative front.
DANGER
HOT GLASS WILL
CAUSE BURNS.
DO NOT TOUCH GLASS
UNTIL COOLED.
NEVER ALLOW CHILDREN
TO TOUCH GLASS.
A barrier designed to reduce the risk of
burns from the hot viewing glass is provided
with this appliance and shall be installed for
the protection of children and other at-risk
individuals.
Introduction
This kit is for use with decorative fronts installed using
the inside t nishing method. Inside t decorative fronts
may be recessed into non-combustible nishing material
up to 4 inches thick. Figure 2. Vanity Panels
TOP ARCH VANITY PANELS
BOTTOM VANITY PANEL
Note: Bottom vanity panel is used on Forge Arch
decorative fronts only.
Hearth & Home Technologies • ARCH-KIT-36, ARCH-KIT-42, ARCH-KIT-50 Instructions • 2281-939 Rev. G • 10/19 2
1. Bend end tab on upper glass vanity panel as shown
in Figure 3. The vanity panel for the left side of the
appliance is shown. Slide the top edge between the
glass and glass frame and attach with one 1/2 inch
self-tapping screw into the glass frame as shown in
Figure 4. Bend the tab on the other glass vanity panel
and install on opposite side of appliance.
2. For Forge decorative fronts, install the two bottom
vanity panels, one on each side, using a process
similar to that used for the upper glass vanity panels.
The bottom glass vanity panels require two 1/2 inch
self-tapping screws.
3. Remove xed glass assembly from appliance
according to instructions in installation manual. Set
aside.
4. Remove the existing top template by removing the
four 1/4 inch hex screws. Remove the existing side
templates by removing the four Phillips screws on the
inside edge of the appliance.
5. Install left and right arch ll pieces by securing each
piece into the corresponding corner with two 1/2 inch
self-tapping screws. See Figure 1.
Note: Notches on the ll pieces correspond to the slots on
the appliance corners. When the ll pieces are fastened
with the screws, the notches allow them to be secured
into position.
The factory-supplied non-combustible board should be
installed to the face of the appliance before installing the
nishing template.
Installation
For nishing material less than one inch, the templates
are optional. Finishing material less than one inch may
be installed up to the replace opening (Overlap Method).
Templates can be removed by removing the two 10-24
x 3/4 inch hex screws per side and the four 1/4 inch hex
screws on top.
If nishing material to be installed is greater than one
inch thick, proceed to step 1. (Inside Fit).
Figure 3. Bend Upper Glass Vanity Panel Tabs
Figure 4. Attach Vanity Panel
Figure 5.
HAND BEND TAB
ATTACH TOP TEMPLATE
ATTACH SIDE
TEMPLATES
USE THIS SCREW TO ATTACH TOP
FINISHING TRIM (LEFT AND RIGHT SIDES)
3Hearth & Home Technologies • ARCH-KIT-36, ARCH-KIT-42, ARCH-KIT-50 Instructions • 2281-939 Rev. G • 10/19
Please contact your Hearth & Home Technologies
dealer with any questions or concerns.
For the location of your nearest
Hearth & Home Technologies dealer,
please visit www.hearthnhome.com.
Hearth & Home Technologies
7571 215th Street West, Lakeville, MN 55044
www.hearthnhome.com
3/4 IN.
Figure 6. Bend Side Templates
DETAIL A FINAL TAB
LOCATION
Figure 7. Bend Tabs
ARCH STRIP
TOP ARCH TEMPLATE
6. Bend new side templates as shown in Figure 6.
Attach side templates with two new 10-24 x 3/4 inch
hex screws per side. See Figure 5.
7. Secure the top arch template to the arch ll pieces
with two 1/2 inch self-tapping screws. See Figure 1.
8. Bend the ve tabs out to 90 degrees and then form
them around the arch strip. See Detail A in Figure
7. This will make a uniform arch. See Figure 5 for
completed hand bend.
9. Install nishing materials in accordance with Finishing
section of appliance Installation Manual.
10. Template components may be removed after nishing
materials have fully cured. Retain screws for later
use.
11. Bend tab on the top nishing trim 90 degrees. Attach
trim to the top lip of the appliance with two 1/2 inch
self-tapping screws. Install two additional 1/2 inch
self-tapping screws where the top nishing template
was held in place, shown in Figure 5. Apply a bead of
silicone sealant (300 °F minimum continous exposure
rating) on the top arch nishing trim and secure in
place. See Figure 8.
12. Install left and right side trim using the one inch
Phillips screws that were used to attach the side
nishing template as shown in Figure 5.
Note: After the template components have been removed,
a layer of mortar may be applied over the visible non-
combustible board between nishing material and the
replace opening.
13. Reinstall glass frame according to the instructions in
the installation manual.
14. Reinstall decorative front.
Figure 8. Finishing Trim
SIDE FINISHING TRIM
TOP FINISHING TRIM BEND TAB
90 DEGREES

This manual suits for next models

14

Other Hearth & Home Indoor Fireplace manuals
Hearth & Home PRIMO-II Series User manual

Hearth & Home

Hearth & Home PRIMO-II Series User manual

Hearth & Home 43M-ACC-MBK User manual

Hearth & Home

Hearth & Home 43M-ACC-MBK User manual

Hearth & Home Simplifyre SFE-26 Mounting instructions

Hearth & Home

Hearth & Home Simplifyre SFE-26 Mounting instructions

Hearth & Home QUARDA-FIRE MTVERNON-AE-CSB User manual

Hearth & Home

Hearth & Home QUARDA-FIRE MTVERNON-AE-CSB User manual

Hearth & Home pelpro PP60 User manual

Hearth & Home

Hearth & Home pelpro PP60 User manual

Hearth & Home COSMO-IFT-B Series User manual

Hearth & Home

Hearth & Home COSMO-IFT-B Series User manual

Hearth & Home TA-EXC25 User manual

Hearth & Home

Hearth & Home TA-EXC25 User manual

Hearth & Home Outdoor Lifestyles Lanai ODLANAIG-51 User manual

Hearth & Home

Hearth & Home Outdoor Lifestyles Lanai ODLANAIG-51 User manual

Hearth & Home HHFPDF32F1 Manual

Hearth & Home

Hearth & Home HHFPDF32F1 Manual
Hearth & Home Majestic SB100 User manual

Hearth & Home

Hearth & Home Majestic SB100 User manual

Hearth & Home Outdoor Lifestyles ODCOUG-36NR User manual

Hearth & Home

Hearth & Home Outdoor Lifestyles ODCOUG-36NR User manual

Hearth & Home CFT-36-BK Manual

Hearth & Home

Hearth & Home CFT-36-BK Manual

Hearth & Home Quadra-Fire DISCOVERY-II-C User manual

Hearth & Home

Hearth & Home Quadra-Fire DISCOVERY-II-C User manual

Hearth & Home DVLINEAR36 Series User manual

Hearth & Home

Hearth & Home DVLINEAR36 Series User manual

Hearth & Home QUARTZ Series User manual

Hearth & Home

Hearth & Home QUARTZ Series User manual

Hearth & Home Majestic MDV3732 User manual
Hearth & Home

Hearth & Home Majestic MDV3732 User manual

Hearth & Home COSMO32-IFT User manual

Hearth & Home

Hearth & Home COSMO32-IFT User manual

Hearth & Home CFL-18NG-C User manual

Hearth & Home

Hearth & Home CFL-18NG-C User manual

Hearth & Home DVLINEAR36 Series User manual

Hearth & Home

Hearth & Home DVLINEAR36 Series User manual

Hearth & Home Majestic MERIDIAN Series User manual

Hearth & Home

Hearth & Home Majestic MERIDIAN Series User manual

Hearth & Home CDLS User manual

Hearth & Home

Hearth & Home CDLS User manual

Hearth & Home Pelpro PPC90 User manual

Hearth & Home

Hearth & Home Pelpro PPC90 User manual

Hearth & Home outdoor lifestyles TWILIGHT-MD-IFT User manual

Hearth & Home

Hearth & Home outdoor lifestyles TWILIGHT-MD-IFT User manual

Hearth & Home Simplifyre SFE-26 User manual

Hearth & Home

Hearth & Home Simplifyre SFE-26 User manual

Popular Indoor Fireplace manuals by other brands

European Home evonicfires Tyrell Instruction guide

European Home

European Home evonicfires Tyrell Instruction guide

Rinnai Arriva Operation and installation manual

Rinnai

Rinnai Arriva Operation and installation manual

Dru Maestro g20 Instructions for installation

Dru

Dru Maestro g20 Instructions for installation

CIB UNIGAS R91A Manual of installation - use - maintenance

CIB UNIGAS

CIB UNIGAS R91A Manual of installation - use - maintenance

Amantii TRD Series Fixing instructions

Amantii

Amantii TRD Series Fixing instructions

MHSC CDVR33N/PV7 Installation and operating instructions

MHSC

MHSC CDVR33N/PV7 Installation and operating instructions

Heat & Glo LifeStyle 6000 Series brochure

Heat & Glo LifeStyle

Heat & Glo LifeStyle 6000 Series brochure

FireFriend DF-6500JU user manual

FireFriend

FireFriend DF-6500JU user manual

Hearth and Home Technologies CFL-18NG-C owner's manual

Hearth and Home Technologies

Hearth and Home Technologies CFL-18NG-C owner's manual

J. A. Roby JOE owner's manual

J. A. Roby

J. A. Roby JOE owner's manual

Napoleon 1600C-1 Installation and operating instructions

Napoleon

Napoleon 1600C-1 Installation and operating instructions

Comfort Glow CF26NR OWNER'S OPERATION AND INSTALLATION MANUAL

Comfort Glow

Comfort Glow CF26NR OWNER'S OPERATION AND INSTALLATION MANUAL

Stellar Hearth VP-36M Installation and operating manual

Stellar Hearth

Stellar Hearth VP-36M Installation and operating manual

Desa VSGF36NRA OWNER'S OPERATION AND INSTALLATION MANUAL

Desa

Desa VSGF36NRA OWNER'S OPERATION AND INSTALLATION MANUAL

Montigo R520 Installation & maintenance manual

Montigo

Montigo R520 Installation & maintenance manual

Spartherm Magic operating manual

Spartherm

Spartherm Magic operating manual

Napoleon Acies Series owner's manual

Napoleon

Napoleon Acies Series owner's manual

Luxor LDV-3 Installation and owner's manual

Luxor

Luxor LDV-3 Installation and owner's manual

manuals.online logo
manuals.online logoBrands
  • About & Mission
  • Contact us
  • Privacy Policy
  • Terms and Conditions

Copyright 2025 Manuals.Online. All Rights Reserved.