Heatlie Barbecues Roaster R3000SS Configuration guide

Instructions and General Information
THE HEATLIE ROASTER
Model R3000SS
The Heatlie Roaster Series has the following advantages
•
Energy efficient with the revolutionary Heatlie Ribbon Burner System
•
Utilises the unique Heatlie Circular Cooking System for more efficient and effective
roasting
•
Large cooking area of 1350x540mm
•
All stainless steel construction
•
Removable burner, gas fittings and controls for easy cleaning and maintenance
•
Fixed rear hood with roll top lid for easy access
•
Roaster base is cradle mounted with separate leg attachments for ease of transport
•
Automatic piezo ignition
•
Flame failure protection device
Plus a large variety of Accessories to suit your cooking requirements
•Bain Marie which takes frozen foods to hot and holds them at a set temperature (BM3O)
•Extra “double up” racks to increase cooking capacity (SU3O or SU30L)
•End Table for carving and serving (ETSS)
This product is protected from copying by Design Registrations:
Overall Design No.
II0623
Ribbon Burner System No.RD l00131
Gas Cylinder Holder
No.2084-88
AGA Approval No
.
4683
Action will be taken against those who copy
.

June 14, 2016 Page 2of 8
“Congratulations on your decision to purchase a Heatlie
Roaster
.
I am confident that the Roaster will give you
years of trouble free cooking and enable you to serve juicy,
succulent food every time.”
MANAGING DIRECTOR
Container Contents
The following items should be standard with the delivery of your Heatlie Roaster:
•
Heatlie Roaster
•
Heatlie Ribbon Burner
•
3 cooking racks
•
Leg box
•
Two handles
Leg Kit Box containing:
(For mobile barbecues)
•
2 x wheels
•
1 x Wheel leg end complete with patented cylinder bracket
•
2 x axels
•
2 x Black Nylon Washers
•
2 x Nylock Nuts
•
1 x leg end
Wheel Kit Assembly
Remove contents of Leg Kit Box.
To secure wheels on wheel leg kit:
1. Place the wheel on the axle
2. Place 1 black nylon washer on axle
3. Pass axle through hole at the bottom of the wheel leg so the axle thread is protruding
from the inner side of the leg
4. Place the M10 (small) washer on the axle
5. Screw on the nylock nut with the nylon on the external side
6. Tighten nut to required tension using a spanner
7. Repeat the process for the other wheel.
For use with Propane Gas and Universal LP Gas
Refer to appliance data plate for gas type, consumption and injector size details.

June 14, 2016 Page 3of 8
Roaster Assembly
1. Once the legs have been assembled lift the control end of the Roaster undo
the thumb screws and insert the wheel leg end. Tighten the thumb screws
2. Repeat the process at the other end using the non-wheel leg end.
3. Slot the burner through the opening on the right hand side.
4. Slot the end of the burner through the left hand side and secure with the bolt.
5. Place the food racks on the support rail at the front and rear of the Roaster
Ensure that the raised racks are placed at the rear of the Roaster.
6Loosen thumb screws to enable the handles to be inserted into the brackets
Gas Cylinder and Line Fittings
1. Hang a 9kg gas cylinder on the brackets of the wheel leg end.
2. Connect the regulator to the cylinder. Do not over tighten.
Tighten the connection with finders (left hand external thread
POL Type 21 CGA510 fitting).
3. Keep gas line away from potential hot surfaces.
Note: This is a low pressure appliance and pressure regulator must
be used.
You cannot connect this LPG Roaster directly to a Natural Gas Supply.

June 14, 2016 Page 4of 8
Assembly of Roaster Accessories
1. End Table: Tilt end table at 45° to fit under hooked bracket on top of handles, then lower
into position “saddled” over handles
.
2. Double-Up Racks: One or Two available. Sit the triangular support legs to the front and
rear locating between grill grids to stop movement. Place the double up rack grid
onto the support legs
.
3. Bain Marie: Remove racks and back support rail from the Roaster. Insert the Bain Marie tank
into the Roaster with the wire support brackets positioned in the
rear corners
.
Pour 25 litres of water into the Bain Marie tank
.
Insert Pans onto support rails
.
Location Requirements
WARNING: This appliance shall not be used
indoors
.
: It must be located at least 200 mm away from any combustible surfaces
: This appliance shall only be used in an above ground open-air situation with natural
ventilation, without stagnant areas, where gas leakage and products of combustion
are rapidly dispersed by wind and natural convection
.
Any enclosure in which the appliance is used shall comply with one of the following (also see
diagrams):
1. An enclosure with walls on all sides, but at least one permanent opening at ground level
and no overhead cover (Figure 1)
.
2. Within a partial enclosure that includes an overhead cover and no more than two walls
(Figures 2 and 3)
.
3. Within a partial enclosure that includes an overhead cover and more than two walls, the
following shall apply (Figures 4 and 5):
(i) At least 25% of the total wall area is completely open and unrestricted
.
(ii) At least 30% of the remaining wall area is open and unrestricted
.
4. In the case of balconies, at least 20% of the total of the side, back and front wall areas
shall be and remain open and unrestricted
.
Ensure that the Roaster Lid is closed at all times
when the Bain Marie is in use other than to load
or unload food as required.

June 14, 2016 Page 5of 8

June 14, 2016 Page 6of 8
Operation
Before lighting
1. Ensure that the Roaster is placed on a solid surface.
2. The Roaster must be level - adjust using thumbscrews on legs to raise or lower each end.
3. Place fat container (not plastic or paper) under drain outlet at the front of the Roaster. A metal container
with handle to hang on bracket provided is recommended.
4. The Roaster is designed for Propane Gas only.
5. Open the Roasting Hood lid.
Lighting
1. Turn on gas at the 9 kg gas cylinder.
2. Push Knob in and slowly turn anti clockwise.
3. You will hear a click, the burner is now alight.
4. If the burner does not alight try again.
5. The flame will be on high so adjust the flame to required heat.
6. Close lid and enjoy your cooking!
7. After use - turn off at valve on gas cylinder.
Manual Lighting
1. Turn on gas at the 9 kg gas cylinder.
2. Place a lit match through the viewing aperture adjacent to burner, turn tap to high and hold
down for 5 seconds once lit.
3. Repeat steps 4 to 6 from previous Lighting Section above.
Troubleshooting
1.
Burner will not light:
Check gas cylinder valve is on. Check there is plenty of gas in the cylinder. Check that spark
occurs at burner port hole, if not then check wiring connections not loose. Check that thermocouple
is within the flame when burner is alight .Check the gas control valve is working
correctly and is on High setting. Otherwise refer to service/repair section
.
2.
Burner lights but does not stay on:
Check that thermocouple at burner is still within a flame when burner is alight. Check
connection to gas valve is not loose. Any thermocouple replacement must be performed by an
authorised person, refer to service/repair section
.
3.
Flame is low, excessively yellow or depositing soot:
Check the gas cylinder is not nearly empty (i.e. low pressure). Check that burner ports are not
blocked by removing the burner tube assembly and clean as necessary. Check that gas valve
is at correct setting. Check there is no blockage (e.g. spider webs) at the burner gas entry
mixing tube. To remove the burner simply undo the barrel bolt at the end of the roaster,
unscrew the regulator at the gas cylinder and slide the burner out through the hole
.
4.
Flame is not sharp and blue but is blurry and “soft” and giving off smelly combustion
products:
This indicates the burner flame is starving for air. Check all ventilation openings in the roaster
for blockage
.
If any of the above conditions cannot be fixed or if the roaster does not perform correctly,
contact the place of purchase, they may be an authorised service centre, or alternatively
return the product to Heatlie for repair
.
June 14, 2016 Page 7of 8
Roaster Cooking Times
With lid down, cook on High setting for ½ hour then turn down to Low setting for the remainder.
Cooking times will vary with weight and thickness of food
.
• Whole Pigs - 40kg 4 to 5 hours
• Whole Lambs - 20kg 3 to 3.5 hours
• Whole Butts - 25kg 5 to 6 hours
• Whole Turkeys - 7.5kg 2 to 2.5 hours
• Whole Snapper - 8 to 9kg I to I .5 hours
• Combination legs of Pork-
Whole topside or rumps 4 to 4.5 hours
• Rolled shoulder Pork,
Small cuts - legs of Lamb,
Chickens etc. To Operator requirements
Vegetables
A variety of garden vegetables may be cooked in the Heatlie Roaster. Some vegetables can be
wrapped in foil to retain moisture and flavour. Potatoes cook well in their jackets
.
Cooking Tip
As the Circular Cooking System rotates hot air around the food, you will find that the front and
back are the hottest spots on the Roaster similarly, you will also find that food placed on the
double-up rack cooks slightly quicker than food placed on the standard racks
.
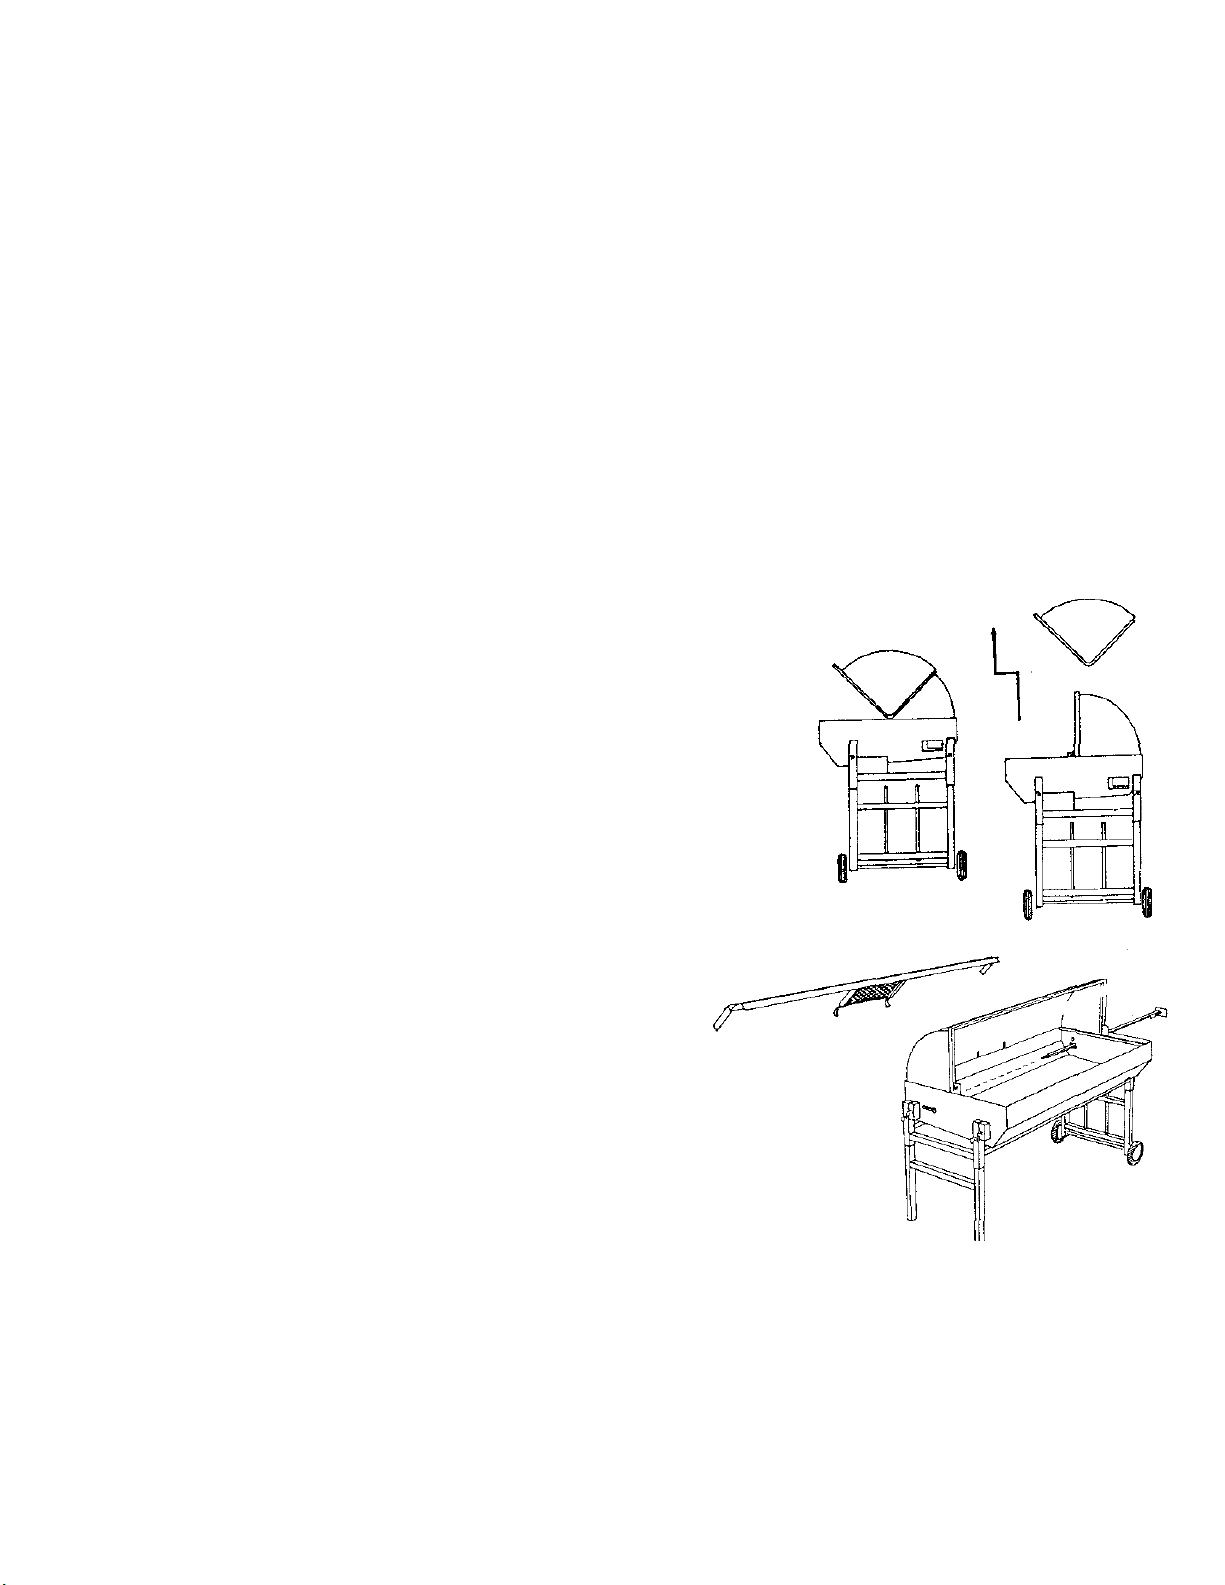
Cleaning
After use and when Roaster is cold, clean and dismantle Roaster
as shown opposite
.
1. Disconnect burner hose at gas cylinder
.
2. Remove food racks.
3. Remove burner by unbolting at end and withdrawing
through the hole.
4. Use warm soapy water to clean all parts including base
and lid of unit
.
Removal of Bain Marie
1. Remove pans and divider rails
2. Lift front of Bain Marie tank
3. Pull rear of tank to the front of the Roaster.
4. Lift front of tank to allow water to drain into the Roaster.
5. Hint: The Roaster drain will take a 1” sink plug if you want to
catch the water and use it for washing up
Servicing and Maintenance
Apart from regular cleaning, no scheduled maintenance is required on your Heatlie Roaster. However, if you are
experiencing continued problems with the operation of the Roaster please contact Heatlie Barbecues for service.
Details as follows:
Heatlie Engineering
60 Kinkaid Ave
North Plympton SA 5037

June 14, 2016 Page 8of 8
Ph (08) 8376 9330, Email: i[email protected]
Designed and manufactured by:
M&A Mead Investments Pty Ltd t/as
Heatlie Engineering ABN 55 111 671 008
60 Kinkaid Ave NORTH PLYMPTON SA 5037
Phone (08) 8374 1999
Email Address: info@heatlie.com.au Web Page: www.heatlie.com.au
Warranty Policy
Heatlie Engineeringwarrants its productstobe free of original manufacturing defects in material and
workmanship, for a period of ten years from the date of purchase for domestic use and one year for
commercial use. Anyclaim must bemadewithin thistime, datingfromthedate of purchase.
Our goods come with guarantees that cannot be excluded under the Australian Consumer Law. You
are entitled to a replacement or refund for a major failure and for compensation for any other
reasonably
foreseeable loss or damage. You are also entitled to have the goods repaired or replaced
if the goods fail to be
of acceptable quality and the failure does not amount to a major failure.
This warranty is subject to the following conditions:
1.
The warranty appliestothe original owner, so long as the original date of purchase can be
verified or
Warranty Card has been completed and returned to Heatlie Engineering.
2.
The owner has the responsibility of adequately packaging the product and transporting it
under
insurance to place of purchase, Heatlie Authorised Service Centre, or to Heatlie
Engineering, at the
owner’scost.
3.
WarrantyservicemustbeperformedbyaHeatlie AuthorisedServiceCentreorbyHeatlie
Engineering.
4.
Installation must conform tothe applicable Gas and Building standardslaiddown by the
country or
state, and according to the Heatlie product instructions.
5.
Thiswarrantypolicydoesnot coveranyproblemassociatedwithrust.
6.
This warranty policy does not coverbuckling orwarping ofthe hotplate.
7.
Lackofmaintenance,abuse,misuse,neglect,accidentorimproperinstallationoftheappliance
will not
becovered.
8.
Corrosion or damage caused by exposure to the elements, insects, weather orhail will not be
covered
under this warranty.
NOTE:All barbecuesmustbe covered byaweatherproofcoverwhennotinuse.
9.
Any evidence that the product has been modified or serviced by an unauthorised person will
void the
warranty.
10.
HeatlieAuthorisedServiceCentresortheirrepresentativesmayprovideon-sitewarranty
service.No
other costs shall be covered by warranty other than the costs of parts and
labour.
Inthe eventthat warranty serviceisrequired,contact a Heatlie Authorised Service Centre orthe
retailerfrom
whom the product was purchased.
Nootherwarranties,eitherexpressedorimplied,whetherbydistributor, retailer oremployeesofHeatlie,
will
be recognized or honoured by Heatlie. This limited warranty sets forththe sole remedy of the
owner. The total
liabilityofHeatlieEngineeringislimitedtothepurchase oftheproduct.
Heatlie are continually updating and improving their products. Therefore details and specifications are subject to
change.
Other manuals for Roaster R3000SS
2
Table of contents
Other Heatlie Barbecues Grill manuals

Heatlie Barbecues
Heatlie Barbecues SNAPPY KING RB1000SS User manual

Heatlie Barbecues
Heatlie Barbecues 1150 Configuration guide

Heatlie Barbecues
Heatlie Barbecues 1150 Configuration guide

Heatlie Barbecues
Heatlie Barbecues Roaster R3000SS Configuration guide

Heatlie Barbecues
Heatlie Barbecues ISLAND GOURMET ELITE IGE600 Configuration guide

Heatlie Barbecues
Heatlie Barbecues COMMUNITY BARBECUE CBBQ 600 Configuration guide

Heatlie Barbecues
Heatlie Barbecues ISLAND GOURMET ELITE IGE600 Configuration guide

Heatlie Barbecues
Heatlie Barbecues ISLAND GOURMET ELITE IGE600 Configuration guide

Heatlie Barbecues
Heatlie Barbecues Island Gourmet Elite Service manual


