manuals.online logo
Brands
  1. Home
  2. •
  3. Brands
  4. •
  5. Heatlie Barbecues
  6. •
  7. Grill
  8. •
  9. Heatlie Barbecues ISLAND GOURMET ELITE IGE600 Configuration guide

Heatlie Barbecues ISLAND GOURMET ELITE IGE600 Configuration guide

ISLAND
GOURMET ELITE
IGE600 & IGE850
Instructions and
General Information
ISLAND GOURMET ELITE
3
A-0010-MAN Heatlie IGE Instruction Manual V5 Updated Feb 2022
CONGRATULATIONS
ON PURCHASING A HEATLIE
BARBECUE!
Designed for those who love the experience of outdoor cooking, we’re sure you’ll
enjoy the power and efficiency of the Ribbon Burner System. Especially the fact
that you’ll never have to worry about flare-ups! Here’s looking forward to many
delightful occasions preparing the food you crave, for the ones you love.
• Please read through the following instructions before you begin to install your
Heatlie Island Gourmet Elite Barbecue.
• If you have purchased the Island Gourmet Elite Hood, please refer to the
instructions included in this manual.
• If you have purchased the Heatlie Island Gourmet Cabinet, please refer to the
instructions supplied with the cabinet.
• Check the product supplied has the correct gas type, either LPG or Natural
Gas, required for your use. This will be clearly marked on the carton and on
the product.
This appliance is for OUTDOOR USE ONLY.
CONTENTS
5 6
10
13
Unpacking The Box
Positioning Your
Heatlie Barbecue in
an Outdoor Area
Connecting to
a Gas Supply
Installation:
Cabinet Preparation
IGE850:
Bench Preparation
IGE Installation
Using the Barbecue
Plate: Cleaning &
Seasoning
14
1716
19
Trouble-shooting
15
Lighting Instructions
18
Gas ConsumptionCooking Instructions
Warranty Policy
7
IGE600:
Bench Preparation
IGE Installation
11 12
Installation: Optional
Roasting Hood
(IGE600 & IGE850)
ISLAND GOURMET ELITE
A-0010-MAN Heatlie IGE Instruction Manual V5 Updated Feb 2022
ISLAND GOURMET ELITEISLAND GOURMET ELITE
54 A-0010-MAN Heatlie IGE Instruction Manual V5 Updated Feb 2022
A-0010-MAN Heatlie IGE Instruction Manual V5 Updated Feb 2022
Remove all items from the box and check against the list below to ensure
that all components are included.
Box Contents
Before installation, please check that the following components have been
supplied:
1 x Heatlie Island Gourmet Elite 600 or 850 Barbecue
1 x Ziploc bag containing 2 x Philips head screws and 1 x lid handle
2 x Knobs
1 x Large Ziploc bag containing 1 x instructions and 1 x fat container
1 x Heatlie Island Gourmet Elite Flat Lid (standard item)
1 x Plate lifting tool, tether and match holder
2 x Drop in Heat Deflectors
If you have purchased the optional hood, the following parts will also have
been supplied in a separate box:
1 x Hood
If you have purchased the optional grill plate, the following parts will have
been supplied:
1 x Grill plate
4 x Waste containers (IGE600) or 6 x Waste containers (IGE850)
Tools Required (not supplied)
1 x No. 2 Philips head screw driver
NOTE: Template for bench cut out
If you are installing your Barbecue in a bench top, please retain the
template provided in the Barbecue box marked “Template for cut out”.
Visual references of these templates can be found in page 10 (IGE600)
and page 11 (IGE 850).
If the information in this manual is not followed exactly, a fire or explosion
may result causing property damage, personal injury or death.
Do not store flammable material in or near this appliance, this includes
fuel gas.
Do not store articles on or against this appliance.
Do not spray aerosols in the vicinity of this appliance while it is in
operation. This includes spray cooking oils.
Do not modify this appliance.
Do not use an adaptor at the cylinder connection.
UNPACKING
THE BOX
SAFETY
PRECAUTIONS
IGE600
IGE850
IGE850
IGE600
ISLAND GOURMET ELITEISLAND GOURMET ELITE
76 A-0010-MAN Heatlie IGE Instruction Manual V5 Updated Feb 2022
A-0010-MAN Heatlie IGE Instruction Manual V5 Updated Feb 2022
This Barbecue is only to be used in an above ground, open air situation
with natural ventilation.
The Island Gourmet Elite Barbecue is not for use indoors. Please refer to
AS5601 for specific installation and ventilation regulations.
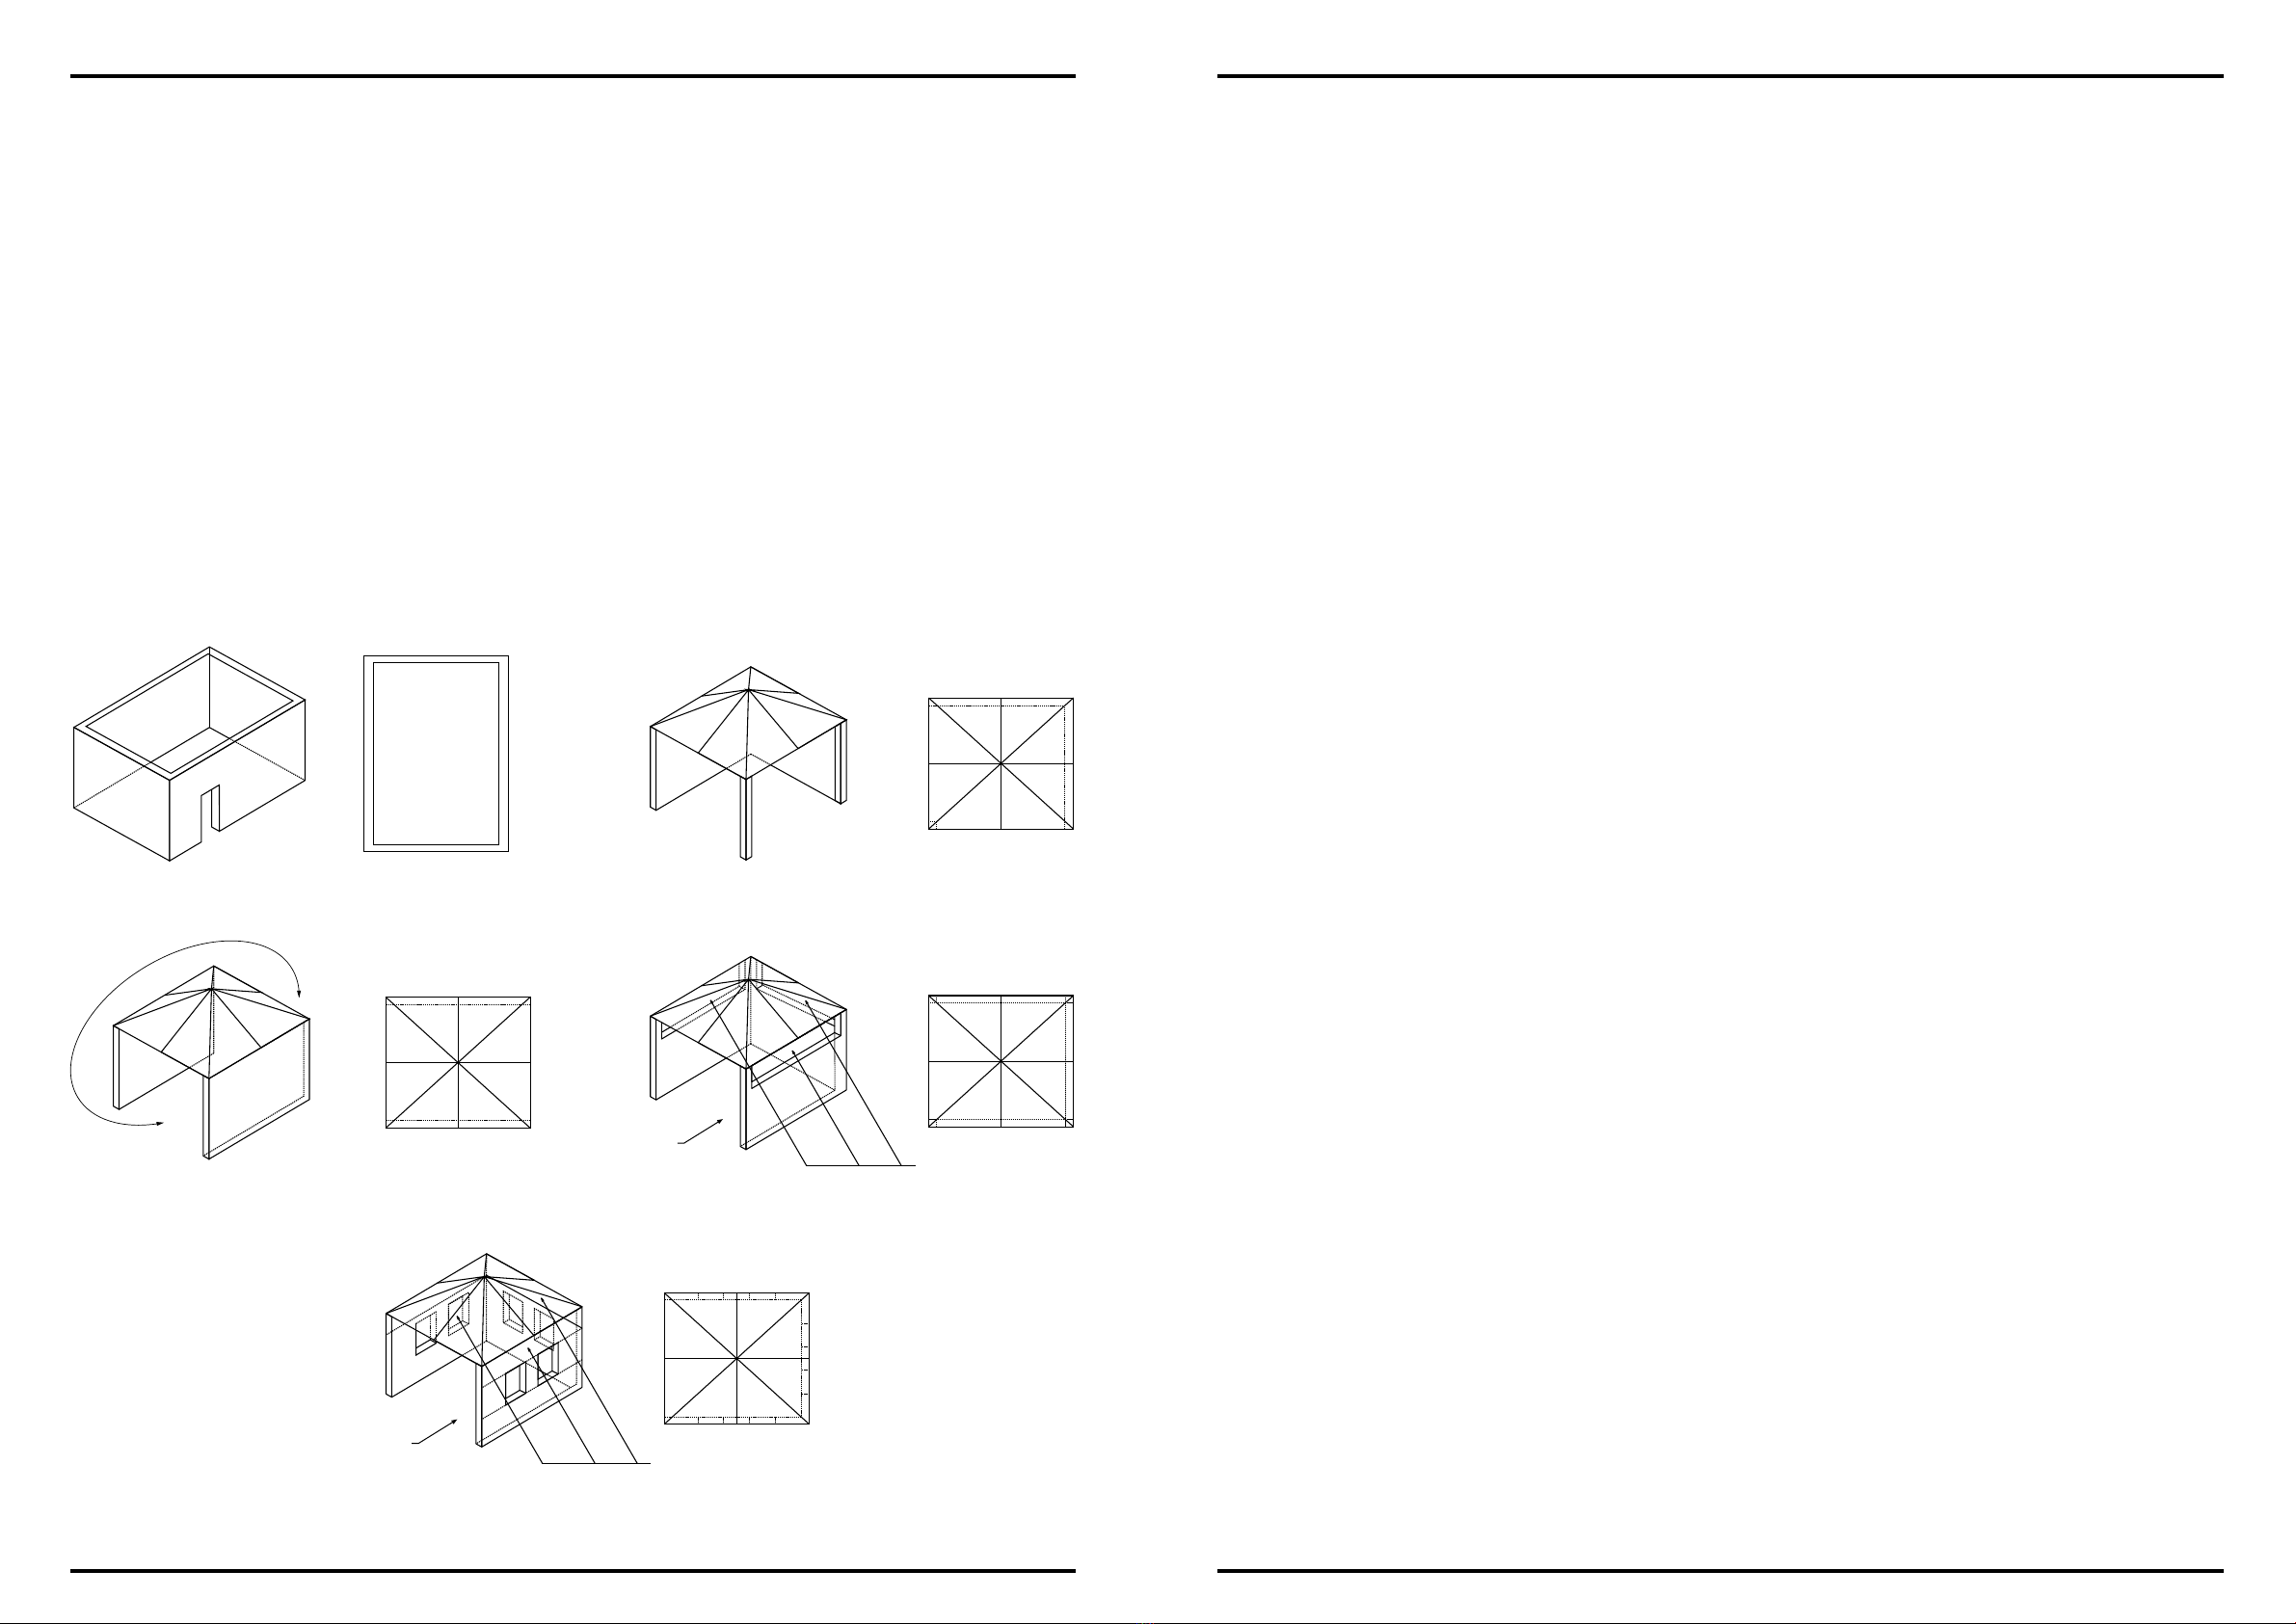
If you are using the Barbecue within a structure, please ensure that you
are complying with at least one of the following positioning options:
• An enclosure with walls on all sides, but at least one permanent opening
at ground level and no overhead cover (Figure F1);
• Within a partial enclosure that includes an overhead cover and no more
than two walls (Figures F2 and F3);
• Within a partial enclosure that includes an overhead cover and more
than two walls, with the following also applying (Figures F4 and F5):
(i) At least 25% of the total wall area is completely open and unrestricted
(ii) At least 30% of the remaining wall area is open and unrestricted;
• In the case of balconies, at least 20% of the total of the side, back and
front wall areas are to be open and unrestricted, and remain as such.
NOTE: A door, blinds, or window, is not to be considered a permanent
opening.
POSITIONING
YOUR HEATLIE
BARBECUE IN
AN OUTDOOR
AREA
INSTALLATION
CABINET
PREPARATION
Firstly, all Island Gourmet Elite barbecues need to be kept under a
weather proof cover.
If you purchased an Island Gourmet Elite Cabinet, refer to page 10 or 11 for
the appropriate installation instructions for your model. Instructions for
installing the hood can be found on page 12.
The requirements and instructions for using your Heatlie Barbecue in a
purpose-built cabinet are outlined below.
The Island Gourmet Elite can be installed into a bench and bench top
which are made from combustible and/or non-combustible materials.
The Island Gourmet Elite can also be installed into a cabinet with zero
clearance between the Barbecue body and the cabinet panels, providing
the appropriate ventilation requirements are met.
Combustible Construction Materials
The Island Gourmet Elite has been designed to allow installation into
benches and bench tops manufactured from combustible materials. The
following are examples of combustible materials that can be used when
installing the Island Gourmet Elite: Timber, Laminate or MDF.
Non-combustible Construction Materials
Examples: Steel, Stainless steel, Caesar Stone, Granite, Brick.
Ventilation Requirements
A minimum ventilation area of 400cm2between the Barbecue and
open air is required, for both LPG and Natural gas applications. This
is the requirement for both zero clearance and non-zero clearance
installations.
This essential ventilation area of 400cm² can be located anywhere in the
cabinet. As an example, see Figure 1 which shows the ventilation holes at
the top and bottom of the Heatlie Island Gourmet Cabinet.
For example, if the back of your bench is against a brick wall and there
is no opportunity for ventilation in the back, the 400cm2ventilation area
will need to be placed somewhere in the front or sides of the cabinet.
FIGURE F1 - OUTDOOR AREA - EXAMPLE 1
FIGURE F4 - OUTDOOR AREA - EXAMPLE 4
FIGURE F5 - OUTDOOR AREA - EXAMPLE 5
30 percent or more in total
of the remaining wall area is
open and unrestricted
30 percent or more in total
of the remaining wall area is
open and unrestricted
FIGURE F3 - OUTDOOR AREA - EXAMPLE 3
Both ends open
FIGURE F2 - OUTDOOR AREA - EXAMPLE 2
Open side at
least 25% of
total wall area
Open side at
least 25% of
total wall area
ISLAND GOURMET ELITEISLAND GOURMET ELITE
98 A-0010-MAN Heatlie IGE Instruction Manual V5 Updated Feb 2022
A-0010-MAN Heatlie IGE Instruction Manual V5 Updated Feb 2022
Zero Clearance Ventilation
The Island Gourmet Elite can be installed with zero clearance between
the Barbecue body and the cabinet panels on either side. This would
require panels to be directly underneath the Barbecue and on the side.
Figures 2 and 3 clearly shows how adequate ventilation can be achieved
with a panel that has a minimum width of 860mm underneath the
Barbecue and a minimum height of 35mm on the side.
The minimum ventilation area of 400cm2needs to be positioned at the
base of the Island Gourmet Elite, at the same height as the base plate of
the Barbecue.
Before installation, refer to AS5601 for details on ventilation requirements.
LPG Gas Cylinder Compartment
When using LPG, the gas cylinder needs to be placed in a ventilated
compartment that is completely separate from the compartment which
houses the Barbecue. This compartment where the LPG cylinder is stored
needs to be ventilated at the top and bottom, with each opening at least
200cm². The upper edge of the bottom opening must not be more than
120mm above the base of the cabinet, as per Figure 4.
NOTE: This ventilation is in addition to the 400cm2required for the
barbecue (refer page 7).
Figure 5 shows the separate LPG gas cylinder compartment in the Heatlie
Island Gourmet Elite Cabinet.
A hole (maximum diameter 20mm) must be made in the unit to enable
the hose fitting to pass from the cylinder compartment to the Barbecue.
Refer to AS5601 for pipe sizing details.
Natural Gas
When the Island Gourmet Elite is connected to a main gas supply
(Natural Gas), a separate compartment is not required.
A 40mm diameter hole is required on the rear of the cabinet (on the
side which has the control knob) to allow access to the natural gas
connection. The hole should not be more than 40cm above the base of
the cabinet.
Refer to AS5601 for pipe sizing details.
Measurements for both IGE600 and IGE850
FIGURE 2
FIGURE 3
FIGURE 1
Side ventilation showing outlets
with minimum gap of 530mm
x 35mm
35mm
35mm
530mm
860mm
Zero Clearance ventilation showing a gap of
860mm x 35mm
FIGURE 4
FIGURE 5
Bottom is open for
the unit.
Bottom is solid to seal off unit from
gas compartment.
ISLAND GOURMET ELITEISLAND GOURMET ELITE
1110 A-0010-MAN Heatlie IGE Instruction Manual V5 Updated Feb 2022
A-0010-MAN Heatlie IGE Instruction Manual V5 Updated Feb 2022
Bench Preparation
NOTE: If you are installing an IGE 850 please refer to page 11.
Before cutting your bench top please ensure you have a minimum of
230mm clear space below the bench top to accommodate the body of
the Barbecue.
1. Prepare bench top cut out using the template provided, as shown in
Figure 6. Use a fine point marker; then make your cut as accurately as
possible.
2. Ensure ventilation openings meet the requirements on page 7.
IGE600 Installation:
1. Carefully lower the Barbecue into the opening in the bench top.
2. Connect IGE600 to a gas supply (refer page 13).
Figure 8 (below) shows the depth of the IGE600. The trim sits 14.2mm
above the top of the bench. Figure 9 (below) shows the depth from the
top of the hood to the base of the IGE600. Figure 10 (below) shows the
dimensions of the handle on the lid.
IGE 600 IGE 850 Bench Preparation
NOTE: If you are installing an IGE 600 please refer to page 10.
Before cutting your bench top please ensure you have a minimum of
230mm clear space below the bench top to accommodate the body of
the Barbecue.
1. Prepare bench top cut out using the template provided, as shown in
Figure 11. Use a fine point marker and make your cut as accurately as
possible.
2. Ensure ventilation openings meet the requirements on page 7.
IGE850 Installation:
1. Carefully lower the Barbecue into the opening in the bench top.
2. Connect IGE850 to a gas supply (refer page 13).
Figure 13 (below) shows the depth of the IGE850. The trim sits 14.2mm
above the top of the bench. Figure 14 (below) shows the depth from the
top of the hood to the base of the IGE850. Figure 15 (below) shows the
dimensions of the handle on the lid.
1105mm
540mm
160mm
1117mm
555mm
850mm
540mm
160mm
867mm
555mm
FIGURE 6
231mm
14.2mm
33mm
FIGURE 7
FIGURE 8
FIGURE 10
FIGURE 9
385mm
Benchtop Cut Out measurements (as per template) Trim Dimensions Benchtop Cut Out measurements (as per template)
FIGURE 11
14.2mm
FIGURE 12
FIGURE 13
FIGURE 15
FIGURE 14
436mm
Trim Dimensions
231mm
33mm
ISLAND GOURMET ELITEISLAND GOURMET ELITE
1312 A-0010-MAN Heatlie IGE Instruction Manual V5 Updated Feb 2022
A-0010-MAN Heatlie IGE Instruction Manual V5 Updated Feb 2022
Instructions for installing the optional Roasting Hood
(applicable to both IGE600 and IGE850)
1. Place the hood onto something soft to protect it from becoming
scratched.
2. Remove all the plastic from the stainless steel.
3. Remove the Barbecue plate. All screws on the internal back edge and
the screw closest to the back of the Barbecue on each side will need
to be removed using the tool supplied. Please see Figure 16. 6 screws
will need to be removed.
4. Place the hood along the back of the Barbecue, on the inside of trim.
Line up the holes in the hood with the screw holes from where the
screws were just removed. Screw into place, using the screws that
were removed. Please see Figure 17 and Figure 18. One person to hold
the hood and another to insert the screws.
5. Inserting the Barbecue Plate. After cleaning the plate (instructions on
page 15), insert it into the brackets on the side of the Barbecue body
by holding it vertically and sliding it into the bracket. Then gently
lower the plate down to a horizontal position with the plate tool,
ready for use.
CONNECTING
TO A GAS
SUPPLY
LPG Connection
If using Liquid Petroleum Gas (LPG), a 9kg bottle is required. Ensure the
correct ventilation requirements have been applied. For details, please
refer to page 7.
Connect the regulator to the cylinder. Do not over tighten. Tighten the
gas cylinder connection with fingers (right-hand internal thread AS 4637,
Type 27 CGAS fitting). The inlet to the manifold is via a ¼” BSP external
threaded elbow connection. Keep the gas line away from potential hot
surfaces.
Conduct a leak test (details below) to check for leaks after connecting to
the gas bottle.
NOTE: This is a low-pressure appliance and the pressure regulator must
be used.
If you have an IGE Cabinet, ensure the gas cylinder is securely held in
position using the retaining chain supplied.
An LPG barbecue cannot be converted directly into a natural gas (piped)
supply. Whilst the IGE can be converted, you will need to contact your
nearest stockist or gas fitter for details. This conversion will need to be
conducted by a qualified gas fitter.
Natural Gas Connection
Natural gas installation must be carried out by an authorised Gas Fitter.
Where the barbecue is supplied for use with natural gas, a hose fitting
complying to AS1869 is attached. This has a ¾” SAE internal threaded
fitting on one end and a bayonet fitting on the other for connection to
the fixed gas supply. To connect the bayonet fitting, push it into the fixed
connection and rotate it clockwise to lock into place. When connected,
check for leaks as outlined below.
Leak Test
With the gas connected, turn the gas on and perform the following test
to check for gas leaks.
Using soapy water, brush or spray over the joint between the gas cylinder
and the connection on the barbecue and watch for bubbles. If bubbles
appear, gas is leaking. The fitting may need to be tightened, or this may
be a result of faulty equipment.
Instructions for gas fitter: The installer must test the appliance for
satisfactory operation before handing over to the customer.
FIGURE 16
FIGURE 17
FIGURE 18
ISLAND GOURMET ELITEISLAND GOURMET ELITE
1514 A-0010-MAN Heatlie IGE Instruction Manual V5 Updated Feb 2022
A-0010-MAN Heatlie IGE Instruction Manual V5 Updated Feb 2022
Cleaning the Barbecue Plate (Before first time use)
The Barbecue plate has a food grade protective coating on it to prevent
rust before use. Before inserting the hotplate into the Barbecue this
coating needs to be completely removed. Using warm, soapy water and
a non-scratch scourer, wash the hotplate until the water runs clear. If the
plate feels tacky to touch, wash again.
Repeat the cleaning process described above if the plate remains
“tacky”.
Plate cannot be left without oil on it, i.e. it must be seasoned once the
lanolin is removed.
Seasoning the Barbecue Plate & Grill Plate
The Heatlie Island Gourmet Plate is made of either mild steel or stainless
steel (optional) and both need to be seasoned prior to use. This will
reduce the likelihood of food sticking to the plate and ensure longevity of
the plate. This is a similar process to seasoning a wok.
To season the plate, first follow the instructions on Cleaning the Barbecue
Plate (above). This may have been cleaned prior to inserting the plate.
Rinse and dry the Plate or Grill. Apply a layer of vegetable oil or cooking
oil. Spread the oil over the Plate using a scraper or brush. Turn the
Barbecue on and heat for around 3 minutes. Turn off the Barbecue. Wipe
off excess oil with a paper towel.
Your Barbecue is now ready to cook.
Placing the Barbecue Plate or Grill Plate into the Barbecue
Insert the plate or grill into the brackets on the side of the Barbecue body
by holding it vertically and sliding into the bracket. Then gently lower
the plate down to a horizontal position with the plate lifting tool, ready
for use.
NOTE: If you are installing the optional Roasting Hood please refer to
page 12, before installing the Barbecue plate.
USING THE
BARBECUE
PLATE:
CLEANING &
SEASONING
LIGHTING
INSTRUCTIONS
Before Lighting
1. Ensure the knobs are in the OFF position.
2. Turn on valve at the gas cylinder (for LPG connection).
3. Check there are no leaks (see Leak Test on page 14).
Lighting
1. If the Roasting Hood is in use, open hood before lighting.
2. Turn on the front burner by pushing down the knob, rotating anti-
clockwise slowly until the Piezo igniter clicks. Hold down for 10 seconds
until the burner stays alight. Alternatively, light by placing a match
in the match holder provided and hold the match on the right hand
side between the plate and the trim. If ignition does not occur within
15 seconds, turn off, wait for 30 seconds then repeat the above
process.
3. Repeat this process for the rear burner.
4. Ensure gas vents remain clear.
5. Turn off knobs and gas supply after use.
NOTE: If the Barbecue does not operate correctly, turn it off and refer to
the Troubleshooting section on page 17.
ISLAND GOURMET ELITEISLAND GOURMET ELITE
1716 A-0010-MAN Heatlie IGE Instruction Manual V5 Updated Feb 2022
A-0010-MAN Heatlie IGE Instruction Manual V5 Updated Feb 2022
COOKING
INSTRUCTIONS
CLEANING
INSTRUCTIONS
Turn the Barbecue on high for 2 minutes to pre-heat the hotplate.
As a guide:
For a 20mm thick, medium cooked steak, cook for 3-4 minutes each side.
For a medium-rare steak, cook for 2 minutes on each side.
For gourmet sausages (25mm thick) cook for approximately 10 minutes,
turning every couple of minutes.
Roasting: Sear the meat on all sides on the hotplate. Place a baking
tray, or disposable aluminium foil tray on the Barbeque plate, insert a
roasting rack (or cake cooling rack), then place the roast on the rack
before closing the hood. Turn the flame to low. Maintain the temperature
at 200ºC by keeping the flame on low or medium. Cook for 30 minutes
per 500 grams of meat. Check periodically, until the juices run clear.
Alternatively, use a meat thermometer to test for correct internal
temperature to determine if cooked.
Problem Possible Cause Remedy
Barbecue does
not light
Gas supply problem Turn knob slowly prior to igniter
clicking so gas has time to enter
burner
Check cylinder valve is open
Check gas bottle is not empty
Check hose is connected at
bayonet fitting
Check Natural Gas line is functional
and turned on
The electrode is too
far away from the
burner
Wire probe needs to be 4-5mm
away from the burner and over a
slot in the burner
The electrode is not
sparking
Ensure the lead is connected
securely to the piezo
Burner lights but
does not stay on
Gas supply problem Check cylinder valve is open
Check gas bottle is not empty
Check hose is connected at
bayonet fitting
Check Natural Gas line is functional
and turned on
Gas control valve
problem
Ensure the knob turns freely and is
on HIGH to LIGHT
Thermocouple is not
positioned correctly
Thermocouples need to be
positioned in the flame, 3-5mm
above the burner slots
Flame is low,
excessively
yellow and/or
depositing soot
on under side of
plate
Gas supply problem Low pressure may result from the
gas cylinder being close to empty
Change to a full gas cylinder
Blocked burners Clean burners by blowing high
pressure air through the burner or
with a wire brush.
Inspect gas valve for blockage
caused by insects or spiders,
for example
Burner flame is
starved of air
Ensure Barbecue is ventilated
correctly
TROUBLE-
SHOOTING
If any of the above conditions cannot be rectified, contact the place of
purchase or the manufacturer, Heatlie Barbecues.
After use, scrape the food particles off the hotplate and apply a layer
of cooking oil before replacing the lid for protection. Avoid washing the
plate with water.
Clean the trim and hood of the Barbecue with a soft cloth and a
commercially available stainless steel cleaner.
The internal housing can be cleaned with a commercially available
Barbecue cleaner.
Both the mild steel and stainless steel plates will become black with use.
This is characteristic of all Heatlie Barbecue plates.
ISLAND GOURMET ELITEISLAND GOURMET ELITE
1918 A-0010-MAN Heatlie IGE Instruction Manual V5 Updated Feb 2022
A-0010-MAN Heatlie IGE Instruction Manual V5 Updated Feb 2022
IGE600
IGE850
GAS
CONSUMPTION Gas Type Natural Gas Universal LPG
Injector Diameter 1.60mm 0.90mm
Burner Pressure 1.00kPa 2.75kPa
Nominal Hourly Gas Consumption
per burner 11.5MJ/hr 10MJ/hr
NHGC Total 23MJ/hr 20MJ/hr
Gas Type Natural Gas Universal LPG
Injector Diameter 2.10mm 1.20mm
Burner Pressure 1.00kPa 2.75kPa
Nominal Hourly Gas Consumption
per burner 19MJ/hr 19MJ/hr
NHGC Total 38MJ/hr 38MJ/hr
Heatlie Barbecues warrants its products to be free of original
manufacturing defects in material and workmanship, for a period of
ten years from the date of purchase for domestic use and one year for
commercial use. Any claim must be made within this time, dating from
the date of purchase.
Our goods come with guarantees that cannot be excluded under
Australian Consumer Law. You are entitled to a replacement or refund for
major failure and for compensation for any other reasonably foreseeable
loss or damage. You are also entitled to have the goods repaired or
replaced if the goods fail to be of acceptable quality and the failure does
not amount to major failure.
This warranty is subject to the following conditions:
1. The warranty applies to the original owner provided the original date
of purchase can be verified or the warranty card has been completed
and returned to Heatlie.
2. The owner has the responsibility of adequately packaging the
product and transporting it under insurance to place of purchase, or
to Heatlie Barbecues, at the owner’s cost.
3. Warranty service must be performed by a Heatlie authorised gas fitter
or by Heatlie Barbecues.
4. Installation must conform to the applicable gas and building
standards laid down by the country or state, and according to the
Heatlie product installation guide and instructions.
5. This warranty policy does not cover problems associated with
corrosion.
6. This warranty policy does not cover buckling or warping of the
hotplate.
7. Lack of maintenance, abuse, misuse, neglect, accident or improper
installation of the appliance will not be covered.
8. Corrosion or damage caused by exposure to the elements, insects,
weather or hail will not be covered under this warranty.
NOTE: ALL BARBECUES MUST BE COVERED BY A WEATHERPROOF
COVER WHEN NOT IN USE
9. Any evidence that the product has been modified or serviced by an
unauthorised person will void the warranty.
10. Heatlie authorised gas fitters may provide on-site warranty service. No
other costs shall be covered by warranty other than the costs of parts
and labour.
In the event that warranty service is required, contact the place of
purchase. No other warranties, either expressed or implied, whether
by distributor, retailer or employees of Heatlie, will be recognised or
honoured by Heatlie.
This limited warranty sets forth the sole remedy of the owner. The
total liability of Heatlie is limited to the purchase of the product.
Heatlie are continually updating and improving their products,
therefore details and specifications are subject to change.
WARRANTY
POLICY
Designed and manufactured by:
M&A Mead Investments Pty Ltd t/as Heatlie Engineering
ABN 55 111 671 008
60 Kinkaid Ave NORTH PLYMPTON SA 5037
Phone (08) 8376 9330
Email Address: [email protected]
Web Page: www.heatlie.com.au

Other manuals for ISLAND GOURMET ELITE IGE600

2

This manual suits for next models

1

Other Heatlie Barbecues Grill manuals

Heatlie Barbecues ISLAND GOURMET ELITE IGE600 Configuration guide

Heatlie Barbecues

Heatlie Barbecues ISLAND GOURMET ELITE IGE600 Configuration guide

Heatlie Barbecues 1150 Configuration guide

Heatlie Barbecues

Heatlie Barbecues 1150 Configuration guide

Heatlie Barbecues Roaster R3000SS Configuration guide

Heatlie Barbecues

Heatlie Barbecues Roaster R3000SS Configuration guide

Heatlie Barbecues Island Gourmet Elite Service manual

Heatlie Barbecues

Heatlie Barbecues Island Gourmet Elite Service manual

Heatlie Barbecues SNAPPY KING RB1000SS User manual

Heatlie Barbecues

Heatlie Barbecues SNAPPY KING RB1000SS User manual

Heatlie Barbecues Roaster R3000SS Configuration guide

Heatlie Barbecues

Heatlie Barbecues Roaster R3000SS Configuration guide

Heatlie Barbecues 1150 Configuration guide

Heatlie Barbecues

Heatlie Barbecues 1150 Configuration guide

Heatlie Barbecues ISLAND GOURMET ELITE IGE600 Configuration guide

Heatlie Barbecues

Heatlie Barbecues ISLAND GOURMET ELITE IGE600 Configuration guide

Heatlie Barbecues COMMUNITY BARBECUE CBBQ 600 Configuration guide

Heatlie Barbecues

Heatlie Barbecues COMMUNITY BARBECUE CBBQ 600 Configuration guide

Popular Grill manuals by other brands

Whirlpool ADN 630 Instructions for installation, use and maintenance

Whirlpool

Whirlpool ADN 630 Instructions for installation, use and maintenance

DS Produkte SW-123G instruction manual

DS Produkte

DS Produkte SW-123G instruction manual

Traeger BBQLHS owner's manual

Traeger

Traeger BBQLHS owner's manual

TREVIDEA G3 FERRARI LAVICA BLACK G10162 user manual

TREVIDEA

TREVIDEA G3 FERRARI LAVICA BLACK G10162 user manual

CROWN VERITY Infinite IBI30 owner's manual

CROWN VERITY

CROWN VERITY Infinite IBI30 owner's manual

TrueFlame TF25-NG user manual

TrueFlame

TrueFlame TF25-NG user manual

Kenmore 141.16228 owner's manual

Kenmore

Kenmore 141.16228 owner's manual

Weber Spirit E-310 manual

Weber

Weber Spirit E-310 manual

Arzum Techno Grill AR 2059 instruction manual

Arzum

Arzum Techno Grill AR 2059 instruction manual

Lincat Opus 800 OG8410-A001 operating instructions

Lincat

Lincat Opus 800 OG8410-A001 operating instructions

Calphalon CKCLIG3 instruction manual

Calphalon

Calphalon CKCLIG3 instruction manual

Brinkmann 2411 Assembly instructions

Brinkmann

Brinkmann 2411 Assembly instructions

BRAND-MAN Rodeo Deluxe with cart owner's manual

BRAND-MAN

BRAND-MAN Rodeo Deluxe with cart owner's manual

Steba VG 195 Instructions for use

Steba

Steba VG 195 Instructions for use

RUSTA ELEMENTS 623514680101 manual

RUSTA

RUSTA ELEMENTS 623514680101 manual

Traeger Renegade Pro Use & care instructions

Traeger

Traeger Renegade Pro Use & care instructions

ARIETE 794 manual

ARIETE

ARIETE 794 manual

Uniflame GBC850W owner's manual

Uniflame

Uniflame GBC850W owner's manual

manuals.online logo
manuals.online logoBrands
  • About & Mission
  • Contact us
  • Privacy Policy
  • Terms and Conditions

Copyright 2025 Manuals.Online. All Rights Reserved.