Heli-Professional SOXOS 550 KIT User manual
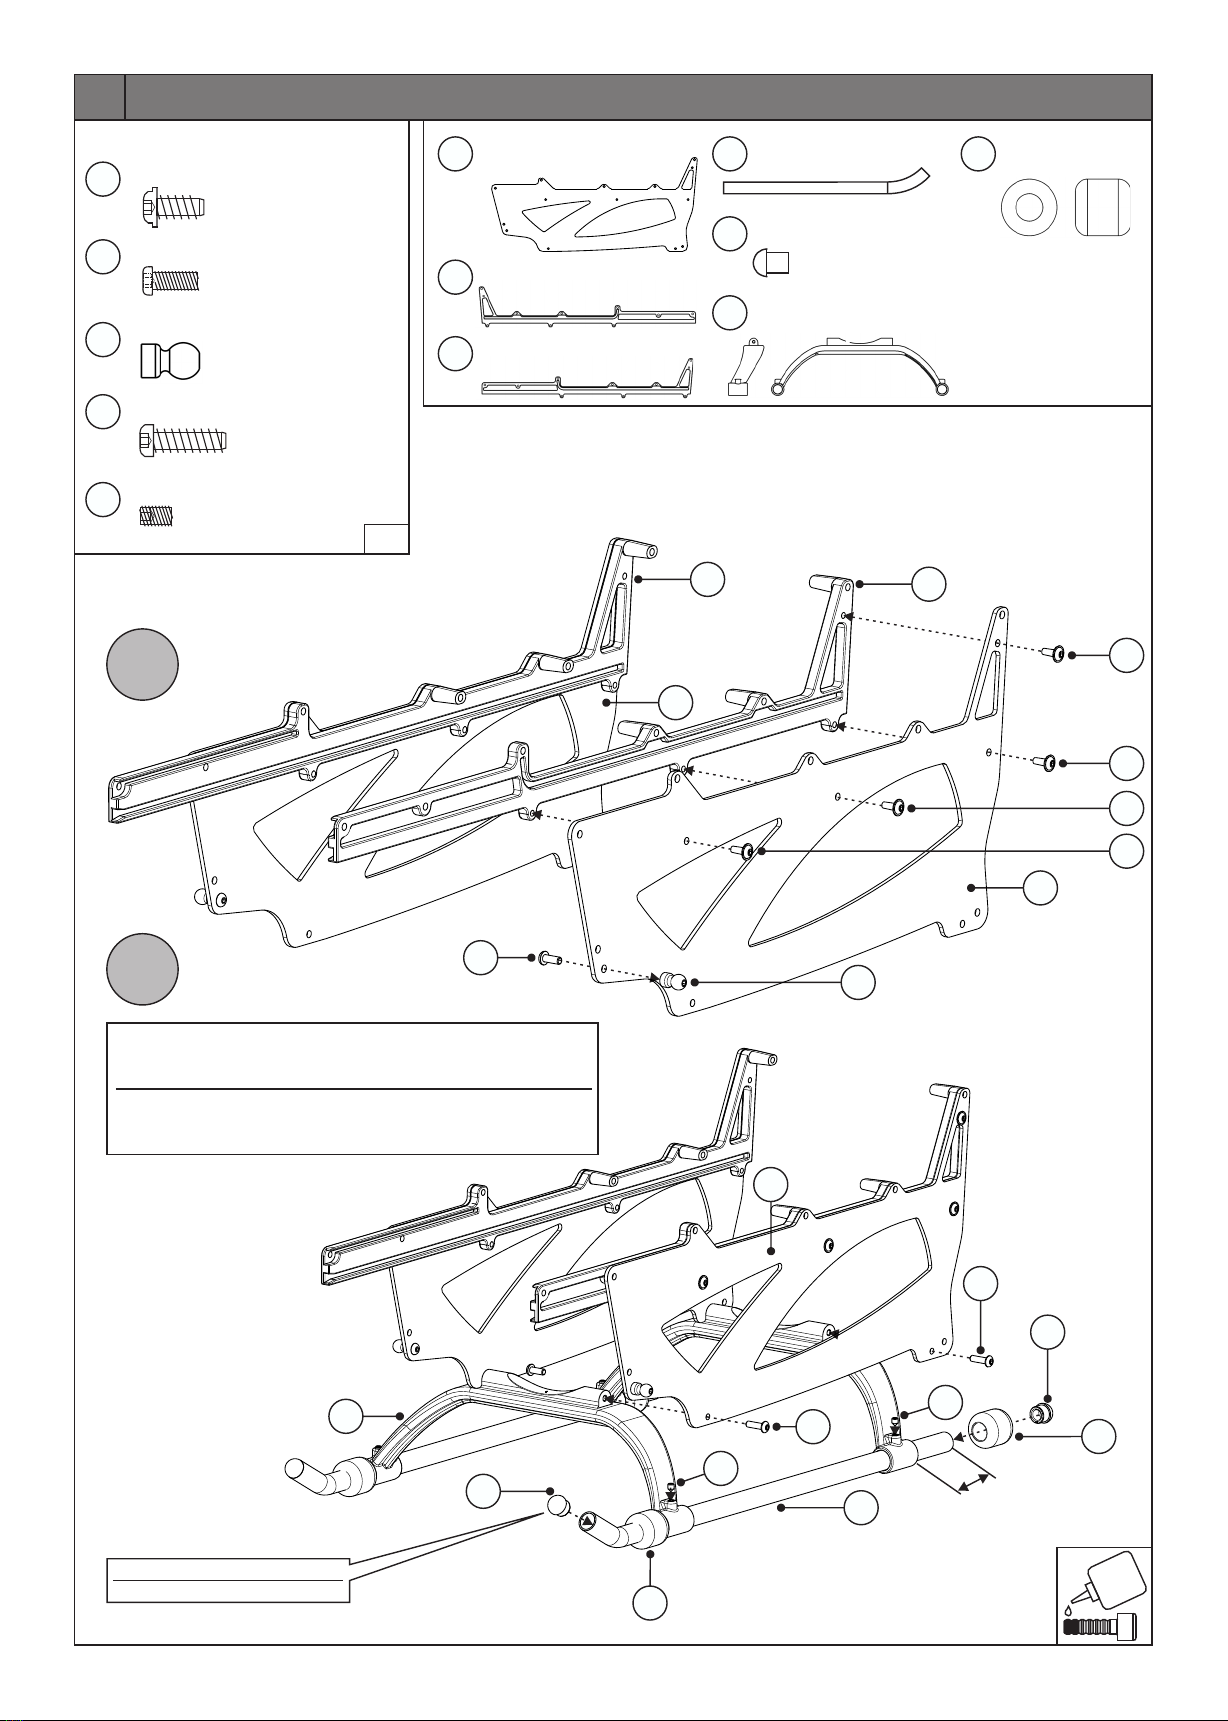
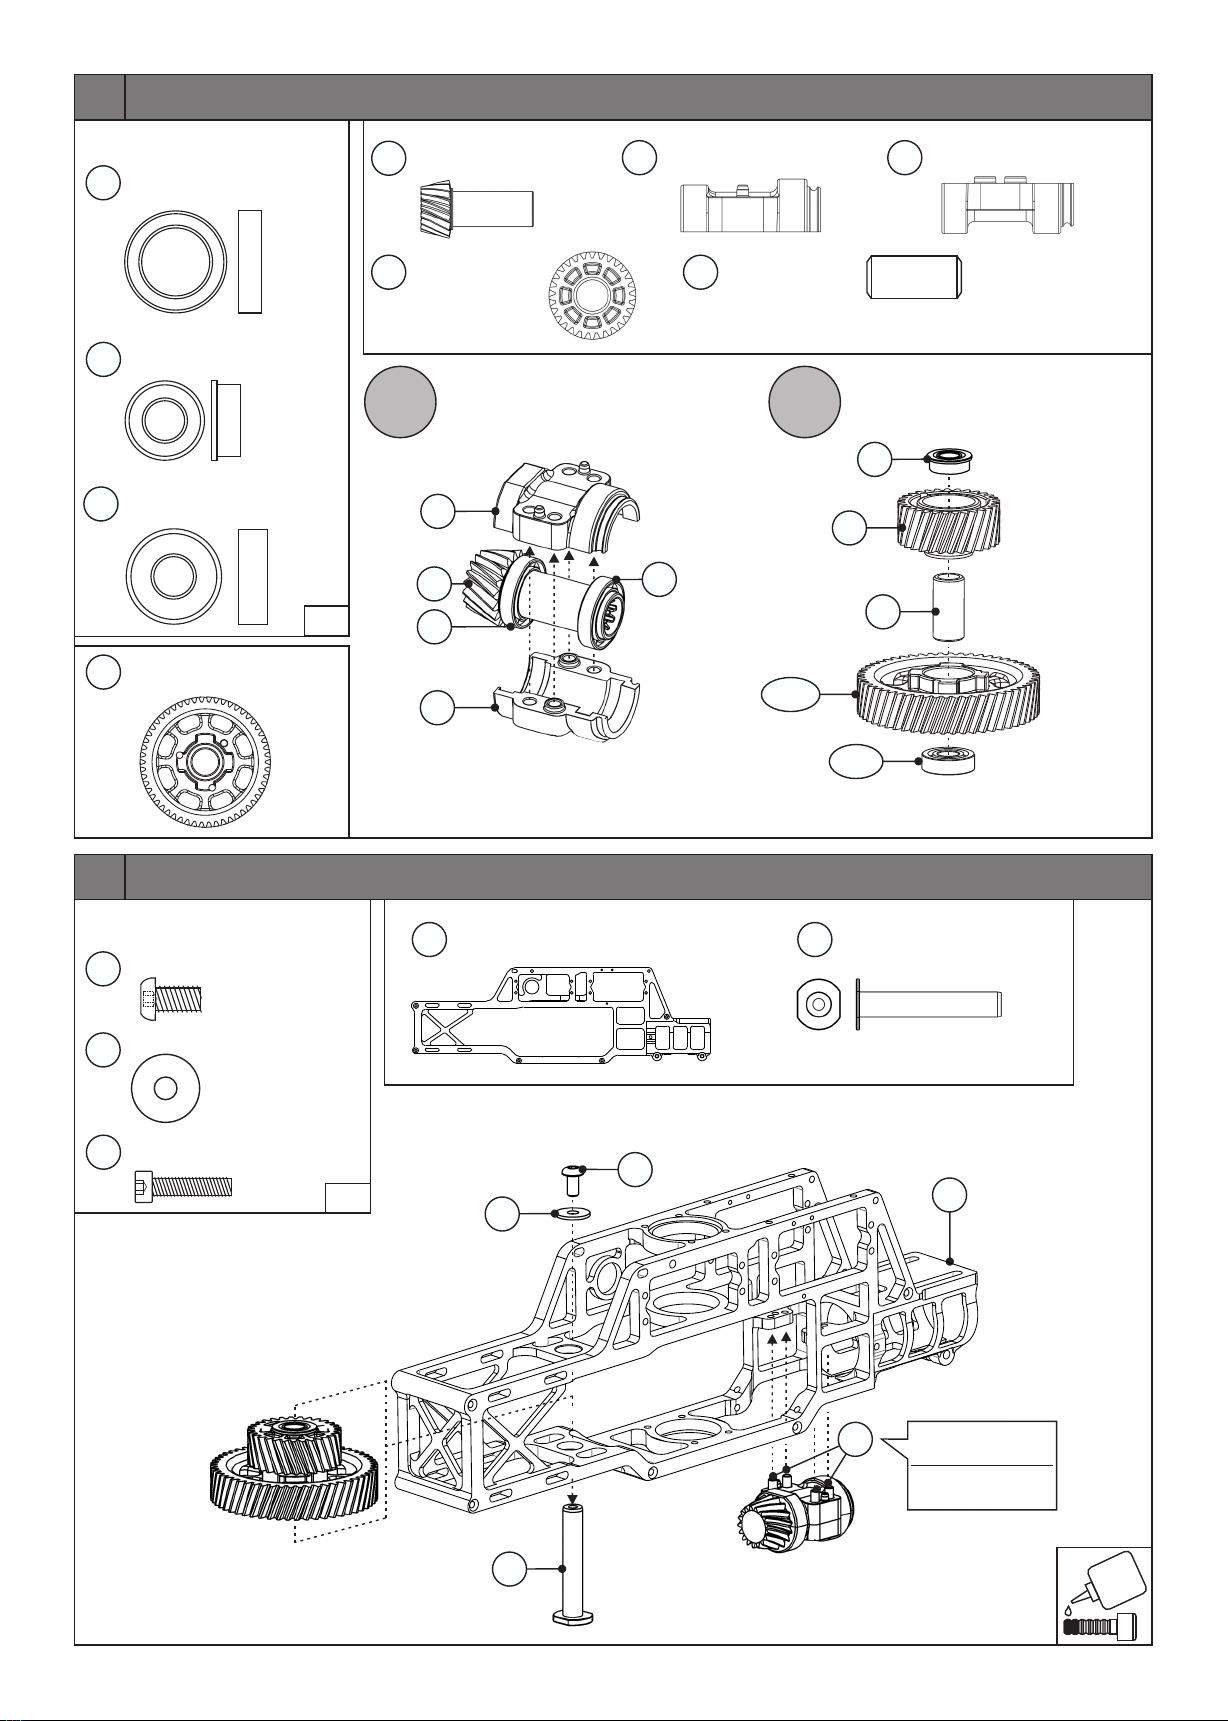
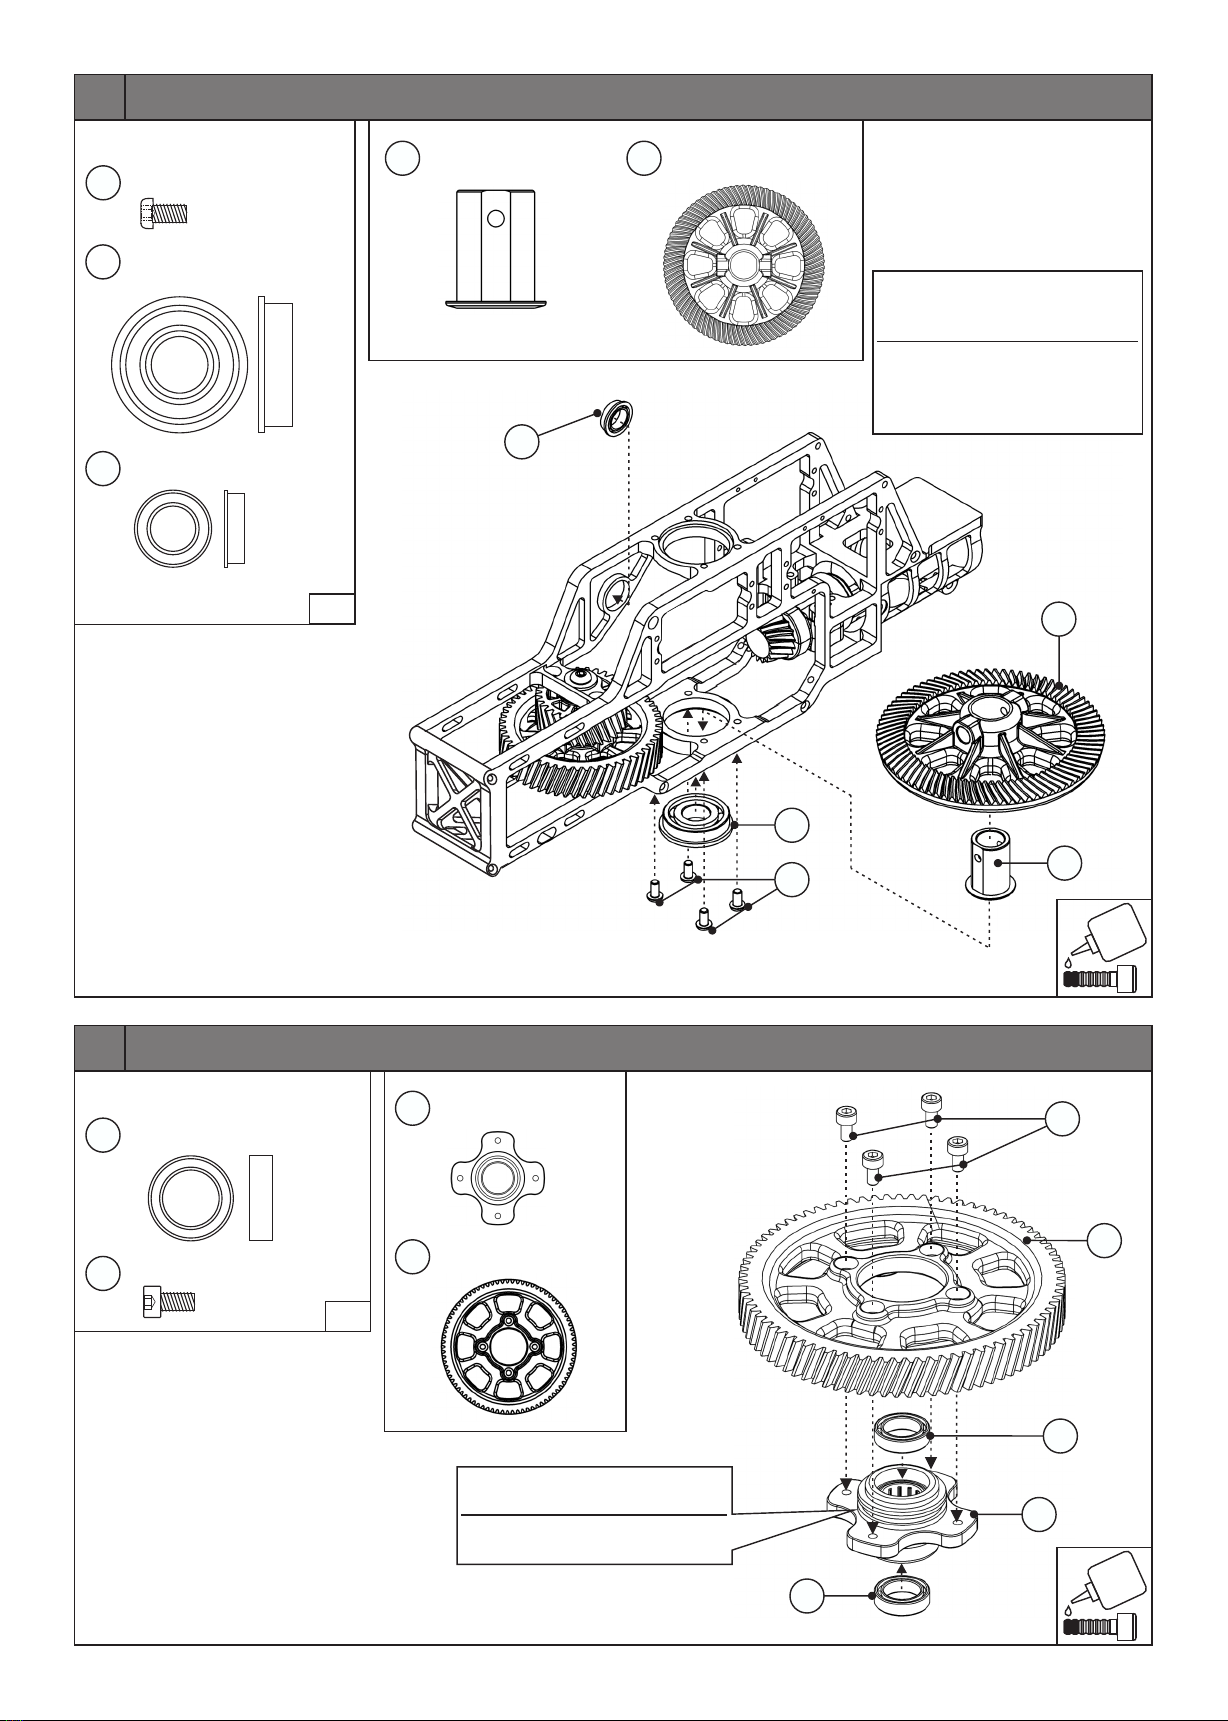
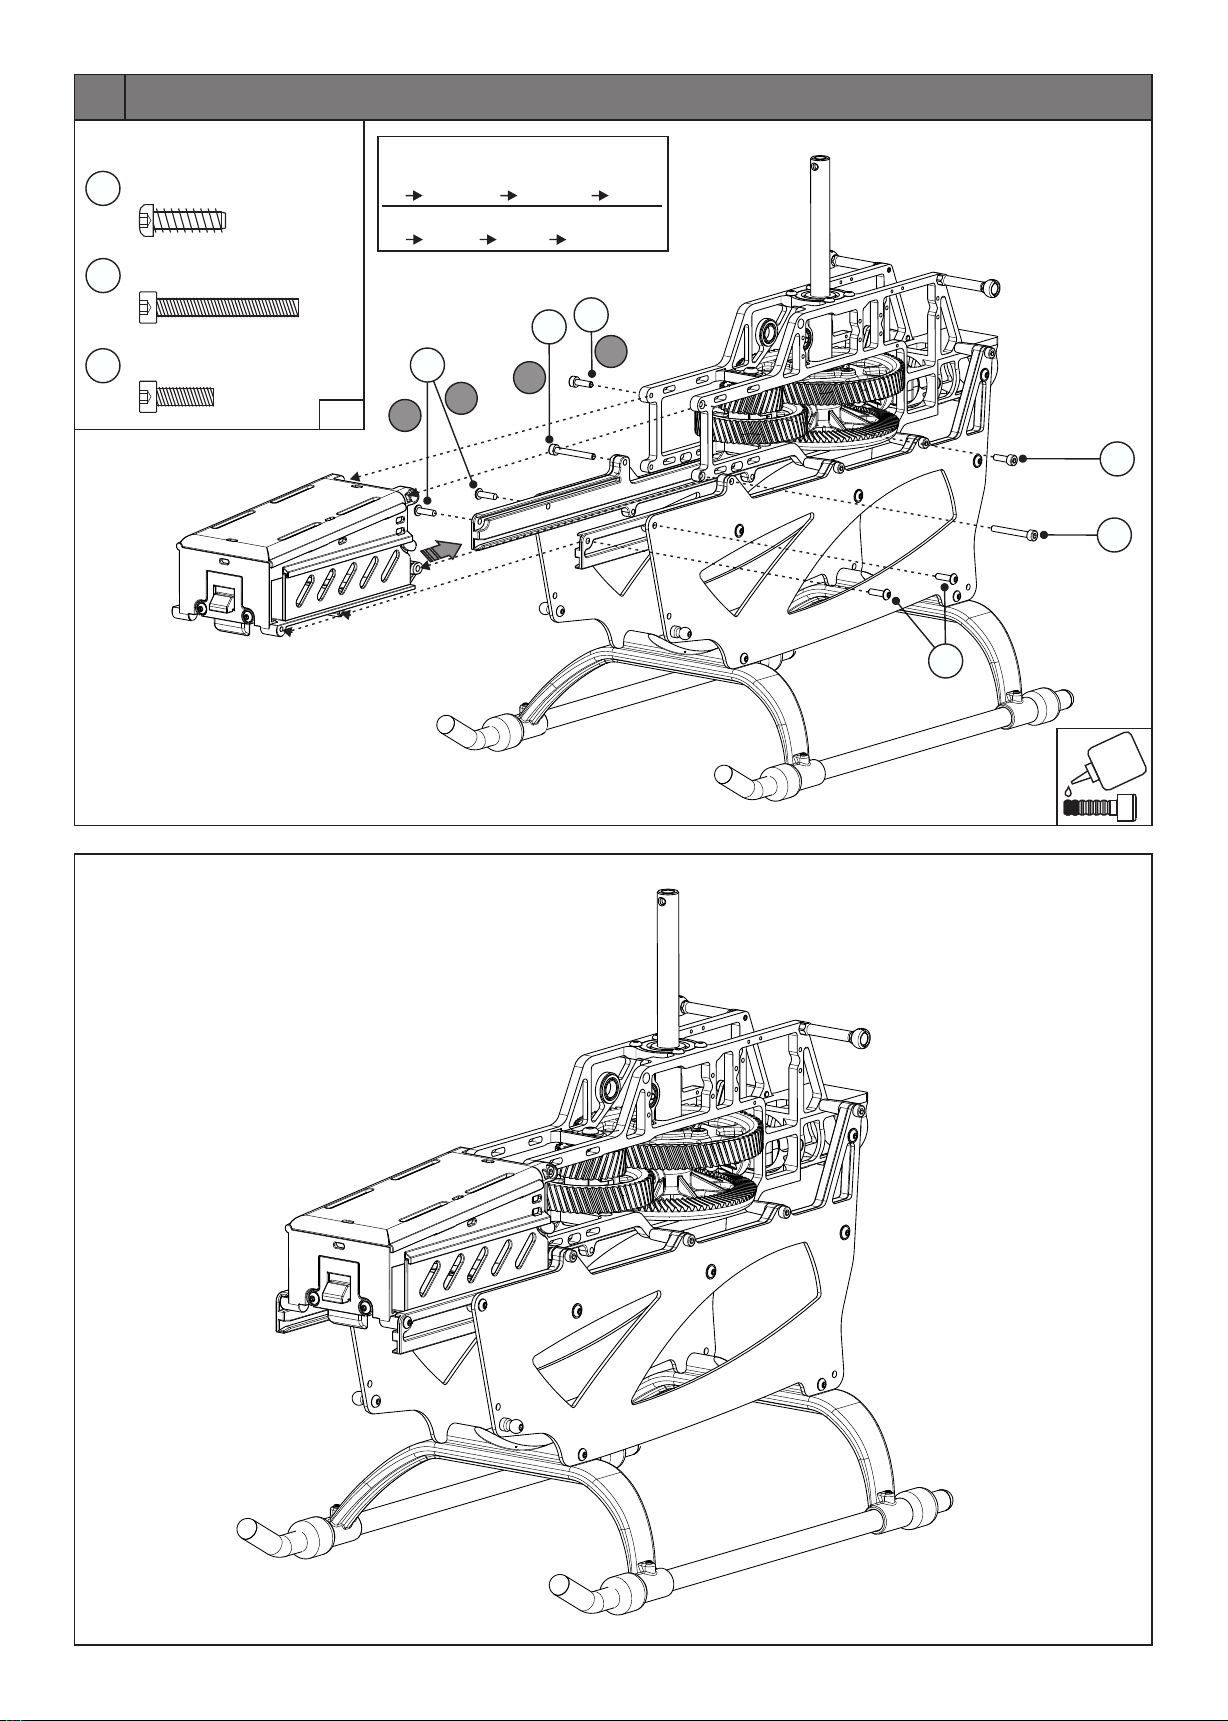
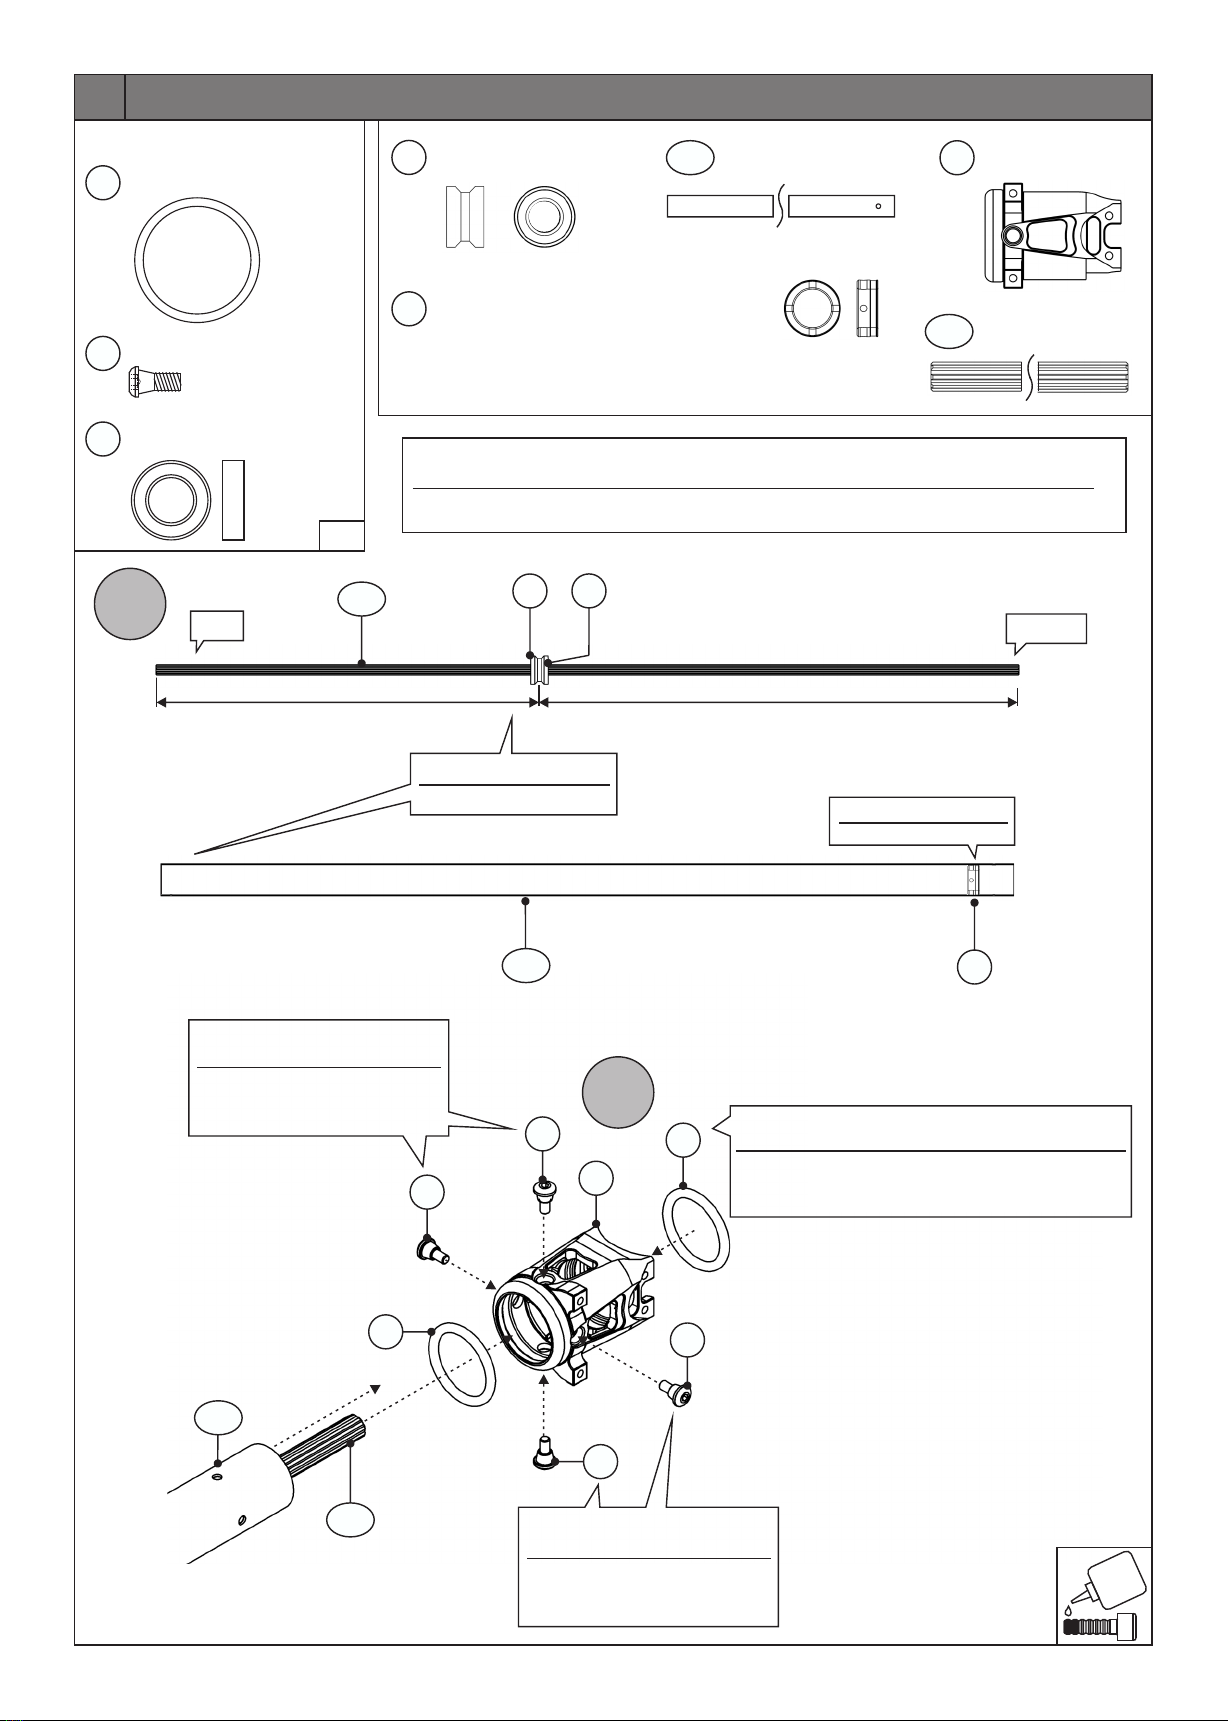
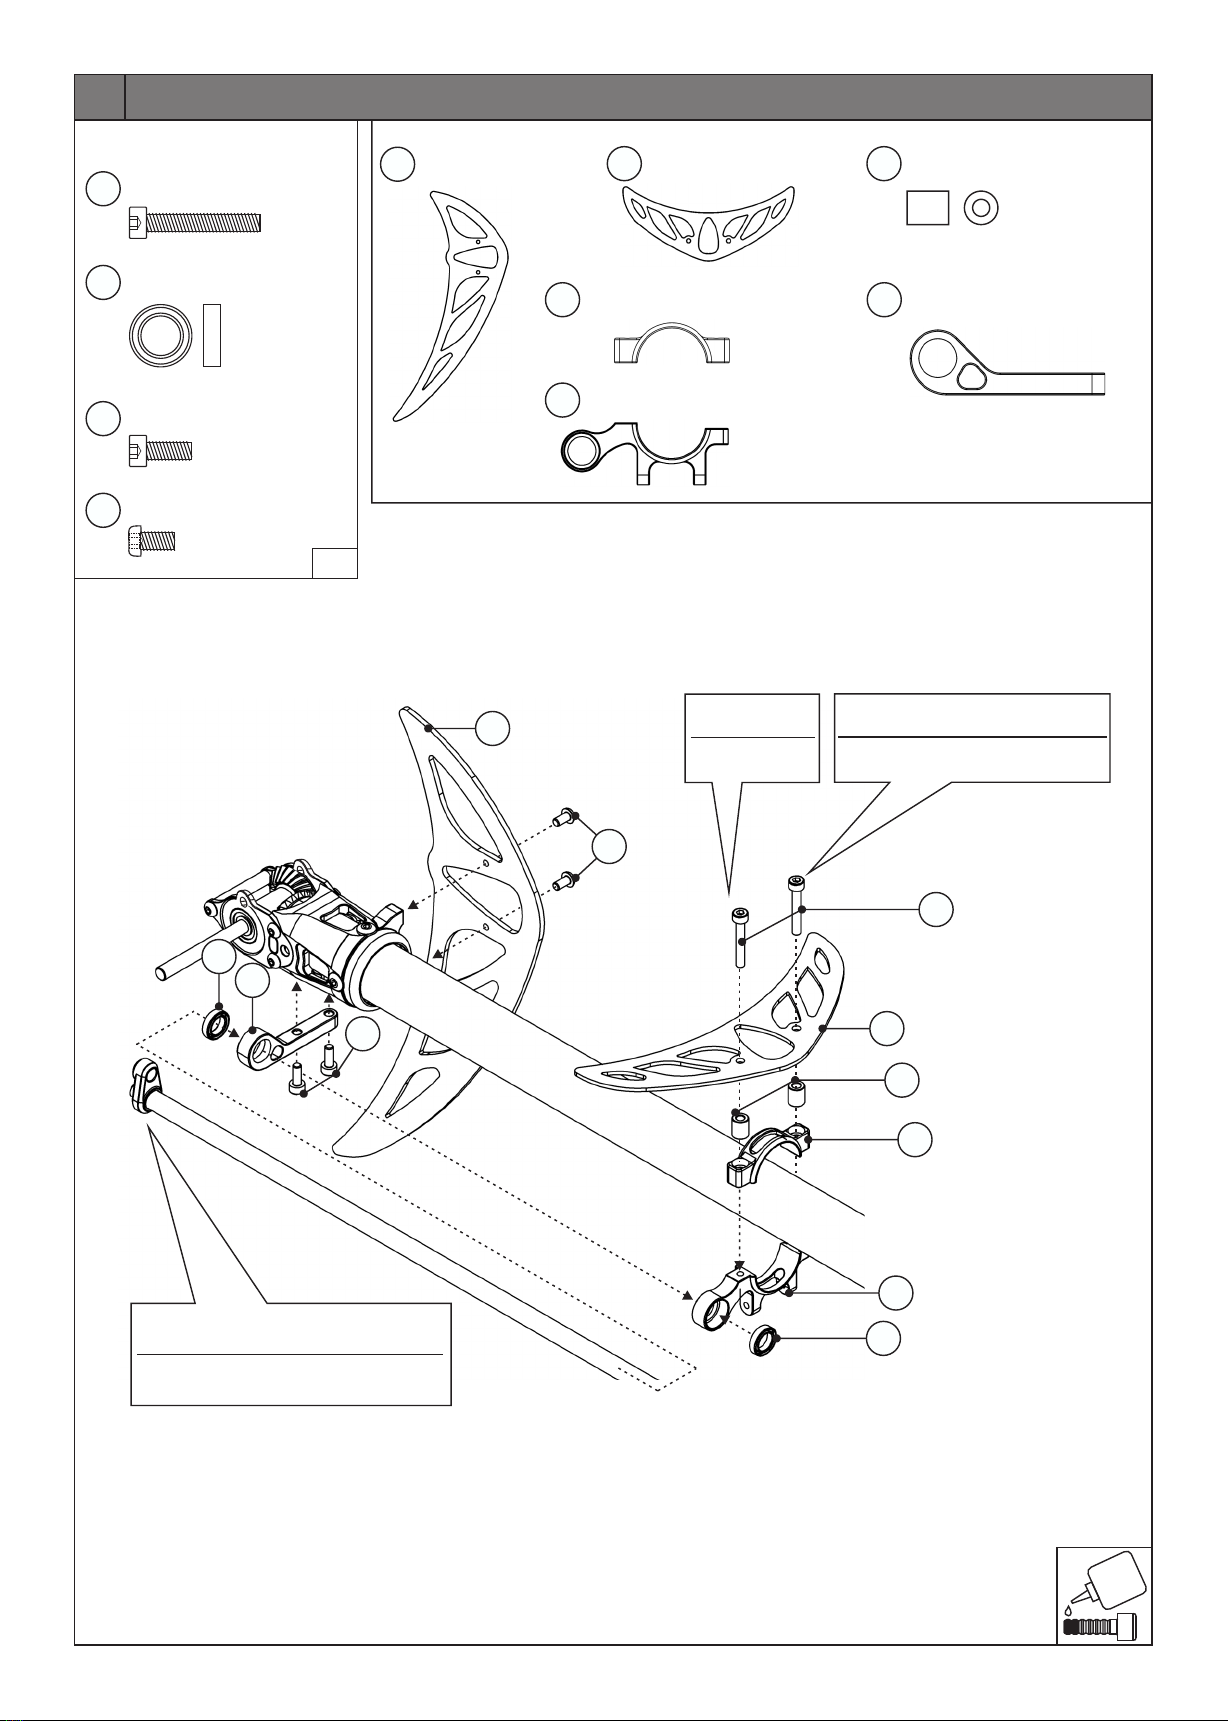
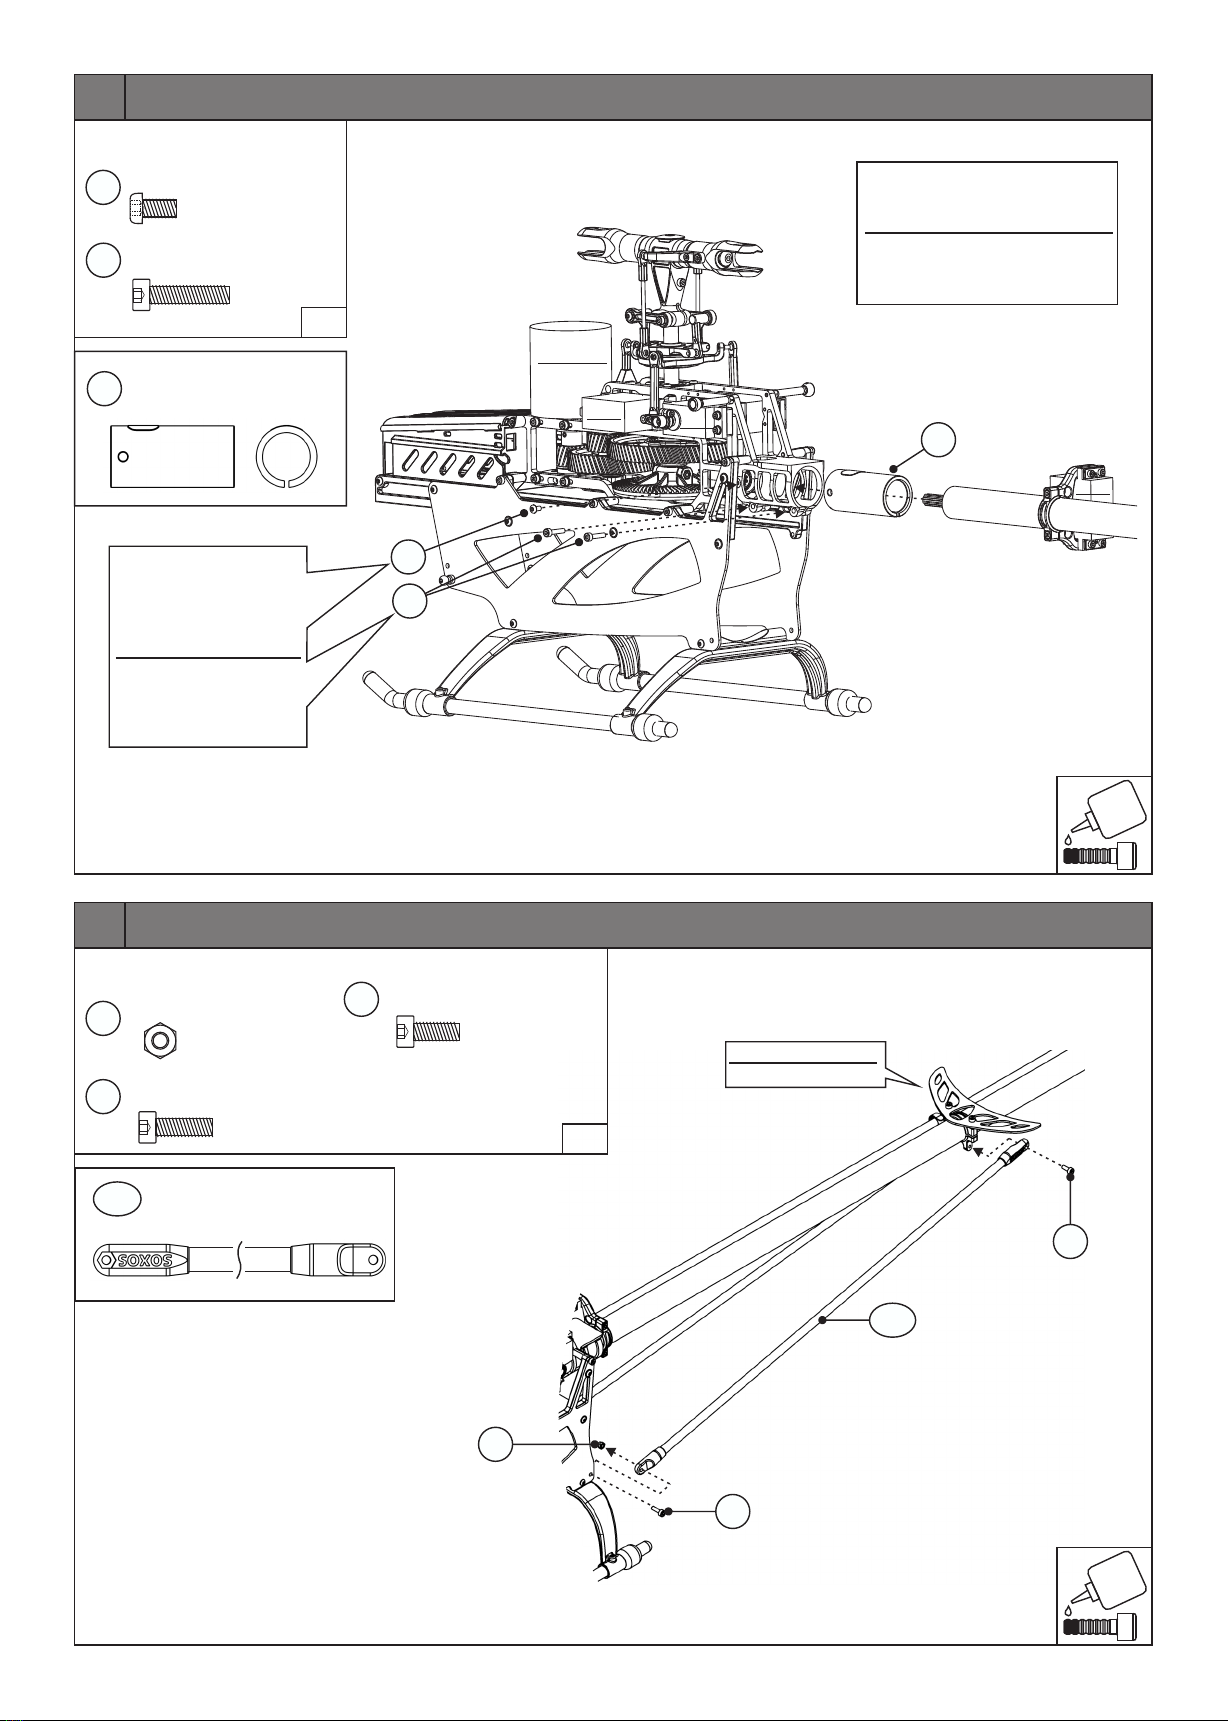
Bauanleitung und Handbuch V 2.1
Assembly Instruction and Manual V 2.1
INHALT/CONTENT
Technische Daten & Sicherheitshinweise/Specifications & Safety Instructions
Benötigtes Werkzeug & Allgemeine Hinweise/Required Tools & General Information
Bauanleitung und Handbuch/Assembly Instructions and Manual
Teileliste/Parts List
Heli Professional 2020C
550 KIT

SEHR GEEHRTER KUNDE,
BESTEN DANK, DASS SIE SICH FÜR DEN SOXOS 550 ENTSCHIEDEN HABEN.
Bevor Sie mit dem Zusammenbau oder der Inbetriebnahme beginnen,
lesen Sie diese Anleitung bitte sorgfältig durch!
DEAR CUSTOMER,
THANK YOU FOR CHOOSING THE SOXOS 550 MODEL HELICOPTER.
Before beginning with the assembly or operating the helicopter,
please read this manual thoroughly!
! !
Sicherheitshinweise: Safety Instructions:
Ein Modellhubschrauber ist kein Spielzeug, sondern ein
sehr leistungsfähiges Flugmodell, das bei unsachgemäßer
Bedienung und Wartung großen Schaden an Mensch und
Material verursachen kann. Kinder und Jugendliche sollten
einen Modellhubschrauber nur unter Aufsicht eines sach-
kundigen Erwachsenen bedienen. Heli Professional kann
für Haftungs- und Nachfolgeschäden von und mit Erzeug-
nissen aus dem Lieferprogramm nicht aufkommen und
lehnt deshalb jegliche Haftung ab, da ein ordnungsgemäßer
Betrieb oder Einsatz unsererseits nicht überwacht werden
kann. Zudem bitten wir Sie, sich an die Bedienungsanleitung
zu halten und nur Originalersatzteile von Heli Professional
zu verwenden.
Technische Daten/Specifications
Hauptrotordurchmesser/Main Rotor Diameter: ca. 1250mm
Weight (without battery):
Gewicht (ohne Akku)/ ca. 2780g
Höhe/Height: ca. 330mm
Länge/Length: ca. 1150mm
Übersetzung Hauptrotor:Motor/
Gear ratio main rotor:motor
Übersetzung Hauptrotor:Heckrotor/
Gear ratio main rotor:tail rotor
1:7.94 - 1:10.06
1:4.8
A model helicopter is a very powerful flying device and not a
toy. Disregarding our instructions, inappropriate use, and
insufficient maintenance by persons lacking necessary
competence may result in injuries for the user and can cause
damage to the surroundings and to the material. Children and
adolescents should operate a model helicopter only under
supervision of an experienced adult. Heli Professional will not
accept responsibility for any damage caused by their products
and rejects any liability as we are not in a position to supervise
proper operation, handling, and maintenance by the user.
Furthermore, we ask you to follow our operating and
assembly instructions carefully and to use only original Heli
Professional parts.
19 Zähne/Ratio: 7.94
Getriebe Übersetzungen: (Ritzel sind erhältlich für 6mm oder 8mm Motorwellen)
Gear Options: (Pinions available for 6mm and 8mm motorshafts)
15 Zähne/Ratio: 10.06
16 Zähne/Ratio: 9.43
17 Zähne/Ratio: 8.87
18 Zähne/Ratio: 8.38

Benötigtes Werkzeug/Required Tools
Allgemeine Hinweise/General Information
Schraubensicherungslack, mittelfest
Threadlocker, medium
Innensechskantschlüssel
Hexagon Socket Wrenches
SW 1.5/2/2.5/3
Kreuzschlitzschraubendreher
Phillips Screwdriver
Kombizange
Slip Joint Pliers
Messschieber
Caliper
Kugelkopfzange
Ball Link Pliers
Fett
Grease
Sekundenkleber
CA (Cyanoacrylic Instant Adhesive)
Digi-Pitch
Die in den Bauabschnitten mit diesem Symbol abgebildeten Schrauben, etc. sind in Originalgröße dargestellt.
The screws and all other parts depicted with this symbol in the assembly steps are actual-size drawings.
Achten Sie auf die Freigängigkeit aller verbauten Rillenkugellager, Flanschlager und Drucklager.
Check all ball bearings, flanged bearings, and thrust bearings for ease of movement.
Montieren Sie die Bauteile in der angegebenen Reihenfolge.
Assemble the parts in the specified order.
Wiederholen Sie den Montageschritt so oft wie angegeben (hier: zwei Mal).
Repeat the assembly step as often as specified (here: twice).
Handbücher und Bauanleitungen für Tuningteile sind direkt von der Webseite zu beziehen.
Manuals and assembly instructions for tuning parts are to be downloaded directly from the
website. www.heli-professional.com
1:1
Kugelkopfeindreher
Ball Link Driver
ABC
2x
WICHTIG:
IMPORTANT:
Bevor Sie mit dem Zusammenbau oder der Inbetriebnahme beginnen,
lesen Sie diese Anleitung bitte sorgfältig durch!
Before beginning with the assembly or operating the helicopter,
please read this manual thoroughly!
Grundsätzlich muss jede Schraube entfettet und mit Sicherungslack eingeklebt werden. Auch bereits
vormontierte Teile müssen diesbezüglich kontrolliert werden. Das rechts abgebildete Symbol soll Sie
während des Zusammenbaus daran erinnern. Rillenkugellager werden NICHT eingeklebt.
In general, every screw must be cleaned and secured with threadlocker. Also, check preassembled parts
regarding this. The symbol on the right-hand side is supposed to remind you while going through the
assembly process. Ball bearings must NOT be secured with threadlocker.
Es sind keine elektronischen Bauteile, wie z.B. Servos, etc. im Lieferumfang enthalten.
The kit does not include any electronic components such as servos, etc.
Gabelschlüssel 5,5mm
Flat Wrench

8Treibschraube
Self Tapping Screw
3x12 4x
1:1
8x
3x7.5
9Linsenkopf-Treibschraube
Flanged Round Head Self
Tapping Screw
Normteile/Standard Parts
1
334 Kufenrohr
Skid Pipe
2x
356 Endkappe Kufenrohr
Cap Skid Pipe
4x
282 Landegestell Weiss
Landing Skid White
2x
333 Carbon Seitenplatte
Carbon Side Plate
2x
276 Akkuschiene rechts
Battery Rail Plate right
1x
275 Akkuschiene links
Battery Rail Plate left
1x
373 Haubenbolzen
Canopy Pin
2x
354 Rundkopfschraube
Round Head Screw
M3x8 2x
4x
Gewindestift
Set Screw
354
373
334
464
464
282
282
92
8
8
356
356
9
275 276
333
333
ca. 30 mm
464 Kufengummi
Skid Rubber
4x
M3
Mit Sekundenkleber einkleben!
Use CA!
9
9
9
92
Die Kufenrohre müssen vor dem endgültigen Festziehen
absolut plan und ohne Spannungen im Landegestell aufliegen.
Auf einer ebenen Unterlage überprüfen und ggf. justieren!
The landing skid pipes should be checked to make sure they are
level and not warped in the landing skids before finally tightening
them. Check on a flat surface and adjust if necessary!
M3x6
92
A
B

1:1
Normteile/Standard Parts
2
2x
297 Kugellager
Ball Bearing
1x
278 Kegelzahnrad 17Z
Bevel Wheel 17T
12x18x4
1x
280 Kegelzahnradgehäuse unten
Bevel Gear Housing bottom
1x
279 Kegelzahnradgehäuse oben
Bevel Gear Housing Top
499
1577
499
Flanschlager
Flanged Bearing
7x14x5 1x
273 Zahnrad 29Z
Drive Gear 29T
1x 500 Distanzhülse
Distance Sleeve
1x
278
280
279
297
297
273
500
274-2
1577 Kugellager
Ball Bearing
7x17x5 1x
274-2 Zahnrad 54Z
Drive Gear 54T
1x
502
52 332
501
4x
32 Schraube
Hex Socket Screw
M3x14
3
Normteile/Standard Parts
1:1
502 Rundkopfschraube
Round Head Screw
M4x8 1x
1x
332 Rahmen
Main Frame
52 U-Scheibe
Washer
4x12x1 1x
501 Zwischenachse
Intermediate Gear Shaft
1x
32 Schrauben nicht
zu fest anziehen.
Do not overtighten
the screws.
A B

5
Normteile/Standard Parts
20
1:1
2x
4x
Kugellager
Ball Bearing
10x15x4
M3x6
20
Zylinderkopfschraube
Socket Head Screw
21
1x
Freilaufnabe
Autorotation Hub
325
325
1x
Hauptzahnrad 81Z
Main Drive Gear 81T
272 272
20
Die Rillen im Freilauf müssen
zum Zahnrad zeigen.
The grooves in the autorotation hub
must point towards the drive gear.
21
Normteile/Standard Parts
4
4x
155 Rundkopfschraube
Round Head Screw
M3x6
1:1
306 10x24x6
1x
330 Distanzhülse
Distance Sleeve
1x
270 Kegelzahnrad 82Z
Bevel Gear 82T
Flanschlager
Flanged Bearing
1x
348 8x12x3.5 Flanschlager
Flanged Bearing
1x 348
270
330
155
306
Kugellager 12 liegt nicht zwingend
am Kegelzahnrad 270 an. Es dient
lediglich der Abstützung von unten.
Ball bearing 12 doesn‘t necessarily
have to touch the bevel gear 270.
It serves merely as support from
below.

1554
303
12
303
6
Normteile/Standard Parts
1:1
487 1x
M3x23 Spezialschraube
Special Screw
18 1x
M3 Stoppmutter
Lock Nut
310 Hauptrotorwelle
Main Shaft
1x
4x
155 Rundkopfschraube
Round Head Screw
M3x6
306 10x24x6 Flanschlager
Flanged Bearing
1x
1x
331 Distanzhülse
Hauptrotorwelle
Distance Sleeve
Main Shaft
487
310
Schrauben 155 mit Flanschlager 306 erst
nach komplettem Zusammenbau der
Getriebeeinheit gleichmäßig anziehen.
Getriebeeinheit und Rotorwelle dürfen
kein axiales Spiel im Rahmen haben.
Benutzen Sie ggf. zur Justierung die beilie-
genden Paßscheiben zwischen 306 & 331.
After assembly of the transmission unit
tighten screws 155 on the flanged bearing
306. There must be no axial movement of
the transmission assembly when installed
in the frame. Use the enclosed shim
washers between 306 & 331 if necessary.
!
Schraube durch Kegelzahnrad (270), Distanzhülse (330) und Hauptrotorwelle (310) stecken
und dann mit Stoppmutter (18) sichern. Achtung: Nicht zu stark anziehen!
Insert hex socket screw in bevel gear (270), distance sleeve (330) and main shaft (310) ,
and then, secure with lock nut (18). Warning: Do not overtighten the screw!
!
18
155
306
331
Es ist normal, dass sich das Getriebe beim ersten Zusammenbau strengläuftig anfühlt,
nach 5 bis 10 Flügen ist das Getriebe eingelaufen und leichtgängig.
It is normal for the transmission to feel stiff when first assembled, it will free up after
5 to 10 flights as the gears wear in.
!
1:1
1554 Kegelrad Abstützung
Bevel Wheel Support
1x
303 M3x8 Zylinderkopfschraube
Socket Head Screw
3x
12 3x10x4 Kugellager
Ball Bearing
1x
ca.
0.1mm
Distanz von ca. 0.1mm einhalten zwischen Kugellager und Kegelzahnrad!
Distance around of 0.1mm comply between the Ball Bearing and Bevel Wheel!
!12
303
430

7
1:1
Normteile/Standard Parts
55 6x
M3x25 Zylinderkopfschraube
Socket Head Screw
8
1:1
Normteile/Standard Parts
8
445 Vorbaudeckel
Lid
1x
284 284
Vorbau
Cabinet
1x
446 446
Schubdeckel
Sliding Lid
1x
318
318
Verschluss
Bolt
1x 350
350
Druckfeder
Pressure Spring
1x 319
319
Verschlussgehäuse
Bolt Box
1x
55
55
513
412
496
496 2x
M3x10 Gewindestift
Set Screw
412
513
2x
2x
Haubenbolzen hinten
Canopy Pin Rear
Haubenclip
Canopy Clip
Der Haubenclip ist als Sollbruchstelle
für den Fall eines Absturzes konzipiert.
Sollte er abbrechen, können Sie durch
erhitzen eines Schraubendrehers einen
neuen Schlitz in das Restgewinde des
Haubenclips einschmelzen zum
entfernen.
The canopy clip is designed as a pull
linkage in case of a crash.
If it's broken, you can melt a new slot
with a heated flat-bladed screwdriver
into the remaining part and then
carefully detach the screw thread
from the frame.
8Treibschraube
Self Tapping Screw
3x12 2x
445
Sichern Sie nach dem Einbau der Elektronik
den Vorbaudeckel mit drei Kabelbindern am Vorbau.
Secure the porch lid after installing all electronic
components with three cable ties on the porch.
Wichtig: Haubenclip 513
von Hand einschrauben
und vorsichtig festziehen.
Important: Screw in the
canopy clip 513 by hand
and tighten it carefully.
Bereits montiert.
Already assembled.
496 erst mit Sicherungslack von innen
bündig mit dem Rahmen verschrauben.
Dann den Haubenbolzen 412 und zum
Schluss den Haubenclip 513 aufschrauben.
First mount 496 flush with the inside of
the frame (threadlocker!). Then screw on
the canopy pin 412 and the canopy clip
513 at last.

9
1:1
Normteile/Standard Parts
55 2x
M3x25 Zylinderkopfschraube
Socket Head Screw
8Treibschraube
Self Tapping Screw
3x12 4x
71 2x
M3x10 Zylinderkopfschraube
Socket Head Screw 8
In folgender Reihenfolge zusammen-
schrauben:
71 vordere 8 hintere 8 55
Assemble in the following order:
71 front 8 rear 8 55
B
8
55
55
71
71
A
CD

10
1:1
Normteile/Standard Parts
25 2x
M2.5x8 Zylinderkopfschraube
Socket Head Screw
145 Kugelbolzen
Ball-End Bolt
M3x4.5 2x
145
315 313
25
71
71
2x
M3x10 Zylinderkopfschraube
Socket Head Screw
Servohebel
Servo Horn
2x
315
Servoachse 25Z kurz
Servo Axos 25T short
2x
313
Servodistanz 6 mm
Servo Distance
4x
137
137
Die bei den Servos enthaltenen Gummitüllen (nicht abgebildet) unbedingt in die Servoaufnahmen
einsetzen und Servos erst dann gemäß Zeichnung einbauen.
First insert the included rubber grommets (not depicted) into the servo sockets, then mount the
servos according to the drawing.
Schraube 25 erst nach elektronischem Nullen der Servos
und horizontaler Ausrichtung des Servohebels festziehen.
Außerdem Servoachse 313 und Servohebel 315 mit etwas
Sicherungslack verkleben.
Tighten screw 25 after having electronically set the servo to
centre and horizontally aligned the servo horn. Also use some
threadlocker between the servo axis 313 and the servo horn
315.
11 8x
M3 U-Scheibe
Washer
1601 8x
M3x20 Rundkopfschraube
Round Head Screw
1601
1601
11
Je nach verwendeten Servos können Sie die 6mm oder 9mm Servodistanzen verwenden.
Zusätzlich kann die Servoeinbautiefe mit beiliegenden Servoplättchen ausgeglichen werden.
Wichtig: Auf beiden Seiten immer gleich viele Servoplättchen unterlegen. Alle beweglichen Teile
auf Freigängigkeit prüfen. Die Servos dürfen sich auf keinen Fall in der Mitte berühren.
Je nach Servo Einbauart, können die Schrauben innen am Rahmen überstehen.
Depending on the servos used, you must compensate the differing mounting depth of the servos
by using the 6mm or 9mm servo mounting adapters. For more adjustment you can use the thinner
servo plates. Important: Use the same amount of servo mounting plates on each side. Check all
parts for ease of movement. The servos must not touch each other in the middle of the frame.
Depending on the type of servo installed, the screws may protrude from the inside of the frame.
10x
Servoplättchen
Servo Mounting Plates
41
Servodistanz 9 mm
Servo Distance
4x
1665
optional
optional

326
155
54
54
305
62
327
155
11
1:1
Normteile/Standard Parts Hebelarm TS
Swashplate Lever
1x
2x
326
155 2x
M3x6 Rundkopfschraube
Round Head Screw
54 2x
3x7x3 Flanschlager
Flanged Bearing
71 1x
M3x10 Zylinderkopfschraube
Socket Head Screw
11
139 1x
M2.5x6 Zylinderkopfschraube
Socket Head Screw
Servoachse 25Z lang
Servo Axos 25T long
1x
312
Nummer muss zum
Kugelkopf hin zeigen.
Number must point
towards ball-end bolt.
!
312
71
Kugelpfanne
Ball Link
1x
62 Nick Servohebel
Nick Servo Lever
1x
327
139
Flanschlager mit Sicherungslack
einkleben.
Stick flanged bearing in with
threadlocker.
Flanschlager mit Sicherungslack
einkleben.
Stick flanged bearing in with
threadlocker.
Servoplättchen
Servo Mounting Plates
41
Servo darf nicht an der Rotorwelle oder der Freilaufnabe streifen - ggf. mit beiliegen-
den Servoplättchen und entsprechend längeren, beigelegten Schrauben 305 ausgleichen.
Servo must not touch main shaft or autorotation hub - adjust with included servo
mounting plates and the appropriate longer, included screws 305 if necessary.
Die bei den Servos enthaltenen Gummitüllen (nicht abgebildet) unbedingt in die
Servoaufnahmen einsetzen und Servo erst dann gemäß Zeichnung einbauen.
First insert the included rubber grommets (not depicted) into the servo sockets,
then mount the servo according to the drawing.
305 M2.5x12 Zylinderkopfschraube
Socket Head Screw
5x
Schraube 139 erst nach elektronischem
Nullen der Servos und horizontaler
Ausrichtung des Servohebels festziehen.
Außerdem Servoachse 312 und Servohebel
327 mit etwas Sicherungslack verkleben.
Tighten screw 25 after having electronically
set the servo to centre and horizontally
aligned the servo horn. Also use some
threadlocker between the servo axis 312
and the servo horn 327.
optional
optional
optional
A
B
1684 4x
M3x10 Rundkopfschraube
Round Head Screw
4x
11 M3 U-Scheibe
Washer
1684
1684
11

12
1:1
Normteile/Standard Parts
2x
297 Kugellager
Ball Bearing
12x18x4
2x
2x
8x
8x
71
528
149
11
Zylinderkopfschraube
Socket Head Screw
Zylinderkopfschraube
Socket Head Screw
Zylinderkopfschraube
Socket Head Screw
U-Scheibe
Washer
M3x10
M4x10
M3x12
M3
Ritzel, nicht im Liefer-
umfang enthalten
Pinion, not included
in the kit
15-19Z
15-19T
2x
329 Motorplatte
Motor Plate
Zahnflankenspiel anhand der Langlöcher
einstellen.
Adjust backlash with the slotted holes.
Je nach verwendetem Motor entweder Schraube 71 oder 528 verwenden. Beim Eindrehen darauf
achten, dass die Wicklungen des Motors nicht verletzt werden. Ggf. andere Schrauben verwenden.
Depending on the motor, use either screw 71 or 528. Make sure not to damage the windings with the
screws. Use different screws if necessary.
19 Zähne: 7.94
Getriebe Übersetzungen:
(Ritzel sind erhältlich für 6mm
oder 8mm Motorwellen)
15 Zähne: 10.06
16 Zähne: 9.43
17 Zähne: 8.87
18 Zähne: 8.38
297
528 71
329
149
149
149
11
297
149
11 11
11
329
optional
optional
optional
optional

13
1:1
Normteile/Standard Parts Taumelscheibe
Swash Plate
1x
308
308 145
309
145
309
145
309
145
Kugelkopf
Ball End Screw
M3x7 3x
309
Kugelkopf
Ball End Screw
M3x4.5 4x
145
In innerer Bohrung
einschrauben.
Insert in inner hole.
Anlenkgestänge TS
Double Ball Linkage Swashplate
281
Nummer muss zum
Kugelkopf hin zeigen.
Number must point
towards ball-end bolt.
!
2x
281
281 Auf Rechtwinkligkeit der Gestänge achten.
Pay attention to the perpendicularity of
the linkage links.
optional
optional
optional
A
B

14
1:1
Normteile/Standard Parts
Zentralstück
Main Hub
1x
Dämpfergummi
Damper Rubber
2x
Blatthalter
Blade Holder
2x
Mischhebelarm
Mixing Lever Arm
2x
Blattlagerwelle
Spindle Shaft
1x
Kugelkopf
Ball End Screw
M3x4.5 2x
145
145
Kugelkopf
Ball Link
1x
62
Dämpfer
Damper
2x
large ID (IN)
small ID (OUT)
21
Blattlagerwelleführung
Spindle Shaft Support
1x
Einfetten.
Grease.
Nummer muss zum
Kugelkopf hin zeigen.
Number must point
towards ball-end bolt.
!
Gewindestift
Set Screw M2.5x12
1x
Kugelpfannenhalter
Ball Link Holder
1x
1675
62
155
54
54
1672 54 155
54
Nummer
Number
1673
Mitnehmer Arm
Mixing Lever
1x
1672
1675
79
Einfetten
Grease
A
C
Distanz-Scheibe
Supporting Washer
16.7x9.2x1
2x
Zuerst in Kugel-
kopf schrauben!
Thread screw
into plastic
Ball Link first!
!
5 mm
M5x14
5x12x1
2x
481 Rundkopfschraube
Round Head Screw
481
48
Drucklager
Thrust Bearing
2x
477
large ID (IN) small ID (OUT)
IN OUT
8x14x5
477
369b
369b
478
478
1648
1648
1647
1647
1647
47
48
1670
1670
1669
1669
1674
1674
Zylinderkopfschraube
Socket Head Screw
M3x6 4x
21
1671
1671
2x
79 Flanschlager
Flanged Bearing
5x13x4
1673
54 4x
3x7x3 Flanschlager
Flanged Bearing
48 Kugellager
Ball Bearing
8x14x4 4x
47 Pass-Scheibe
Shim Washer
8x11.6x0.5 2x
302
B
302
79
155 2x
M3x6 Rundkopfschraube
Round Head Screw
302 Rundkopfschraube
Round Head Screw
M3x5 2x

15
Normteile/Standard Parts
Kugelpfanne
Ball Link
4x
62
507
507
62
18
62
62
62
487 1x
M3x23 Spezialschraube
Special Screw
18 1x
M3 Stoppmutter
Lock Nut
Nummer muss zum
Kugelkopf hin zeigen.
Number must point
towards ball-end bolt.
!
487 155155
71
1:1
155 2x
M3x6 Rundkopfschraube
Round Head Screw
1x
71 Zylinderkopfschraube
Socket Head Screw
M3x10
optional
optional
optional
optional
optional
2x
507 Anlenkgestänge
(Links-Rechts Gewinde)
Head Linkage Rod
(Left and Right thread)
32,4 mm
Links-Gewinde
Left thread

16
1:1
Normteile/Standard Parts 523 1x
Heckrotorgehäuse
Tail Rotor Housing
526
491
22x3
M3x8
2x
4x
O-Ring Weiss
O-Ring White
Gummikopfschraube
Rubber Head Screw
Heckrohr
Tail Boom
Schraubhülse, bereits im Heckrohr montiert
Bolted Sleeve, already installed in the tail boom
1x
1x
1x
524 Heckantriebswelle
Tail Drive Shaft
1x
1574
526
523
491
491
526 491
491
Zuerst O-Ringe 526 in die Rillen ins Heckgehäuse ein-
bauen, dann Heckgehäuse auf das Heckrohr stecken.
First, mount o-rings 526 into the grooves in the tail
rotor housing, then slide tail rotor housing onto the
tail boom.
Heck: Vier Bohrungen.
Tail: Four drilled holes.
Kugellagerhalter Gummi
Rubber Bearing Holder
269
ca. 315 mm
Front
269
Schraubengewinde gut entfetten
vor der Montage.
Make sure that the screw thread
is completely free of grease or oil
before assembling
524
48 8x14x4 1x
Kugellager
Ball Bearing
48
ca. 370 mm
Gummitüllen 269 auf Kugellager 48 montieren und beim Einbau ins Heckrohr gut einfetten oder
einölen. Auch das Heckrohr vor der Montage der Heckantriebswelle vorne gut einfetten/einölen.
Mount rubber grommets 269 on ball bearings 48 and use grease or oil to slide it into the tail
boom. Also grease or oil the front of the tail boom before inserting the tail drive shaft.
Einfetten/einölen.
Grease/oil.
Schraubengewinde gut entfetten
vor der Montage.
Make sure that the screw thread
is completely free of grease or oil
before assembling
Heck/Tail
1574
1575
1575
1575
1574
A
B

17
Normteile/Standard Parts
1:1
302 Rundkopfschraube
Round Head Screw
M3x5 6x
302
302
Seitenplatte Heckrotorgehäuse
Tail Rotor Housing Side Plates
Distanzbolzen
Spacer
2x 1x
375c 290
2x
79 Flanschlager
Flanged Bearing
5x13x4
149
266
11
290
79
79
Heckwelle mit Zahnrad
Tail Shaft with Bevel Gear
1x
288
288
1x
1x
149
11
Zylinderkopfschraube
Socket Head Screw
U-Scheibe
Washer
M3x12
M3
Steuerhebel
Tail Lever
1x
266 Drehstab
Torque Tube
1x
1573
262
261
261
297
297 12x18x4 2x
Kugellager
Ball Bearing
261 2x
Kugellagergehäuse Heckrotor
Ball Bearing Housing Tail Rotor
262 Kegelzahnrad Heckrotor 23Z
Bevel Gear Tail Rotor 23T
1x
1573
A
B
375c
375c

18
Normteile/Standard Parts
17
448
364
360
296
353
2x
17 Zylinderkopfschraube
Socket Head Screw
M3x20
1:1
2x
296 Kugellager
Ball Bearing
7x11x3
Carbon Seitenleitwerk
Carbon Vertical Fin
1x
484 Carbon Höhenleitwerk
Carbon Stabilizer Fin
Halterklemme, oben
Upper Holder Clamp
1x
1x
353
364
Distanzhülse
Distance Sleeve
2x
448
Höhenleitswerksklemme, unten
Lower Stabilizer Fin Clamp
1x
360
Drehstablagerung Heckgehäuse
Torque Tube Support Tail
1x
264
296
264
303
2x
303 Zylinderkopfschraube
Socket Head Screw
M3x8
484
155 2x
M3x6 Rundkopfschraube
Round Head Screw
155
Ganz zusammen-
schrauben.
Screw together
completely.
Mit dieser Schraube erst nach
Montage der Heckstreben klemmen.
Clamp with this screw after
having installed the tail brace tubes.
Drehstab ganz nach vorne zum Kugellager
296 einschieben.
Slide the torque tube completely in, to
the bearing 296.

19
Halterklemme, oben
Upper Holder Clamp
1x
364
Heckservohalter
Tail Servo Holder
1x
363
Parallel ausrichten und Höhen-
leitwerk und Heckservohalter
auf Heckrohr klemmen.
Align parallel and clamp stabilizer
fin and tail servo holder onto tail
boom.
Die bei den Servos enthaltenen Gummitüllen (nicht abgebildet) unbedingt in die
Servoaufnahmen einsetzen und Servo erst dann gemäß Zeichnung einbauen.
First insert the included rubber grommets (not depicted) into the servo sockets,
then mount the servo according to the drawing.
Drehstabhebel
Torque Tube Lever
1x
1658
1573
1575
71
364 363
71
1658
305
305
Markierung/Schrift muss nach
oben zeigen.
Marking/writing must point
upwards.
346
346
Den passenden Einsatz zum Servo verwenden
Use the correct insert for the servo
Erst beim Programmieren des
Heckservos endgültig anziehen.
Tighten fully after centring the tail
servo, apply threadlocker.
303
Servo Einsatz 23Z,24Z,25Z,25Z/8
Insert Servo 23T,24T,25T,25T/8
1659
1663
-
optional
optional
1:1
Normteile/Standard Parts
71 M3x10 3x
Zylinderkopfschraube
Socket Head Screw
305 4x
M2.5x12 Zylinderkopfschraube
Socket Head Screw
346 4x
M2.5 U-Scheibe
Washer
1x
303 Zylinderkopfschraube
Socket Head Screw
M3x8

20
1:1
Normteile/Standard Parts
Dämpferhülse
Absorber Sleeve
1x
367
2x
32 Zylinderkopfschraube
Socket Head Screw
M3x14
155 1x
M3x6 Rundkopfschraube
Round Head Screw
21
303
71
18
1572
1572
2x
Heckstrebe
Tail Brace Tube
Normteile/Standard Parts
1:1
18 2x
M3 Stoppmutter
Lock Nut
71 M3x10 2x
Zylinderkopfschraube
Socket Head Screw
2x
303 Zylinderkopfschraube
Socket Head Screw
M3x8
Jetzt klemmen.
Clamp together now.
Dämpferhülse 391 zuerst in den
Rahmen einschieben und dann
das Heckrohr montieren.
First slide the absorber sleeve
391 in the frame and then
mount the tail boom.
optional
optional
155
32
367
Mit den Schrauben 32
Heckrohr klemmen und
danach Schraube 155 zur
zusätzlichen Sicherung
montieren.
Clamp the tail boom with
these screws 32 after
assemble the screw 155
for saefty.
optional
optional
Table of contents
Other Heli-Professional Toy manuals

Heli-Professional
Heli-Professional REVOLUTION 500E User manual

Heli-Professional
Heli-Professional SOXOS 600 User manual

Heli-Professional
Heli-Professional REVOLUTION 500E User manual

Heli-Professional
Heli-Professional soXos Strike 7.1 User manual

Heli-Professional
Heli-Professional SOXOS 550 Combo User manual

Heli-Professional
Heli-Professional SOXOS 600 User manual

Heli-Professional
Heli-Professional Soxos DB7 User manual

Heli-Professional
Heli-Professional REVOLUTION 500E User manual

Heli-Professional
Heli-Professional ALIEN 600 V2 Installation instructions