HELI G3 Series Installation and operating instructions
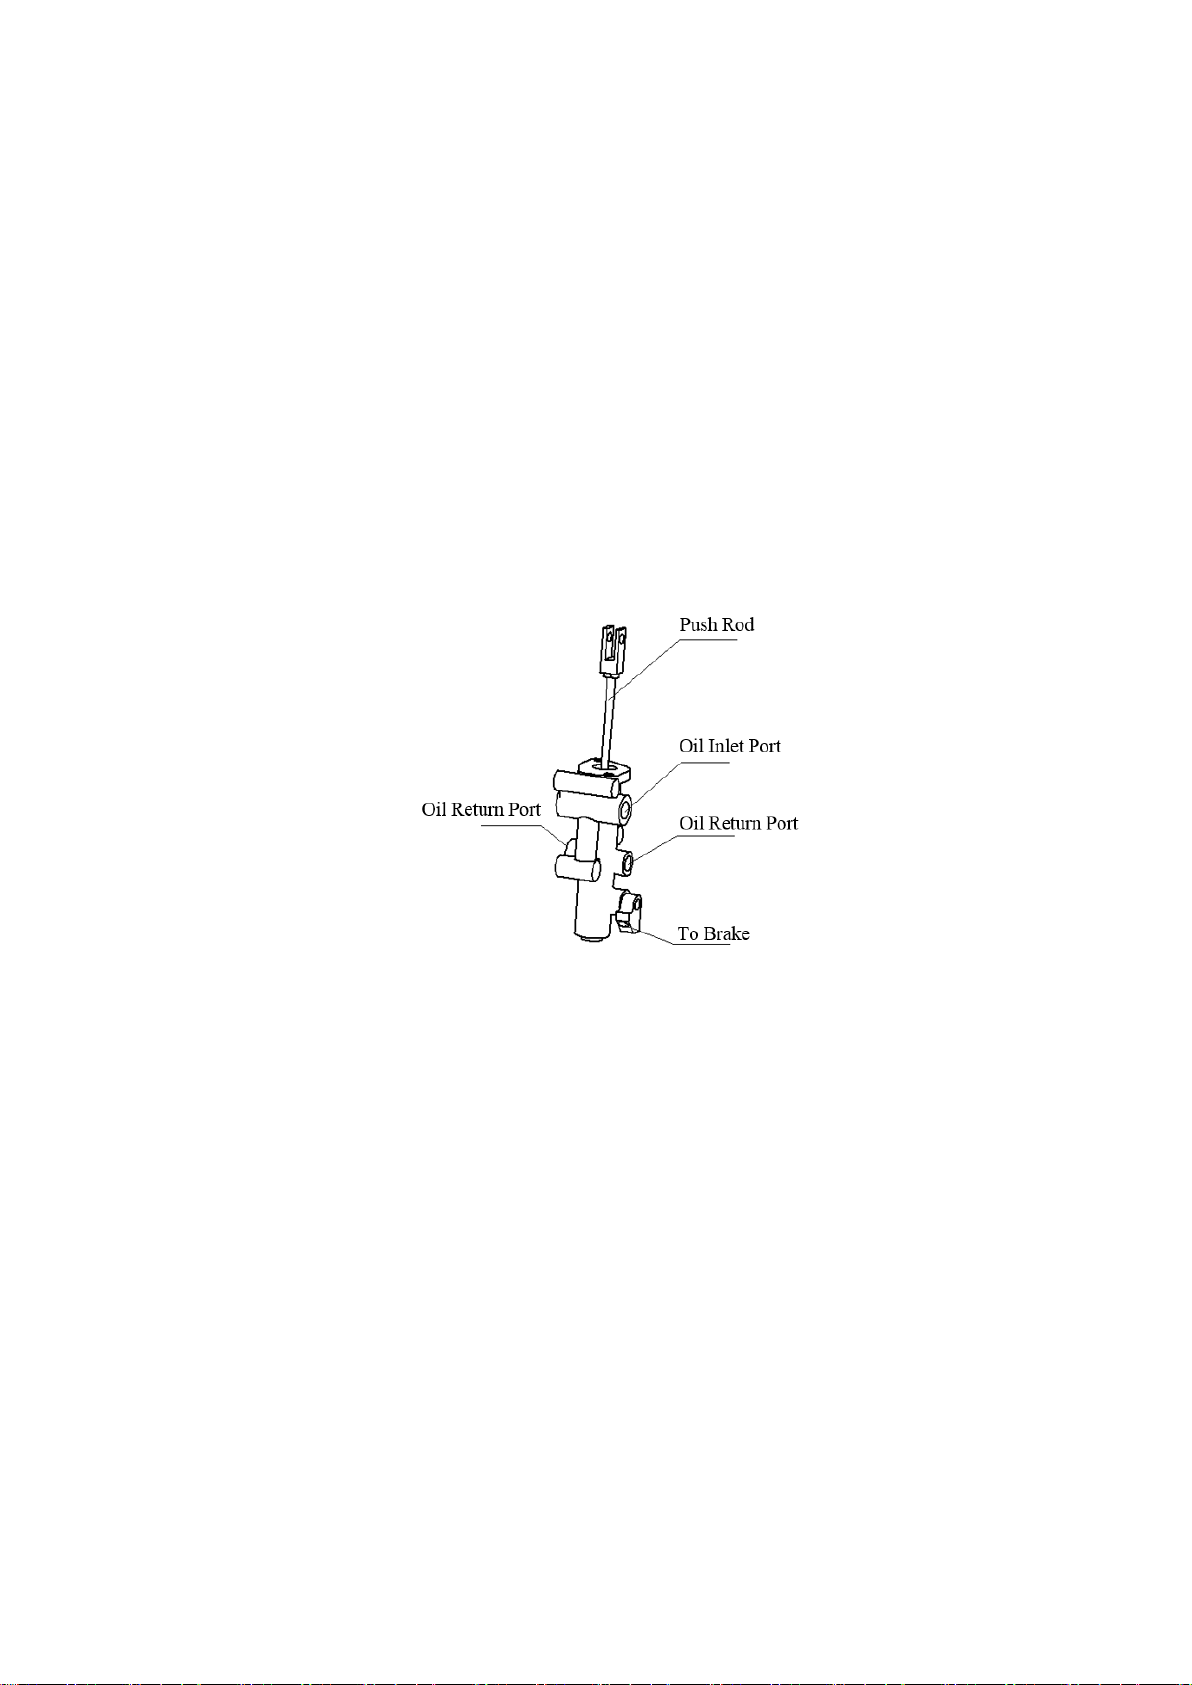
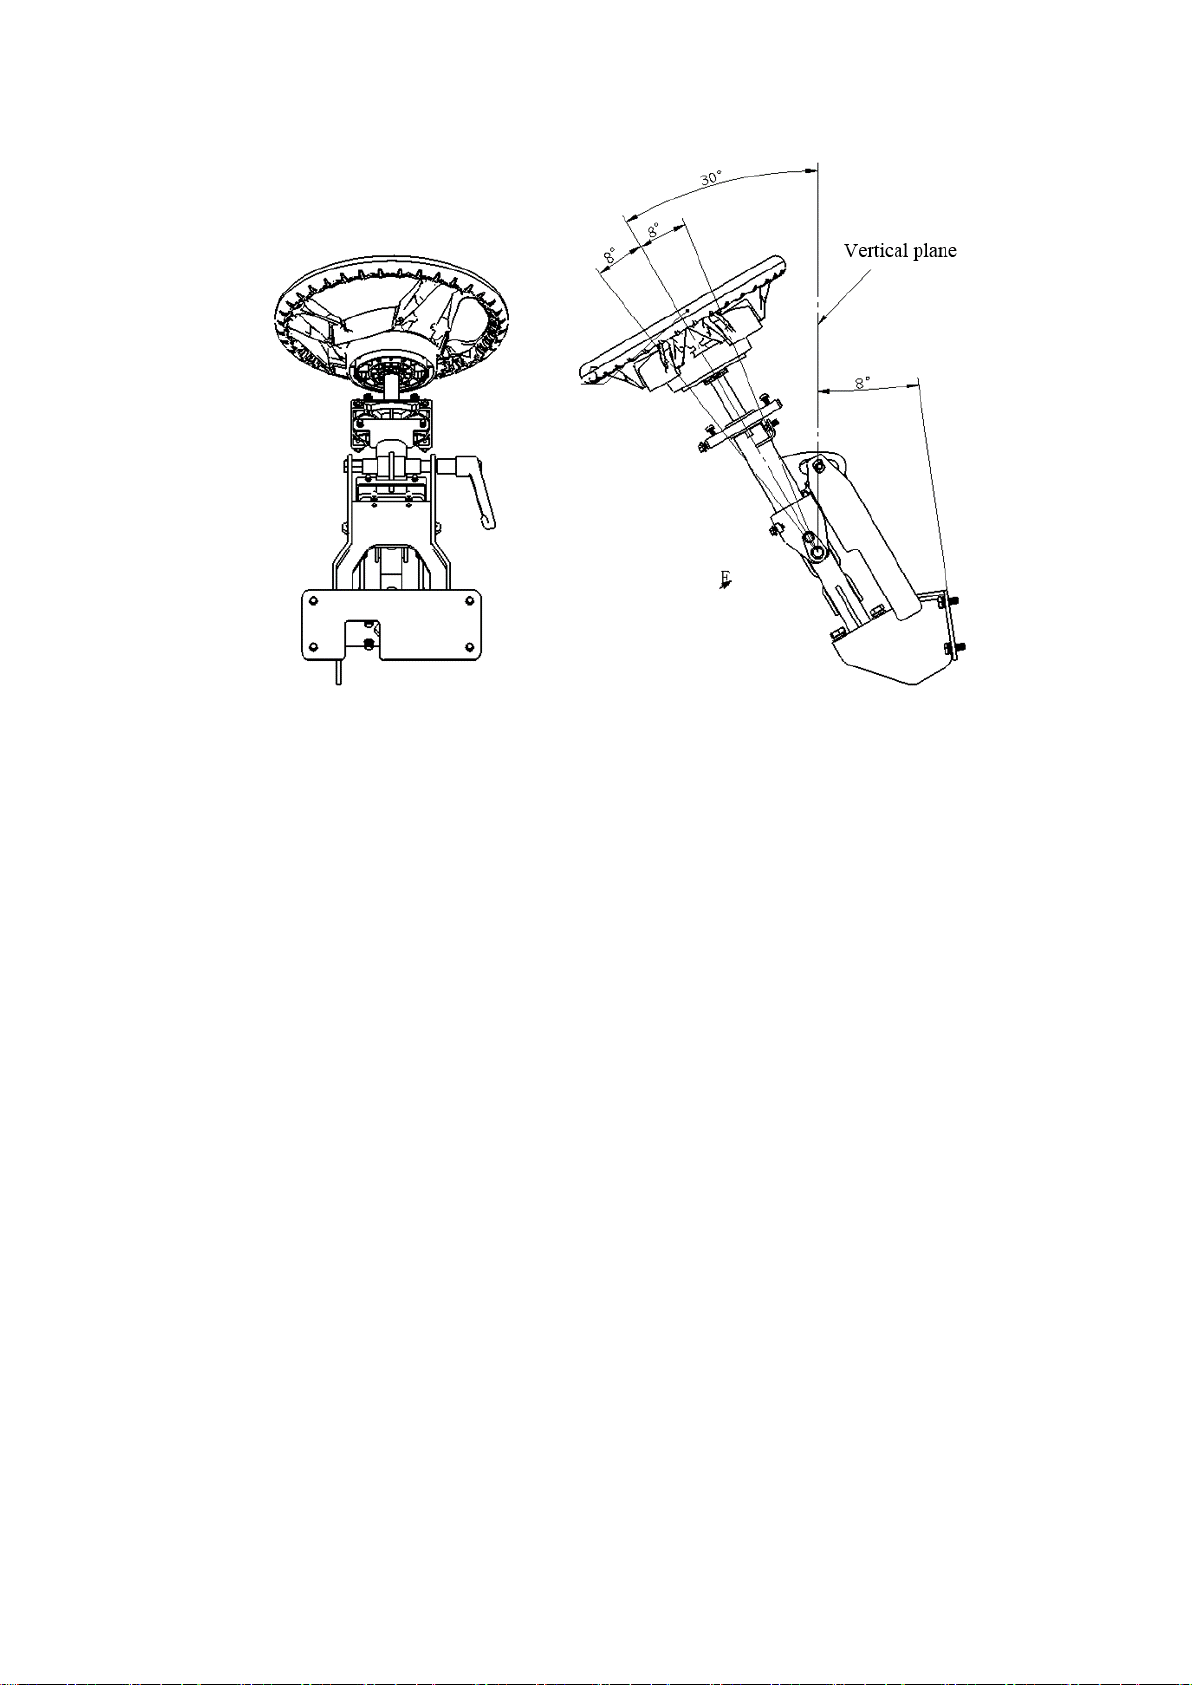
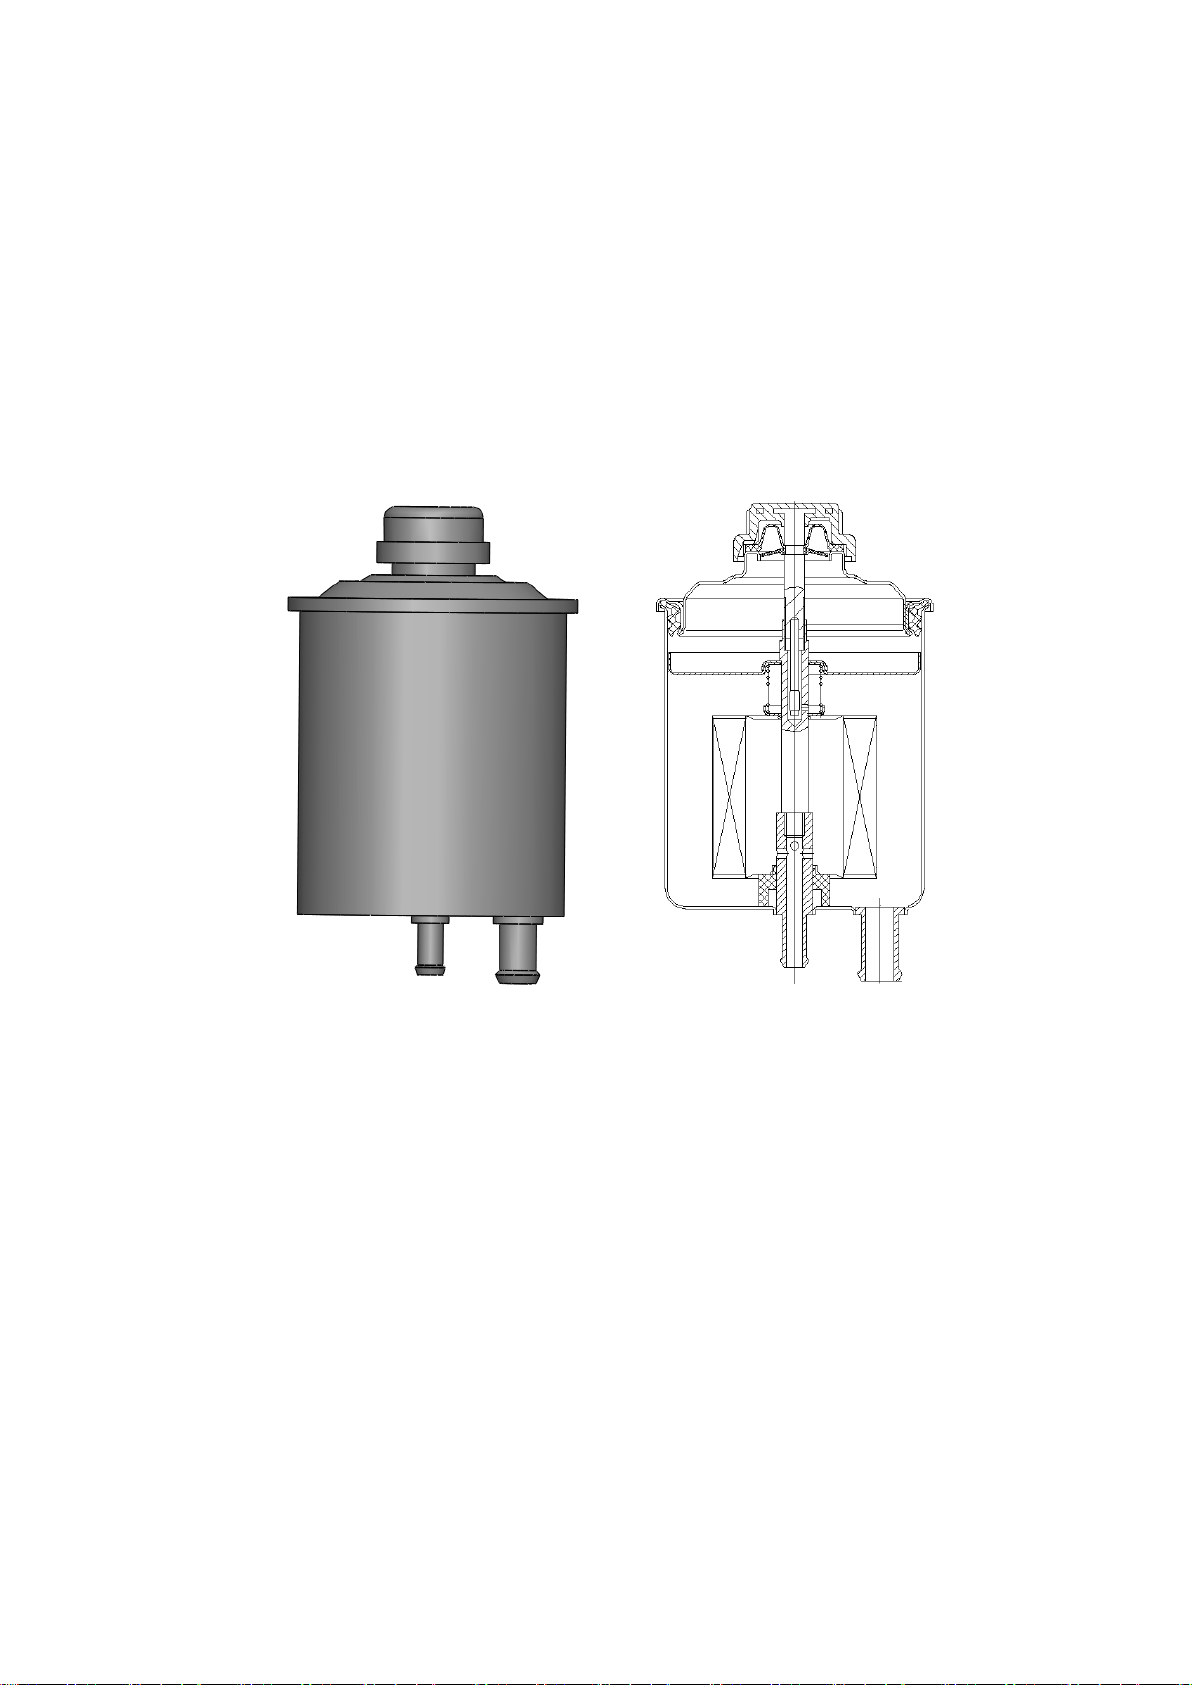

Foreword
This manual briefly introduces the technical parameters of our G3 series 4-5 ton
lithium battery counterbalanced forklift truck including the structure, working principle and
maintenance of the main parts. It can help operators to use this series of forklift trucks
reasonably and make the forklift truck play the most effective role. It is hoped that
operators and equipment managers will read the manual carefully before operating the
lithium battery forklift truck, strictly abide by the provisions and precautions in the manual,
and carefully use it so that your forklift truck will be in the best working condition for a
long time and exert its maximum efficiency.
This product is not suitable for cold storage, dusty, electrify dust, high temperature,
high corrosion environment. For a small amount of dust (non-conductive) environment,
regular cleaning and maintenance of components should be done. This manual content
might not correspond with the actual condition because of the improving of our products.
Our products are subject to improvements and changes without notice.

CONTENTS
I. Main specifications of forklift trucks ................................................................................. 1
1. External view of the truck.......................................................................................... 1
2. Main parameters......................................................................................................... 2
3. Size and weight of the main parts that can be disassembled ..................................... 3
II. Construction, Principle,Adjustment and Maintenance of Forklift Trucks ....................... 4
1. Transmission system.................................................................................................. 4
2. Brake system............................................................................................................ 10
3. Steering system........................................................................................................ 14
4. Electric system......................................................................................................... 24
5. Hydraulic system ..................................................................................................... 92
6. Lifting system .......................................................................................................... 95
III. Lithium battery changing............................................................................................. 101
1. General description................................................................................................ 101
2. Truck selection for lithium battery changing......................................................... 101
3. Steps to change the lithium battery........................................................................ 102
4. Steps to install the lithium battery.......................................................................... 104

1
I. Main specifications of forklift trucks
1. External view of the truck
P1
R
GF
C
D

2
2. Main parameters
NO.
Item
Unit
CPD40
CPD45
CPD50
1
Overall length
With fork
mm
3990
3990
3990
Without fork
2920
2920
2920
2
Overall width
Front wheel
1350
1350
1500
Frame
1346
1346
1468
3
Overall height
Mast, lowered
2240
2240
2230
Overhead guard
2275
2275
2270
Mast, extended
4235
4235
4225
4
Wheel base
1960
1960
1960
5
Load center distance
500
500
500
6
Tread
Front
1120
1120
1189
Rear
1070
1070
1070
7
Underground clearance
(without load)
Middle of chassis
145
145
135
Lower end of mast
140
140
130
8
Front overhang
560
560
560
9
Max. lifting height
3000
3000
3000
10
Min. steering radius
2580
2580
2580
11
Max. lowering speed
Unladen
mm/s
450
450
450
Laden
500
500
500
12
Max. lifting speed
Unladen
450
450
450
Laden
310
280
260
13
Max. travelling speed
Unladen
km/h
14
Laden
13
14
Max. gradeability (laden)
%
16
15
14
15
Max. drawbar pull (laden)
kN
21
21
21
16
Mast tilting angle (front/rear)
°
6/8
6/8
6/8
17
Fork (length×width×thickness)
mm
1070×150×50
18
Lithium Battery
Voltage
V
80
Capacity
Ah
500
600
600
19
Motor
Travelling motor
kW
20
Pump motor Ⅰ
2.5
Pump motor Ⅱ
26.5
20
Tyre
Front
250-15
28x12.5-15
Rear
21×8-9
21
Service weight
kg
6670
6835
7210
22
Service weight without lithium battery
6085
6150
6525

3
3. Size and weight of the main parts that can be disassembled
No.
Parts name
Dimension
and weight
Unit
Model
CPD40
CPD45
CPD50
1
Overhead
guard
Max.
dimension
mm
1625×1274×1511
Weight
kg
132.3
2
Mast
M300
Max.
dimension
mm
540×1334×2250
Weight
kg
1015
3
Drive axle
Max.
dimension
mm
φ350×1326
Weight
kg
240
4
Balance
weight
Max.
dimension
mm
1330x750x910
1330x750x910
1330x750x910
Weight
kg
2215
2280
2550

4
II. Construction, Principle, Adjustment and Maintenance of Forklift
Trucks
1. Transmission system
1.1 General description
The 5t domestic integrated electrical bridge mainly consists of two reduction box
assemblies, a fully enclosed AC motor and a set of brake assemblies.
The reduction box assembly contains a planetary reduction mechanism to increase the
output torque of the bridge assembly. The driving gear in the box is connected with the rotor
shaft of the motor. The walking speed of the forklift varies with the speed of the motor, and
the driving direction is determined by the rotation direction of the motor. The motor adopts
IP54 protection grade design and almost completely closed design, with stronger
applicability in working conditions, which can be applied to harsh working conditions such
as large dust and oil pollution. The whole bridge adopts multi-chip wet friction brake, which
is located in a sealed cavity to effectively avoid external pollution, greatly extending the
service life of the brake and reducing the maintenance cost. When the brake pedal is pressed,
the wet friction plate is compressed, locking both the motor rotor shaft and the wheel for
prompt braking.
1.2 Disassembly of integrated bridge
When disassembling an integrated bridge, place the bridge assembly in a suitable, clean
place. Open the oil drain plug to drain the lubricating oil from the left and right reduction box
assembly of the integrated bridge.

5
1.2.1 Disassembly and assembly of right reduction box assembly
Lift and erect the integrated bridge assembly, remove the connection bolts of the
reduction box assembly, specification: 14-M12*1.25. When installed, the bolt torque is
124-165N.m.
Remove the reduction box assembly and the primary planetary reduction assembly.

6
Remove the end cover bolt of the reduction box assembly, remove the hub end cover,
O-ring seal and hub retainer ring in turn; Then remove the retainer ring, secondary reduction
assembly, gear ring cylindrical pin and gear ring from the other side in turn, and the
disassembly complete. The removal of the left reduction box assembly shall be consistent
with this.
1.2.2 Disassembly of wet friction plate
After removing the right reduction box assembly, remove the short axle, press plate,

7
friction plate (large), baffle, spacer, friction plate (small), cylinder pin, baffle (spline),
compression spring, etc. in turn.
1.2.3 Disassembly of piston assembly
Remove the piston bolt, bolt head specification M17, remove the compression spring,
then remove the piston. Torque for piston bolt installation is 22-30N.m.

8
1.2.4 Brake lever, fork disassembly
After removing the retainer ring, remove the handle and torsion spring in turn, loosen
the bolt, remove the flange and brake fork.
1.3 Announcements in daily maintenance
1)Replace the brake pull lock or adjust the brake structure
When the hand brake pull lock is released completely, the wheel is suspended and the
wheel hub of the disk-rotating drive axle can make it rotate freely. If it is found that the

9
wheel cannot rotate freely, it is forbidden to use, so the hand brake pull lock mechanism
needs to be readjusted to make the wheel hub rotate freely, otherwise the friction disc will be
sintered in a short time and the brake will fail.
2)Fuel quantity of Integrated electrical bridge
Model: HELI dedicated 85w/90
Brake side: 1.6-1.7L
No brake side: 1-1.1L
Every 10-15 days, it is necessary to check the integrated electrical bridge for no oil
leakage, if necessary to find out the cause, and timely fill oil.
Replace gear oil of wheel side reducer every 1200 hours, oil type should be consistent
with requirements.
If the dust and oil in the working environment are large, dust and oil on the motor
surface need to be cleaned regularly to ensure the normal heat dissipation of the motor.
3)Brake maintenance
Wet braking is a completely closed structure, which is maintenance free and has a
design life of ≥6000h. When the braking failure occurs, relevant investigations should be
conducted to further ensure the cause.
4)Vulnerable parts of Integrated electrical bridge
NO.
Figure Code
Name
Unit Amount
1
A71Z3-02051
Combination oil seal
2
2
A71Z3-02431
X-ring 164.4x3.53
1
3
A71Z3-02451
Retainer ring 164.4x3
1
4
A71Z3-02441
Retainer ring 146.4x3
1
5
A71Z3-02421
X-ring 146.4x3.53
1
6
A71Z3-02501
Oil seal 70x110
1
7
A71Z3-02511
Oil seal 50x90
1
8
A71Z3-02521
Oil seal 28x40
1
9
A71Z3-02311
Spacer
2
10
A71Z3-02341
Friction plate (small)
1
11
A71Z3-02331
Friction plate (large)
1

10
2. Brake system
2.1 General description
The brake system includes service brake and parking brake.
Full hydraulic braking mode is adopted for driving brake, and the power source for
brake is hydraulic gear pump. The service brake system is mainly composed of brake pedal,
brake pump, brake valve and oil-cooled disc brake. The driving brake schematic diagram is
shown in Fig. 2-1.
Figure 2-1principle diagram of service brake Figure 2-2 Brake pedal

11
2.1.1 Brake pedal
The installation of brake pedal is suspension type. Specific structure is shown in Figure
2-2. The force acting on the pedal is converted to the brake oil pressure by the push rod of the
brake valve, and the wet disc brake of the driving axle is acted on to realize braking.
2.1.2 Brake valve
The shape of the brake valve and the position of each interface are shown in Fig. 2-3.
Brake valve mainly consists of seat, safety stem, support, piston, reaction piston, slide
valve and so on.
The main principle of brake valve is introduced in hydraulic system.
Figure 2-3 Shape of the brake valve and the position of each interface
2.1.3 Connection between brake system and drive axle
There are two connections between the brake system and the driving axle, one is the
connection between the brake oil outlet of the vehicle and the other is the connection of the
parking brake cable.
(1)The connection of service brake
The brake hose from the brake valve to the driving axle is connected with the service
brake connection port shown in Figure 2-4 ①. The pre-tightening torque is 12-16Nm. Note:
The bending radius of the brake hose shall be as large as possible to reduce the recovery
resistance when the pedal is loosened.

12
Figure 2-4
(2)The connection of parking brake
The parking brake push rod on the driving axle is connected with one end of the brake
rod through the brake cable, and the parking brake is realized by changing the working state
of the brake push rod. Note: The bending radius of brake cables shall be as large as possible.
Figure 2-5
2.1.4 Gas exhausting of brake system
When the braking system is installed, the air mixed in the braking system must be
discharged to achieve a good braking effect. The specific steps are as follows:
1) As shown in Figure 2-4, open the gas exhaust plug (part ○
2) of brake from the
discharge valve to the appropriate position so that the hydraulic oil can just flow out.

13
2) Repeatedly press down the brake pedal, so that the hydraulic pressure can discharge
the mixed gas in the brake system.
3) When the air is exhausted and the exhaust plug ejects completely hydraulic oil, press
the brake pedal and tighten the gas exhaust plug, and the pre-tightening torque should reach
10N m.
4) Release the pedal and check the braking effect. If the braking effect is not ideal, the
exhaust operation can be repeated until the braking effect meets the requirements.
2.1.5 Operation of brake system
When the service brake and parking brake are installed and debugged, the service brake
is realized by pressing the brake pedal normally; the parking brake handle is placed on the
right side of the seat, and it is engaged with the laminated disc brake in the driving unit by
the brake cable. The parking brake can be realized through pulling down the parking brake
handle by hand.
2.2 Maintenance and adjusting of brake system
This section mainly describes the inspection and maintenance of the brake system and
the adjustment method of the brake pedal.
2.2.1 Inspection and maintenance of brake system
(1) Inspection of parking braking performance (Daily inspection)
First check whether the parking braking performance is in good condition, and then
check whether the inching switch works when the hand brake is pulled down (that is, whether
the circuit is disconnected).
(2) Inspection of service braking performance (Daily Inspection)
Before driving, check whether the brake pedal has the function of return, that is,
whether the spring works.
(3) Leakage inspection
If you step on the brake pedal, the braking effect is not ideal. At this time, we should
carefully check the assembly of parts and components in the braking system, check whether

14
there is hydraulic oil leakage, so as to eliminate potential safety hazards.
2.2.2 Adjustment of brake pedal
(1) Shortening Push Rod
1) Adjust the stop bolt to make the brake pedal height appropriate;
2) Press the brake pedal down and lengthen the push rod until the front end of the push
rod contacts the piston of the main pump.
3) Tighten the lock nut of push rod.
(2) Adjustment of brake switch:
1) After adjusting the height of the brake pedal, loosen the lock nut of the brake switch;
2) Pull the plug to separate the wires;
3) Turn the switch to make the clearance A=1mm.
4) Make sure that the brake lamp should be on when the brake pedal is down.
3. Steering system
3.1 General description
The steering control mechanism of G3 series 4-5t forklift trucks is mainly composed of
steering wheel, pipe column, coupling shaft, steering unit and installation bracket (as shown
in Figure 3-1). They are fixed on the panel of instrument bracket by installation bracket. The
steering wheel, pipe column and coupling shaft are connected together. The steering gear is
fixed at the lower end of the coupling shaft, and the rotation of steering wheel will drive the
steering gear to rotate. The steering wheel can be adjusted to the comfortable position that the
driver feels by adjusting the handle.

15
Figure 3-1 Steering operation device
3.1.1 Steering wheel and its function
The steering wheel is the most direct component for the driver to control the driving
direction of forklift truck. During the normal driving process of forklift truck, the driver turns
the steering wheel to the left or right, so that the forklift truck can drive to the left or right. In
order to meet ergonomics, the forklift truck is designed to turn left when turning the steering
wheel to the left and right when turning the steering wheel to the right. The turning radius of
forklift truck varies according to the turning angle of steering wheel. During the driving of
forklift truck, the driver should hold the steering wheel with both hands.
In order to facilitate the rapid steering of the driver, there is a handle ball on the steering
wheel of the forklift truck. The driver can turn the steering wheel quickly by holding the
handle ball in one hand. The driver can also grasp the handle ball in one hand and control the
multi-way valve in one hand to realize the joint operation. However, special attention should
be paid to the above two kinds of manipulation: when a driver makes a quick turn with only
one hand holding the steering wheel handle ball, he should fully consider the safety of the
operation at this time. He should not steer suddenly when driving in a fast straight line, or
when loaded. The other hand must grasp the handles, handrails or other joysticks of the car to

16
maintain his body balance. During these operations, the speed of forklift driving and steering
should not be too high to avoid accidents
There is a horn in the center of the steering wheel. When the driver wants to prompt the
pedestrians, he can use his hand to press down the cover of the box marked with horn.
3.1.2 Oil can for steering
The oil can for steering (Fig. 3-2) serves as a common fuel tank for steering and braking,
and integrates an oil gauge, a breather and a return oil filter.
Figure 3-2 Oil can for steering
3.1.3 Duplex pump
The steering pump and brake pump are combined to form a duplex pump, which is
driven by a single motor. The duplex pump sucks oil from the crude oil pipe and the front
pump supplies the steering gear. The pressure oil from the back pump enters the driving axle
through the brake valve to meet the requirements of dynamic braking. The oil from the
duplex pump returns to the oil can through the internal filter when the operations are in
neutral condition. The principle of the hydraulic steering system is shown in Figure 3-3.

17
Figure 3-3 Principle diagram of the hydraulic steering system
3.1.4 Full hydraulic steering unit
Full hydraulic steering gear (Figure 3-4) transmits pressure hydraulic oil to the steering
cylinder according to the rotation angle of steering wheel. The hydraulic oil drives the piston
rod of the steering cylinder to move left and right, and realizes steering through the steering
mechanism. If the steering pump fails to work properly due to faults, the driver needs to turn
the steering wheel directly with force to achieve steering, which is also called manpower
steering.
The steering unit on the truck adopts priority distribution technology. When there is
steering operation, the hydraulic system first meets the needs of the steering system. When
there is no steering or only minor steering action, the remaining hydraulic oil is directly
returned to the tank through the pipeline through multiple valves. In the course of steering,
when steering resistance exceeds the maximum set pressure of the steering system, the
Table of contents
Other HELI Truck manuals

HELI
HELI CQDH13 User manual

HELI
HELI CBD35-530 User manual

HELI
HELI gieen Series Installation and operating instructions

HELI
HELI G Series Installation and operating instructions

HELI
HELI CPD15 Installation and operating instructions

HELI
HELI green Series User manual

HELI
HELI CBD15J-Li2 Series User manual