Helios KWLC 350 User manual

Heat recovery unit KWLC 350
1
It is important for safety reasons, that you read and observe these instruc-
tions fully before proceeding.
RECEIPT
The consignment contains one of the following units including a three speed con-
troller and a summer-heat exchanger:
KWLC 350 __ __ __
S vertical installation
L horizontal installation
EH electric heater battery
WW water heater battery
Please check delivery immediately on receipt for accuracy or damage, please no-
tifiy carrier immediately of any damage. In case of delayed notification, any possi-
ble claim may be void.
STORAGE
When storing for a prolonged time the following steps are to be taken to avoid da-
maging influences: protection by dry air and dustproof packing (plastic bags with
drying agent and moisture indicators). The storage area must be free of water, vi-
bration and temperature variations.
When storing for years or non rotation of motor an inspection of the bearings with
possible replacement and an installation inspection in accordance with VDE 0530
are necessary before starting using the unit. Damage caused by incorrect storage,
transportation or installation are not valid warranty claims.
OPERATIO / USE
The unit is designed to ventilate a combination of living rooms, bathrooms and kit-
chens in a single dwelling. The unit is equipped with a heat recovery cube. It must
not be connected to kitchen hoods or laboratory extract systems. The standard
equipment has a working temperature range from -20°C up to 40°C. The ambient
temperature where the unit is installed must not be below 0°C. For operation un-
der unusual conditions, e.g. high humidity, long periods of standstill, high air pollu-
tion, extreem climatic conditions (e.g. operating temperature over 40°C), technical
or electronic inputs other than standard operation may affect the units performan-
ce. For this reason please enquire and obtain a quotation for a suitable unit, if avai-
lable.
U IT OPERATIO
In the heat exchanger the cold outside air and the warm extracted air “cross over”
and the temperature of the incoming air is raised. Through this method up to 80%
of the energy of the warm air is tranfered to the incoming air (Pic. 3). In addition a
thermostatically controlled heating element warms up the inlet air, in extreme cold
weather conditions, to the required temperature. Frost coditions are detected by a
Thermo-Humidity sensor which is positioned in the heat exchanger. The after heater
warms up the inlet air and the pre heating element is used as an additional heater to
avoid frost in the heat exchanger. The inlet air is directed to the living rooms and be-
drooms through ducts and dampers. The stale air is extracted from the bathrooms,
toilets and kitchens and flows back to the heat exchanger via the ducting system
and fan, transfering heat before being discharge into the open air.
PERFORMA CE DATA
To achieve the given performance, the unit must be correctly installed. The duct
system must be designed to be within the units pressure capablities and have
good flow into and out of the unit otherwise there will be a reduction in the units
performance. Noise figures are stated as sound power levels LWAin dB(A) (confor-
ming to DIN 45635 Pt.1). Sound pressure levels LPA depend on room specific con-
ditions.
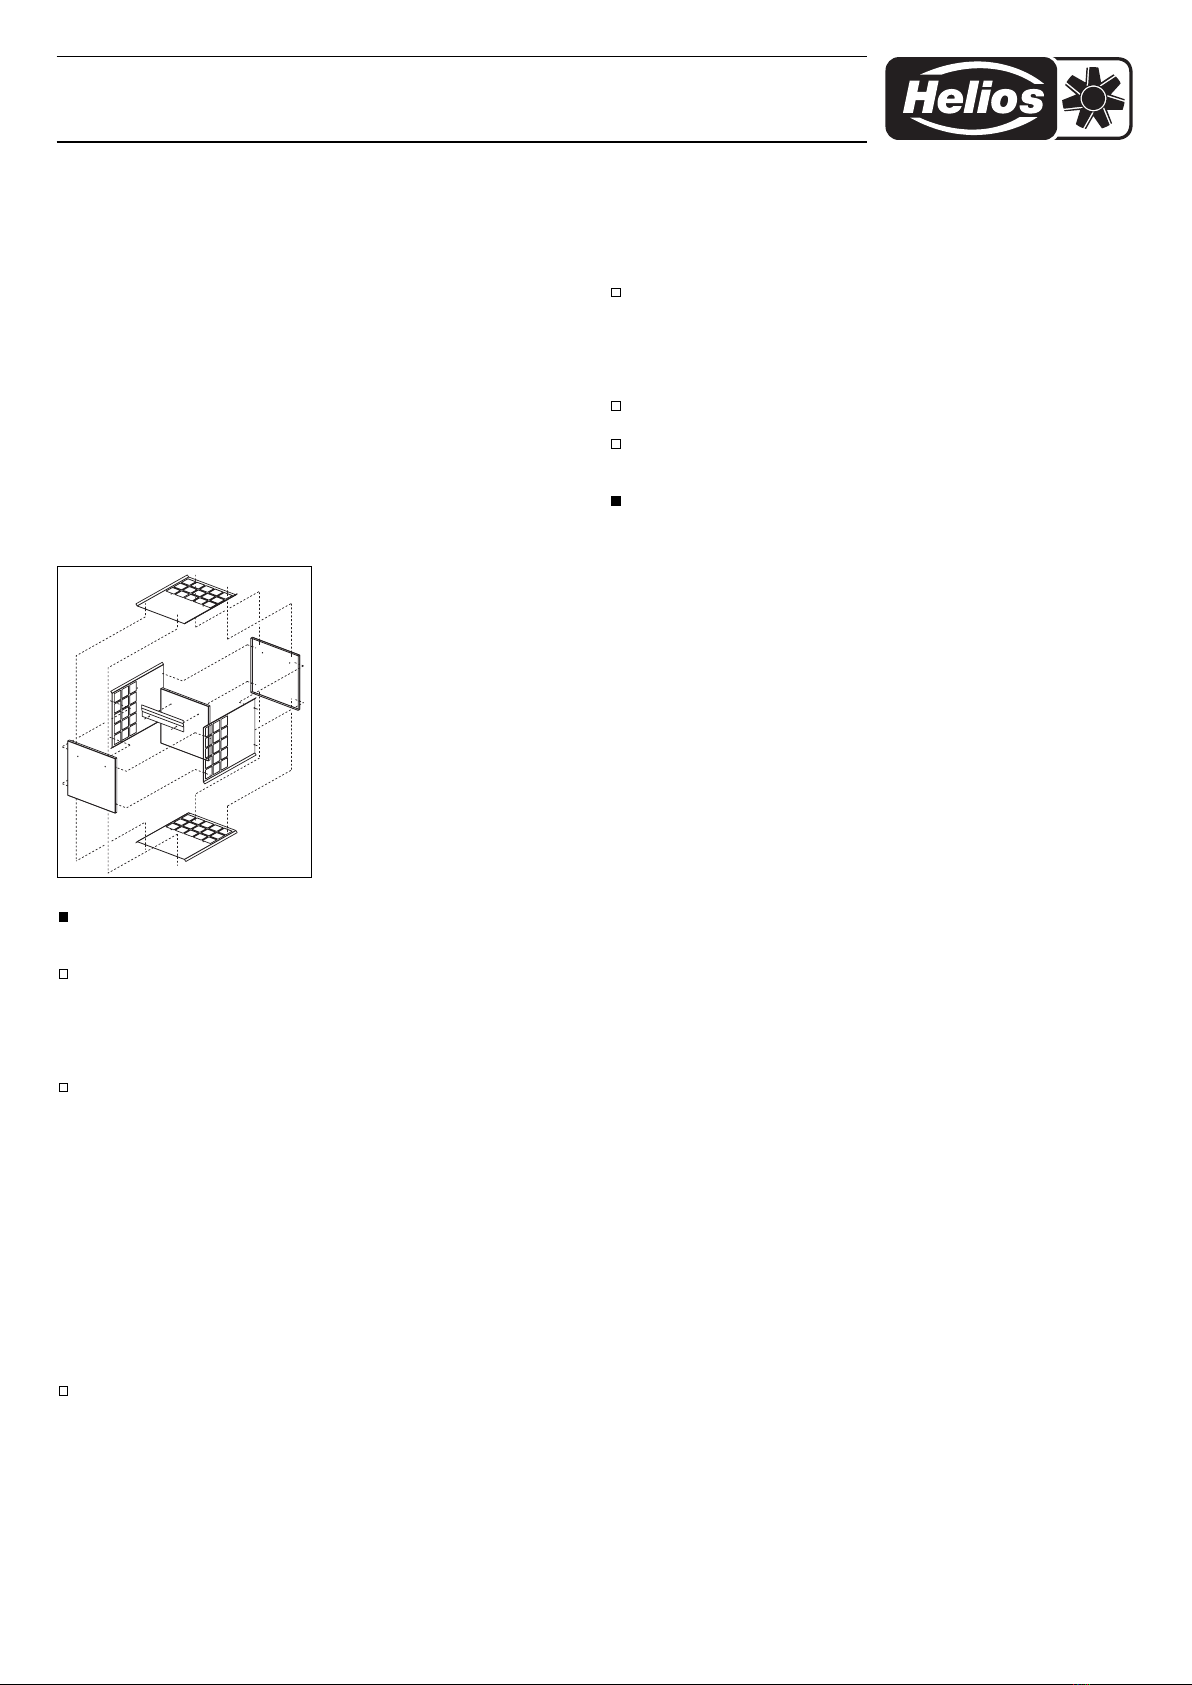
I STALLATIO -ASSEMBLY (picture. 3, page 4)
The KWLC 350 S is suitable for "vertical" installation wherever desired usually in the
loft space. As a base to mount the unit on we recommend chipboard on a secure
mineral wool board (approx. 60 x 120 cm) to prevent vibration transmission or use a
commercial anti vibration pad (approx. 60 x 120 cm). The mounting surface must
be level, flat and even. The KWLC 350 L is suitable for "horizontal" installation. For
effective condensate removal from the unit, the unit should slope down in the
direction of the drain pipe by 5° the init has differing height feet to acheive
this . The ducting should be as short as possible and tight bends should be avoided
as they can lead to a high pressure loss and airflow noise. The ductwork joints
should be fully sealed to prevent air loss. The supply and extract ducting should be
insulated to gain the best thermal efficiency. For maintenance and installation work,
instal the unit in an accessible position. When installed in areas with low ambient
temperature (e.g. roof space) the unit may require additional insulation.
The summer-heat exchanger and operating switch are supplied inside the
unit, these must be removed before installation. It is essential that the instal-
led unit tray has a drop in the direction of the condensate water flow.
General recommendation
The use of oil or gas burning devices e.g. boilers, gas heaters gas hobs and ovens
require a free flow of air. Used in combination with a heat recovery unit all national
regulations must be followed. A separate air inlet may have to be provided for.
– CO DE SATIO RU -OFF (picture 4/5)
The condensation pipe (4) is to be connected to the water run off by means of a
flexible pipe of 15mm diameter. If it is not in a room which is heated, it must be is-
sulated. A suitable drain trap is to be provided with a minimum height of 100 mm,
otherwise water could be drawn back through the fan.
Fill the drain trap with water before putting into operation to avoid smells
from the drain system. The regulations of the water board and other legislati-
on must be observed.
OTE: When connecting the condensation pipe by (cold) pressing avoid
any axial or radial forces on the unit drain pipe. The use of a flexible pipe is
recommended.
– AIR DUCTI G, VE TILATIO CIRCUIT (picture 4.)
When designing the ductwork, try to achieve the shortest possible runs. Use
smooth pipes (rigid plastic or steel ducting), to avoid high pressure loss, noise
etc. For the main ducting (outside air, extract air, inlet air, discharge collection) a
diameter 160 mm or 140 mm is recommened, for side pipes a diameter 80 mm to
125 mm. To reduce condensation in the extract pipes, the ducting has to be insu-
lated where appropriate. Also if inlet and extract ductwork cross unheated rooms
insulation must be provided to reduce heat loss.
Fresh air should be taken into living- and bedrooms, extraction from bathrooms,
toilets and kitchens. To regulate the whole system use adjustable Helios valves.
The extract from the kitchen needs to be filtered. A kitchen hood must not be
connected up to the unit (danger of grease carried into the heat exchanger). There
must be a good air flow (e.g. using door grilles) within the building between intake
rooms and extract rooms.
Important: all fire protection regulations - where applicable- must be follo-
wed.
– Thermo-humidity sensor (picture 5)
The electronic thermo humidity sensor (3) is in the heat exchanger in order to de-
tect the humidity level of the fresh and extract air. This allows a more precise de-
tection of the risk of frost in the heat exchanger.
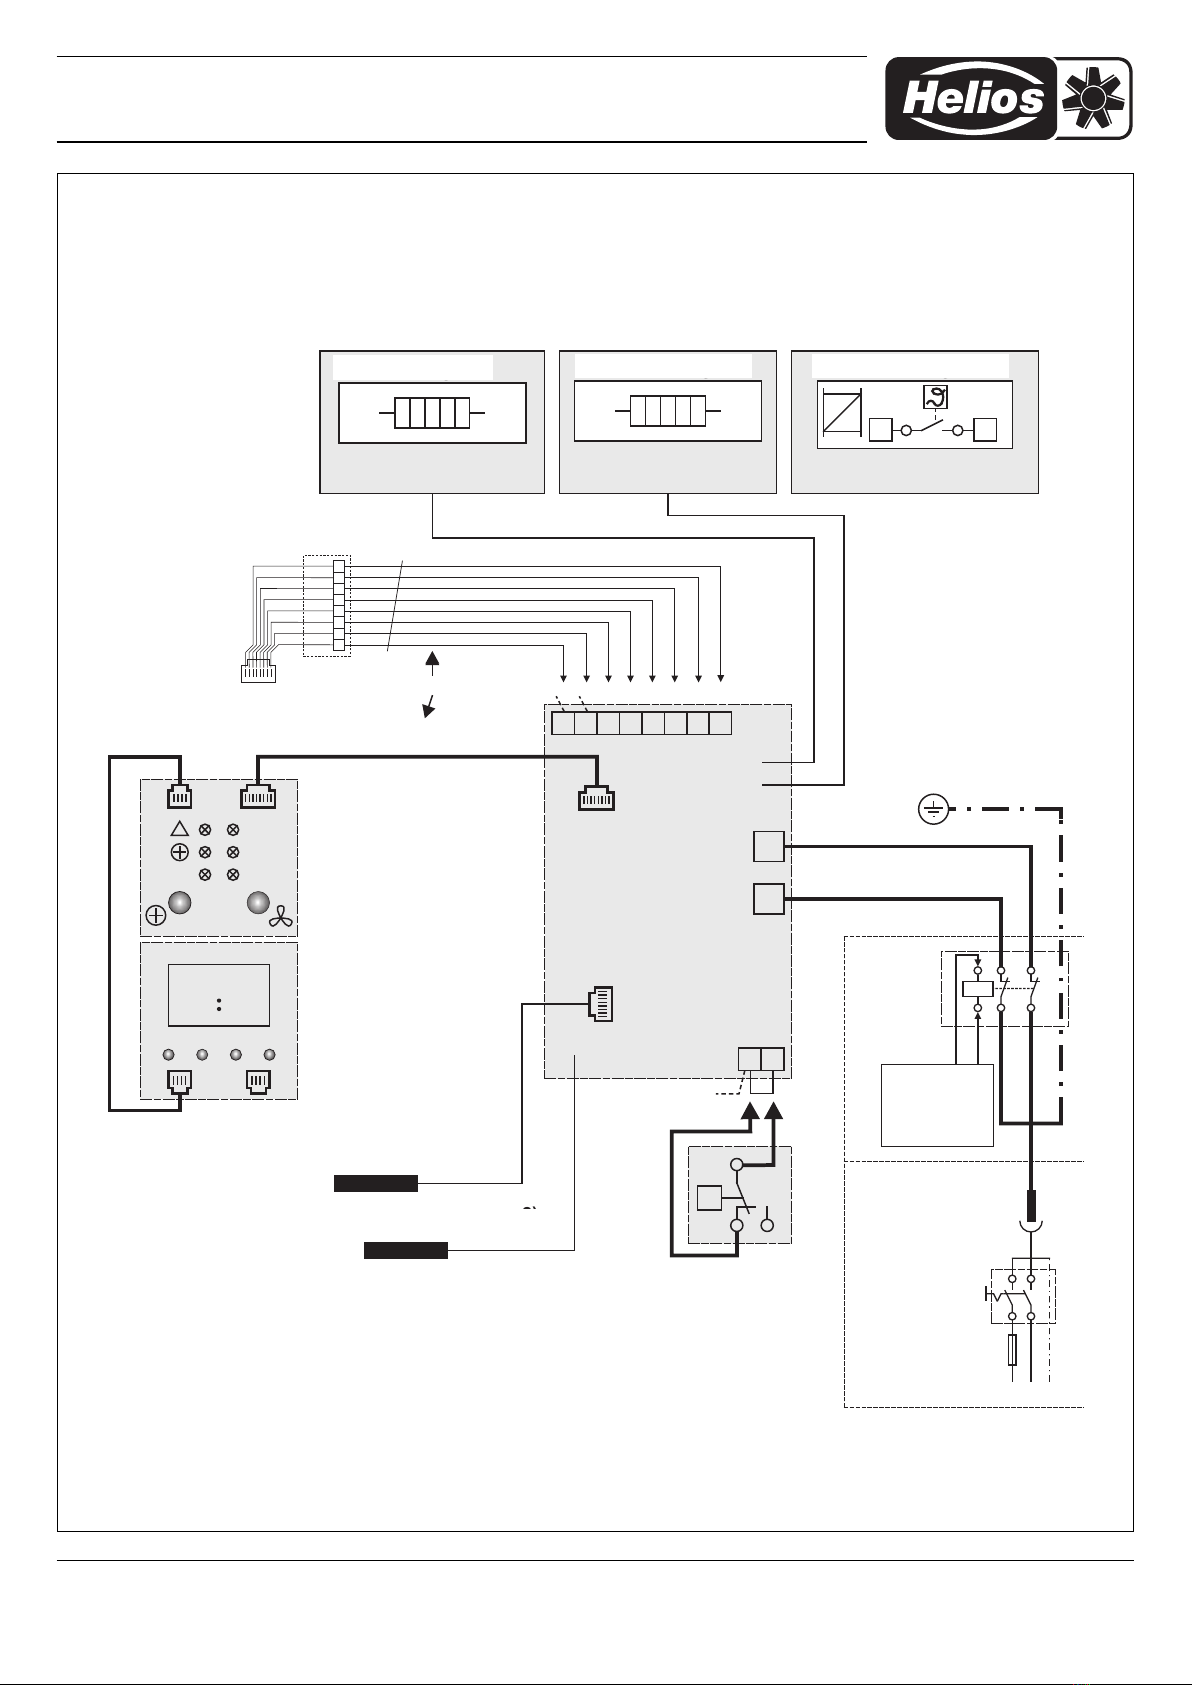
– ELECTRICAL CO ECTIO S (pic. 5/6)
Electrical connection may only be carried out by a qualified person. All electrical
work must only be carried out with the power supply off. A lockable isolator is re-
quired isolate from the mains with a minimum of 3 mm contact opening of each
pole.
All relevant safety and installation regulations (for example DI VDE 0100
and IEE regulations) are to be adhered.
Electrical connections are to be made according to wiring diagrams provided in
these instructions. The connection to the control panel are of plug in type using
the cables provided. The unit is designed for continous running and cannot be
switched off as a standard. To switch off please use mount a switch in the supply.

The installation of the intake air temperature sensor (21) should be fitted inside the
intake air duct (approx. 1-1,5 meters from the unit). The sensor is prewired as
standard.
OPERATIO – ADJUSTME T (picture 5)
Three fan speeds are possible with the KWLC 350 S/L using the 3 step switch,
which should be installed in a place easy to reach within the house.
MIN speed step 1 Basic air flow, for less intake air needs
NORMAL speed step 2 Normal air flow
MAX speed step 3 Full R.P.M., for maximum intake air.
In addition the control panel offers the following functions:
–
Left button (+ Symbol) activates/deactivates the after heater (in relation to the dip
switch settings). If the after heating is activated it turns on automatically if the set
temperature is not reached through the heat exchanger.
Red light (!) slow flashing Change filter!
(if the DDS pressure sensor is fitted)
fast flashing One of the safety temperature cut
outs (2) of the pre or after heater has
tripped .
constant light both cut outs tripped.
Green light (+) Lights up, when the after heater is activated.
Yellow light (°C) Lights up if the after heater is in use.
*) The switch control light operates when the heating coil is in use. For units with a
water heater battery this control light can be switched via a remote signal.
– Regulating the additional heating for units with electric heater battery
(Type KWLC 350..EH):
The thermostat for the additional heating (Pic.5, no.1) is on the top of the unit sen-
sing the extract air after the heat exchanger. The thermostat is factory set at 15°C,
but can be adjusted as required.
The heater is protected against overheating by a thermal overload thermostat that
switches off automatically when a temperature of 55°C has been reached. As an
additional safety control, a second thermostat switches off the whole unit if a tem-
perature of 80°C is exceeded. The thermostat can be manually reset by pressing
the red push button, which is accessible by removing the white plastic lid.
SPEEDS A D SETTI GS
Speed step 2 of the unit can be set to the size of the dwelling by opening up the
unit and changing the marked speed step 2 wire at the transformer in the unit ac-
cording to the internal wiring diagram. Isolate the unit from the power supply befo-
re opening.
Note: if the power supply of the unit is cut it will restart afterwards in NORMAL
speed (speed 2) and the electric after heater is activated.
Attention: For good room conditions and to reduce condensation water damage,
the unit should not be completely switched off, except when servicing / mainten-
ance or in case of breakdown.
– DIP-Switch setting
Important: When putting the unit into operation the dip-switch settings and
the tempatures settings must be checked. It is recommended to carry out
customer specific setting on site if required.
Switch No. Recommend. setting Function
1 O O = After heater switched off in case of
Frost
OFF = After heater not switched off in case
of frost
2 OFF O = After heater switched off on MIN
speed
OFF = After heater always on
3 OFF O = Inlet air night set back of 3 °C
only with (if S2 is in OFF position)
KWL-WSU
OFF= No temp. night set back
4 O O = Air flow set to MIN during night
only with KWL-WSU
OFF = no function
5 OFF O = Pre heater is used as frost protection
and additional (after) heating. Pre-
and after heater both work if set
inlet temp. is not reached (more KW)
OFF= Pre heating is only used as frost
protection
6 OFF O = Frost sensor with Phono plug
OFF = Frost sensor with ISDN- plug
otes and recommendation for settings: (see table above)
Switch o. 1
As the frost protection will reduce the speed of the intake air fan to speed MIN the
pre hater will provide the follwoing delta temperature:
KWLC 350 V
.=100 m3/h results in a ∆Tof 30K
+the heat of the heat exchanger. Therefore after heating is not required.
Switch o. 2
As the after heater is regulated by a temp. sensor it may also be used for speed
step „ MIN“ (position OFF), in order to achieve the desired inlet temperature.
Switch o. 3
When using a KWL-WSU switch clock, if S2 is in OFF position, a temperature night
setback of 3°C can be acheived when setting S3 is in the ON position.
Switch o. 4
When using a KWL-WSU switch clock, if S2 is in the OFF position, the air flow
may be set to MIN during the night if S4 is set to ON.
Switch o. 5
Under normal wheather condition the output of the after heater is sufficient. An
additional pre heating reduces the efficiency of the heat exchanger as the delta
temperature drops. The pre heater is only used for frost protection when S5 is set
to OFF.
Switch o. 6
(!) do not touch! see plug = ISDN - RJ 45 plug.
– Regulating the additional heating for units with electric heater battery
(Type KWLC 350...EH): (picture 5.)
The thermosat for the additional heating (1) is on top of the unit sensing the sup-
ply air after the heat exchanger. The thermostat is factory set at 15 °C, but can be
adjusted as required.
The heater is protected from overheating by a thermal overload thermostat (2). It
switches off automatically when the temperature of 65 °C has been reached. This
will reset automatically after having colled down. As an additional safety control, a
second thermostat switches off the whole unit if a temperature of 80 °C is excee-
ded (2.1). The thermostat can be manually reset by pressing the red push button,
which is accessible by removing the white plastic lid.
– Regulating the additional heating for units with water heater battery
(Type KWLC 350..WW): (picture 5, version WW)
The after heating is provided by a build-in water heater battery (7a). Intake and ex-
tract duct-work must be insulated to avoid ice build up on the water heater bat-
tery and the pipes. For regulation, a thermostat is positioned in the intake air duct,
which works as a closing contact. The volt free contact can be used to regulate a
valve.
Attention: The temperature sensor is located in the intake spigot. When intake
ductwork goes through cold areas, heat loss on the way to the valve must be con-
sidered.
– Frost protection of the Water Heater Battery (picture 5, version WW)
Intake and extract ductwork must be insulated to avoid ice build up on the water
heater battery. Directly in front of the water heater battery a frost protection ther-
mostat is positioned which closes at +5°C. The volt free contact of the thermostat
is to be connected with the heater control in a way, that the shunt valve opens as
soon as heater and circulating pump are switched off. This forced control avoids
the ice build up on the water heater battery. When switching off the heater be sure
that the water heater battery will be drained. Otherwise avoiding ice build up can-
not be guaranteed.
– Frost Protection of the Heat Exchanger Unit (picture. 5)
The sensor (3) for the frost protection thermostat is mounted where the extract air
leaves the heat exchanger. This sensor controls the intake air fan to avoid ice build
up. Warm air (e.g. from the bathroom) contains high humidity and therefore it is
Heat recovery unit KWLC 350
2

very likely that condensation will occur. Thus the temperature in the heat
exchan-
ger must not drop so low that the water in it freezes. With the drop of the outside
temperature the heat exchanger temperature drops as well. When the heat exchan-
ger temperature drops to +2°C the intake air fan switches off until the heat exchan-
ger has warmed up sufficienty. The frost protection thermostat (3) is factory set and
normally needs no adjustment. Note: the use of the pre heating element will avoid
ice build up to much lower outside temperatures.
–Summer Service
During the warmer summer months when it is not necessary to recover heat, the heat
exchanger can be replaced with a summer insert. Then outside air comes directly into
the house without being warmed up. Make sure that the temperature sensor is set to
alow temperature (e.g. +18°C) in order to avoid unwanted heating up inside the buil-
ding. In the autumn, the summer kit must be replaced with the heat exchanger and
the temperature sensor should be adjusted accordingly.
Note:
Before first use, the summer insert has to be assembled as shown in picture 2.
Remember to reset the thermostat the following autumn and to mount the heat
exchanger unit again.
MAI TE A CE:
The unit should be isolated from the mains before any servicing starts.
Opening of access doors (pic. 5)
Open the clamps (14). Then remove the access door completely (12/13). To repla-
ce the door - fit back into the frame and clamp in place.
Attention: The unit has an access door on both sides so that entry can be made
through the side required.
Filter
The unit comes complete with filters (DIN EN 1946, T.2):
• Outside air: pre filter 3 and fine filter F5
(also available: optional pollen filter F7)
• Extract air: pre filter 3
Spare filter set 2x 3 + 1x F5 ELF-KWL 350/3/3/5 Ref.-No. 0024
Spare filter set 2x 3 + 1x F7 ELF-KWL 350/3/3/7* Ref.-No. 0025
The outside and the extract prefilter are to be changed or cleaned at least every
three months. The fine filter should be replaced at least once a year of use for hy-
gienic reasons. When replacing the filter the correct air flow direction through the
filter has to be observed. When the outside air is very dirty an air filter box (LFBR
250, ref.-no. 8580) should be fitted in the ductwork and the filter should be clea-
ned or replaced frequently.
Filter control (pict. 5)
To monitor the filter, a differential pressure switch (accessory DDS switch, Ref.-no.
0445) can be connected to the KWLC. The knock outs for the pressure hoses (18)
are already drilled and connected with duct adapters. Remove link “FI” on the el-
ectrical terminal board. Then if the fiIter is dirty, the lamp on the control panel will
light up.
– Fans
The fans are to be maintained and cleaned once a year at least. For cleaning use
a small brush and an oil free cleaning fluid. Make sure that no water gets into the
motor. Fan must be completely dry before re-using. To remove the fan,
Heat recovery unit KWLC 350
3
unplug the electrical plug-socket facility. Loosen the four screws (16) and re-
move it carefully by pulling. To remove the right fan loosen the two side screws
(15) and pull the fan towards you. Then the fan can be removed like the other one.
Ensure that the balancing clips are not removed from the impeller.
Heat exchanger battery
Must be cleaned at least twice a year. Pull out the unit carefully. For cleaning put in
warm soapy water (do not use cleaning fluid containing Natriumcarbonate) and fi-
nally clean with warm water. When re-assembling ensure correct installation and
take care not to damage the seals.
Room grilles: To be cleaned at least annually.
Outside grilles: Check yearly that grilles are free from leaves etc.
SOURCES OF MALFU CTIO I G (picture 5)
Before working on the unit make sure that it is fully isolated from the supply.
– o air flow
•Check electrical connection / fuses
– Inlet air is cold
• Set heater thermostat (1) to a higher temperature
• Ductwork in cold areas need extra insulation.
• Make sure that summer-insert was changed for the heater exchanger.
• The overheating thermostat (2) may have tripped. Remove white plastic cap
and press red button.
– Substantially reduced air flow
• Filters (5 and 6) could be dirty. Change or clean them (see maintenance)
If any of the above points do not help please contact HELIOS.
Please state serial number given on the rating plate which is near the thermostat
of the heating coil.
Do not try to repair the unit yourself.
Pict. 2

4
Heat recovery unit KWLC 350
Pict. 3
Dimensional drawing KWLC 350.. (standing version)
ACCESSORIES
The use of accessories not recommended by Helios is not permitted, as this may
invalidate your guarantee. The use of speed controllers is not permitted.
■■ IMPORTA T OTE: It is no longer possible to use of AFS switch clock as
on previous models. The KWL-WSU is the correct unit to use with model.
■
■S
Sw
wi
it
tc
ch
h
c
cl
lo
oc
ck
k
w
wi
it
th
h
n
ni
ig
gh
ht
t
s
se
et
t
b
ba
ac
ck
k
Digital switch clock with night set back and LCD-display.
Weekly timer with individual programming for each day.
(consider DIP-switch settings!)
Type KWL-WSU Ref.-No. 0856
Dimension: W 85 x H 85 x D 52
■■AAddddiittiioonnaall mmoodduullee ZZMMEEAA ffoorr KKWWLLCC 335500
This module allows the control of the unit via external control signals (relays
- contactors). There is a volt free contact to indicate the operating conditions.
Type KWL ZMEA Ref.-No. 1431
Dimension W x H x D: 110 x 110 x 65 mm
■■Additional module ZMPA for KWLC 350
To allow the user to override the control panel if fans are used in MIN or MAX
mode. The module settings will always override the control panel.
Type KWL ZMPA Ref.-No.1430
Dimensions W x H x D: 110 x 110 x 65 mm
■■Difference pressure sensor DDS
Complete set to monitor the filter condition.
Type DDS Ref.-No. 0445
Dimensions Ø 104 x D 58 mm
WARRA TY – EXCLUSIO OF WARRA TY
If the preceeding instructions are not followed or if the unit is modified all warranty
claims are voided. The same applies to related claims towards the manufacturer.
REGULATIO S
If installed correctly the units comply to all relevant regulation as per the date of
manufacture and is CE-marked.
Condensation
drainage ø 15 mm
(standing version)
Supply Extract
Exhau t Out ide air
Condensation
drainage ø 12 mm
(lying version)

connection pipe
changeable from
horizontal to
vertical
SCHEMATIC SKETCH
drop
extract air
outside air
minimum 50 mm
mineral wool
switch
drainpipe
plaster of paris/
chipboardplaster of
mineral wool
copper pipe 15mm outside diameter
to be layedfrost-proof
minimum 100 mm
copper drain trap to be layedfrost-proof
intake
air
extract
air
isolated
circulating pump
from heating system
warm water
to heating system
heating
control
shunt
controller
extract
air
intake
air
extract air
volt free
contact T2
of thermostat
onlyfor KWLC350 S/LWW
Heat recovery unit KWLC 350
5
Pict. 4
Pict. 5
Schematic drawing EH/WW
in ulated
Out ide air
Supply air
Extract air
Supply
air
Exhau t air
Supply Extract
air air
Supply
air
Exhau t air
Extract ducting
can be connected
in the horizontal or
vertical po ition
chipboard ba e
mineral wool upporting
cipboard ba e
1. Temperature setting intake air 8. Intake air fan 18. Knock out holes for hoses of filter control
2. Overheat thermostat /after heating 9. Extract air fan 19. Connection water battery (standing model)
2.1 Overheat thermostat /pre heating 10. Terminal box 20. Connection water battery (laying model)
3. Thermo humidity sensor (frost thermostat) 11. Heat exchanger 21. Intake air temperature sensor
4. Condensation drain pipe 15 mm 12. Left access door 22. Frost sensor
5. Fine filter F5 13. Right accessdoor
6. Pre filter 3 14. Clamp
7. After heater battery 15. Screws for blower dismantling
7a. Warm water heater battery 16. Screws for fan dismantling
7b. Electric pre heater battery 17. Mounting holes for DDS pressure switch

Heat recovery unit KWLC 350
Druckschrift-Nr. 94 303/ 08.04
Service und Information
DHELIOS Ventilatoren mbH & Co · Lupfenstraße 8 · 78056 VS-Schwenningen FHELIOS Ventilateurs · Z.I. La Fosse à la Barbière · 2, rue Louis Saillant · 93605 Aulnay sous Bois Cedex
CH HELIOS Ventilatoren A · Steinackerstraße 36 · 8902 Urdorf / Zürich GB HELIOS Ventilation Systems Ltd. · 5 Crown ate · Wyncolls Road · Severalls Industrial Park ·
AHELIOS Ventilatoren · Postfach 854 · Siemensstraße 15 · 6023 Innsbruck Colchester · Essex · CO4 9HZ
92941 001 SS-832 07.06.05
Steuerplatine
Circuit board
12345678
FI
MIN
NORMAL
MAX
!
°C
8888
KWL 350 ...
KWL 350 .WW
5°C
Bedienelement
KWL-WSU Best.Nr. 0856
Wochenzeitschaltuhr
Nachtabsenkung,
optional
Weekly timer, night set back
Nachheizung WW
Frostschutzfühler
im Wärmetauscher / Abluft
Temperaturfühler Zuluft
Vorheizung Nachheizung
KWL 350 .EH
KWL 350 ...
DDS
Optional:
Drucksensor
Differential
pressure switch
P
P
21
Best.Nr / Ref.no.. 0445
L1 N PE
L
N
Optional:
Bauseitiger
On/off switch
Trennschalter /
VDE 0700 T1 7.12.2
Signal der
Feuerstätte,
siehe MBV-
Montage und
Betriebsvorschrift
Optional:
Bauseits bei
Raumluft-
abhängigen
Feuerstätten
zu erstellen !
1)
2)
3)
1)
ab KW17/'05
2)
3)
potentialfreier Frostschutzthermostat
Warm Wasser Register
bei WW-Type nur zum Abtauen des Wärmetauschers
nur bei EH-Type!
34
wahlweise
Leitung mit RJ45-Stecker,(Adern "gedreht":
1-8, 2-7, 3-6, 4-5, 5-4, 6-3, 7-2, 8-1)
18 ...
18 ...
Klemmenadapter
Terminalblock
optional
Zur Installation der
Steuerleitung, bitte
die Montage und
Betriebsvorschrift
beachten !
or
bl
gn
br
ge
rt
ws
sw
18 ...
8 x 0,25 mm²
KWLC 350
with control panel
Wiring diagram o. SS-832
Pict. 6
Pre heating After heating EH After heating WW
Temperature en or intake air
Fro t en or in heat
exchanger / extract air
Control panel
(included in delivery)
Please follow the in-
struction leaflet when
installing an optional
control line.
This manual suits for next models
4
Table of contents
Other Helios Heating System manuals
Popular Heating System manuals by other brands

Samsung
Samsung AE040RXEDEG Service manual

Oxygen
Oxygen X-Air V400E Installation and operation manual

Aqua-Hot
Aqua-Hot 600 series Use and care guide

Viessmann
Viessmann Vitovalor PA2 Installation and service instructions for contractors

Bryant
Bryant DuraPac 580F Series Installation, Start-Up and Service Instructions

Dimplex
Dimplex DF3033ST troubleshooting guide