Heliospectra sensorHUB User guide

Setup Manual
sensorHUB
Heliospectra
Horticulture
Fixtures
www.heliospectra.com
2
Disclaimer
Table of content
The contents of this document are subject to revision without notice due to continued progress
in methodology, design and manufacturing. Heliospectra AB shall have no liability for any error
or damage of any kind resulting from the use of this document. At Heliospectra AB we aim to
continuously improve our product documentation. If you have comments or ideas regarding
this document, please contact us at support@heliospectra.com.
Limitation of Liability
IN NO EVENT, REGARDLESS OF CAUSE, SHALL HELIOSPECTRA AB BE LIABLE FOR ANY
INDIRECT, SPECIAL, INCIDENTAL, PUNITIVE OR CONSEQUENTIAL DAMAGES OF ANY KIND,
WHETHER ARISING UNDER BREACH OF CONTRACT, TORT (INCLUDING NEGLIGENCE),
STRICT LIABILITY OR OTHERWISE, AND WHETHER BASED ON THIS AGREEMENT OR OTHER-
WISE, EVEN IF ADVISED OF THE POSSIBILITY OF SUCH DAMAGES.
1. Product Overview
2. Box Installation
2.1 Wall Mounting
2.2 Network installation
3. Sensor Installation
3.1 Cable Installation
3.2 Sensor connection
4. Software Startup
5. Maintenance
6. Support & FAQ
7. Warrenty
3
4
4
5
6
6
7
8
8
8
8
SENSOR Hub Setup Manual
V. 1.3
3
1. Product Overview
sensorHUB is enabling the possiblity for the helioCORE system to be able to collect real
world data. The data could then for example be used for controlling how much added
light need for suppling the plants with the correct amount of light.
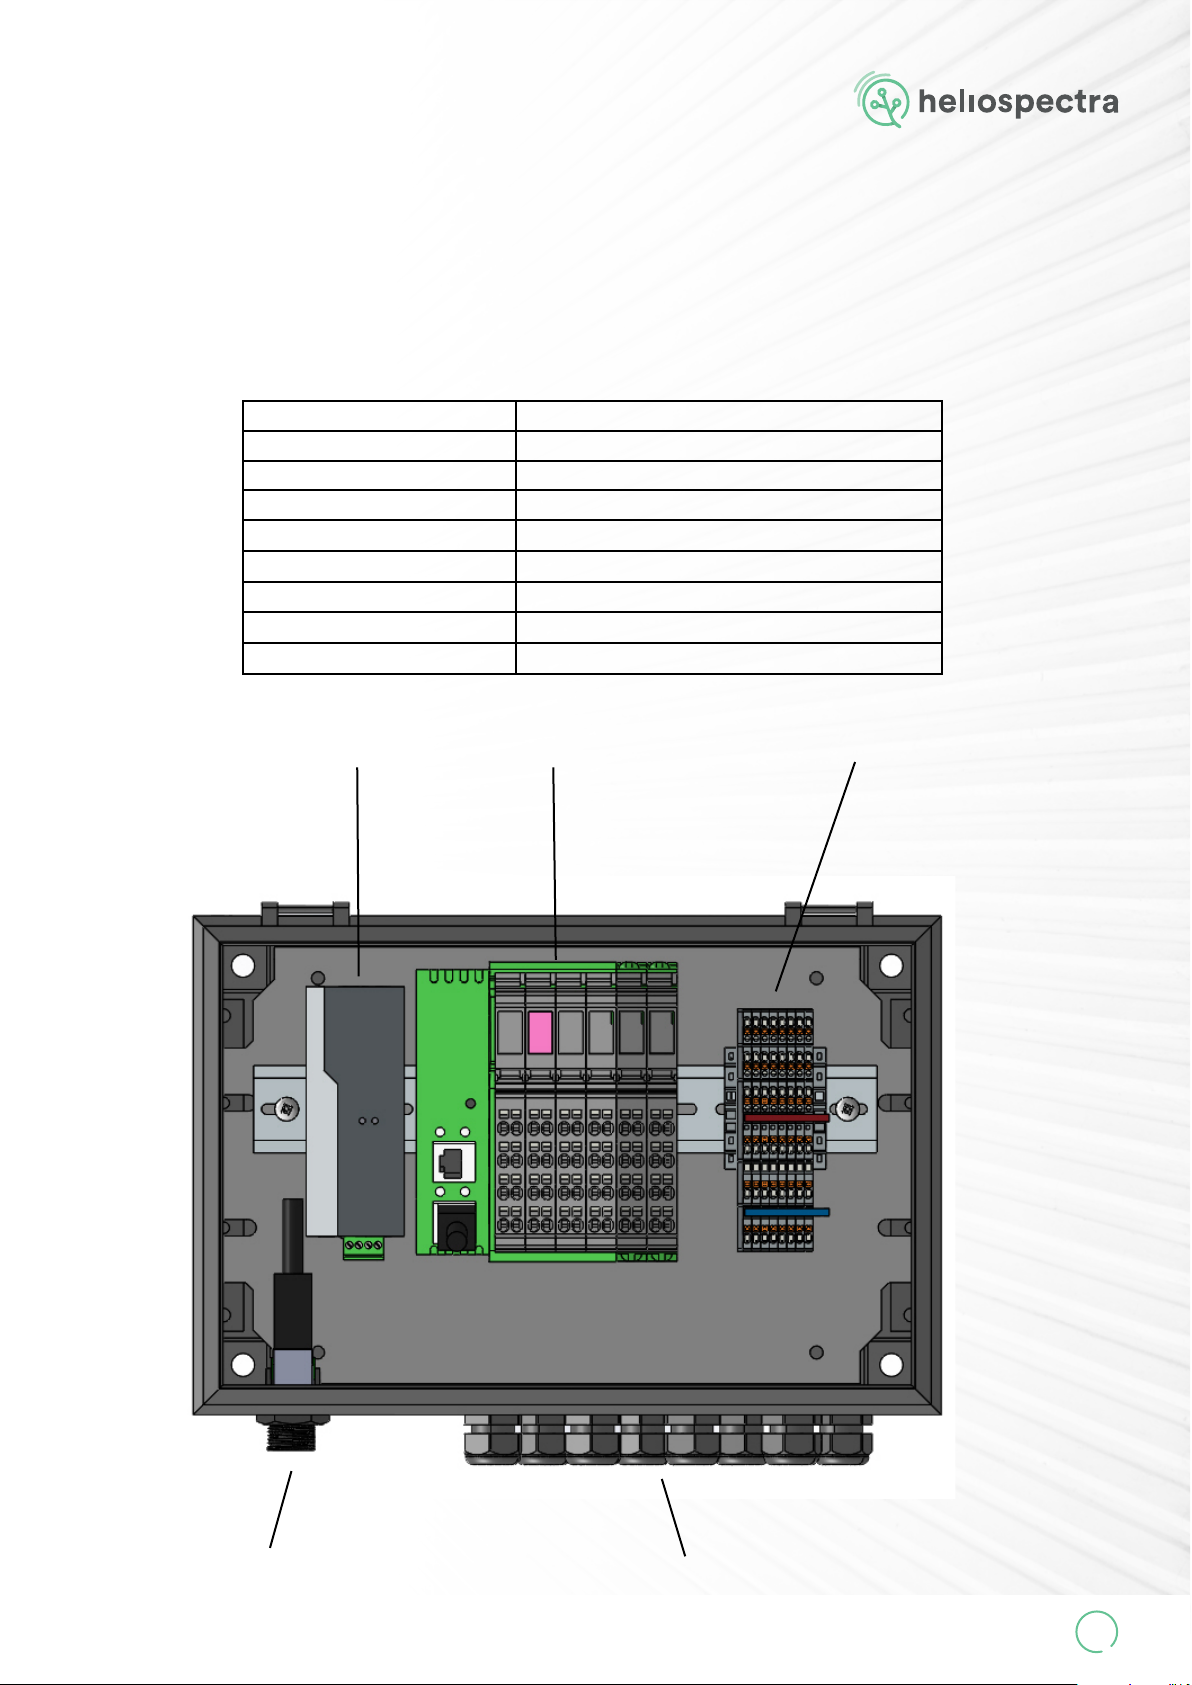
Specications
Input Voltage POE 48VDC (IEEE 802.3at)
Maximum power 21.5W
IP rating IP65
Weight 4kg (8.8 lbs)
Dimensions 300x200x160mm
Temperature -25 ... +70 °C (operation) -40 ... +85 °C (storage)
Humidty 5 … 90% no condensation
Certications UL, CE, ROHS
POE SUPPLY IO-MODULE CUSTOMER CONNECTION PANEL
POE network connection 8 x Cable glands for sensor inputs

www.heliospectra.com
4
2. Box Installation
The box has prefabricated mounting holes designed for M6 screw installation. Note the dimensions in
the gure above.
Mount the box to a at sturdy surface, the box is also allowed to be laying down, but should be xed to
the surface. The box weight is 4 kg (9 lbs) so please take the appropriate measures to make sure that
the box is stable. Place the box in such way, so it is available for service and maintenance. When mount-
ing the cabinet, please use galvanized or stainless M6-M8 screw that withstand humid environments
over time.
2.1 Wall Mounting
260mm
160mm
200mm
300mm

SENSOR Hub Setup Manual
V. 1.3
5
sensorHUB is supplied with power through the ethernet cable, also named POE or Power Over
Ethernet. This means that no power cable has to be connected, but instead the other end of
ethernet cable must be connected to a switch that supports POE+. The power consumption for
the sensorHUB is a maximum of 21.5W, depending on how many sensors that is connected.
Below you can see a simplyed setup of the sensorHUB in a helioCORE network:
2.2 Network Installation
Internet
WLAN
ACCESSPOINTS
WLAN
ACCESSPOINTS
WLAN
ACCESSPOINTS
POE SWITCH
OR
STD SWITCH WITH
POE INJECTORS
sensorHUB
sensorHUB
helioCORE
WAN
LAN

www.heliospectra.com
6
3. Sensor Installation
The sensorHUB has eight inputs for sensors, the input module expects a 4-20mA sensor sig-
nal. Any sensor with this sensor signal could be connected to the system, as long as the sensor
could be supplied with the 24 volts that the sensorHub supplies and that the helioCORE system
has support for it.
The sensors should be placed at canopy level or as close to the canopy as possible. Once the
sensors have been placed appropriately, then make sure to place the cable in safe locations
out of direct passing trac as they are fragile by nature. The best is to install them close to
a structural element such as a support pole and pull the cables along the truss space to the
sensorHUB .
Most sensors come equipped with 5 m (16 ft 5 in) long cables, prebuilt extentions could also
be purchased. If extensions are made with a general cable, it is important that the cable fulls
this requirments: Shielded Twisted Pair AWG20 (0,52mm2). It is also very imortant that the
cable shielding connected and intact all the way from the sensor into the sensorHUB and then
connected to the GND bar.
Each sensor has an indended cable gland, make sure that the cable gland seals correclty around
the cable, so that no moisture enters. Each gland have a pushout seal that seals the gland when
no cable is connected. Only one cable is allowed in each gland, to ensure proper sealing. The
cable gland will accept cable dimensions between 3 and 5mm (12 to 14 AWG).
3.1 Cable Installation
LAN S1 S2 S3 S4
Sensor data cable entry
S5 S6 S7 S8

SENSOR Hub Setup Manual
V. 1.3
7
3.2 Sensor Connection
Depending on sensor type, dif-
frent connection options is aval-
ible. Below, a general schematic
of a 3-cable based 4-20mA sensor
is described. If the sensor is 2-ca-
ble based, the GND cable in the
schematic is removed.
In the picture to the right, the
customer connection terminal is
showed.
There is eight terminal blocks with
three corresponding push-in con-
nectors. The row at the top is the
24 volt supply line, the row at the
bottom is the ground and the row
in the middle is the signal input.
+24 SUPPLY
GND
S1-S8 inputs
FOR INTERNAL USE
www.heliospectra.com
8
3.2 Sensor Connection
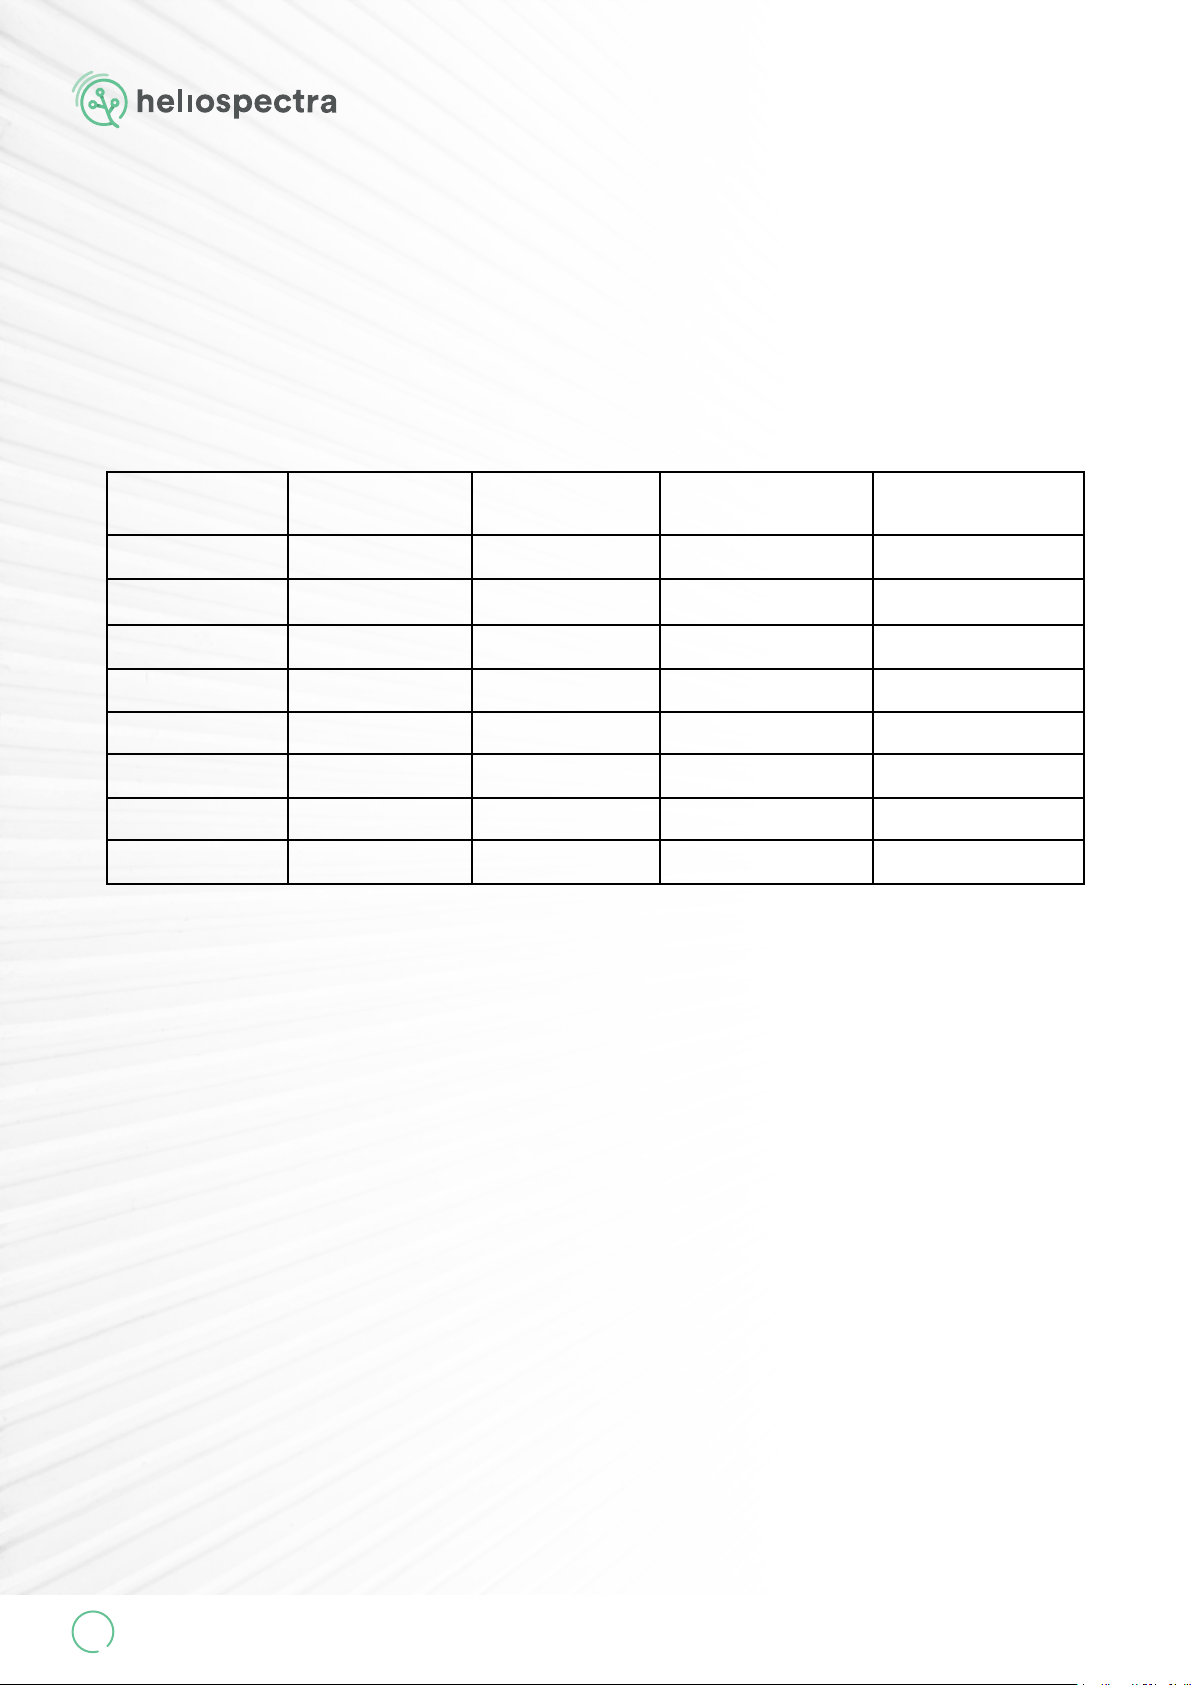
When connecting sensors, it is very important to ll in the sensor connection map below to en-
sure that the helioCORE user will know which sensor name in the software is referring to which
sensor in the grow facility.
Sensor input
port
Sensor serial
number Sensor location Sensor
calibration factor
helioCORE default
Display Name
S1 BC01M03AIO01
S2 BC01M03AIO02
S3 BC01M03AIO03
S4 BC01M03AIO04
S5 BC01M04AIO01
S6 BC01M04AIO02
S7 BC01M04AIO03
S8 BC01M04AIO04
If multiple sensorHUBs are connected to the helioCORE they will appear with in with Display
Names starting with “BC02” and “BC03” and so forth.
The sensor serial number is found on the label of the sensor head.
The sensor location refers to the physical placement of the sensor.
Example: “Greenhouse A Bay 1”
The sensor calibration factor is found in the Certicate of calibration for LI-COR sensors as the
‘Multiplier’-value under the caption “If this is an LI-190R-BL”.

SENSOR Hub Setup Manual
V. 1.3
9
4. Software Setup
The sensorHUB will be automaticly identied by the helioCORE system when the unit is con-
nected to the nework. After identication of the sensorHUB, the helioCORE system has to be
mapped up with sensor types, how the sensors are placed and how they should be named. This
procedure will be further described in the user manual for helioCORE.
5. Maintenance
6. Support
7. Warrenty
No specic maintence would be needed for the sensorHUB, but it is important that the sen-
sorHUB is handled with care, that the lid is closed at all times and that all cable glands are tigtly
sealed around the cables.
For support questions and more information about the product, for
example full product manual, visit support.heliospectra.com/portal
or scan the QR code to go straight there.
sensorHUB carry a warranty that the hardware components will be free from defects in ma-
terial and workmanship for a period of three (3) years from the date of delivery. The warranty
extends only to the original Buyer of the Product and may not be transferred or assigned by
the original Buyer. The warranty only applies to sales directly through Heliospectra or any au-
thorized reseller. If the Product was purchased through an authorized reseller, the same terms
shall apply, but any claim shall be made via the reseller who sold the Products to the original
Buyer. For extended information about warrenty, a full version if Heliospectra General Warranty
Terms and Conditions can be found in the support portal.

www.heliospectra.com
10
Contact Details
Sweden
Heliospectra AB.
Fiskhamnsgatan 2,
414 58, Gothenburg
+46 31 40 67 10
Canada
Heliospectra Canada Inc.
2 Bloor Street West
Suite 2120
ON M4W 3E2, Toronto
+1 888-942-GROW
United States
Heliospectra Inc.
1658 N. Milwaukee Avenue
Suite #100-6558
60647 Chicago, Illinois
+1 888-942-GROW
Japan
Heliospectra Japan Co., Ltd.
2-10-3 Terada Kojimachi Build.
Chiyoda-ku, 102-0083, Tokyo
00(81)3-4405-3536
OUR OFFICES
Got questions? Or need info related to how to set up the SENSOR Hub?
Visit our Support Portal for User Manauals, articels and videos. https://support.heliospectra.com/portal/en/home
Table of contents
Other Heliospectra Lawn And Garden Equipment manuals


 Handling instructions")


