Helvex MB-1101 User manual

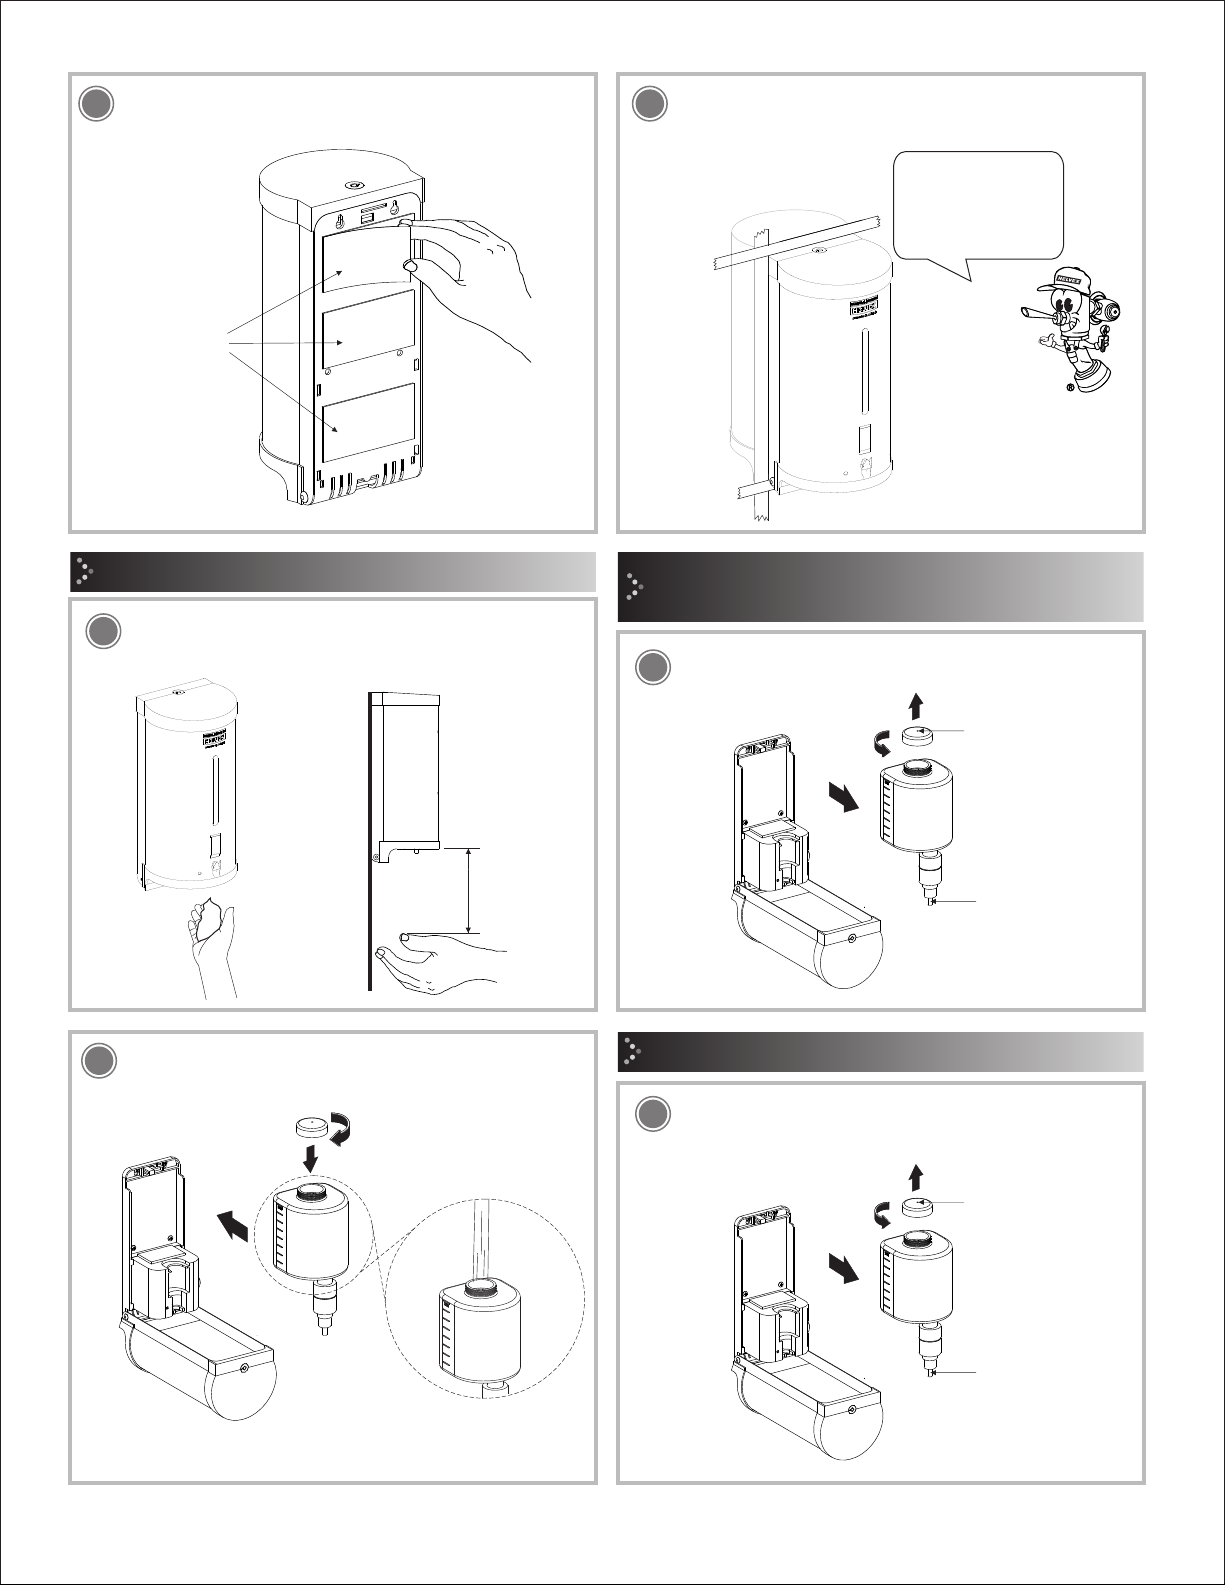
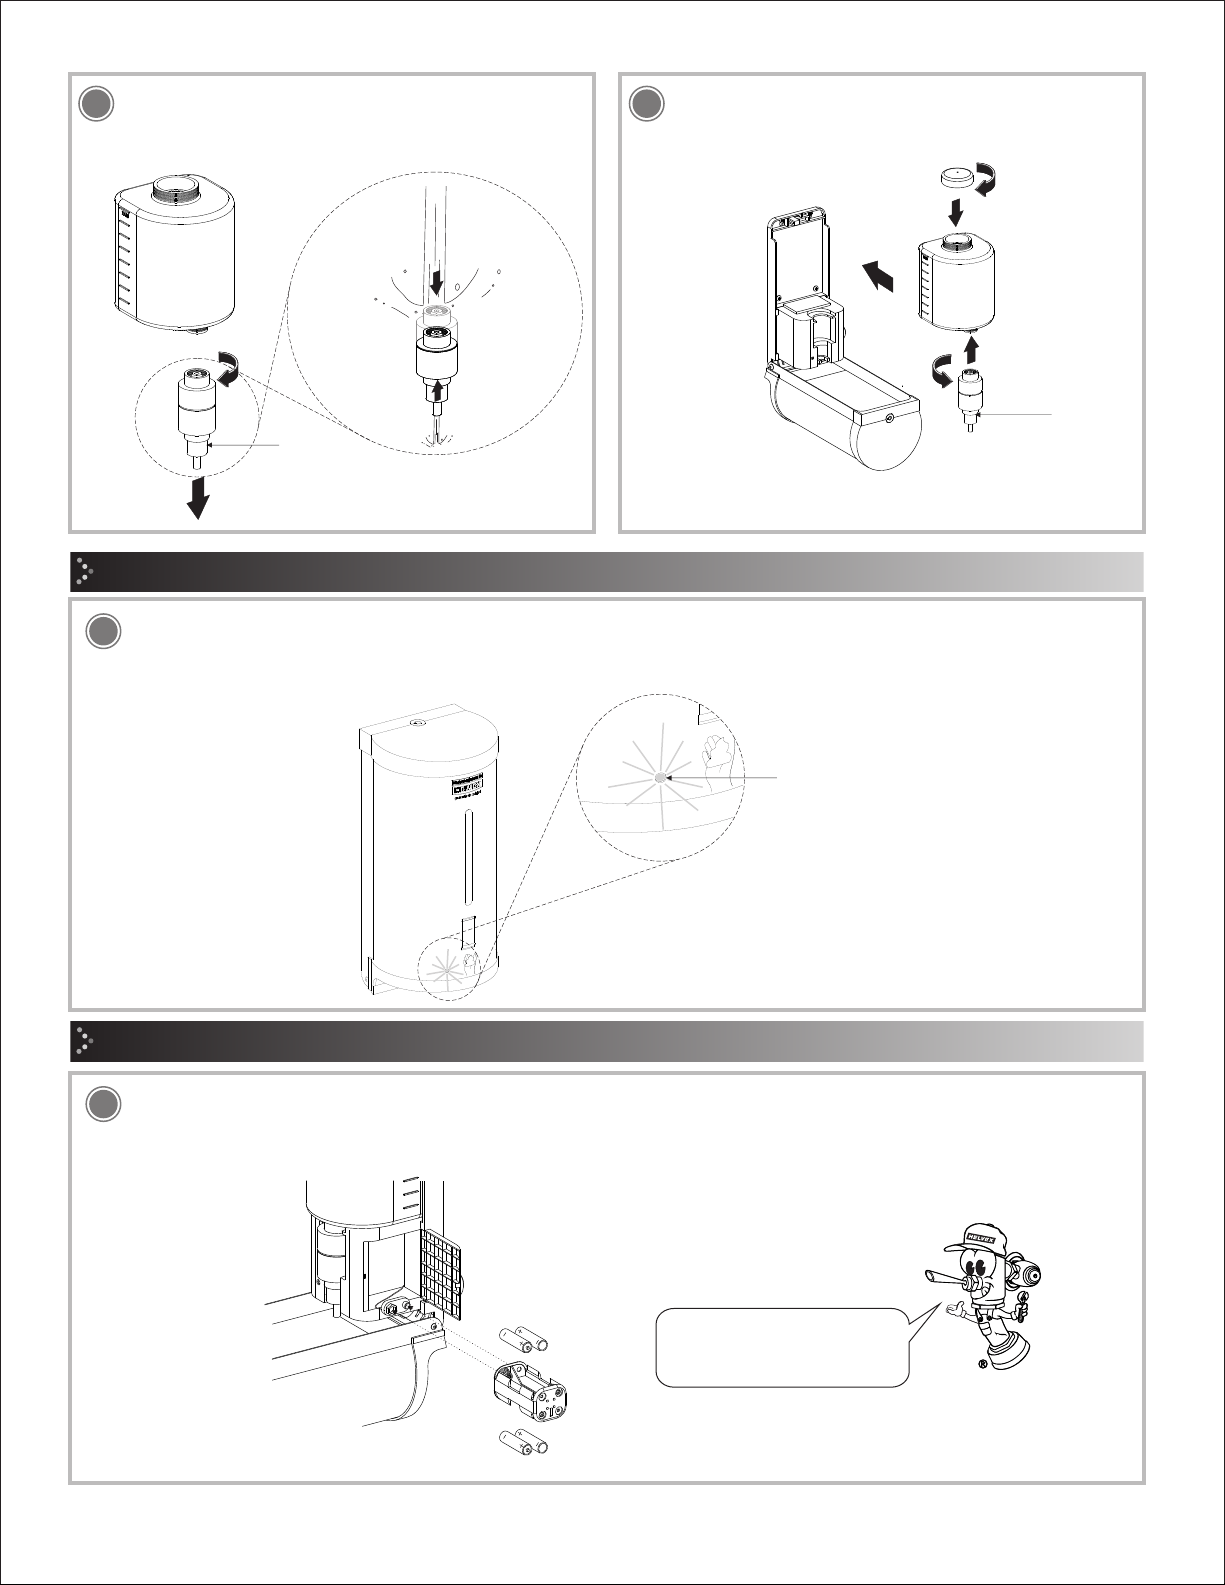
Instalación General / General Installation
concrete drill with Ø ¼"
cross screwdriver
desarmador de cruz taladro con broca para
concreto de Ø ¼”
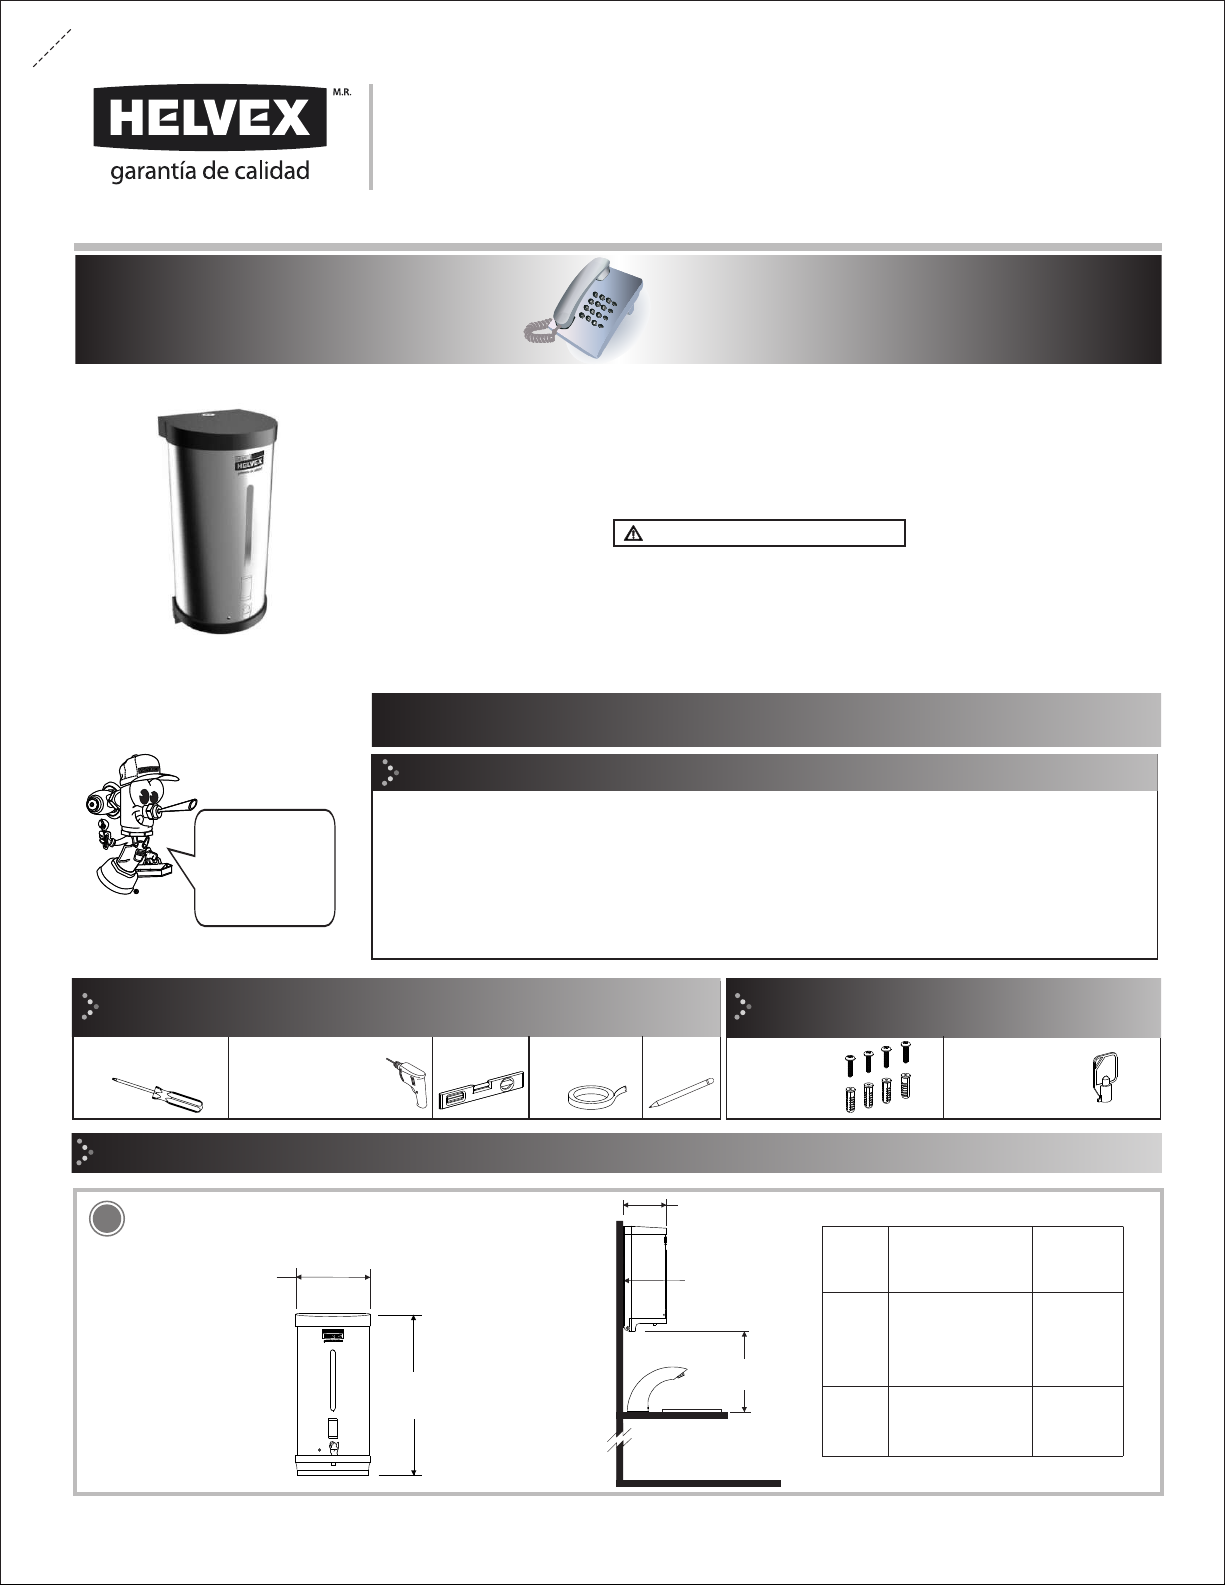
Dimensiones de Instalación. / Installation dimensions
1
INSTALLATION GUIDE
GUÍA DE INSTALACIÓN
Dosificador de Jabón en Espuma,
Electrónico de Baterías/ Foam Soap
Dispenser, Electronic Batteries
fixing kit
kit de fijación
-Capacidad del depósito de jabón / 800 ml
-Baterías requeridas / 4 Baterías Alcalinas (1,5 V)
-Potencia / 2W
-Rango de detección / 4 cm a 6 cm, auto ajustable
-Temperatura del entorno / 5-40 ºC
-Tiempo de respuesta / 0,5-1 seg.
-Volumen por descarga / 5 ml
-Modo de operación / -Activación automática del sensor
-Tipo de depósito (incluido) / -Reutilizable
-Tipo de jabón / -En espuma
Hola soy Fluxy, te
ayudaré a instalar
tu producto.
Hi I'm Fluxy, I'll
help you to install
your product.
Herramienta Requerida / Required Tools Artículos incluidos en su Producto
/ Item Included in your Product
pencil
lápiz
Datos Técnicos / Technical Data
2
MB-1101
Original Spare Parts:
Consultancy and Technical
01(55)53339431
01800 909 2020 01 (55) 53 33 94 00
Refacciones Originales:
Asesoría y Servicio Técnico:
Ext. 5068, 5815 y 5913
Service:
53 33 94 21
01 800 890 0594
Para disminuir el riesgo de lesiones o daños a la propiedad, lea todas las instrucciones antes de instalar el
producto. Utilice gafas de seguridad. En obras de construcción, instalación, modificación, ampliación y
reparación deben cumplir con el reglamento de construcción y obras de su localidad. El producto ilustrado
puede sufrir cambios de aspecto como resultado de la mejora continua a la que está sujeto.
Agradecemos su elección por los productos HELVEX.
Estamos seguros de que su confiabilidad por el producto excederá sus más altas expectativas, cuya
funcionalidad, estética, durabilidad, respaldo integral y alta calidad le otorgarán plena satisfacción por años,
reflejando el compromiso con la calidad, innovación y el medio ambiente que forman parte de Helvex.
To reduce the risk of injury or property damage, read all instructions. Before installing the product, please
remember to use safety glasses. Apply building normative for any construction, installation, alteration,
extension or repair. As result of continuous improvement, the product illustration may change in appearance.
ADVERTENCIA / WARNING
Esta guía de instalación aplica al producto en cualquier acabado. / This installation
guide applies to the product in any finish.
Thank you for choosing HELVEX products.
We are confident that the product reliability will exceed your maximum expectations. The functionality,
aesthetics, durability, quality and support will grant you full satisfaction for years, it is Helvex commitment to
the quality, innovation and the environment.
level
nivel
-Capacity of soap deposit / 800 ml
-Batteries required / 4 Alkaline Batteries (1.5 V)
-Power / 2W
-Range of detection / 4 cm to 6 cm, auto adjustable
-Temperature of the environment / 5-40ºC
- Response time / 0.5-1 sec.
-Volume by download / 5 ml
-Operation mode / Automatic activation of the sensor
-Type of deposit (included) Reusable /
-Type of soap / In foam
cinta adhesiva
masking tape
security key
llave de seguridad
Medida
Superficie normal
(mármol, lozeta etc.).
Normal surface
(marble, tile, etc.).
20 cm
(7,87”)
Superficie de acero
inoxidable.
Stainless steel
surface.
30 cm
(11,8”)
DescripciónAltura
h1
h2
27,5 cm
12,3 cm
(10,8”)
(4,8”)
10,6 cm
Pared
terminada
o espejo
h1 o h2
h1 or h2
(4,17”)
Measure
DescriptionHeight

4Abra el seguro con la llave (incluida). /
Open the lock with the key (included).
plantilla
template
h1 o h2
h1 or h2
superficie
surface
Inserte los taquetes en los barrenos. /
Insert the anchors into the holes.
Trace una línea horizontal en el muro, a la altura deseada (h1 ó h2). Coloque la plantilla,
empatando la línea guía con la marcada en el muro, marque y barrene con una broca de
Ø 1/4”/ Draw a horizontal line on the wall, at the desired height (h1 or h2). Place the
template, tying the guide line with the marked on the wall, mark and drill with a drill Ø 1/4
"/ Drill with masonry bit Ø 3/8" and insert anchors (provided) into the holes.
23
taquete
anchor
llave
(incluida)
key (included)
Jale la cubierta para abrir el dosificador.
/ Pull the cover to open the dispenser.
56Retire el depósito de jabón. / Remove
the soap container.
depósito
de jabón
soap
container
compartimento
de baterías
batteries
compartment
Apriete
firmemente.
Tighten
firmly.
7Enrosque las pijas. / Thread the lag
screw.
Llene y coloque el depósito. / Fill and
place the container.
89Abra el compartimento de baterías. /
Open the batteries compartment.
2

llave
(incluida)
key
(included)
porta
baterías
battery
holder
12 Conecte e Inserte el porta baterías. /
Connect and Insert the batteries
holder.
Coloque 4 baterías alcalinas AA (no
incluidas) nuevas. / Place 4 new AA
alkaline batteries (not included).
Desconecte y retire el porta baterías. / Unplug and remove the batteries conteiner.
10
Cierre la tapa del compartimento de
baterías y la cubierta del dosificador.
/ Close the batteries compartment cover
and the dispenser cover.
Asegure con la llave (incluida). / Secure
with the key (included).
Limpie con alcohol la superficie donde
se instalará. / Clean the surface with
alcohol where it will be installed.
Ubique y marque con cinta adhesiva el contorno del dosificador. / Locate and mark the
contour of the dispenser with masking tape.
porta
baterías
batteries
conteiner
11
Instalación en Espejo / Installment in Mirror
cinta
adhesiva
masking
tape
13 14
15 16
3

19 Acerque la mano para activar el dosificador. / Reach your hand
to activate the dispenser.
Coloque el dosificador en el espejo y mantenga presionado
durante 1 minuto. / Place the dispenser in the mirror and hold it
down for 1 minute.
Retire los protectores de las almohadillas adhesivas. / Remove
the protectors from the adhesive pads.
17
Para desmontar el depósito siga los pasos 4-6 de la pag. 2. /
To disassemble the deposit follow steps 4-6 of the page. 2.
18
20
protectores
protectors
Para una adhesión
correcta, llene el
depósito despues de 10
horas. / For a correct
adhesion, fill the
deposit after 10 hours.
Operación / Operation
Rango de detección
ajuste de fábrica 4
cm a 6 cm. /
Detection range
factory setting 4 cm
to 6 cm.
boquilla
nozzle
Llenado del Depósito de Jabón
/ Filling the Soap Deposit
21 Llene el depósito con jabón en espuma, cierre el depósito y
móntelo nuevamente al dispensador. / Fill the deposit with foam
soap, close the deposit and mount it to the dispenser.
Asegúrese de que el depósito se cierre correctamente, y que el orificio de
ventilación y la boquilla no estén obstruidos. / Make sure that the deposit
closes properly, and that the ventilation hole and nozzle are not clogged.
Mantenimiento / Maintenance
Desmonte el depósito asegurándose de que se encuentre
vacío y desenrosque la tapa. / Remove the deposit making
sure it is empty and unscrew the cap.
22
orificio de ventilación
de la tapa / cap
ventilation hole
boquilla
nozzle
orificio de ventilación
de la tapa / cap
ventilation hole
4

25 Observe el comportamiento de la luz azul. Si la luz de color azul parpadea 3 veces, quiere decir que las baterías están cargadas. Si la luz
de color azul es continua debe cambiar las baterías. / Observe the behavior of the blue light. If the blue light flashes 3 times, it means that
the batteries are charged. If the blue light is continuous, you should change the batteries.
23
Extraiga el porta baterías y cambie las baterías (siga los pasos 9-14 pag. 2 y 3). / Remove the batteries holder and replace the batteries
(follow steps 9-14, page 2 and 3).
26
/ Verification of Batteries
Cambio de Baterías / Battery Replacement
boquilla
nozzle
Desenrosque la boquilla y actívela presionandola mientras el
chorro de agua limpia el interior. / Unscrew the nozzle and
activate it by pressing it while the water jet cleans the inside.
24 Enrosque la boquilla al depósito , llene el depósito con jabón en
espuma, cierre la tapa del depósito y móntelo nuevamente al
dispensador. / Screw the nozzle to the deposit, fill the deposit
with foam soap, close the diposit cap and mount it back to the
dispenser.
Verificación de las Baterías
Asegúrese de que el depósito se cierre correctamente, y que el orificio de
ventilación y la boquilla no estén obstruidos. / Make sure that the deposit
closes properly, and that the ventilation hole and nozzle are not clogged.
luz azul
blue light
boquilla
nozzle
Instale correctamente las 4
baterías (AA alcalinas no incluidas).
/ Install the 4 batteries correctly
(alkaline AA not included).
Realice este mantenimiento por lo
menos cada 15 días. / Perform this
maintenance at least every 15 days.
5

01 55 53 33 94 00
Ext. 5804, 5805 y 5806 (0133) 36 19 01 13
Comunícate:
Participa en nuestros
cursos gratuitos
de capacitación.
(0181) 83 33 57 67
(0181) 83 33 61 78
In Guadalajara:
Contact:
Enter our free
training courses.
In Monterrey:
En la Ciudad de México:
In Mexico City:
En Monterrey:
En Guadalajara:
Es muy importante seguir las siguientes instrucciones para conservar los
acabados de los productos HELVEX, con brillo y en perfecto estado:
1. Utilice únicamente agua y un paño limpio.
2. No utilice fibras, polvos, abrasivos, ni productos químicos.
3. No utilice objetos punzo-cortantes para limpiar los acabados.
4. Se recomienda realizar la limpieza de su producto diariamente.
Visite nuestras páginas www.helvex.com.mx para México y www.helvex.com
para el mercado Internacional
It is very important to follow the instructions below to preserve HELVEX products
finishes, shiny and in perfect condition:
1. Use only water and a clean cloth.
2. Do not use fibers, powders, abrasives, or chemicals.
3. Do not use sharp objects to clean the finish.
4. It is recommended to clean your product daily.
Visit our pages www.helvex.com.mx for Mexico and www.helvex.com
for the International market.
Recomendaciones de Limpieza / Cleaning Recommendations
HELVEX, S. A. DE C. V. Calzada Coltongo # 293, Col. Industrial Vallejo, Del. Azcapotzalco, C. P. 02300, Ciudad de México.
Problemas y Soluciones / Troubleshooting
Problema / Problem Causa / Cause Solución / Solution
No descarga el jabón
/ Do not discharge the soap
Las baterías están descargadas.
/ The batteries are discharged.
Cambie las baterías. (Página 5, paso 26).
/ Change the batteries (Page 5, step 26).
La boquilla o el orificio de ventilación del depósito están
obstruidos. / The reservoir nozzle or vent hole is clogged.
Realice el mantenimiento a la boquilla y asegúrese de que el
orificio de la tapa no esté obstruido. (Página 4, paso 22). / Perform
maintenance on the nozzle and make sure the hole in the cap is
not obstructed (Page 4, step 22).
No hay jabón en el depósito. / There is no soap in the tank. Recargue el depósito de jabón. / Recharge the soap deposit.
El dosificador se activa solo.
/ The doser is activated alone.
Se encuentra muy cerca una superficie reflejante.
/ A reflective surface is very close.
Mueva el dosificador de acuerdo a las medidas de instalación
recomendadas. / Move the doser according to the recommended
installation measures.
HECHO EN TAIWÁN
6
Other Helvex Dispenser manuals