manuals.online logo
Brands
  1. Home
  2. •
  3. Brands
  4. •
  5. Henderson
  6. •
  7. Indoor Furnishing
  8. •
  9. Henderson SHUTTER SLIDE User guide

Henderson SHUTTER SLIDE User guide

SHUTTER SLIDE
Single Panel or Sim Action - Manual Operation
Fitting Instructions
No. of Panels
Type of
System
Min. Panel
Width Max. Panel Height
Panel Thickness
Range
Max. Panel
Weight
1 or 2* Manual 400mm 3000mm 35-48mm 120kg
*For 2 door applications (1+1) please use these instructions in conjunction with the Shutter Slide SIM Action Fitting Instructions
PANEL SPECIFICATION
SYSTEM COMPONENTS
TOOLS REQUIRED
120 Track (x1) HH4/AN Track
Stop (x2)
WP50F Fascia (x1) WP50/EC End
Cap (x2)
WP50T Wall Fixing
Profile (x1)
51/120/SS Hanger (x2) or
56/120/SS Hanger (x2)
GSS/SBK10 Guide (x1)
GSSUR
Channel (x1)
GSSULR Channel
(x1)
GSS/MK40 Fixing Plate (x1) GSS/MK60 Fixing Plate (x1) GSS/MK100 Fixing Plate (x1)
Phillips Screwdriver
Tape Measure
Drill
Hammer
2, 3, 4 & 5mm
Allen Keys
13mm Spanner
Chisel
Components vary depending on specification
GSS/SSK10 Guide (x1) GSS/SL Guide (x1)
GSS/RH Offset Angle
Plate Right (x1)
GSS/LH Offset Angle
Plate Left (x1)
OR
OR
OR
OR
OR
OR
Page 1
TRACK, WALL FIXING PROFILE AND FASCIA OVERVIEW
SUGGESTED SHUTTER HEIGHT
Fascia
Wall Fixing Profile Track
49mm
Midpoint of Track =
Top of Shutter + 49mm
Centre
Line
Page 2
STEP 1: Position apron plates a minimum of 32mm away from the edge of the door. Ensure apron plates are
equal distance from either edge of the door. Once positioned correctly, screw into place.
STEP BY STEP INSTRUCTIONS
STEP 2: Install the U-profile channel onto the base of the shutter, fixing at 200mm intervals along the centre
line
=
=
Min 32mm
GSSUR GSSULR
Page 3
STEP 3: Cut track, track profile and fascia to the required length. Drill holes in the track (50mm from each of
the track and then equal distances inbetween). Use "V" to ensure holes are central (hole size depends on
fixing method). Finally, fix the profile to the wall and fix the track to the underside of the profile.
STEP 4: Insert stops and hangers into the track in the order shown below.
Use "V" in track to ensure
hole is central
NOTE: It is the installer’s responsibility to
ensure that the correct fixing/wall insert is
used and is suitable - depending on the
wall/ceiling type and quality.
Page 4
STEP 6: Check and adjust the shutter height so that it is between 20 - 32mm from bottom of track.
STEP 5: Hang the shutter onto the track, set the height and tighten into position.
STEP 7: Ensure shutter is parallel to the wall and track.
i. Set shutter height by rotating strap bolt
on flats
ii. Once the required position is set –
tighten the thin nut against the apron
plate.
i.
ii.
20mm –
32mm
Page 5
STEP 9: Position and secure track stop at both ends of the track using an allen key.
STEP 8: Using appropriate fixings, fit the L plate fixing guide to the edge of the opening. Next, attach the
guide using an allen key to tighten into place.
Follower
Door
Lead
Door
29mm
OR
Page 6
P C Henderson Ltd, Durham Road, Bowburn, Co. Durham, DH6 5NG, UK 100215
UK Sales Export Sales LVL01
t: +44 (0) 191 377 7345 t: +44 (0) 191 377 7346 Aug-19
e: [email protected]om e: international@pchenderson.com
w: www.pchenderson.com w: export.pchenderson.com
STEP 11: If you are installing two bi-parting doors, please now follow the Shutter Slide SIM Action fitting
instructions
STEP 10: Clip on fascia and screw on end caps.
Fascia
Page 7
51/120/SS Hanger (x2) or
Page 8

Other manuals for SHUTTER SLIDE
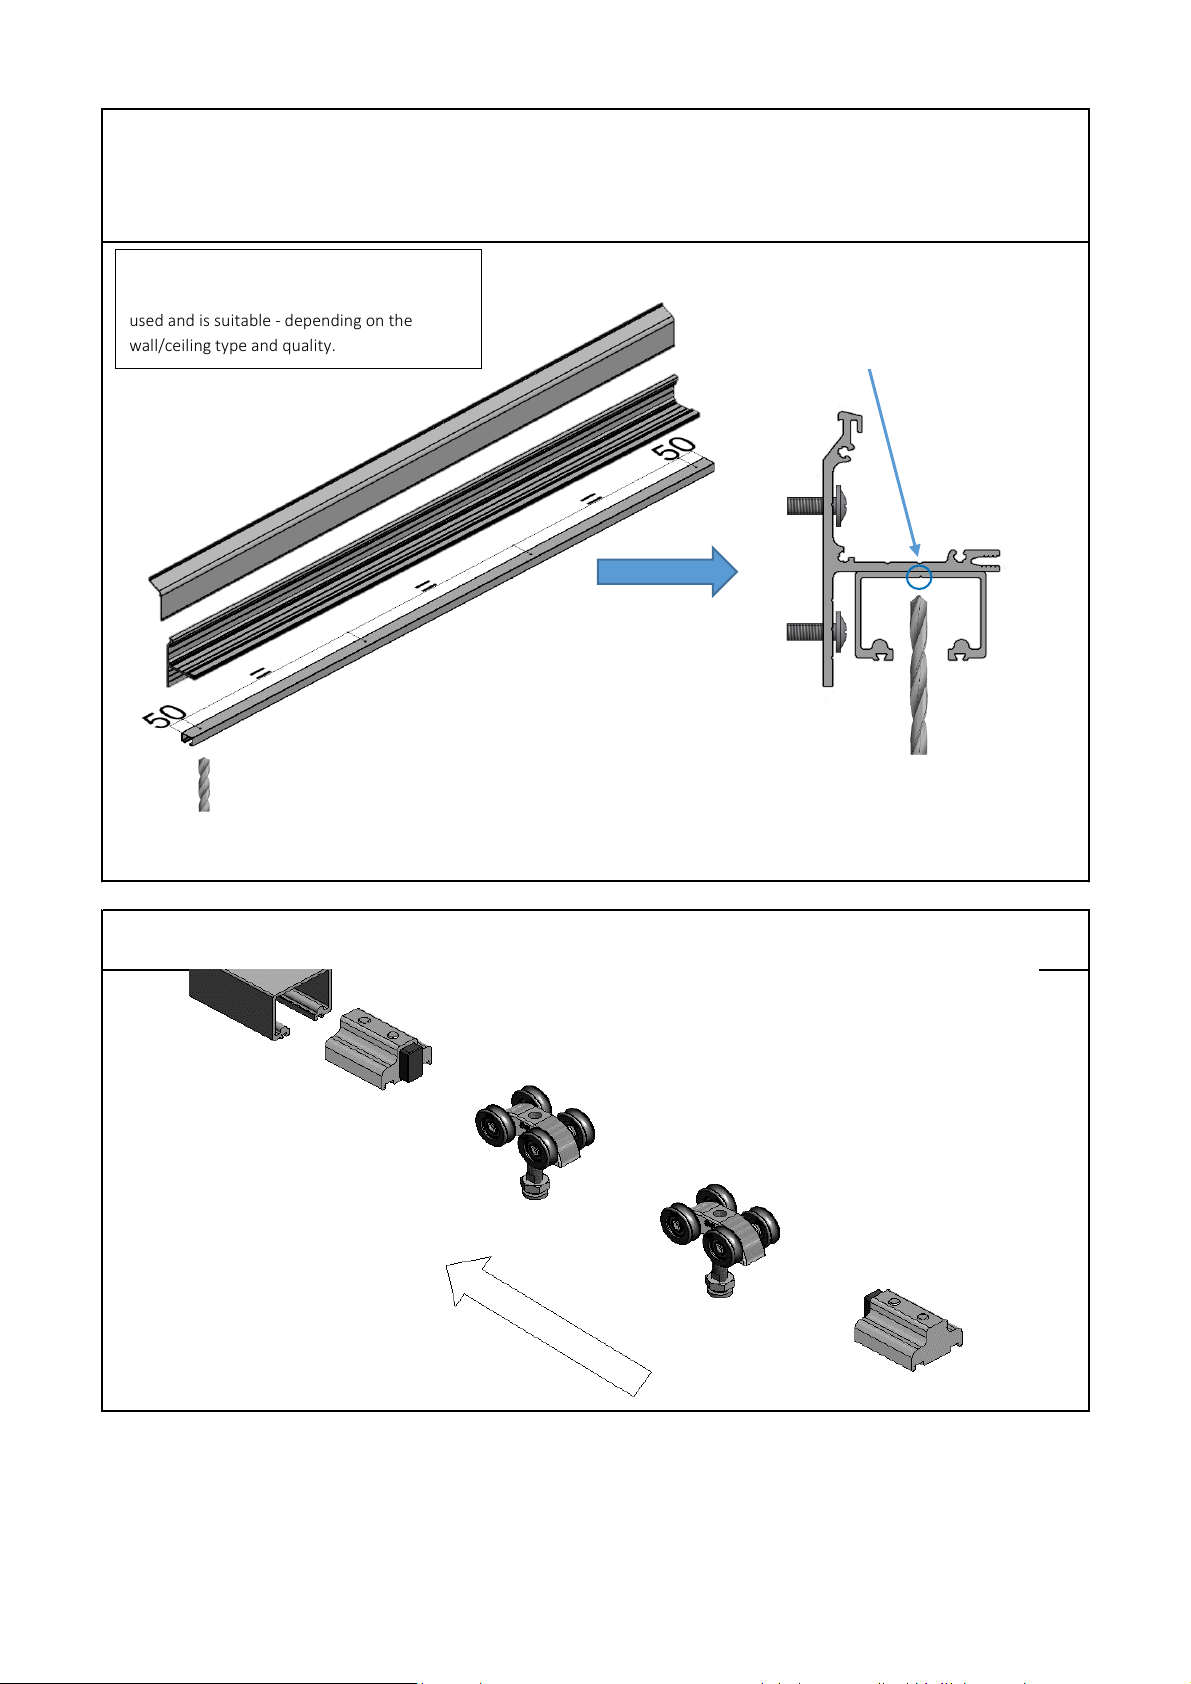
1

Other Henderson Indoor Furnishing manuals

Henderson Rustic 80 User manual

Henderson

Henderson Rustic 80 User manual

Henderson IMPERIAL PATIO KIT User manual

Henderson

Henderson IMPERIAL PATIO KIT User manual

Henderson SHUTTER SLIDE User manual

Henderson

Henderson SHUTTER SLIDE User manual

Henderson LORETTO User manual

Henderson

Henderson LORETTO User manual

Henderson LORETTO User manual

Henderson

Henderson LORETTO User manual

Popular Indoor Furnishing manuals by other brands

EAST OAK EO-CS001 owner's manual

EAST OAK

EAST OAK EO-CS001 owner's manual

BYYU WESTSIDE 20610 Assembly instructions

BYYU

BYYU WESTSIDE 20610 Assembly instructions

Stadium BA8230 Assembly instructions

Stadium

Stadium BA8230 Assembly instructions

Salli Professional instructions

Salli

Salli Professional instructions

Bell'O AVSC2155 Assembly instructions

Bell'O

Bell'O AVSC2155 Assembly instructions

Costway HW68639 user manual

Costway

Costway HW68639 user manual

Interprofil IPdesign jon edwards IP-124-8000 operating instructions

Interprofil

Interprofil IPdesign jon edwards IP-124-8000 operating instructions

OFM 55295 Assembly instructions

OFM

OFM 55295 Assembly instructions

Safavieh Furniture Wolcott FOX4205 quick start guide

Safavieh Furniture

Safavieh Furniture Wolcott FOX4205 quick start guide

pakoworld GAYE manual

pakoworld

pakoworld GAYE manual

Belleze 014-HG-49033 manual

Belleze

Belleze 014-HG-49033 manual

Trasman PATROVA POSTEL Assembly manual

Trasman

Trasman PATROVA POSTEL Assembly manual

Rauch M2597 Assembly instructions

Rauch

Rauch M2597 Assembly instructions

Coopers of Stortford G842 Instructions for use

Coopers of Stortford

Coopers of Stortford G842 Instructions for use

DeVorm MG 4 installation guide

DeVorm

DeVorm MG 4 installation guide

Germania 1690 Assembly instruction

Germania

Germania 1690 Assembly instruction

The Land of Nod Pavilion Tent Assembly instructions

The Land of Nod

The Land of Nod Pavilion Tent Assembly instructions

Next M67571/T01435 Assembly instructions

Next

Next M67571/T01435 Assembly instructions

manuals.online logo
manuals.online logoBrands
  • About & Mission
  • Contact us
  • Privacy Policy
  • Terms and Conditions

Copyright 2025 Manuals.Online. All Rights Reserved.