Henis Electronic Technology BH100 User manual
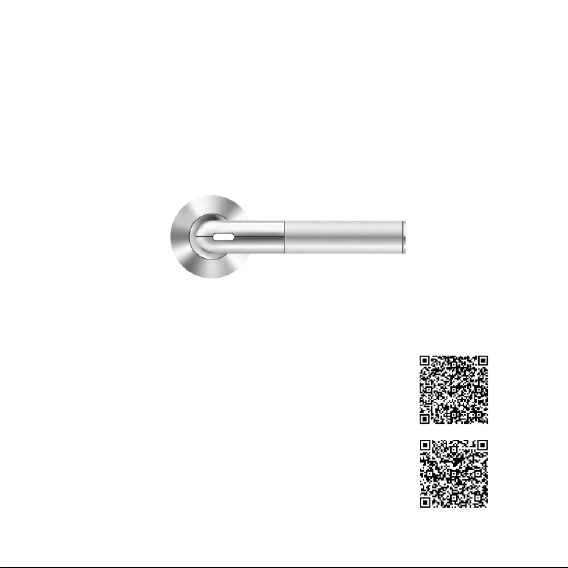
Smart Handle
User Manual
Android users can download and install
the App by scanning this code or searching
“ Smart Handle” in Google Play.
iOS users can download and install the
App by scanning this code or searching
“Smart Handle” in Apple App Store.

● Not installed or used in strict accordance with the manual.
● For national or public interests, or by force majeure.
● Your own or third party’s reason (including but not limited to the use of
third-party-products, software, components or other issues).
Any of the following reasons that result in interruption or termination of
service of the product, the manufacturer shall not be liable for personal or
third party’s injury or property loss :
Within the fullest extent permitted by law, the product described in this
manual (including hardware, software, rmware, etc.) is in accordance with
the “nished product”. There may be defects, errors or failures, while the
manufacturer will not provide any kind of express or implied guarantee,
including but not limited to marketability, satisfactory quality, tness for a
particular purpose and non-infringement of third party’s rights; nor
compensate for any special, incidental, accidental or consequential damages
caused by using this manual or our products, including but not limited to loss
of business prots, or missing of data and documents. Within the fullest extent
permitted by law, the liability of the manufacturer for damage will not exceed
the amount paid for the product.
Disclaimer
It is strongly recommended that you read this manual carefully before using
the product. It will ensure that you use the product correctly.
About this manual
This manual can be used as a guide. The photos, graphics, charts, and
illustrations in this manual, are for explanation and illustration purposes only
and may be different from the specic product. Please refer to the actual
product.
Safety and Disclaimers
Attention
2

Compatible Devices
The Smart Handle mobile App only supports iPhone4S (or later), and
approved Android 5.0 Lollipop devices.
The Smart Handle is also compatible with the Smart Key. Additional
Smart Key is available separately.
Blackberry and Windows platforms are not supported.
Caution
● Do not disassemble, modify or maintain the product by yourself.
● The Smart Handle ID QR code in this manual is for product registration
purpose. After successful registration, this code also can be used to delete all
previous registration information. Please keep it safely.
When using the product, please strictly follow the applicable laws. If the
above conicts with applicable laws, the applicable laws shall prevail.
● If the product is connected to the internet, it may face network attacks, hacker
attacks, virus infection and other risks, which will cause malfunction, privacy
breach and other issues. The manufacturer will not be liable for these, but will
promptly provide you with technical supports.
3
iOS Devices Android 5.0, Lollipop
iPhone 4s
iPhone 5,5s
iPhone 6,6 plus
iPhone 6s,6s p lu s
iPhone 7,7 plus
iPod Tou ch 5 th Gen
iPod Tou ch 5th Gen (16GB Mid 2013)
iPod Tou ch 6 th Gen
iPad 3rd Gen,4th G en,
iPad Air, Air 2
iPad Pro (12.9 -i nch),Pro(9.7 inch)
iPad Mini, Mini 2, M ini 3, Mini 4
Nexus 5X, 6, 6P, 9
HTC One M9
Samsung Galaxy S 5, S5 Act ive
Samsung Galaxy S 6, S6 Act ive
Samsung Galaxy S 6 Edge
Samsung Galaxy S 7, S7 Act ive
Samsung Galaxy S 7 Edge
Samsung Galaxy N ote 4
Samsung Galaxy N ote 4 Edge
Samsung Galaxy N ote 5
Samsung Galaxy N ote 7
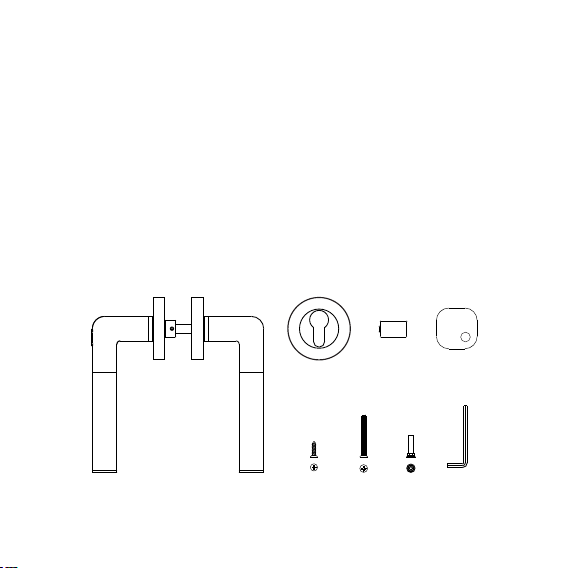
Package Details
After opening the product packaging, please make sure the product is intact,
and conrm the accessories are complete as per the gure below.
① Smart Handle
② Escutcheons
③ CR2 disposable Lithium batteries
④ Smart Key (optional)
⑤ Self-tapping screws
⑥ Back-to-back screws
⑦ Back-to-back bolts
⑧ Hex key
C R 2
①
② ③ ④
⑤ ⑥ ⑦ ⑧
1 set
2pieces
2 pieces
8 pieces
2 pieces
2 pieces
1 piece
4
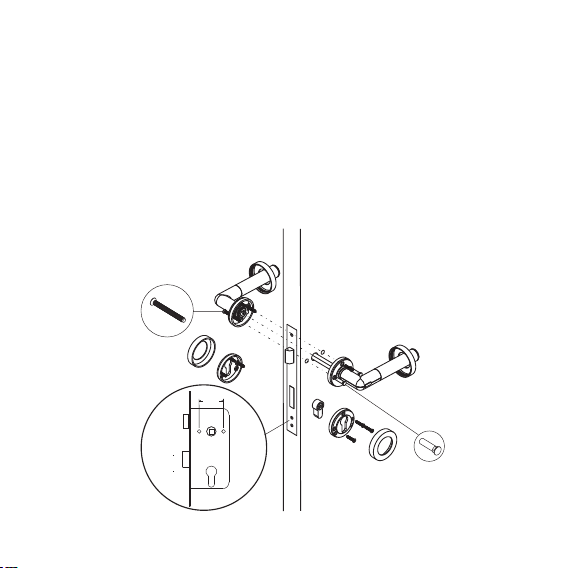
Product Installation and Key Points
The installation for Smart Handle is the same as normal handles.
Please note the following:
1. Please check if there are 38mm back-to-back screw holes in the lockbody,
otherwise replace the lockbody.
2. Please choose the right product according to the opening direction of the door.
Make sure the handle with power button is installed on the outside of the door.
3. Please install back-to-back bolt on the outside of the door when installing
back-to-back screws.
4. Carry out the assembly with the door open.
5
Bol t
Scr ew
38 mm
Out door
Ind oor
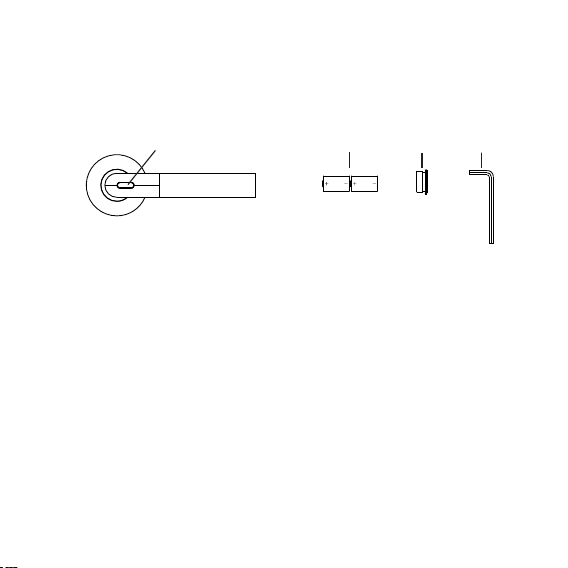
Buttons, Installation and Replacement of the Battery
The product uses two CR2 disposable Lithium batteries. Remove the battery
tag to activate the Smart Handle for initial use.
Please use the Hex key provided to open the battery lid on the end of the door
handle, and follow the diagram below for battery installation or replacement:
Power Button
Caution
● When the product or App signals low battery warning, please replace the
battery to avoid battery leakage and damage or unable to unlock the product.
After warning signal appears, theoretically the door can still be unlocked for
about 50 times.
● Use CR2 batteries when replacing. Do not use batteries in other specications.
● Pay attention to the correct polarity when replacing the batteries.
● Always replace discharged batteries with new batteries.
Battery Safety Alert
● CR2 Lithium battery is disposable. Do not charge it to avoid re or bums.
● Do not disassemble, heat or burn the battery.
● Keep it out of reach of children to avoid hazard.
● Please dispose the battery in accordance with local laws and regulations.
C R 2 C R 2
Battery
6
Lid Hex key
Battery
Pairing
The rst registered user using the ID QR code in this manual will be set as the
Administrator.
Product Usage Guide

Each time when a new Administrator is registered, all the previous users’
information and unlocking records in the Smart Handle will be erased.
Administrator can send authorization code to any other users and other
users can be registered as My User.
● Press “ + ” button in the App.
● Press the power button on the handle for 10 seconds till red and blue LED
ashes, then press "Next" in the App when it becomes blue.
● For Administrator registration, please scan ID QR code in the User Manual and
press "Next" button.
● For User registration, please input authorization code into SMS code box and
press "Next" button.
● After successful registration, the users can make "Calibration" if needed.
(which will be explained in the next section).
Create and Send Authorization Code to My User
Administrator can send authorization code to invite other users to register as
My User.
● Enter My Keys page, then press “ + ” button in the App and the power button on
the handle to create a Bluetooth Key.
●Edit Bluetooth Key authorized user's name, and unlocking time period. (Each
user can have up to three unlocking time periods).
● Send the authorization code through SMS by “Send” or other ways by “Copy”
to other users.
7
Smart Key
If some users have no smart phone, or their smart phone is not compatible
with Smart Handle, the users can use Smart Key to unlock the door. Smart Key
is not a standard accessory supplied. Users need to purchase separately.
● Enter My Keys page, then press “ + ” button in the App and power button on the
handle to create a Smart Key.
● Edit Smart Key authorized user's name, and unlocking time period. (Each user
can have up to three unlocking time periods).
● Press and hold the button on the Smart Key to complete the pairing process.

●After successful registration, the users can make "Calibration" if needed.
(which will be explained in the next section).
Calibration
To ensure the smart phone or the Smart Key is able to unlock the door from a
certain distance, users can make calibration. This step is not essential. You can
still use this product without doing this step.
Administrator and User's smart phone calibration can be completed in his cell
phone App. The Smart Key calibration needs to be done through the auxiliary
by Administrator's App.
After entering the calibration page, App will prompt “Calibration will start in
5 seconds…”, then please place your device in your most commonly used
location for about 10 seconds (such as pocket, backpack, etc.) for accurate
calibration.
Due to the Bluetooth signal uctuation, if you can not unlock the door after
calibration, please place your device closer to the Smart Handle and try again
or re-calibrate to a more suitable distance.
Unlocking the door
Place your paired smart phone close to the Smart Handle or within the
calibration range, press the power button on the handle, then the door can be
unlocked.
8
Place your paired Smart Key close to the Smart Handle or within the
calibration range, press once the power button on the Smart Key, then press
the power button on the handle, the door can be unlocked.
The Smart Handle will be automatically locked again after unlocking in 5
seconds.
When using smart phone to unlock the door, please lock the phone screen or
put the App into the background, otherwise it will enter setting mode.
Due to the Bluetooth signal uctuation, if you can not unlock the door, please
place your device closer to the Smart Handle and try again.

Attention:
After the initial installation of the handle, please check if the lock works by
unlocking the door while the door is open.
If the door can not be locked or unlocked properly, please check the
installation steps and the lock itself.
LED Indicator
● The LED indicator light is integrated into the power button on the handle.
● The resepective LED indicator status as follows:
No. Product Status LED Indicator Status
1
2
3
4
Unlock normally Blue LED ashes---Green LED ashes
Unlock in low battery status Blue LED ashes ---Red LED ashes
Unlock in normal handle mode Blue LED ashes 2 times
Pairing mode Red and Blue LED icker in interval
Use as a Normal Handle
If you don’t need to use the Smart Handle function in certain situations, you
can turn on the "Use as a normal handle" option in the App, then it can be used
as a normal handle.
9
After replacing the Smart Handle batteries, Administrator need to unlock the
door once for information authorizing to the handle, otherwise the User's
smart phone or Smart Key can not work properly.
5Setting mode Purple LED ashes
User List
● Only Administrator can access and manage this page.
● This page contains all users’ names, unlocking permissions and other
information.
● Administrator can delete users, and edit other users’ unlocking permissions.
●You can carry out the calibration on the Smart Key under this page.
● Only Administrator can enter and view the unlocking records.
● The records contain the unlocking time, date, user and other information.
● The last three months' unlocking records will be synchronized to the App after
every handle unlocking by the Administrator.
● If you want to check unlocking information of other time period, please click
on the top right corner of the App to select and download manually.
● Unlocking records can not be deleted directly.
● Up to 6000 unlocking records can be stored in the App. Beyond the range, the
earliest records will be replaced by the latest automatically.
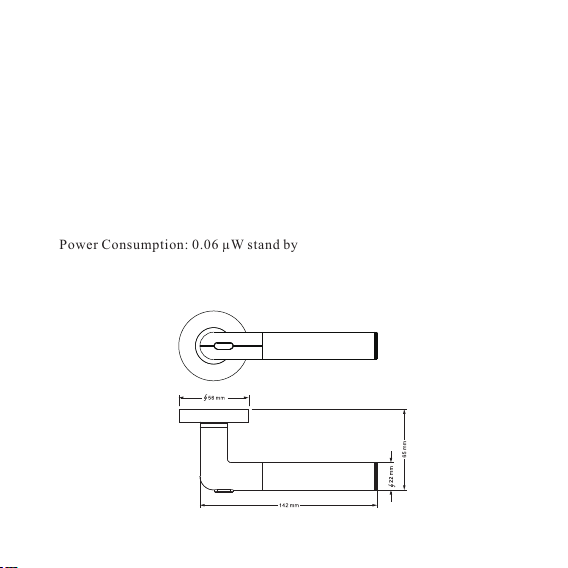
Product Specication
● Power: 2 × CR2 Lithium batteries
● Power Consumption: 0.06 µW stand by
● Bluetooth:Bluetooth Low Energy 4.0
● Operating systems:iOS/Android
Unlocking Records
● Size:
10
● Weight:880 grams
0.5 W in operation
DC Power Consumption: 0.06 μW stand by

This device complies with Part 15 of the FCC Rules. Operation is subject to the following two
conditions: (1) this device may not cause harmful interference, and (2) this device must accept any
interference received, including interference that may cause undesired operation.
Changes or modifications not expressly approved by the party responsible for compliance could
void the user's authority to operate the equipment.
NOTE: This equipment has been tested and found to comply with the limits for a Class B digital
device, pursuant to Part 15 of the FCC Rules. These limits are designed to provide reasonable
protection against harmful interference in a residential installation. This equipment generates, uses
instructions, may cause harmful interference to radio communications. However, there is no
guarantee that interference will not occur in a particular installation. If this equipment does cause
harmful interference to radio or television reception, which can be determined by turning the
equipment off and on, the user is encouraged to try to correct the interference by one or more of
the following measures:
-- Reorient or relocate the receiving antenna.
-- Increase the separation between the equipment and receiver.
-- Connect the equipment into an outlet on a circuit different from that to which the receiver is
connected.
-- Consult the dealer or an experienced radio/TV technician for help.
Table of contents
Popular Door Lock manuals by other brands


Salto
Salto Ei45 Series installation guide

CISA
CISA SIKUREXIT 43295 Series instruction sheet

Yale
Yale YDD120 installation instructions

ResortLOCK
ResortLOCK LockState RL 4000 user guide

Andersen
Andersen Tulsa Hardware Application and Adjustment Guide

Igloohome
Igloohome Push-Pull Mortise Installer/user guide