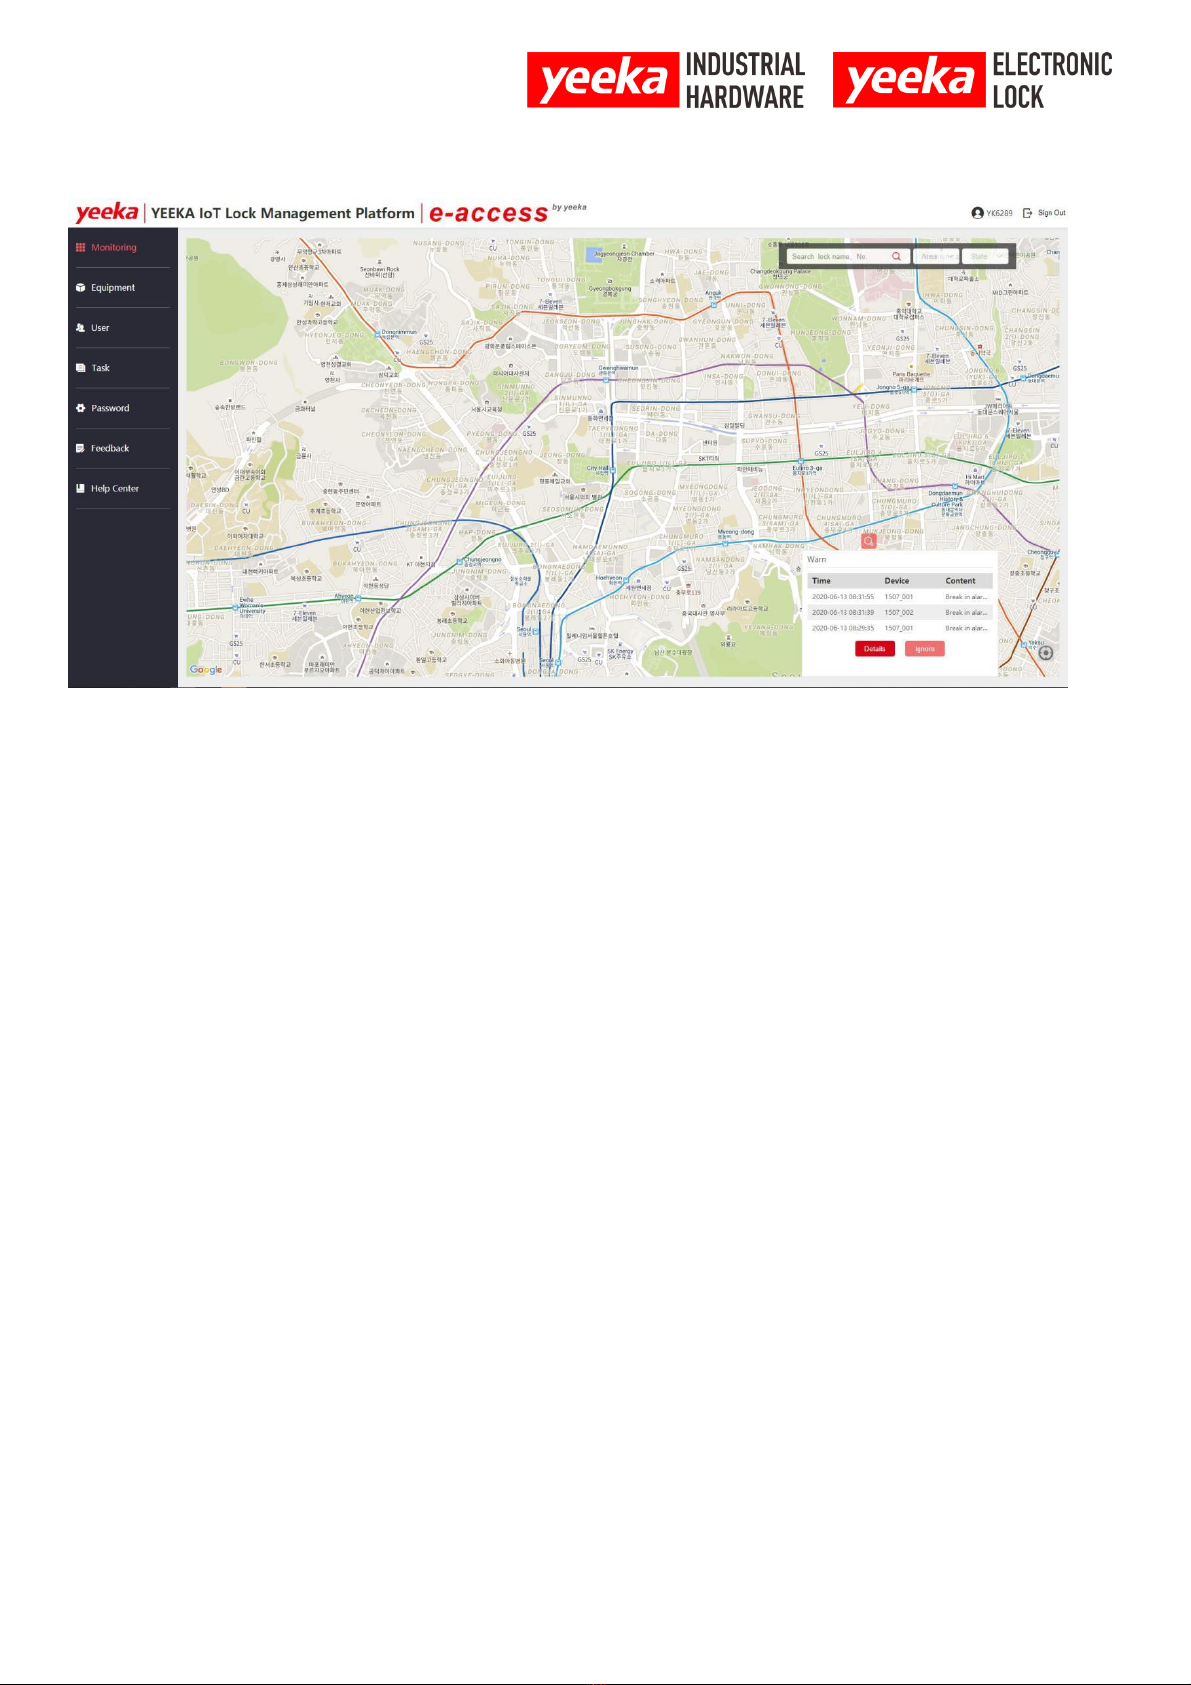
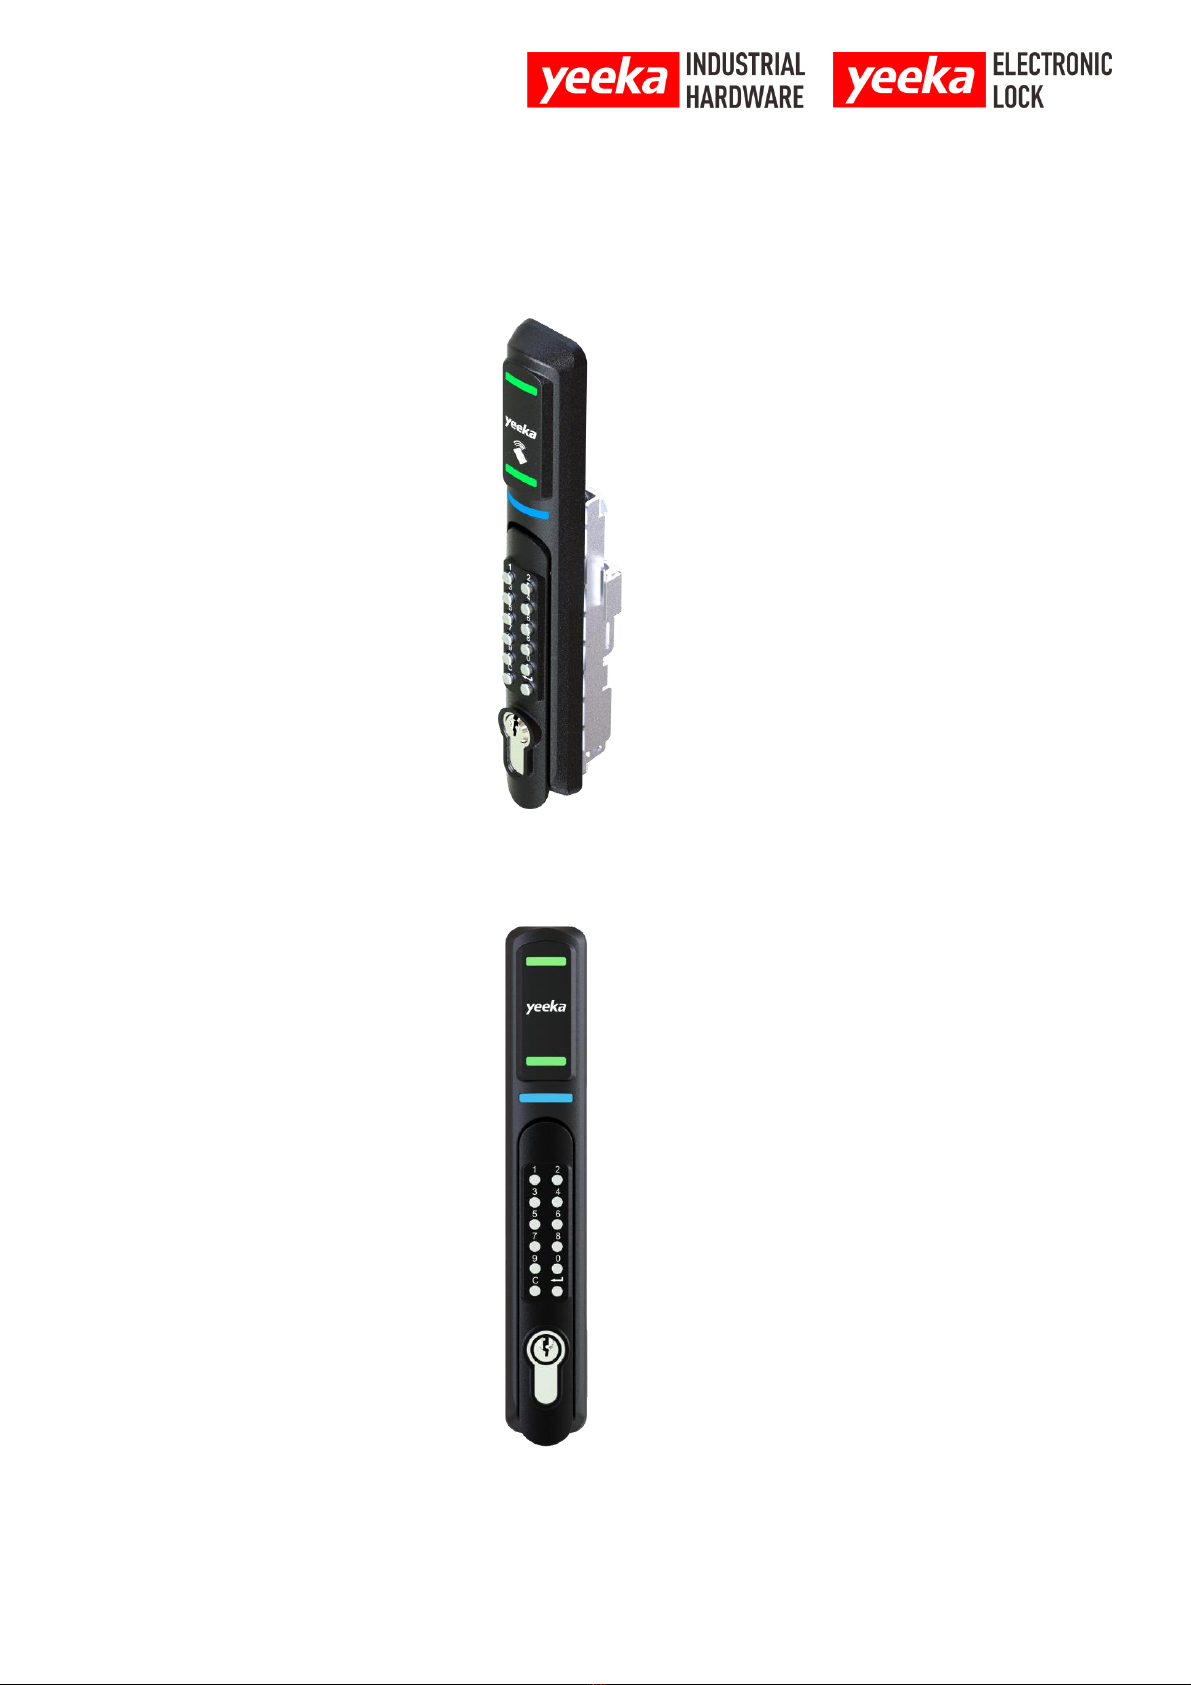
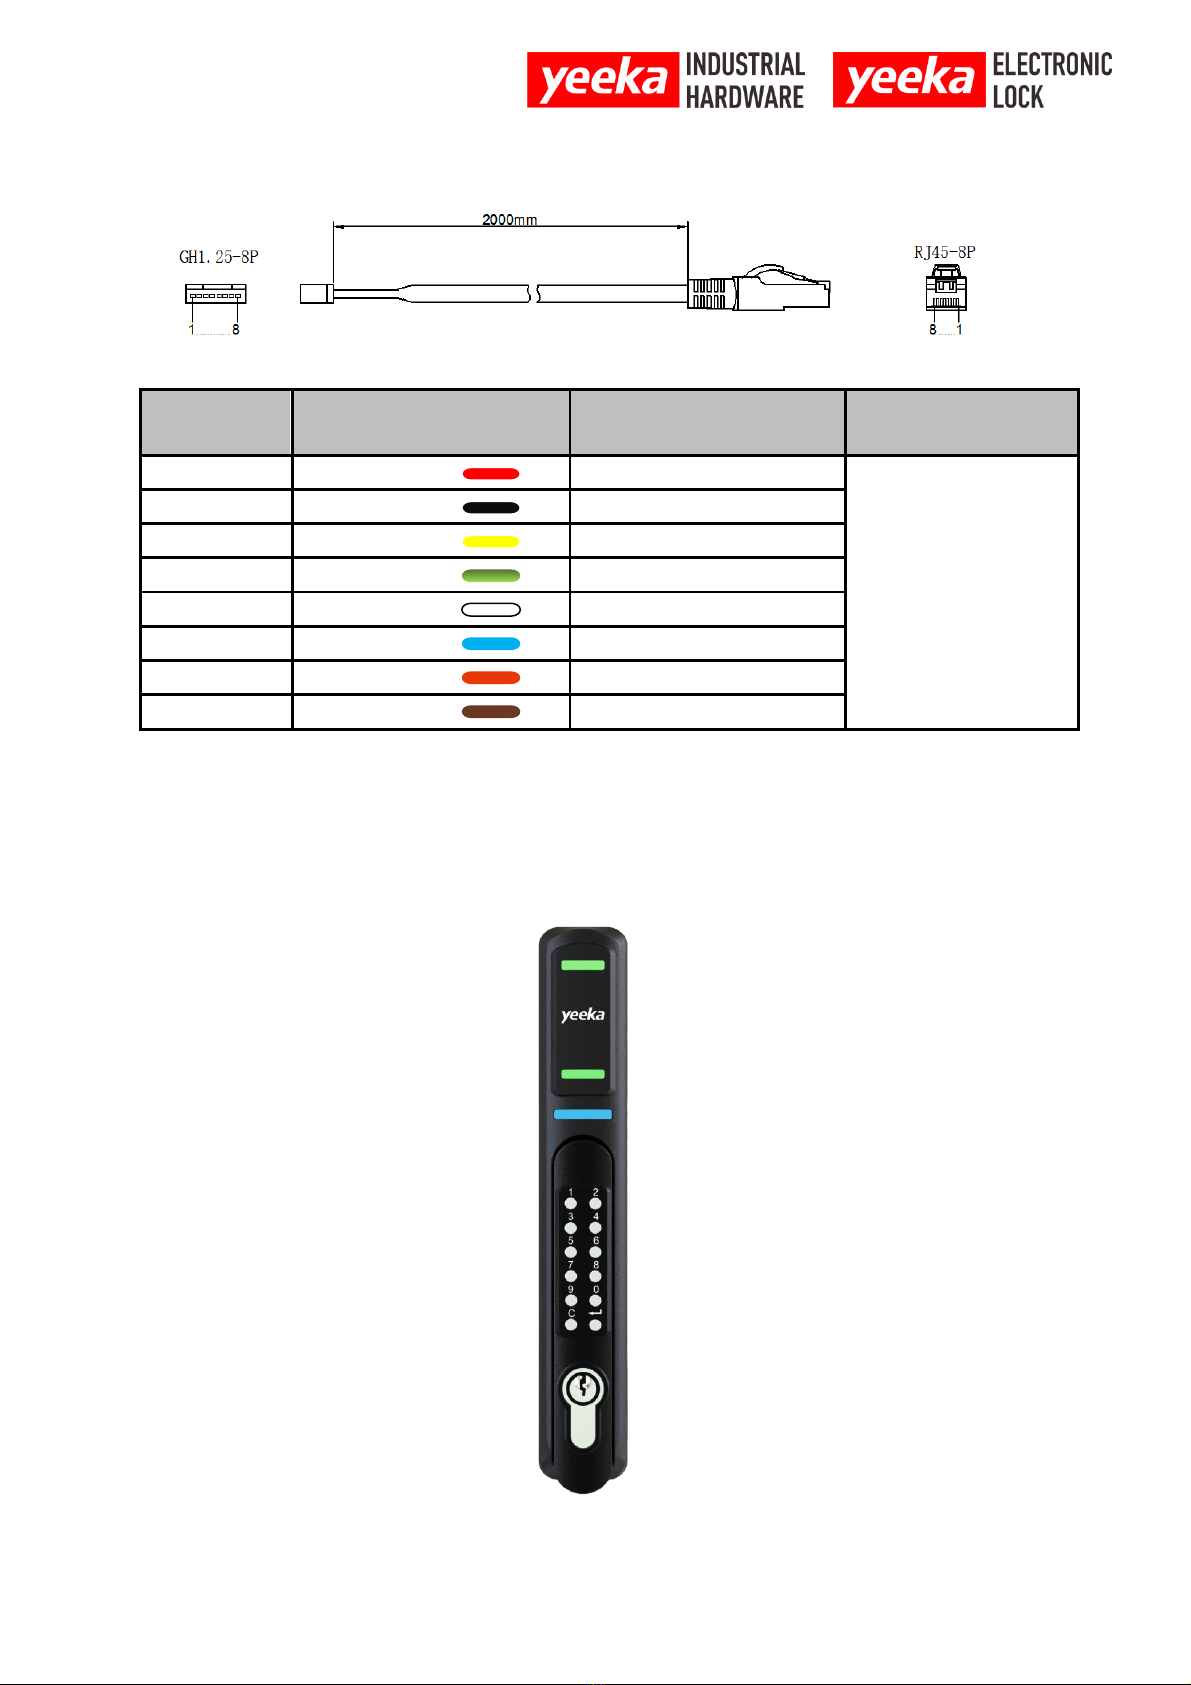
Yeeka 1507 IoT Lock User manual

www.
yeekaco
.com
1
1507 IoT Lock
Operation Manual V1.0.0
Wenzhou Yeeka Lock Technology Co.,Ltd
Address:No.49,Fuyang North Road, Sanxi Industrial Park .Ouhai district, Wenzhou,China

www.
yeekaco
.com
2
Contents
1. Preface ............................................................................................................4
1.1 Read and keep instructions ............................................................................4
1.2 Support and Services......................................................................................4
1.2.1 Warranty ..........................................................................................................4
2. Overview .........................................................................................................5
2.1 Usage ..............................................................................................................5
2.1.1 Features...........................................................................................................5
2.2 System Architecture Diagram .........................................................................6
2.3 Management Platform.....................................................................................7
3. IoT Lock instructions .......................................................................................8
3.1 Product appearance........................................................................................8
3.2 Installation Diagram ........................................................................................9
3.3 Wiring Diagram .............................................................................................10
3.4 Functional schematic diagram ......................................................................10
3.4.1 Password functional schematic diagram .....................................................10
3.4.2 Card read functional schematic diagram.....................................................11
3.4.3 Finger print functional schematic diagram...................................................11
3.4.4 Lock back functional schematic diagram.....................................................12
3.4.5 Head functional schematic diagram ............................................................12
3.5 Operation Instructions .................................................................................13
3.5.1 Access way of Mechanical key:...................................................................13
3.5.2 Access way of DO Remote Control: ............................................................13

www.
yeekaco
.com
3
3.5.3 Access way of RS485 Remote Control: ....................................................13
3.5.4 Access way of password:........................................................................13
3.5.5 Access way of card read:...........................................................................13
3.5.6 Access way of QR code:............................................................................13
3.5.7 Access way of finger print: .........................................................................14
3.6 Programming instructions..........................................................................14
3.6.1 Password programming .............................................................................14
3.6.2 Card read programming.............................................................................15
3.6.2.1 Card read programming(when the handle has keypad).............................15
3.6.2.2 Card read programming(when the handle has no keypad) .......................15
3.6.3 Fingerprint setting ......................................................................................15
4. Controller instructions................................................................................16
4.1 Functional diagram....................................................................................16
4.2 Wiring diagram ..........................................................................................16
4.3 Operating instructions ...............................................................................17
4.3.1 Controller configuration..............................................................................17
4.3.2 Platform operation......................................................................................17

www.
yeekaco
.com
4
1. Preface
Thanks for choosing 1507 IoT lock. On behalf of Yeeka team, we thank you for your
purchase. The instructions in this manual provide technicians with information on the
installation, operation, and setting of the 1507 IoT lock.Please supervise inexperienced
users to ensure pleasant and safe operation.
1.1 Read and keep instructions
Please read and understand this manual before using the 1507 IoT lock.Retain all
instructions for future reference and provide it to subsequent users of the product.And
follow all instructions to avoid any hazards caused by improper operation.
The 1507 IoT lock is only applicable for those who have fully read and understood the
contents of this manual to use.Make sure everyone who use the 1507 IoT lock have
read these instructions and followed them. For product damage caused by incorrect
operation, the warranty service will be invalid.
1.2 Support and Services
Maintain original purchase records to claim warranty services.Service options depend
on the status of the IoT lock warranty.Please attach the serial name of the product when
contacting yeeka for product support.All 1507 IoT lock have a serial name, which is a
unique identifier used to track the history of manufacturing, sales, and maintenance.
The serial name is located on the back of the device in the following format: SN:
167777777.
The service provider of Yeeka products also provides technical support and services.If
yeeka or a certified service provider provides extended warranty or other services,
separate quotation terms may be used. For products purchased from certified service
providers, please contact the original service provider for assistance before contacting
yeeka.For any requests for support or services, including product information, technical
assistance or explanatory assistance,please contact Yeeka or certified service provider.
1.2.1 Warranty
This product is provided with warranty service. Yeeka provides warranty for all Yeeka
brand hardware.Unless otherwise expressly provided, the terms of service (including
warranty) constitute the entire agreement between you and yeeka,covering after-sales
services and any products you purchase from yeeka, and supersede all prior or
contemporaneous communications, proposals and agreements between you and yeeka,
whether electronic, oral or handwritten. Please read the warranty instructions for more
details of yeeka warranty service in your area.

www.
yeekaco
.com
5
2. Overview
2.1 Usage
The 1507 series intelligent lock is suitable for data center, which can solve the problem
of authority management and data asset security.In addition, the intelligent lock can be
controlled remotely and the temperature and humidity of cabinet can be remotely
collected.
The access ways can be obtained through mechanical key, password, card, fingerprint,
Bluetooth, remote management platform and mobile APP.
It can be used on a stand-alone basis, independently on a network, or connected to a
carrier's network.
2.1.1 Features
1.Cabinet intelligent locks can implement functions such as diversified access ways,
user authority management, query of lock operation records, and intelligent
management of lock tasks.
2.Adopt modular design, no special control unit and readers, integrated with password
button, card readers,Bluetooth communication modules, fingerprint identification
modules, RS485 communication modules.
3.Driven by high reliability motor and adopted high stability hardware design to
guarantee the stability and reliability of the product.
4.High versatility of the cabinet.The lock is suitable for APC, Emerson, Vertiv, Eaton,
Toten, Panduit, CPI and etc.
5.The electronic lock can connect various intelligent PDU or control unit for remote
communication and control.
6.The appearance of the product is simple and elegant, easy to use and convenient to
install and maintain.

www.
yeekaco
.com
6
Access Unit
Management Platform
Switch
Access Unit
Access Unit Wireless
Wireless electronic lock
Wired electronic lock
Sensor
2.2 System Architecture Diagram

www.
yeekaco
.com
7
Task Management
⚫ Task dispatching
Records Query
⚫Operation record query
⚫Alarm record query
Data Analysis
⚫Data analysis of unlocking
⚫Data analysis of temperature
and humidity
⚫Data analysis of other sensors
2.3 Management Platform
Features
Monitor Center
⚫Equipment information overview
⚫Display lock status by color change
⚫Real-time alarm alerts
⚫Powerful search query function to
get rapid positioning of the lock
Equipment Management
⚫Set the lock area
⚫Manage lock and control unit
User Management
⚫User authority management
⚫User department management

www.
yeekaco
.com
8
3. IoT Lock instructions
3.1 Product appearance

www.
yeekaco
.com
9
Screw
Panel
Mounting
bracket
Cam
Locating
plate
Lock
3.2 Installation Diagram

www.
yeekaco
.com
10
3.3 Wiring Diagram
Pin No
Color
Signal Definition
Wire Gauge
1
Red
12V +
UL2464/26AWG
2
Black
GND
3
Yellow
485+
4
Green
485-
5
White
DO+
6
Blue
DO-
7
Orange
lock status
8
Brown
lock status
3.4 Functional schematic diagram
3.4.1 Password functional schematic diagram

www.
yeekaco
.com
11
3.4.2 Card read functional schematic diagram
3.4.3 Finger print functional schematic diagram

www.
yeekaco
.com
12
3.4.4 Lock back functional schematic diagram
GH Joint
With buckle can not be
pulled by force
Reset button
Long press for three
seconds to restore the
factory settings.
Setting button for
fingerprint or card
Bar code
Contains lock
hardware information
Back
3.4.5 Head functional schematic diagram
External power interface
Interface type: type-c
Used for emergency power
supply unlock

www.
yeekaco
.com
13
3.5 Operation Instructions
3.5.1 Access way of Mechanical key:
Use the key to open the emergency cylinder in an emergency situation, and
then lift the handle to unlock.
3.5.2 Access way of DO Remote Control:
The lock can be unlocked by connecting the two wires of the lock DO.
3.5.3 Access way of RS485 Remote Control:
The lock can be unlocked by issuing the unlock command to the two lines of the lock
485.
3.5.4 Access way of password:
Input the password in the area of password input; at this moment the lock status LED
turns from blue to green with blink and the buzzer sounds three times. When green of
the lock status LED keeps on, then you can lift the handle and open the lock. (For the
setting of password authority, please refer to "Programming
instructions")
3.5.5 Access way of card read:
Read the authorized IC card in the area of card read; at this moment the lock status
LED turns from blue to green with blink and the buzzer sounds three times. When green
of the lock status LED keeps on, then you can lift the handle and open the lock. (For the
setting of IC card authority, please refer to "Programming instructions")
3.5.6 Access way of QR code:
Use the mobile APP to scan the QR code in the QR code recognition area of the lock
and operate it on the mobile phone;at this moment the lock status LED turns from blue
to green with blink and the buzzer sounds three times. When green of the lock status

www.
yeekaco
.com
14
LED keeps on, then you can lift the handle and open the lock.
3.5.7 Access way of finger print:
Read the authorized finger print in the area of card read; at this moment the lock status
LED turns from blue to green with blink and the buzzer sounds three times. When green
of the lock status LED keeps on, then you can lift the handle and open the lock. (For the
setting of finger print authority, please refer to "Programming instructions")
3.6 Programming instructions
Administrator: The administrator masters the "programming password" who can set the
lock parameters, and issue the "password" and "card" to normal users.
Normal users: Normal users can unlock through "password", "card", "password +
password" and "card + password".
(Programming Password factory default:123456,replace below Enter with “#” for reference)
Entering programming mode process:
1.Long pressing “1” key with sound prompt
2.Entering Programming Password “#” with sound prompt
3.6.1 Password programming
Programming
name
Programming content
Note
Add user password
Long press 1 Programming Password #12 new
password #
User password is 6 digits. The user can set multiple
sets of passwords for unlocking. When users unlock
through password, enter the "password" and press "#"
to unlock
Delete user
password
Long press 1 Programming Password #13 password
#
Set unlock time
Long press 1 Programming Password #16 XX #
XX refers to time, the time range is “01” seconds -
“99” seconds.
Set safety mode
Long press 1 Programming Password # 17 #
1. The default setting of safe mode is off. The first time
setting is on-state, then the second time setting is off
state. Cycle setting is available.
2. When the security mode is turned on, another
password must be verified after the password is
successfully verified. After successful card verification,
another set of passwords must be verified.
password + password (no requirement for the
sequence of two groups of passwords)
card + password (card always before password)

www.
yeekaco
.com
15
(two-factor authentication)
Delete all users
Long press 1 Programming Password # 21 #
This operation deletes all users card and password.
Change
Programming
Password
Long press 1 Programming Password #90 New
Programming Password #
The programming password is 6 digits. If users forget
the programming password, they can long press the
reset button to restore the factory settings.
3.6.2 Card read programming
3.6.2.1 Card read programming(when the handle has keypad)
Programming
name
Programming content
Note
Add user card
Long press 1 Programming Password #14 read the
card #
If users need to add more than one user cards at a
time, they can read the card continuously.
Delete user card
Long press 1 Programming Password #15 read the
card #
If users need to delete multiple user cards at a time,
they can read the card continuously.
3.6.2.2 Card read programming(when the handle has no keypad)
Restore factory
settings
Long press “reset” button for 5 seconds
The programming password is restored to 123456,
and the user information is cleared.
Add administrator
card
(when the handle
has no keypad)
After leaving the factory, users shortly press the “fingerprint
or card setting” button and then read a card.
The first card read is the administrator card.
(Only one administrator card can be set, and normal
user cards can be added by pressing keypad and
administrator cards.) Clearing administrator card
requires factory reset.
Add user card
(when the handle
has no keypad)
Read the administrator card → shortly press “fingerprint or
card setting” button and read a new blank card
Add one card at a time
Delete user card
(when the handle
has no keypad)
Read the administrator card → long press “fingerprint or
card setting” button and read the authorized card
Delete one card at a time
3.6.3 Fingerprint setting
Add finger print
Shortly press the “fingerprint setting” button and then put
your fingerprint in the authentication area for
authentication
Release the fingerprint once after pressing for two
seconds. The beep indicates that the fingerprint
needs to be further authenticated.The successful
beep indicate that the authentication is successful.

www.
yeekaco
.com
16
4. Controller instructions
4.1 Functional diagram
4.2 Wiring diagram
Connect
with IoT lock
Connect with
door sensor
Program
upgrade
port
Button to
set lock
Indicator
light
Ethernet
interface
Power
Interface
Reserved
antenna
position

www.
yeekaco
.com
17
4.3 Operating instructions
4.3.1 Controller configuration
First, insert the interlock cable into the corresponding port of the controller successively,
then insert the network cable into the Ethernet interface of the controller, and finally
insert the power adapter connector into the power interface of the controller.
Lock C1-L1 corresponds to C1 Controller’s L1 port
Lock C1-L2 corresponds to C1 Controller’s L2 port
Lock C1-L3 corresponds to C1 Controller’s L3 port
Lock C1-L4 corresponds to C1 Controller’s L4 port
Remark: The meaning of C1-L1:Lock corresponds to C1 Controller’s L1 port.
Access unit indicator light
Red: The network is not connected.
Blue: During the network configuration, waiting about 10-20 seconds, which depending
on the network conditions.
Green: The network connection is successful, the server connection is successful, and
the lock can be operated.
Remark:If the network connection is failed, please check your network first and try to
restart the power.
4.3.2 Platform operation
To login→Indoor model→List mode→Choice model→Unlock remotely

www.
yeekaco
.com
18
Caution: The user is cautioned that changes or modifications not expressly approved by the party responsible for
compliance could void the user's authority to operate the equipment.
This device complies with Part 15 of the FCC Rules. Operation is subject to the following two conditions: (1) this device
may not cause harmful interference, and (2) this device must accept any interference received, including interference
that may cause undesired operation.
NOTE: This equipment has been tested and found to comply with the limits for a Class B digital device, pursuant to Part
15 of the FCC Rules. These limits are designed to provide reasonable protection against harmful interference in a
residential installation. This equipment generates, uses and can radiate radio frequency energy and, if not installed and
used in accordance with the instructions, may cause harmful interference to radio communications. However, there is
no guarantee that interference will not occur in a particular installation.
If this equipment does cause harmful interference to radio or television reception, which can be determined by turning
the equipment off and on, the user is encouraged to try to correct the interference by one or more of the following
measures:
-- Reorient or relocate the receiving antenna.
-- Increase the separation between the equipment and receiver.
-- Connect the equipment into an outlet on a circuit different from that to which the receiver is connected.
-- Consult the dealer or an experienced radio/TV technician for help.
FCC Radiation Exposure Statement
This equipment complies with FCC radiation exposure limits set forth for an uncontrolled environment.
This transmitter must not be co-located or operating in conjunction with any other antenna or transmitter.
Table of contents
Popular Door Lock manuals by other brands

Alarm Lock
Alarm Lock PDL6100 Programming instructions

Dorma
Dorma PHA Glas Kit quick start guide

Stuv
Stuv 37105501 Installation instruction

Assa Abloy
Assa Abloy Sargent 11 Line installation instructions

Assa Abloy
Assa Abloy Sargent PE8900 Series installation instructions

ikonic
ikonic 697460 Assembly instructions