manuals.online logo
Brands
  1. Home
  2. •
  3. Brands
  4. •
  5. Henri Studio
  6. •
  7. Outdoor Fountain
  8. •
  9. Henri Studio 4006F17 User instructions

Henri Studio 4006F17 User instructions

SETTING UP THE
4006F17 & 4007F17
1) Prepare a suitable location for your new fountain. Set its
basin on that location with the power cord notch at
bottom facing your power supply. Once
positioned, now stand the basin up on one
side with the cord exit facing up.
2) From underneath, push the Rope Light
up through the large hole in the basin’s floor
and into the hole in the side of the basin’s
interior riser. Continue to push the Rope
Light until it can be grasped above the top
opening of the riser section. The gently pull
the Rope Light all the way through the riser,
stopping once the thin, black power cord
begins to pull out of the top as well.
3) Find the plastic barbed adapter which has
a slot cut along one side. Hole it close to the
internal riser and push the light’s thin power
cord into the slot. Then carefully thread this
adapter into the side of the internal riser.
4) Set the pump inside the basin and push its
power cord through the same hole in the
basin floor. Open the slit in the rubber
stopper and place both power cords in the
provided slots. Close the stopper and push it
firmly into the basin floor’s hole. Gather the
power cords from under the basin, holding
them toward the basin’s power cord notch,
and tip the basin back down. The square rope
light controller box needs to be treated gently
and positioned outside the edge of the basin.
Make sure the basin is sitting firm and level.
5) Roll two of the large o-rings onto one
end of the 4’ long 4” wide clear tube. They
should be spaced about 1” from each other,
with one of them within ½” of the tube end.
Push the top of the rope light into the tube
(starting by the o-rings). Once your fountain is
running, the rope light will be buoyant and will stay in place without effort). Hold the tube vertical and
push it down into the basin’s internal riser. The o-rings should help it fit straight and watertight.
(If the o-
rings are still visible above the internal riser they will not provide a water tight seal. Pull tube out, reset o-rings, and insert
again until o-rings are below the top of the internal riser.)
Use a shim if needed to make it perfectly vertical.
(You may find 2 extra o-rings in your kit. If so, they will be slightly smaller than the others. If you are unable to push the
tube all the way down in the basin’s internal riser, use these smaller o-rings instead and the tube will push down easier.)
Make sure to place your fountain on a firm
area which will not settle. Note: Always
follow local electrical codes and use a
110V GFCI protected outlet.
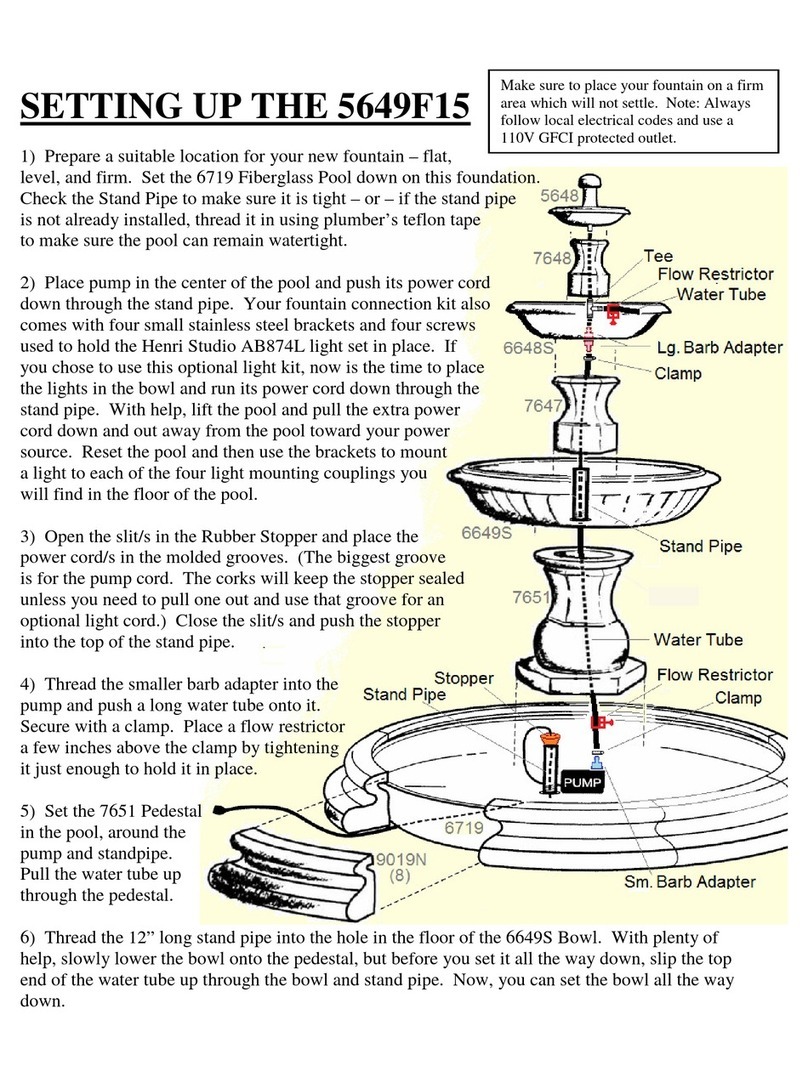
6) Thread the other adapter into the top
of the pump. Loosen and slip the clamps
onto the tube. Then push the open ends
of the tube onto both barbed adapters and
tighten the clamps on both ends.
7) Set the 6006A and 6006B cover
pieces on the basin. Then set the first of
fourteen stone segments on the internal
riser. Make sure it is level.
8) Place one of the 1” plastic tube rings
on the first segment and place another
stone segment on the tube ring. Repeat
several times. Prior to the eighth stone
segment, roll another of the o-rings down
the 4” tube, stopping where the next
stone segment will stop. Then install the
eighth segment down the 4” tube and
over the o-ring. (This will keep most of
the water from falling down on the inside,
rather than the outside, of the stone
segments.) Repeat the stacking until the
last segment, which should again be
installed over an o-ring to direct the
water outward.
9) Read your pump and light instructions.
Fill the basin with water. Then plug in the
pump and connect to the light transformer
to enjoy your fountain. Use your light kit
fob to select the light display you prefer.
If the pump does not immediately begin
working, there may be an “airlock”
within the impeller chamber. Simply
unplug and plug in a few times
and it starts.
csd 2
2/2020
IMPORTANT – WINTER CARE
Winter ice build-up can cause damage to concrete statuary. Follow
these tips to reduce winter weathering to your fountain:
* Disconnect power to pumps and lights.
* Remove plugs/stoppers in all fountain bowls to open drains and let
all moisture out. Keep drains open throughout winter.
* Cover with a Henri fountain cover. Keep tight and do not let snow
or water collect in sagging areas.
* Do not allow snow or ice to build up on or against the concrete.
Remove snow before it turns to ice. Do not use antifreeze, salt or
chemical ice removers as these may damage concrete.
Online Resources
Products: www.henristudio.com/products
FAQs: www.henristudio.com/faq
Warranty: www.henristudio.com/warranty
Contact :
www.henristudio.com/contact
-
us
Caution: The use of Chlorine or Chlorine Bleach or water
coloring additives may damage the finish of your fountain.

This manual suits for next models

1

Other Henri Studio Outdoor Fountain manuals

Henri Studio Palazzo Venus User manual

Henri Studio

Henri Studio Palazzo Venus User manual

Henri Studio Rock Falls 5887F2 User manual

Henri Studio

Henri Studio Rock Falls 5887F2 User manual

Henri Studio 5452F Quick start guide

Henri Studio

Henri Studio 5452F Quick start guide

Henri Studio 5705F7 User manual

Henri Studio

Henri Studio 5705F7 User manual

Henri Studio 4005F3 User instructions

Henri Studio

Henri Studio 4005F3 User instructions

Henri Studio 5661F User manual

Henri Studio

Henri Studio 5661F User manual

Henri Studio Large Rock Falls Fountain User manual

Henri Studio

Henri Studio Large Rock Falls Fountain User manual

Henri Studio 4875A Manual

Henri Studio

Henri Studio 4875A Manual

Henri Studio 5887F3 User instructions

Henri Studio

Henri Studio 5887F3 User instructions

Henri Studio 5501F6 User instructions

Henri Studio

Henri Studio 5501F6 User instructions

Henri Studio 5231F21 User instructions

Henri Studio

Henri Studio 5231F21 User instructions

Henri Studio 4946F1 User instructions

Henri Studio

Henri Studio 4946F1 User instructions

Henri Studio 5649F15 User manual

Henri Studio

Henri Studio 5649F15 User manual

Henri Studio 4012F2 User manual

Henri Studio

Henri Studio 4012F2 User manual

Henri Studio 5595F14 User instructions

Henri Studio

Henri Studio 5595F14 User instructions

Henri Studio 5701F2 User manual

Henri Studio

Henri Studio 5701F2 User manual

Henri Studio 5513F20 User instructions

Henri Studio

Henri Studio 5513F20 User instructions

Popular Outdoor Fountain manuals by other brands

LuxenHome WHF1603 instruction manual

LuxenHome

LuxenHome WHF1603 instruction manual

LuxenHome WHF1025 instruction manual

LuxenHome

LuxenHome WHF1025 instruction manual

LuxenHome WHF825 instruction manual

LuxenHome

LuxenHome WHF825 instruction manual

YARDART Soma Medallion FT-366 Assembly instructions

YARDART

YARDART Soma Medallion FT-366 Assembly instructions

LuxenHome WHF844 instruction manual

LuxenHome

LuxenHome WHF844 instruction manual

LuxenHome WHF1740 instruction manual

LuxenHome

LuxenHome WHF1740 instruction manual

LuxenHome WHF726 instruction manual

LuxenHome

LuxenHome WHF726 instruction manual

YARDART Corsini FT-171 quick start guide

YARDART

YARDART Corsini FT-171 quick start guide

LuxenHome WHF819 instruction manual

LuxenHome

LuxenHome WHF819 instruction manual

LuxenHome WHF548 instruction manual

LuxenHome

LuxenHome WHF548 instruction manual

LuxenHome WHF1016 instruction manual

LuxenHome

LuxenHome WHF1016 instruction manual

LuxenHome WHF721 instruction manual

LuxenHome

LuxenHome WHF721 instruction manual

LuxenHome WHF836 instruction manual

LuxenHome

LuxenHome WHF836 instruction manual

LuxenHome WHF1027 instruction manual

LuxenHome

LuxenHome WHF1027 instruction manual

Bond Y97024 Assembly instruction

Bond

Bond Y97024 Assembly instruction

Profi-pumpe GRANIT-BLACK operating instructions

Profi-pumpe

Profi-pumpe GRANIT-BLACK operating instructions

Angelo Decor Seneca AD96053W quick start guide

Angelo Decor

Angelo Decor Seneca AD96053W quick start guide

Bernini Calcata owner's manual

Bernini

Bernini Calcata owner's manual

manuals.online logo
manuals.online logoBrands
  • About & Mission
  • Contact us
  • Privacy Policy
  • Terms and Conditions

Copyright 2025 Manuals.Online. All Rights Reserved.