Hi-Tec X1 AC Plus User manual

INSTRUCTION MANUAL

2
Table of Contents
Introduction................................................................................................. 3
Warnings and Safety Notes......................................................................... 4
Charger Layout ............................................................................................ 8
Specications............................................................................................... 9
Features...................................................................................................... 10
Charger/Battery Connections................................................................... 12
Lithium ....................................................................................................... 13
Charge Modes................................................................................................................13
Chare Mode .............................................................................................................13
Balance Charge Mode..........................................................................................15
Fast Charge Mode..................................................................................................16
Storage Mode..........................................................................................................18
Discharge Mode .....................................................................................................19
NiCd/NiHM ................................................................................................. 21
Charge Modes................................................................................................................21
Chare Mode .............................................................................................................21
Disharge Mode .......................................................................................................22
Cycle Mode...............................................................................................................23
Pb (Lead Acid) ............................................................................................ 24
Charge Modes................................................................................................................24
Chare Mode .............................................................................................................24
Disharge Mode .......................................................................................................25
Save/Load Data.......................................................................................... 26
Additional Features & Settings................................................................. 28
Warnings and Error Messages .................................................................. 34
Warranty and Service ................................................................................ 35

3
Introduction
Congratulations on your choice of the Hitec X1 charger from Hitec RCD USA.
The Hitec X1 is a high-performance, microprocessor controlled charger/dis-
charger with battery management capabilities that are suitable for use with
most popular battery types. The X1 also features integrated balancing for
six-cell, Lithium-Polymer (LiPo), Lithium-Ferrite (LiFe) and Lithium-Ion (Li-Ion)
batteries.
Please read this entire operating manual before using the X1 Charger. If you
are unsure of its proper operation after reading the manual, please seek advice
from an experienced hobbyist or someone familiar with proper battery charg-
ing procedures.
THE CHARGING AND DISCHARGING OF RC HOBBY BATTERIES CAN BE
DANGEROUS. FAILURE TO FOLLOW THESE EXPLICIT WARNINGS CAN
RESULT IN PROPERTY DAMAGE AND/OR LOSS OF LIFE.
ANEVER LEAVE YOUR CHARGER UNATTENDED WHILE IN OPERATION.
ANEVER CHARGE ON OR AROUND COMBUSTIBLE MATERIALS.
ANEVER CHARGE A DAMAGED BATTERY PACK.
ALOW COST, NO-NAME BATTERY PACKS POSE THE MOST DANGER. WE REC-
OMMEND YOU ONLY USE BATTERY PACKS THAT ARE SOLD AND WARRAN-
TIED BY A REPUTABLE COMPANY.
AIT IS HIGHLY RECOMMENDED THAT YOU UTILIZE A SAFETY DEVICE SUCH
AS A STEEL CASE OR LIPO SACK™ WHILE CHARGING LITHIUM CHEMISTRY
BATTERIES.
AIT IS HIGHLY RECOMMENDED THAT YOU KEEP AN OPERABLE “CLASS A”FIRE
EXTINGUISHER IN THE CHARGING AREA.
FAILURE TO FOLLOW THESE WARNINGS CAN BE CONSIDERED NEGLI
GENCE BY THE OPERATOR AND MAY NEGATE ANY CLAIMS FOR DAM
AGES INCURRED.
Hitec RCD USA will not be held responsible for any damages or injuries that
may occur by persons who fail to follow these warnings or who fail to properly
follow the instructions in this manual.
Warning
These warnings and safety notes are of the utmost importance. You must fol-
low these instructions for maximum safety. Failure to do so can damage the
charger and the battery; and in the worst cases, may cause a re.
NEVER LEAVE THE CHARGER UNATTENDED WHEN IT IS CONNECTED
TO ITS POWER SOURCE. IF ANY MALFUNCTION IS FOUND, TERMINATE
THE PROCESS AT ONCE AND REFER TO THE OPERATION MANUAL.
AThe allowable DC input voltage is 11-18V DC.
AThe allowable AC input voltage is 100-240V AC.
AKeep the charger away from dust, damp, rain, heat, direct sunlight and
excessive vibration.
AIf the charger is dropped or suers any type of impact, it should be inspect-
ed by an authorized service station before using it again.
AThis charger and the battery should be put on a heat-resistant, non-am-
mable and non-conductive surface.
ANever place a charger on a car seat, carpet or similar surface. Keep all am-
mable volatile materials away from the operating area.
AMake sure you know the specications of the battery to be charged or dis-
charged to ensure it meets the requirements of this charger. If the program
is set up incorrectly, the battery and charger can be damaged.
AFire or explosion can occur due to overcharging.
ATo avoid a short circuit between the charge lead, always connect the
charge cable to the charger rst, then connect the battery. Reverse the
sequence when disconnecting.
Warning: Be sure to read this section for your own safety.
Caution: Be sure to read this section to prevent accidents
and damage to your charger.
Tip: This section will help you maximize the performance of
your charger.
Note: This section will provide more detailed explanations.
Warnings and Safety Notes
Caution
Tip
Warning
Warning
Note

5
ANever attempt to charge or discharge the following types of batteries:
• A battery tted with an integral charge circuit or a protection circuit
• A battery pack which consists of dierent types of cells (including dif-
ferent manufacturer’s cells)
• A battery that is already fully charged or just slightly discharged and
non-rechargeable batteries (these pose an explosion hazard)
• A faulty or damaged battery
• Batteries installed in a device or which are electrically linked to other
components
• Batteries that are not expressly stated by the manufacturer to be suit-
able for the currents the charger delivers during the charge process
PLEASE BEAR IN MIND THE FOLLOWING POINTS BEFORE YOU
COMMENCE CHARGING:
• Did you select the appropriate program suitable for the type of battery you
are charging?
• Did you set up the adequate current for charging or discharging?
• Have you checked the battery voltage? Lithium battery packs can be wired
in parallel and in series, i.e. a 2-cell pack can be 3.7V (in parallel) or 7.4V (in
series).
• Have you checked that all connections are rm and secure?
• Make sure there are no intermittent contacts at any point in the circuit.
Warnings and Safety Notes

Warnings and Safety Notes
LiPo LiIon LiFe NiCd NiMH Pb
Nominal Voltage 3.7V/cell 3.6V/cell 3.3V/cell 1.2V/cell 1.2V/cell 2.0V/cell
Max. Charge Voltage 4.2V/cell 4.1V/cell 3.6V/cell 1.5V/cell 1.5V/cell 2.46V/cell
Storage Voltage 3.8V/cell 3.7V/cell 3.3V/cell n/a n/a n/a
Min. Discharge Voltage 3.0-3.3V/cell 2.9-3.2V/cell 2.6-2.9V/cell 0.1-1.1V/cell 0.1-1.1V/cell 1.8V/cell
Standard Battery Parameters
WHEN ADJUSTING YOUR X1 CHARGING PARAMETERS, BE SURE YOU
SELECT THE PROPER BATTERY TYPE AND CELL VOLTAGE FOR THE
TYPE OF CELL YOU ARE CHARGING. CHARGING BATTERIES WITH THE
WRONG SETTINGS MAY CAUSE THE CELLS TO BURST, CATCH FIRE OR
EXPLODE.
Charging
Before charging your batteries, it is critical that you determine the maximum
allowable charge rate for your batteries. The X1 is capable of charging at high
rates that may not be suitable or safe for your particular batteries. For ex-
ample, Lithium cells are typically safe to charge at 1C, or the total mAh÷1000.
A 1200mAh battery would have a 1C charge rate of 1.2 amps. A 4200mAh
battery would have a 1C charge rate of 4.2 amps. Some manufacturers are
oering Lithium cells that can be charged at greater than 1C but this should
ALWAYS be veried before charging a Lithium battery at rates higher than 1C.
Voltage is just as critical as the charging amperage rate and this is determined
by the number of cells in series, or “S”. For example, a 3S LiPo is rated at 11.1
volts (“S” multiplied by a single LiPo cell with a nominal voltage of 3.7 volts
DC. 3 cells x 3.7 volts each equals 11.1 volts DC).
Connect the battery’s main leads to the charger output: red is positive and
black is negative. Keep in mind that the gauge or thickness of your charging
leads from the X1 to your battery must be of an acceptable current rating to
handle the applied charge current. For maximum safety and charging eec-
tiveness, always match or exceed the main battery lead rating when assem-
bling or selecting your charging leads. If you charge a battery at a high current
rate (amperage) with a charging lead not rated for the chosen amperage, the
wire could get hot, catch re, short out and/or potentially destroy your battery
and the charger. When in doubt, always use a higher gauge wire (lower AWG
number). It is common to see charging leads constructed of 14AWG, 16AWG or
18AWG wire.
Warning

7
Always refer to recommendations from your battery manufacturer for your
specic battery type and size before initiating a charge or discharge process.
Do not attempt to disassemble or modify Lithium or Lead-Acid battery packs.
Discharging
The X1 discharging functions are for two specic purposes:
• Refreshing the capacity of a Nickel-based battery that has lost capacity over
time (NiMH or NiCd).
• Reducing the voltage of a Lithium battery for safe storage.
LITHIUM CHEMISTRY BATTERY PACKS SHOULD ONLY BE DISCHARGED
TO THEIR MINIMUM SAFE VOLTAGE, NO LOWER. DEEP DISCHARGING A
LITHIUM CELL WILL DO PERMANENT DAMAGE. REFER TO THE STAN
DARD BATTERY PARAMETERS TABLE ON PAGE 6 OF THIS MANUAL FOR
MINIMUM DISCHARGE VOLTAGES.
LiPo Charge/Discharge Cycling
Lithium batteries are known to reach full capacity after a break-in period of
about 10 charge/discharge cycles. We do not recommend you use the X1 char-
ger to do this, normal use and recharging will achieve the same results. If you
wish to perform a Lithium break-in on the bench with the X1, discharging to
minimum acceptable voltages and performing a balance charge at 1C maxi-
mum rate is recommended. If you choose to break in your Lithium batteries
under normal use, charging at only 1C for the rst ten cycles will help ensure
full performance and service life from your Lithium cells.
Warnings and Safety Notes
Warning

8
Charger Layout
1. Hitec X1 AC Plus Charger
2. AC Power Cord
3. DC Power Cord
4. 18AWG Wire Charging Cable
5. Balancing Board Cable
6. Universal Balancing Board
Stop/Battery Type Button
Temperature Controlled Fan
Start/Resume/Enter Button
Decrease Value(-)/View Status Button Increase Value(+)/View Status Button
LCD Display
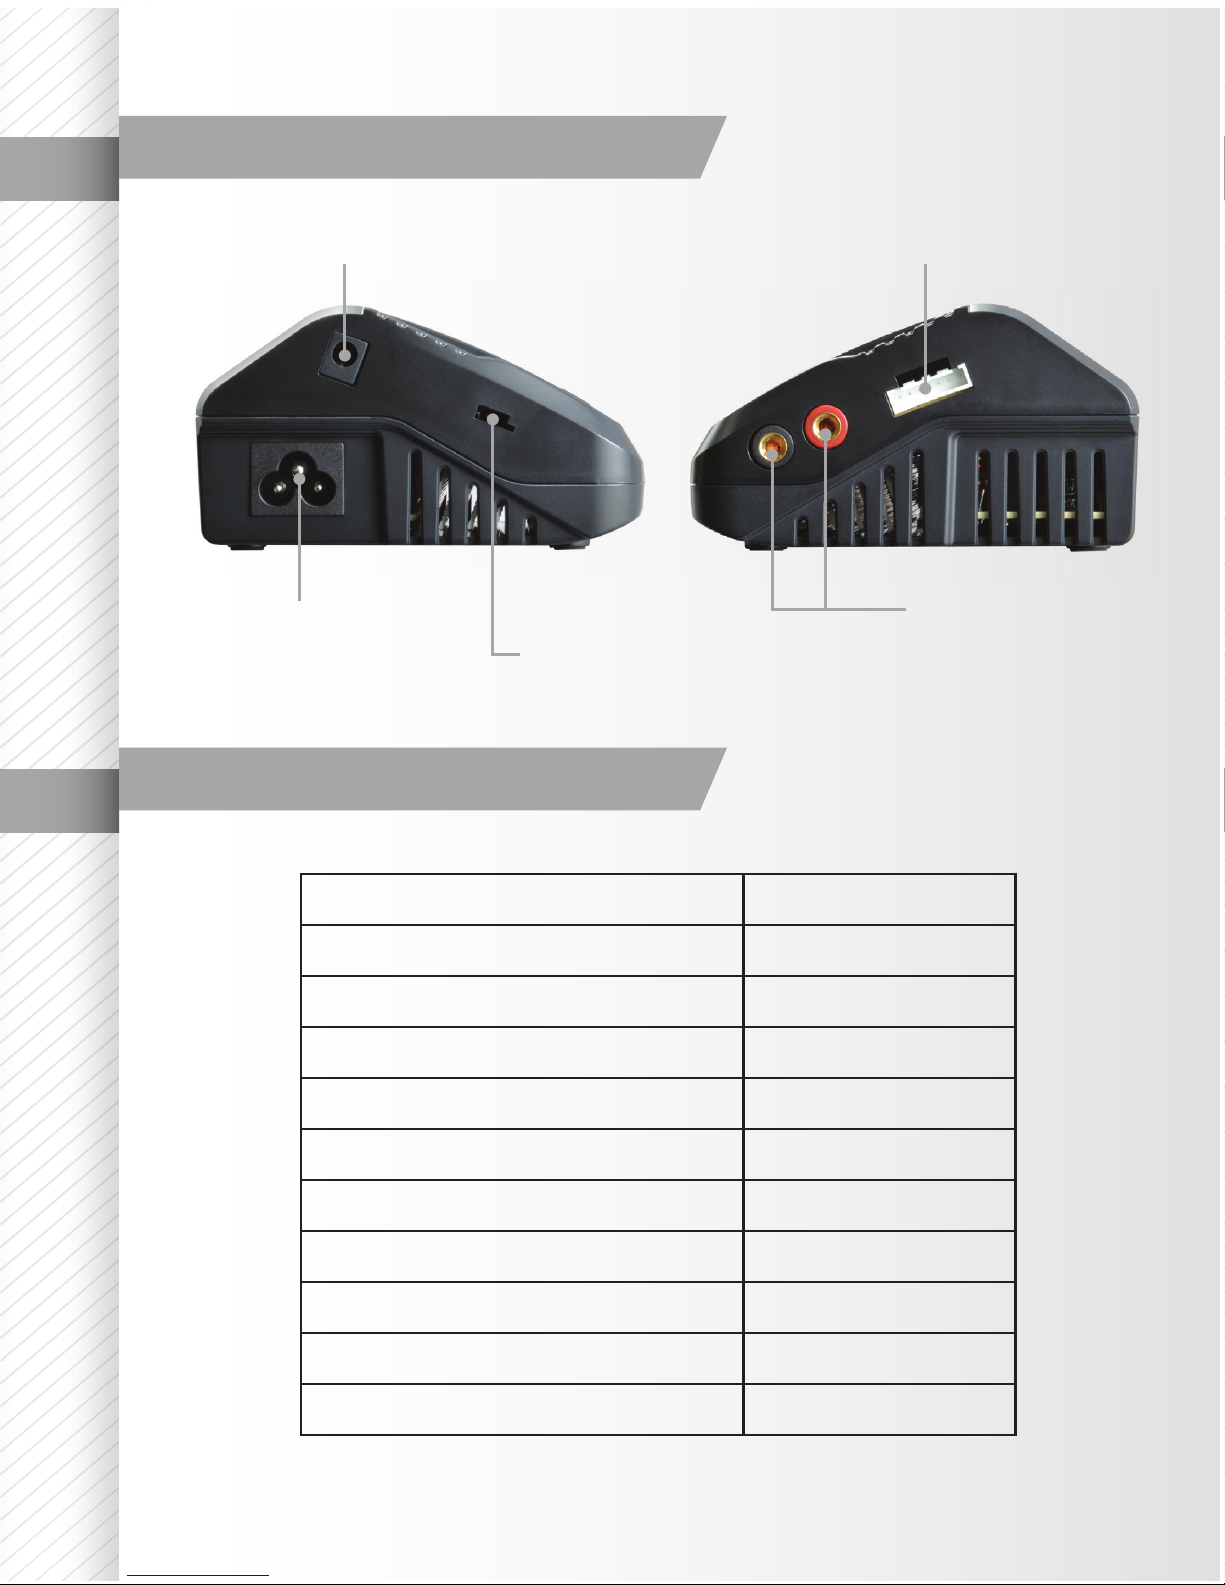
9
Specications
DC Input (11-18V) Balance Socket
AC Input
(100-240V, 50/60HZ) Temperature Sensor Port
Charging Output
Charger Layout
AC Input 100 - 240 Volts
DC Input 11-18 Volts
Charge Circuit Power 50 Watts
Charge Current Range 0.1 - 1.0 Amps
Discharge Current Range 5 Watts
Discharge Current Power 0.1-1.0 Amps
Current Drain for Balancing LiPo 300mA per cell
NiCd/NiMH Battery Cell Count 1-15 Cells
LiPo/LiFe/Lilon Cell Count 1-6 Cells
Pb Battery Voltage 2-20V
Net Weight 15 oz.

10
Features
Optimized Operating Software
The X1 “auto” feature sets the charge and discharge current for you automati-
cally, preventing overcharging which can damage your battery. In the event
of an error, the X1 instantly disconnects the circuit and sounds an alarm. This
feature can be set by the user and controlled through the two-way link for
maximum safety.
Internal Independent Lithium Battery Balancer
The X1 features a built-in cell voltage balancer so you don’t need to fuss with
external balancers while charging.
Balancing Individual Cells During Discharging
The X1 also monitors and balances each cell in the pack individually while
discharging. If the voltage of any single cell is abnormal, the X1 will display an
error message and the process will end automatically.
Adaptable to various types of lithium batteries
The X1 will charge and discharge a variety of Lithium batteries, such as Li-ion,
LiPo and the new LiFe series of batteries.
Fast and Storage Mode of Lithium Batteries
The X1 features two styles of charging. “Fast” charge reduces the charge dura-
tion while “Store” controls the nal voltage of your battery, to optimize your
packs for long term storage and maximum lifespan.
Maximum Safety
Our delta-peak voltage detection program ends the charge cycle whenever a
battery’s voltage exceeds the set threshold.
Automatic Charging Current Limit
Charging current can be set by the user when charging NiCd or NiMH batteries.
The ‘AUTO’ charging mode, however, is recommended when charging NiMH
batteries with low impedance and capacity.
Capacity and Temperature Limits
The charge process will terminate if either the charging capacity or battery
temperature exceeds the limit set by the user. The temperature function re-
quires an optional temperature probe, which is not included with the X1.

11
Features
Processing Time Limit
Protect your battery by setting a maximum time limit for charging and dis-
charging.
Input Power Monitoring
The X1’s input voltage is monitored to protect the battery from becoming dam-
aged. The process ends automatically if it drops below the limit.
Data Store/Load
A maximum of ve setting proles can be stored for your convenience. The X1
will store the data pertaining to a program’s settings and you can call up data
at anytime.
Cyclic Charging/Discharging
A battery can be cycled 1 to 5 times consecutively. This process is good for
refreshing and balancing your battery.
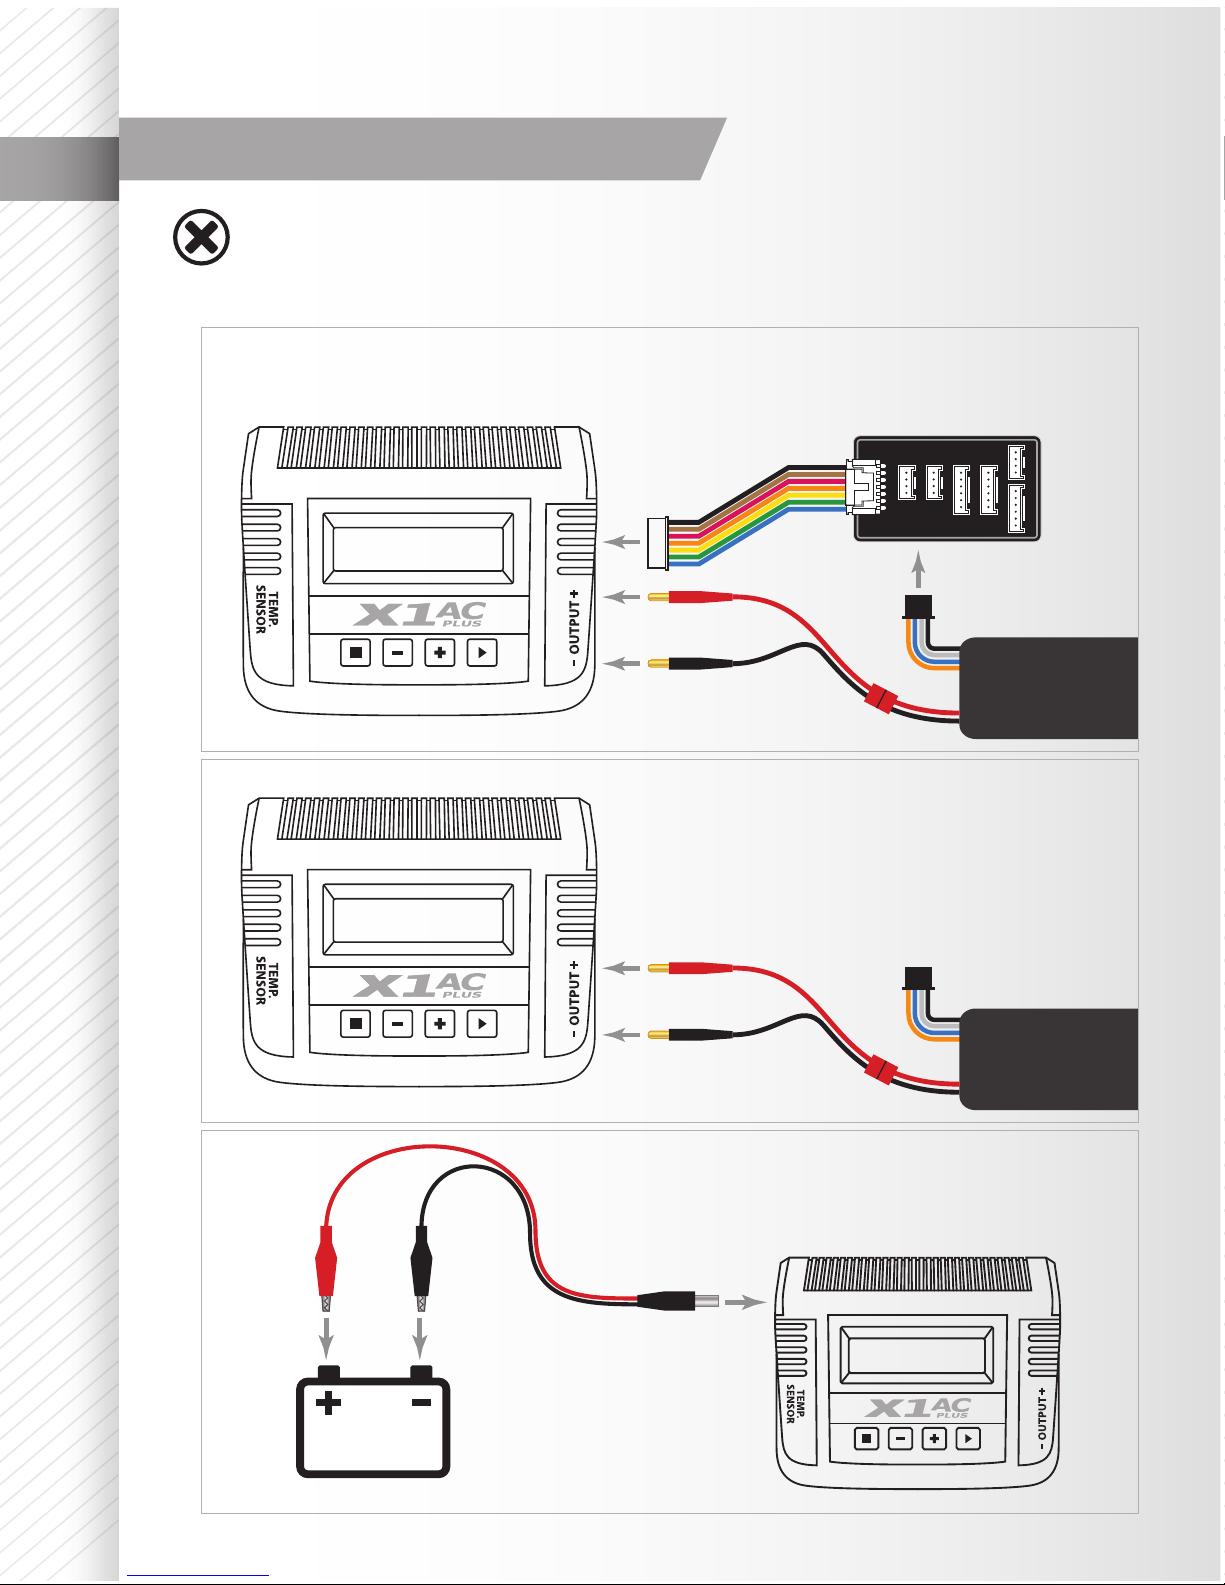
12
TO AVOID SHORT CIRCUITS, ALWAYS CONNECT THE CHARGE LEADS
TO THE CHARGER FIRST, AND THEN TO THE BATTERY. REVERSE THE
SEQUENCE WHEN DISCONNECTING THE PACK.
Charger/Battery Connections
Warning
2S 3S 4S 5S
6S
1
2
3
4
5
6
BATTERY
DC 11-18V BALANCE
SOCKET
BALANCE ADAPTOR
X1 CHARGER
BALANCE
LEAD
Battery Connection With Balance Adaptor.
BATTERY
DC 11-18V BALANCE
SOCKET
X1 CHARGER Battery Connection
Without Balance Adaptor.
DC 11-18V BALANCE
SOCKET
12VDC Battery/DC Power Supply Connection.
**12VDC battery or
11~18V DC, 30 amp
power supply
13
The X1 oers the following lithium charge modes: Charge, Balance Charge,
Fast Charge, Storage and Discharge.
BEFORE SELECTING A CHARGE MODE, IT IS CRITICAL THAT YOU
SELECT THE CORRECT TYPE OF LITHIUM BATTERY TO BE CHARGED.
FAILURE TO DO SO CAN RESULT IN DAMAGE TO THE BATTERY AND
POSSIBLE EXPLOSION.
Selecting a Lithium Battery Type
From the “USER SET PROGRAM->” screen, press the ►
button once to advance to the “V.Type“ screen. The
default setting is “LiPo 3.7V“.
Press the ► button once and the voltage value will
begin ashing. Use the ✚or ▬buttons to choose from the following options:
“LiPo 3.7V“, “ LiIo 3.6V“ or “LiFe 3.3V“. Once you have selected the correct
battery type, press the ► button to save your settings.
This program is only suitable for charging/discharging Lithium (LiPo/LiIon/LiFe)
batteries.
BEFORE YOU BEGIN CHARGING YOUR BATTERY, MAKE SURE YOU
HAVE READ AND UNDERSTAND ALL OF THE WARNINGS AND SEFETY
INFORMATION CONTAINED ON PAGES 47.
IN THE CHARGE MODE, LITHIUM BATTERIES CAN BE CHARGED WITH
OUT THE USE OF A BALANCE ADAPTOR. A BALANCE ADAPTER CAN BE
USED, BUT IT IS NOT REQUIRED. BALANCE CHARGE MODE IS RECOM
MENDED FOR ANY BATTERY WITH A BALANCE LEAD.
See page 12 for the appropriate charging connections setup for this operation.
First, select the correct battery type by following the instructions above. Once
you have set the correct battery type, press the ■ button once to return to the
“USER SET PROGRAM->“ screen. Press the ■ button to enter the “PROGRAM SE-
LECT“ screen. On this screen you should see the type
of battery you have selected.
Charge Modes
Lithium Charge Mode
PROGRAM SELECT
LiPo BATT
USER SET
PROGRAM->
LiPo
V.Type 3.7V
Lithium
Warning
Warning
Note
14
Lithium Charge Mode (cont.)
Lithium
Press the ► button once to enter the “CHARGE” screen.
Press the ► button again and the amp rate value will
begin ashing. Use the ✚or ▬buttons to adjust the value to the desired rate.
Follow the instructions provided with your battery when setting the amp rate.
Press the ► button again and the voltage value will begin ashing. Use the ✚
or ▬buttons to adjust the value to the desired rate. The voltage and cell count
should match the values listed on the battery label.
Choosing “AUTO” for the voltage/cell count setting will allow the X1 to auto-
matically determine these settings. If you choose the “AUTO” setting be sure to
conrm that the correct cell count is displayed once charging begins.
You are now ready to begin charging. Press and hold the ► button until you
see “BATTERY CHECK WAIT...” followed by the “CONFIRM/CANCEL“ screen.
This screen displays the number of cells you set up as
”R” and the number of cells detected by the processor
as “S”. If both numbers are identical, you may press and hold the ► button to
conrm and begin charging. If these numbers do not match, press the ■ but-
ton to return to the previous screen to carefully check the number of cells of
the battery pack before proceeding.
Once charging has commenced, the charger will display
the following real-time information: Battery type/cell
count, charging current, battery voltage, charging time and charged capactiy.
DURING CHARGING, THE BATTERY SHOULD BE PLACED INSIDE A
FIREPROOF/RETARDANT BAG AND ON A FIRE PROOF SURFACE, AWAY
FROM OTHER COMBUSTIBLE OBJECTS.
If you are using a balance adapter, during charging you
may press the ✚button to view the voltage of each
individual cell.
Once the battery is fully charged the screen will read “FULL” and the charger
will emit a chiming sound. Press the ■ button to stop charging. You may press
the ■ button at any time during the charging process to stop charging.
LiPo CHARGE
0.1A 3.7V(1S)
R:3SER S:3SER
CONFIRM(ENTER)
Li3s 1.2A 12.69V
CHG 022:43 00682
4.09 4.09V 4.09V
0.00 0.00V 0.00V
Caution

15
This function is for balancing the voltage of individual Lithium-polymer bat-
tery cells while charging. In order to use the Balance Mode, the battery must
have a balance lead. Charging in this mode is dierent from the normal modes
because the built-in processor monitors the voltage of each individual cell and
controls the input current fed into each cell in order to equalize the voltage.
Use of a balance adaptor with any battery that has a balance lead will improve
the performance and lifespan of your battery.
BEFORE YOU BEGIN CHARGING YOUR BATTERY, MAKE SURE YOU HAVE
READ AND UNDERSTAND ALL OF THE WARNINGS AND SEFETY INFOR
MATION CONTAINED ON PAGES 47.
See page 12 for the appropriate charging connections setup for this operation.
First, select the correct battery type by following the instructions on page 13.
Once you have set the correct battery type, press the ■ button once to return
to the “USER SET PROGRAM->“ screen. Press the ■ button again to enter the
“PROGRAM SELECT“ screen. On this screen you should
see the type of battery you have selected.
Press the ► button once to enter the “CHARGE“ screen.
Now use the ✚or ▬buttons to change the charge
mode to “BALANCE“. Press the ► button again and the amp rate value will
begin ashing. Use the ✚or ▬buttons to adjust the value to the desired rate.
Follow the instructions provided with your battery when setting the amp rate.
Press the ► button again and the voltage value will begin ashing. Use the ✚
or ▬buttons to adjust the value to the desired rate. The voltage and cell count
should match the values listed on the battery label.
You are now ready to begin charging. Press and hold the ► button until you
see “BATTERY CHECK WAIT...” followed by the “CONFIRM/CANCEL“ screen.
This screen displays the number of cells you set up as
”R” and the number of cells detected by the processor
as “S”. If both numbers are identical, you may press the ► button to conrm
and begin charging. If these numbers do not match, press the ■ button to re-
turn to the previous screen to carefully check the number of cells of the battery
pack before proceeding.
Lithium Balance Charge Mode
Lithium
LiPo BALANCE
0.1A 3.7V(1S)
R:3SER S:3SER
CONFIRM(ENTER)
Warning
PROGRAM SELECT
LiPo BATT

16
Charging in Fast Charge Mode allows for a shorter charge time and will result in
a slightly reduced charging capacity. To achieve maximum charge capacity, we
recommend you use the Lithium Balance Charge Mode. If a fast charge is nec-
essary, select the fast charge mode and follow the same charging instructions
as for the Lithium Charge Mode or Lithium Balance Charge Mode.
BEFORE YOU BEGIN CHARGING YOUR BATTERY, MAKE SURE YOU HAVE
READ AND UNDERSTAND ALL OF THE WARNINGS AND SEFETY INFOR
MATION CONTAINED ON PAGES 47.
IN THE FAST CHARGE MODE, LITHIUM BATTERIES CAN BE CHARGED
WITHOUT THE USE OF A BALANCE ADAPTOR. A BALANCE ADAPTOR
CAN BE USED, BUT IT IS NOT REQUIRED. BALANCE CHARGE MODE IS
RECOMMENDED FOR ANY BATTERY WITH A BALANCE LEAD.
See page 12 for the appropriate charging connections setup for this operation.
Lithium Balance Charge Mode (cont.)
Lithium Fast Charge Mode
Lithium
Once charging has commenced, the charger will display
the following real-time information: Battery type/cell
count, charging current, battery voltage, charging time and charged capactiy.
DURING CHARGING, THE BATTERY SHOULD BE PLACED INSIDE A
FIRE PROOF/RETARDANT BAG AND ON A FIRE PROOF SURFACE, AWAY
FROM OTHER COMBUSTIBLE OBJECTS.
During charging you may press the ✚button to view
the voltage of each individual cell.
Once the battery is fully charged the screen will read “FULL” and the charger
will emit a chiming sound. Press the ■ button to stop charging. You may press
the ■ button at any time during the charging process to stop charging.
Caution
Li3s 1.2A 12.69V
BAL 022:43 00682
4.09 4.09V 4.09V
0.00 0.00V 0.00V
Note
Warning
17
Once charging has commenced, the charger will display
the following real-time information: Battery type/cell
count, charging current, battery voltage, charging time and charged capactiy.
DURING CHARGING, THE BATTERY SHOULD BE PLACED INSIDE A
FIRE PROOF/RETARDANT BAG AND ON A FIRE PROOF SURFACE, AWAY
FROM OTHER COMBUSTIBLE OBJECTS.
If you are using a balance adapter, you may press the ✚
button to view the voltage of each individual cell.
Once the battery is fully charged the screen will read “FULL” and the charger
will emit a chiming sound. Press the ■ button to stop charging. You may press
the ■ button at any time during the charging process to stop charging.
Lithium Fast Charge Mode (cont.)
Lithium
Caution
Li3s 1.2A 12.69V
FAS 022:43 00682
4.09 4.09V 4.09V
0.00 0.00V 0.00V
First, select the correct battery type by following the instructions on page 13.
Once you have set the correct battery type, press the ■ button once to return
to the “USER SET PROGRAM->“ screen. Press the ■ button again to enter the
“PROGRAM SELECT“ screen. On this screen you should
see the type of battery you have selected.
Press the ► button once to enter the “CHARGE“ screen.
Now use the ✚or ▬buttons to change the charge
mode to FAST CHG. Press the ► button again and the amp rate value will
begin ashing. Use the ✚or ▬buttons to adjust the value to the desired rate.
Follow the instructions provided with your battery when setting the amp rate.
Press the ► button again and the voltage value will begin ashing. Use the ✚
or ▬buttons to adjust the value to the desired rate. The voltage and cell count
should match the values listed on the battery label.
You are now ready to begin charging. Press and hold the ► button until you
see “BATTERY CHECK WAIT...” followed by the “CONFIRM/CANCEL“ screen.
This screen displays the number of cells you set up as
”R” and the number of cells detected by the processor
as “S”. If both numbers are identical, you may press and hold the ► button to
conrm and begin charging. If these numbers do not match, press the ■ but-
ton to return to the previous screen to carefully check the number of cells of
the battery pack before proceeding.
LiPo FAST CHG
0.1A 3.7V(1S)
R:3SER S:3SER
CONFIRM(ENTER)
PROGRAM SELECT
LiPo BATT
18
First, select the correct battery type by following the instructions on page 13.
Once you have set the correct battery type, press the ■ button once to return
to the “USER SET PROGRAM->“screen. Press the ■ button again to enter the
“PROGRAM SELECT“ screen. On this screen you should
see the type of battery you have selected.
Press the ► button once to enter the “CHARGE“ screen.
Now use the ✚or ▬buttons to change from “CHARGE“
mode to “STORAGE“. Press the ► button again and the amp rate value will
begin ashing. Use the ✚or ▬buttons to adjust the value to the desired rate.
Follow the instructions provided with your battery when setting the amp rate.
Press the ► button again and the voltage value will begin ashing. Use the ✚
or ▬buttons to adjust the value to the desired rate. The voltage and cell count
should match the values listed on the battery label.
Press and hold the ► button and charging will begin.
Once charging has commenced, the charger will
display the following real-time information: Battery
type/cell count, charging current, battery voltage, charging time and charged
capactiy.
This function is for charging/discharging batteries that will not be used im-
mediately. The program is designed for charging/discharging batteries up-to or
down-to safe storage levels. The program will automatically begin to discharge
if the current state of the battery exceeds the voltage level for storage.
BEFORE YOU BEGIN CHARGING/DISCHARGING YOUR BATTERY, MAKE
SURE YOU HAVE READ AND UNDERSTAND ALL OF THE WARNINGS AND
SEFETY INFORMATION CONTAINED ON PAGES XXXX.
IN STORAGE MODE, LITHIUM BATTERIES CAN BE CHARGED WITH OR
WITHOUT THE USE OF A BALANCE ADAPTOR. USE OF A BALANCE
ADAPTOR IS RECOMMENCED WHENEVER POSSIBLE.
See page 12 for the appropriate charging connections setup for this operation.
Lithium Storage Mode
Lithium
Li3s 1.2A 12.69V
STO 022:43 00682
Note
Warning
LiPo STORAGE
0.1A 3.7V(1S)
PROGRAM SELECT
LiPo BATT

19
If you plan to discharge your battery to reach safe storage levels we strongly
recommend that you use Storage Mode. In very few instances should discharg-
ing become necessary with LiPo batteries. One such instance may include
preparing a battery for disposal, in which case the battery should not be com-
pletely discharged. Be sure to follow the discharging instructions provided by
the battery manufacturer. Over-discharging a battery can severly damage
the battery and may cause a re or explosion.
DISCHARGING LITHIUM CHEMISTRY BATTERIES CAN CAUSE PER
MANENT DAMAGE TO THE BATTERY AND IT IS NOT RECOMMENDED
FOR ANYTHING OTHER THAN THE DISPOSAL OF THE BATTERY. IF YOU
CHOOSE TO DISCHARGE YOUR LITHIUM BATTERIES, MAKE SURE TO
PAY CLOSE ATTENTION TO THE MINIMUM VOLTAGE SETTING. IF YOU
WANT TO STORE YOUR BATTERY FOR A LONG PERIOD OF TIME YOU
SHOULD UTILIZE THE STORAGE MODE CHARGE PROGRAM AS THIS IS
THE SAFEST METHOD OF STORING YOUR LITHIUM CHEMISTRY
BATTERIES.
IN DISCHARGE MODE, LITHIUM BATTERIES CAN BE DISCHARGED
WITH OR WITHOUT THE USE OF A BALANCE ADAPTOR. THE USE OF A
BALANCE ADAPTOR IS RECOMMENDED FOR DISCHARGING ANY
BATTERY THAT HAS A BALANCE LEAD.
DURING CHARGING/DISCHARGING, THE BATTERY SHOULD BE PLACED
INSIDE A FIRE PROOF/RETARDANT BAG AND ON A FIRE PROOF SUR
FACE, AWAY FROM OTHER COMBUSTIBLE OBJECTS.
If you are using a balance adapter, you may press the ✚
button to view the voltage of each individual cell.
Once the battery is fully charged the screen will read “FULL” and the charger
will emit a chiming sound. Press the ■ button to stop charging. You may press
the ■ button at any time during the charging process to stop charging.
Lithium Storage Mode (cont.)
Lithium Discharge Mode
Lithium
Caution
4.09 4.09V 4.09V
0.00 0.00V 0.00V
Note
Warning
20
Press the ► button once to enter the “CHARGE“ screen.
Now use the ✚or ▬buttons to change from “CHARGE“
mode to “DISCHARGE“. Press the ► button again and the amp rate value will
begin ashing. Use the ✚or ▬buttons to adjust the value to the desired rate.
Follow the instructions provided with your battery when setting the amp rate.
Press the ► button again and the voltage value will begin ashing. Use the ✚
or ▬buttons to adjust the value to the desired rate. The voltage and cell count
should match the values listed on the battery label.
Press and hold the ► button and discharging will begin.
Once discharging has commenced, the charger will
display the following real-time information: Battery
type/cell count, discharging current, battery voltage, discharging time and
discharged capactiy.
DURING CHARGING/DISCHARGING, THE BATTERY SHOULD BE PLACED
INSIDE A FIRE PROOF/RETARDANT BAG AND ON A FIRE PROOF SUR
FACE, AWAY FROM OTHER COMBUSTIBLE OBJECTS.
If you are using a balance adapter, you may press the ✚
button to view the voltage of each individual cell.
Once discharging is complete, the X1 charger will emit a chiming sound. Press
the ■ button at any time to stop discharging.
Lithium Discharge Mode (cont.)
Lithium
Li3s 1.2A 12.69V
DSC 022:43 00682
LiPo STORAGE
0.1A 3.7V(1S)
Caution
4.09 4.09V 4.09V
0.00 0.00V 0.00V
See page 12 for the appropriate charging connections setup for this operation.
First, select the correct battery type by following the instructions on page 13.
Once you have set the correct battery type, press the ■ button once to return
to the “USER SET PROGRAM->“screen. Press the ■ button again to enter the
“PROGRAM SELECT“ screen. On this screen you should
see the type of battery you have selected.
PROGRAM SELECT
LiPo BATT
Table of contents
Other Hi-Tec Batteries Charger manuals

Hi-Tec
Hi-Tec X2-700 User manual

Hi-Tec
Hi-Tec RDX1 Mini User manual

Hi-Tec
Hi-Tec X4 User manual

Hi-Tec
Hi-Tec Smart Charger H4 User manual

Hi-Tec
Hi-Tec X4-80 User manual

Hi-Tec
Hi-Tec X4 ADVANCED User manual

Hi-Tec
Hi-Tec X2 Ultima User manual

Hi-Tec
Hi-Tec X4 AC Pro User manual

Hi-Tec
Hi-Tec CG-340 User manual

Hi-Tec
Hi-Tec X1 Pro User manual

Hi-Tec
Hi-Tec X2 Ultima User manual

Hi-Tec
Hi-Tec X1 Pro User manual

Hi-Tec
Hi-Tec X1 mini User manual

Hi-Tec
Hi-Tec Multi-Charger X2-400 User manual

Hi-Tec
Hi-Tec X4 MICRO User manual

Hi-Tec
Hi-Tec X1 Touch User manual

Hi-Tec
Hi-Tec RDX 2 PRO User manual

Hi-Tec
Hi-Tec 44246 User manual

Hi-Tec
Hi-Tec Smart Charger H4 User manual

Hi-Tec
Hi-Tec RDX1 Mini User manual


