Hi-Tec Multi-Charger X2-400 User manual


TABLEOFCONTENTS
Introduction.…..…..…..…..…..…..…..…..…..…..…..…..…..…..…..….01
Charger Layout…..…..…..…..…..…..…..…..…..….…..…..…..…........03
Special Features…..…..…..…..…..…..…..…..…..….........................04
Warnings and Safety Information…..…..…..…..…..…..…..…..…..…..06
Default User Preferences Setup…..…..…..…..…..…..…..…..…..…...09
Connecting the Battery…..…..…..…..…..…..…..…..…..….................11
Program Flow Chart…..…..…..…..…..…..…..…..…..….....................12
Program Display Information…..…..…..…..…..…..…..…..…..…........13
Charging Lithium Chemistry (LiPo/LiIo/LiFe) Type Batteries............13
Discharging Lithium Chemistry (LiPo/LiIo/LiFe) Type Batteries........16
Charging/Discharging and Cycling NiCd or NiMH Batteries..............17
Charging/Discharging Lead-Acid (Pb) Batteries...............................18
Battery Data Preset Storage and Load Feature…..…..…..…..…..…..20
Warning and Error Messages…..…..…..…..…..…..…..…..…..…........21
Recommended Accessories…..…..…..…..…..…..…..…..…..…..........22
Conformity and Regulatory Information…..…..…..…..…..…..…..…...22
Warranty and Servicing…..…..…..…..…..…..…..…..…..…................23
INTRODUCTION
01
Congratulations on your purchase of the Hitec X2-400 Multi-Charger. You are now the
owner of a compact multi chemistry battery charger with battery management and integral
Lithium battery balancing features. The X2-400 features four totally independent and
identical 50 watt charging circuits for a total power of 200 watts. As a result, it can simulta-
neously charge or discharge up to 4 separate battery packs.
The X2-400 can be attached to a 12 volt car battery with the include connector you
connect it to a 12 – 18 V DC power supply with a minimum amperage rating of 60 amps.
The Hitec X2-400 is simple to use, but the operation of a sophisticated automatic charger
such as the X2-400 does require some knowledge and education by the user. This
instruction manual is designed to ensure that you can quickly become familiar with the
charger’s functions and capabilities. It is important that you read this instruction manual in
its entirety before attempting to use your new X2-400 charger.
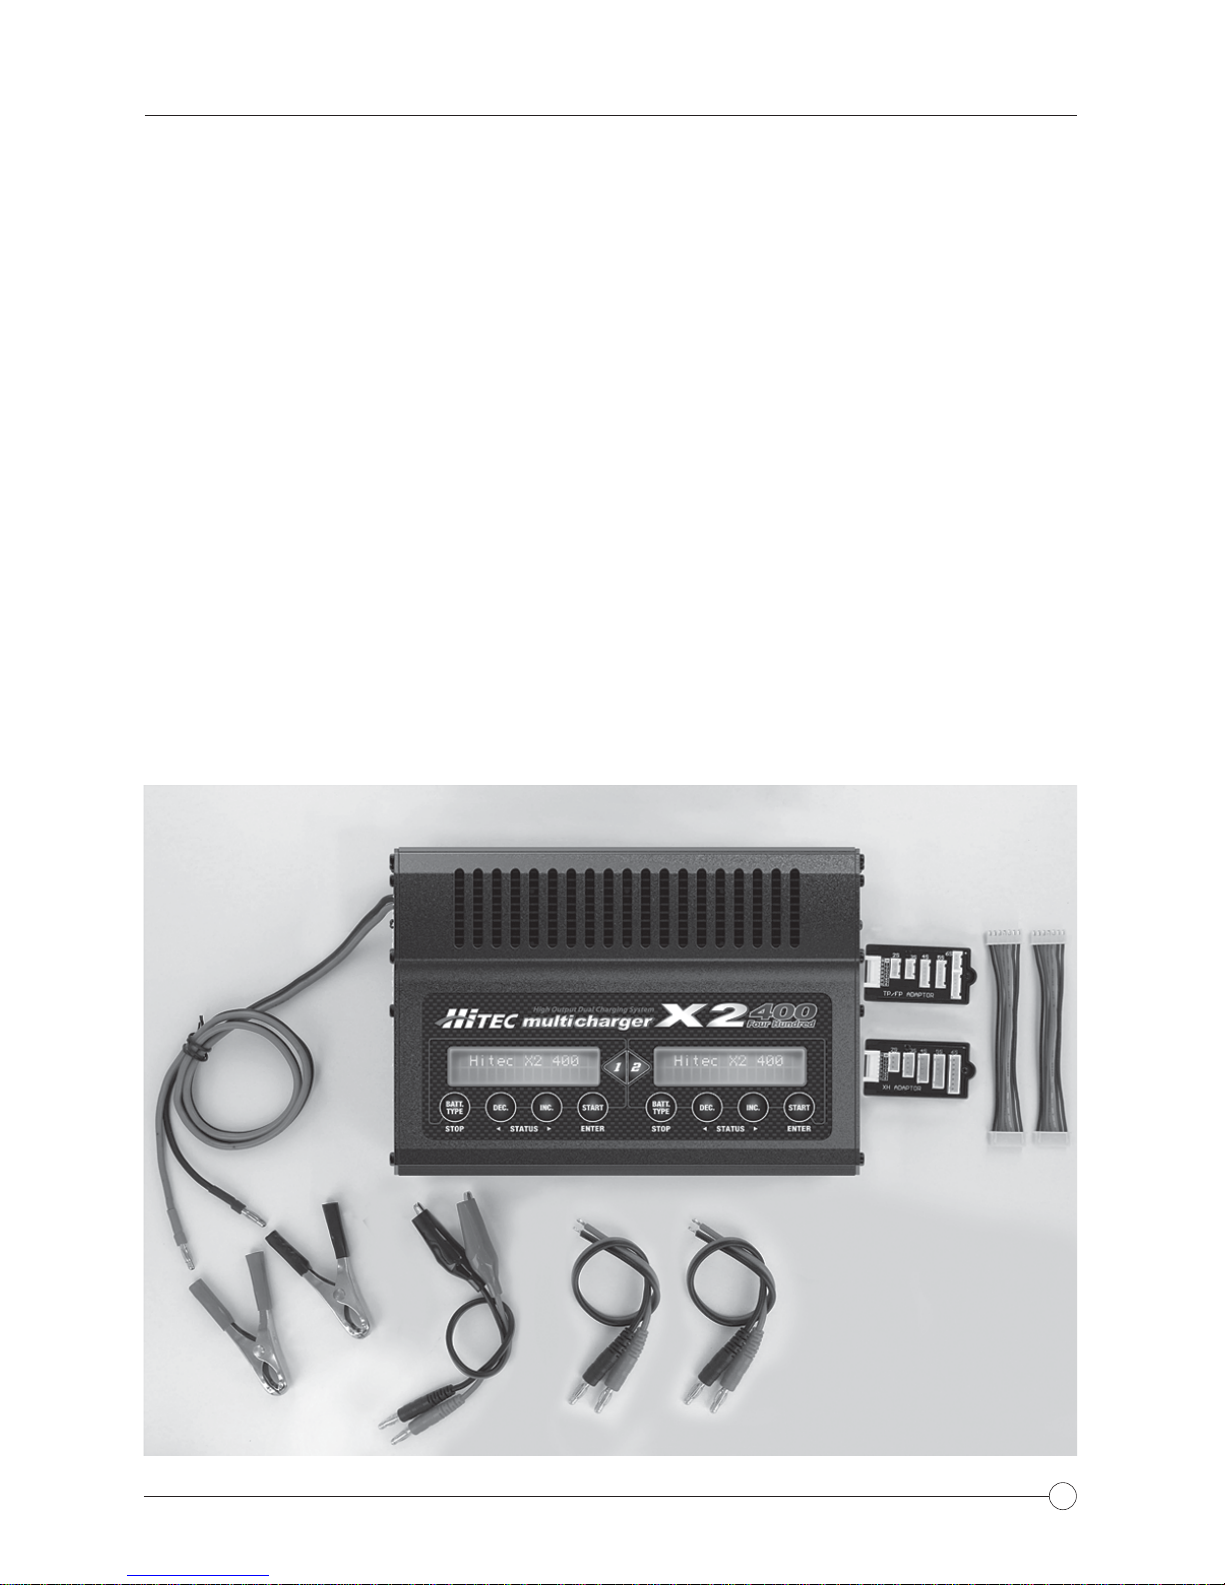
1. X2-400 Charger
2. Plug-in battery clamps
3. Crocodile clip charging cable
4. 18AWG wire charging cable x 2
5. TP/FP Adaptor
6. XH Adaptor
The Set Contains:
1
2
34
5
6

02
INTRODUCTION
Specifications
The Hitec X2-400 allows you to charge up to two different batteries simultaneously. The
charger will automatically charge all 4 batteries at a time to their maximum capacity. Addi-
tionally the batteries being charged do not need to have the same configuration or the
same chemistry. Therefore you can connect any one of a NiMH/NiCD/LiPo/LiFe battery
into any of the charging ports. This eliminates the time consuming efforts of charging all
your batteries separately.
Discharger Power 25 Watts per Channel
Power Source
Charge Power
Cell Count
Dimensions
Net Weight
12 Volt Car Battery or
12-18 Volts DC 60 AMP Power Supply
400 Watts per Channel (800 watts total)
1-6 LiPo/LiIon/LiFe cells
1-15 NiCd/NiMH cells
1-10 Lead-Acid cells (2V - 20V)
8.9” x 6.7” x 2.6”
3.4 lbs.
Operating Voltage Range 12 - 18 Volts DC
Current Drain for Balancing Lithium 200mA Per Cell
Charge Current 0.1 - 20 Amps
Discharge Current 0.1 - 5.0 Amps
03
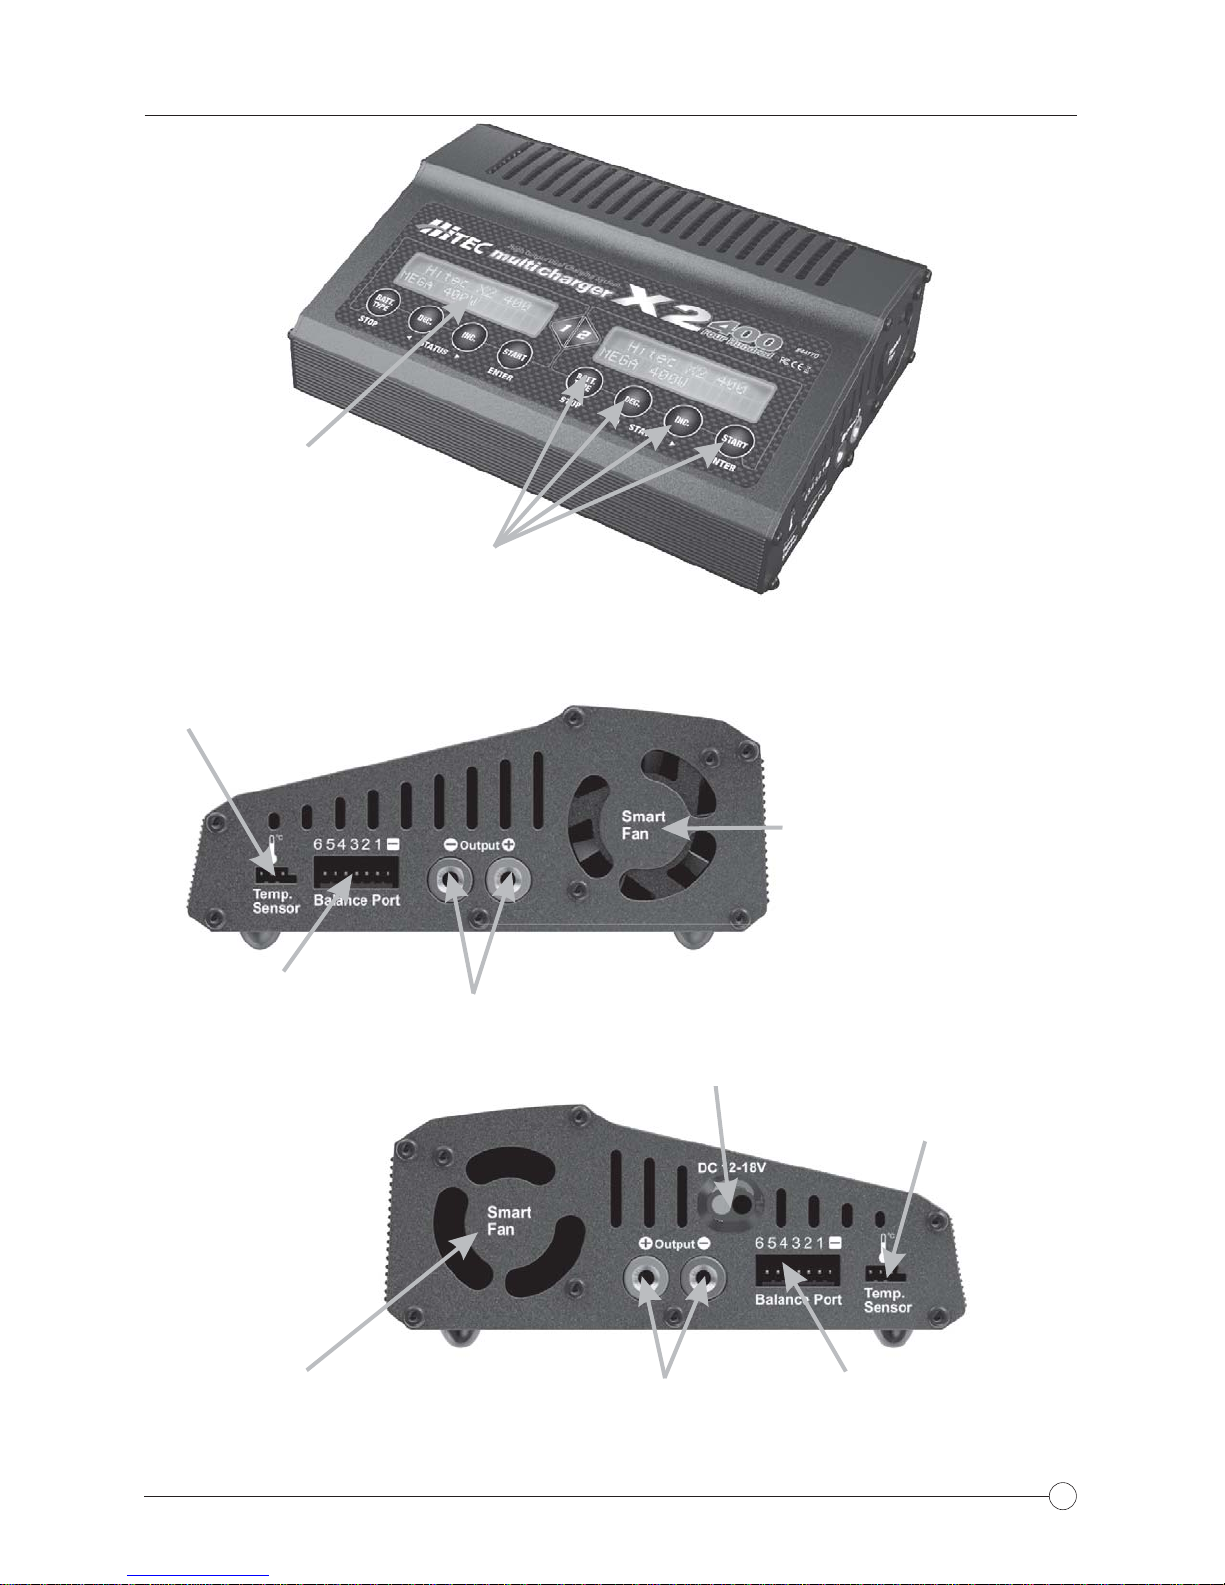
CHARGERLAYOUT
LCD Screen
Menu Control Buttons
Temp Sensor/PC Link
Temp Sensor/PC Link
Universal
Balancing
Port
Universal
Balancing
Port
Battery Socket
Battery Socket
Input DC 12-18
Ventilation Fan
With Temperature Sensor
Ventilation Fan
With Temperature Sensor

04
Optimized Operating Software
The software in X2-400 automatically controls the current rate during the charging or
discharging process. This feature can prevent the user from overcharging their batteries
which could lead to damage or injury. If the charger detects a malfunction, the circuit
automatically disconnects and an alarm will sound, The operating functions of the
X2-400 are controlled through a two-way communication link in order to maintain
maximum safety with minimal errors. All of these functions and settings are easily config-
ured by the user.
Internal Independent Lithium Battery Balancers
Each channel of the X2-400 employs an individual-cell voltage balancer eliminating the
need for an external balancer for balance charging.
Monitors Individual Cells During Battery Discharging
During the process of discharging, the X2-400 can monitor and display each cell of
lithium type batteries individually. If the voltage of any single cell is abnormal, an error
message will display and the discharge process will automatically end.
Charges Most Popular Lithium Batteries
The X2-400 is compatible with the three most common Lithium chemistry batteries,
Li-Ion, LiPo and LiFe.
Multiple Lithium Battery Charge Modes
The X2-400’s programming allows for Fast Charge, Balance Charge or Storage Charge
Modes for LiPo, Li-Ion, and LiFe batteries.
)DVW&KDUJH0RGH Reduces charging time, but does not balance the cells, this
mode only charges the battery to approximately 90% capacity.
%DODQFH&KDUJH0RGH Monitors individual cell voltage, keeping the cells within an
acceptable voltage range and charges the pack to peak capacity.
6WRUDJH&KDUJH0RGH Used for long-term battery storage. Adjusts the voltage
level so the battery will not be damaged during long term storage.
Delta Peak Technology for Maximum Safety
The automatic charge termination program utilizes Delta-Peak voltage detection.
When the battery's voltage exceeds the threshold, the charge process is terminated
automatically.
Automatic Charging Current Limit
The maximum charge rate can be manually set when charging NiCd or NiMH batteries.
The X2-400 will auto-detect when the batteries are fully charged and shut off, even with
low impedance NiMH packs.
SPECIALFEATURES

05
Capacity and Processing Time Limit
The charging capacity is calculated as the charging current multiplied by time. If the
charging capacity exceeds the maximum limit set by the user, the process will terminate
automatically. Additionally the user can set the maximum amount of charging time. If the
charging time exceeds this limit, the process will terminate automatically.
Temperature Threshold*
The battery's internal chemical reaction causes the temperature of the battery to rise
during the charging process. If the temperature exceeds the limit, the charging process
will automatically terminate.
* This function is available by connecting an optional temperature probe, which is not
included in our package.
5 User Customizable Presets per Port
Each port of the X2-400 features 5 individually customizable presets so the user can store
the charge and discharge parameters for any particular battery type. These presets can
be recalled for the desired battery type without the need for any additional programming.
Cyclic Charging / Discharging
Batteries can be set to automatically Charge/Discharge or Discharge/Charge up to a
maximum of 5 cycles.
PC Based Analysis Using USB Communication*
The Hitec X2-400 offers a PC-based program which can analyze the characteristics of
the battery via a USB port. It shows a graph of voltage, current and capacity curves. It
also displays the individual voltage of each cell in the lithium battery pack.
* Using optional PC-LINK USB Adapter (sold separately) and software that can be
downloaded from www.hitecrcd.com
SPECIALFEATURES

06
$EDWWHU\SDFNZKLFKFRQVLVWVRIGLIIHUHQWW\SHVRIFHOOV
LQFOXGLQJGLIIHUHQWPDQXIDFWXUHUV
$EDWWHU\WKDWLVDOUHDG\IXOO\FKDUJHGRUMXVWVOLJKWO\GLVFKDUJHG
1RQUHFKDUJHDEOHEDWWHULHVWKH\SRVHDQH[SORVLRQKD]DUG
%DWWHULHVWKDWUHTXLUHDGLIIHUHQWFKDUJHWHFKQLTXHIURP1L&G1L0+/L3R
RUJHOFHOO3EOHDGDFLGEDWWHU\
$IDXOW\RUGDPDJHGEDWWHU\
$EDWWHU\ILWWHGZLWKDQLQWHJUDOFKDUJHFLUFXLWRUDSURWHFWLRQFLUFXLW
%DWWHULHVLQVWDOOHGLQDGHYLFHRUZKLFKDUHHOHFWULFDOO\OLQNHGWRRWKHU
FRPSRQHQWV
%DWWHULHVWKDWDUHQRWH[SUHVVO\VWDWHGE\WKHPDQXIDFWXUHUWREHVXLWDEOHIRU
WKHFXUUHQWVWKHFKDUJHUGHOLYHUVGXULQJWKHFKDUJHSURFHVV
Never Attempt to Charge or Discharge the Following Types of
Batteries
WARNING
)$,/85(72)2//2:7+(6(,03257$176$)(7<127(6257+(,16758&7,21
0$18$/&$15(68/7,16(9(5(,1-85<3523(57<'$0$*(25/2662)/,)(
3OHDVHUHDGWKLVHQWLUHLQVWUXFWLRQPDQXDOFRPSOHWHO\DQGDWWHQWLYHO\EHIRUHXVLQJ
WKLVSURGXFWDVLWFRYHUVDZLGHUDQJHRILQIRUPDWLRQRQRSHUDWLRQDQGVDIHW\
NEVEROHDYHWKHFKDUJHUXQDWWHQGHGZKHQLWLVFRQQHFWHGWRLWVSRZHUVXSSO\,IDQ\
PDOIXQFWLRQ LV IRXQG 7(50,1$7( 7+( 352&(66 $7 21&( DQG UHIHU WR WKH
LQVWUXFWLRQPDQXDO
.HHSWKHFKDUJHUDZD\IURPGXVWPRLVWXUHZDWHUH[FHVVLYHKHDWGLUHFWVXQOLJKW
DQGYLEUDWLRQ
7KHPD[LPXPDOORZDEOHLQSXW YROWDJH LV 9ROWV'&ZKHQXVLQJ DQ H[WHUQDO '&
SRZHUVRXUFH
7KHFKDUJHUDQGWKHEDWWHU\VKRXOGEHSXWRQDKHDWUHVLVWDQWQRQIODPPDEOHDQG
QRQFRQGXFWLYHVXUIDFH1HYHUSODFHWKHPRQDFDUVHDWFDUSHWRURWKHUIODPPDEOH
VXUIDFH.HHSDOOIODPPDEOHYRODWLOHPDWHULDOVDZD\IURPWKHRSHUDWLQJDUHD
0DNHVXUH\RXNQRZWKHVSHFLILFDWLRQVRIWKHEDWWHU\\RXDUHFKDUJLQJRUGLVFKDUJLQJ
WRHQVXUHLWPHHWVWKHUHTXLUHPHQWVRIWKLVFKDUJHU,IWKHSURJUDPLVVHWXSLQFRU
UHFWO\WKHEDWWHU\DQGFKDUJHUPD\EHGDPDJHG)LUHRUH[SORVLRQFDQRFFXUGXHWR
RYHUFKDUJLQJ
7R DYRLG VKRUW FLUFXLWLQJ EHWZHHQ WKH FKDUJH OHDG DOZD\V FRQQHFW WKH FKDUJH
FDEOHWRWKHFKDUJHUILUVWWKHQFRQQHFWWKHEDWWHU\5HYHUVHWKHVHTXHQFHZKHQ
GLVFRQQHFWLQJ
WARNINGSANDSAFETYINFORMATION

07
'LG\RXVHOHFWWKHDSSURSULDWHSURJUDPVXLWDEOHIRUWKHW\SHRIEDWWHU\\RXDUHFKDUJLQJ"
'LG\RXVHWXSDGHTXDWHFXUUHQWIRUFKDUJLQJRUGLVFKDUJLQJ"
+DYH\RXFKHFNHGWKHEDWWHU\YROWDJH"/LWKLXPEDWWHU\SDFNVFDQEHZLUHGLQSDUDOOHO
DQGLQVHULHVLHDFHOOSDFNFDQEH9LQSDUDOOHORU9LQVHULHV
+DYH\RXFKHFNHGWKDWDOOFRQQHFWLRQVDUHILUPDQGVHFXUH"0DNHVXUHWKHUHDUHQR
LQWHUPLWWHQWFRQWDFWVDWDQ\SRLQWLQWKHFLUFXLW
Before you Start Charging or Discharging your Batteries Consider the
Following
79/FHOO
Nominal
Voltage
Min. Discharge
Voltage
Max Charge
Voltage
Storage
Voltage
Allowable
Fast Charge
79/FHOO
9/FHOO
89/FHOO
1&
09/FHOO
LiPo LiIon
69/FHOO
19/FHOO
59/FHOO
1&
9/FHOO
69/FHOO
9/FHOO
&
09/FHOO
LiFe
19/FHOO
159/FHOO
Q/D
1&&
9FHOO
NiCd
19/FHOO
159/FHOO
Q/D
1&&
109/FHOO
MiMH
09/FHOO
69/FHOO
Q/D
0&
9FHOO
Pb
Charging
'XULQJWKHFKDUJHSURFHVVDVSHFLILFTXDQWLW\RIHOHFWULFDOHQHUJ\LVIHGLQWRWKHEDWWHU\
7KH FKDUJH TXDQWLW\ LV FDOFXODWHG E\ PXOWLSO\LQJ FKDUJH FXUUHQW E\ FKDUJH WLPH 7KH
PD[LPXPSHUPLVVLEOHFKDUJHFXUUHQWYDULHVGHSHQGLQJRQWKHEDWWHU\W\SHRULWVSHUIRU
PDQFHDQGFDQEHIRXQGLQWKHLQIRUPDWLRQSURYLGHGE\WKHEDWWHU\PDQXIDFWXUHU2QO\
EDWWHULHVWKDWDUHH[SUHVVO\VWDWHGWREHFDSDEOHRITXLFNFKDUJHVKRXOGEHFKDUJHGDW
UDWHVKLJKHUWKDQWKHVWDQGDUGFKDUJHFXUUHQW
&RQQHFWWKHEDWWHU\WRWKHWHUPLQDORIWKHFKDUJHU5HGLVSRVLWLYHDQGEODFNLVQHJDWLYH
,QWKHHYHQWWKHUHLVDQ\VLJQLILFDQWUHVLVWDQFHLQWKHEDWWHU\FDEOHDQGRUFRQQHFWRUWKH
FKDUJHUZLOOQRWEHDEOHWRSURSHUO\GHWHFWWKHUHVLVWDQFHRIWKHEDWWHU\SDFNUHVXOWLQJLQ
DQHUURU,WLVHVVHQWLDOLQRUGHUIRUWKHFKDUJHUWRRSHUDWHSURSHUO\WKDWWKHEDWWHU\FKDUJH
OHDGVVKRXOGEHRIDGHTXDWHTXDOLW\IRUWKHVL]HRIWKHEDWWHU\
$OZD\VUHIHUWRWKHPDQXDOE\WKHEDWWHU\PDQXIDFWXUHUSHUWDLQLQJWRFKDUJLQJPHWKRGV
2SHUDWHDFFRUGLQJWRWKHLUUHFRPPHQGHGFKDUJLQJFXUUHQWDQGFKDUJLQJWLPH/LWKLXP
EDWWHULHV LQ SDUWLFXODU VKRXOG EH FKDUJHG VWULFWO\ DFFRUGLQJ WR WKH PDQXIDFWXUHUV
LQVWUXFWLRQ
3D\FORVHDWWHQWLRQWRWKHFRQQHFWLRQRIOLWKLXPEDWWHULHV
'RQRWDWWHPSWWRGLVDVVHPEOHWKHEDWWHU\SDFN
3OHDVHWDNHQRWHWKDWOLWKLXPEDWWHU\SDFNVFDQEHZLUHGLQSDUDOOHODQGLQVHULHV,QWKH
SDUDOOHOFRQQHFWLRQWKHEDWWHU\¶VFDSDFLW\LVFDOFXODWHGE\PXOWLSO\LQJWKHVLQJOHEDWWHU\¶V
FDSDFLW\E\WKHQXPEHURIFHOOVEHDULQJLQPLQGWKDWWRWDOYROWDJHVWD\VWKHVDPH,IWKH
YROWDJH LV LPEDODQFHG LW PD\ FDXVH D ILUH RU H[SORVLRQ /LWKLXP EDWWHULHV DUH DOZD\V
UHFRPPHQGHGWREHFKDUJHLQVHULHV
WARNINGSANDSAFETYINFORMATION
Standard Battery Parameters

08
Discharging
The main purpose of discharging a battery is to clean the residual capacity of the
battery or to reduce the battery’s voltage to a defined level. It is even more critical that
close attention be paid to the discharging process as failure to properly monitor the
process can destroy your batter. The final discharge voltage should be set correctly to
avoid deep discharging. Some rechargeable batteries have a memory effect. If they
are partly used and recharged before the complete charge/discharge cycle is accom-
plished, they remember this and will only use that part of their capacity next time. It is
generally known that NiCd and NiMH batteries suffer from this memory effect.
Discharging Lithium Batteries
Lithium batteries cannot be discharged to a voltage lower than the minimum voltage
for the cell type. Doing so will result in a rapid loss of capacity and/or total failure.
While the X2-400 monitors each individual cell during the discharge process the
discharging cutoff is based on the total pack voltage. Generally, lithium batteries don’t
need to be discharged and it is not recommended that you discharge them. If you do
choose to discharge your lithium batteries make sure to pay attention to the minimum
voltage setting as well as the individual cell voltage.
4mm bullet
connectors
plug directly
into most power
supplies.
Using terminal
clip attaching
to car battery.
POWERINGTHECHARGER
WARNINGSANDSAFETYINFORMATION
The Hitec X2-400 charger can also be powered by a 12VDC car battery using the
included large terminal clips with matching 4mm female bullet connectors or it can be
connected directly to a DC power supply. When connecting to a battery or power supply
it is critically important that you use either a fully charged 12 volt car battery or a high
quality DC power supply that has a voltage range between 12 to 18 volts DC and a
minimum current rating of 60 amps. Failure to use proper input power can result in unreli-
able performance and may damage the charger.
NOTICE
THIS CHARGER WAS DESIGNED AND APPROVED EXCLUSIVELY FOR USE WITH
THE TYPES OF BATTERIES STATED IN THIS INSTRUCTION MANUAL. HITEC RCD
USA ACCEPTS NO LIABILITY OF ANY KIND IF THE CHARGER IS USED FOR ANY
PURPOSE OTHER THAN THAT STATED. SINCE WE ARE UNABLE TO ASSURE THAT
THE USER WILL PROPERLY FOLLOW THE SUPPLIED INSTRUCTIONS AND HAVE
NO CONTROL OVER ONE'S PROPER USE OR MAINTENANCE OF THE DEVICE, WE
ARE OBLIGATED TO DENY ANY AND ALL CLAIMS OF LIABILITY FOR LOSS,
DAMAGE OR INJURY WHICH ARE INCURRED DUE TO IMPROPER USE AND OPERA-
TION OF THIS PRODUCT. UNLESS OTHERWISE PRESCRIBED BY LAW, THE LIMIT
OF OUR LIABILITY SHALL NOT EXCEED THE INVOICE VALUE OF THE CHARGER.

09
When powered on for the first time the X2-400 will load a set of default parameters most
commonly used by most users. The screen displays the information in the following
sequence. The user can customize the parameters on each screen to suit their own
preferences.
To change the parameter values in the program, press the Start/Enter key to choose the
parameter you want to change. Once the parameter is blinking you can change the value
with the INC (up/forward) or DEC (down/back) keys. The value will be stored by pressing
the Start/Enter key once and the blinking stops.
WARNING
DO NOT CONNECT A BATTERY TO THE CHARGER BEFORE SETTING
UP THE DEFAULT USER PREFERENCES
Main User Setup Screen
The first screen displayed is the Lithium battery set-up screen, you
can press ENTER to bypass this screen and go to the next user
setup screen, or you can set the default Lithium battery type before
moving on.
The Lithium Battery Select Screen
Here you can choose one of the three kinds of Lithium batteries
supported by the X2-400, LiFe (3.3V), Lilo (3.6V) or LiPo (3.7V). If
you plan to use one type of Lithium chemistry battery you can set the
default here. WARNING: Make sure when you connect your battery
that you have selected the proper type of battery before you begin
charging your battery. Once you have established the desired
settings press Start/Enter to confirm the setting then press INC to
move on to the next parameter.
LiPo /LiIo/LiFe Check Time
To avoid an erroneous setting by the user the X2-400 will automati-
cally detect the cell count of a Lithium battery at the beginning of the
charge or discharge process. To prevent an over-discharged battery
from being detected incorrectly, resulting in an error, you can set a
time limit for the processor to verify the cell count. The default setting
is 10 minutes which is typically enough time to properly detect the
cell count. It is not recommended that you change this setting as
setting to long of a “Check Time” can produce dangerous results.
Once you have established the desired settings press Start/Enter to
confirm the setting then press INC to move on to the next parameter.
DEFAULTUSERPREFERENCESSETUP
DEC INC
ENTER
DEC INC
DEC INC
10
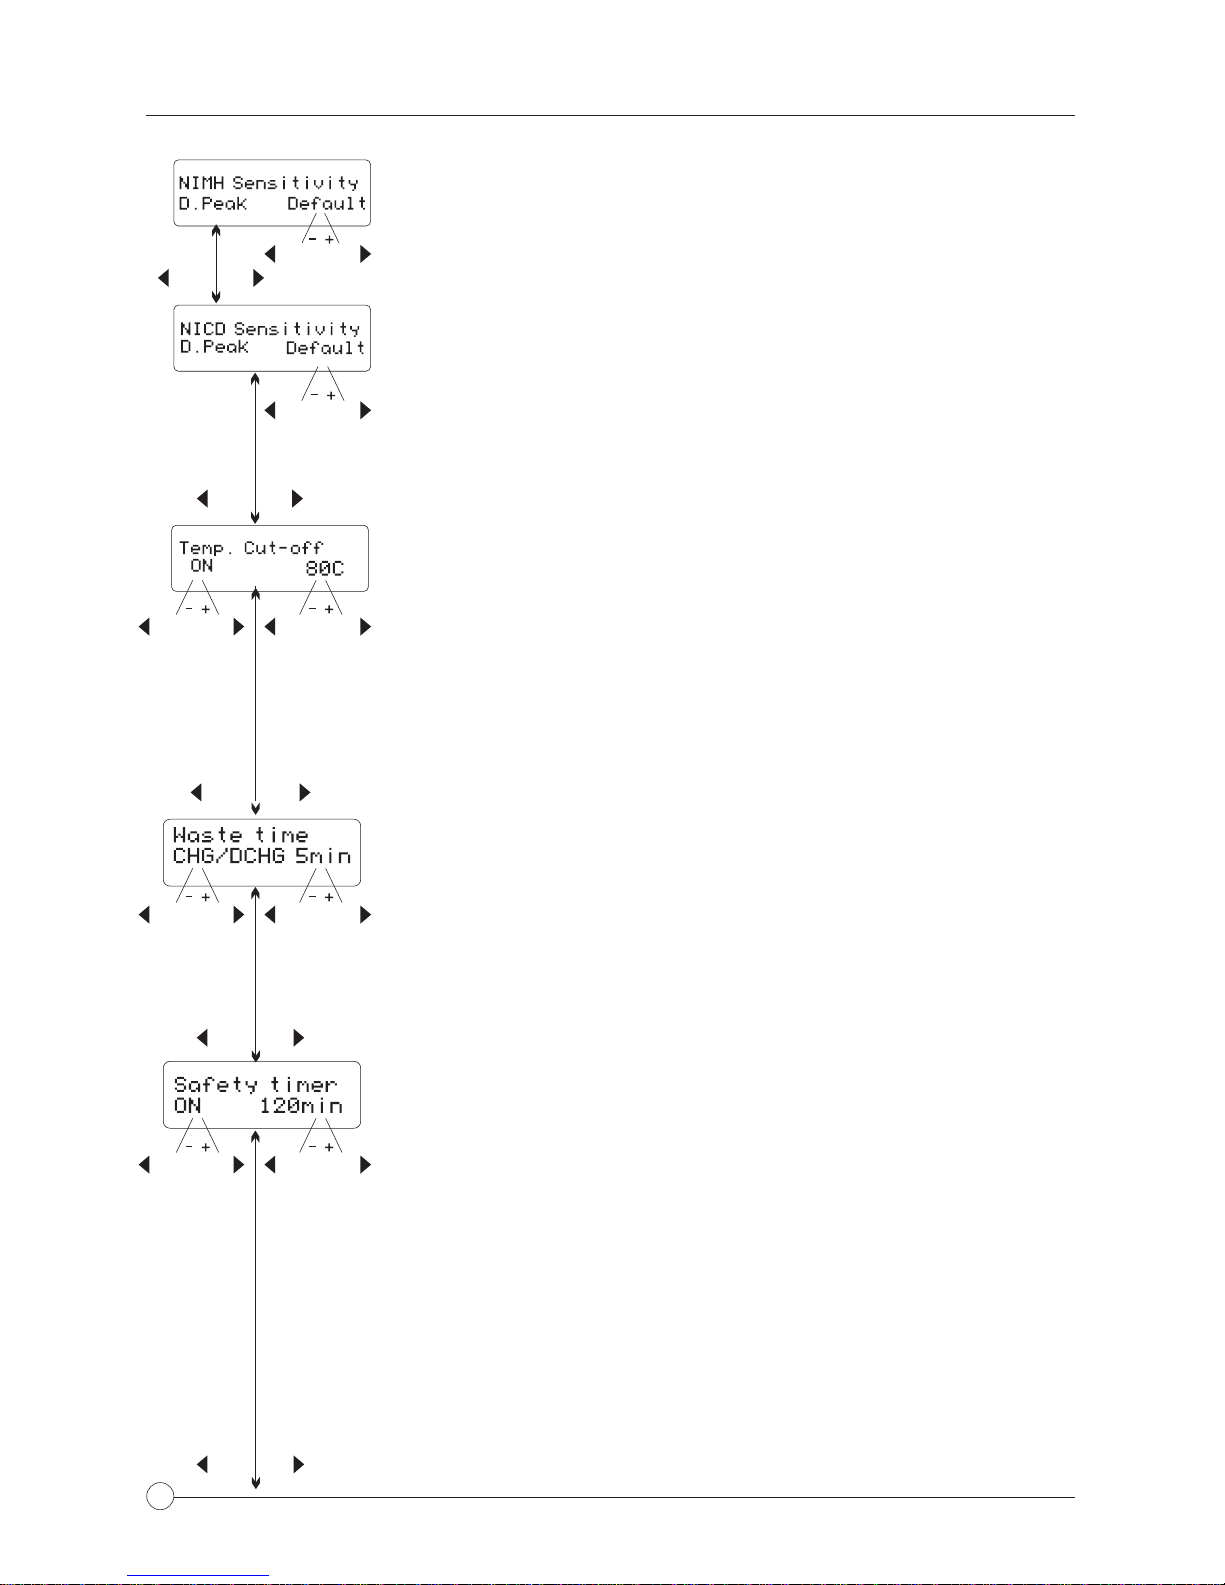
NiMh & NiCd Delta Peak Sensitivity Setting
This feature sets the cutoff voltage for the automatic charge
termination of a NiMH and NiCd battery pack. The setting can
range from 5 to 20mV per cell, the default is 12mV for NiCd
batteries and 7mV for NiMH, the parameters are set individually
for NiCd and NiMh batteries. If the cutoff voltage is too high,
there is a danger of overcharging the battery, if it is too low there
is a possibility of premature charge termination. Refer to the
battery manufacturer’s specifications to determine the proper
setting. Once you have established the desired settings press
Start/Enter to confirm the setting then press INC to move on to
the next parameter.
Temperature Cutoff Setting
You can choose whether or not you want to use the automatic
temperature cut off when using the optional temperature
sensors. When turned on you can set the maximum temperature
at which the charger should allow the battery to reach during
charging. Once a battery reaches this temperature, the charge
or discharge process will be terminated to protect the battery.
Once you have established the desired settings press
Start/Enter to confirm the setting then press INC to move on to
the next parameter.
Waste Time Setting
When charge/discharge cycling a battery the battery will become
warm. You can set a time delay ranging from 0 to 60 minutes
after each charge/discharge process to allow the battery to cool
down before starting the next charge/discharge cycle. Once you
have established the desired settings press Start/Enter to
confirm the setting then press INC to move on to the next
parameter.
Safety Timer Setting
When the charge process starts, the integrated safety timer runs
simultaneously. If an error occurs or the charge termination
circuit cannot detect if the battery is fully charged, this setting will
terminate the charge process to prevent overcharging. Use the
Safety Timer Calculation below to determine the proper setting.
Safety Timer Setting Calculation
To determine the correct safety time setting when charging NiCd
or NiMH batteries, divide the capacity by the current, and then
divide the result by 11.9. Set the results of this calculation as the
number of minutes for the safety timer setting. If the charger
stops at this time threshold, about 140% of the capacity will have
been fed into the battery. Example: 2000mAh 2.0A
(2000/2.0=1000)/11.9=84 minutes.
DEC INC
DEC INC
DEC INC
DEC INC
DEC INCDEC INC
DEC INC
DEC INC
DEC INC
DEC INCDEC INC
DEC INCDEC INC
DEFAULTUSERPREFERENCESSETUP
11
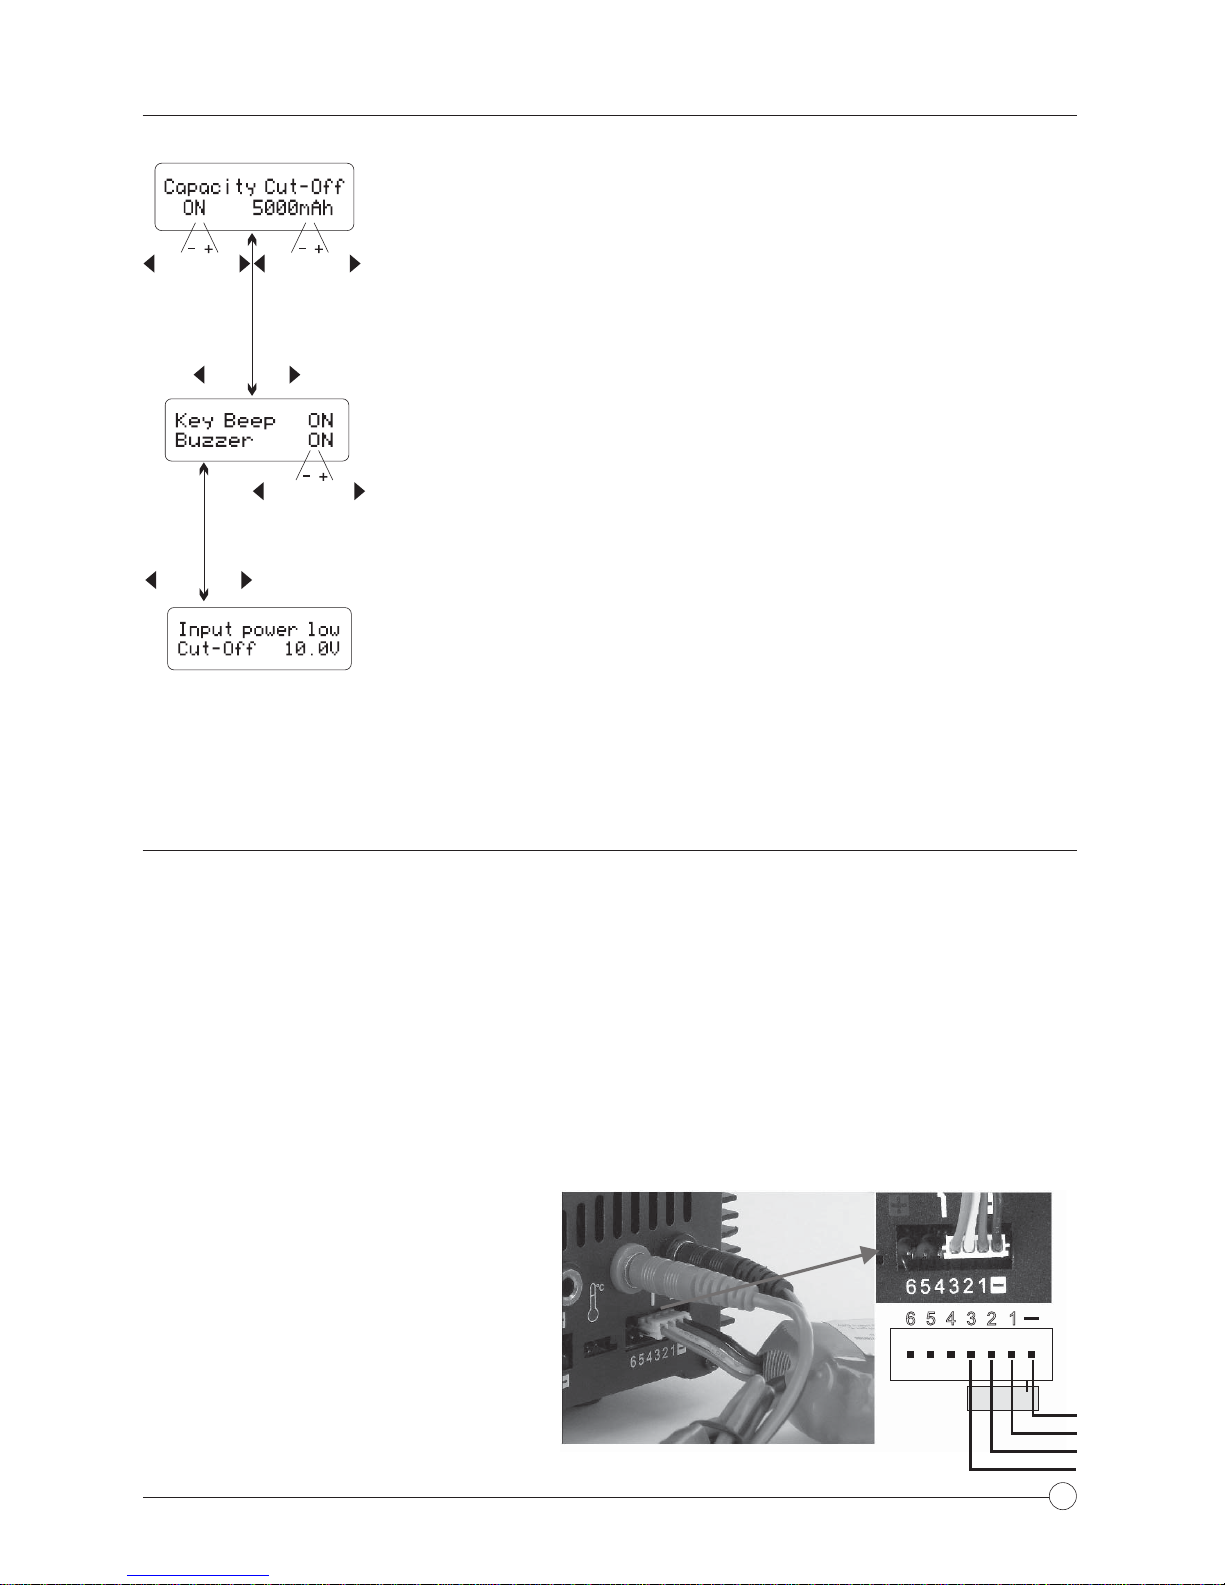
Capacity Cutoff Setting
The charging software allows the user to create a maximum
charge capacity protection setting. If the delta-peak voltage is not
properly detected or the safety timer times out, the charge process
will stop automatically when the battery reaches the set maximum
charge capacity set by the user. Once you have established the
desired settings press Start/Enter to confirm the setting then press
INC to move on to the next parameter.
Sound Settings (Key & Buzzer Mute)
A beep sounds to confirm the every time the user presses a button,
additionally a sound is emitted during the operation of the charger
to confirm a different mode change. These functions can be
switched on or off. Once you have established the desired settings
press Start/Enter to confirm the setting then press INC to move on
to the next parameter.
Low Input Voltage Setting
This function monitors the input voltage of the DC power source
used to power the charger. If the voltage is lower than the user
setting, the program will end forcibly to protect the input source.
Once you have established the desired settings press Start/Enter
to confirm the setting. You have now set the initial user settings.
You can repeat this procedure for the other Channels.
CONNECTINGTHEBATTERY
WARNING
Before connecting a battery, it is absolutely essential to check that you have set the
parameters correctly. If the settings are incorrect, you can damage the battery and create
a dangerous situation that could result in serious damage or injury.
Connecting the Battery
To avoid creating a short circuit between the banana plugs always connect the charge
leads to the charger first, and then to the battery. Reverse the sequence when disconnect-
ing the pack.
Connecting the Balancer Socket
These pictures show the correct way
to connect your battery to the Hitec
X2-400 for charging in the balance
mode. The balance socket attached
to the battery must be connected to
the charger with the black wire aligned
with the negative marking. If your
battery’s balancer socket does not
fit in the socket make sure to use
the proper adapter board for you
battery type.
123456
+
S2
+
S1
+
S3
DEFAULTUSERPREFERENCESSETUP
DEC INC DEC INC
DEC INC
DEC INC
DEC INC

12
PROGRAMFLOWCHART

13
You can view a variety of information on the LCD screen during the charge and
discharge process. Press the DEC key to display and scroll through these settings.
When connected to the balancing port you can monitor the voltage of each individual
cell by pressing the INC key.
DEC
DEC
DEC
DEC
DEC
When the program is completed, the final voltage is displayed.
When the capacity cutoff function is turned on, the capacity value is
displayed.
When the safety timer is displayed, the duration of time in minutes is
displayed.
This screen shows that the temperature cutoff function is turned on.
When the temperature probe is used, the external temperature will
be displayed.
This shows the present input voltage going to the charger.
When the battery is connected to the balancing port, you can check
the voltage of each cell in the battery pack. The program can display
the voltages of up to 6 batteries.
CHARGINGLITHIUMCHEMISTRY(LiPo/Lilo/LiFe)TYPEBATTERIES
NOTICE
This program is only suitable for charging/discharging Lithium chemistry batteries. The
X2-400 was designed to only charge three kinds of Lithium batteries, Lithium Ferrite
(LiFe), Lithium Ion (LiIo) and Lithium Polymer (LiPo). It is very important that you deter-
mine the type of battery you are charging and set the charging parameters correctly. It is
important that the nominal voltage, final voltage, and battery capacity be properly set for
desired operation. Please refer to the following information regarding the different types
of Lithium chemistry batteries.
PROGRAMDISPLAYINFORMATION
DEC

14
‘>3 seconds’
Charging Lithium Battery in the Charge Mode
These methods for charging LiPo/Li-Ion/LiFe batteries without a balance lead.
The first line on the left side of this screen shows the type of
battery chosen. The second line shows the user set current
on the left and the user set voltage on the rights. After setting
the current and voltage, press the START/ENTER key for
more than 3 seconds to start the process (charge current
range: 0.1 - 20.0A, voltage range: 3.7-22.2V).
The next display shows the number of cells you set up as ”R”
and the number of cells the processor detects as “S”. If both
numbers are identical, you can start charging by pressing the
START/ENTER button. If not, press the BATT TYPE/STOP
button to go back to the previous screen to carefully check the
number of cells of the battery pack before proceeding.
This next screen shows the real-time status during the charge
process. Press the BATT TYPE/STOP key once to stop the
charge process.
NOTE
When you want to change the settings, press the START/ENTER key to make it blink,
then use the DEC or INC key to change the setting. Then press the START/ENTER key
again to store the setting.
A Lithium battery is charged at a
constant current until it reaches the
final charge voltage of 4.2 V per
cell (B). After this point the voltage
is kept at a constant level, and the
residual charge takes the form of a
declining current curve (C) until the
cut-off point (D) is reached. Charge
current = C/10. At this point you can
disconnect the battery from the
charger, as it is ready for use.
The final voltage of charge process is also very important; it should be precisely
matched with the charged voltage of the battery. They are 4.2V for LiPo, 4.1V for Lilon,
and 3.6V for LiFe. The charge current and the nominal voltage for the cell count on the
charge program must always be set correctly for the battery that is being charged.
Refer to the chart on page 7 for standard lithium battery parameters
CHARGINGLITHIUMCHEMISTRY(LiPo/Lilo/LiFe)TYPEBATTERIES
DEC INC DEC INC
Batt Type
Stop Start
Enter
Start
Enter
Number
of Cells Charging
Time
Charging
Current
Battery
Voltage
Charged
Capacity
4.2V
V
A
Ah
ABCD
t
V/A/Ah

15
Charging Lithium Battery in Balance Mode
This function is for balancing the voltage of Lithium-polymer battery cells individually
while charging. In the balance mode, the battery needs to have a balance lead to connect
to the balance port at the right side of the charger and the battery's power leads to the
output of the charger. Charging in this mode is different from the normal modes because
the built-in processor monitors the voltage of each individual cell and controls the input
current fed into each cell in order to equalize the voltage.
Charging Lithium Batteries in Fast Mode
When charging lithium chemistry batteries in the fast charge mode the charging current
will become lower towards the end of the charge cycle. In fast mode the charging capac-
ity is slightly lower than in normal charge mode, but charging time is reduced.
CHARGINGLITHIUMCHEMISTRY(LiPo/Lilo/LiFe)TYPEBATTERIES
‘>3 seconds’
The first line on the left side of this screen shows the type of
battery chosen. The second line shows the user set current
on the left and the user set voltage on the rights. After setting
the current and voltage, press the START/ENTER key for
more than 3 seconds to start the process (charge current
range: 0.1 - 20.0A, voltage range: 3.7-22.2V).
The next display shows the number of cells you set up as ”R”
and the number of cells the processor detects as “S”. If both
numbers are identical, you can start charging by pressing the
START/ENTER button. If not, press the BATT TYPE/STOP
button to go back to the previous screen to carefully check the
number of cells of the battery pack before proceeding.
This next screen shows the real-time status during the charge
process. Press the BATT TYPE/STOP key once to stop the
charge process.
DEC INC DEC INC
Batt Type
Stop Start
Enter
Start
Enter
Number
of Cells Charging
TimeCharging
Current
Battery
VoltageCharged
Capacity
16
This screen, you can set up the current and voltage of the
battery pack. Charging and discharging will bring the batter-
ies to the storage level.
This screen shows the real-time status of the charge or
discharge process. Press the BATT TYPE/STOP key once to
stop the charging process.
NOTE
During the discharge process the X2-400’s Microprocessor monitors the voltage of each
cell during the Storage Mode or Discharge process. If the voltage of any cell is abnormal,
the charger will display an error message and immediately terminate the program.
Before disconnecting the battery review the error message then press the INC button to
display which cell is.
Charging Lithium Batteries in the Storage Mode
The Storage Mode function is for charging/discharging batteries that will not be used
immediately or that will be stored for a period of time. The program is designed for charg-
ing or discharging batteries to a specific voltage level depending on the type of battery
(Li-ion = 3.75V, LiPo = 3.85V and LiFe = 3.3V) The program will begin to discharge if the
original state of the battery exceeds the voltage level for storage.
WARNING: Lithium batteries cannot be discharged to a voltage lower than the minimum
voltage for the cell type. Doing so will result in a rapid loss of capacity and/or total failure.
While the X2-400 monitors each individual cell during the discharge process the discharg-
ing cutoff is based on the total pack voltage therefore it is important to watch the discharge
process closely to make sure a cell does not fall below the minimum voltage. Generally,
lithium batteries don’t need to be discharged and it is not recommended that you discharge
them. If you do choose to discharge your lithium batteries it is recommended that you cycle
them using use Storage Mode charging to cycle the batteries.
Error Message Display
This screen shows that the processor detected the voltage of
one on the cells is too low.
This screen shows the 4th cell was damaged. If the cell is
disconnected or not present the reading of the voltage will be
zero.
CHARGINGLITHIUMCHEMISTRY(LiPo/Lilo/LiFe)TYPEBATTERIES
DISCHARGINGLITHIUMCHEMISTRY(LiPo/Lilo/LiFe)TYPEBATTERIES
Number
of Cells Charge or
Discarge
Current
Battery
Voltage
Supplied
Capacity
Elapsed
Time
DEC INC DEC INC
‘>3 seconds’
Batt Type
Stop Start
Enter
INC

17
The setting of the discharge current on the left cannot exceed
1C, and the setting on the right cannot be under the voltage
recommended by the manufacturer to avoid deep discharg-
ing. Press the START/ENTER key for more than 3 seconds to
start discharging.
This shows the real-time status of discharging; you can press
the BATT TYPE/STOP key to stop discharging.
Charging NiCd or NiMh Batteries
This program is for charging NiCd/NiMH batteries typically
used in an R/C model application. Press the START/ENTER
key until the parameter you want to change begins to blink
then use the INC or DEC keys to change the value. Press the
START/ENTER key to store the setting.
This screen shows the real-time status of charging. You can
press the BATT TYPE/STOP key to stop the charge process.
There are two methods of charging NiCD and NiMh batteries, Manual or Auto Mode. When
in the NiMh or NiCd Program Select screen you can change modes by pressing the
START/ENTER key until the current field begins flashing then press INC and DEC simulta-
neously to switch between Auto and Manual Mode. using the charge current you set up. In
the“auto”mode,youshouldset the upper limitof the charge currentto avoid damage caused
by excessive charge current. This is especially important for low quality batteries that have
low resistance and capacity. In the “manual mode” the charger will only charge at the current
you set. Note the following charger / discharge specifications for NiCd and NiMh Batteries.
Nominal Voltage level: 1.2V/cell
Allowable Fast Charge Current: 1C-2C (depends on performance of cell)
Discharge Voltage Cut Off Level NiCd: 0.85V per cell
Discharge Voltage Cut Off Level NiMh: 1.0V per cell
CHARGING/DISCHARGINGANDCYCLINGNiCdORNiMhBATTERIES
Error Message Display
INC
This screen shows that the processor detected the voltage of
one on the cells is too low.
This screen shows the 4th cell was damaged. If the cell is
disconnected or not present the reading of the voltage will be
zero.
DISCHARGINGLITHIUMCHEMISTRY(LiPo/Lilo/LiFe)TYPEBATTERIES
DEC INC DEC INC
‘>3 seconds’
Batt Type
Stop Start
Enter
Number
of Cells Elapsed
Time
Discharge
Current
Battery
Voltage
Discharged
Capacity
DEC INC DEC INC
‘>3 seconds’
Batt Type
Stop Start
Enter
Battery
Type Elapsed
Time Charge
Current
Battery
VoltageCharged
Capacity
DEC INC
18
Discharging NiCd or NiMh Batteries
Set the discharge current on the left and the voltage cutoff on
the right by pressing the START/ENTER key for more than 3
seconds to start the program. Discharge current can be set
from 0.1-5.0A and voltage cutoff from 0.1-25.0V.
This screen indicates the discharging state. You can press the
START/ENTER key to alter the discharge current. Press the
START/ENTER key again to store the setting. Press the BATT
TYPE/STOP key to stop discharging. The charger will emit a
sound to indicate the end of the discharge process.
Charge/Discharge Cycling Of NiCd/NiMh Batteries
Set the cycle sequence on the left and the number of cycles on
the right. The battery can be cycled 1-5 cycles.
Press the BATT TYPE/STOP key to stop the program then
press the START/ENTER key to alter the charge or discharge
current. A sound will indicate the end of the program.
When the charger approaches the end of the program cycle,
you can view the capacity of the battery being charged or
discharged. Use the INC or DEC keys to scroll through the
results of each cycle.
This program is only suitable for charging a lead-acid (PB) type battery with a nominal
voltage range of 2 to 20 volts. Lead acid (Pb) batteries can only deliver current lower in
comparison to their capacity. The same restriction applies to the charging process.
Consequently, the optimum charge current for lead acid (Pb) batteries is only 1/10 of its
rated capacity. You cannot fast charge lead acid (Pb) batteries. Please refer to the
following specification regarding charging and discharging lead acid (Pb) batteries.
Nominal Voltage Level: 2.0V per cell
Maximum Charge Voltage: 2.46V per cell
Allowable Charge Current: 0.4C or less
Discharge Voltage Cut Off Level: 1.75V or higher per cell
.
CHARGING/DISCHARGINGLEAD-ACID(PB)BATTERIES
CHARGING/DISCHARGINGANDCYCLINGNiCdORNiMhBATTERIES
DEC INC
‘>3 seconds’
Batt Type
Stop Start
Enter
DEC INCDEC INC
‘>3 seconds’
Batt Type
Stop Start
Enter
Battery
Type Elapsed
Time Battery
Voltage Discharged
or Charged
Capacity
Discharge
or Charge
Current
Battery
Type
Elapsed
Time Battery
Voltage
Discharged
Capacity
Discharge
Current
Table of contents
Other Hi-Tec Batteries Charger manuals

Hi-Tec
Hi-Tec X1-200 Touch User manual

Hi-Tec
Hi-Tec RDX1 Mini User manual

Hi-Tec
Hi-Tec X4 AC Pro User manual

Hi-Tec
Hi-Tec CG-340 User manual

Hi-Tec
Hi-Tec X1RED User manual

Hi-Tec
Hi-Tec X1MF User manual

Hi-Tec
Hi-Tec RDX1 Mini User manual

Hi-Tec
Hi-Tec CG-330 User manual

Hi-Tec
Hi-Tec X1 Touch User manual

Hi-Tec
Hi-Tec RDX1 PRO User manual

Hi-Tec
Hi-Tec power peak D7 User manual

Hi-Tec
Hi-Tec X4 MICRO SE User manual

Hi-Tec
Hi-Tec X1 Touch User manual

Hi-Tec
Hi-Tec X1 mini User manual

Hi-Tec
Hi-Tec X2-700 User manual

Hi-Tec
Hi-Tec 44253 Operating and maintenance manual

Hi-Tec
Hi-Tec X1 Pro User manual

Hi-Tec
Hi-Tec X4-80 User manual

Hi-Tec
Hi-Tec 44246 User manual

Hi-Tec
Hi-Tec RDX 2 MiNi User manual


