Hilti HA EXO-O1 User manual

1

2

*2327944* 2327944 English 1
Original operating instructions
1 Information about the documentation
1.1 About this documentation
• Read this documentation before initial operation or use. This is a prerequisite for safe, trouble-free
handling and use of the product.
• Observe the safety instructions and warnings in this documentation and on the product.
• Always keep the operating instructions with the product and make sure that the operating instructions
are with the product when it is given to other persons.
1.2 Explanation of symbols used
1.2.1 Warnings
Warnings alert persons to hazards that occur when handling or using the product. The following signal words
are used:
DANGER
DANGER !
▶Draws attention to imminent danger that will lead to serious personal injury or fatality.
WARNING
WARNING !
▶Draws attention to a potential threat of danger that can lead to serious injury or fatality.
CAUTION
CAUTION !
▶Draws attention to a potentially dangerous situation that could lead to personal injury or damage to the
equipment or other property.
1.2.2 Symbols in the documentation
The following symbols are used in this document:
Read the operating instructions before use.
Instructions for use and other useful information
Dealing with recyclable materials
Do not dispose of electric equipment and batteries as household waste
1.2.3 Symbols in the illustrations
The following symbols are used in illustrations:
These numbers refer to the corresponding illustrations found at the beginning of these operating
instructions
The numbering reflects the sequence of operations shown in the illustrations and may deviate
from the steps described in the text
Item reference numbers are used in the overview illustrations and refer to the numbers used in
the product overview section
This symbol is intended to draw special attention to certain points when handling the product.

2 English 2327944 *2327944*
1.3 Product-dependent symbols
1.3.1 Symbols on the product
The following symbols can be used on the product:
The power tool supports near-field communication (NFC) technology, which is compatible with
iOS and Android platforms.
Warning: Magnetic field
1.4 Product information
products are designed for professional users and only trained, authorized personnel are
permitted to operate, service and maintain the products. This personnel must be specifically informed about
the possible hazards. The product and its ancillary equipment can present hazards if used incorrectly by
untrained personnel or if used not in accordance with the intended use.
The type designation and serial number are printed on the rating plate.
▶Write down the serial number in the table below. You will be required to state the product details when
contacting Hilti Service or your local Hilti organization to inquire about the product.
Product information
Exoskeleton HA EXO-O1
Generation 01
Serial no.
2 Safety
2.1 Safety instructions
WARNING Study all safety instructions and other instructions, images and technical data with
which this product is provided. Failure to comply with the instructions below can cause serious injuries.
Keep all safety precautions and instructions for future reference.
Personal safety
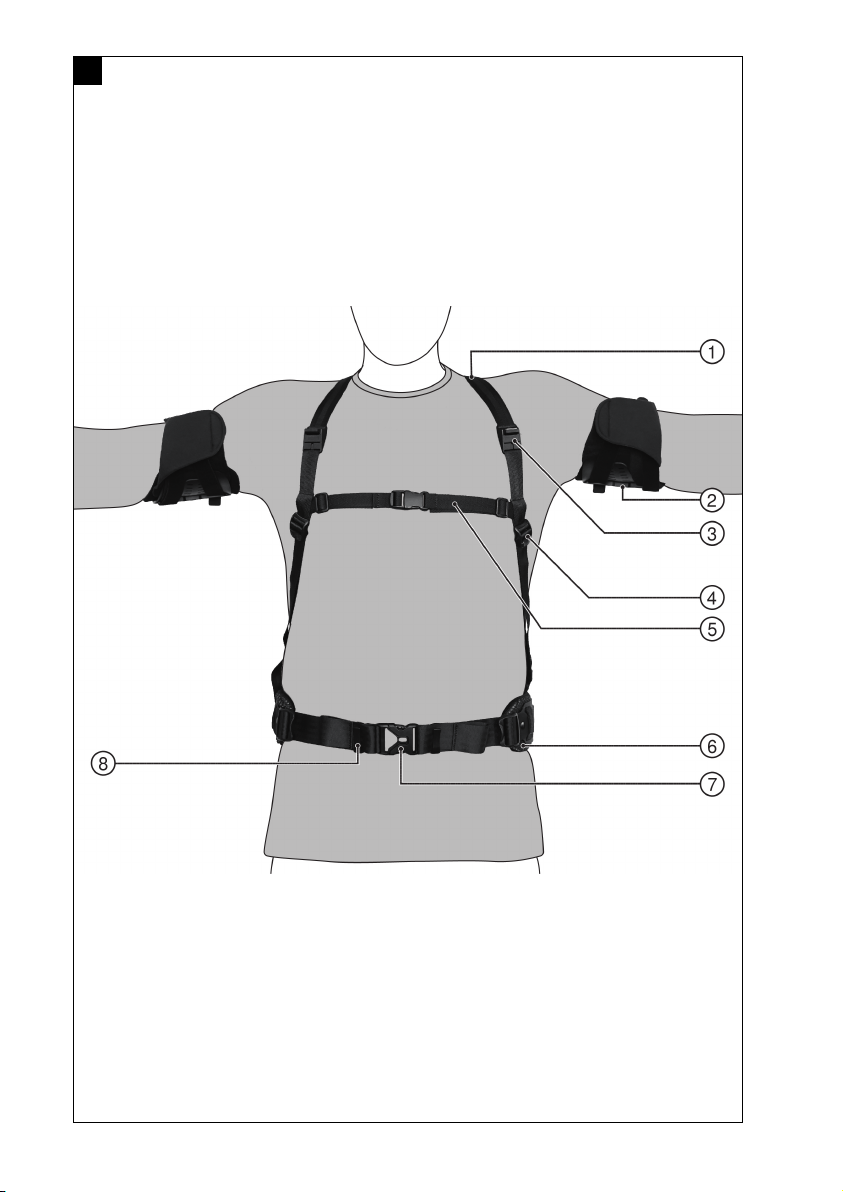
▶The catches of the shoulder straps and the arm supports contain magnets. The magnets can affect
cardiac pacemakers or comparable implants. A cardiac pacemaker can be switched to test mode and
cause indisposition. Under certain circumstances, a defibrillator might cease to function. Wearers of
devices of this nature should keep at least 100 mm clear of the magnets. Warn wearers of devices of this
nature to keep clear of magnets. These persons are not permitted to use the product.
▶Wear suitable work clothes. Do not wear jewelry or loose clothing. Keep your hair, clothing and gloves
away from moving parts. Loose clothes, jewelry or long hair can be snagged by moving parts.
▶Avoid unusual body positions. Keep proper footing and balance at all times.
▶Only persons who are familiar with it, who have been trained on how to use it safely and who understand
the resulting hazards are permitted to use the tool.
▶Keep children and other persons clear when the product is in use.
▶The product can be used by only one person.
▶Do not use the product to lower a person by rope or to secure a person. Do not secure a tool tether to
the product.
▶Do not attach to the waist belt objects that could restrict correct operation of the product.
▶Make sure that you do not snag with the product on fixed or movable objects.
▶It is not permissible for the product to interfere with the functionality of your personal protective
equipment.
Product safety
▶Avoid overstraining the load-bearing components. A sudden loss of function can lead to injuries. Use the
product only within its specified limits.
▶Always check the product prior to use to ensure that it is in full working order, free of wear and
undamaged. Do not continue to use the product after it has been dropped or if it is damaged. Contact
Hilti Service.
▶To avoid damage, do not expose the product to sources of heat. Comply with the stated temperature
limits for storage and operation.

*2327944* 2327944 English 3
3 Description
3.1 Product overview, front 1
@Shoulder strap
;Arm support with padding
=Parked position, magnetic catch
%Strap clip of the shoulder strap
&Chest strap
(Waist-belt pad
)Clip catch
+Belt holder, waist belt
3.2 Product overview, rear 2
§Adjusting knob for assistance
/Articulation unit (cover not available in all
markets)
:Arm-rail
∙Magnetic catch
$Pivot stop
£Expander
|Cover for expander
¡Locknut
QThreaded rod
WAdjustment unit with ball socket
ELocking clip
RHang-up loop
TWaist-belt reinforcement
ZBurr fastener, waist-belt pad
UBack strap
IStrap clip of the back strap
OTensioner
PBack cross
ÜTension cord
3.3 Intended use
The product described is a passive exoskeleton. It is to be used only as an assistance system by trades
and only by adults. It is designed to relieve the strain on the arms and pectoral girdle during overhead and
over-shoulder work.
The product is to be used and maintained only by trained, authorized personnel who have received special
instruction regarding the hazards that may be encountered.
The maximum wearing period is 8 hours per working day.
The maximum service life is 10 years.
3.4 Restrictions on use and misuse
Do not use the product in environments where there is a risk of explosion.
Do not use the product without user-specific product fitting.
Do not use the product for performance enhancement and do not use it to lift persons.

4 English 2327944 *2327944*
The product is not be used by persons
• with cardiac pacemaker or comparable active implants
• with pre-existing debilitating conditions of the musculoskeletal system in the area of the shoulders, arms,
back and hands
• with skin diseases/injuries, inflammations; raised scars with swellings
• with reddening and above-normal temperature in the body areas affected (arms, shoulders, hips and
back)
• with pronounced varicose veins, especially with venous insufficiency, lymphatic drainage disorders –
also unexplained soft-tissue swelling in parts of the body away from the product
• with sensory and circulatory disorders in the area of the upper extremities, hips and back (e.g. diabetic
neuropathy)
Do not continue to use the product if you experience discomfort, develop a rash or notice increased
sensitivity of the skin.
3.5 Items supplied
Exoskeleton, bag, 4 magnetic adjusting screws, 2 spare clips, operating instructions
Other system products approved for use with this product can be found at your local Hilti Store or at:
www.hilti.group
4 Technical data
Weight 1.99 kg
Ambient temperature for operation −10 ℃ … 45 ℃
Storage temperature −10 ℃ … 60 ℃
Dimensions (length x width x height) 850 mm x 400 mm x 200 mm
5 Donning
CAUTION
Risk of injury if product is worn incorrectly or too tightly. Local pressure points and restrictions of blood
vessels and nerves.
▶Be sure to don and wear the product correctly.
1. Shrug the product on to your shoulders as if it were a
backpack. Slip your arms through the shoulder straps
and position the shoulder straps on your shoulders.

*2327944* 2327944 English 5
2. Close the clip catch of the waist belt.
3. Adjust the waist belt. → page 10
4. Close the clip catch of the chest strap.
5. Adjust the shoulder straps. Pull the ends of the straps
down to tighten the shoulder straps. To loosen the
shoulder straps, flip the strap clip up.
▶The shoulder straps must sit loosely on your
shoulders and should not hinder you from raising
your arms.
▶Raising your arms should not cause the waist belt
to ride up. If the waist belt changes its position,
you have to loosen the shoulder straps.

6 English 2327944 *2327944*
6. Tuck the ends of the shoulder straps into the rubber-
ized strap holders.
WARNING
Risk of injury caused by arm-rail snapping back.
When under tension, the arm-rail can snap back and
injure your head.
▶When disengaging the magnetic catch, keep your
finger hooked into the pull loop until the magnetic
catch is securely engaged in the parked position.
7. Slip the index finger of your right hand into the pull
loop of the left magnetic catch.
8. Pull the pull loop up and carefully disengage the
magnetic catch.

*2327944* 2327944 English 7
9. Pull the arm support down with the pull loop. As you
do so, hold your arm out in front of your body.
10. Center your upper arm in the arm support.
11. Use the pull loop to engage the magnetic catch in
the hook on the arm support.
▶Make sure that the magnetic catch engages fully.

8 English 2327944 *2327944*
12. Use the burr fasteners to adjust the fit of the arm-
support strap round your upper arm. Center the burr
fasteners and close them completely.
▶The arm-support strap is adjustable at both ends.
13. Secure the arm support on the other side of your body in the same way.
14. Check that the product is fitted symmetrically. The
clip catches do not necessarily have to be centered.
Make sure that the waist belt is correctly
seated. Use the padding on the waist belt to
make sure that it is seated symmetrically.
15. Center the back cross between your shoulder blades.
The back cross should not chafe your back.
6 Adjusting
WARNING
Risk of injury caused by crushing. Risk of crushing the fingers in the articulation unit.
▶When adjusting the product, keep your fingers well clear of the articulation unit's mechanism.

*2327944* 2327944 English 9
6.1 Adjusting assistance
1. If applicable, attach the magnetic adjusting knob to the articulation unit.
2. Adjust the assistance by turning the magnetic adjusting knob.
▶Turn the knob clockwise (+) for more assistance, turn it counter-clockwise (-) for less assistance.
▶The scale on the articulation unit is merely an indicator marking the position.
Assistance is correct when gravity is enough to make your arms drop, without further exertion on
your part. Do not attempt to set assistance to a value higher than this; any lower setting is
possible, in accordance with your preference.
3. Engaging the second expander is an option, if more assistance is necessary.
6.2 Engaging second expander
Step through the following procedure for each side of the exoskeleton in turn.
1. Zero the tension on the articulation unit and open the
pivot stop.

10 English 2327944 *2327944*
2. Turn the product so that the side normally toward the
body is up.
3. Take hold of the second expander and pass it over
the guide pulley.
The expanders determine the assistance pro-
vided. Try out the assistance provided by only
one expander by increasing it step by step. If
more assistance is necessary, the second ex-
pander can be used as well.
4. Tension the articulation unit and close the pivot stop.
6.3 Adjusting waist belt
1. The waist belt has to sit above the gluteal muscles
and level with your pelvis.
▶It is important to make sure that the waist belt
cannot slip while the product is in use.

*2327944* 2327944 English 11
2. Flip the strap clips up to loosen the waist belt.
3. Pull both ends of the waist belt forward to tighten the
belt.
4. Tuck the ends of the waist belt into the belt holders.
6.4 Adjusting articulation unit
You have to remove the exoskeleton in order to adjust the articulation unit.

12 English 2327944 *2327944*
Horizontal alignment
1. Squeeze the sides of the locking clip in.
2. Pull the locking clip out of the adjusting unit.
3. Move the adjusting unit with the ball socket on the belt web of the waist belt. Use the mark at the top
edge to determine the latching position.
Set both sides to the same latching position.
4. Insert the locking clip to maintain this position.
5. Slip the product on to your shoulders and check the symmetrical positioning of the waist belt.
▶The ball sockets must be fixed vertically relative to the shoulder articulations and can be tilted outward
(V-shape), depending on the wearer's upper-body build. The wearer's hands must be free to swing
without hindrance.

*2327944* 2327944 English 13
Adjusting height
6. Slacken the locknut.
7. Adjust the height of the threaded rod by hand.
8. Retighten the locknut.
9. Slip the product on to your shoulders and check that the articulation units are at the same height.
▶When the product is worn, the top edge of the articulation unit must match the height of the shoulder.
6.5 Aligning back cross
1. Flip the strap clip of the back strap up to loosen the strap.
2. Pull the end of the strap to tighten the strap.
3. Check the position of the back cross.
▶The back cross must be centered between the shoulder blades.

14 English 2327944 *2327944*
6.6 Adjusting tension cord
The tension cord forms a wide-open Vee between the shoulder blades. The tension cord lets you adjust the
position of the expander covers. Tightening the tension cord brings the covers closer to your body.
1. Open the top and bottom parts of the tensioner on the tension cord.
2. To shorten the tension cord, pull the ends of the tension cord taut and push the top part of the tensioner
up.
▶Make sure that the tension cord is symmetrically positioned.
3. To lengthen the tension cord, pull the bottom part of the tensioner down.
▶Make sure that the tension cord is symmetrically positioned.
4. To secure the tension cord in position, push the top and bottom parts of the tensioner together.
7 Removing
WARNING
Risk of injury caused by arm-rail snapping back. When under tension, the arm-rail can snap back and
injure your head.
▶When disengaging the magnetic catch, keep your finger hooked into the pull loop until the magnetic
catch is securely engaged in the parked position.
1. Slip the index finger of your right hand into the pull
loop of the left magnetic catch.
2. Slowly pull the magnetic catch up and disengage it
from the hook of the arm support.

*2327944* 2327944 English 15
3. Draw the pull loop down, keeping the strap taut.
4. Remove your arm from the arm support and hold it
in front of your body.
5. Slowly guide the arm support up.
6. Let the magnetic catch engage fully at the parked
position on the shoulder strap.
7. Check that the magnetic catch is correctly seated.
8. Repeat these steps with your left hand for the right arm support.
9. Open the clip catch of the chest strap.

16 English 2327944 *2327944*
10. Disengage the ends of the waist belt from the belt
holders.
11. Loosen the waist belt.
12. Open the clip catch of the waist belt.
13. Shrug the product off your shoulders as if it were a
backpack.
8 Care and maintenance
WARNING
Risk of injury caused by expanders under tension. Injuries during care and maintenance work.
▶Carry out care and maintenance work only with the expanders at zero tension.
Care
• Carefully remove stubborn dirt from the tool.
• Clean the product only with a slightly damp cloth and pH-neutral soap. Do not use cleaning agents
containing silicone as they can attack the plastic parts.
Maintenance
• Check all visible parts and controls for signs of damage at regular intervals and make sure that they all
function correctly.
• Do not operate the product if signs of damage are found or if parts malfunction. Have it repaired
immediately by Hilti Service.
• After cleaning and maintenance, fit all guards or protective devices and check that they function correctly.
To help ensure safe and reliable operation, use only genuine Hilti spare parts and consumables. Spare
parts, consumables and accessories approved by Hilti for use with the product can be found at your
local Hilti Store or online at: www.hilti.group.
8.1 Cleaning pads
1. Remove the pads from the arm supports and the waist belt.
Other manuals for HA EXO-O1
1
Table of contents
Languages:
Popular Safety Equipment manuals by other brands

Innotech
Innotech UNI-EAP-01 manual

3M
3M PELTOR TACTICAL 100 instruction manual

Reer
Reer 46101 Instructions for use

Hunter Safety System
Hunter Safety System HSS-320 Instruction and Safe Use Manual

Safety 1st
Safety 1st Wide & Sturdy Sliding Gate GA089 user guide

JSP
JSP FAR0504 INSTRUCTIONS ON USE, CARE AND INSPECTION

eqss
eqss OverWatch 6253 installation manual

Sagola
Sagola 4240 Instruction manual / spare parts list

Rescue Solutions International
Rescue Solutions International ResQmax Operation manual

Klein Tools
Klein Tools KONSTRUCT 60447 instructions

Viking
Viking FIRECYCLE III-OH quick start guide

IKAR
IKAR HRA Series Instructions for use