_3_
TO ATTACH HOSE
Insert the joint pipe 2into the air inlet 7of the cleaner. When you remove
the hose 3, press the button 8and pull the hose from the cleaner.
COMMENT FIXER LE TUYAU FLEXIBLE
Insérer le tuyau à joint 2dans l’entrée d’aspiration 7de l’aspirateur. Lorsque
l’on enlève le tuyau 3, tirer le tuyau 3tout en pressant le bouton 8.
ANBRINGEN DES SCHLAUCHES
Das Verbindungsrohr 2in den Sauganschluß 7des Staubsaugers einführen.
Zum Herausziehen des Schlauches ist der Knopf 8zu ziehen.
TO ATTACH EXTENSION PIPES
Fit the extension pipes 9together by twisting, and add to the hose selecting
the suction attachment you require for cleaning.
COMMENT FIXER LES TUYAUX DE RALLONGE
Ajuster les tuyaux de rallonge 9ensemble en tordant, et ajouter au tuyau
flexible l’accessoire d’aspiration requis pour le nettoyage.
ANBRINGEN DER VERL ¨
AGERUNGSROHRE
Die Verlängerungsrohre 9werden durch Verdrehen aufeinander befestigt.
Schließen Sie dann das gewünschte Saugzubehör an.
ON/OFF SWITCH
Motor is switched ON/OFF by changing the power switch 0with finger.
INTERRUPTEUR DE MARCHE/ARRET (ON/OFF)
Le moteur est mis en marche ou à l’arrêt en mettant l’interrupteur 0sur la
position “ON” ou sur celle “OFF”
EIN/AUS-SCHALTER
Der Motor wird mit dem EIN/AUS-Schalter ein-und ausgeschaltet.
Fig. 3 To attach hose
Fig. 3 Comment fixer le tuyau flexible
Abb. 3 Anschließen des Schlauchs
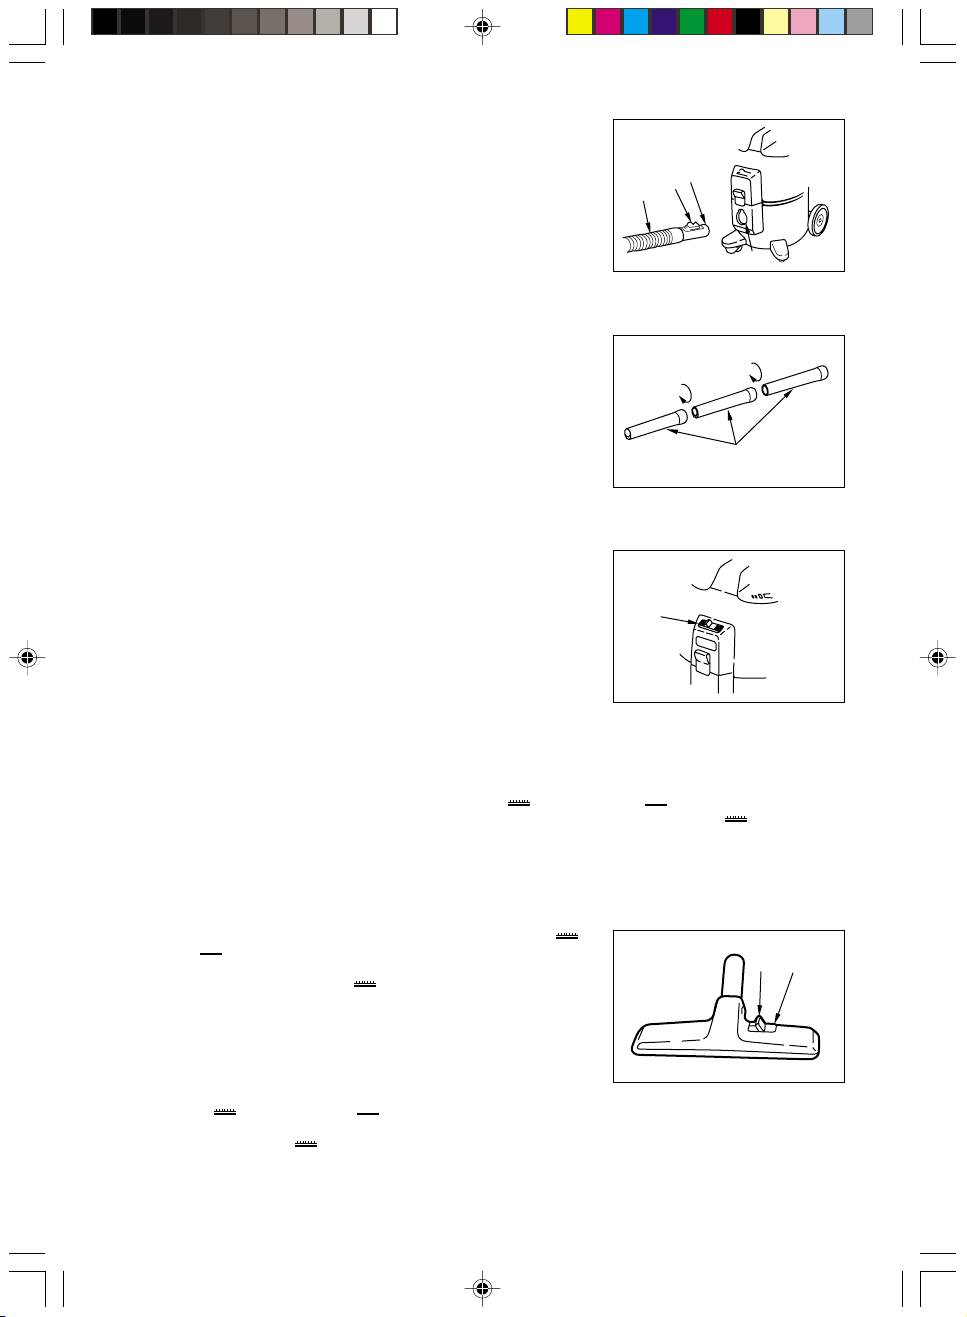
RUG AND FLOOR TOOL
The tool is fitted with a brush at the back which can either be used in the “withdrawn“ or “projected” position.
These positions are operated by the pedal on the tool marked “ ” (Carpet) A and “ ” (Floor) B.
For cleaning rug or carpet keep the brush in its “withdrawn” position, i.e., with the pedal marked “ ” pressed down
with your toe.
If you feel the tool is heavy to slide on the carpet, please reduce the suction power by adjusting the suction control.
OUTIL COMBINAISON TAPIS ET PLANCHER
Le bec est ajusté avec une brosse sur la partie arrière, laquelle peut être retirée
ou mise en saille.
Ces positions sont actionnées par la pédale placée sur l’outil marqué “ ”
(tapis) Aet “ ” (plancher) B.
Pour le nettoyage de carpette ou tapis, mettre la brosse sur la position retirée,
c’est-à-dire, avec la pédale marguée “ ” pressée vers le bas avec l’orteil.
Si l’on remarque que l’outil est difficile à déplacer sur le tapis, réduire la puissance
d’aspiration en réglant la commande d’aspiration.
TEPPICH- UND FUSSBODEND ¨
USE
Diese Düse ist mit einer Bürste ausgerüstet, die ausgestellt oder eingezogen
warden kann.
Diese Stellungen werden mit dem Fußschalter an der Düse entsprechend den
Markierungen “ ” (Teppich) A und “ ” (Fußboden) Beingestellt.
Für das Reinigen von Auslegeware oder Teppichen ist die Bürste einzuziehen,
d.h. der Fußschalter ist auf “ ” zu stellen.
Wenn der Widerstand beim Gleiten über den Teppich zu groß ist, ist die Saugkraft
mit der Luftregulierung zu verringern.
Fig. 4 Extension pipes
Fig. 4 Tuyaux de rallonge
Abb. 4 Verlängerungsrohre
Fig. 5 ON/OFF switch
Fig. 5 Interrupteur de marche/arrêt
Abb. 5 EIN/AUS-Schalter
Fig. 6 Rug and floor tool
Fig. 6 Outil combinaison tapis et
plancher
Abb. 6 Teppich- und Fußbodendüse
382
9
0
AB
7
HITACHI 3/8/02, 9:34 AM3