manuals.online logo
Brands
  1. Home
  2. •
  3. Brands
  4. •
  5. Hitachi
  6. •
  7. Whiteboard
  8. •
  9. Hitachi StarBoard FX Series User guide

Hitachi StarBoard FX Series User guide

All Rights Reserved. Copyright © 2010, Hitachi Software Engineering Co., Ltd.
1
StarBoard FX/FX-DUO Wireless Connection Setup Manual (Windows 7)
1. Preface
To establish the wireless connection between StarBoard FX/FX-DUO and the PC, the
following devices are necessary:
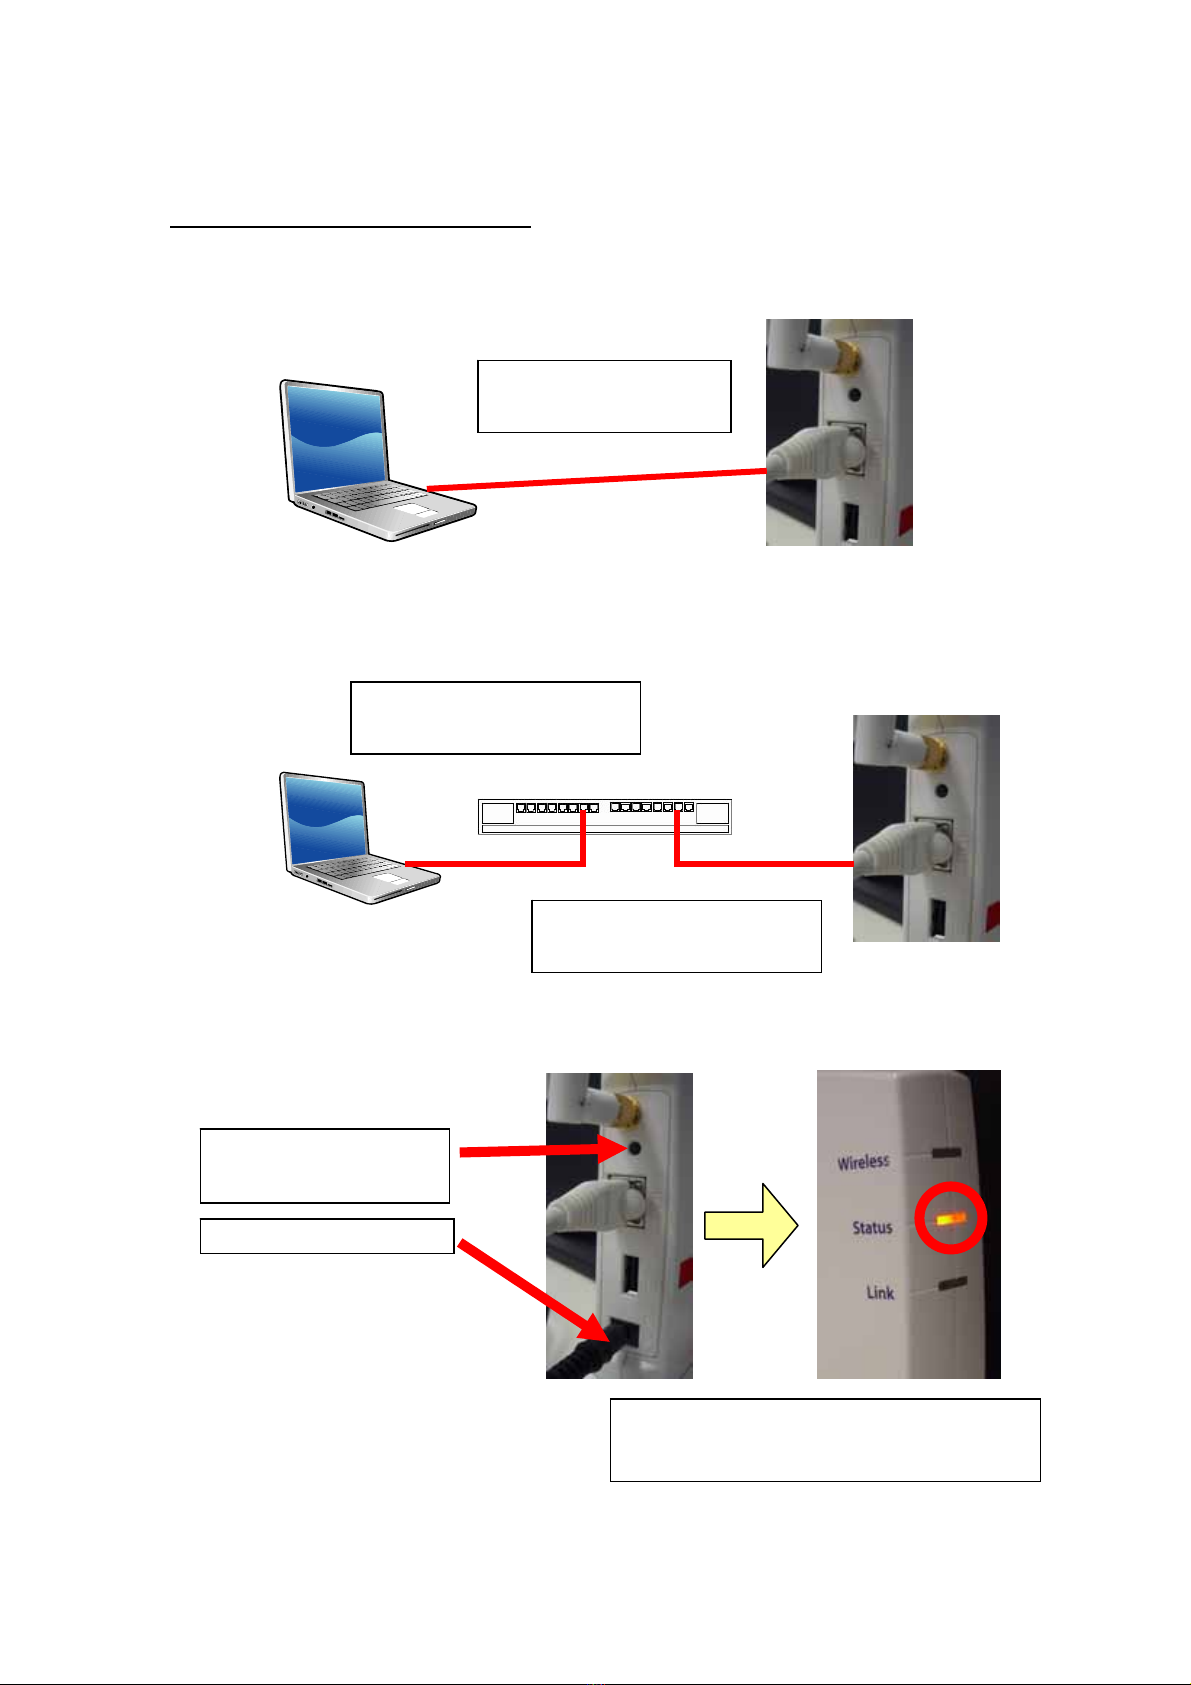
Wireless USB Device Server: silex technology SX-2000WG+
USB2.0 WiFi Adapter: Planex GW-US54Mini2W
StarBoard Software 9.2 or higher is necessary prior to setup of the wireless connection.
Make sure to select “FX/FX-DUO” in the Board Type screen during the installation of
StarBoard Software.
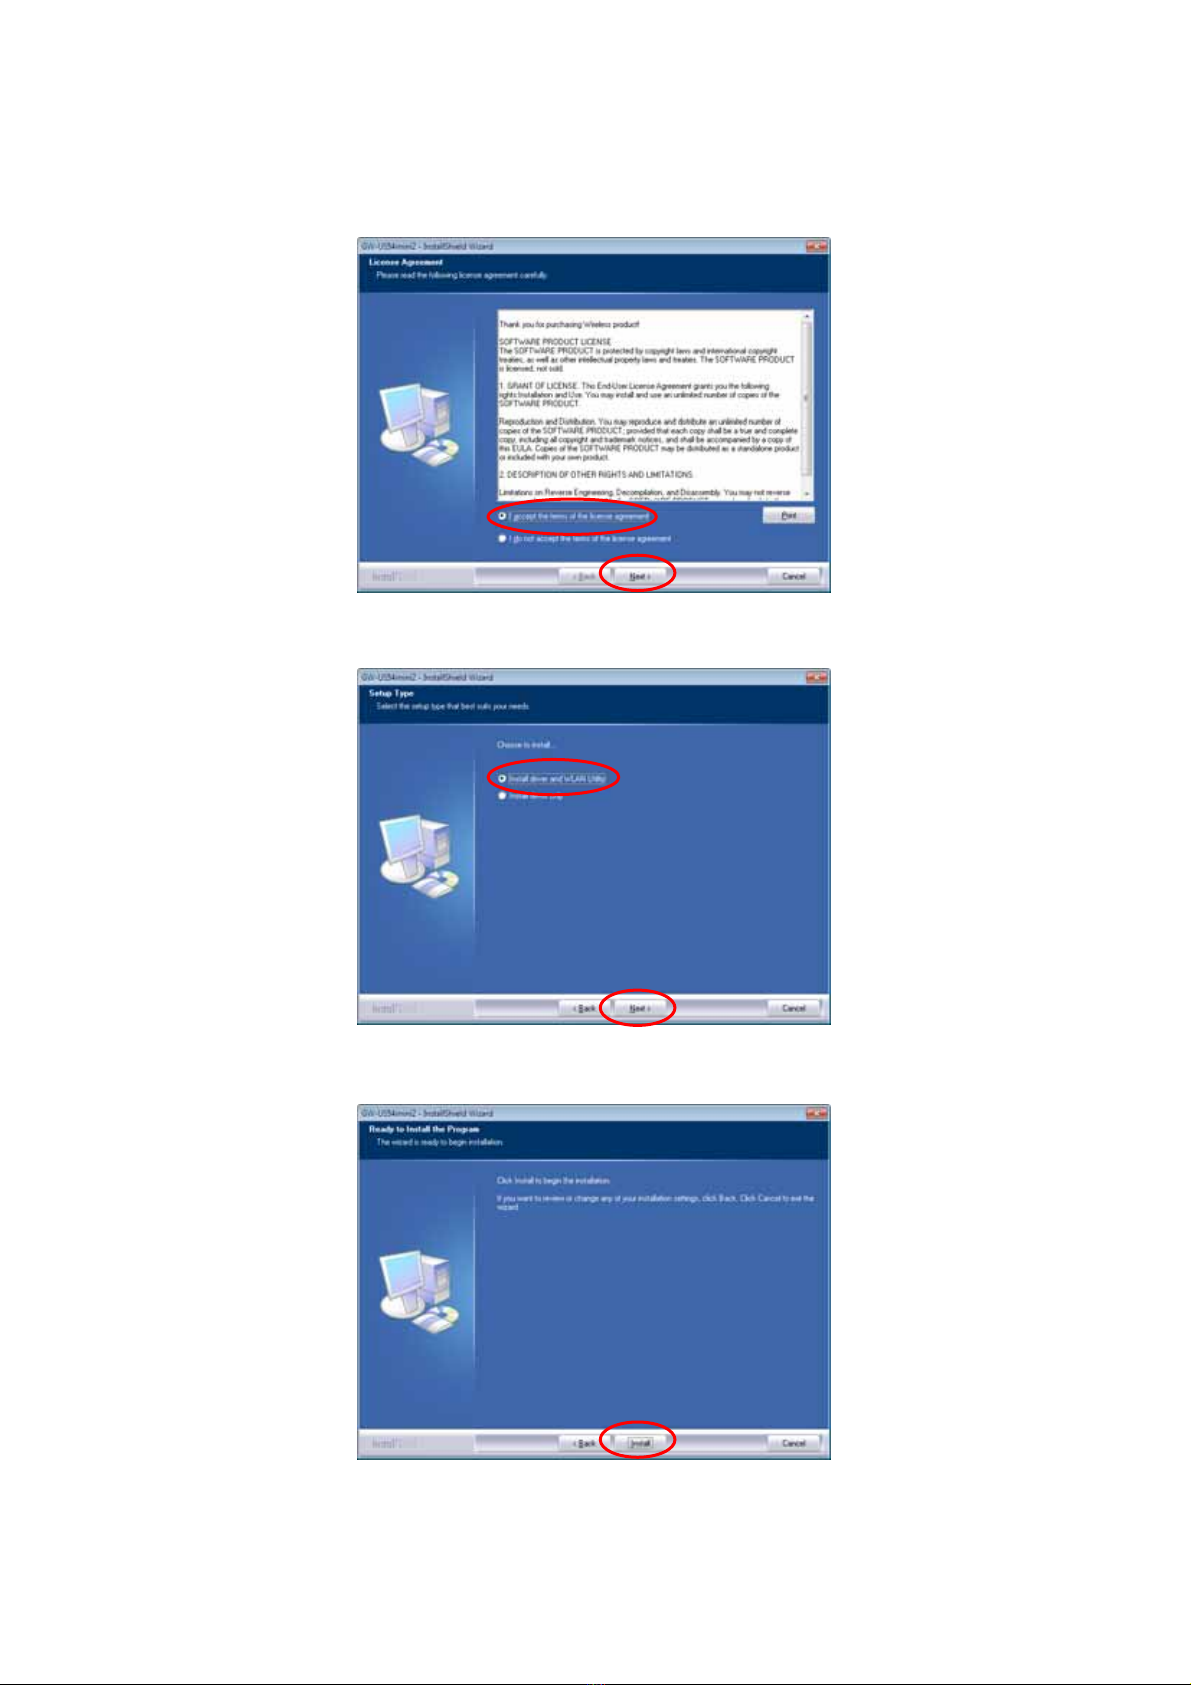
2. GW-US54Mini2W Setup
(1) Run the installer of GW-US54Mini2W. If the menu is not displayed automatically,
double-click on ” GW-US542090319.exe” in the CD-ROM root.
(2) If the User Account Control window is shown, select “Yes”.
- Log on as Administrator to install.
- Do not plug the USB2.0 WiFi Adapter into the computer until 4(3).
- Disable the firewall on Windows Vista and commercial security software during installation.
Installation of GW-US54Mini2W driver
All Rights Reserved. Copyright © 2010, Hitachi Software Engineering Co., Ltd.
2
(3) Select “I accept the …..” and Select “Next”.
(4) Select “Install driver and WLAN Utility” and Select “Next”..
(5) Select “Install”. Installation is performed.
All Rights Reserved. Copyright © 2010, Hitachi Software Engineering Co., Ltd.
3
(6) If the “Planex Wireless Utility” window is shown, click “x” button to close the window by
force.
(7) Select “Finish”.
All Rights Reserved. Copyright © 2010, Hitachi Software Engineering Co., Ltd.
4
3.Device Server SX-2000WG+ Setup
(1) Please connect SX-2000WG+ and the PC with one of the following methods:
(a) Prepare a network cross over cable to connect SX-2000WG+ and PC

(b) Prepare two network straight cables and an Ethernet hub to connect SX-2000WG+
and PC

(2) Reset SX-2000WG+ as shown below
Connect cross over network
cable to SX2000WG+ and PC
(a) Connect straight network cable to
Ethernet hub and PC
(b) Connect straight network cable to
Ethernet hub and SX-2000WG+
(a) Hold pressing the
reset button
(b) Plug the power cable
(c) Hold pressing the button until the LED
turns red, then release the button
All Rights Reserved. Copyright © 2010, Hitachi Software Engineering Co., Ltd.
5
(3) And then, make sure the bottom LED is solid green.
(4) Insert the CD-ROM bundled with SX-2000WG+ into the PC and select “Run
AUTORUN.EXE”. If the menu is not displayed automatically, double-click on “Autorun”
in the CD-ROM root.
(5) If the “Security Warning” window is shown, select “Run”. (This window may not be
shown foreground.)
If the LED is blinking green (wireless connection)
as shown below, follow (a)-(c) in the section 3(2).
If still not good, refer to Trouble shooting 7(1)
If the LED shows wireless
All Rights Reserved. Copyright © 2010, Hitachi Software Engineering Co., Ltd.
6
(6) Select ”Device Server Setup”.
(7) If the “User Account Control” window is shown, select “yes”.
(8) Select ”Yes”.
(9) Select “Next”.
All Rights Reserved. Copyright © 2010, Hitachi Software Engineering Co., Ltd.
7
(10) Select “Yes”.
(11) After a while, SX-2000WG+ is listed in the window. Click on the entry required and
select “Next”.
1.If SX-2000WG+ is still not listed in the window, click on the “Search” button and wait for 1
or 2 minutes.
2.If still not listed, please disconnect and connect the network cable, and restart the device
Server (Disconnect and connect the power cable). Please wait 2 minutes to configurate
wireless connection.
3.If still not listed, please go back to Step (a)-(c) in Section 3(2)
If SX-2000WG+ is not listed
All Rights Reserved. Copyright © 2010, Hitachi Software Engineering Co., Ltd.
8
(12)Input the default parameters shown below and select “Next”.
IP Address: 192.168.0.1
Subnet Mask” 255.255.255.0
Default Gateway” 0.0.0.0
(13) Select “SSID:GROUP” “Channel:11” and select “Detailed Config”.
If the same parameters are used for other network, use a different subnet address such as
192.168.1.1. If you are not sure, please ask the network administrator.
IP Address to be used
All Rights Reserved. Copyright © 2010, Hitachi Software Engineering Co., Ltd.
9
(14) Input the default parameters shown below and select “Next”.
Wireless Mode: AdHoc
SSID: Arbitrary (”Room1” for this manual)
Channel: 11
Network Authentication: Open
UseWEP: OFF
(15) Select “Execute”.
If you install multiple device servers in a close range, please assign unique SSID for each
device server. For exam
p
le, use the room name and so on.
SSID
All Rights Reserved. Copyright © 2010, Hitachi Software Engineering Co., Ltd.
10
(16) Select “Yes” and select “Finish” and install SX Virtual Link.
(17) If the “Security Warning” window is shown, select “Run”.
(In case that same window shown twice, select “Run” in either case.)
(This window may not be shown foreground)
(18) Click on “English” and select “Next”. Skip to (19) if the window is not appear.
All Rights Reserved. Copyright © 2010, Hitachi Software Engineering Co., Ltd.
11
(19) Select ”Next”.
(20) Select “Yes”.
(21) Select “Next”.
All Rights Reserved. Copyright © 2010, Hitachi Software Engineering Co., Ltd.
12
(22) Select “Next”.
(23) Select “Start”.
(24) Select “Install”. Installation is performed. (This window may not be shown foreground.)
All Rights Reserved. Copyright © 2010, Hitachi Software Engineering Co., Ltd.
13
(25) Select ”Yes”.
(26) Select “Do not ……” and select “Next”.
(27) Select “Finish” and finish the installation.
All Rights Reserved. Copyright © 2010, Hitachi Software Engineering Co., Ltd.
14
(28) Select “Cancel”. (This window may not be shown foreground.)
(29) Select “Quit”.
(30) Select “Yes”.
All Rights Reserved. Copyright © 2010, Hitachi Software Engineering Co., Ltd.
15
4. Planex GW-US54Mini2W Detailed Setup
(1) Unplug the network cable from SX-2000WG+, and Restart SX-2000WG+ (disconnect
and connect the power cable).
(2) Please check if the top LED is blinking green.
.
(3) Plug GW-US54Mini2W into the PC.
Please refer to Trouble
Shooting 7(2)
(a) Unplug the network cable
(b) Disconnect and connect
the power cable
All Rights Reserved. Copyright © 2010, Hitachi Software Engineering Co., Ltd.
16
(4) Run “Start” Æ“Control Panel”, and select “View network status and tasks”.
(“Network and Sharing Center”)
(5) Select “Manage wireless networks”.
(6) Select “Adapter properties”.
All Rights Reserved. Copyright © 2010, Hitachi Software Engineering Co., Ltd.
17
(7) Click on “Internet Protocol Version 4 (TCP/IPv4)” and select “Properties”.
(8) Input the following default parameters, and select “OK”.
IP Address 192.168.0.2
Subnet Mask: 255.255.255.0
Default Gateway: Blank
Select “OK” and close all windows.
If you did not use the default parameters for SX-2000WG+, please use the relevant
parameters. If you are not sure, please ask the network administrator.
IP Address to be used
All Rights Reserved. Copyright © 2010, Hitachi Software Engineering Co., Ltd.
18
(9) Select “Close”.
(10) Right click the Planex GW-US54Mini2W icon on the task tray.
If window does not appear, run “Start”Æ”All Programs”Æ”PlanexWireless”Æ”Planex
WirelessUtility”.
(11) Select the “Launch Config Utility” on the right click menu.
All Rights Reserved. Copyright © 2010, Hitachi Software Engineering Co., Ltd.
19
(12) Select “Room1”(SSID) and select “Add to Profile”.
If you cannot find the entry, select “Rescan” or reboot SX-2000WG+.
(13) Select “System Config” and input the default parameters.
Profile Name: ROOM1
SSID: Room1
Network Type: Adhoc
All Rights Reserved. Copyright © 2010, Hitachi Software Engineering Co., Ltd.
20
(14) Select “Auth. \ Encry.” and input the default parameters shown below and select
“OK”.
Encryption: NONE
(15) Select “ROOM1”(SSID) and select “Activate”.

This manual suits for next models

3

Other Hitachi Whiteboard manuals

Hitachi HILU-86101 User manual

Hitachi

Hitachi HILU-86101 User manual

Hitachi StarBoard FX-79E2 User manual

Hitachi

Hitachi StarBoard FX-79E2 User manual

Hitachi StarBoard Link EZ2 User manual

Hitachi

Hitachi StarBoard Link EZ2 User manual

Hitachi StarBoard FX User guide

Hitachi

Hitachi StarBoard FX User guide

Popular Whiteboard manuals by other brands

Vivo DESK-WB24C instruction manual

Vivo

Vivo DESK-WB24C instruction manual

SMART SMART Board D685ix manual

SMART

SMART SMART Board D685ix manual

CleverMic e-Blackboard manual

CleverMic

CleverMic e-Blackboard manual

PQ Labs JJ-F67-T user manual

PQ Labs

PQ Labs JJ-F67-T user manual

Glasstudio Modena MD3648 Installation and Assembly Sheet

Glasstudio

Glasstudio Modena MD3648 Installation and Assembly Sheet

Speaka Professional 2564734 Important information

Speaka Professional

Speaka Professional 2564734 Important information

Goodview GMS4 Series user manual

Goodview

Goodview GMS4 Series user manual

EGAN MFTE Assembly & installation

EGAN

EGAN MFTE Assembly & installation

Vivo CART-WB48A instruction manual

Vivo

Vivo CART-WB48A instruction manual

IKEA MALA 104.889.67 manual

IKEA

IKEA MALA 104.889.67 manual

Rapidline GB96 Assembly instructions

Rapidline

Rapidline GB96 Assembly instructions

Mooreco Classroom Series quick start guide

Mooreco

Mooreco Classroom Series quick start guide

SMART Board X885i4 Configuration and user's guide

SMART Board

SMART Board X885i4 Configuration and user's guide

Quartet IQ Series installation instructions

Quartet

Quartet IQ Series installation instructions

manuals.online logo
manuals.online logoBrands
  • About & Mission
  • Contact us
  • Privacy Policy
  • Terms and Conditions

Copyright 2025 Manuals.Online. All Rights Reserved.